
Initial Setup
Accounting Setup
Support Guide
-
Overview
Accounting software in Striven can help your Company track taxes, reconcile accounts, report on finances, and much more. Before diving into accounting, it is recommended to first start off by setting up your accounting to suit your Company’s needs. This guide will help configure taxes, Chart of Accounts, and more to set you up for success utilizing Striven accounting software.
Read this guide if you are trying to:
✔ Build your Chart of Accounts to include all your General Ledger Accounts.
✔ Configure taxes and agencies to charge and pay taxes.
✔ Design your Accounting Dashboard to meet your needs.
-
Accounting Setup
The Accounting Settings are an integral part of configuring your system and a good place to start when setting up your accounting within Striven. Here you can note during what month your fiscal year starts, choose your default accounts, whether you track Classes, and much more. Options chosen here will drive how your accounting in Striven functions including how you create Orders, Transactions, Items, and much more.
To access the Accounting Settings, navigate to Company → Settings → Accounting → Settings.
Below is a screenshot illustrating how the Accounting Settings page appears and descriptions of what can be accomplished here.
- Enable Numbering for GL Accounts: Allows for numbers to be added in addition to GL Account names. With the numbering option enabled, the GL Account will be listed throughout the system with not only the name, but will instead display as Account Number – Account Name.
- Enable Class Tracking: Will allow you to track transactions through the use of Classes which can then be reported on through the Report Builder, the Balance Sheet reports, and the Profit & Loss reports. To add or manage Classes, navigate to Company → Settings → Accounting → Classes.
- Track Class for Line Items: Enables the ability to track Classes through each line item listed on Transactions.
- Require Class Tracking: Ensures a Transaction or Order cannot be created in Striven until the Class fields are set.
- Apply Payments Directly to Bank Account: With this option enabled, money that would normally be sent to the To Be Deposited account will instead directly be deposited into your Bank GL Account. When creating a Payment, the user will have the ability to select the Bank Account that the payment will be deposited to.
- Default Accounts Receivable / Accounts Payable: Lists the default Accounts Receivable and Accounts Payable Accounts. These accounts can be changed if your company has more than one Accounts Receivable and Accounts Payable GL Account type listed within the Chart of Accounts.
- Opening Balance Equity: Lists the default Opening Balance Equity Account. You can select a different Opening Balance Equity Account from your Chart of Accounts here if desired. Equity GL Account types can be selected for this option.
- To Be Deposited: Sets your default To Be Deposited account for incoming payments. By default, the Undeposited Funds account is associated, but you can change the account here. Asset or Other Asset GL Account types can be selected for this option.
- Rounding: The GL Account set here will be used to keep the Balance Sheet in balance when the Posting Journal for transactions goes out of balance due to minor discrepancies arising from currency conversions, fractional quantities, or other rounding differences.
- Rounding Threshold: If there are rounding discrepancies in the Posting Journal on transactions, an adjustment will be made if the discrepancy is less than or equal to the amount set here.
- Default Inventory Transfer Offset Account: This option will only be available when Class Tracking is enabled. This is to ensure that when using Inventory Transfers with Classes, the Posting Journal will remain in balance when running the Balance Sheet by Class report. Any GL Account type can be selected for this option except for Accounts Receivable and Accounts Payable.
- Fiscal Year starts in: Indicates when the fiscal year begins for your company. By default this setting will be set to January, but can be changed to a different month based on your when your company’s fiscal year ends.
- Closing Date: You can set a closing date by using the calendar icon to make sure no transactions can be edited prior to the closing date set. Users who have the permission “Transactions Prior to Closing Date – Edit” will still have the ability to edit transactions prior to the closing date.
- Accounting Migration: Will open the Accounting Migration page which will list the steps needed to migrate your accounting data into Striven. A final step can be completed on this page to Create adjustment journal entries to match your historical legacy system trial balances. Learn more about this tool by reviewing the Performing a Historical Accounting Migration section in the Accounting Migration Guide.
- Save: Saves any changes made to the settings on this page. If you attempt to navigate away from the page without clicking Save, a warning popup will display alerting you that your changes have not been saved.
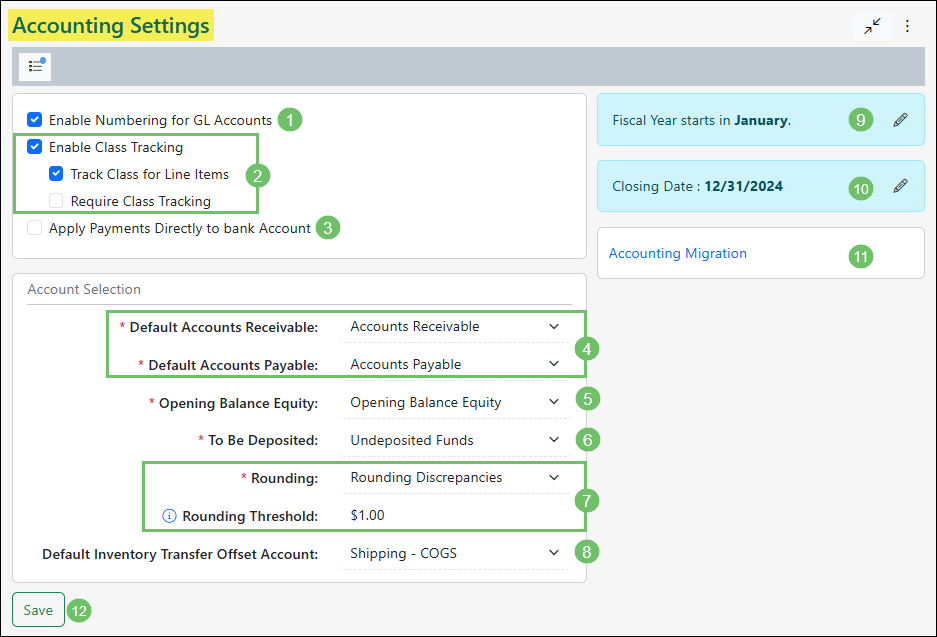
Example of the Accounting Settings Page

-
Payment Terms
Payment Terms are time conditions on which two parties agree to fulfill a sale by a certain date or period. Payment Terms are available for both Accounts Receivable and Accounts Payable Transactions and will allow your Company to track late Payments in Collections. Learn more about using Collections in Striven by reviewing our Collections Guide.
You can add new Payment Terms from the Payment Terms List. To view Payment Terms use one of the following steps below:
Company → Settings → Accounting → Sales → Invoices → Payment Terms
Company → Settings → Accounting → Sales → Sales Orders → Payment Terms
Company → Settings → Accounting → Purchasing → Bills → Payment Terms
Company → Settings → Accounting → Purchasing → POs → Payment Terms
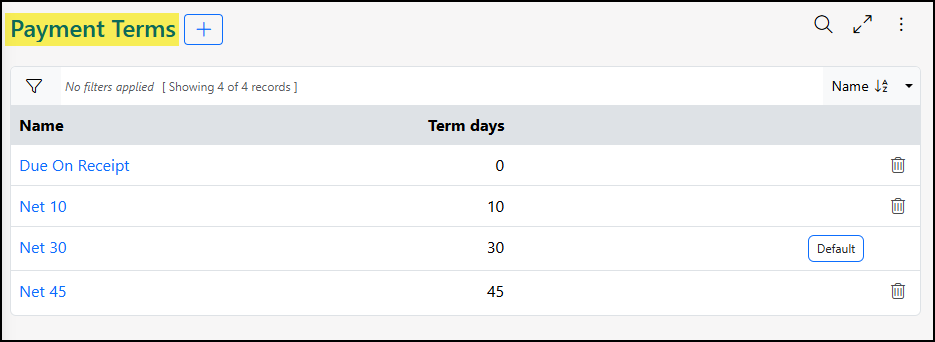
Example of the Payment Terms List
Payment Terms List
The Payment Terms List will display information related to the Payment Term to indicate key information without having to click into each Payment Term to view further details. Review the image to view what type of information is available to view from the Payment Terms List.
- Name: Used to differentiate between different Payment Terms when selecting terms on Orders and Transactions. Clicking the name of the Payment Term will allow the user to make configuration updates.
- Term Days: Number of days until the Transaction is determined late and will begin to go through the Collections process.
- Tags: Indicates if the Payment Term has been set as the Default or has the setting configured for Has Discount.
- Deactivate: Removes the Payment Term and will no longer be available to select on Orders and Transactions. The Payment Term that has been set as the Default cannot be deactivated.
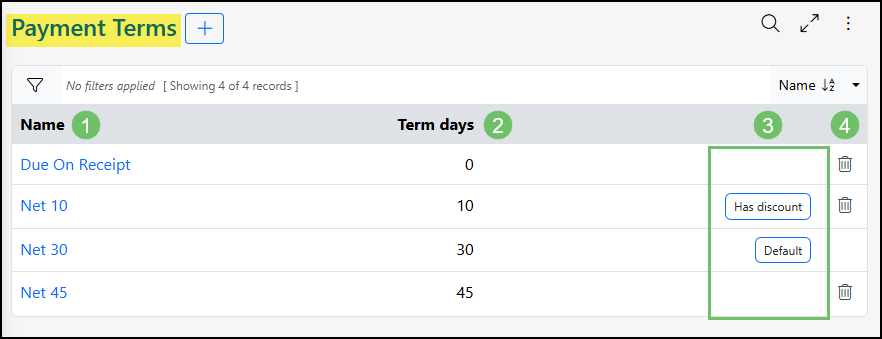
Example of the Information Available from the Payment Terms List
Add Payment Term
To begin adding a new Payment Term in Striven click the plus icon at the top of the Payment Terms List and enter the following information to the Add Payment Term page.
- Name: Allows the user to differentiate between the different Payment Terms when selecting terms on Orders or Transactions.
- Term Days: Indicates the number of days until the Transaction is considered late. Accounts Receivable Transactions will begin to follow the Collections process once the days here have passed.
- Default: If there are no Payment Terms selected within the Sales Settings, Purchasing Settings, or the Sales Order and Purchase Order Type, then the Payment Term set as the Default on this list will be preselected when creating Orders and Transactions.
- Has Discount: Allows for a Discount to be set up for the Payment Term. Once checked, additional configurations are available which are described in further detail below.
- Note: The Discount set up within these Payment Terms will only be utilized for Accounts Payable in Striven. Learn more about managing Discounts for Accounts Receivable in Striven with the Discounts & Convenience Fees Guide.
- Percentage: Takes the total of the Accounts Payable Transaction and uses the percentage entered here to determine the total amount of discount that will be received for paying within the discount days indicated within the Payment Term.
- Days: Indicates the number of days until the Discount can no longer be applied. The Accounts Payable Transaction will not be considered late however until the Term Days entered above have surpassed the due date.
- Account: The GL Account that will reflect the Discount that is being received if the Accounts Payable is paid within the number of Days listed above.
- Class: If Classes are turned on in your Striven system, a Class field will be available for the Discount in order to have the Discount tracked accordingly.
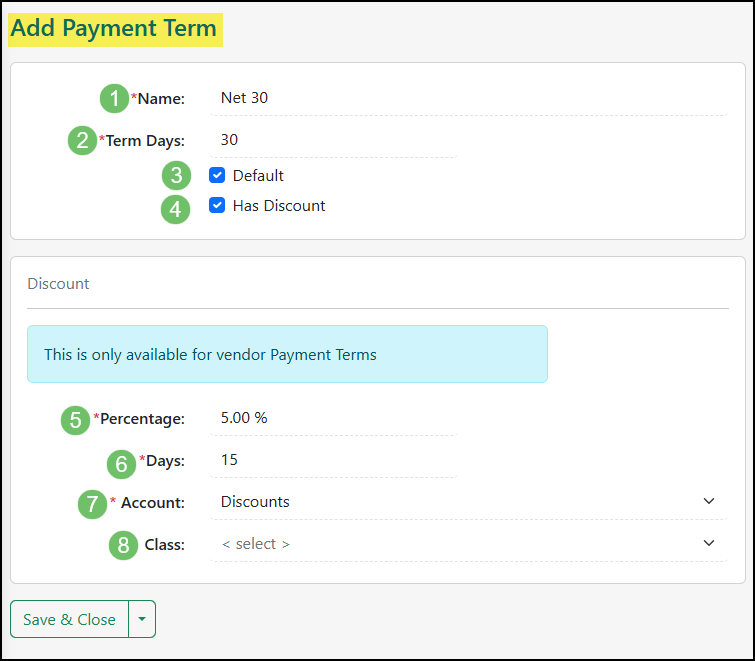
Example of the Add Payment Term Page
-
Class Tracking
Classes are used to separate the finances of your Company. This can be used in a variety of ways from separating finances by Company Locations, Departments, etc. Each Class will have its own Balance Sheet, profit and loss inside Striven’s Balance Sheet by Class, and P&L by Class reports. Using the Accounting Settings, you can choose to enable Class tracking for your Company. Below is a screenshot of how the Class window appears and descriptions of what can be accomplished there. To view Classes use the following steps below:
Company → Settings → Accounting → Classes
- Class Name: The name of the new Class you are creating. This will appear in drop-down menus within transactions when Class tracking is turned on in your Striven system.
- Parent Class: Setting a parent Class allows you to create a hierarchy for your Class tracking. It is important to note the parent Class must have already been created to appear available in the parent Class drop-down menu.
- Access: Designates access to the Class. If no one is selected, everyone can access the Class.

Example of Adding a Class
-
Currency Settings and Multi-Currency
Currency Settings within Striven allow you to designate the Home Currency your transactions will be made in and whether you will be managing transactions made in other currencies.
You can begin configuring your Currency Settings by navigating Company → Settings → Company → Currency Settings. When viewing the Currency Settings page, you can choose your Home Currency from over 100 different currencies by using the drop-down menu.
- Note: When changes are made to your Currency Settings, all users will be signed out in order to apply updates. It is best to configure your Currency Settings outside of your business hours to avoid any workflow disruptions.
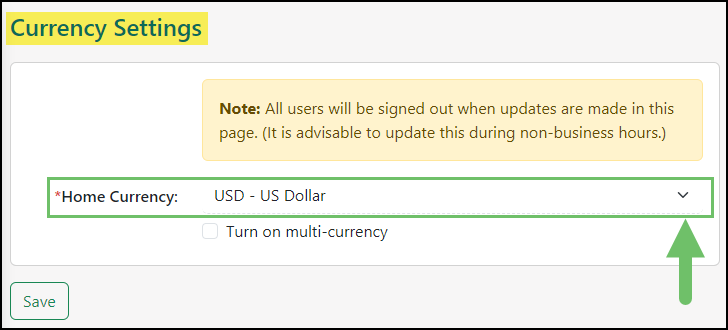
Example of Choosing a Home Currency in the Currency Settings
From this page, you may also “Turn on multi-currency” using the available checkbox. This setting will allow you to handle transactions across numerous currencies within your Striven system. Once checked, a message will appear stating several warnings which are important to note. These warnings are detailed in the section below.
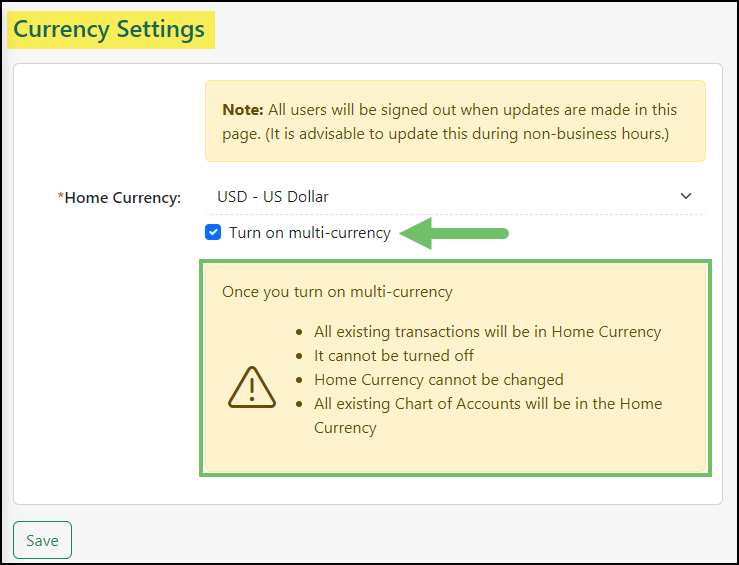
Example of Turning On Multi-Currency
- “All Existing Transactions will be in Home Currency” : Your existing transactions will be converted to reflect the chosen Home Currency.
- “It cannot be turned off” : Multi-currency cannot be disabled once it has been turned on, the change is permanent.
- “Home Currency cannot be changed” : Unlike using a one currency system, the Home Currency in multi-currency systems cannot be changed. It is important to ensure the correct Home Currency has been selected prior to turning on multi-currency.
- “All existing Chart of Accounts will be in the Home Currency” : Any configured Chart of Accounts will be adjusted to the chosen Home Currency.
If you are ready to accept these changes to your system, you may proceed by selecting the Save option from the bottom of the page. You will be signed out of your system as these first configurations are applied. After signing back into Striven, you can continue with the next steps.
Managing Currencies
If multi-currency has been turned on within your System, the Currency Settings page will now display the Manage Currencies options. This page allows you to select the currencies you will be conducting transactions in, as well as their exchange rates. When multi-currency is first enabled, only the Home Currency will be configured. To add additional currencies, select the Add icon from the top of the page.
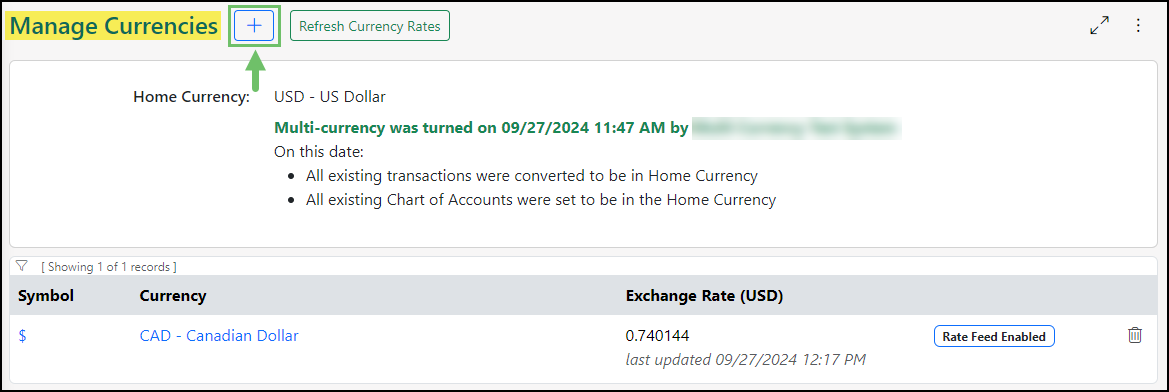
Example of the Manage Currencies Page
When adding a new currency there are a few pieces of information you are required to enter, which are detailed below.
- Currency: Allows you to select a currency from the drop-down list.
- Rate: After selecting the currency, the Rate field will be automatically filled in with the current exchange rate. If necessary, you may edit the exchange rate after it has been populated.
- Enable Exchange Rate Feed: This checkbox allows your system to automatically update the exchange rate for this currency once a date to ensure your conversions are accurate.
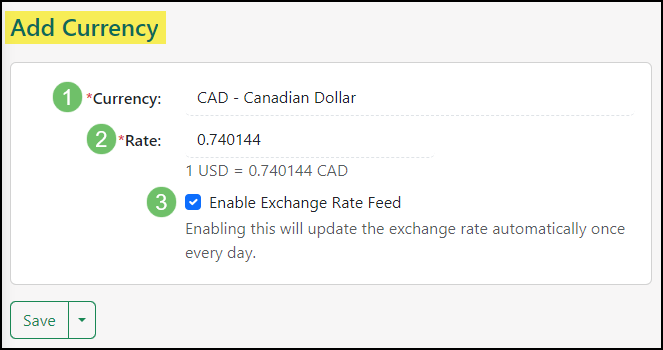
Example of Adding a Currency
Once the Currency has been configured for use, you may view the Currency – Info page where you can view and edit additional currency information.
- Waffle Menu Options: Selecting the waffle menu in the top left corner of the page will allow you to switch between the two different views.
- Info: Allows you to view and edit the configured Currency – Info.
- History: Allows you to view the previous exchange rates for the currency, and when it was updated.
- Symbol: Allows you to view the Currency Symbol that will be displayed in your system, and transactions when this currency is used. The Symbol cannot be edited.
- Currency: Displays the chosen currency name.
- Rate: Enables you to view and edit the exchange rate.
- Enable Exchange Rate Feed: This checkbox allows your system to automatically update the exchange rate for this currency once a date to ensure your conversions are accurate. This can be enabled and disabled at any time.
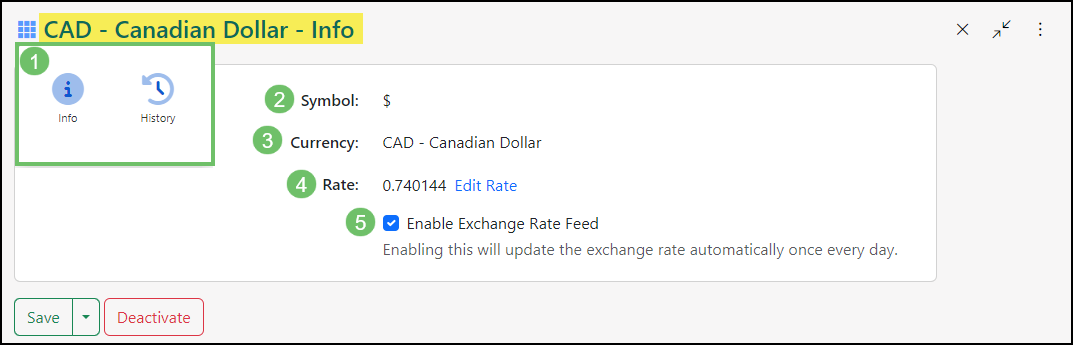
Example of the Currency – Info Page
-
Chart of Accounts
How to Create a Chart of Accounts in Striven
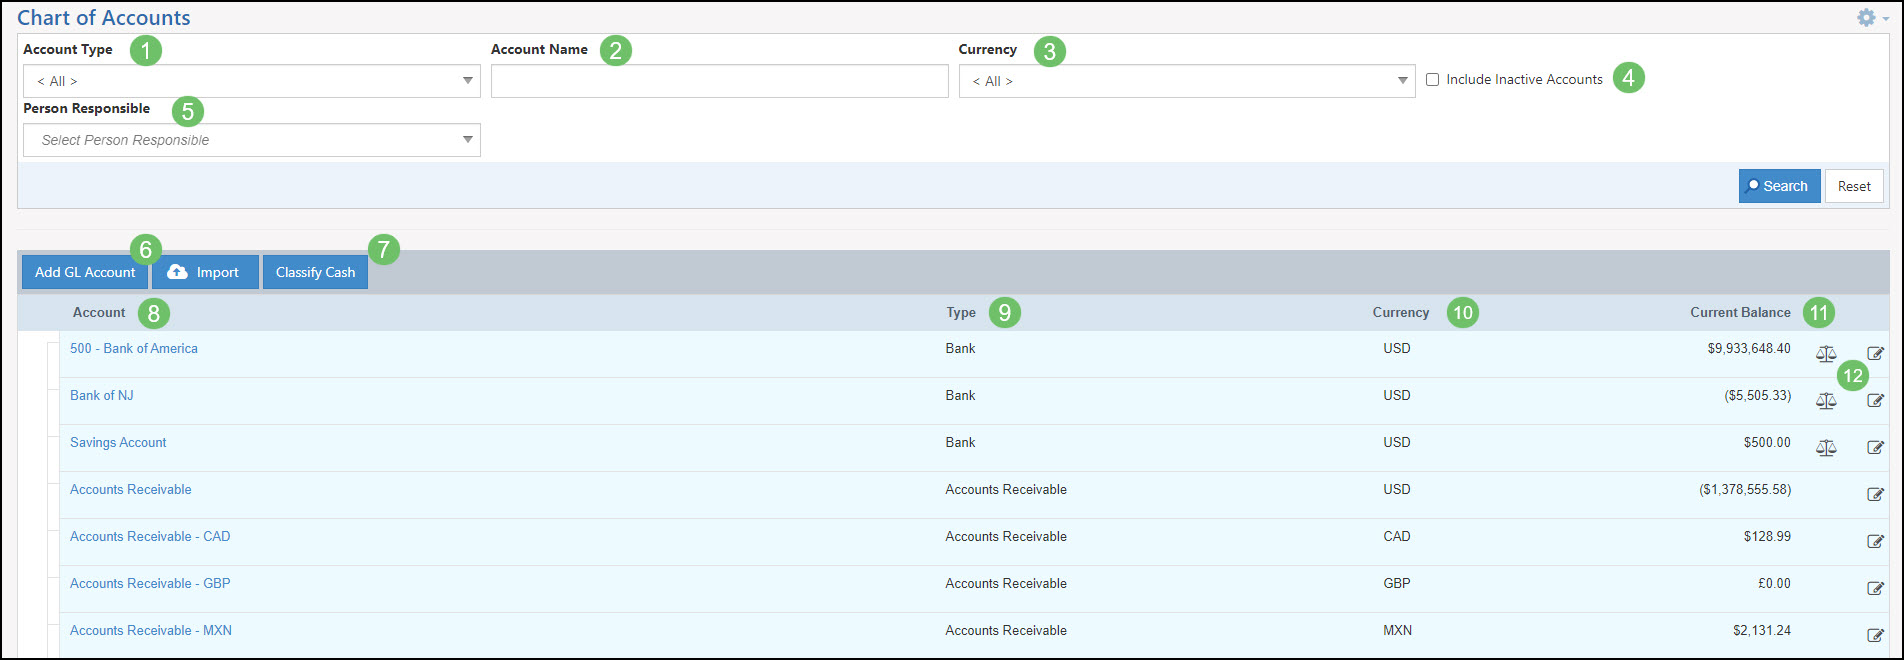
The Chart of Accounts lists all of your General Ledger Accounts (GL Accounts) in one spot. Each listed account has a hyperlinked name which when clicked, populates the Account Activity Report (discussed further below in the Account Activity Report section). Accounts are grouped by type and can be added or imported from here as well. Below is a screenshot displaying how the GL Account List appears and descriptions of what can be accomplished there. To view the Chart of Accounts, use the following steps below:
Accounting → Chart of Accounts
- Account Type: Search filter that displays accounts of the selected Account Type.
- Account Name: Search filter that allows you to view a specific account by name.
- Currency: Search filter that displays accounts based on the currency selected.
- Include Inactive Accounts: Option to display Inactive accounts as well as Active.
- Person Responsible: Search Filter that allows you to view accounts by the assigned Person Responsible.
- Adding Accounts: Allows you to create accounts manually or by import.
- Account: Lists the General Ledger Accounts that are within your Striven system. By clicking on the hyperlinked name, you will be taken to an activity report, which lists all transactions affecting the selected General Ledger Account.
- Classify Cash: Allows you to change the Cash Flow Classification for the accounts listed on the Chart of Accounts. For more information on Cash Flow Reports, visit our Financial Reporting Support Guide.
- Account Type: Indicates the type of account. The Chart of Accounts is sorted and grouped based on the type of account for convenience.
- Currency: Indicates the currency set for the account.
- Current Balance: This column will list the current balance recorded for the account. To gain more details as to what is making up this amount, click on the hyperlinked name of the account in the first column to view an activity report.
- Available Icons: There are two icons that are displayed on the Chart of Accounts that are described below for further detail:
- Reconcilable: The Reconcilable Scale icon indicates that you have set this account to be reconciled and can be included in completing reconciliations in Striven. To learn more about reconciliations in Striven, review our Banking Guide.
- Edit: The Edit icon will allow you to edit the existing General Ledger Account information.
Example of Chart of Accounts
-
Adding Chart of Accounts
How to Add GL Accounts in Striven
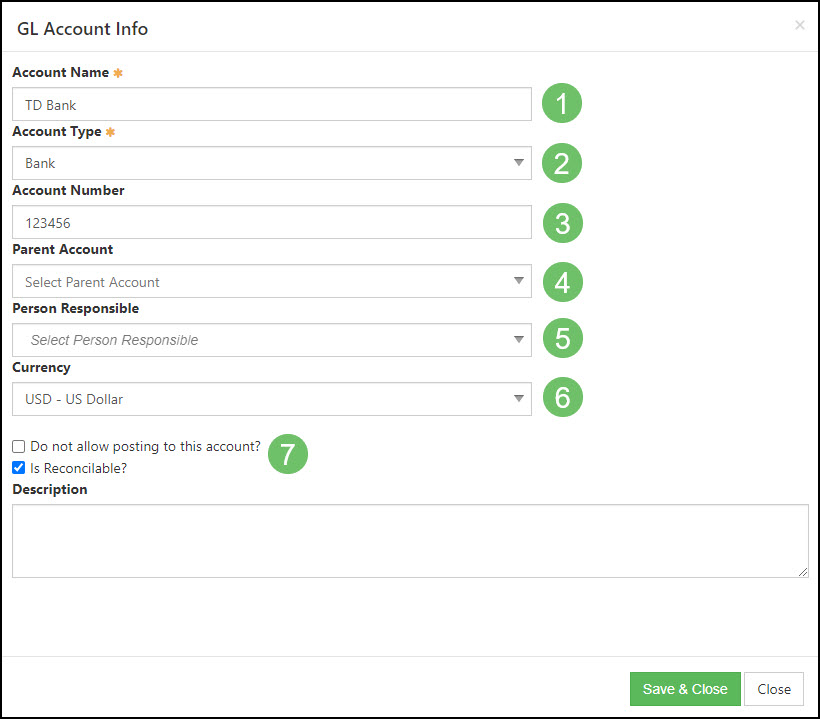
There are multiple accounts that have been added to Striven as defaults for convenience. These accounts can be edited or new accounts can be created to fit your Company’s needs. Once an account has been created, the type cannot be converted to a different type. Choosing a hierarchy, if the account should allow posting or if it is reconcilable, can all be accomplished right when creating a General Ledger Account. Below is a screenshot of adding a General Ledger Account into Striven and descriptions on what can be accomplished there:
- Account Name: The name of the General Ledger Account you are adding or viewing. When clicked, the link will populate the GL Activity Report.
- Account Type: The type of account you are viewing or editing. Types differ in functionality, for instance, some may be reconcilable, while others are not. Account Types include the following: Bank, Accounts Receivable, Other Asset, Fixed Asset, Accounts Payable, Loan, Credit Card, Other Liability, Equity, Income, Other Income, Cost of Goods Sold, Expense, and Other Expense.
- Account Number: To indicate the account number, enter it into this field. This will allow you to reference this number throughout the system. To ensure numbers for accounts show, review the Accounting Setup section above.
- Parent Account: Choosing an account here will note a parent-child account relationship. This allows you to create a hierarchy for your accounting functionality.
- Person Responsible: Allows you to associate an Employee that is responsible for maintaining the account.
- Currency: Designates the currency set for this account.
- Account Options: There are additional options available regarding whether you wish to allow posting to your account or if you wish for the account to be reconcilable.
- Do not allow posting: If this account should not be posted to, you can check the box to not allow posting.
- Is Reconcilable: If you would like the option to reconcile this account, you can check the box to reconcile in the future. Each reconcilable account will be noted as such on the Chart of Accounts by the use of the Reconcilable Scale icon.
Example of Adding a GL Account
-
Importing Chart of Accounts
How to Import Your Chart of Accounts in Striven
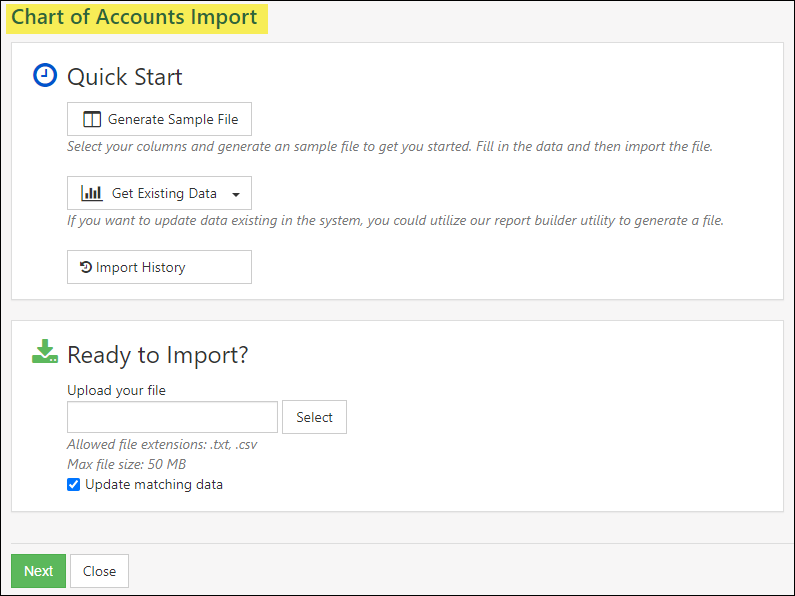
Your Chart of Accounts can be brought into Striven en masse by utilizing Striven’s Chart of Accounts Import tool. This can be done for large and small databases to bring in multiple General Ledger Accounts at once.
Below is a screenshot demonstrating how the Chart of Accounts Import page appears. To view the Chart of Accounts Import page, follow the steps below:
Accounting → Recurring Transactions → Chart of Accounts → Import Button → Chart of Accounts Import
There are multiple tools on the Chart of Accounts Import Page that will help when importing data into Striven. In the Quick Start section of the page, you’ll see the following options:
- Generate Sample File: Initiates a popup with the Import Mapping options. This determines what information will be included on the import spreadsheet. When mapping selections are checked, clicking Download Sample provides a spreadsheet with pre-filled column headers (based on the mapping) to assist with entering data. For more information on Importing, please reference our Import Management Guide.
- Get Existing Data: Provides the options to Create New Report or Choose Existing Report to pull GL Account information already in your system to update the data via import.
- Import History: Redirects you to the Import Progress Page which displays links to previous imports that have been uploaded to the system.
In the Ready to Import section of the page, you’ll see the following options:
- File Select: field to choose your import file for upload. There are 2 file types allowed for imports: .TXT and .CSV, with a limit of 50 MB for file size.
- Update Matching Data: Checkbox that determines whether your upload will update existing account information in your Striven system with an import rather than create new accounts.
- Note: the GL Account ID would be required to update existing information to avoid creating duplicate GL Accounts.
Example of Chart of Accounts Import Page
-
Flag Equity Account as Retained Earnings
The Retained Earnings account displayed on the Balance Sheet, Balance Sheet by Class, and Trial Balance reports is automatically calculated based on the following:
- On the Balance Sheet & Balance Sheet by Class Reports: Net Income from the start of time to the end of the previous fiscal year.
- On the Trial Balance Report: Net Income from the start of time to the End Date specified by the report filter, or today’s date if the End Date is left blank.
With that in mind, Striven provides the option to flag an Equity-type account as a Retained Earnings account, which will then be calculated into the actual Retained Earnings account amount on those reports.
Using this account-flagging option, when you flag an Equity-type account for Retained Earnings, any postings (such as Journal Entries) will now be automatically calculated into this amount on the reports on the backend.
In order to use this feature, you will first need to create a new GL Account, set it as an Equity-type account, and check the box so the Retained Earnings Account option is selected.
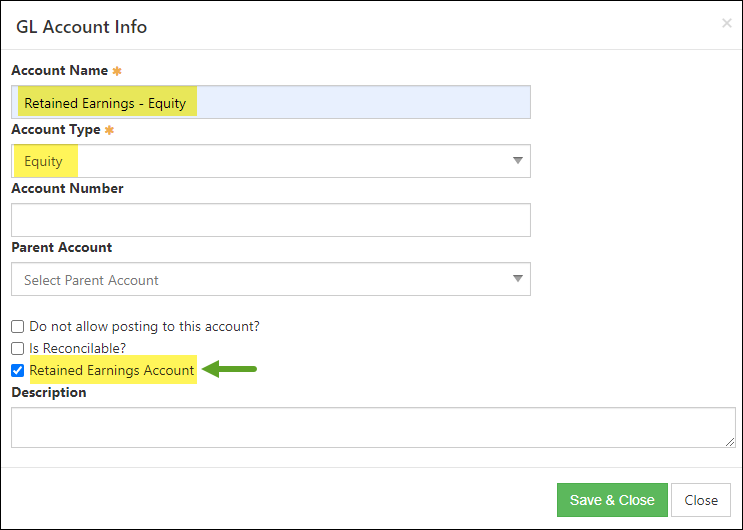
Example of New GL Account Flagged for Retained Earnings
With this new account established, you can create a Journal Entry and select the flagged Retained Earnings account to adjust the amount as needed, making sure to select an offsetting account with which to offset the posting as well.
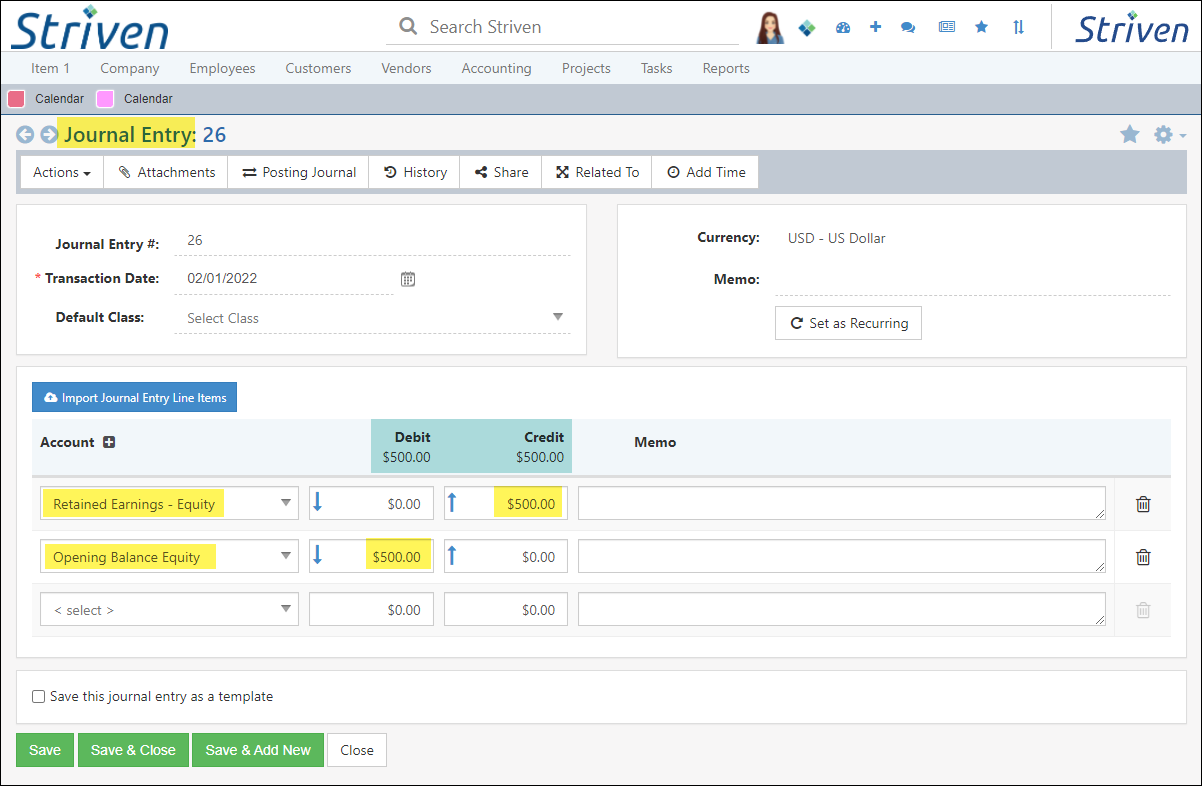
Example of Creating a Journal Entry Using the Flagged Retained Earnings Equity Account
It is important to note that the flagged Equity-type account you create in your Chart of Accounts will not display on the Balance Sheet, Balance Sheet by Class, or Trial Balance reports but will be automatically calculated as part of the Retained Earnings on the reports behind the scenes.
-
Set Opening Balance
The Opening Balance for a GL Account can be set once it has been created in Striven. To use the Set Opening Balance option for a GL Account, navigate to the Chart of Accounts and click the edit icon in order to access the GL Account Info pop-up page. Once you are viewing a specific account’s GL Account Info page, click the hyperlink in the corner labeled Set Opening Balance.
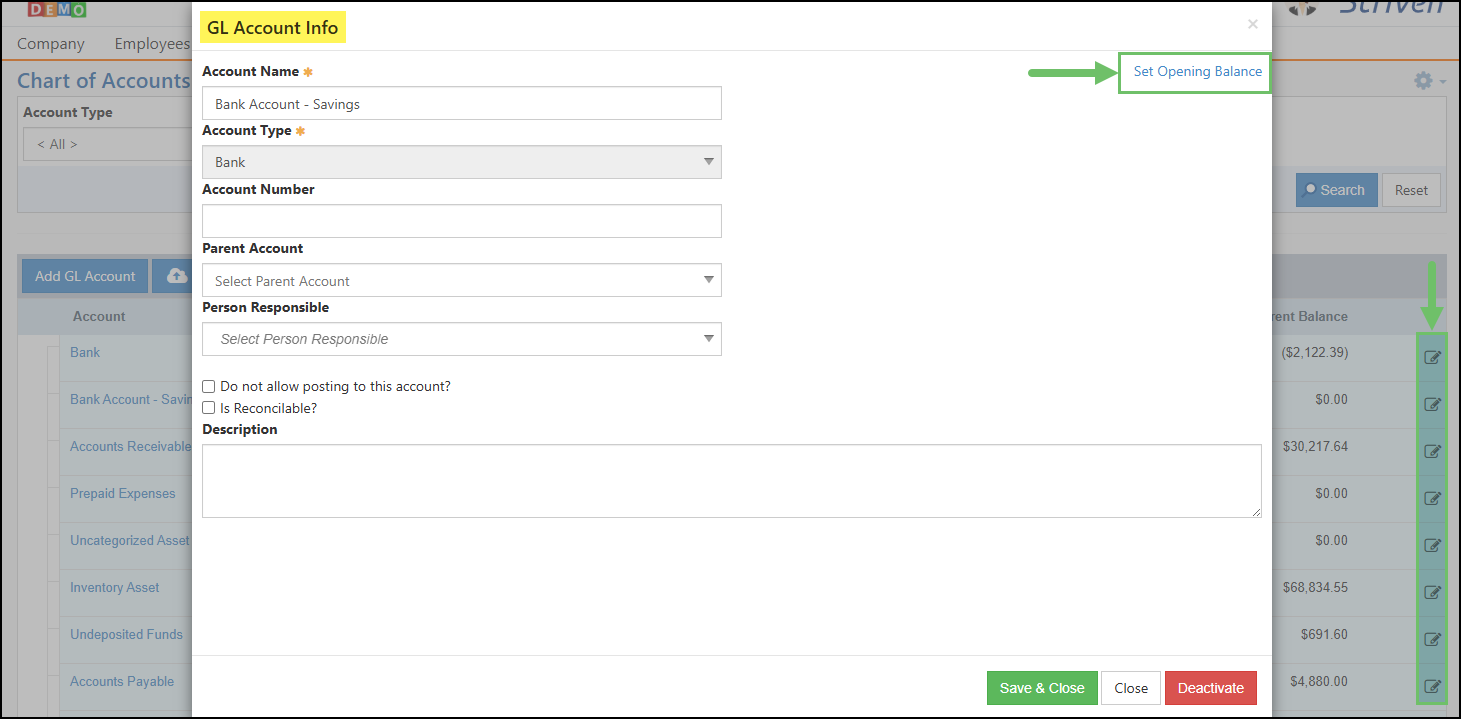
Example of the Set Opening Balance Option When Editing a GL Account
When the Opening Balance for a GL Account is set using this method the following actions will take place:
- The Add Journal Entry page will be opened in a new tab with GL Account populated on one line and the Opening Balance Equity account that is set within your Accounting Settings page prepopulated on the second line.
- The memo for the Journal Entry will prepopulate with This entry was created while setting the opening balance for GL Account: [GL account name here].
- The Transaction date prepopulates with the current date.
- The above information can be updated before the Opening Balance Journal Entry is created.
- Additional information can be added to the Opening Balance Journal Entry before or after it is created such as the Class, additional lines, or attachments.
- Once created, if applicable, the Opening Balance Journal Entry will need to be reconciled manually.

Example of Creating an Opening Balance Journal Entry
To learn more about best practices for Migrating Accounting in Striven, make sure to review our Accounting Migration Guide.
-
Account Activity Report
As discussed above, clicking on the name of the GL Account from the Chart of Accounts will generate the Account Activity Report. The Account Activity Report lists all of the transactions that have been entered in Striven for individual GL Accounts. These reports also show a running log of the account’s financial information from the start of your Striven system up to the present day. Below is a screenshot displaying how the Account Activity Report appears and details of what can be accomplished there:
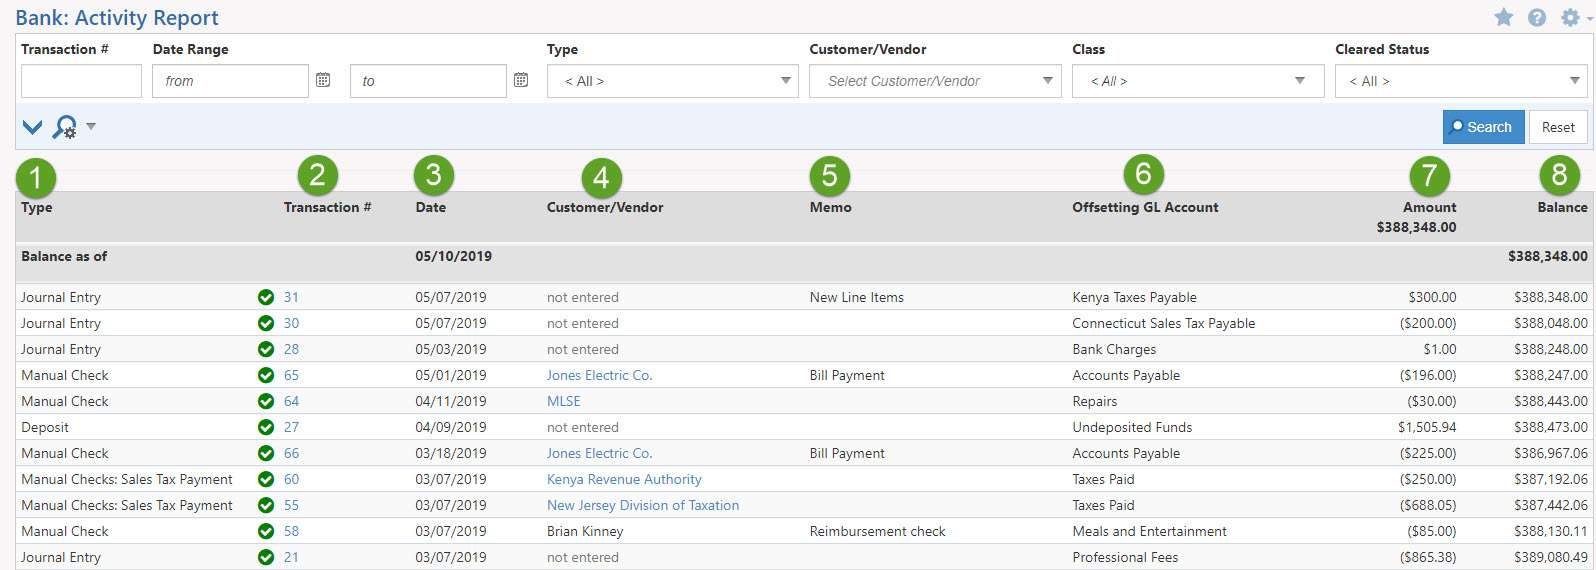
Example of Account Activity Report
- Type: Lists what type each transaction is.
- Note: Transaction Types include: Deposit, Bill, Invoice, Manual Check, Credit Memo, and many more.
- Transaction #: The number of each transaction and is a hyperlink to enable you to view each transaction’s details by clicking on the hyperlink.
- Date: The date set on each transaction.
- Customer/Vendor: The Customer or Vendor that the transaction is associated with.
- Memo: Lists the memo entered on individual transactions. For Journal Entries listed within this report, the line memo will display instead of the transaction header memo.
- Offsetting Account: The offsetting GL Account for each transaction. This can be seen in more detail using the Posting Journal on transactions.
- Amount: The amount of each transaction. The column header totals the amount for all transactions shown on the report page.
- Balance: The balance of the account from the start of your Striven system to the present day.
- Type: Lists what type each transaction is.
-
Tax Setup
Taxes are usually collected at the point of sale for goods and services which are then paid to governing bodies over prescribed periods of time. If your Company charges and pays taxes, it is important to view the Tax Setup page. These settings allow you to choose how you record taxes; whether you record them upon receipt (Cash), or when the sales occur (Accrual). You can also choose a Tax GL Account, which is the GL Account from which taxes are owed and paid to governing bodies. To view Tax Setup use the following steps:
Company → Settings → Accounting → Tax → Set up
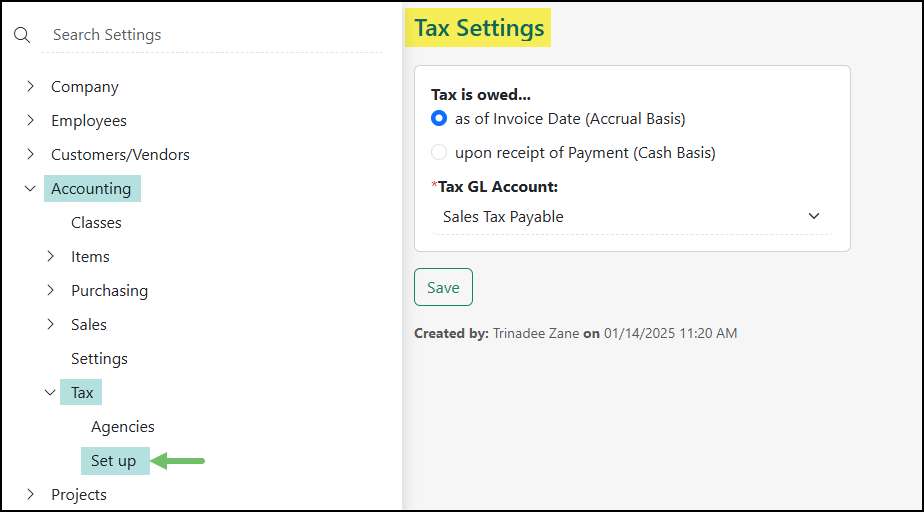
Example of the Tax Settings Page
Below is a screenshot illustrating how Tax Setup appears and descriptions of what can be accomplished there:
- Tax is Owed: Allows you to note when tax is owed. You can choose to owe tax on an Accrual or Cash Basis. Accrual Basis allows you to owe the tax as of the Invoice Date. Cash Basis is owed upon receipt of Payment.
- Tax GL Account: The account with which all taxes flow through your system. A Sales Tax Payable GL Account has been created in your Striven system as a default for convenience.This was created as an Other Current Liability GL Account type.
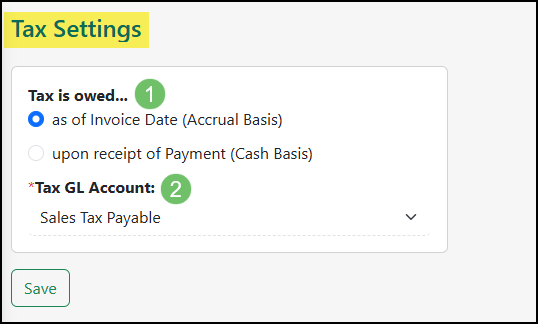
Example of the Tax Settings Page Configuration Options
-
Tax Agencies
Once you have set up how your taxes are recorded and assigned a default taxes paid account, you are ready to create Agencies. Tax Agencies capture the tax rate that is charged and which governing body charges that tax rate. To set up Tax Agencies use the following steps below:
Company → Settings → Accounting → Tax → Agencies

Example of the Tax Agencies List
By creating Tax Agencies, your Company can charge taxes for either State, City, or other rates as needed on transactions. Striven has a unique feature when charging taxes in which Agencies will automatically be chosen on transactions based on the Customer Location. Below is a screenshot demonstrating how Tax Agencies appear and descriptions of what can be accomplished there.
- Tax Type: Striven allows you to set up Tax Agencies for not only the state, but for city and/or other taxes as well. The available types of tax that can be configured in Striven are the following:
- State Tax: Any state agencies that you pay taxes to on a regular basis can be set up with the State option. With this choice, a drop-down menu is available to select the appropriate state.
- City Tax: If your Company pays a city tax as well as a state tax, this option can be selected. This allows you to specify the tax rate at the city level to combine with the state tax.
- Postal Code Tax: Allows you to enter a specific postal code in order to track tax rates per ZIP Code that your company conducts business with.
- Other Tax: If your Company pays any other type of tax that needs to be noted within your system, the Other Tax option can be used.
- State: Allows you to choose a state abbreviation from a list to associate the correct state for the tax. Once chosen, the Tax Name field will populate with the state for convenience.
- Tax Name: Once a state and/or a city has been chosen and entered, the name field will populate with State: City to allow for the quick creation of Tax Agencies. This name can be changed by typing over the pre-populated name if desired.
- Tax Agency: The Vendor who you owe the taxes to and who you pay at the end of a period. If your Tax Agency has not been created as a Vendor in your Striven system yet, the quick add option can be used from this page.
- Tax %: Allows you to enter the tax rate as the percentage owed to the Agency.
- Tax Options: Additional configurations are available to determine shipping information and defaults in regards to your Tax Agencies:
- Is Shipping Taxable: To enable taxation on your shipping, check this box. This will make sure that shipping is marked as taxable when creating transactions.
- Do Not Allow To Be Selected Individually: Toggling this option on would mean that the tax code can only be used as part of a Group Tax. Learn more about this feature by reviewing the Flag Tax Agencies as Unselectable section below.
- Is Default: A default Tax Agency will be automatically selected on transactions and Orders unless the Customer information overrides the default.
- Tax Group: If you have both state and city taxes that your Company deals with, then a tax group may be ideal. This will allow you to create your State Tax Agencies and City Tax Agencies and then group them together accordingly.
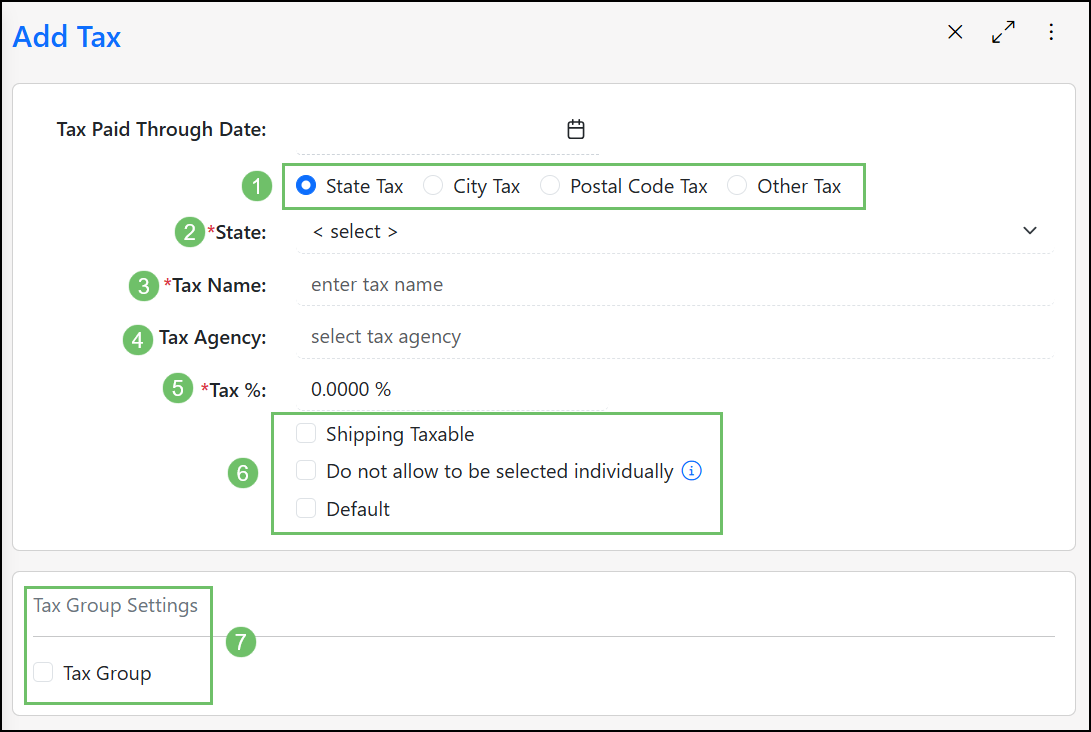
Example of Adding a Tax Agency
- Tax Type: Striven allows you to set up Tax Agencies for not only the state, but for city and/or other taxes as well. The available types of tax that can be configured in Striven are the following:
-
Sales Tax Locking
This feature was built to lock Tax Agencies to prevent changes or additions being made to transactions prior to the lock date specified.
By navigating to Company → Settings → Accounting → Tax → Agencies, you can select the Tax Agency in your system you wish to lock. The locking option is located on the Sales Tax Info page for the Tax Agencies, noted by the Tax Paid Through Date. The Tax Paid Through Date must be a past date; it cannot be today’s date or any future date. Setting this date will determine the lock date so users can no longer make changes that affect the Sales Tax for that agency.

Example of a Tax Agency Info Page showing the Tax Paid Through Date Setting
The exception would be for users that have the “Transactions Prior Closing Date – Edit” permission included in their User Role. Users with this permission will be given the choice to allow the changes to be made, whereas a user without the permission will be unable to save any changes or additional transactions that are prior to the Tax Paid Through Date.
Creating a New Invoice, Credit Memo, or Sales Receipt
If the user has the “Transactions Prior Closing Date – Edit” permission in their User Role and the transaction date is prior to the Tax Agency’s Tax Paid Through Date, Striven will display a popup confirmation message stating that the payment for the Tax Agency used has been paid through a certain date and asks if you wish to proceed.
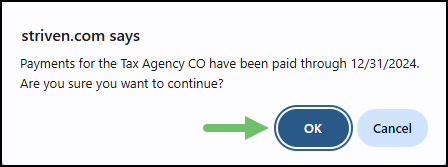
Example of the Tax Paid Through Date Popup Confirmation Message
If the user does not have the permission in their User Role and the transaction date is prior to the Tax Agency Tax Paid Through Date, Striven will present a popup error message notifying the user that the transaction date cannot be on or before the date of the Tax Agency’s Tax Paid Through Date. It will also not allow the user to create the transaction.
The same applies to editing existing transactions. If the user has the permission, they will get the same popup notification. If the user does not have the permission, the transaction will be un-editable for them.
Pay Tax Page
After the tax is paid, you will have the ability to set the Tax Paid Through Date directly from there by selecting the Tax Agencies you would like to update and save. This will save time and help avoid having to go to each Tax Info page individually and update the Tax Paid Through Date for the agencies that had Tax Payment checks created.
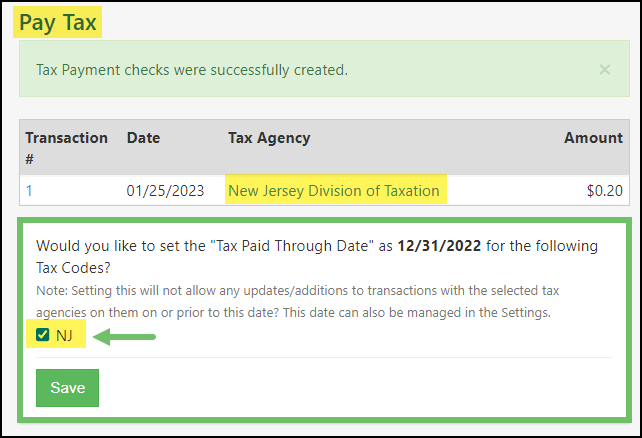
Example of the Pay Tax Page Option to Set the Tax Paid Through Date
- Note: Specifying the Tax Paid Through Date for Tax Groups is not possible, so Striven will always take the latest Tax Paid Through Date specified for the component Tax Agencies.
-
Flag Tax Agencies as Unselectable
Striven has a feature that will prevent users from selecting certain Tax Agencies when creating a new Sales Order or any A/R transaction, such as an Invoice, Credit Memo, or Sales Receipt. This feature is designed to flag a component Tax Agency as unselectable, as they are meant to be used internally within a Tax Group.
On the Tax Info page, there is an option for Do not allow to be selected individually with a checkbox to toggle the setting on/off. Next to the option is an Info icon explaining how the feature works.

Example of a Tax Info Page with the Flag Tax Agency as Unselectable Option Toggled On
Toggling this option on will only be effective going forward, and all existing transactions that use Tax Agencies that are flagged to not be used individually would not change and will continue to display with that configuration.
The following areas of the system will be affected by turning on this feature:
- Account Location Info Page:
- If a Tax Agency is already designated and is then flagged to not be selected, it will continue to use that Agency setting.
- If you create a new Location, a Tax Agency flagged to not allow selection would not even appear in the drop-down list as an option for selection.
- Sales Order Info Page (or any A/R transaction info page):
- For an existing transaction or Sales Order, if the Tax Code used is one of those flagged to not be selected, it will still be attached to the transaction and will calculate the taxes according to that setting.
- When copying existing transactions or createing a new Salse Order by selecting a Customer, if the Customer has the Ship To Location defaulted to a Location that has a flagged to not be selected Tax Code, that Tax Code will not be selected on the transaction. Instead, the default Tax Code will be selected.
Note: This feature is not applicable to Invoices or Credit Memos that are automatically generated by the nightly job or those that are configured to periodically recur.
- Account Location Info Page:
-
Import Tax Codes
A Tax Code import is useful for maintaining accuracy, efficiency, compliance, and consistency in financial and tax-related processes. It helps manage your tax obligations and financial data more effectively while reducing the potential for errors.
With this in mind, Striven has implemented a Tax Code Import feature. Users can upload Tax Codes into their Striven system using the Tax Code Import Tool found on the Tax Agencies List page.
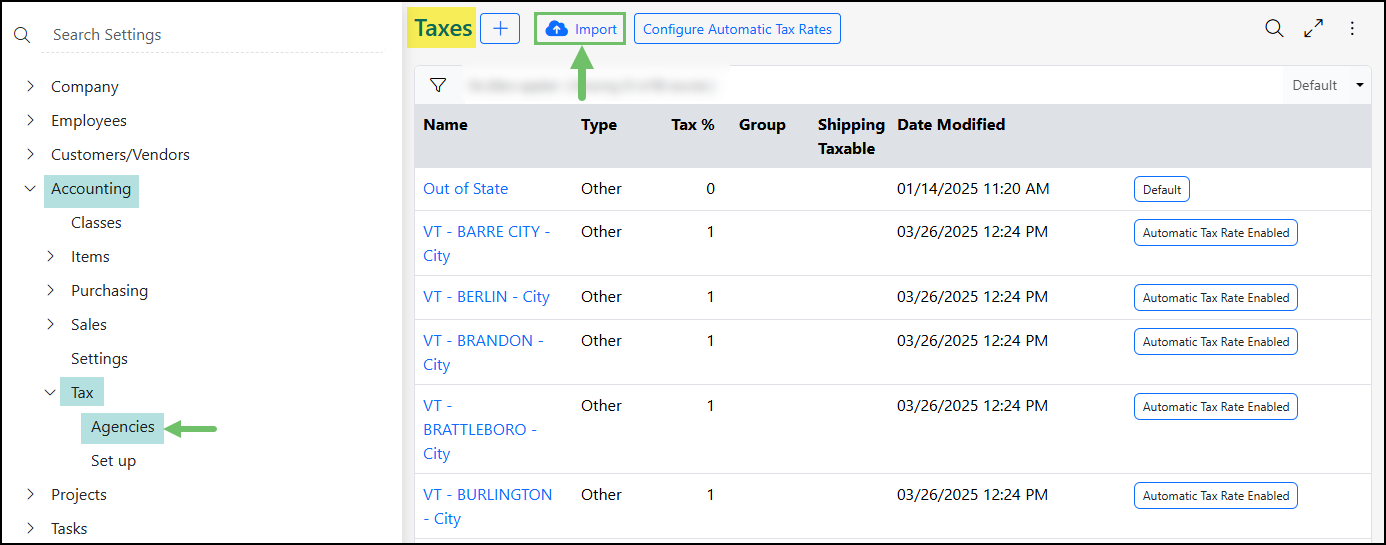
Example of the Tax Code Import on the Tax Agencies List Page
Clicking on the Generate Sample File button on the Import page will allow you to select the columns you will need to import the Tax Codes properly. This will help when mapping the data in your import file to the corresponding fields in Striven.
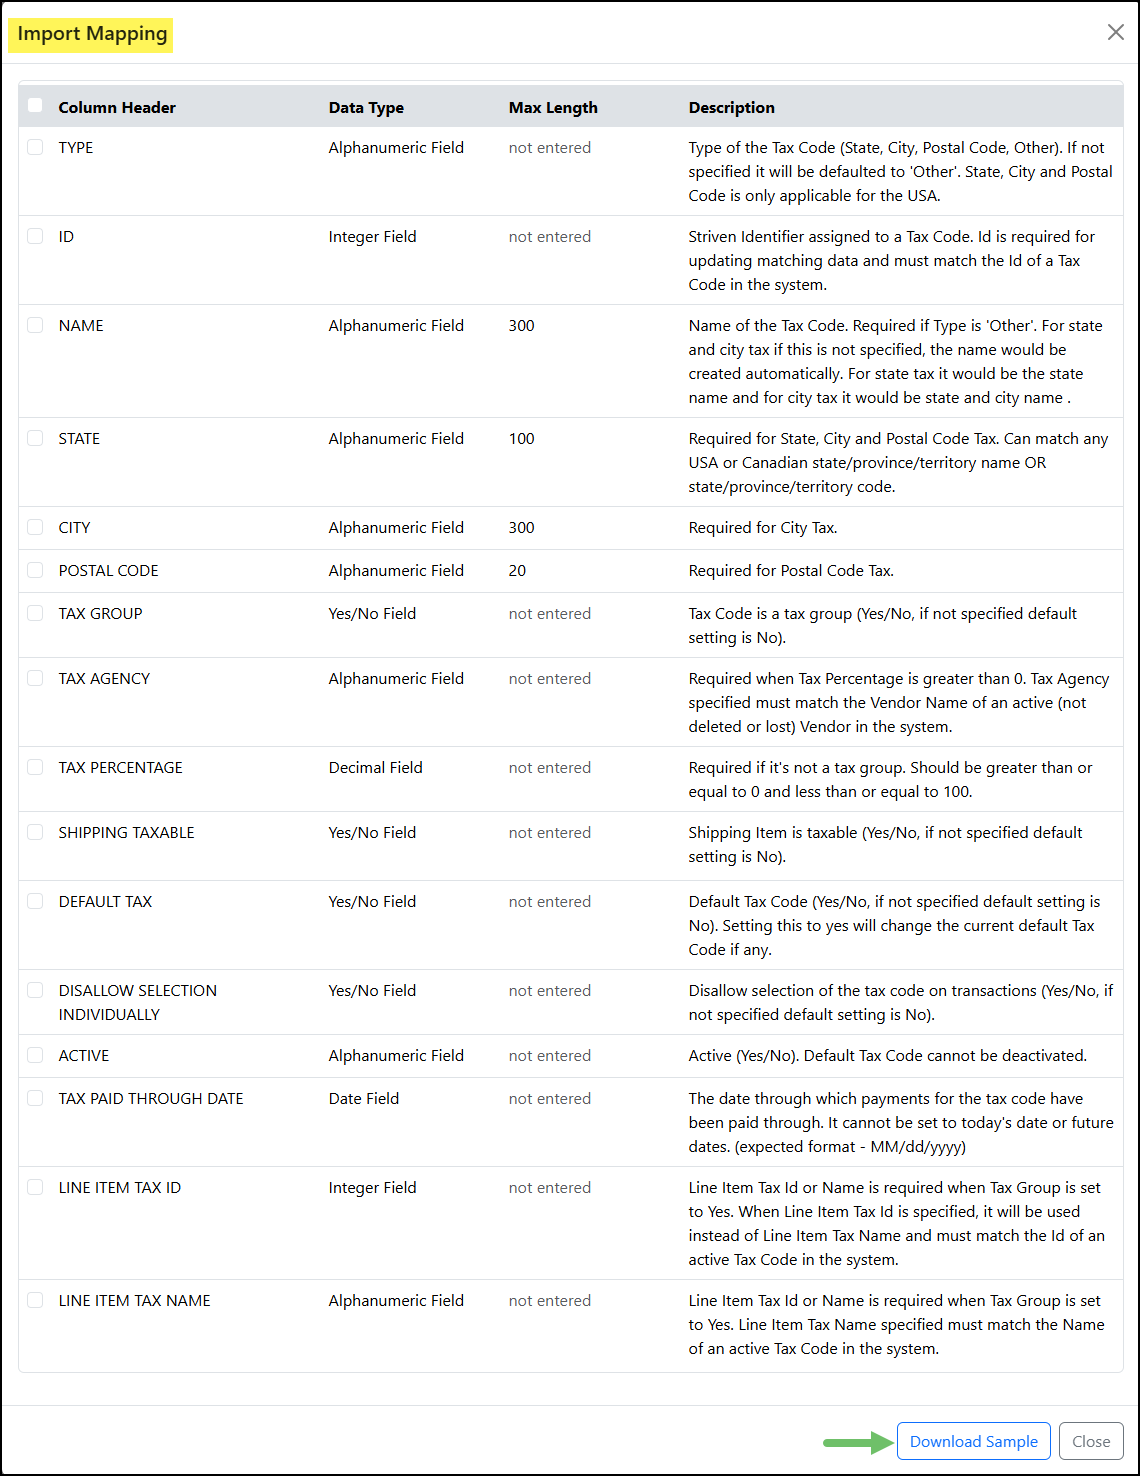
Example of the Generate Sample File/Import Mapping for the Tax Code Import
Updating Automatic Tax Rates with the Tax Codes Import
It is important to note that Tax Codes that have been added as an Automatic Tax Rate cannot be deactivated through the Tax Codes Import tool. Automatic Tax Rates can only have the Tax Agency, Tax Paid Through Date, and Shipping Taxable fields updated when using the Tax Codes Import tool.
-
Configure Automatic Tax Rates
Tax rates can be set up automatically based on the US State by selecting the Configure Automatic Tax Rates button. Adding US States that will have their tax rate automatically set will take the hassle out of any tax set up that needs to be completed. To begin adding Automatic Tax Rates in Striven, click the Configure Automatic Tax Rates button on the Tax Agencies page and follow the prompts for each US State where business is being conducted for your company.
Note: Tax Rates will be updated automatically as rates change. However, if you see anything that seems out of date or incorrect, please contact Striven Support at support@striven.com.
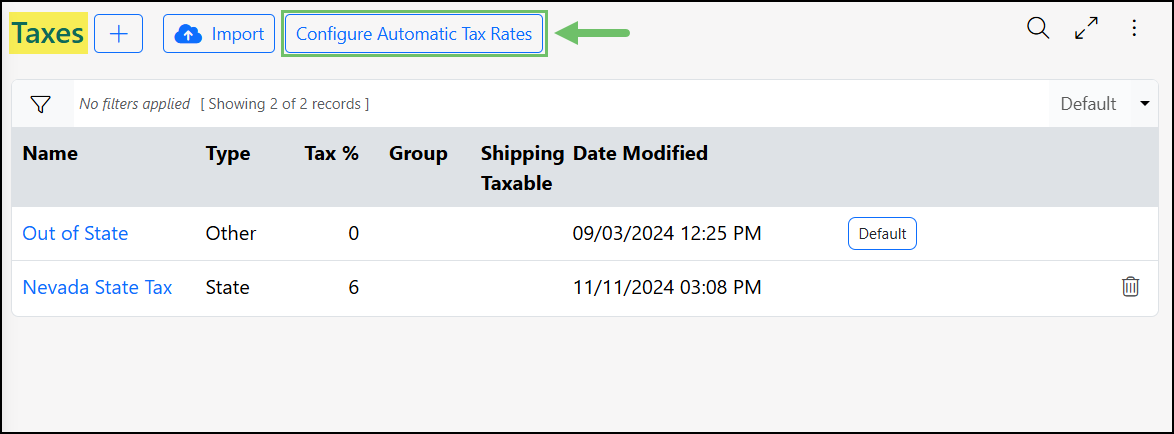
Example of the Location of the Configure Automatic Tax Rates Button
There are a few configurations and options when selecting US States to automatically have their tax rates updated. Review steps and information that can be added to the Configure Automatic Tax Rates page in Striven:
- Select State: Drop-down menu which lists US States that can be selected to have their tax rate automatically set.
- States and Agency: Lists the US States that have already been selected to have their tax rate automatically set. The Vendor Account to which taxes will be paid can be set in the Select Tax Agency field displayed next to each State.
- Include Special Rate: Checking this box will include Special tax rates in the selected State’s sales tax. An Other type sales tax will be created for the Special rate, and added to the State’s tax group. The term “Special” will be added to the tax code for a Special Tax for identification purposes.
- Deactivate: Clicking the trash can icon will remove the US State from having their tax rate automatically set.
- Automatically add tax agencies where the tax agencies are not selected above: When selected, this option will create a Vendor Account for each State that does not have a tax agency set.
- Note: Using this option may result in duplicate Vendor Accounts if any tax agencies are already saved in Striven but not selected in the Select Tax Agency field.

Example of the Configure Automatic Tax Rates Page
Tax rates for US States that have been saved for the Automatic Tax Rate will not be able to be modified. You can click the Configure Automatic Tax Rates button to re-configure the list or remove States. Removing States that are automatically being updated will result in those tax rates and agencies to still be listed but will now be editable by the user.
Note: If you choose to re-add a State, all previously existing tax rates and agencies associated with that State will remain in the Tax Agency List, but new tax rates and agencies will be automatically created for the State.
Example of the Warning for Removing a State from the Automatic Tax Rates
After saving any changes made to the Configure Automatic Tax Rates page, the Tax Agencies List will be updated according to the States that were previously added. A tag will be listed indicating whether the Tax Agency was created and is being managed by the Automatic Tax Rates feature.
Example of the Tax Agencies List with Automatic Tax Rate Tag
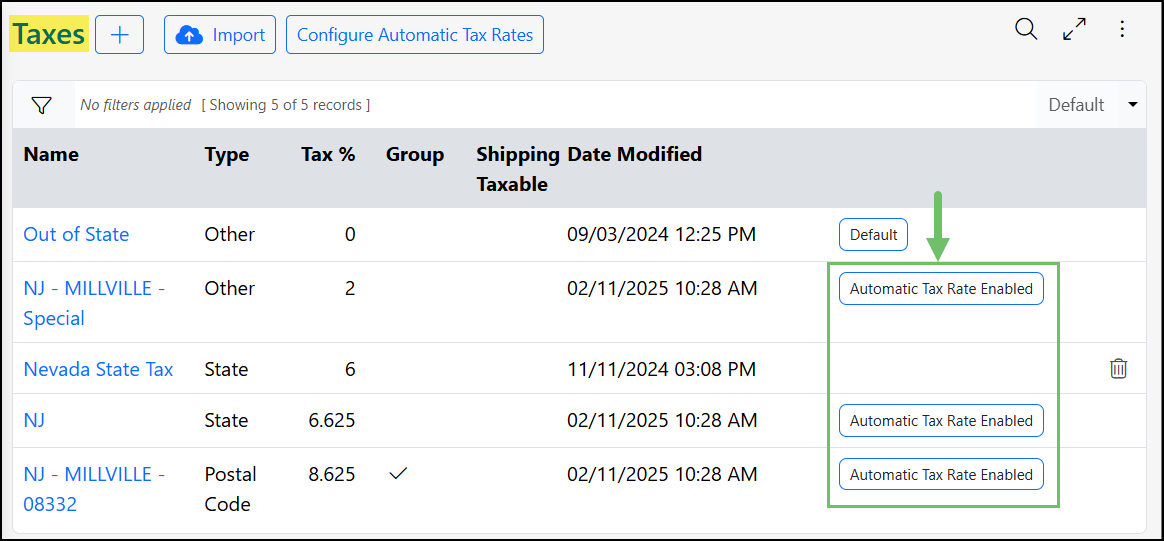
If any US States that were selected have additional tax rates, for example based on a County tax, a tax agency will be created and listed for each rate. Tax Groups will be created accordingly to group together any State and County tax rates.
Example of Various Types of Tax Codes Related to Automatic Tax Rates
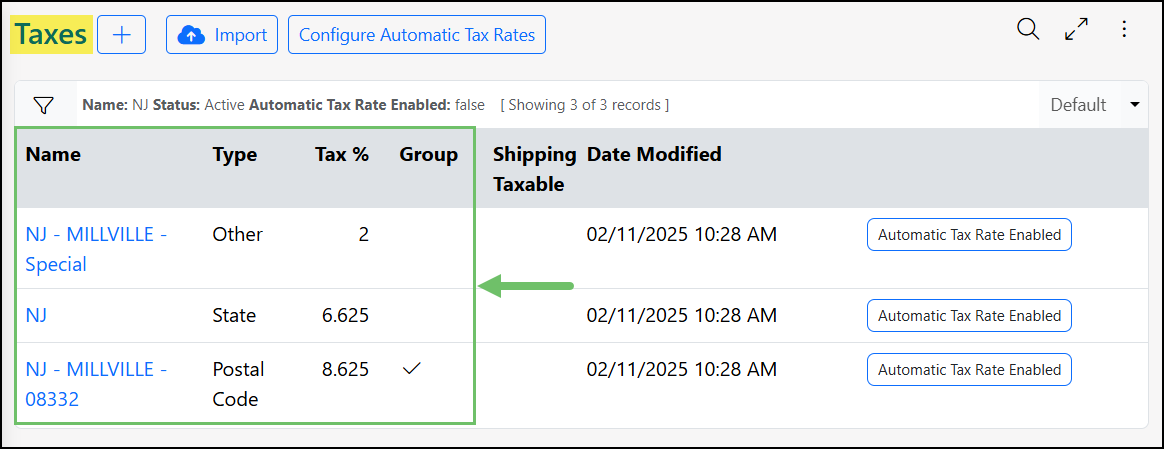
When viewing the Tax Info page, a section will be listed for Related Tax Groups which will list the Tax Groups that the Tax Code has been added to. Clicking on the Tax Group name listed here will access the Tax Group Info page.
Note: When the Ship To Location is selected on Sales Orders or AR Type Transactions and there are multiple tax rates that can be set, Striven will choose the manually created tax rate over the automatically created rate. Similarly, the Tax Group will be selected over the individual tax rate if multiple rates meet the requirements. Any tax rate that is set at the Location for the Customer will override all other available options.

Example of a Tax Code Info Page Displaying the Related Tax Groups
-
Deactivating Tax Codes
There may be occasions when you want to deactivate Tax Codes from your Striven system, whether as part of general system maintenance or to ensure accurate data is easily accessible. Deactivating outdated codes streamlines tax selection during transactions, reducing errors and ensuring compliance.
Tax Codes Used in Customer/Vendor Locations or Tax Groups
When attempting to deactivate a Tax Code that is currently linked to a Customer/Vendor Location or is included in a Tax Group, a popup notification will display. This popup will explain the Tax Code’s usage and prompt the user to select a replacement Tax Code from a drop-down list in the Tax field. The selection of a replacement Tax Code is required to complete the deactivation process.
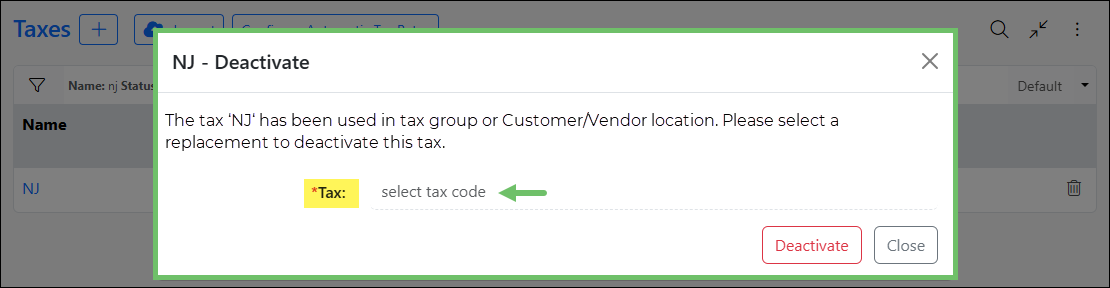
Example of the Tax Code Replacement Popup for Deactivating Tax Codes
Tax Codes Associated with Automatic Tax Rates
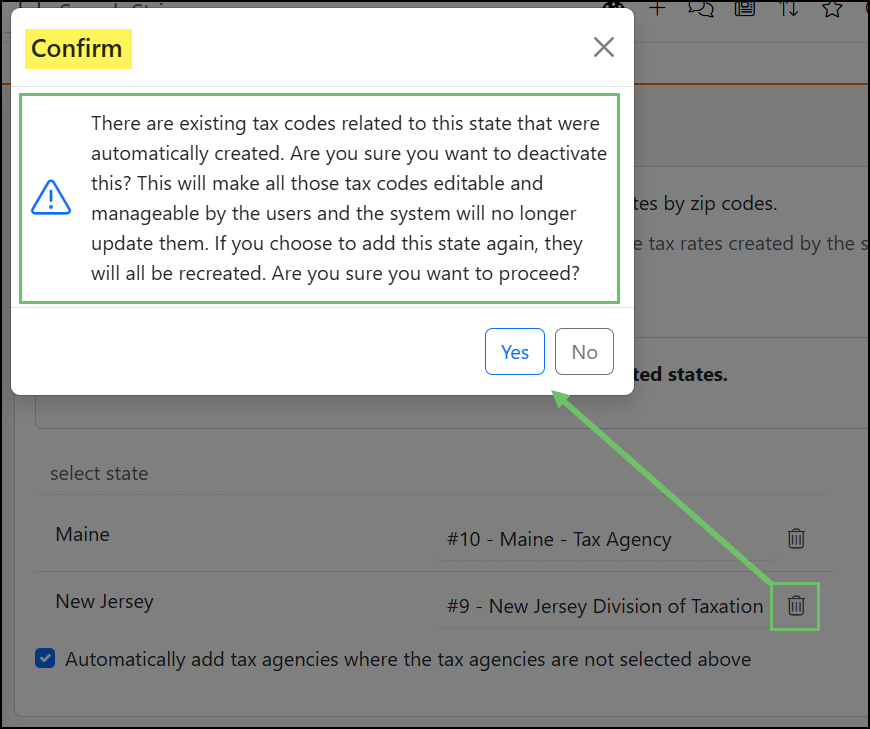
When deactivating a state from the Automatic Tax Rates List, a confirmation popup will appear asking if you wish to deactivate all Tax Codes automatically created for that state. Selecting Yes will deactivate all automatically generated Tax Codes for the state, saving the time and effort of manual deactivation. Selecting No will retain the Tax Codes associated with the deactivated state, but they will no longer be updated automatically.

Example of the Confirmation Popup for Deactivating Automatic Tax Rates
Careful consideration is advised when deactivating Tax Codes in Striven, especially those currently in use, to ensure continued operational efficiency and streamlined Tax Code management.
-
Tax Liability
The Tax Liability Report is a comprehensive tool designed to help businesses monitor their tax obligations effectively. It provides a detailed breakdown of both taxable and non-taxable sales, allowing for clear differentiation between the two categories. This granular view is further enhanced by its ability to track sales per agency, offering valuable insights into the tax implications of transactions across different business units or locations.
Moreover, the report accommodates both Accrual and Cash Basis accounting methods. This flexibility ensures that businesses can track their tax liability in a way that aligns with their specific accounting practices.
Learn more about the Tax Liability Report by reviewing the Tax Liability Report section in the Financial Reporting Guide.
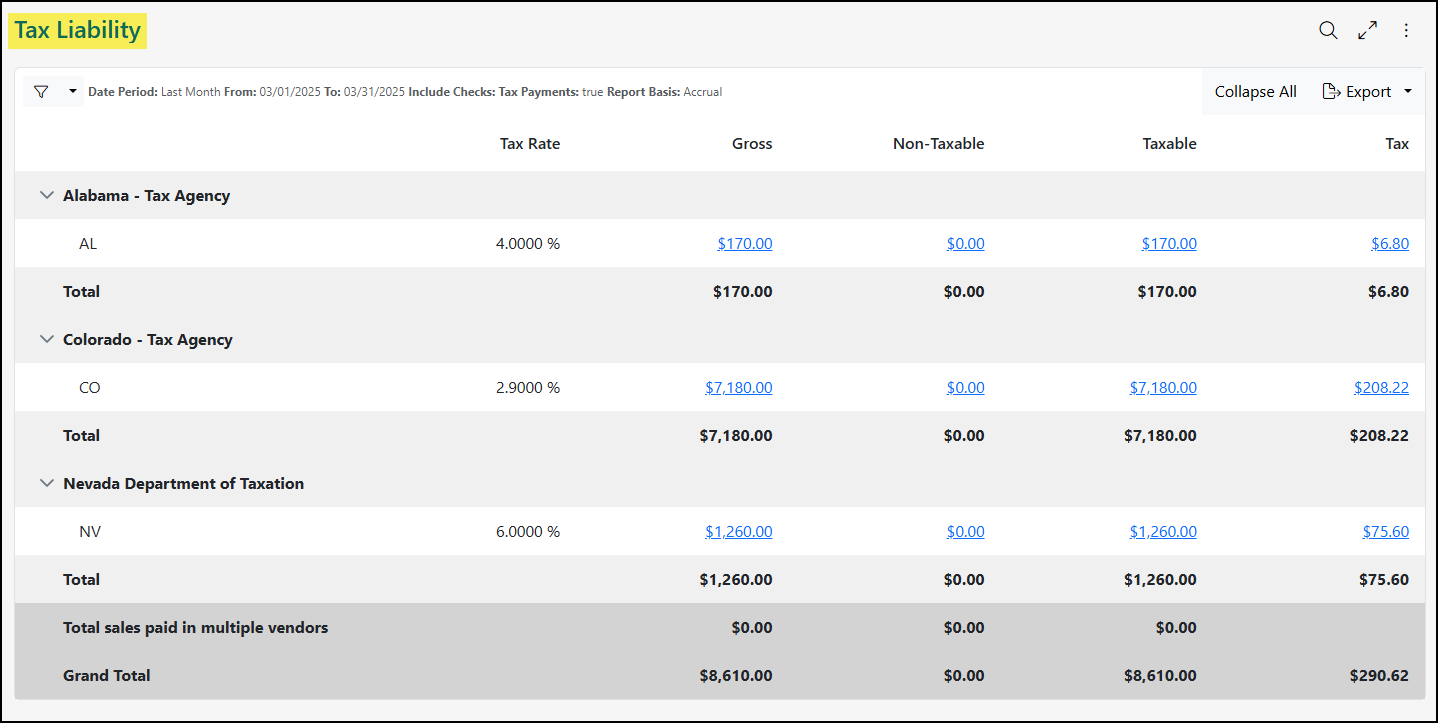
Example of the Sales Tax Liability Report in Striven
-
Accounting Dashboard
The Accounting Dashboard is a great way to view information regarding your Items, Accounts Payable, and Accounts Receivable transactions all in one place. Widgets can be added, removed, and restructured using the Manage Widgets popup on the right-hand side of the dashboard page. Below are some of the available widgets on the Accounting Dashboard page.
- Note: Any widgets available on the Accounting Dashboard page will also be available on the My Dashboard page. Also, all widgets can be renamed.
Accounting: Use this widget for quick links to add a check, credit card charge, deposit, Journal Entry, funds transfer or to reconcile an account.
Add Items: Use this widget for quick links to the Items page, Sales Orders, Purchase Orders page, or to import Items.
AP Aging: Use this widget for a line graph showing the amount of money you need to pay to Vendors and whether it is current or past due. You can specify a Vendor or leave the filter blank for totals for all Vendors.
AR Aging: Use this widget for a line graph showing money owed to you by your Customers and whether it is current or past due. You can specify a Customer or leave the filter blank for totals for all Customers.
Bills: Use this widget for a filtered or unfiltered view of Bills owed to Vendors. There are sections for Open Balance, Past Due Balance, Current Balance, Open Credits, and Open Payments. The sections are able to be selected to dive a bit deeper into the transactions that make up the totals for each section.
Invoices: Use this widget for a filtered or unfiltered view of Invoices owed to you by your Customers. There are sections for Open Balance, Past Due Balance, Current Balance, Open Credits, and Open Payments. The sections are able to be selected to dive a bit deeper into the transactions that make up the totals for each section.
Items: Use this widget to view Items that are below their reorder point or currently at or below zero as their quantity.
Payments: Use this widget to show a line graph of payments made by your Customers within a certain time frame. Your total undeposited funds also show below the line graph and is able to be selected to drill down into the payments that make up the total shown.
Profit & Loss: Use this widget for a view of your profit and loss showing for your different GL Accounts. You can filter this widget by Customer, Class, and time frame. Clicking on the bars on the chart displays the P&L Report in another browser tab.
Profit & Loss Trending: Use this widget to demonstrate how Income, COGS, Expenses, Gross Profit, and Net Income are trending from one month to another within a given period of time. Clicking on a point on the chart will direct you to the P&L Report, pre-filtered for the month associated with the point on the chart.
Queues: Use this widget to show how many Invoices need to be printed and how many Bills require review. You can select the sections to view either the Print Invoices Page or the Review Bills Page.
Sales Orders: Use this widget to view total Orders approved, total incomplete Orders along with total Sales Orders pending approval within a certain time frame. Select each section of a drill-down of Orders matching the criteria.
Transactions: Use this widget to show a list of all recent transactions. This widget can be filtered by Customer, Vendor, or Transaction type, and may also be added to Customer/Vendor Dashboards.
Transactions: Custom Report: Use this widget to show results from custom reports created using the Report Builder and using the transactions dataset.
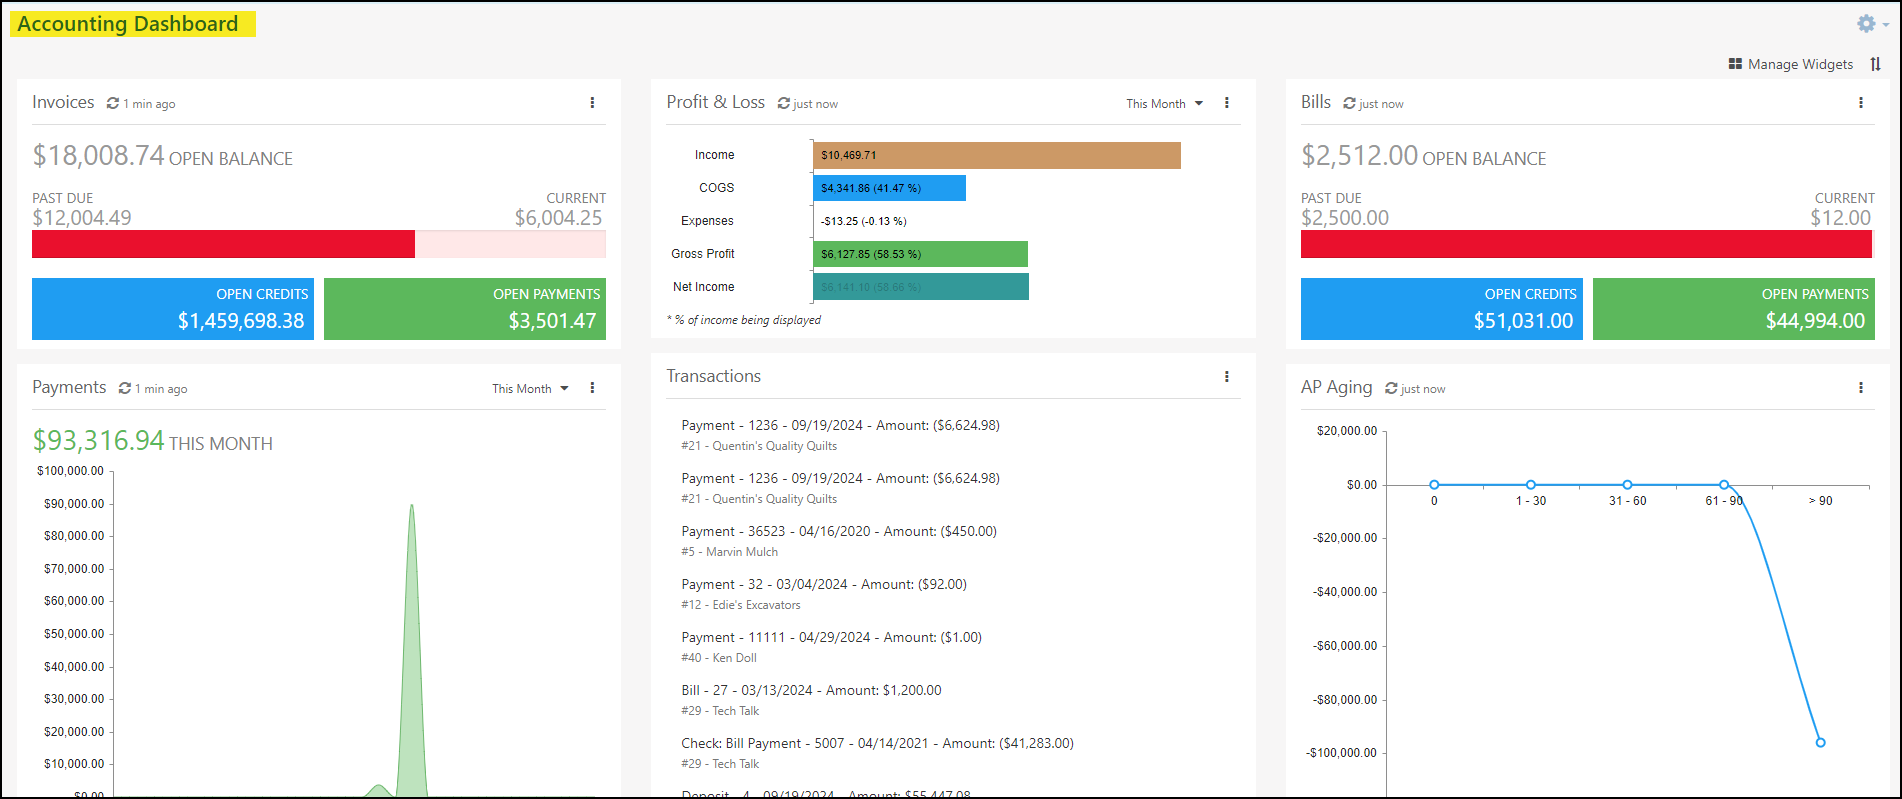
Example of Accounting Dashboard
Note: Many Dashboard Widgets store data and will not update for up to 60 minutes without a manual refresh. Clicking on the Widget Refresh button on the top of the widgets will ensure the data displayed on the widget is the most current available.
-
Recap
With this Accounting Setup & Reporting Guide, we’ve discovered how to create and manage GL Accounts, Tax Agencies, and more to enable you to set up your Accounting in Striven. We’ve also discovered ways to create Classes and to design your Accounting Dashboard to ensure the best user experience when accounting in Striven.

Have a Question?
Ask the Striven Community
User-sourced how-to’s, feedback, and more!
FAQs
-
Now that I have my Chart of Accounts, how do I create Items in Striven?
Items can be created in Striven using the Items List underneath the Accounting tab. Here you can create Inventory Items, Service Items, and more. To learn more about Items please reference our Item Management Guide.
-
I use Striven for other things and would like to start using accounting. Where do I start in bringing over my accounting data?
That’s excellent news! We’re confident you will love Striven’s accounting software because it’s accurate and easy to use. When migrating accounting from one system to Striven there is really no wrong place to start. We recommend bringing over your Items, Accounts, taxes, and financial data. To learn more about migrating accounting, please reference our Accounting Migration Guide.