
Purchasing & AP
Accounts Payable
Support Guide
-
Overview
Accounts Payable in Striven can help your Company order goods or services, receive stock, report on what is owed, and much more. This guide will help set up your A/P Settings, Bills, Bill printable formats, and more to set you up for success with more effective use of the A/P features in Striven.
Read this guide if you are trying to:
✔ Set up your A/P settings in Striven.
✔ Create Bills, receive Items, Bill Credits, and pay Bills to your Vendors.
✔ View and manage purchases utilizing the A/P Aging Report.
Accounts Payable
-
Purchasing Settings
Before beginning to purchase in Striven, it is recommended you visit the Purchasing Settings within your Striven system to ensure your Accounts Payable suits your Company’s needs. Here you can note the next available number(s) for Purchase Orders and transactions, decide whether Striven should warn you of duplicate numbers, and more. Below is a screenshot illustrating how the Purchasing Settings appears and details on what can be accomplished there.
To view Purchasing Settings, navigate to:
Company → Settings → Accounting → Purchasing → Settings
- Prompt to update Item Cost if it is changed while creating Purchase Orders, Checks, Bills, & Bill Credits: Triggers a warning if an Item cost has changed while you are in the process of creating a PO, Check, Bill, or Bill Credit and asks if you want to update it.
- Payment Terms: Allows you to choose the default Payment Terms for Purchase Orders created in Striven. The default Payment Terms can be overridden on individual POs if desired.
- Note: If Payment Terms have been set at the Vendor level, then they will override the default Payment Term set within the A/P Settings.
- Checks: There are 3 settings options here as explained below:
- Warn about duplicate Check Numbers: Triggers a warning to alert the user that they are attempting to use a duplicate Check number for the selected bank account. The warning will not be triggered if a different bank account has been selected for the Check.
- Note: If this warning is activated, you can either choose to keep the duplicate number or change it when creating a check.
- Recurring Checks use the same Check Number: Enables you to indicate with your check number how the check was processed. For example, you can enter Online, EFT, ACH, etc.
- Cannot Print Checks Unless Reviewed: Prevents users from being able to print checks from Striven unless the Transaction has gone through the Transaction Review process. Learn more about the Transaction Review Queue by viewing our Financial Reporting Guide.
- Warn about duplicate Check Numbers: Triggers a warning to alert the user that they are attempting to use a duplicate Check number for the selected bank account. The warning will not be triggered if a different bank account has been selected for the Check.
- Next Number: Displays the next available number for Bills created in Striven and allows you to decide whether or not Striven should warn you of duplicate Bill numbers. The warning will not be triggered if the same Bill number is used for a different Vendor.
- Note: If this warning is activated you can either choose to keep the duplicate number or change it when creating a Bill.
- Bill Recipient for Review: Enables you to choose the user(s) who will receive notifications when a Bill needs to be reviewed. A Bill will be sent to the Bill Review Queue when a Vendor has submitted a Bill via the Portal.
- Default Format: Sets the default Bill format when creating a Bill. This format can be changed on the Bill if desired.
- Send Approved Bill as Attachment: Sends an email to the recipient including an attachment of the Bill upon creation, Bill approval, or if the Bill total gets updated.
- Bill Credit Numbers: Displays the next available number for Bill Credits created in Striven.
- Warn about duplicate Bill Credit Numbers: Triggers a warning to alert the user that they are attempting to use a duplicate Bill Credit number for the selected Vendor. The warning will not be triggered if the same Bill Credit number is used for a different Vendor.
- Note: If this warning is activated you can either choose to keep the duplicate number or change it when creating a Bill Credit.
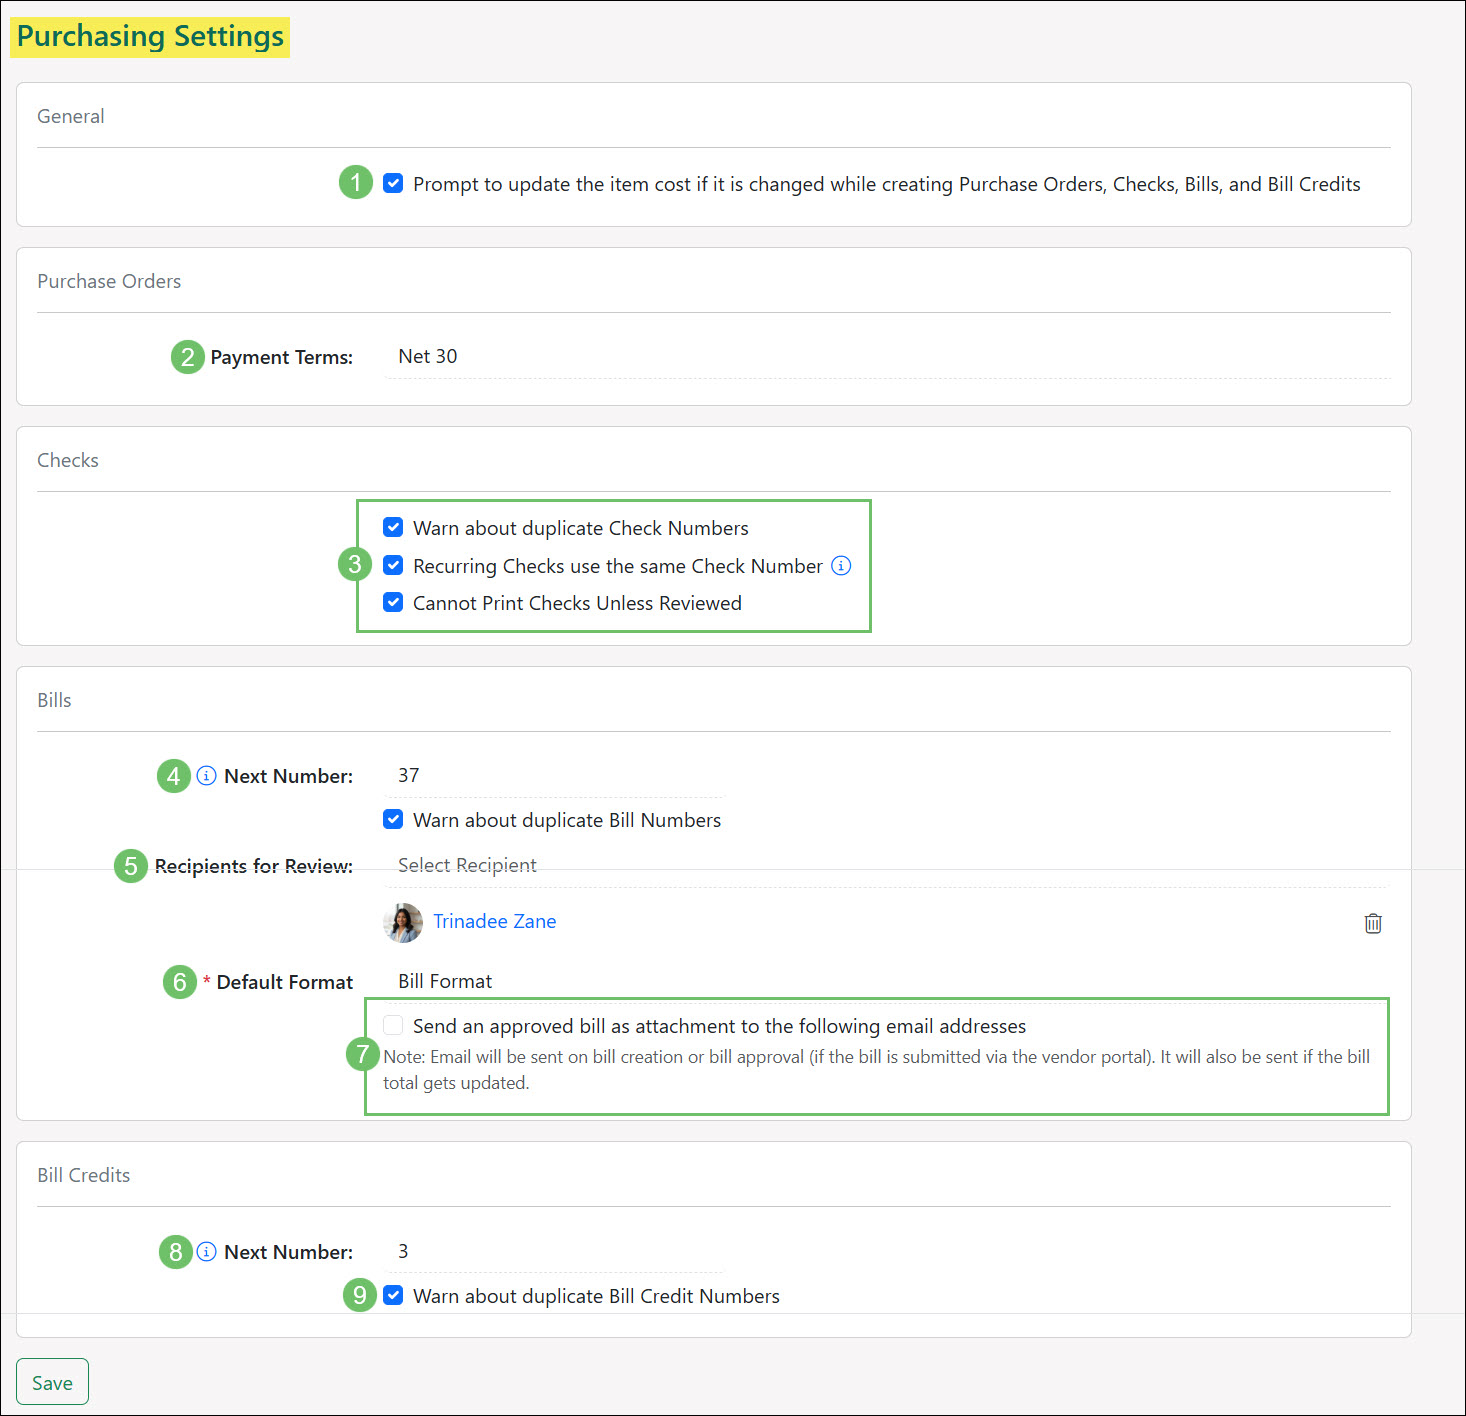
Example of the Purchasing Settings Page

Payment Terms
Payment Terms are time conditions on which two parties agree to fulfill a sale by a certain date or period. Payment Terms are available for both Accounts Receivable and Accounts Payable Transactions and will allow your Company to track late Payments in Collections. Learn more about setting up Payment Terms in Striven by reviewing the Payment Terms section in our Accounting Setup Guide.
You can add new Payment Terms from the Payment Terms List. To view Payment Terms use one of the following steps below:
Company → Settings → Accounting → Sales → Invoices → Payment Terms
Company → Settings → Accounting → Sales → Sales Orders → Payment Terms
Company → Settings → Accounting → Purchasing → Bills → Payment Terms
Company → Settings → Accounting → Purchasing → POs → Payment Terms

Example of the Payment Terms List
-
Bill Printable Formats
Items: This section will allow you to configure how the Items appear on the printable format. To configure the Items section header, you can choose a column header background color along with the font size and color. You can determine the table width for the display of the Items on the Bill, as well as set the Barcode Type. Within the Items, you can also choose what to include and exclude in the section from a list of available columns. The columns can also be renamed and rearranged to fit your needs. The example shown illustrates how the Items section appears.
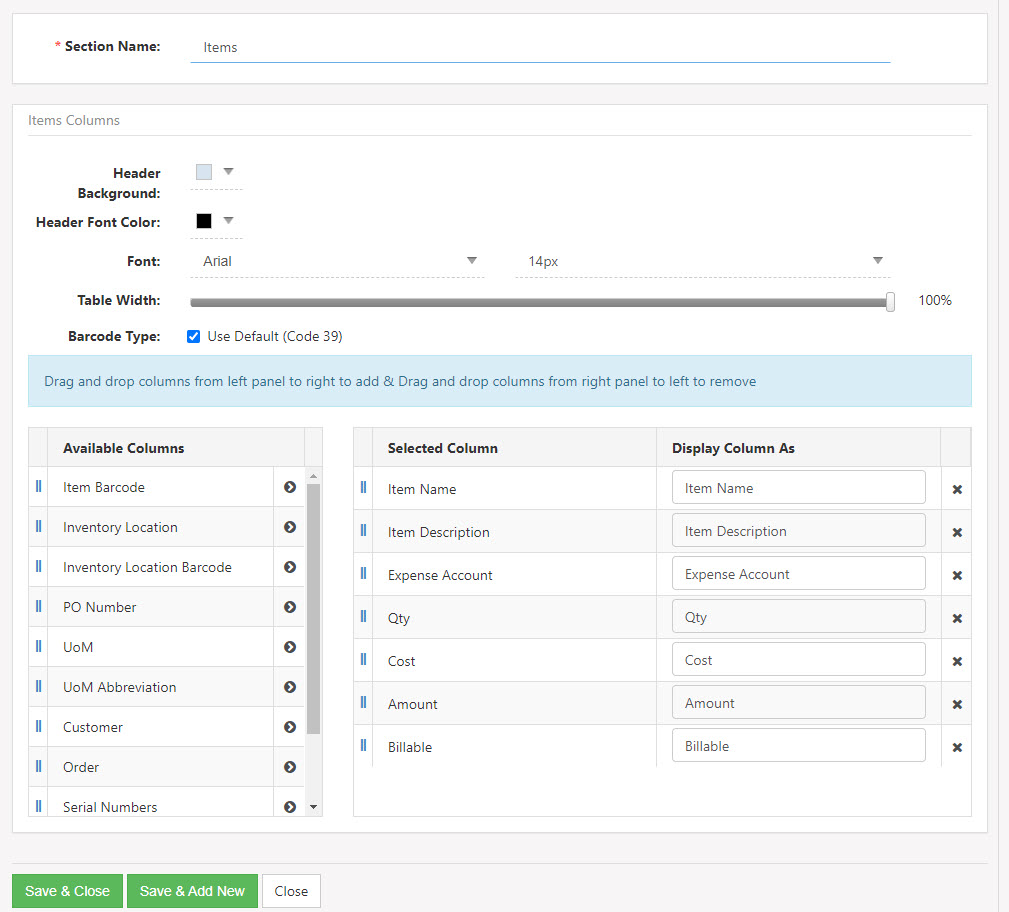
Example of the Items Section for Bill Formats
Totals: The Total section will add everything up and total Line Items on the Bill. Configurations can be made to allow the hiding of information deemed less vital to your Company using a series of toggles. By using the Hide toggle, this notes that the section will be hidden on the format. Override the text for each piece of information by updating the Display As field. This image displays how the Totals Section appears on the Bill format and what can be configured there.
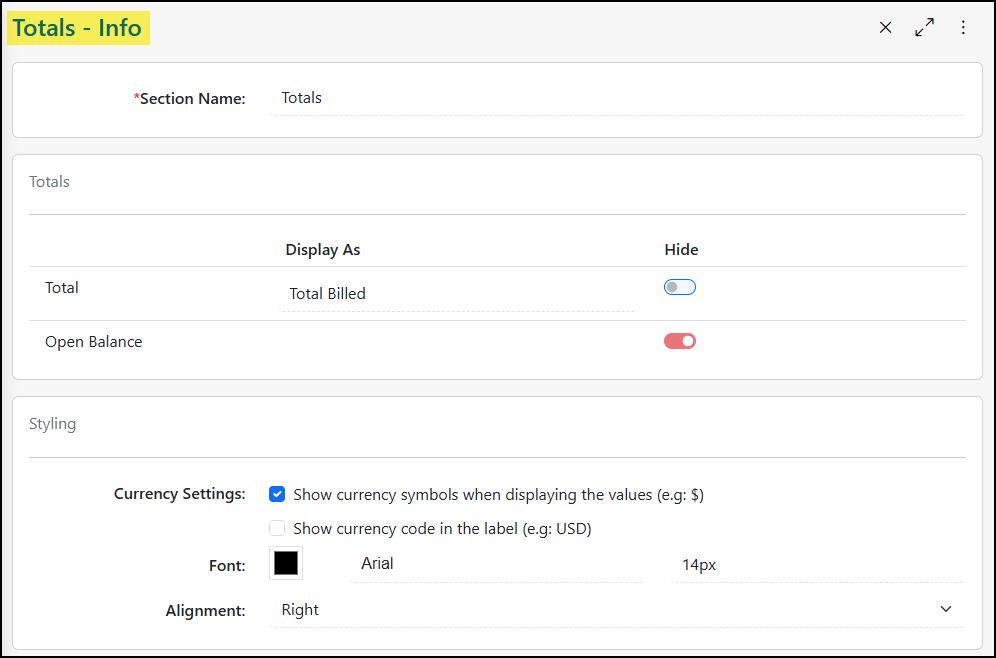
Example of the Totals Section for Bill Formats
-
Bills
Once a Purchase Order is accepted by a Vendor, the Line Items will need to be fulfilled and shipped to the designated location on the Purchase Order. After the Items are shipped or fulfilled, the Vendor can create a Bill from which your Company will have to pay for the goods or services you’ve received.
Unlike a Purchase Order, which is an agreement to purchase goods or services from a Vendor, a Bill is a transaction from which your Company will have to pay the Vendor for those goods or services. Bills can be created by the Vendor Contact in the Vendor Portal or by internal users by choosing Bill under the Vendors tab. You will have the ability to choose a default Bill format under A/P Settings with the option to select from a list of saved formats for all Bills. If a default is set, it will show in the Bill format section of the Bill Info page. The Bill Info page will have a drop-down menu for you to select a Bill format if multiple formats are available. You will also have the option to email Bills to both Vendor Contacts and Employees to allow for a smoother, automated process. Below is a screenshot representing how adding a Bill appears and details on what can be accomplished there.
- Vendor/PO Info: This section contains the following information:
- Vendor: Enables you to choose the Vendor for which you are creating a Bill to pay.
- Purchase Order: Allows you to select open Purchase Orders from a popup window to populate the Line Items automatically on the Bill.
- Vendor Location: Allows you to choose the Vendor’s Location.
- Note: Customer/Vendor address changes will not reflect on existing transactions, only new transactions after the address change was made.
- Shipping Method: Allows you to choose how you would like to receive the Items from the Vendor.
- Tracking Link: If a tracking link is available you can add it here. A button next to the tracking number will quickly bring you to a Google search for the entered number.
- Bill Info: This section contains the following information:
- Date: The date on which the Bill will be considered open.
- Due Date: The due date on which you will need to pay the Bill. After this date has passed, payment will be considered late.
- Payment Terms: The period specified in which your Company will need to pay the Bill based on the date chosen above.
- Requested By: Allows you to choose either an internal user or Vendor Contact who has requested the Bill.
- Format: Lists the available Bill formats for viewing and printing the Bill.
- Ref#: Field where you can enter the reference number for the Bill. The reference number will appear as the Bill number in various lists throughout Striven.
- Memo: Field for entering a memo for the Bill.
- Related Transactions: Displays Sales Orders, Purchase Orders, or transactions that will be related to the Bill based on the Purchase Order chosen.
- Expenses Section: Allows you to select a General Ledger Account to extract funds from to pay the Bill. You can also relate a Customer and Sales Order to the Bill for the expenses.
- Items Section: Allows you to select Items to purchase for the Bill. You can also associate a Customer and Sales Order to be billed for the Items.
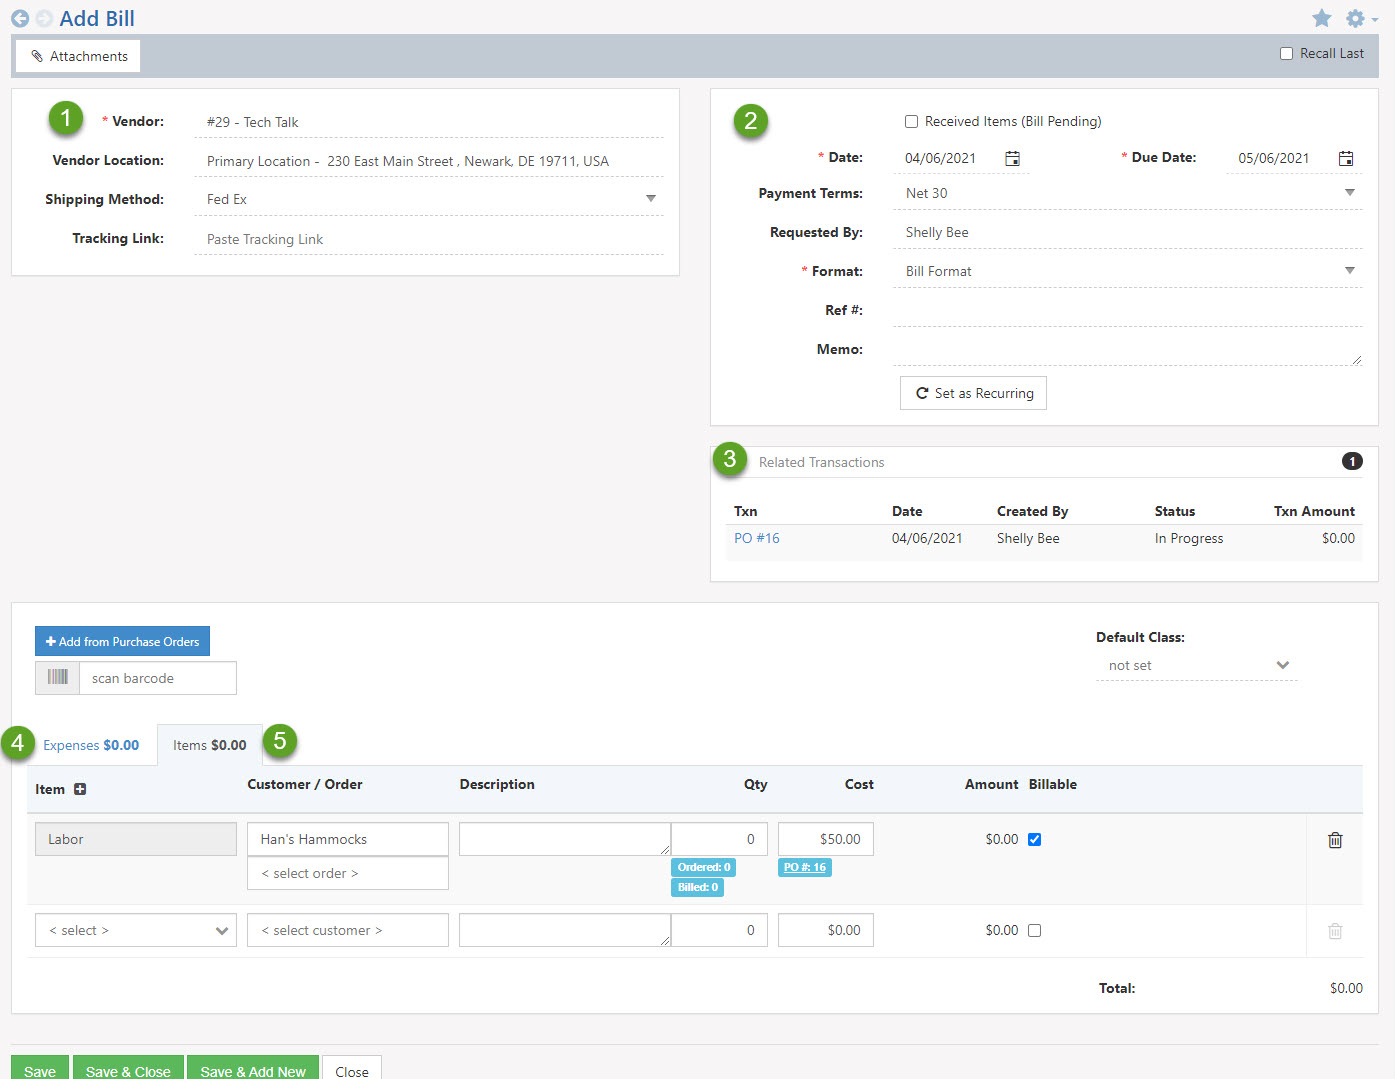
Example of Adding a Bill
- Vendor/PO Info: This section contains the following information:
-
Receiving Items (Bill Pending)
As discussed above, Bills are transactions from which you will have to pay Vendors for goods or services you’ve purchased. However, sometimes you will receive goods or services you’ve ordered without receiving a Bill from the Vendor. To replicate this workflow you can use the Received Items (Bill Pending) checkbox when creating a Bill (shown by the blue arrow in the screenshot below). This checkbox will hide fields that appear on the Bill page as your Company is not responsible to pay until you receive a Bill from the Vendor. Once a Bill is received, you can simply uncheck the Received Items (Bill Pending) checkbox which will create a Bill automatically. You can also create Received Items using the Receive Items and Create Bills for Received Items options using the Create Bills for Received Items under the Vendors tab. Below is a screenshot demonstrating how Received Items (Bill Pending) appears.
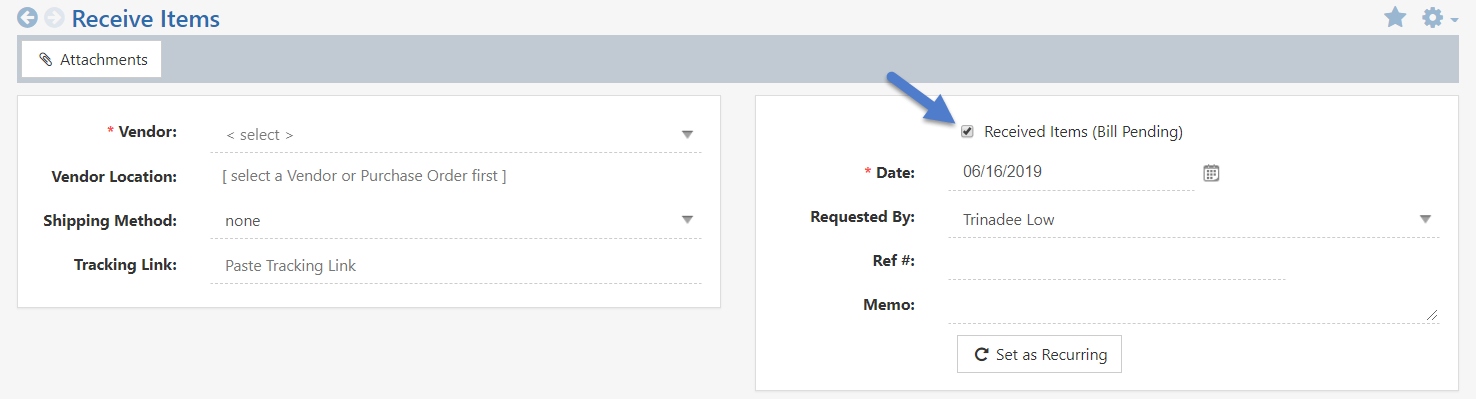
Example of Received Items (Bill Pending)
-
Review Bills Queue
Apart from creating Bills in Striven, Vendor Contacts can also create Bills for Purchase Orders in the Vendor Portal. Vendor Contacts can create Bills in the Portal by using the Vendor Info tab and choosing Create Bill or from the Purchase Order using the PO Actions Menu and clicking Create Bill. Vendor Contacts can then choose what PO they would like to create a Bill for and when the Bill will be due. After the Bill is created from the Portal, it will go into the Review Bills Queue to be reviewed by an internal user to either be Approved or Denied. Below is a screenshot displaying how the Review Bills Queue appears and details on what can be accomplished there.
To view the Review Bills Queue, follow these steps:
Vendors → Purchasing → Approve Bills
- Bill #: A hyperlink of the Bill number that will populate the Bill details when clicked.
- Vendor: The name of the Vendor who has created the Bill and is a hyperlink which will populate the Vendor’s Dashboard when clicked.
- Date Submitted: The date when the Bill was submitted by the Vendor in the Portal.
- Bill Date: When the Bill is dated and owed by your Company.
- PO #: Shows the Purchase Order number and is a hyperlink that will populate the with the Purchase Order details when clicked.
- PO Amount: The amount agreed upon for the Purchase Order.
- Bill Total: The amount your Company owes for the pending Bill.
- Line Items: By clicking the arrow, you can view the Line Item details to review the Bill details before choosing to approve or deny the Bill.
- Approve/Deny: By clicking Approve, the Bill will be created in Striven for your Company to pay. By clicking Deny, you can provide a reason for denying the proposed Bill. Upon denying the Bill will not be created in Striven and will be removed from the Review Bills Queue.
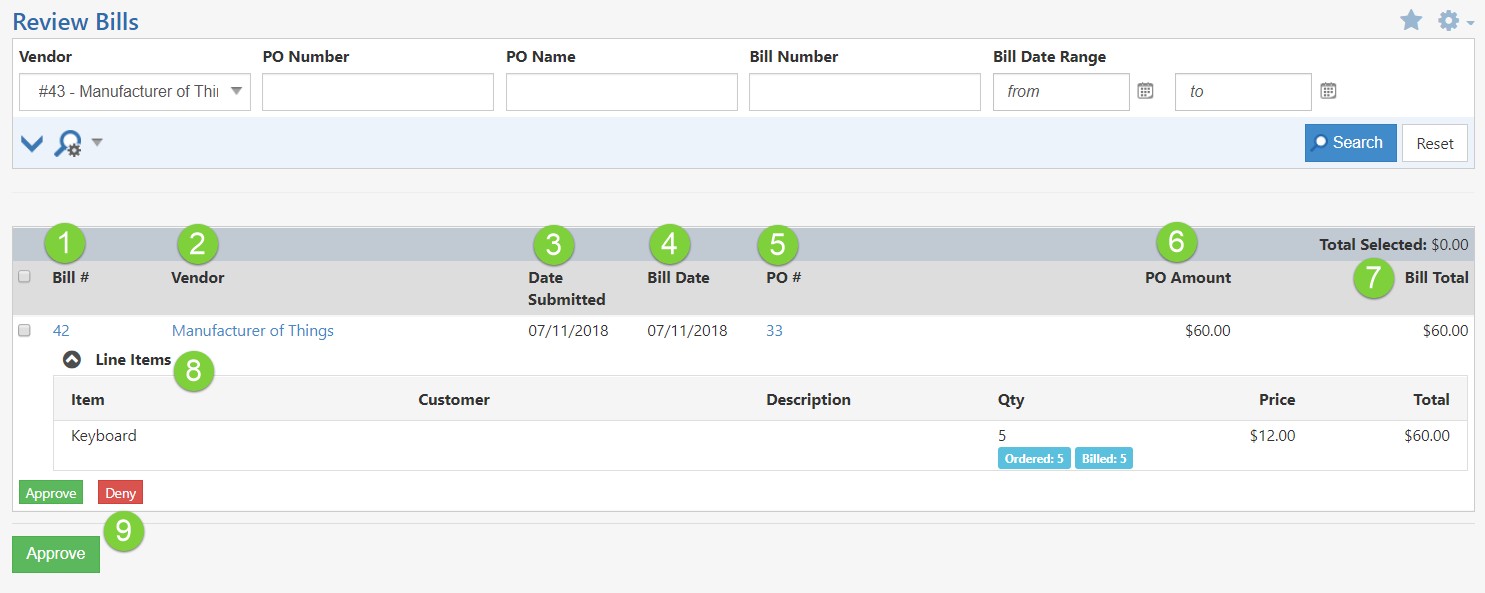
Example of the Review Bills Queue
-
Pay Bills
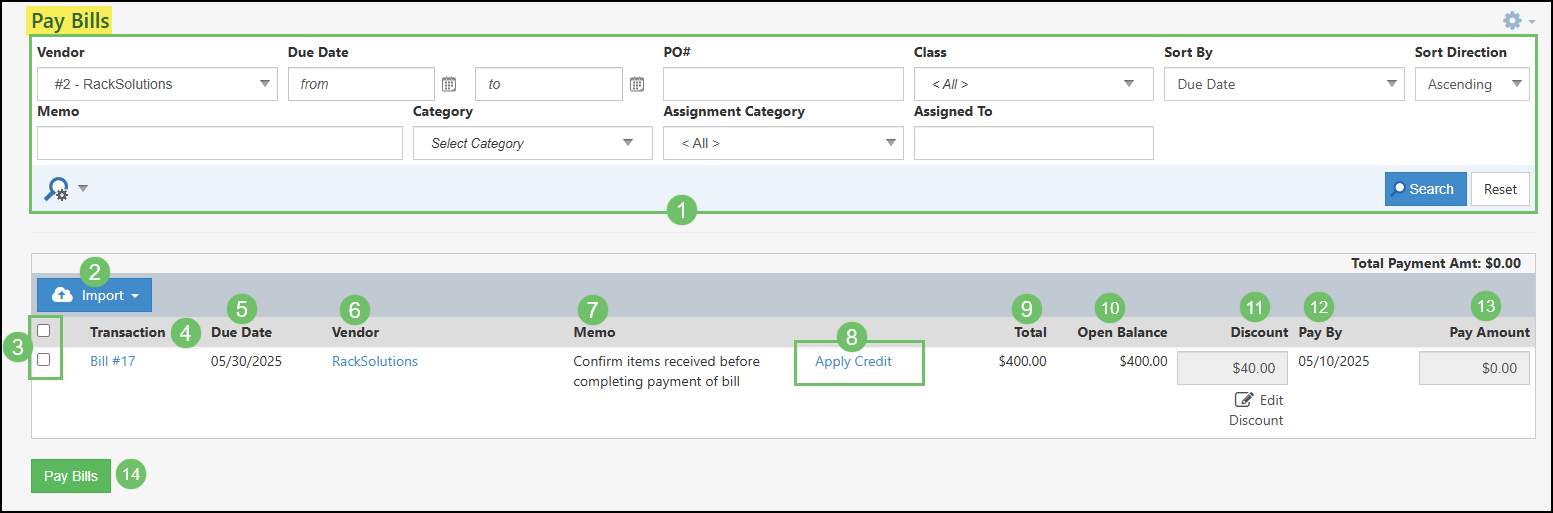
After the Bill is created in Striven, your Company is responsible to submit payment to the Vendor. You can pay Bills by using the Actions menu from the Bill and choosing Pay Bill or by choosing Pay Bills under the Vendor menu. Either method will bring you to the Pay Bills List from which you can choose the Bill(s) you wish to pay. After choosing the Bill(s) to pay, you can click the Pay Bills button to initiate a popup in which you can choose how you’ll pay the Vendor. Below is a screenshot exhibiting how the Pay Bills List appears and details on what can be accomplished there.
To view the Pay Bills List, use the following steps:
Vendors → Financial → Pay Bills
- Search: Provides filter options to locate specific Bills you wish to pay. Filters include Vendor, Due Date, PO#, Class, Sort By, Sort Direction, Memo, Vendor Category, Assignment Category, Assigned To, and Currency.
- Import: Provides 2 options for importing Bill Payments:
- Bill Payment Checks
- Bill Payment Credit Card Charges
- Select: Check boxes to select the Bills you wish to pay. The box at the top of the column will select all listed Bills.
- Transaction: Displays the Bill or Transaction Number. This is a hyperlink to view the actual Bill or Transaction.
- Due Date: Displays the due date of the Bill.
- Vendor: Displays a hyperlink to the Vendor on that particular Bill or Transaction.
- Memo: Displays the memo from the Bill or Transaction when applicable.
- Apply Credit: The Apply Credit option will appear if the Vendor has an open Bill Credit that can still be applied to any open Bills.
- Total: Displays the total amount on the Bill.
- Open Balance: Displays the amount still owed on the Bill. If partial payments have been made, this column will show the difference of what is still outstanding.
- Discount: Displays if a Discount has been applied to a Bill. This is based on the Payment Term set on the related Bill.
- Pay By: Displays the Pay By Date related to the Discount, if applicable.
- Pay Amount: Once a Bill is selected, this field provides the ability to enter the amount you wish to pay towards the Bill.
- Pay Bills: Triggers a popup displaying the selected Bills you are paying with options to enter the Date, Method of payment, select the payment account, and include a Memo. See below for further details on this step.
Example of the Pay Bills Queue
Once you have selected the Bills you want to pay, the Pay Bills popup will display. Below is an example of a Pay Bills popup and a list detailing what you can accomplish there.
- Date: Enables you to select a date when the Bill will be paid.
- Method: Allows you to choose to pay the selected Bill(s) using either Checks or Credit Cards. The screenshot represents display fields after choosing Check from the drop-down menu.
- Payment Account: The GL Account which will be used to pay off the Bill.
- To Be Printed: This checkbox will appear when choosing to pay Bills by check and notes whether or not the check will be printed.
- Memo: Allows you to enter a note about the Bill Payment.
- Check #: Enables you to edit the supplied check number with either another number of your choosing, or another identifier such as ACH, Wire, etc.
- Note: This option is NOT available if the payment is set To Be Printed, since the printed check will most likely already be numbered.
- Pay/Close: Choosing Pay will automatically create either check(s) or credit card charge(s) to pay off the Bills selected. These can be found in the Transactions List as either Checks: Bill Payment or CC Charge: Bill Payment types.
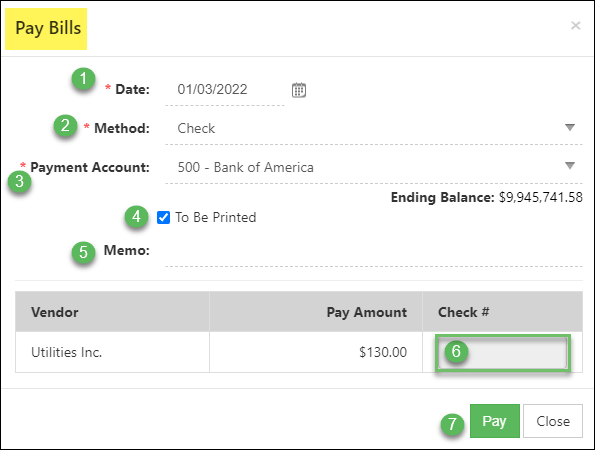
Example of Pay Bills Popup
-
Bill Credits
Bill Credits are transactions that represent credits received from Vendors for goods or services that have been ordered or purchased. Bill Credits can be used to refund your Company for damaged goods you’ve received or unused services that you’ve ordered from the Vendor. You can create Bill Credits using the Actions menu on a Bill or by using Create Credits under the Vendors tab. Bill Credits can be applied to Bills once created to decrease the amount your Company owes the Vendor. Below is a screenshot featuring how adding a Bill Credit appears and details on what can be accomplished there.
- Vendor Info: In this section, you can select the Vendor and the Vendor’s Location you’re receiving the Bill Credit from.
- Note: Customer/Vendor address changes will not reflect on existing transactions, only new transactions after the address change was made.
- Credit Info: In this section, you can choose the date you’ve received the Bill Credit and enter a memo for the Bill Credit. You can also create a recurrence for the Bill Credit based on a daily, weekly, or monthly basis set using the “Set as Recurring” button.
- Expenses Section: The Expenses section will allow you to select GL Accounts to reference the credit received from the Vendor. You can also associate a Customer and Sales Order to be credited for the expenses.
- Items Section: The Items section will allow you to select Items to be credited from the Bill Credit. You can also associate a Customer and Sales Order to be credited for the Items.
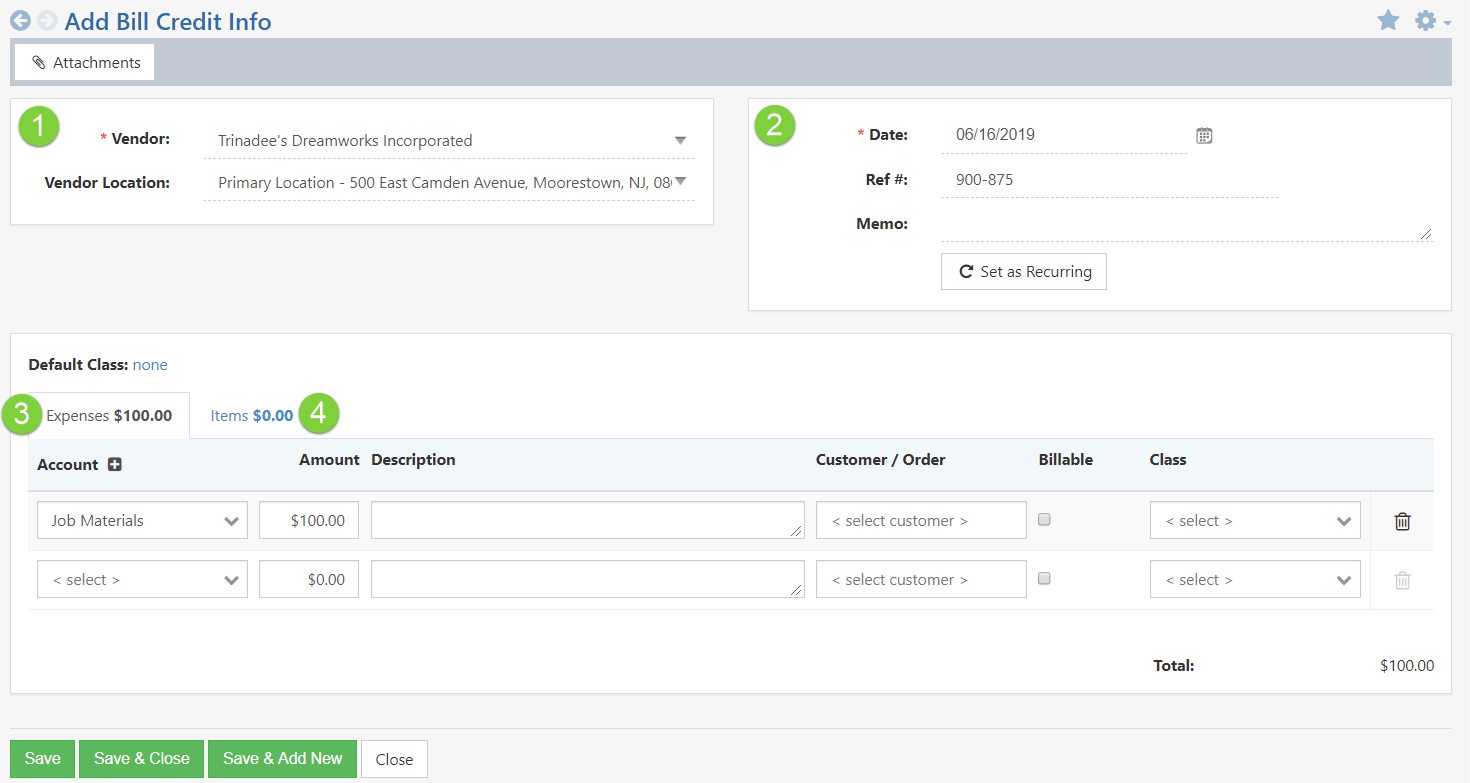
Example of Adding a Bill Credit
- Vendor Info: In this section, you can select the Vendor and the Vendor’s Location you’re receiving the Bill Credit from.
-
Journal Entries
Journal Entries are Transactions in which line items represent GL Accounts which are either debited or credited to create an equal amount of Debits and Credits. When adding a GL Account on a Journal Entry, you can enter the amount in either the Debit or Credit field as needed. Debit and Credit fields will either show up or down arrows depending on the GL Account Type and how debiting or crediting affects the Account.
In Striven Journal Entries for Accounts Payable can be added on a line item. Once an Accounts Payable GL Account has been selected, an additional field will appear in order to select a Vendor that the Debit or Credit should be associated with. When Accounts Payable is selected as a line item on a Journal Entry, the Vendor will be required in order to save the Journal Entry.
Learn more about Journal Entries by reviewing the Journal Entries section in our Banking Guide.
Below is an example of a Journal Entry with an Accounts Payable GL Account selected as a line item.
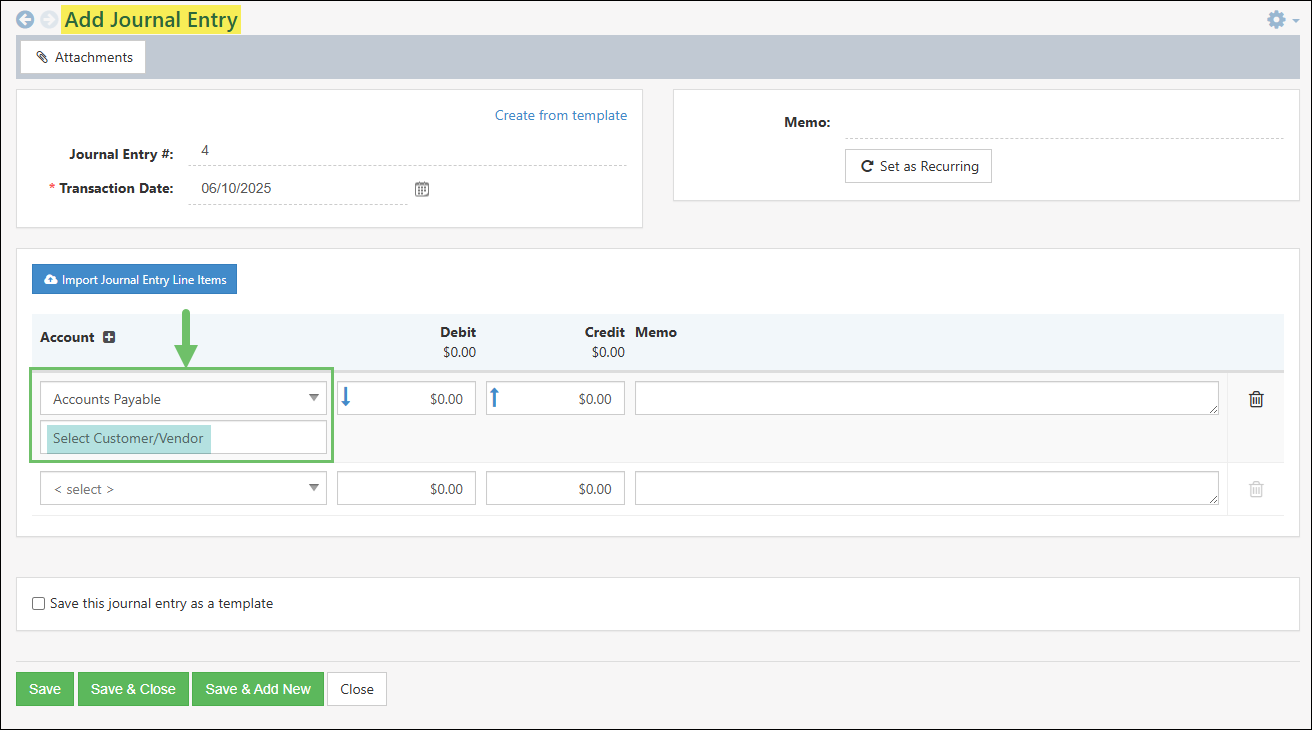
Example of an Accounts Payable Journal Entry
-
Importing A/P Transactions
Striven has several imports available to allow you to import transactions en masse. Imports are available for A/P transactions including Bills and Journal Entries. Though the mapping for each import is different, the import setup functionality is much the same across the board for Striven importing. For more information about all imports, view our Import Management Guide.
Transaction imports can be accessed by clicking the Import button found on the Transactions List and choosing what type of transaction you would like to import into Striven. Each Import page appears the same with two sections which are described further below with a screenshot illustrating how the Bills Import page appears.
- Quick Start: This section has 2 options:
- Generate Sample File: Provides a spreadsheet with pre-filled column headers (listed on the mapping) to assist with entering data.
- Import History: Directs you to the Import Progress page to select a file that has been previously imported into your Striven system.
- Ready to Import: Enables you to select a file to import into Striven.
- Accepted file types are .txt or .csv.
- Maximum file size: 50 MB.
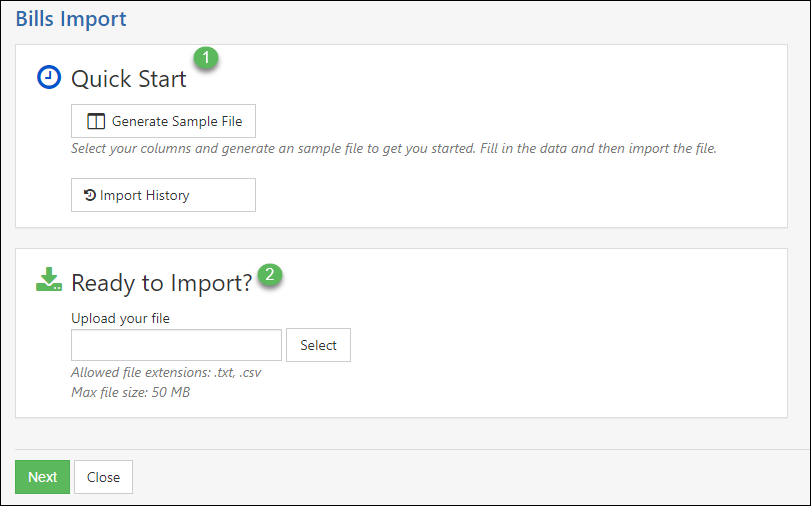
Example of Bills Import Page
- Quick Start: This section has 2 options:
-
Pay Sales Tax
The Pay Tax page provides a centralized location for managing and fulfilling your company’s tax obligations. It allows you to efficiently make payments for any taxes owed to the various agencies that your company interacts with.
This page displays a list of relevant agencies, the tax amounts due to each, and provides the option for creating a Check: Tax Payment transaction for each agency selected. By consolidating tax payment information and functionality into a single page, Striven streamlines the tax payment process and helps ensure that your company remains compliant with its tax responsibilities.
To access the Pay Tax page, navigate to Accounting → Tax → Pay
Below is a screenshot of how the Pay Tax page appears and descriptions of what can be accomplished there:
- Bank Account: Indicates the GL Bank Account that will be used to track the tax payment in Striven.
- Check Date: Sets the date on the Checks that will be created for each agency selected. Checks created through the Pay Tax page can be viewed in the Transactions List by filtering for the Transaction Type Checks: Tax Payment.
- Check # and Print Options: Sets the Check # that will be created per agency selected on the Pay Tax page. If the To Be Printed option is enabled the Starting Check # field can not be set.
- Show Tax Due Through: Filters the Pay Tax page based on the Transactions date that includes any open sales taxes amount owed. By default, this date will be set to the end of the previous month.
- Tax: Lists the State, City, County, or any other or special type of tax that currently has an open amount of sales taxes owed to them. Duplicate results may appear based on different Classes that are selected on the related Transactions, which will be shown in the Class column.
- Tax Agency: The Vendor account that is listed within the Tax Agency will be listed in this column. This is the Vendor that will be selected on the Check that is created through the Pay Tax page.
- Class: Indicates the Class that is selected on the related Transactions with an open sales tax amount.
- Pay Amount: Defaults to the full amount owed. This amount can be edited as needed by clicking into the field and updating the amount that is currently being paid.
- Amount Due: Lists the total amount of sales tax that is owed. This column will list hyperlinked results in order to quickly view the Tax Liability Report for a detailed list of related Transactions.
- Adjust: Rather than creating a Check, the Adjust button can be used per row to quickly create a Tax Adjustment.
- Pay: Creates a Check per result that is selected and takes you to a confirmation page which lists each new Check.

Example of the Pay Tax Page
-
Pay Tax Confirmation Page
After clicking the Pay button on the Pay Tax page, you will see a list of the created Check payments. You can also update the Tax Paid Through for each affected agency. This optional step prevents you from having to update this in the settings later, saving you time.
Below is a screenshot of how the Pay Tax Confirmation page appears and descriptions of what can be accomplished there:
- Tax Payments Checks Confirmation: Confirms that the Checks: Tax Payments Transactions were created in Striven.
- Created Tax Payment Checks: Lists the Checks that were created through the Pay Tax page with hyperlink options to easily access each Check in Striven.
- Update Tax Paid Through Date: Optional configuration that can be completed from this page in order to update the Tax Paid Through Date for each agency that was paid through the Pay Tax page. This prevents the need to update this date within the Tax Agency settings page at a later time.

Example of the Pay Tax Confirmation Page
-
Reports
Striven has built-in reports that are designed to help you gain insight into your purchasing or A/P transactions. The following section of this guide highlights some of the reports within Striven and what configurations can be made to report on what is most important to you.
-
Purchasing by Vendor
The Purchasing by Vendor Report will list out each Vendor in order of how much has been purchased within a given start and end period. By default, the list is sorted by which Vendor your Company has purchased the most from within the selected time period. Below is an example of the Purchasing by Vendor Report and what configurations can be conducted.
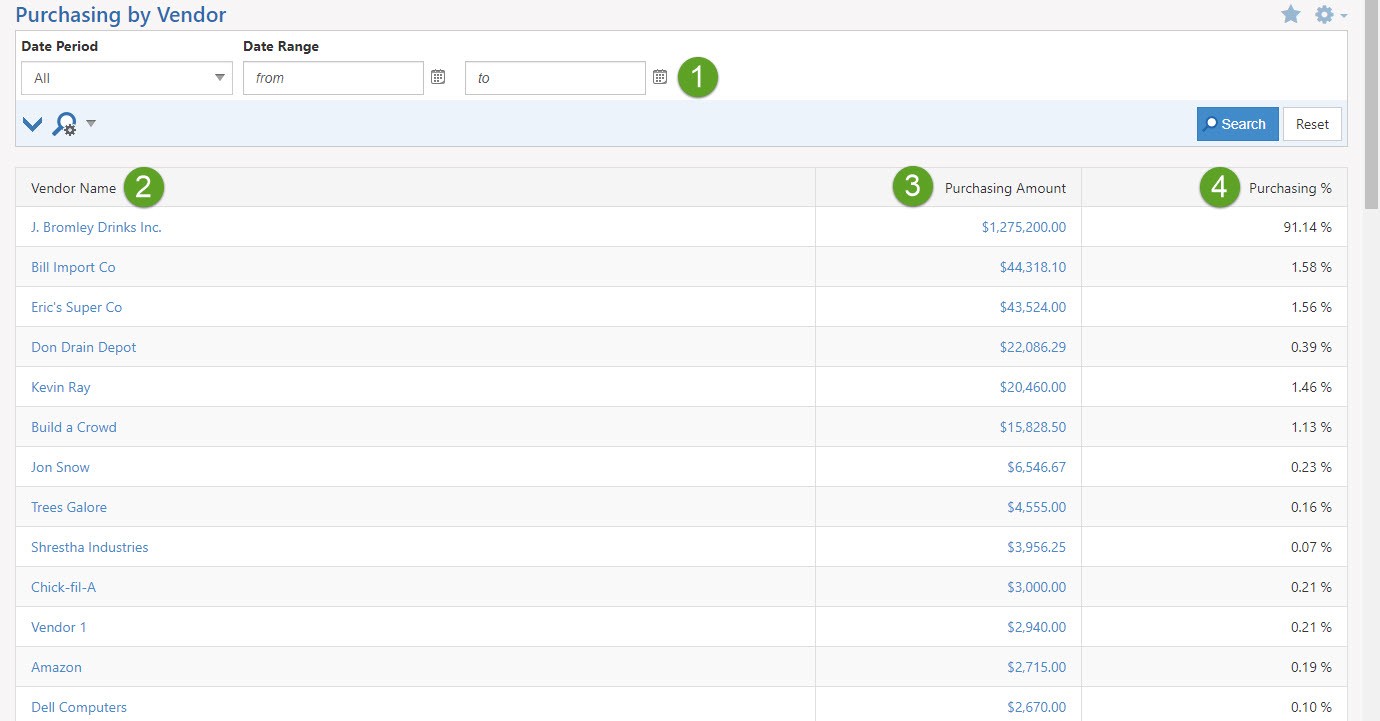
Example of Purchasing by Vendor Report
- Available Search Filters: There are many useful search filters available for this report in order to see the list of Vendors that mean the most to you. Filtering based on Assignment can be a useful way to quickly see your Vendors versus the overall list.
- Vendor: Lists the Vendor’s name as a hyperlink. Clicking on the name will navigate you to their Dashboard for additional information.
- Purchasing Amount: Sums the total amount purchased that has been entered related to the Vendor. The date range filter will determine which transactions are to be included within this calculated column.
- Purchasing %: Displays how much your Company has purchased from the Vendor compared to the rest of the list. Knowing which Customers you have purchased the most with will give you insight into your Company’s Vendor relations.
-
A/P Aging Report
A tool you can utilize when keeping track of what your Company owes Vendors for purchased goods or services is the A/P Aging Report. The A/P Aging Report lists all the Vendors to whom you owe money and how late your Company is paying the open Bills. This report can help you see all open transactions per Vendor, view Vendor information, and view the total owed to each Vendor. Below is a screenshot illustrating how the A/P Aging Report appears and details on what can be accomplished there.
To view the A/P Aging Report, navigate to:
Reports → Purchases & Payables → AP Aging
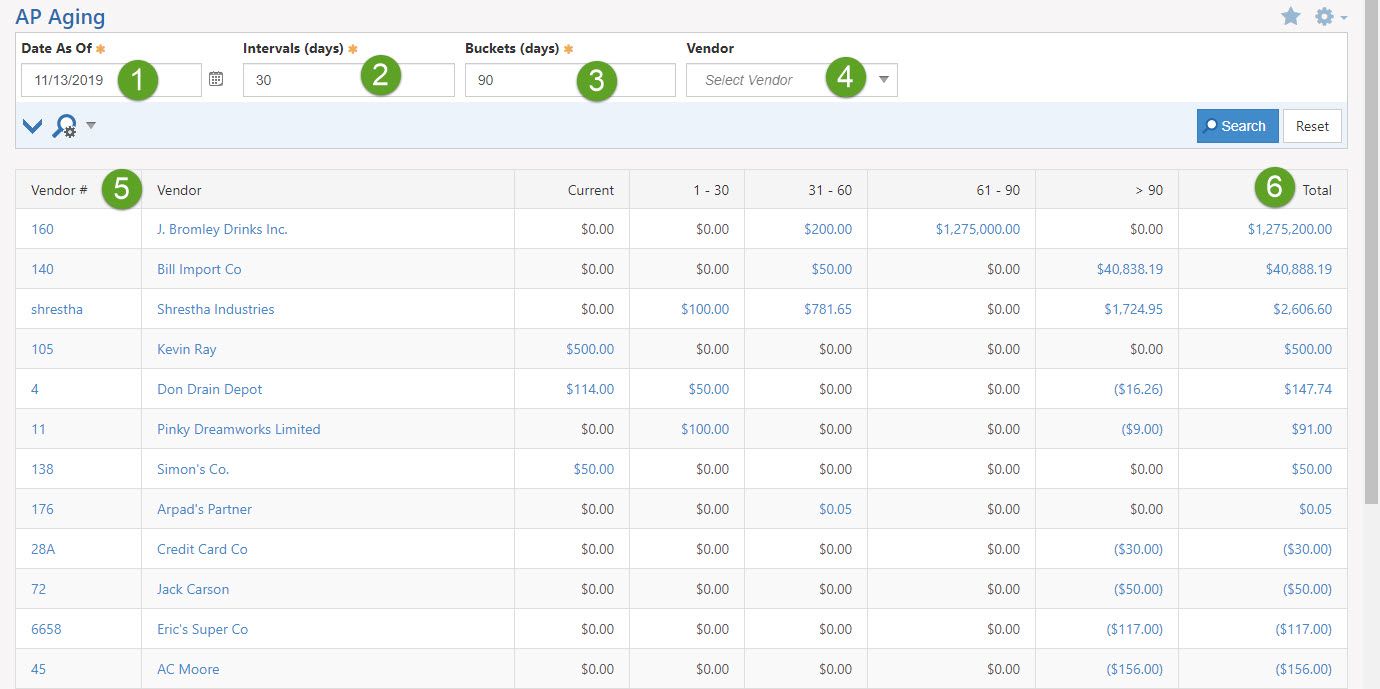
Example of A/P Aging Report
- Date as of: The date which you’re reporting from. A date can be selected using the Calendar icon.
- Intervals: Represent a duration of days that you choose to report on and default to a 30-day interval. You can change intervals by entering a new number in this field.
- Buckets: Represent the max number of days you wish to report on based on the chosen intervals and default to 90 days. You can change the bucket by entering a new number in this field.
- Vendor (Filter): Allows you to choose a Vendor for which you can narrow-down results to only display that Vendor’s open balance.
- Vendor (Name): Lists all the Vendors who currently have an open balance. Vendor Names are hyperlinks, which when clicked will populate the Vendor’s Dashboard in a new browser tab.
- Total: Displays the overall open balance for each Customer and is a hyperlink, which when clicked will populate the Vendor’s A/P Aging Detail Report. The A/P Aging Detail will show all transactions with an open balance that make up the Vendor’s Total.
-
Recap
So with this Purchasing and A/P Management Guide, we’ve discovered how to create and manage Purchase Order Types, Purchase Orders, and more to enable you to purchase goods or services with Striven. We’ve also discovered ways to create Bills, Bill Credits, Bill Payments, and how to report on how much is owed to Vendors to ensure best practices are followed when purchasing in Striven.

Have a Question?
Ask the Striven Community
User-sourced how-to’s, feedback, and more!
FAQs
-
I’ve ordered raw materials, but how do I assemble a finished good from them?
This can be accomplished by creating Manufactured Items and later creating a Build to complete the assembly of Finished Items to be sold to Customers. To learn more please reference our Item Management Guide.