
Scheduling & Communication
Appointments
Support Guide
-
Overview
This Appointments Guide will explore the ways Striven helps manage your Company’s Appointments and scheduling needs. With features that allow you to create links to share with External Contacts to schedule Appointments with you, the ability to create Tasks from Appointments, and the options for setting your Company’s Holidays, Striven can help you maintain your day-to-day workflow by keeping track of your time and availability.
Read this guide if you are trying to:
✔ Establish and set your Appointment Types and Locations.
✔ Configure your External Appointment Links.
✔ Create Tasks from Appointments.
-
Appointment Setup
How to Set Up and Create Appointments in Striven
You can use Appointments in Striven for your Company for both internal and external purposes. There are two ways to create an Appointment in Striven. One way is to create a Meeting Request, which will allow you to send a link for external Contacts to select a date and time from the internal attendee’s open availability. Once a Contact selects a date and time, Striven will create an Appointment on the meeting attendee’s Calendars. Another way is to create an Appointment for all attendees, whether external or internal. Once a user creates an Appointment, all internal attendee’s Calendars will feature the Appointment to remind them of their attendance in the meeting. If the integration with Google or Office 365 is turned on and synced, the Appointment will appear in the meeting attendee’s Google or Office 365 Calendars as well as inside of Striven. The sections below will help explain how you can configure and create Appointments inside of Striven.
-
Appointment Types
In Striven, you can schedule Appointments for yourself, Customers, and other Employees which will appear on their Striven Calendars. There are many functions within Appointments, but one option you can utilize to better organize them is Appointment Types. With Appointment Types, you can note a default duration, allow Candidate associations, and more. Below is a screenshot illustrating how you can add Appointment Types and a list describing what options you can configure there.
To view Appointment Types, you can search for Appointment Types using the Striven Search, or follow the navigation steps below:
Company → Settings → Employees → Appointments → Types
When on the Appointment Types list, you have a number of Actions you can perform. These actions are listed in alongside the image below:
- Add: Using the Plus icon allows you to add a new Appointment Type.
- Search: When the Magnifying Glass icon is selected, a user can search through the list of Appointment Types by Name and Status.
- Type: Lists the Appointment Type’s configured icon and Name.
- Deactivate: The Trashcan icon will allow you to deactivate a specific Type from the list.


When adding a new Appointment Type, you can use the following options to configure the new Type:
- Appointment Type: The name of the Appointment Type. This will be displayed in the Appointment Type List to choose from when adding a new Appointment.
- Default Duration: Allows you to choose how long these Appointments should last on average. When adding a new Appointment of this type, the times will adjust based on the duration set here. The option to override while setting an Appointment is available.
- Type Options: There are some options located here including the following:
- Do not show on workload calculations: Excludes these Appointments from workload calculations for Employees. Workload calculations will appear when reporting on Employee workloads using either Dispatch or Workload Management tools in Striven.
- Allow Candidate Associations: Allows you to associate Candidates to the Appointment.
- Icons: Shows on Appointments on personal Calendars to allow for an “at a glance” identification of the type of Appointment it is.
- Reminder Settings: These options allow you to configure the Reminder settings for an Appointment.
- Enable Text Reminders: Clicking this blue link gives you the option to add text reminders to an Appointment. SMS settings for your system must be configured to enable this feature.
- Send Reminders to External Attendees: Checking this box allows you to have reminders sent to all attendees that are not employees.
- Send Reminders to Internal Attendees: Checking this box allows you to send reminders to attendees that are employees.
Note: Any updates made to the Reminder settings will only be applied to Appointments created moving forward, and will not impact any Appointments currently booked.
- Only allow organizers to cancel appointments of this type: With this configuration enabled, the Cancel this appointment option available under the Actions menu on an appointment will be greyed out and unable to be clicked unless the user is set as the organizer of the appointment.

Example of Adding an Appointment Type
-
Appointment Resources
Appointment Resources represent rooms, offices, or reserved items used for Appointments. When adding a Resource, you can choose Appointment Resources that have been added in your Striven system. With Appointment Resources, you can also choose whether the system checks for scheduling conflicts upon saving an Appointment. If conflicts are found, Striven will warn you and show possible options to solve conflicts, including choosing a different date, time, or Resource. Below is a screenshot of how Appointment Resources appear in the settings. To view or add Appointment Resources, you can use the Striven Search or follow the navigation steps below:
Company → Settings → Employees → Appointments → Resources
- Resource Name: The name of the Appointment Resource, which will appear in the drop-down menu when selecting a Resource for a new or existing Appointment.
- Check for Conflict: Checks for any conflict with the room or item availability when an Appointment is created. Once choosing a date, time, room, and attendees, this function will notify you of any conflict and present options to resolve the conflict. This includes choosing another day, time, or Resource.
- Short Description: Adds a brief description of the Appointment Resource and can also view the history of changes made to the description.
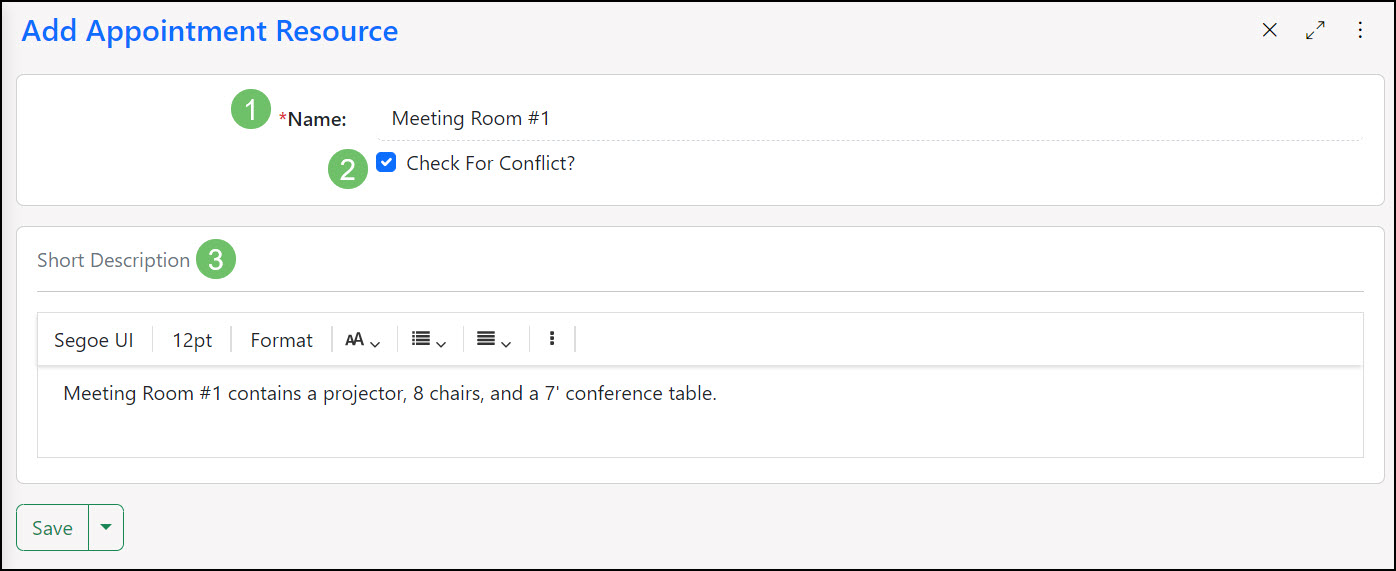
Example of Appointment Resources
-
Holidays
Holidays provide Time Off to all Employees in Striven automatically and block off each Employee’s day for that Holiday. You can enter all observed Company Holidays that entail Time Off into your Striven system to enable this workflow. This prevents Employees from submitting Time Off requests for a day your Company’s Holiday policy has entitled them to have off. To create Holidays in Striven, you can use the Striven Search or follow the navigation steps below:
Company → Settings → Company → Holidays
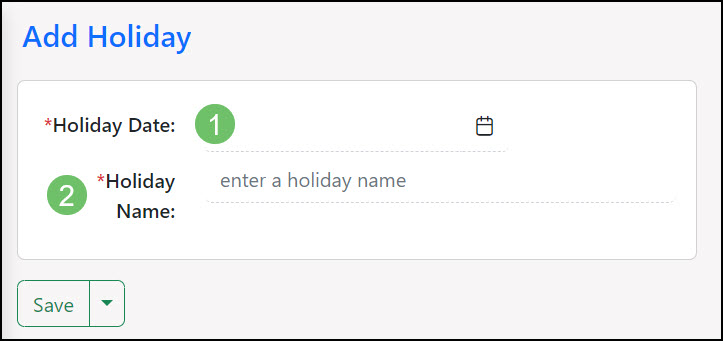
- Holiday Date: Allows you to select a Calendar date for which the Holiday occurs in the coming year.
- Holiday Name: The name of the Holiday that you are adding to Striven.
Once you create a Holiday in Striven, each Employee’s Calendar that includes a Holidays Event will have an Appointment for the appropriate day. This allows all Employees to have the day off without creating any conflicts on their Calendars. Below is an example of a Calendar with a Holiday present:
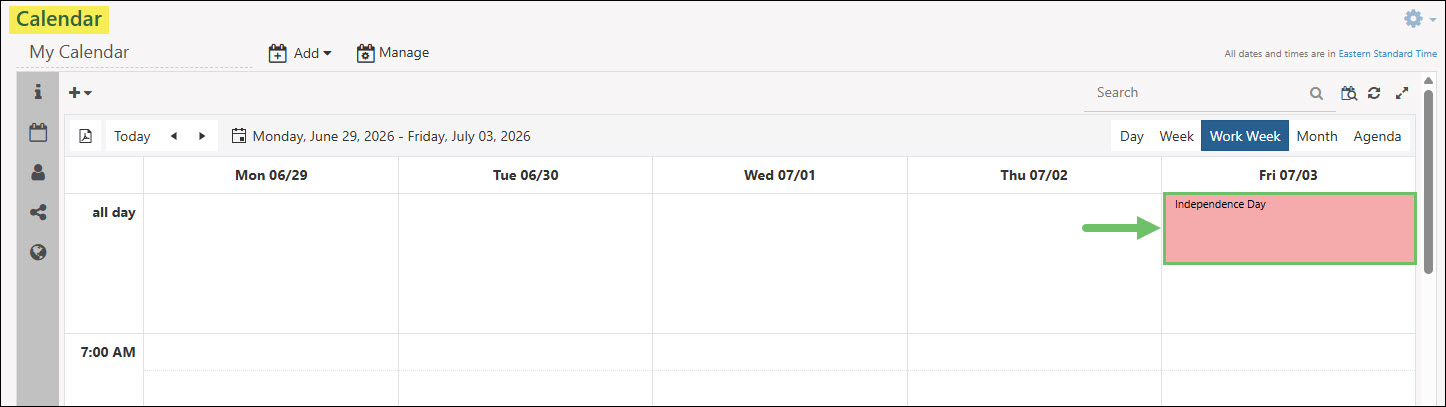
Example of a Holiday Listed on a Calendar
Creating Appointments
-
Creating Appointments
Having the ability to quickly schedule an Appointment or Meeting is important to anyone who is trying to keep their business running smoothly and engage with Employees to ensure their workflows are efficient. Recognizing this need, Striven provides a couple of straightforward ways to create Appointments with other Employees.
Quick Add Menu Option
One way to create an Appointment is by clicking on the Quick Add menu on the top right of the Striven page and selecting Appointment under the Employees section of the list. This will direct you to the Add Appointment page where you can fill in all the relevant information needed for the Appointment.

Example of Add Appointment Option from Quick Add Menu
Striven Calendar Option
Creating Appointments is also quite simple when using the Striven Calendar. This can be accomplished by navigating to either your own Calendar or the Employee’s Calendar with which you want to schedule the Appointment.
- Note: If you do not have your Striven Calendar configured, you will want to do that first. Those steps are explained in detail in the Striven Calendar Guide.
To view the Striven Calendar, select Calendar from the Profile Menu in the top right of the page.
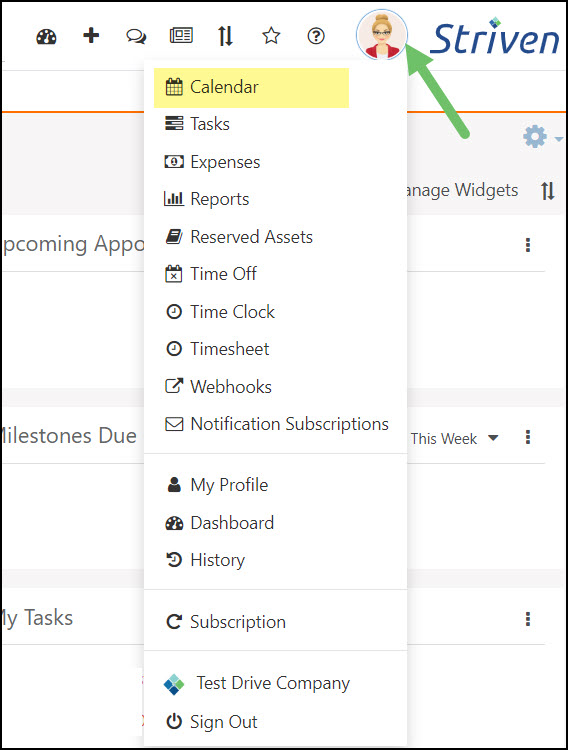
Example of Calendar Option on Profile Menu
Once your Calendar loads, you can select a time block on the date you wish to schedule the Appointment and click Add Appointment.
- Note: Depending on your Calendar’s Events configuration (which will be explained further in the Striven Calendar Guide), your scheduling options may differ from this example. For example, you may see alternative options such as Add Time Off or Add Task when selecting the time block. You can ignore those when scheduling an Appointment.
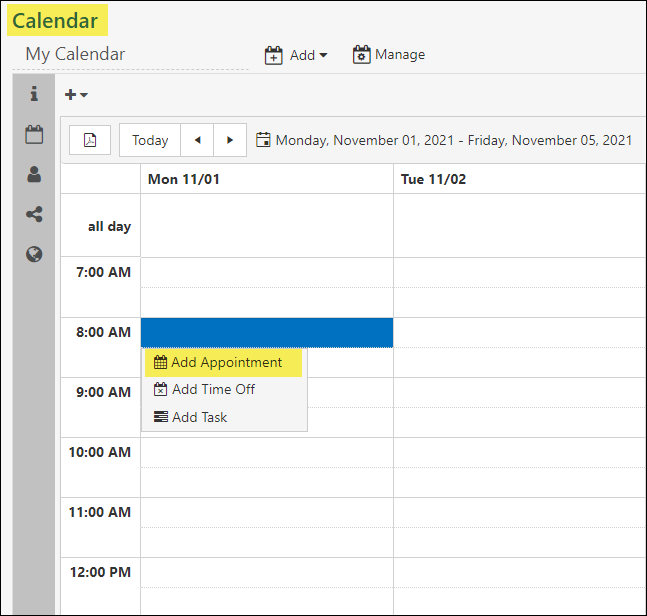
Example of Add Appointment Option on Striven Calendar
When Add Appointment is clicked, you will be taken to the Add Appointment page where you can fill in all the relevant information needed for the Appointment.
Example of Add Appointment Page
-
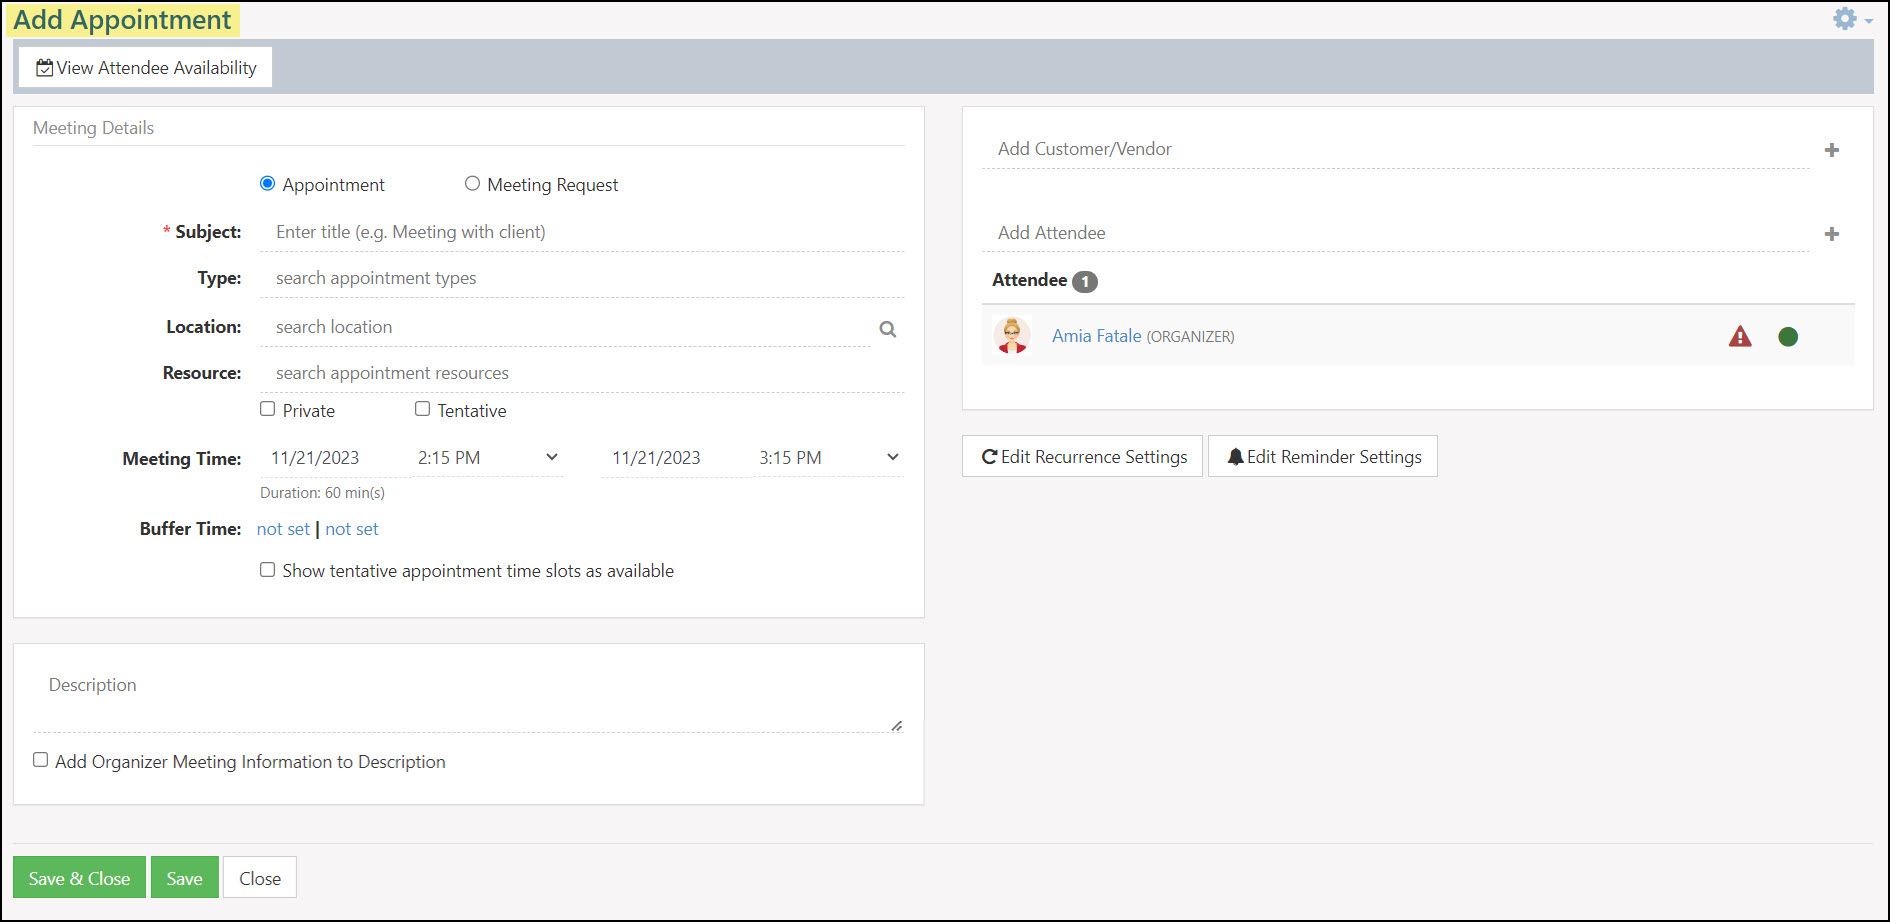
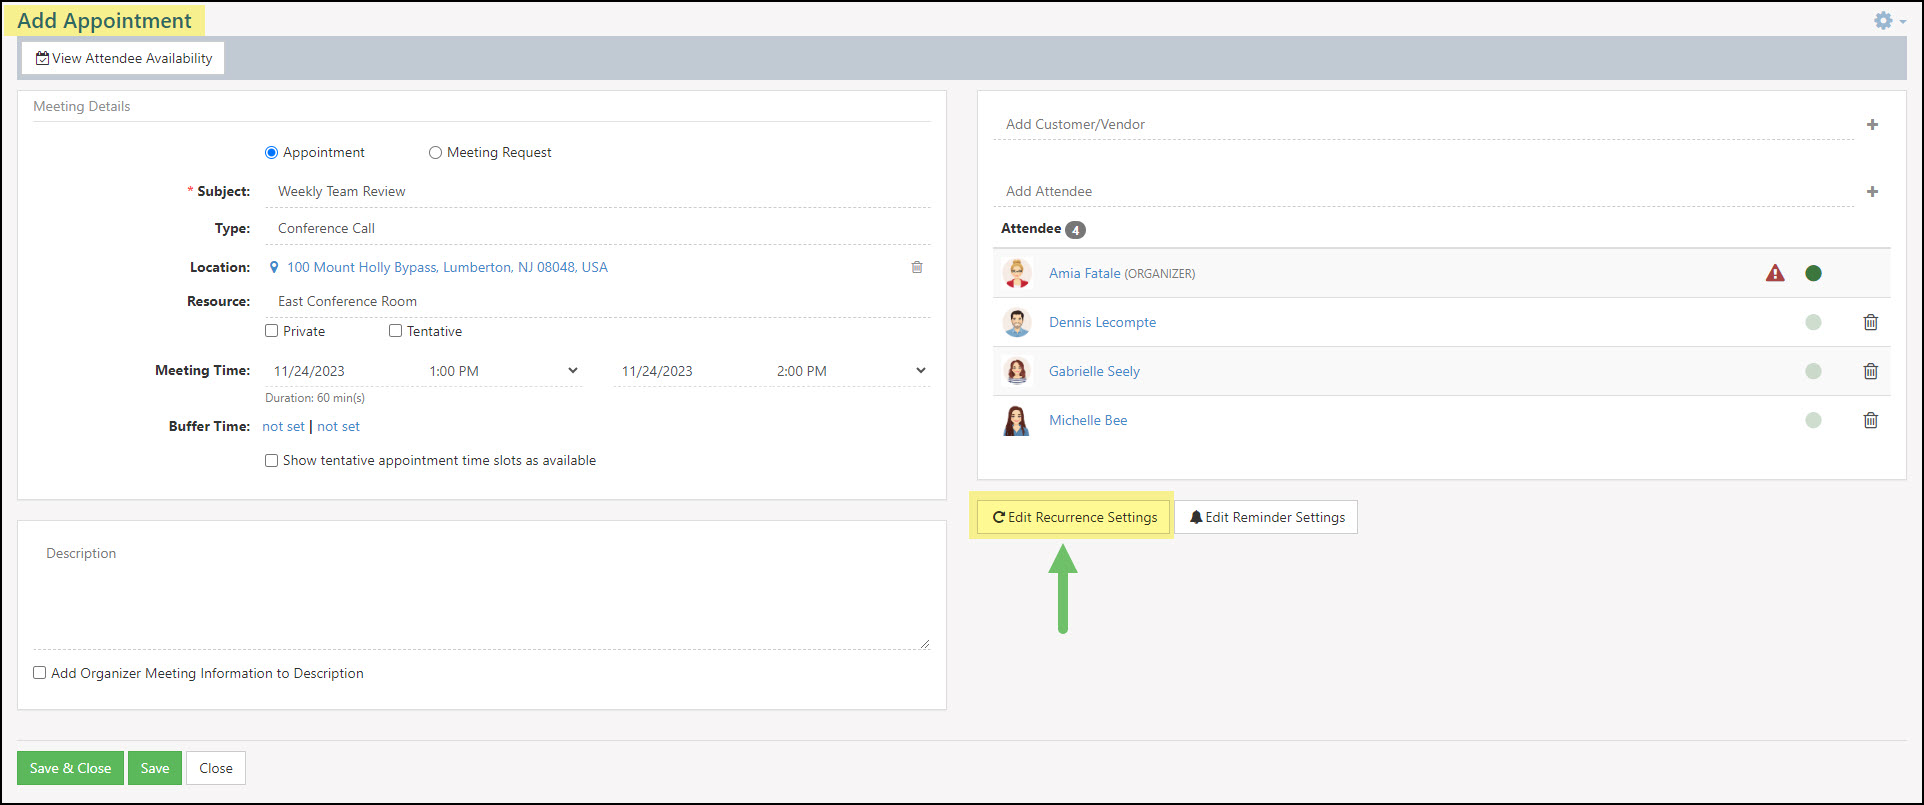
Meeting Details
The first section you’ll see on the Add Appointment page is the Meeting Details section. This is where you will select if you want to create an Appointment or a Meeting Request.
Meeting Requests allow Attendees to select a time best for them within a suggested time frame set by the Organizer of the meeting. A Meeting Request has most of the same configuration options as setting an Appointment, except it does not provide the option to select the Location or a Resource. You have the option to select the duration of the Meeting Request and provide a date range to choose from, but the actual date/time selection is left to the Meeting Request recipient.
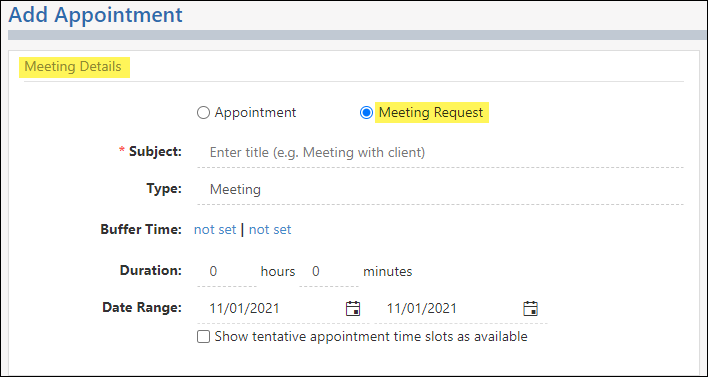
Example of Meeting Request Details
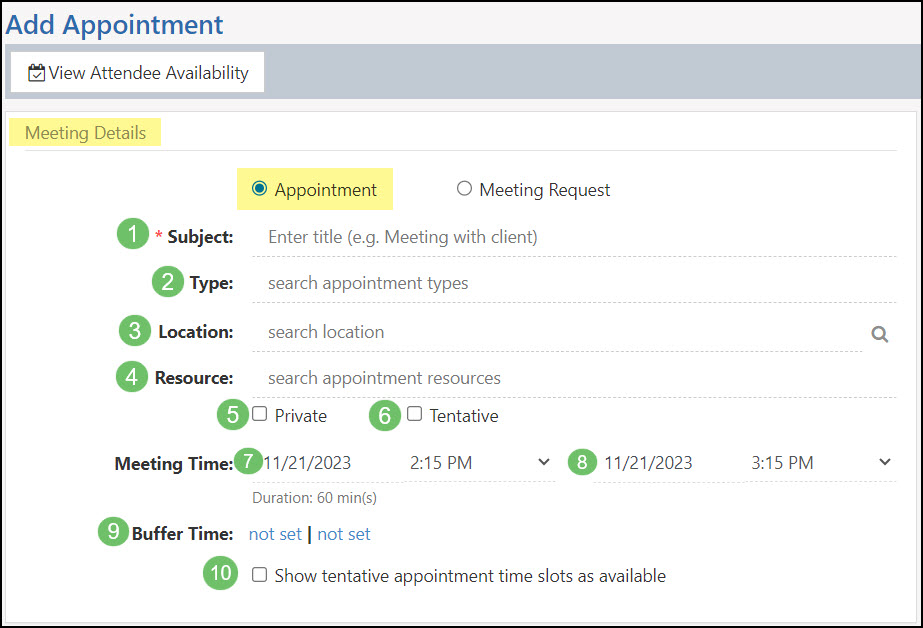
An Appointment is scheduled for a set date and time, and an Attendees’ availability can be viewed before setting the Appointment to ensure the date/time selected is ideal for all parties involved. Creating an Appointment gives you the options to enter the Subject of the Appointment, the Appointment Type, Appointment Location, associated Resources, meeting time and duration, as well as if you wish to set a Buffer Time or show Tentative Appointment time slots as available.
- Subject: The title or name of the Appointment. This is how the Appointment will display on your Calendar for identification.
- Type: Allows you to select the Appointment Type from a drop-down list of Appointment Types saved within your Striven system. Appointment Types will determine the default length of the Appointment, whether to include workload calculations, and whether to allow Candidates to join as Attendees.
- Location: Allows you to select a Location for your Appointment from a drop-down list of Company or Customer Locations saved within Striven. You can also use the Magnifying Glass icon to search for an address using Google.
- Note: Your Company’s Primary Location will be displayed at the top of the list by default. If you have multiple Company Locations, they will be displayed alphabetically following the Primary Location. If you have a Customer or Vendor associated with the Appointment, the Customer/Vendor locations will be displayed following the Company results.
- Resource: Allows you to associate a Resource with the Appointment. Appointment Resources can be anything from locations within your Office, like conference rooms or Employee offices, additional Company branches or offices, or items such as projectors and company vehicles.
- Private: Allows you to set the Appointment as Private. The only Appointment Information that is displayed publicly is the date/time (as it shows on the Calendar during its scheduled time slots) and the Attendees. Only Attendees will be able to see the Subject of the Appointment, the Type, Location, Description, and other Attendees. Only the Attendees can make changes to a Private Appointment.
- Tentative: Enables you to mark the Appointment as Tentative so that if the option to show Tentative Appointments as Available is selected, these Appointments can be scheduled over or “double-booked”. This identifies the Appointment as flexible and/or able to be rescheduled if the time is needed otherwise.
- Meeting Start Date/Time: The date/time the Appointment is scheduled to begin.
- Meeting End Date/Time: The date/time the Appointment is scheduled to end.
- Buffer Time: Increments of additional time that can be added to an Appointment at the beginning or end to allow for extra time needed to prepare for or travel to an Appointment.
- Show Tentative Appointments as Available: Enables you to schedule an Appointment when there’s a Tentative Appointment on an Attendee’s Calendar.
Example of Appointment Meeting Details
If you wish to edit your Appointment Types, Resources, or Locations, please review your system settings by navigating to Company → Settings → Employees → Appointments and selecting the related setting.
-
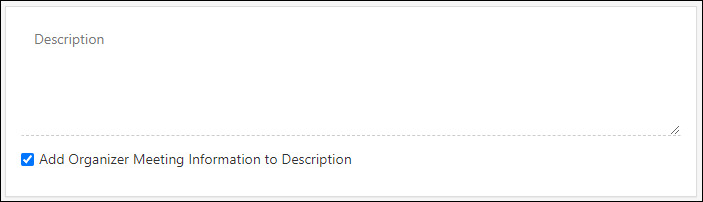
Description
The Appointment Description field provides you with the space to include a Note about your Appointment. This is a useful feature for supplying the Attendees with the Appointment’s purpose, related hyperlinks that may be needed for easy access or sharing, or even meeting links and/or phone numbers required for conference calls.
Example of Description Section of Add Appointment Page
This area of the page also provides the option to Add the Organizer’s Meeting Information to the Description. As long as the Appointment Organizer has their Meeting Link & Join Meeting Info saved in their My Info page, this information will automatically be included in the Notes section of the Appointment.
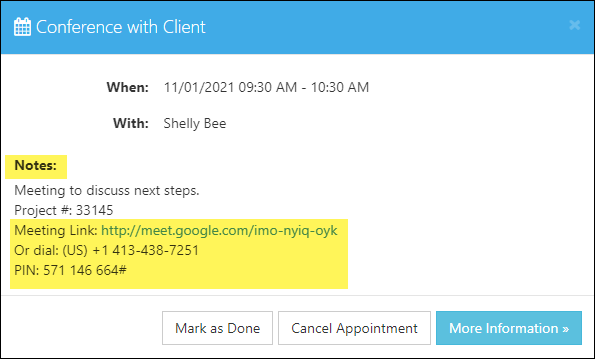
Example of Appointment Note from Description on Add Appointment Page
-
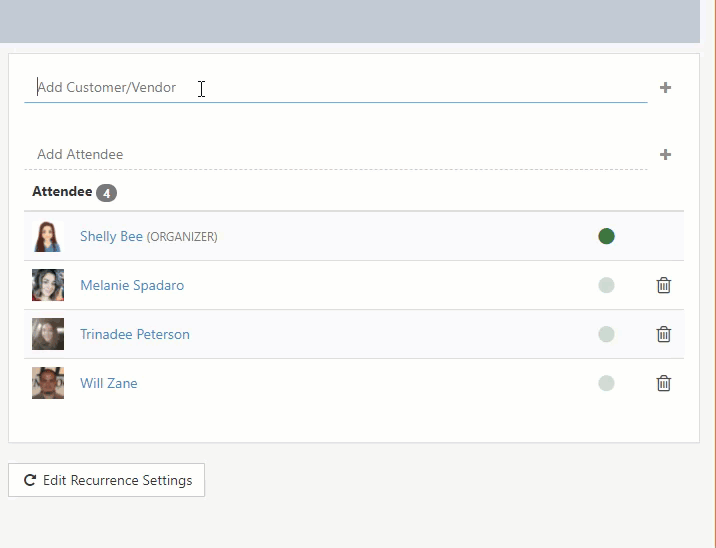
Add Customer/Vendor and Attendees
This section of the Add Appointment page provides the ability to associate the Appointment to a specific Customer/Vendor. This in turn will make Contacts for that particular Customer/Vendor available for selection as Attendees for the Appointment. To add an already existing Customer/Vendor or Attendee, just click and start typing their name in the corresponding field.
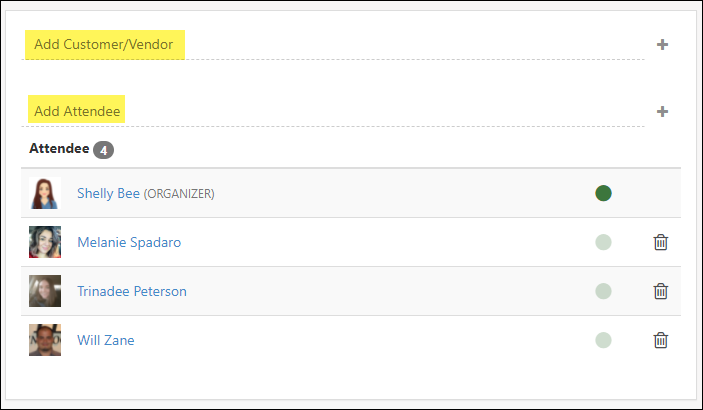
Example of Add Customer/Vendor or Add Attendee Options on Add Appointment Page
If the Customer/Vendor is not already saved in your system, you can click the Plus icon (+) to add them from the Add Appointment page. You can also add an Employee or Contact as Attendees the same way.
Example of Adding a Customer/Vendor and Contact as Attendee to Appointment
Appointment Organizer
The green dot on the Attendees List indicates that individual is the Organizer of the Appointment. This can be changed to another Attendee by clicking on the faded dot on another Attendee’s row to make them the Organizer.
This comes in handy when you’re trying to schedule an Appointment for another Employee without including yourself (the Organizer by default for Appointments created by you) in the Appointment. Once you have switched the Organizer to the appropriate Attendee, you can then remove yourself from the Appointment using the Remove icon.
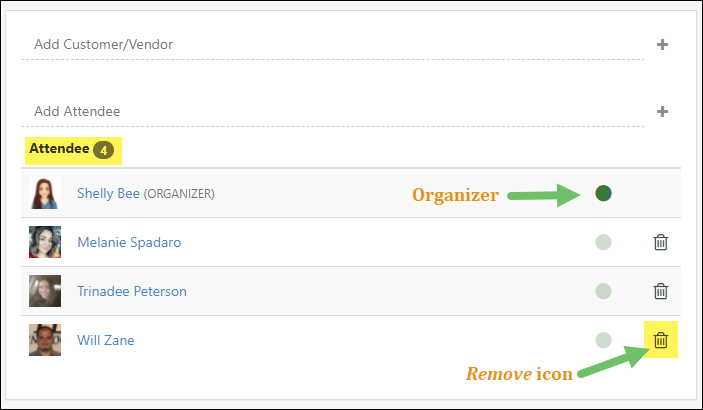
Example of Attendee Organizer and Remove Attendee Icon on Add Appointment Page
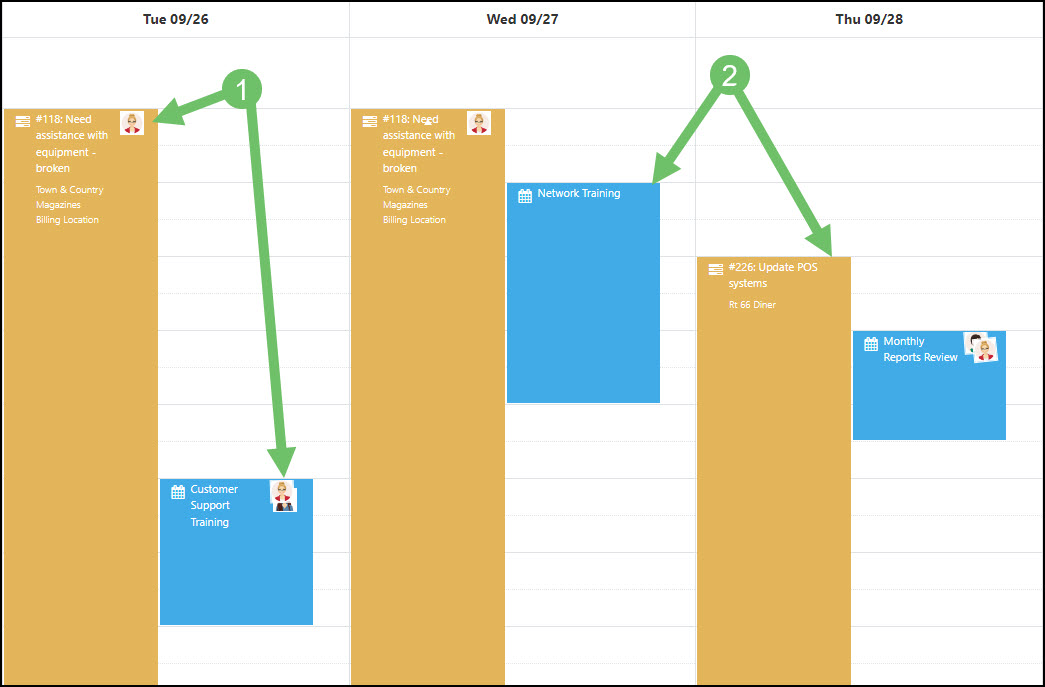
Viewing Events with Attendees
When viewing Appointments, Tasks, and Opportunities that have been placed on the Calendar, Events will display the Attendee images depending on the number of Attendees.
- Events with Less Than Five (5) Attendees: If the Event has less than five (5) Attendees, the Attendee’s images will display in the upper right corner of the Event.
- Events with Five (5) or More Attendees: If the Event has five (5) or more Attendees, the Event will display no Attendee images.
Note: If the Event is marked as Private, only Attendees will be able to view other Attendee’s images. No images will display to users not associated with the Event.
Example of Calendar Events with Attendees
-
Recurring Appointments
Recurring Appointment Settings
If you need to make an Appointment that will repeat on a regular basis, such as a weekly staff meeting, a monthly conference call, or a yearly event like a birthday or anniversary, you can click the Edit Recurrence Settings button located beneath the Attendees section.
Clicking on this button will trigger a popup for Recurrence Settings that will allow you to configure the details of the recurrence. The popup settings options will be different depending on the Frequency you select.
Example of Edit Recurrence Settings Button on Add Appointment Page
Daily Recurrence Settings have the following options:
- Starts On: Designates the day on which the recurrence should begin.
- Recurs: Designates whether the Appointment will recur every weekday, or a selected number of days.
- Ends On: There are 3 options available.
- No End Date: The recurrence will continue indefinitely.
- End After: The recurrence will end after a specified number of occurrences.
- End By: Allows you to select a specific date by which to end the recurrence.
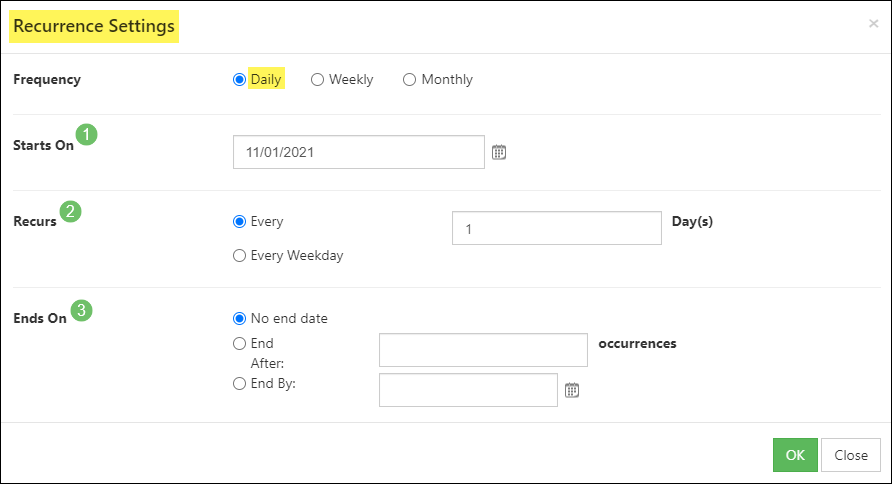
Example of Daily Recurrence Settings Popup on Add Appointment Page
Weekly Recurrence Settings have the following options:
- Starts On: Designates the day on which the recurrence should begin.
- Recurs: Determines how many weeks between recurrences and allows you to select the day(s) of the week for the recurrence.
- Ends On: There are 3 options available.
- No End Date: The recurrence will continue indefinitely.
- End After: The recurrence will end after a specified number of occurrences.
- End By: Allows you to select a specific date by which to end the recurrence.
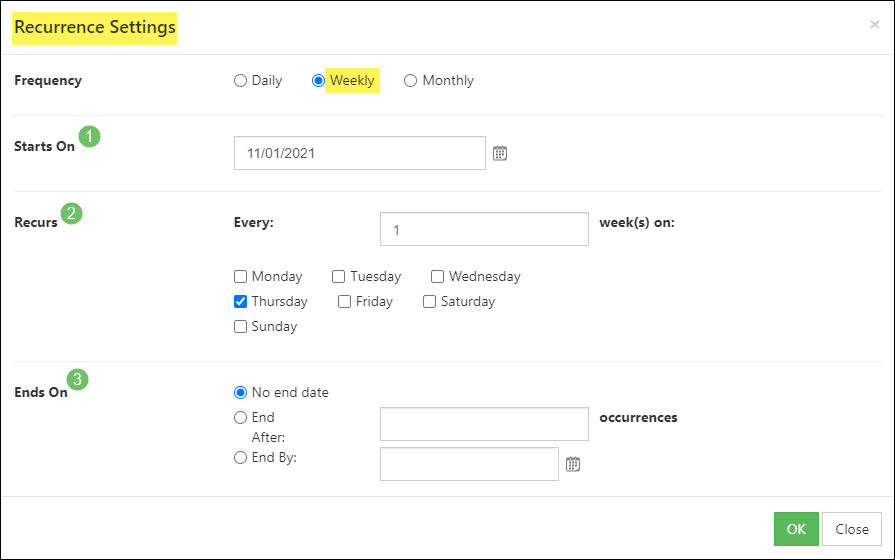
Example of a Weekly Recurrence Settings Popup on Add Appointment Page
Monthly Recurrence Settings have the following options:
- Next Date: Determines the next date the recurrence will be scheduled.
- Recurs: Provides the options of selecting the recurrence by the date of every month or by selecting the day of the week of every month.
- Ends On: There are 3 options available.
- No End Date: The recurrence will continue indefinitely.
- End After: The recurrence will end after a specified number of occurrences.
- End By: Allows you to select a specific date by which to end the recurrence.
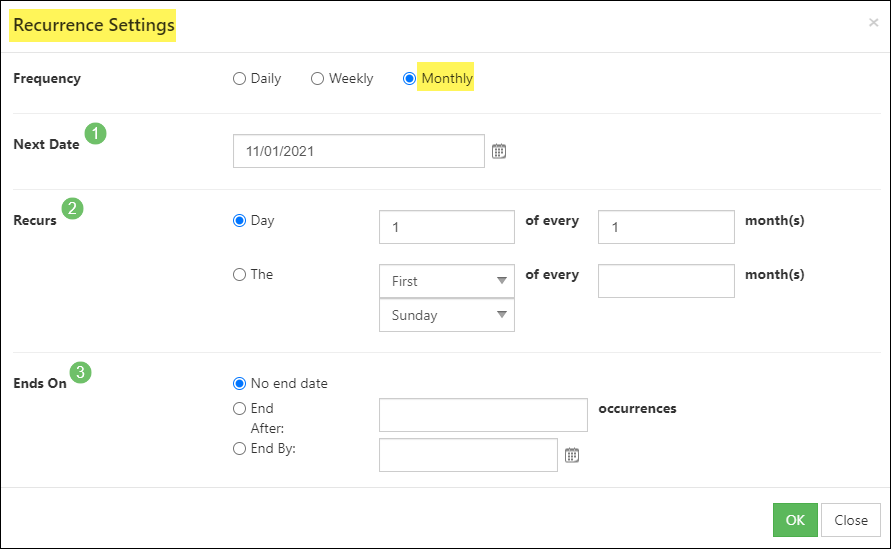
Example of Monthly Recurrence Settings Popup on Add Appointment Page
- Note: Recurrences will only schedule as far in advance as your Lead Creation Time for Recurring Calendar Entries allows. For example, if your Lead Creation Time is set for 30 days and your recurrence is every 6 weeks, the recurrence will not schedule/display until it falls within that 30-day Lead period.
Editing Recurring Appointments
The first instance of a Recurring Appointment is designated as the Master Appointment. As such, making edits to Recurring Appointments within that recurrence pattern can have different outcomes based on the changes made.
For example, if you update the recurrence pattern of a Master Appointment, all related recurrences will be cancelled and new ones will be created based on the new pattern, but if you change one Appointment instance within a Recurring Appointment and select to only apply the changes to that particular appointment, that Appointment breaks off from the Recurring Appointment pattern as a singular Appointment and the rest of the Recurrences will continue as per the original recurrence pattern.
If you then edit the recurrence settings on the singular Appointment you just created from the Recurring Appointment, that will create a whole new string of recurrences and the singular Appointment will become the Master Appointment for those recurrences. This Recurring Appointment will be completely separate from the original Recurring Appointment.
In order to cancel all recurrences of an Appointment, you will need to do so through the Master Appointment’s recurrence settings. Viewing the Audit Log on one of the Recurring Appointments will tell you which Appointment is the Master Appointment for that recurrence pattern so that you can view and edit the correct Recurring Appointment.
- Note: Recurring Appointments that have had the recurrence settings changed multiple times will reference multiple Master Appointments in the Audit Log.
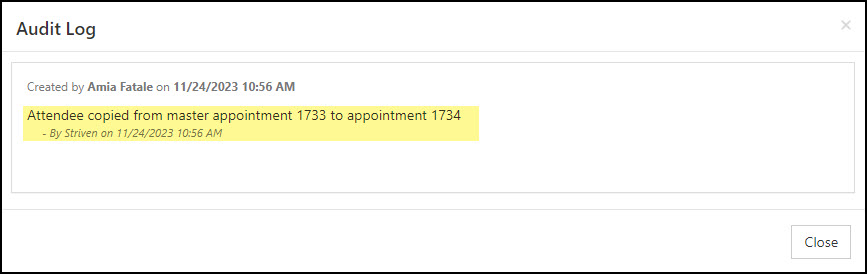
Example of Recurring Appointment Audit Log
-
Appointment Reminders
Striven has Appointment Reminders that notify Attendees of a scheduled Appointment in a variety of ways. There’s a reminder feature that works with Google Chrome via a popup notification which appears 15 minutes before the Appointment. There is also the option to set SMS/Text Message and/or email reminders. The email and text message reminders can be configured at both the Appointment Type level (with the necessary User Role permission) and the Appointment level in your Striven system.
- Note: Appointment level reminders will override Appointment Type level reminders.
In order to utilize the SMS/Text Message reminder option, you will need to have the phone number configured for all Attendees and will need to have the Twilio Integration activated in your Striven system. Provided that your User Role has the “SMS/Text Message Settings” permission, you can review the Twilio Integration settings by navigating in Striven to Company → Settings → Integrations → SMS/Text Messaging → Twilio.
Appointment Type Level Reminders
To edit/configure the reminder settings at the Appointment Type level, your User Role will need to have the “Appointment Types and Locations – Add/Edit” permission included.
On the Appointment Type level, there are two options at the bottom of the Basic Info section to Send Reminders to External Attendees (Contacts or Candidates) and/or Send Reminders to Internal Attendees (Employees).
- Note: Appointment reminders set at the Appointment Type level will only apply to new Appointments created after the reminder settings are saved, and will not be applied to existing Appointments.
The following options can be configured at this level:
- Send Reminders to External Attendees: Reminder messages will be set based on the configuration to all Attendees that are not Employees.
- Select when to send the reminders: Choose to send reminders to Contacts or Candidates 7 days, 1 day, 1 hour, or 15 minutes prior to the Appointment. Multiple reminders can be selected.
- Send Reminders to Internal Attendees: Reminder messages will be set based on the configuration to all Attendees that are Employees.
- Select when to send the reminders: Choose to send reminders to Employees 7 days, 1 day, 1 hour, or 15 minutes prior to the Appointment. Multiple reminders can be selected.
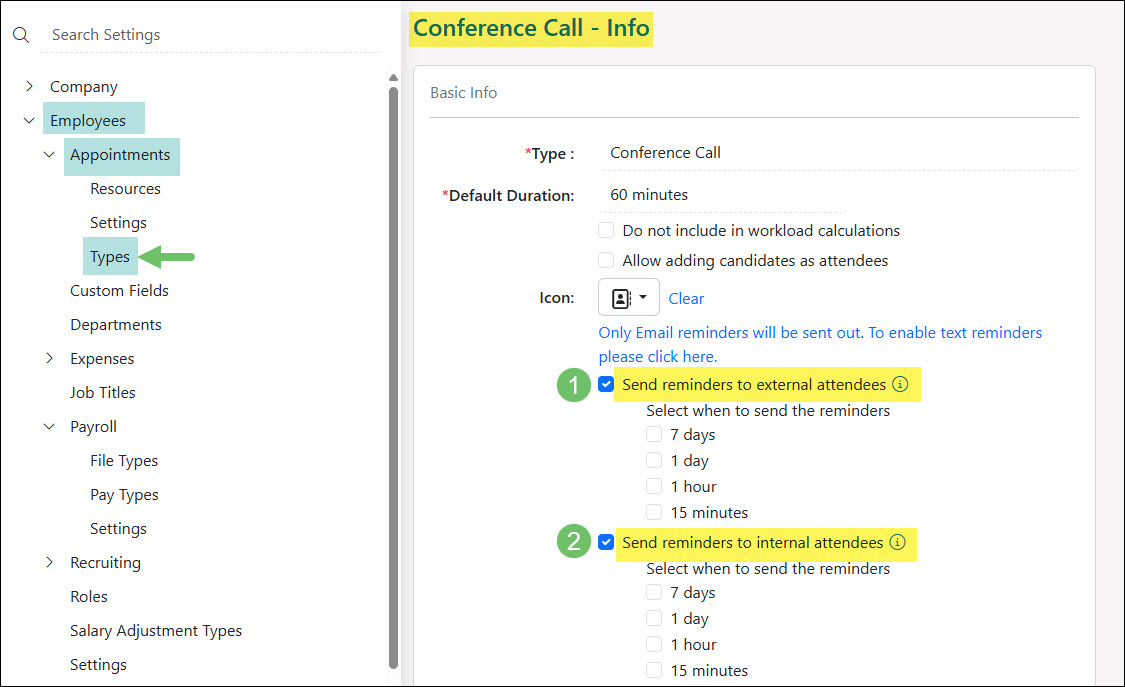
Example of Appointment Type Level Reminder Settings
Appointment Level Reminders
At the Appointment level, there is a Edit Reminder Settings button on the Add Appointment page where you can set Appointment Reminders for a particular Appointment. The Reminder Settings at this level are generally the same as at the Appointment Type level, but will override any Appointment Type level reminder settings. This provides the option to use automatic reminders sent based on Appointment Type level settings, or customized reminder settings per Appointment.
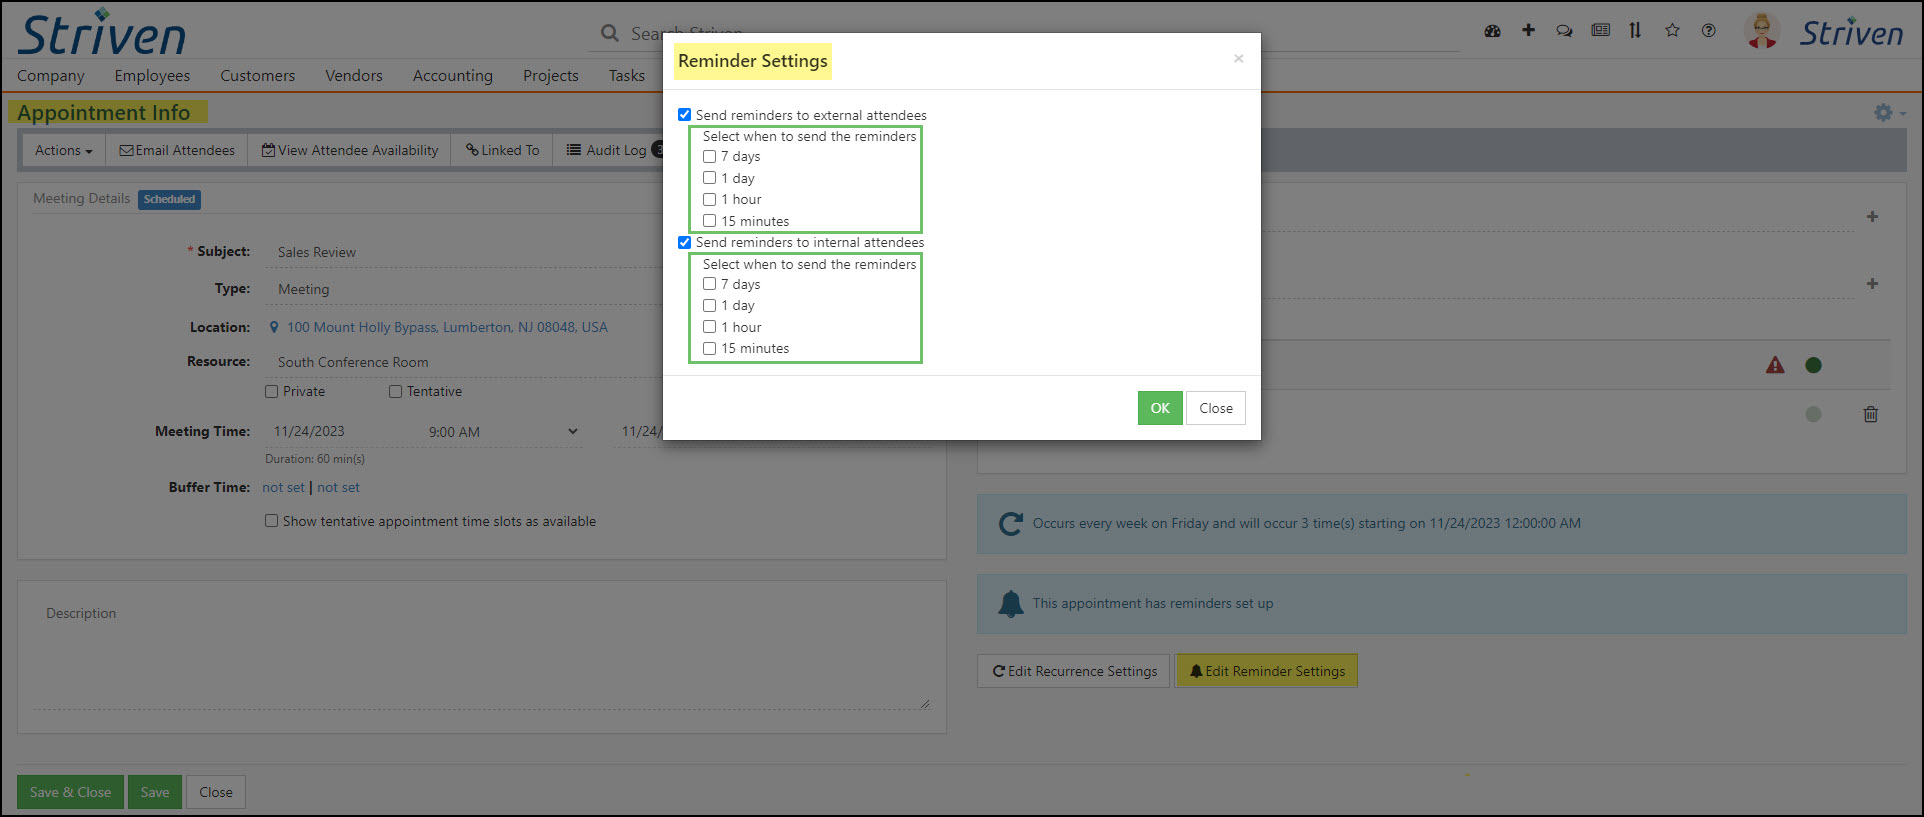
Example of the Edit Appointment Reminders Button & Settings at the Appointment Level
Notification & Portal Content for Appointment Reminders
Striven has Notification & Portal Content related to the reminder messages that are sent when triggered by the reminder settings. The Content related to the notifications are:
- Appointment Reminder
- Appointment Reminder – Text
- Appointment Reminder External
- Appointment Reminder External – Text
The reminder message content can be edited by clicking on the content name to customize the message details and use merge fields as desired.

Example of the Notification & Portal Content for Appointment Reminders
-
Saving Appointments
Once you are finished with the settings and details of your Appointment, you can click to Save the Appointment. This will display the Appointment on all of the Attendees’ Calendars with the details you provided within the Appointment Settings. There’s a Quick View option when clicking on an Appointment from the Calendar, which displays basic Appointment details like the date/time and Attendees, but also provides the option to view more information to see all Appointment details.
-
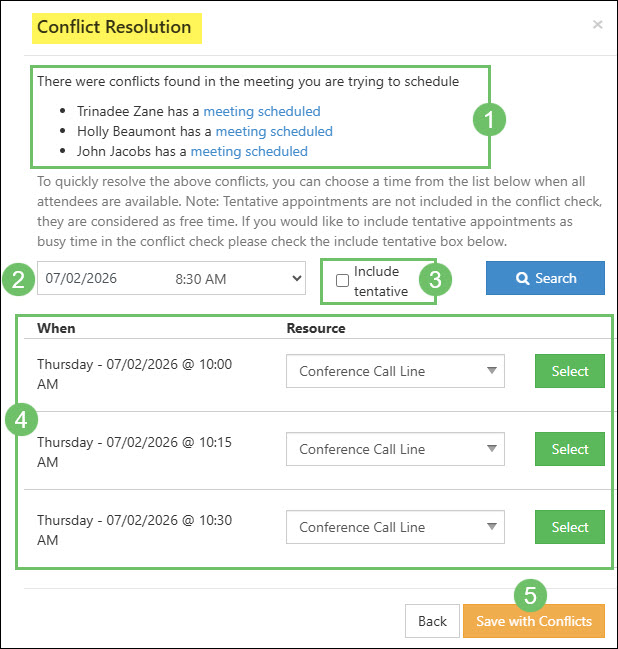
Appointment Conflict Resolution
One great feature of Striven is the ability to check for conflicts with regard to your Appointments. The Conflict Resolution tool will not only check for conflicts for the Employees, but for the Locations as well to ensure there are no double-booking of conference rooms or other Appointment Locations. The great news is this requires no setup! Simply save your Appointment, and if there is a conflict, Striven will inform you and give you the choice to resolve it.
- Conflicts: Any conflict that has been found will be listed out by Striven for your convenience. Hovering over the blue text will then let you know what is conflicting with the Appointment you are trying to create.
- Note: Both Employees and Locations will be listed if there are conflicts.
- Search: If you would like to search for a specific time period, you can do so here and the list below will display times closest available to your search
- Include Tentative: If you would like the option of also scheduling during tentative Appointments, this option will allow for times available to be listed even if tentative Appointments have already been created on the attendee’s Calendar.
- Suggestion List: Displays when all attendees are available with a drop-down menu for Location. The Locations in this drop-down menu will only display if available.
- Save with Conflicts: If you are aware of your conflict and would like to create your Appointment anyway, you can do so by choosing to save with conflicts.
Example of Conflict Resolution Popup
- Conflicts: Any conflict that has been found will be listed out by Striven for your convenience. Hovering over the blue text will then let you know what is conflicting with the Appointment you are trying to create.
External Appointment Links
-
External Appointment Link Permission
This practical tool will provide you with the ability to share your Striven Calendar externally with Contacts, Candidates, or anonymous people. This section of the guide will explain the setup requirements for utilizing this feature and creating the link, followed by how to use the link once it is created.
Before you get started, you’ll need to confirm you have the permission needed in order to utilize this feature. There is a permission called “Calendar – Share Externally” which will need to be included in your User Role permissions in order for you to have access to share your Striven Calendar externally.
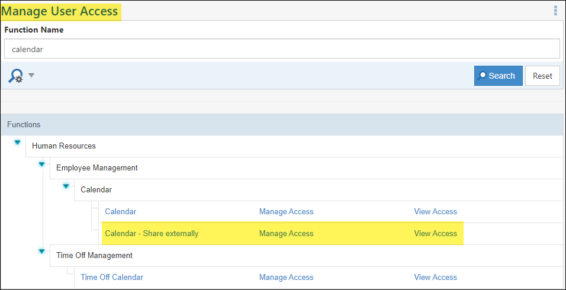
Example of Permission Needed to Share Calendar Externally
If you have the permission, you’ll see the External Link tab as a Globe icon on the Left Navigation Menu when viewing your Striven Calendar.
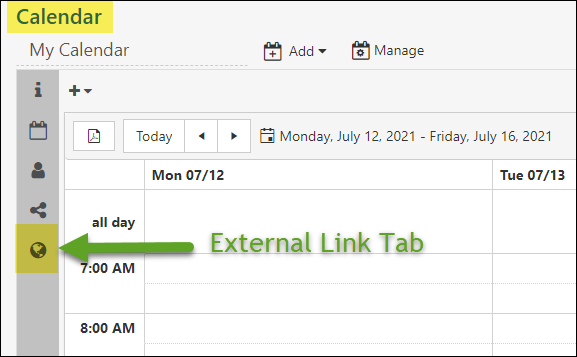
Example of Calendar with External Link Tab
- Note: If this Globe icon is missing, that means your User Role does not include this permission and you will not be able to create external links for your Calendar.
Now that you’ve established whether you have the permission required to utilize this feature, you can begin configuring the settings needed to ensure your External Appointment Links work properly. Striven recommends following these next steps as a best practice way to accomplish an effective setup.
-
Virtual Meeting Settings for External Appointment Links
Before creating your Calendar and using the External Appointment Links, you should make sure the following settings are configured on your My Info page if you plan to use the links for virtual meetings.
On the bottom of the Contact Info section of the page, you will see fields for Meeting Link and Meeting Joining Info. These fields need to be filled in for the External Appointment Links to provide the virtual meeting information to the Contact.
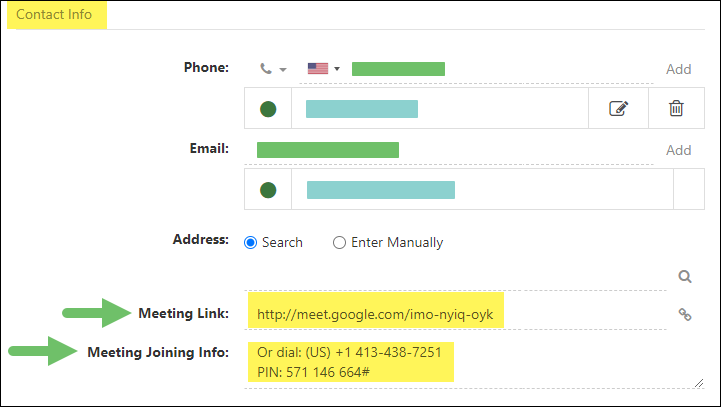
Example of Meeting Link & Meeting Joining Info Fields on My Info Page
You can establish your designated virtual meeting link using Google Meet, Zoom, Skype, or any other virtual meeting program you prefer.
You can store the Meeting Link and Meeting Joining Info in the designated fields so this info can be merged with your External Appointment Links to be included in the Appointment Confirmation information.
-
Creating a Striven Calendar for External Appointment Links
Depending on the type of External Appointment Links you wish to create, this next step can be critical to them functioning properly.
In order to simplify the organization of your External Appointment Links and reduce the number of Calendars you will need to use, it is recommended that you create a Striven Calendar to be used exclusively for External Appointment Links. The following steps will explain the required setup to ensure the proper functioning of your External Appointment Links.
From your Profile menu, select the Calendar option from the drop-down list. If you have not already done so, you may be prompted to view a quick tour of the Calendar feature. (This is not necessary for this purpose, so you can skip it).
Example of the Calendar Option from Profile Menu Drop-Down List
Click on the Add button at the top of the Calendar page and you will see two options: Employee Calendar and Custom Calendar. Select the Custom Calendar option to continue.
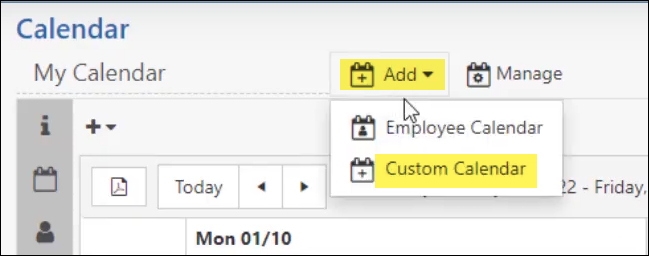
Example of Add Calendar Options
Enter a name for the Calendar, such as “External Appointment Links” or something similarly identifiable. Then select the Calendar Hours or just leave the default settings, and click the Next button.
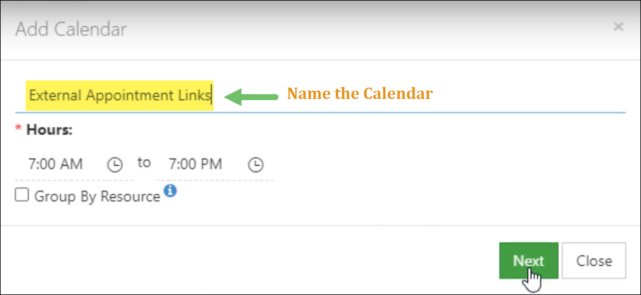
Example of Creating a Custom Calendar Exclusively for External Appointment Links
This next part is very important!
After you click the Next button, a popup will appear prompting you to Add Event.
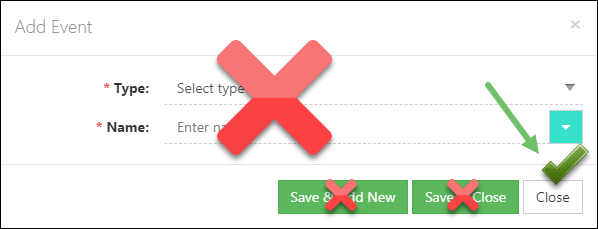
Example of Add Event Popup
Do Not Add Any Events To This Calendar!
Just close the Add Event popup without entering any information by clicking the CLOSE button.
At this point, you may be thinking Striven won’t be able to know the Attendee’s availability without any Events saved on the Calendar, but leaving the calendar “blank” will ensure that your External Appointment Links do not encounter any unnecessary conflicts when trying to determine the availability of the Attendee(s) listed in your External Appointment Link settings. This Calendar does not need any Event information to work properly in this regard.

Example of “Blank” External Appointment Links Calendar
Now you can add all your External Appointment Links to this single Calendar for a “one-stop link shop” kind of setup. This reduces the number of Calendars you will need to keep track of in Striven.
-
Creating External Appointment Links
Now that you have your Calendar established solely for the purpose of External Appointment Links, you can begin creating the links.
Generally speaking, there are 3 types of External Appointment Links you can create in Striven. You can configure different settings and options for these links, but basically you’ll be using a variation of one of the following types: an Individual Link, a Meet with ALL Link, or a Meet with ANY Link.
This section of the guide will review the process for creating each of these types of External Appointment Link.
While viewing your new External Appointment Links Calendar in Striven, you will see the Globe icon at the end of the Left Navigation Menu. Click the Globe and you’ll be presented with the button to Create Link.
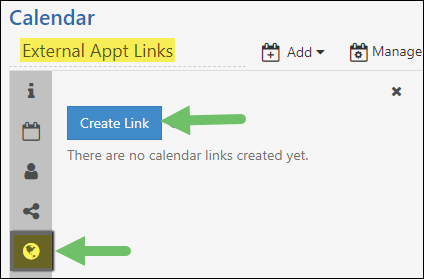
Example of Create Link Button for External Appointment Links
Click the Create Link button and a Link Info popup will appear. This is where you will enter all the External Appointment Link settings depending on what kind of Link you want to make.
Example of the Link Info Popup for External Appointment Links
An Individual External Appointment Link
This type of External Appointment Link will enable Contacts to schedule an Appointment to meet directly with YOU (or potentially just a single Employee, if you happen to be creating the individual link for someone else).
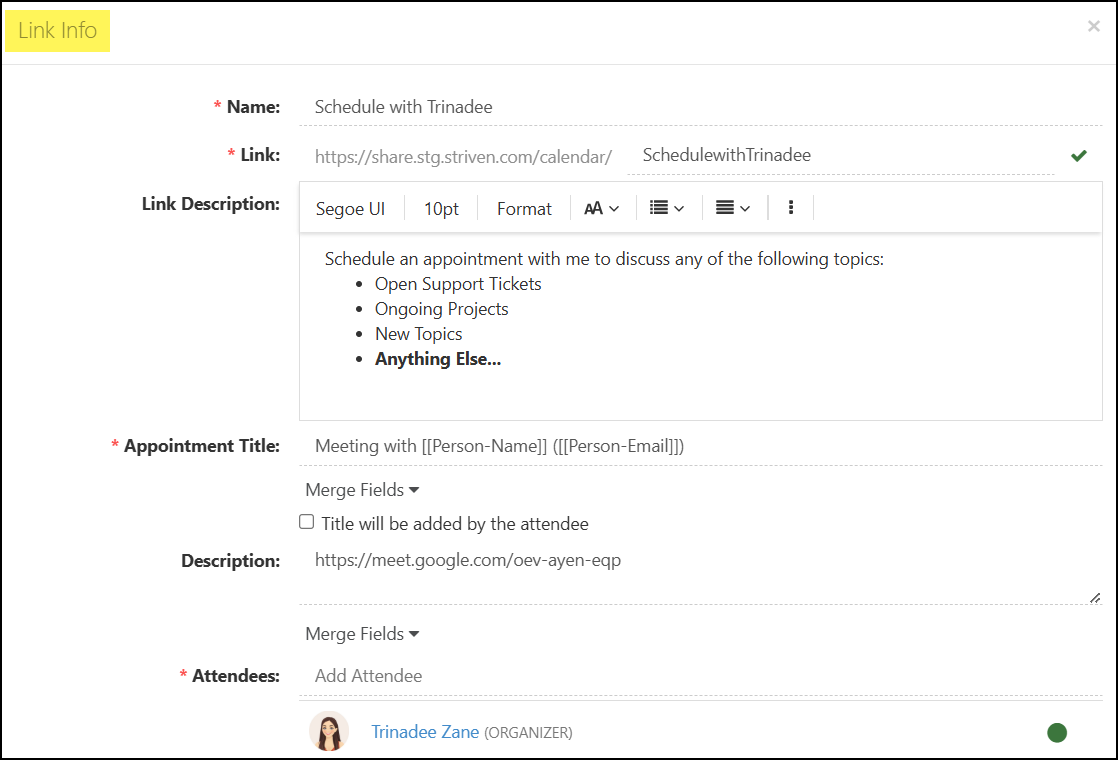
- You will want to create a Link Name that will clearly distinguish it from any other links you may create on this Calendar. Keep in mind the name of this link will appear as the Title on the Schedule Appointment page for the Contact as well, so it is recommended you name the link thoughtfully.
Example of Naming an Individual External Appointment Link
- You may notice that the Link field automatically populates the link to match the Link Name. This can be edited if desired as it does not NEED to match, but the link DOES need to be unique to your Striven system, so you will not be able to use the same Link Name for multiple External Links.
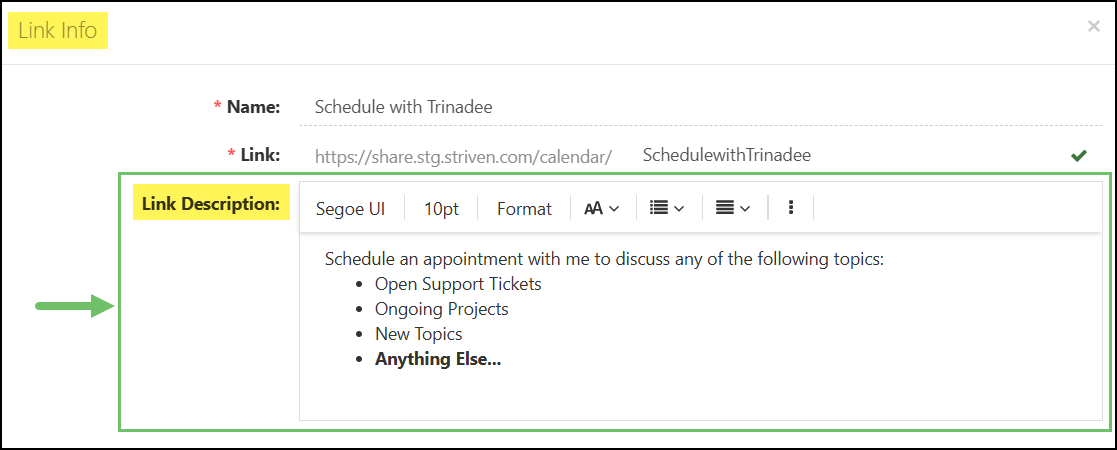
- The Link Description is optional, but explains the objective of the link and will display on the Schedule Appointment page for the Contact so they know the purpose of the Appointment they’re attempting to schedule with you. This description can be added with a rich text editor in order to add formatting.
Example of an Individual External Appointment Link Description
Note: The link description will appear underneath the title of the Appointment when the attendee is scheduling using the external link as shown in the image below.

Example of the Link Description for an External Appointment Link
- The Appointment Title can be edited to include merge fields for the External Contact’s Name, Email, & Company Name. You can change the message that goes along with the merge field info if you desire, which will then all become the Subject of the Appointment. This is how the Appointment will display on your Striven Calendar, as well as the Subject on the Appointment Confirmation page and in the Appointment Confirmation email to the Contact.
If you would like for the Attendee scheduling the Appointment to enter the Appointment Title, you can click the “Title will be added by the Attendee” checkbox. This will require the Attendee scheduling the Appointment to enter a Title before scheduling a time to meet.

Example of Editing the Appointment Title for an Individual External Appointment Link
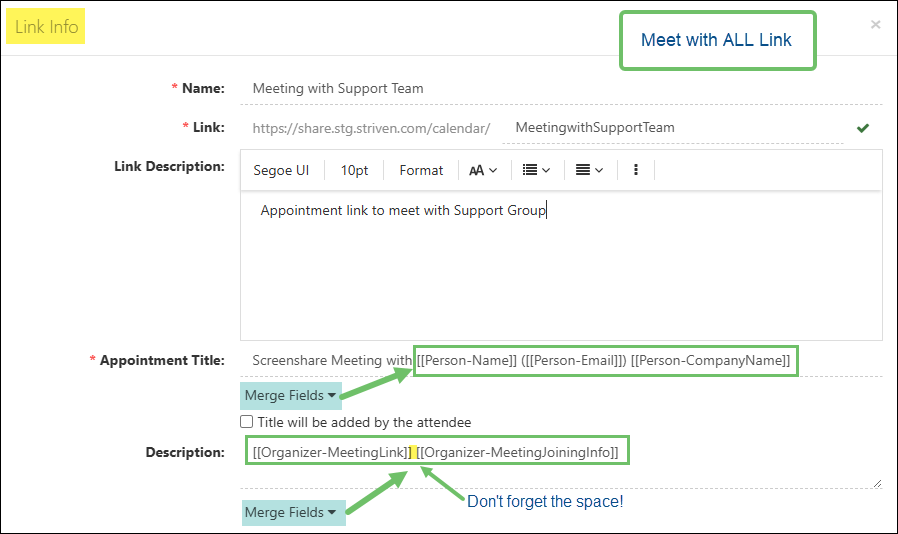
- Below the Appointment Title is the Meeting Description, which is important to configure properly so the Contact receives the appropriate virtual meeting information for the Appointment they’re scheduling, if applicable. This Description field will house the merge fields for the Meeting Link and Meeting Joining Info once configured.
- Note: Be sure you put a space between the merge fields in the settings or the Meeting Link may mix with the Meeting Joining Info.
- If you leave this field blank, the Contact will not be supplied with the relevant virtual meeting information. This is also why one of the first steps in this setup was to save this information in your My Info page.
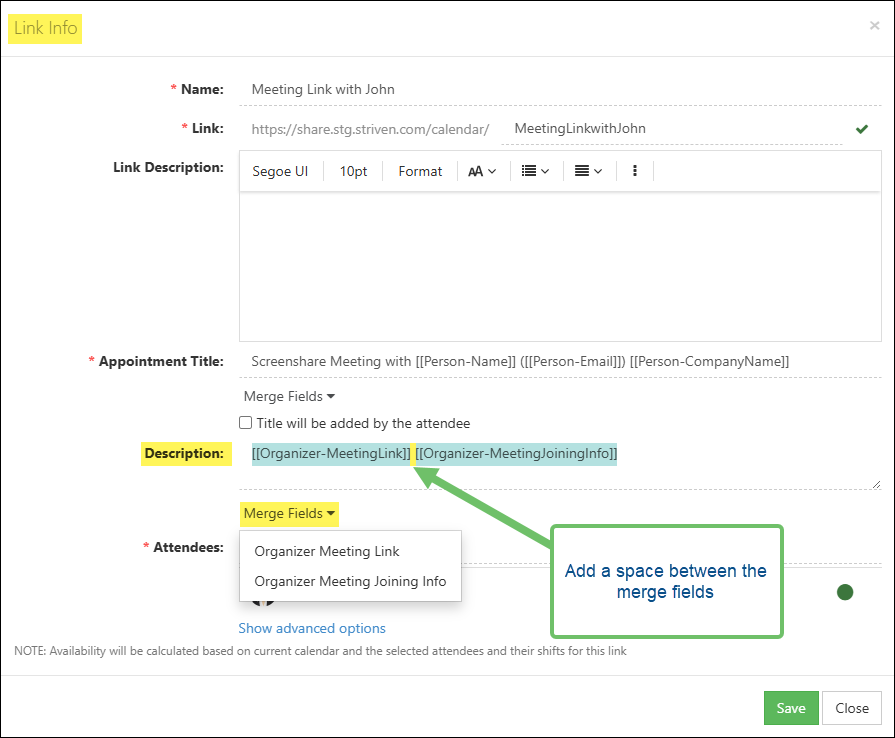
Example of Meeting Link Merge Fields for the Meeting Description
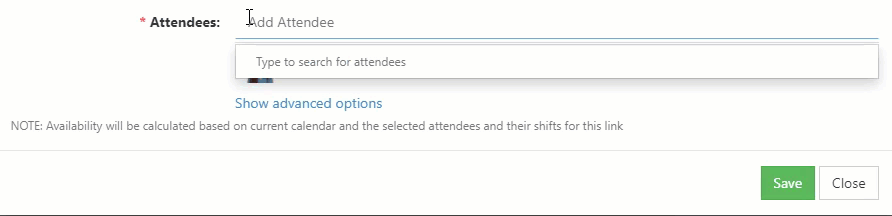
- Next, you will configure the Attendees for this Individual External Appointment Link. Provided that you are not creating an Individual Link for another Employee, there is nothing to change with this setting as you will automatically be selected as the Organizer Attendee for the link.
- Note: If you are creating the Individual Link for someone else, simply add their name to the Attendees list, mark them as the Organizer Attendee by clicking on the green dot next to their name, and then remove yourself from the link settings.
Example of Changing the Organizer Attendee on an External Appointment Link
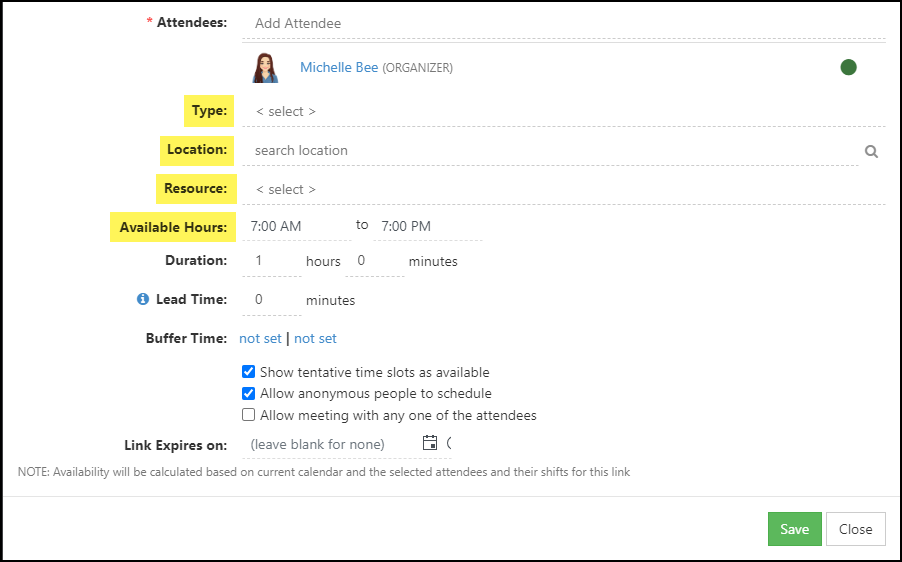
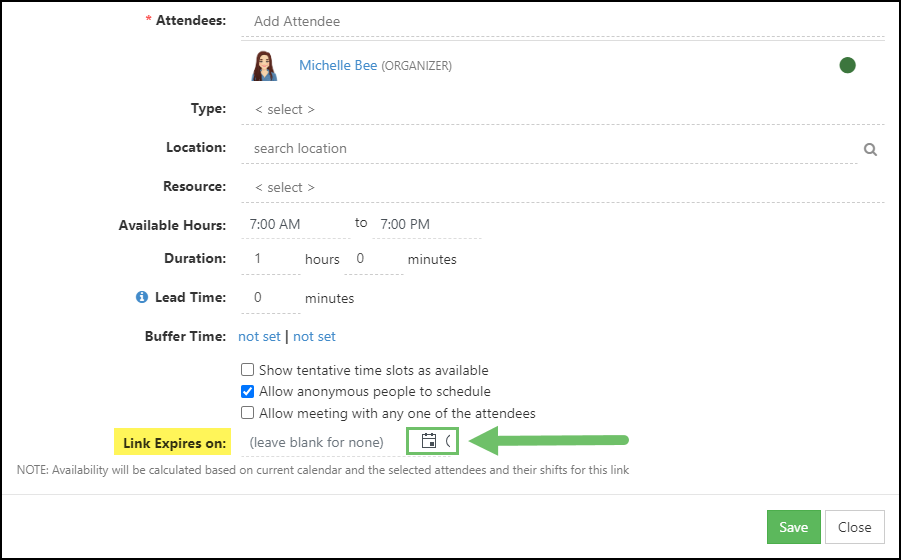
- Beneath the Attendees list is a link to Show Advanced Options. Clicking that will expand the popup to display further detail configuration options for the Link.

Example of Show Advanced Options Link
- Here you can set the Appointment Type, Appointment Location, as well as set the Available Hours for the Attendee’s availability. This is determined based on the current calendar (which is why we left it blank) and the Attendee’s shifts. In other words, if the Attendee does not have a shift that includes weekends, those days will not be made available for selection when scheduling an Appointment externally with this link.
Example of Advanced Settings for External Appointment Links
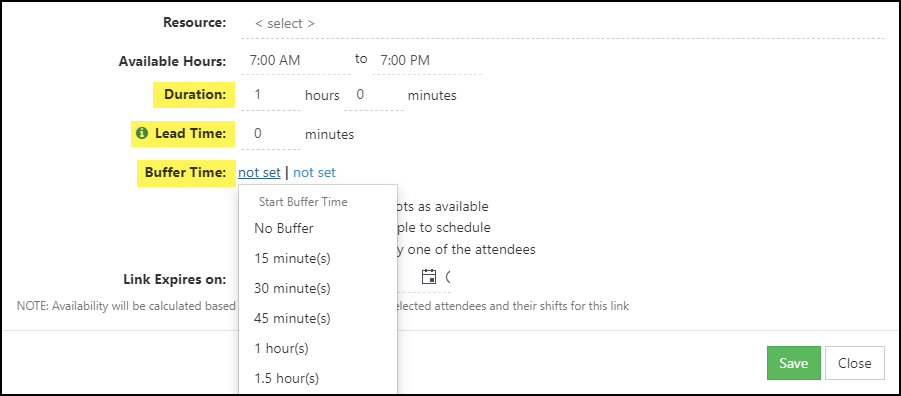
- Generally speaking, the Available Hours will default to match the Calendar hours, but this can be changed to accommodate your scheduling preferences. For instance, if you only want Contacts to be able to schedule an Appointment with you between certain hours of the day, you’ll enter those hours here in the link.
- Set the Appointment Duration for whatever works best for you.
- Lead Times allows your Calendar to automatically calculate when the next available Appointment time on your Calendar is. Lead Times can be used to allow you time between Appointments for organization and preparation.
- Buffer Times can be useful here in order to give you time to prepare for an Appointment or travel to your Appointment’s destination if you’re meeting the Contact in person.
Example of Advanced Settings for Appointment Duration & Buffer Times
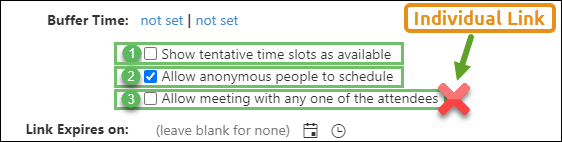
The following are some important settings that can negatively affect your schedule if not configured correctly.
- Only check this box if you want to show tentative time slots on your Calendar as Available for scheduling with this link.
- Only check this box if you want to allow unknown or anonymous Contacts to schedule an Appointment with you using this link.
- Since these are the steps for creating an Individual External Appointment Link, you do not need to check the box to allow a meeting with any one of the Attendees. This option will only be needed when creating an External Appointment Link for ANY Attendee.
Example of Advanced Settings for an Individual External Appointment Link
- The last setting on this Link Info popup is for the Link Expiration Date. If you wish to set a limit for how long the link will be active, you can select a date/time for it to expire. Otherwise, if you leave it blank the link will not expire.
- Click Save and your Individual External Appointment Link is complete!
Example of Setting a Link Expiration Date
A Meet with ALL External Appointment Link
The settings for the next 2 types of External Appointment Links are basically the same as the Individual one, so for these steps we can zip through to where the differences begin.
Since you already created the External Appointment Link Calendar, you can click the Create Link button again and start configuring the new link.
- Obviously, you’ll want to name this Meet with ALL Link with the same things in mind as with the Individual Link. Other settings that will be configured similarly are the Link Description, the Appointment Title, and the Appointment Description. (Don’t forget to include your Meeting Link and Meeting Joining Info merge fields in the Appointment Description and put that space between them!)
- Note: Since this link is scheduling for multiple Attendees, the merge fields will use the Organizer Attendee’s meeting link and joining info.
Example of Meet with ALL External Appointment Link Settings
- Once you get down to the Attendees, the settings will be a little different than the Individual Link you created. This time you will want to add all of the Attendees you wish to be included in the meeting scheduled from this Meet with ALL Appointment Link. This can be an Employee(s), Team, Department, or determined by Job Title.
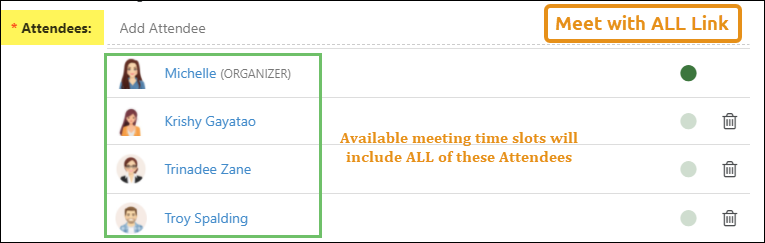
Example of Attendees for a Meet with ALL External Appointment Link
- Moving on to the Advanced Options, you’ll want to decide if you want to set the Appointment Type and Appointment Location, as these are optional fields.
- Set the Available Hours to match the preferences of the Attendees you’ve added to the link and the Duration of the meeting.
- Add Lead Times and Buffer Times if so desired.
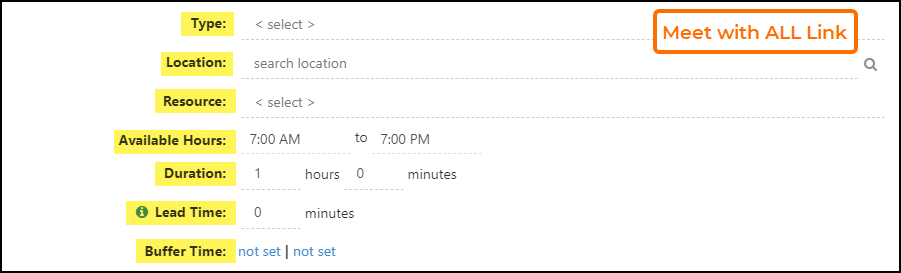
Example of Advanced Options for Meet with ALL External Appointment Link
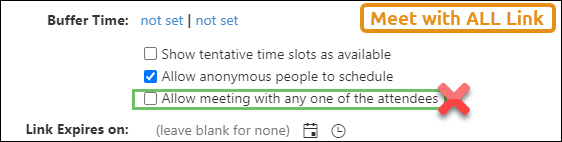
- Again, you will need to check the boxes for the settings options you wish to include in the link for tentative time slots and anonymous people.
- And for this link we want to include ALL Attendees, so you do not need to check the box to allow a meeting with any one of the Attendees.
- Set a Link Expiration if you wish, click Save and it’s done!
Example of Advanced Options for Meet with ALL External Appointment Link
A Meet with ANY External Appointment Link
Once again, since you have already created the External Appointment Link Calendar, you can create this 3rd link type on it like the other External Appointment Links.
- Name the link with the same details in mind as with the other 2 links. The Link Description and the Appointment Title will be configured similarly to before.
- Be sure to add your Meeting Link and Meeting Joining Info merge fields to the Appointment Description (with the space between them!)
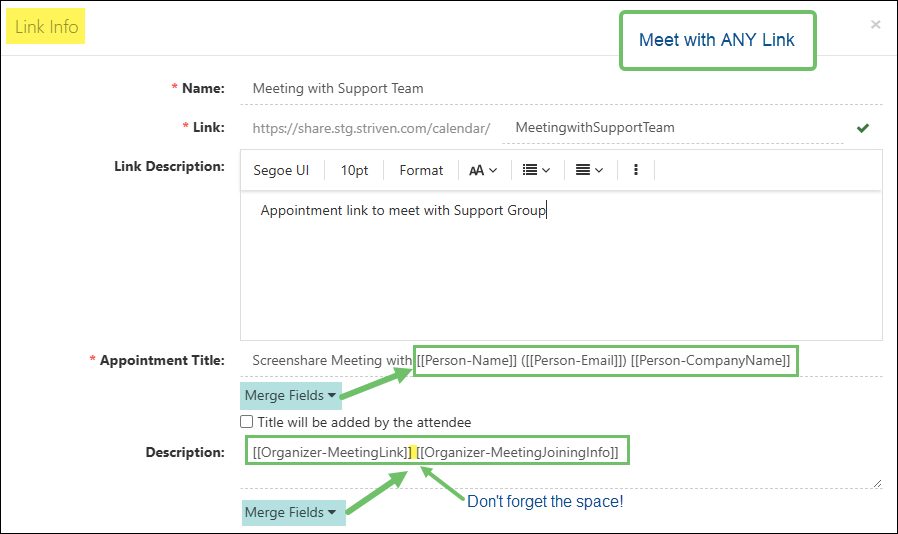
Example of Meet with ANY External Appointment Link Settings
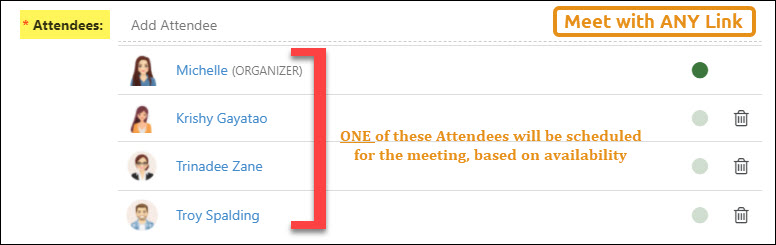
- For this link, you will add all of the Attendees you wish to be considered for scheduling for this Appointment Link. The system will search the availability of each of the listed Attendees and offer time slots that correspond to schedule openings of the Attendees. This provides more options to the Contact from which to select a meeting date/time.
Example of the Attendee Settings for Meet with ANY External Appointment Link
- Again with the Advanced Options, you will want to configure the settings for the Appointment Type and Appointment Location, set the Available Hours to match the preferences of the Attendees on the link, and set the meeting Duration, Lead Times, and Buffer Times if needed.
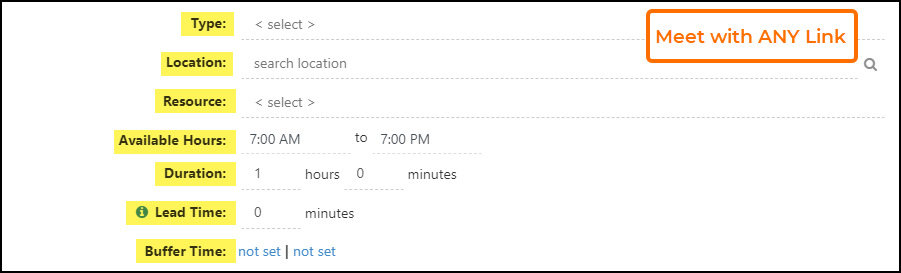
Example of Advanced Options for Meet with ANY External Appointment Link
- Check the boxes for the tentative time slots and anonymous people settings options you wish to include in the link.
- This Meet with ANY Link will be selecting an individual Attendee based on their availability, so you do want to check the box to allow a meeting with any one of the Attendees. This option is required in order for the system to find available dates/times of ANY of the listed Attendees.
- Set your Link Expiration if you wish, click Save and that’s it!
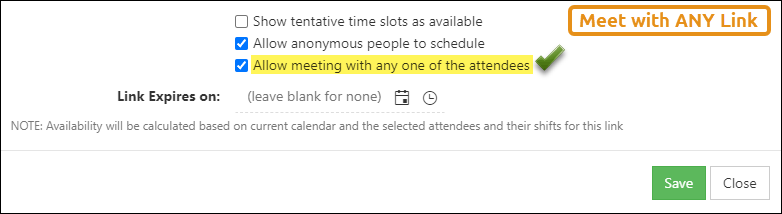
Example of Allow Meeting with Any One of the Attendees Setting
-
Sharing External Appointment Links
One of the prime attributes of the External Appointment Links is how easy it is to share them. This section of the guide will review the various ways you can easily share your External Appointment Links with different types of Contacts.
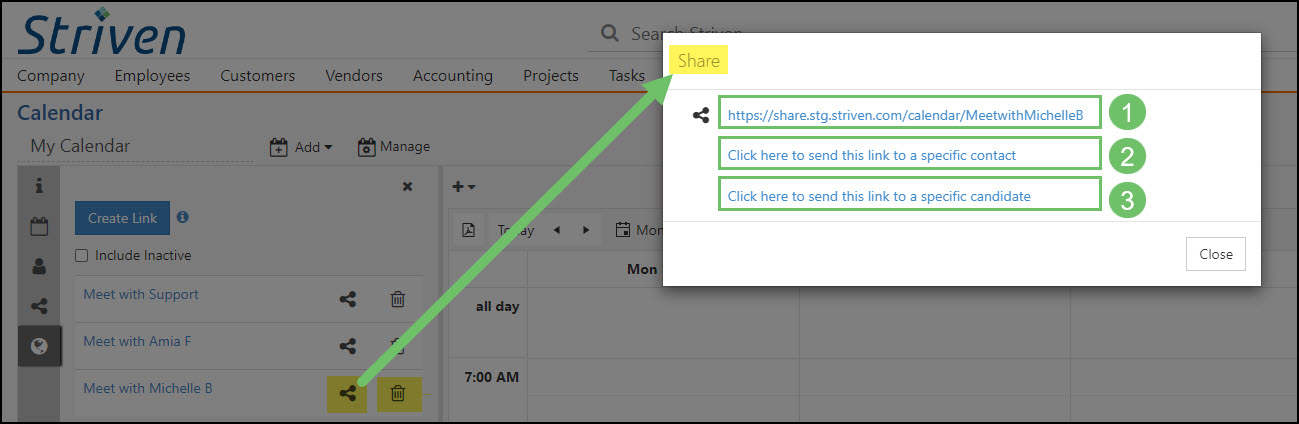
Next to the External Appointment Link names, you’ll see a Share icon and a Trash icon. Clicking on the Share icon will trigger a Share popup with the following 3 link options:
- General Use Link: Automatically copies the link to your clipboard for pasting/sharing with an External Contact when you click on the link. You can then share it in an email, Discussion, chat, or whatever means of electronic communication you choose.
- Internal Contact Link: For sharing with a specific Customer/Vendor Contact saved within your Striven system. This allows you to select the Contact to send the External Appointment Link to using their information already stored in the system so they do not need to enter it again to schedule the Appointment. This option automatically copies the External Meeting Link with the Contact’s info included when you click the Generate Link button after entering the Customer/Vendor and Contact fields.
- Candidate Link: For sharing with a specific Candidate stored within your Striven system. This allows you to select the Candidate to send the External Appointment Link to using their information already stored in the system so they do not need to enter it again to schedule the Appointment. This option automatically copies the External Appointment Link with the Candidate’s info included when you click the Generate Link button.
Example of Sharing Options for External Appointment Links
-
Using the External Appointment Links
This section of the guide will review the steps and process for using the External Appointment Links. The Internal Contact Link and Candidate Link work very similarly, while the General Use Link has a few more steps involved, as described below.
Using the General Use Link
The link will navigate the user to a general Schedule Appointment page with your Link Name displayed at the top, along with the Link Description and the Duration of the Appointment they’re scheduling. Below that is a field for the user to enter their email address and click Next to start the scheduling process.
The display of the next page varies slightly depending on whether or not the user is an External Contact or an Internal Contact. If their email address is already saved within your Striven system (Internal Contacts), the page will recognize their email when they attempt to select a date/time to schedule an Appointment and will not ask for any further identification details.

Example of an Internal Contact Display of the General Use Link Page
Users new to the system (External Contacts) will be required to add their Name, Company Name, and a Phone Number before being able to select a date/time for their Appointment.

Example of an External Contact Display of the General Use Link Page
By default, the page displays available dates/times in the user’s device time zone, which is shown below the user information. This displayed time zone is a hyperlink, allowing the user to select and view available dates/times in a different time zone.

Example of Time Zone Selection on the General Use Link Page
Users can decide how they want to view the slot availability, either by specific dates or by viewing all available slots. For viewing availability by specific dates, there is a calendar control located below the time zone.
If there are time slots available on the current day, that date will be highlighted automatically on the calendar and the available time slots will be displayed for selection to the right of the calendar control.

Example of an External Contact Viewing the Current Day’s Availability
If there is no availability on the current day, the view will default to the next date that has availability and list the available slots for selection.
Alternatively, you can select the View All Available Slots display. This view will display the first 15 available slots in chronological order, with a Load More Slots button located at the bottom.

Example of an External Contact Viewing All Available Slots
Scheduling the Appointment
After all the fields have been filled in and a date/time has been selected, a confirmation message will display. Click Confirm to continue.

Example of the Confirmation Message Displayed When Selecting an Appointment Date/Time
The final page in the External Appointment Link scheduling process is the Thank You page, wherein the details about your appointment are displayed, including the meeting Subject, Duration, Date/Time, Organizer, and the Attendee’s contact information. For virtual meetings, the Meeting Link and Joining Information will be displayed if provided in the meeting link settings. There is also a drop-down list of options to add the Appointment to your Google, Office 365, or Outlook calendar, as well as a general ICS file download option to import the appointment details to another calendar.

Example of the External Appointment Link Thank You Page
- Note: You may need to add the Add to Calendar merge field to your Notification & Portal Content emails related to External Appointments to ensure the option is included in the email notifications.
Using the Internal Contact Link or Candidate Link
There are two (2) other link-sharing options beneath the General Use Link in the Share popup. While the General Use Link can be copied and pasted for use with a variety of communication methods, such as email, text, or direct message, the Internal Contact Link and the Candidate Link make the External Appointment Link more personalized by using contact information already stored in your Striven system.
These additional link-sharing options enable you to customize the External Appointment Link for the specific Contact or Candidate to which you wish to send the link. When you click on the Click here to send this link to a specific contact option, you are prompted to enter a Customer/Vendor name from your system and then select the Contact associated with that Customer/Vendor. Click Generate Link and the personalized link will be automatically copied to be pasted in whatever electronic communication you choose. When the Contact clicks their link, the External Appointment Link page will already recognize their info and will link the Appointment to their record in Striven.

External Appointment Link Share Options for Specific Contacts or Candidates
This process works similarly for the Candidate Link by personalizing the link to recognize the Candidate’s contact information when scheduling, thus saving them the time and effort of having to enter their contact info when selecting a date/time for their Appointment.
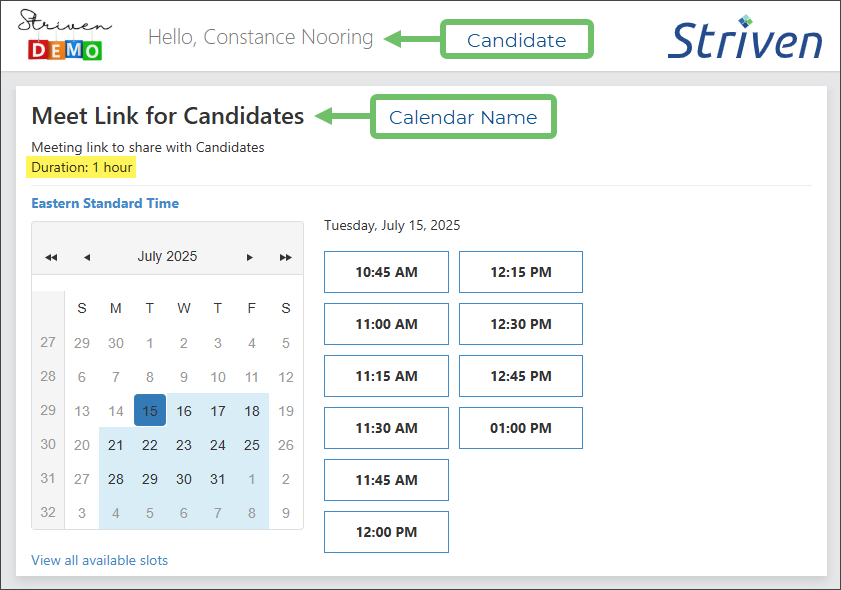
Example of a Candidate View of an External Meeting Link
-
External Appointment Notifications
There are multiple email notifications related to using External Appointment Links in Striven’s Notification & Portal Content settings which can be edited and customized to suit your needs. These notifications can be located by navigating to Company > Settings > Company > Notification & Portal Content.
The content Emails related to External Appointment Link notifications are:
- Appointment Confirmed – External
- Appointment Created – External
- Appointment Modified – External
- Appointment Created Externally Confirmation
- Appointment Reminder – External

Example of Email Messages Related to External Appointment Notifications
Not only will you be able to customize the content of these email notifications, but you will have a selection of merge fields to choose from to automate some of the personalization of the Body of the messages, as well as the Subject line.

Example of Merge Fields Used in the Content of an Email Notification
- Note: Please use only the merge fields provided in the list. Typing or copying/pasting merge fields from other notifications is not supported. Each notification has its own specific list of available merge fields.
Create Tasks from Appointments
-
Create Tasks from Appointments
Striven allows you to easily create a Task from an Appointment. You can do this by clicking on the Actions Menu within the Appointment Info Page and selecting Create a Task. This allows for quicker Task creation when wanting to relate a Task from to a Customer and a particular Appointment.
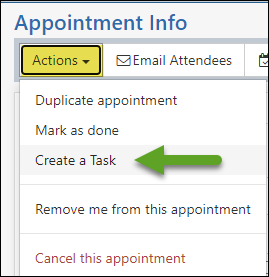
Example of Creating a Task from an Appointment
There are a few specific details within this feature that are important to note when creating your task this way:
- The subject of your Appointment will be used as the title of the Task.
- The Customer and Contact information from within the Appointment will populate over to the Task if they are present within the Appointment details.
- The Task will include the original Appointment link within the Linked To section. This is helpful to not only access the Appointment quickly, but also to allow everyone on the Task to see where it originated from.
For more information about Tasks in Striven, please review the Task Navigation & Management Guide.
-
Recap
With this guide, we’ve discovered how to configure Appointment Types and Locations within your system. We’ve also explored the process for creating External Appointment Links and how to create Tasks from Appointments. These tools and configurations will assist you with managing your schedules and meetings so that your Company doesn’t miss a beat when providing great service to your Customers.

Have a Question?
Ask the Striven Community
User-sourced how-to’s, feedback, and more!
FAQs
-
I was added to an Appointment that I do not need to attend. How can I cancel or delete myself from the Appointment?
To remove yourself from an Appointment, you do NOT want to just Cancel the Appointment, as that will cancel it for all attendees!
There are two options to remove yourself from an Appointment. First would be to click on the Appointment on your Calendar and then click the Remove Me button from the Quick View popup.
The other option would be to click on the More Information button from the Quick View popup to review the details of the Appointment. From there, you can click on the Actions menu on the top left of the screen and select Remove Me From This Appointment from the drop-down.