
Initial Setup
Assignments
Support Guide
-
Overview
Assignments in Striven can be used for a wide variety of entities such as Customers, Vendors, Projects, Tasks, and more. The flexibility of the type of Assignment also extends to whether it is an Employee, Pool, Team, or even a Customer or Vendor assigned to another account. Once Assignment Categories are configured, there is no limit to how to structure Assignments within your system.
Read this guide if you are trying to:
✔ Set up your Assignments within Striven.
✔ Learn how Assignment Categories can benefit your Company’s use of Striven.
✔ Learn how to add, edit, or remove Assignments en masse.
-
Assignment Categories
Assignment Categories can be configured to determine what type of Assignment will be utilized. Where an Employee’s Job Title may be Lead Technician, his Assignment Category on a Project may be a Project Manager. Assignment Categories allow the flexibility to designate who will be working on what for any given Customer, Project, and more. To set up your Assignment Categories, navigate to the following:
Company → Settings → Company → Assignment Categories

Example of Assignment Categories List

New Assignment Category
From the Assignments Category List, you can create a new Assignment Category by clicking the Add button. There are options available when creating a new Assignment Category to determine how this will be used within your Striven system moving forward. Review the options below to learn how they can benefit your Company.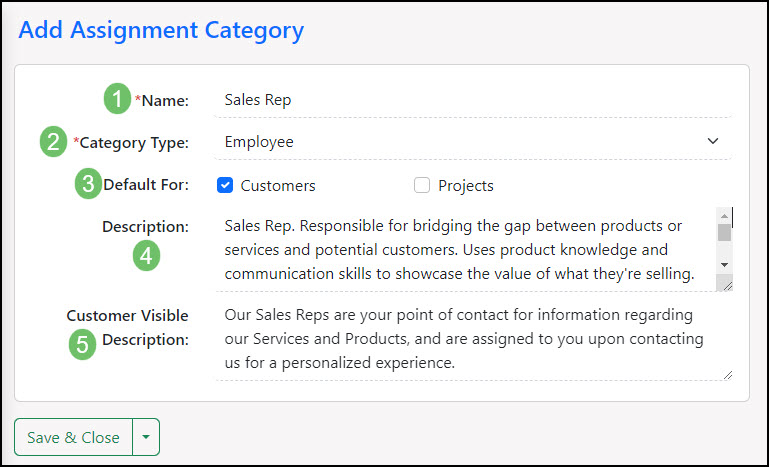
Example of Adding a New Assignment Category
- Name: Appears next to the Assignment’s name in various places once assigned to an entity.
- Category Type: Deciding on your Assignment Category Type will help determine how you would like to start utilizing Assignments within Striven. The following are available as a category type for your Assignments:
- Customer/Vendor: Allows you to assign Customers/Vendors to other Customers/Vendors within your Striven system. This can help keep track of Subcontractors, for example, who primarily work with specific Customers stored in your system.
- Contact: Similar to above, this option allows you to assign a specific Contact from a Customer/Vendor to an account within Striven.
- Employee: Allows you to assign an individual Employee.
- Pool: Pools are a way to group Employees together to ensure they all receive notifications. Pools are ideal with regard to Task Management. Review the Task Pools section from the Task Settings Guide to learn how Tasks can benefit your Company in Striven.
- Team: Another form of grouping Employees together to complete work. This is a great way to indicate, for example, which Team is assigned to a Customer/Vendor. To learn more about Teams in Striven and how they can benefit your Company, please review the Employee Setup & Info Guide.
- Default For: Available for Customers and Projects. This determines when adding a new Customer or Project what is the first Assignment that should be created for the Customer or Project.
- Note: All Category Types can be set as the default for Customers, but only Employees, Pools, or Teams can be set as a default for Projects.
- Description: The description added here will only be visible to internal Employees.
- Customer Visible Description: The description added here will be visible to the Customer within the Customer/Vendor Portal if the Assignment itself has been marked visible on the Portal. This is a great way to indicate to your Customer what the person with this Assignment Category will be primarily working on or what their main job duties will be.
- Note: Deactivating an Assignment Category will result in the following options if Assignments are already in existence for the selected Category:
- I do not want to reassign to another category. Deactivate All Assignments:< Selecting this will result in the Assignment of this Category to be deactivated. Selecting this choice removes the below option from the screen.
- New Category: This will result in a drop-down list of all Assignment Categories that are still active and of the same type. This will move all Assignments of the newly deactivated Category into the selection chosen here en masse.
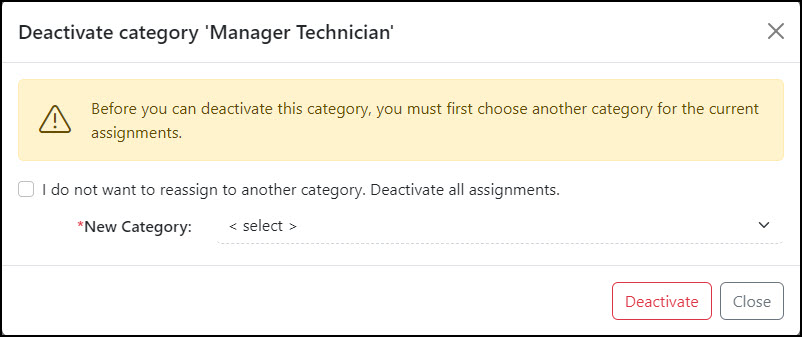
Example of Deactivating an Assignment Category
-
View & Update Assignments
While viewing the Assignments Category List page there is a button to View/Update Assignments. Clicking this button will bring you to the Mass Reassignment Request page. This feature will allow you to update Assignments on a large scale. The following steps outline how to add, reassign, or remove Assignments en masse in Striven:
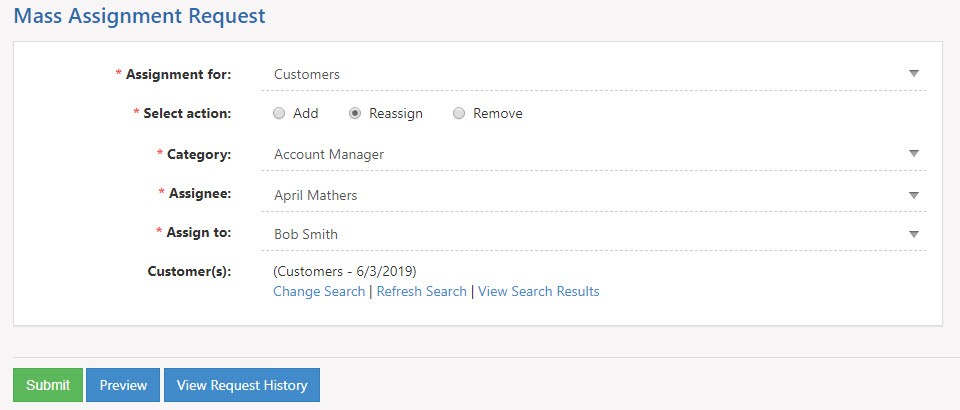
Example of Mass Assignment Request Tool
- Assignment For: Select whether you would like to update Assignments for Customers/Vendors. Once this option is chosen, another drop-down menu will appear for the Assignment Category.
- Select Action: Allows you to select what you would like to do. The following options are available:
- Add: Adds new Assignments to the system. Choosing this option will allow you to determine two additional choices:
- Adds Assignment only if there is no Assignee for that Category.
- Visible on Portal.
- Reassign: Takes the Assignment you have selected and reassigns to a new Assignment Category.
- Remove: Removes any Assignments that fit the search criteria.
- Add: Adds new Assignments to the system. Choosing this option will allow you to determine two additional choices:
- Category: Select the Assignment Category you wish to effect. Once you have selected the Category you wish to edit two additional fields will be available which are detailed below:
- Assignee: Individual who is currently assigned.
- Assigned To: Individual you wish for the Assignment to go to instead.
- Note: The Assigned To option will only be available while reassigning Assignments in Striven.
- Customer(s): By default, the search filters are set to all Active and Prospect Customers. This search filter can be changed to fit your Company’s needs while utilizing this tool. Once the search filter has been set there will be additional options to change your search, refresh your search, and view your search results.
- Actions: Once you have your request configured and your Customer/Vendor search filters set, there are actions that can be taken which are detailed below:
- Submit: Completes the request. Once the request has been submitted you will be brought the Mass Assignment Request History page which lists out details for previous requests.
- Preview: Opens a list of Customers/Vendors that currently fit the search criteria. This will also allow you to remove any individual accounts that meet the search criteria but do not need to have their Assignment updated.
- View Request History: Enables you to view past requests that have been completed. Details of the request along with the date and time the Assignment update was completed as well as who took the action within Striven.
-
Recap
With this guide, we learned how to create new Assignments and Assignment Categories. We also learned how to change Assignments for multiple Customers/Vendors at a time with the mass Assignment request tool to help us manage Assignments in our Striven system.

Have a Question?
Ask the Striven Community
User-sourced how-to’s, feedback, and more!
FAQs
-
How can I indicate that an Employee is assigned to a Customer, but a different Employee will be working on a specific Order for the Customer?
Assignments can be set up within entities such as Orders in Striven. This allows you to assign Employees as Account Managers but then a different Employee as the person who should be working to complete an Order.