
Scheduling & Communication
Buzz
Support Guide
-
Overview
Buzz is a Company-wide communication center that allows you to update other Employees with news for your Company. Buzz is a useful tool to let everyone know of a development, new hire, birthdays, holidays, etc. simply by adding posts to Buzz.
Read this guide if you are trying to:
✔ Communicate effectively using Striven’s Buzz features.
✔ Learn to select specific audiences for Buzz posts.
✔ Create templates for particular Buzz post formats.
-
Viewing Buzz Posts
To view Buzz in your Striven system, click on the Newspaper icon on the User Menu bar (next to the Striven logo) in the top right of the screen. This will redirect your browser tab to the Buzz page where you can view the current Buzz posts or create a new post. There are a variety of options on this page, which will be discussed in further detail below.
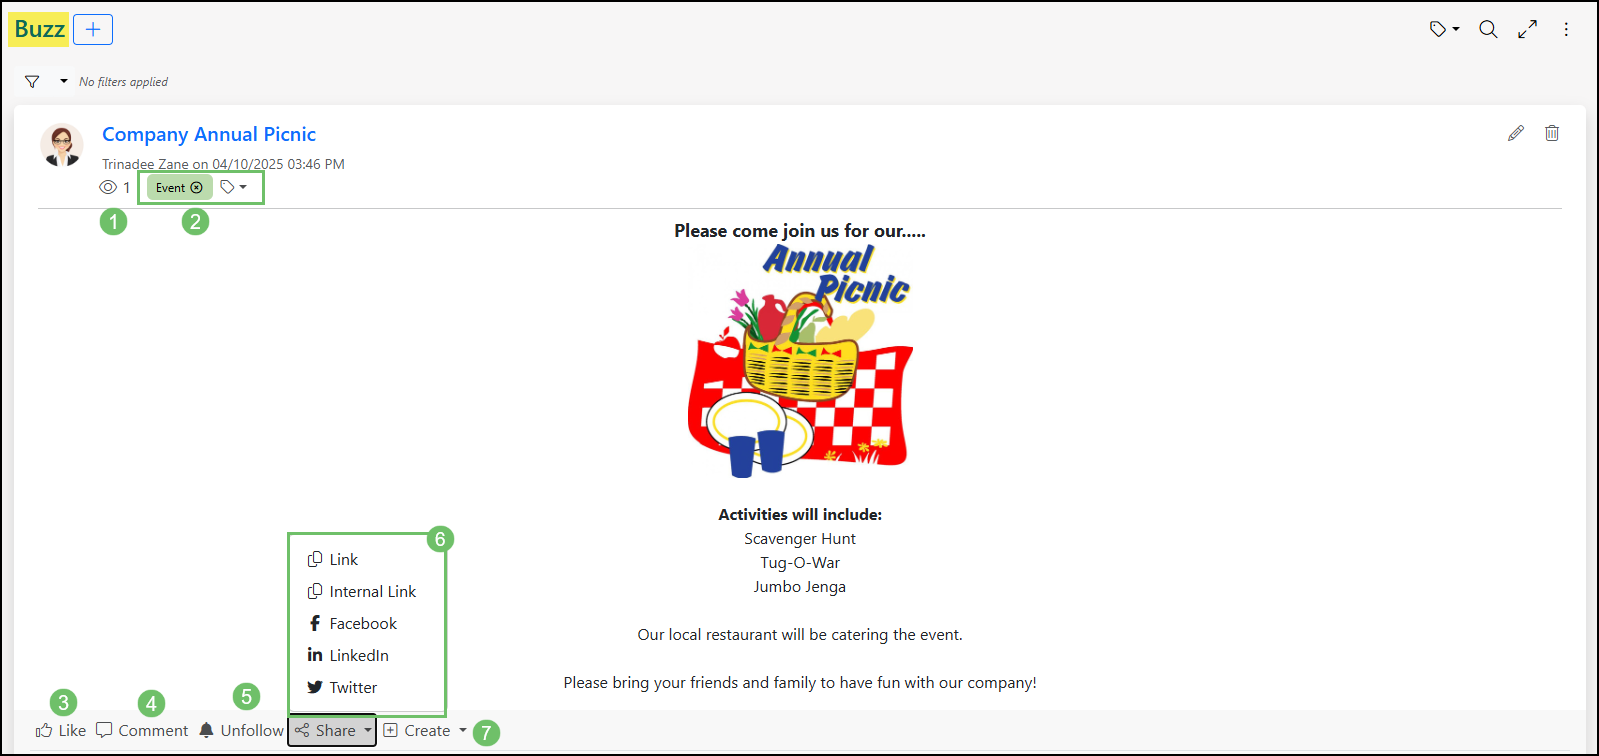
Below is a screenshot illustrating how Buzz appears and a list describing what you can accomplish there.
- View Count: Displays how many people have viewed the post. Clicking this will open up a list of those who have viewed the post.
- Labels: Indicates the topic or general subject of the Buzz post. Labels can be managed and added to the Buzz post by clicking the Apply Label icon. Multiple labels can be applied to a single Buzz post.
- Like: Indicates that you have enjoyed this post. Once Likes have been added to the post, a count will be added next to the view count.
- Comment: Allows the user to leave a comment on the Buzz post for better collaboration and socializing.
- Follow/Unfollow Post: If you have commented on a post, then you will receive a notification when others comment as well. To avoid these for the post, you can click the Unfollow Post button.
- Note: The option to unfollow a Task will also be available within the email received.
- Share: Allows you to share the Buzz post to your social media accounts by clicking the appropriate options, which are described further below:
- Link: Copies a public post link to your clipboard to be pasted where desired, including a message or email. This will allow for the sharing of Buzz posts with people outside of your Striven system to view.
- Internal Link: Copies an internal post link to your clipboard to be pasted where desired, including a message or email. This will allow for the sharing of Buzz posts with other internal users of your Striven system.
- Facebook: Triggers a popup to appear in which you can log in to your Facebook account to post your Buzz post to the social media feed.
- LinkedIn: Triggers a popup to appear in which you can log in to your LinkedIn account to post your Buzz post to the social media feed.
- Twitter: Triggers a popup to appear in which you can log in to your Twitter account to post your Buzz post to the social media feed.
- Create: Allows the user to take the Buzz post and create another entity in Striven for further action such as Tasks.
Example of Buzz

-
Buzz Notification Subscriptions
Users can opt out of receiving Buzz Notifications if they do not wish to receive any or certain email notifications when a Buzz post is created. Review the steps below on how to manage Buzz Notifications.
Access the option to manage Buzz subscriptions by clicking on the profile image in the top right corner of Striven and click on the option for Notification Subscriptions.

Example of the Subscription Notifications Menu Location
Once on the My Notifications page, click on the button labeled Manage Buzz Notifications to access the Buzz Email Notifications page.

Example of the Manage Buzz Notifications Button on My Notifications Page
The Buzz Email Notifications page will have the following options to unsubscribe from Buzz email notifications.
- Unsubscribe from all Buzz posts: Prevents the user from receiving email notifications when a Buzz post is created. If the Buzz post has the option checked for Override user preference and notify all users, the user will receive the email notification regardless of this setting.
- Unsubscribe from Buzz posts that have the following labels: Prevents the user from receiving email notifications for Buzz posts that were created with a labeled associated. Multiple labels can be selected with this option. If the Buzz post has the option checked for Override user preference and notify all users, the user will receive the email notification regardless of this setting.

Example of the Buzz Email Notifications Page
-
Add Buzz Posts
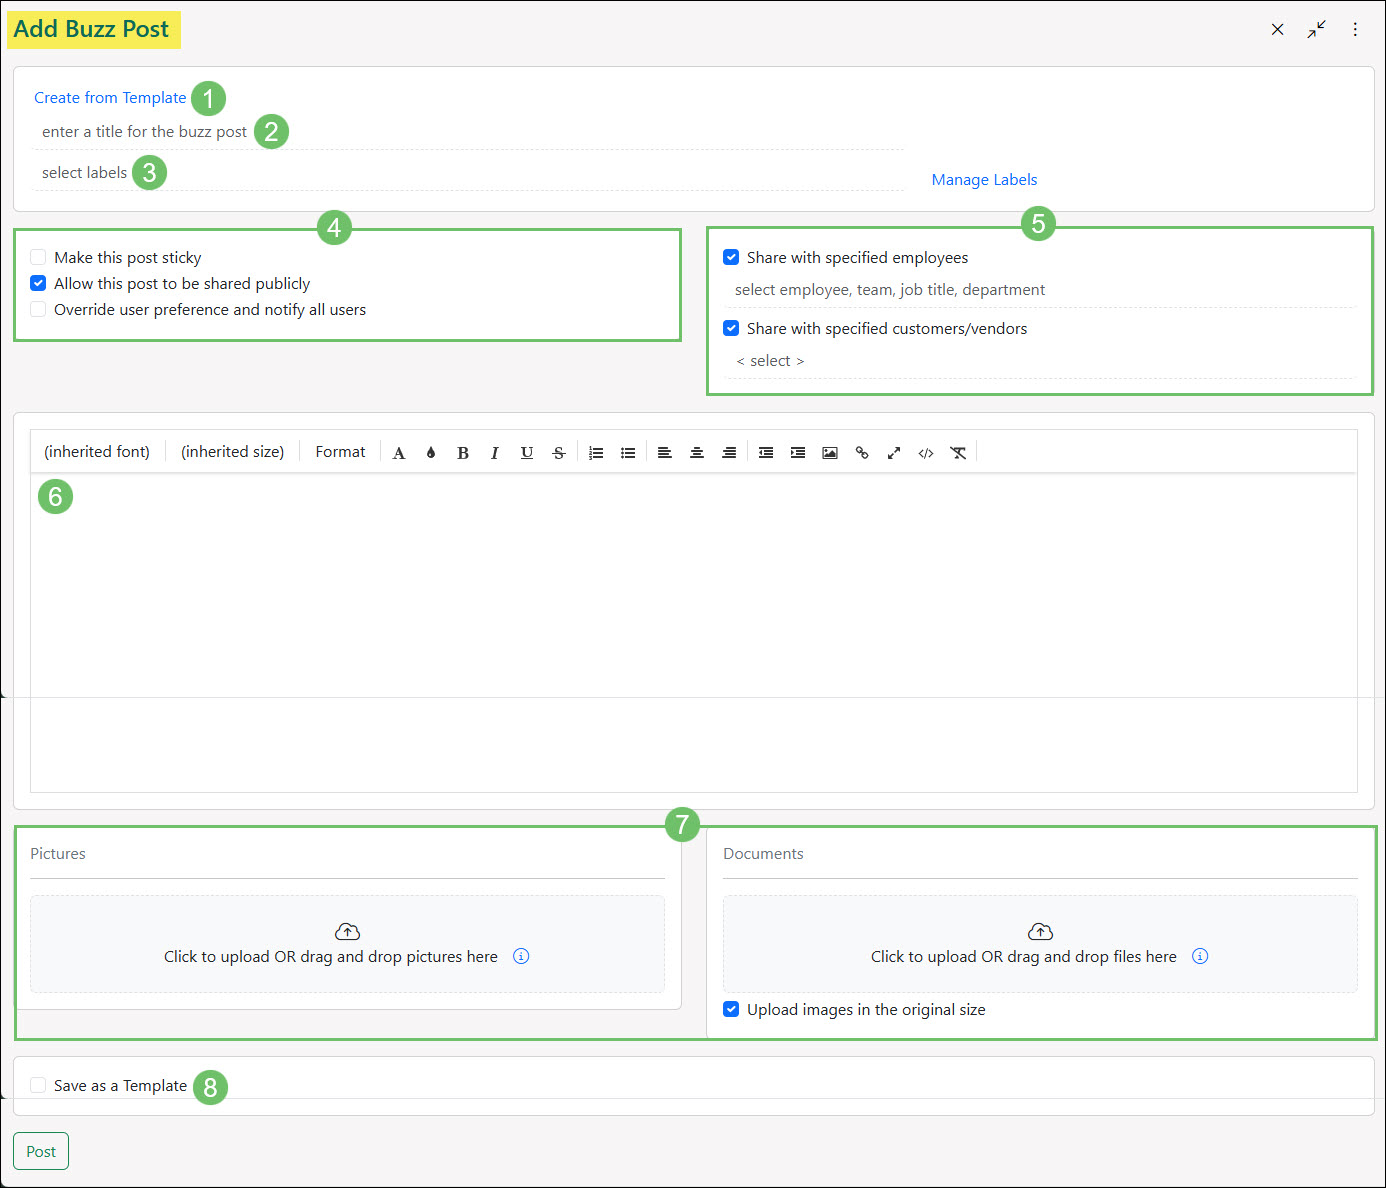
To add a new Buzz post, click the plus sign button at the top of the Buzz page. This will allow you to add content, pictures, and attachments to populate information for the post. The following screenshot will demonstrate the options available when creating a new post:
- Create from Template: Allows you to select a previously created template to work from when creating your post. This will be explained in more detail later in the guide.
- Title: The headline for your Buzz post and should be related to the subject matter of the post.
- Labels: Allows the user to tag Buzz posts with Labels in order to easily distinguish or search for the type of Buzz post content within the post.
- Post Options: There are three options available here that will allow you to control how your post is broadcast:
- Make this post sticky: Makes the Buzz post remain at the top of the Buzz feed until it is viewed by the logged-in user, even after newer Buzz posts are created.
- Allow this post to be shared publicly: Allows your post to be shared with others by linking to social media such as LinkedIn, Facebook, X (née Twitter), or by creating an internal or external link.
- Override User Preference & Notify All Users: Enables you to override users’ preferences to not receive notifications for Buzz posts and send the notification anyway. This is useful when you have urgent information to share and want to make sure your audience is notified to view the post.
- Audience: Allows you to select with whom you share your Buzz post. You can select to share your post with all Employees by checking the relevant box, or you may select specific entities or groups with which to share your post. Customers and Vendors can also be selected in order to share Buzz posts and make the posts available for Contacts to view in the Customer/Vendor Portal. Buzz Audiences are explained in more detail later in this guide.
- Content: This is where you will enter your Buzz post content. There are a variety of editing options, as well as the ability to include hyperlinks and embed images or videos in your post.
- Upload: Images and documents can be uploaded here to attach to your post.
- Save as Template: Saves your current work as a template for use in the future. This will save time if you regularly post similar posts to Buzz such as birthday announcements, work anniversaries, new hires, promotions, etc.
Example of Adding a Buzz Post
-
Buzz Audiences
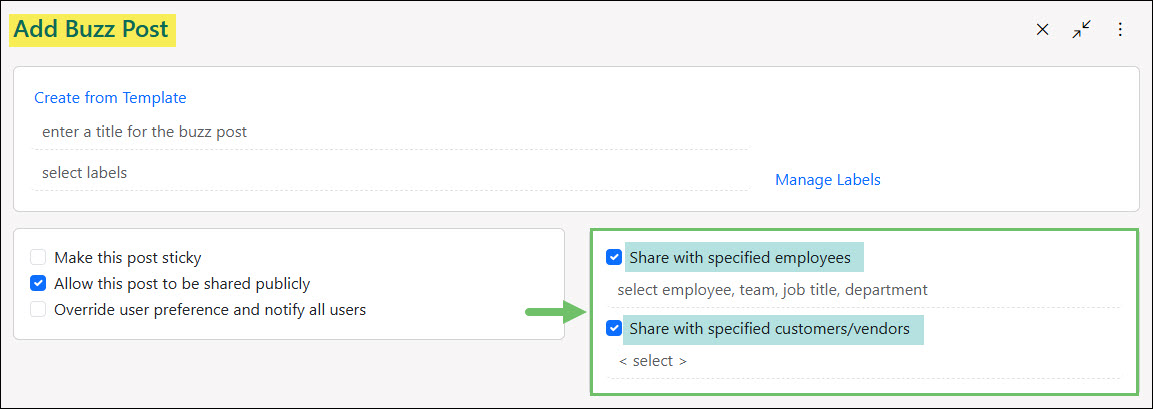
Buzz Audiences allow you to control who’s able to view your post. Generally, Buzz posts default to select All Employees as the audience for a news feed or Buzz post. Additionally, you may choose specific Employees, Teams, Job Titles, or Departments as your audience in your Striven system. An additional option is available to share Buzz posts with Customers and Vendors. Sharing Buzz posts with Customers and Vendors will make the post visible when Contacts are logged into the Customer/Vendor Portal. These options enable you to designate a smaller or more specific viewing audience for the post or feed.
The following options are available to select your desired audience:
- Toggle the checkbox for all Employees on/off.
- Choose from the drop-down menu the Employee(s), Team(s), or other Contacts you wish to include. If the desired option is not displayed, you may type the name of the Contact you wish to include in the audience and their name (or Job Title, Team, etc.) will display in the drop-down options provided they have access to your Striven system and have permission to view Buzz posts.
- Select Customers/Vendors as your Buzz audience. Again, if the desired Contact is not displaying in the drop-down list, start typing the option you’re looking for and their name should appear in the list.
Example of Buzz Audience Options
-
Buzz Templates
Apart from posting on Buzz, there are ways to set up Buzz Templates in order for you to create future posts by utilizing those templates. To add a new Buzz Template, click the Manage Templates button at the top on Buzz. This will bring you to the Buzz Templates List where you can View, Edit, and/or Add new Buzz Templates. You can also create automated Buzz Templates there, which will be sent out by the system without further human interaction. These will automatically post based on what date you choose to post on (this will be discussed further in the next section).
-
Automating Buzz Posts
By choosing an automated post when creating a Buzz Template, you open up some other options such as Post On, Posted By, and Select Picture. Post On options include an Employee’s birthday, work anniversary, or new hire date. There are also Company-related dates, including monthly and quarterly Company Metric Reports. Posted By allows you to choose who the post appears to be coming from.
Along with these options, you also have access to merge fields. You can use the drop-down menu to select which merge fields are appropriate for your post. If you need to use a merge field within the title of the post, you can select it from the drop-down menu and then copy and paste it from the message box into your title.
You will also notice a checkbox above where you would upload your pictures. By selecting the checkbox entitled Select a picture randomly as a merge field, this will allow the system to choose one of the pictures you’ve uploaded to be included in the message wherever you put the corresponding merge field in the message box.
Automated Posts for Employee’s Birthdays and Work Anniversaries will only be processed for Employees that have had their Job Type field set as Full-Time in their Employee Profiles. Notifications for these will also only be sent to Employees that have been set as Full-Time.
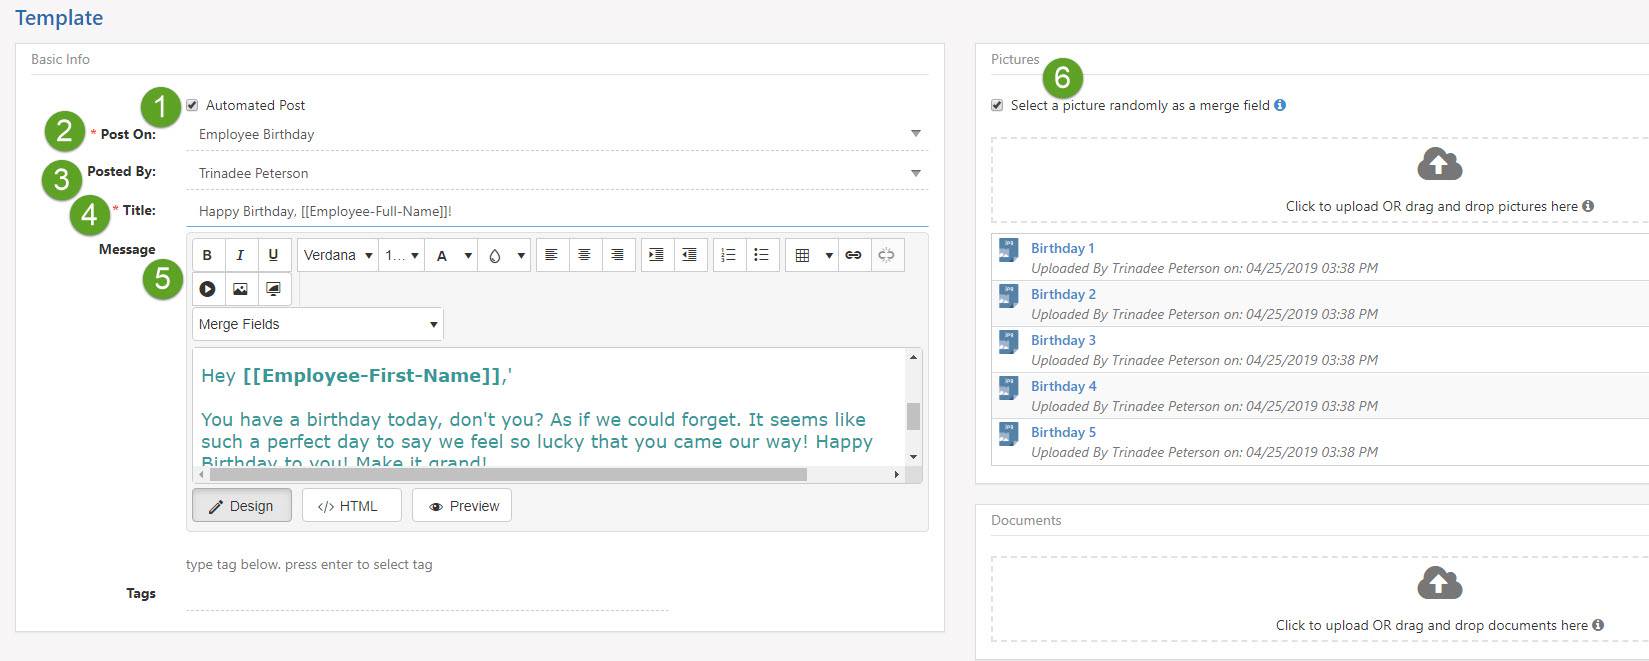
Below is a list describing what can be accomplished by choosing to automate your Buzz Template.
- Automated Post: Allows you to create an Automated Buzz Post. This will also display more fields, which are described below including Post On, Posted By, and Select Picture.
- Post On: Allows you to choose what date the Buzz post will be posted on, which include:
- Employee Birthday: Posts on each Employee’s birthdate, provided the date is entered on their Employee page.
- Employee Work Anniversary: Posts on each Employee’s hire date, as long as it is entered on their Employee page.
- Welcome New Employee: Posts when a new Employee is activated into Striven, based on their hire date. Merge fields include the Employee’s Job Title, Bio, and more.
- Monthly Company Report: Posts each month to notify Employees about Company activities or achievements. Merge fields include the number of Tasks completed, the number of Orders approved, and more.
- Quarterly Company Report: Posts each fiscal quarter to notify Employees about Company activities or achievements. Merge fields include the number of Tasks completed, the number of Orders approved, and more.
- Posted By: Choosing an Employee here will give your automated Buzz post a more personal feel, as it will be posted by that person even though no action was taken.
- Title: The title for the Buzz post being created.
- Message: This is where you will enter your Buzz post content. There are a variety of editing options, as well as the ability to include hyperlinks and embed images or videos in your post.
- Merge Fields: Populate information from the entity automatically to eliminate manual entry and streamline communication.
- Select Picture: Allows you to upload pictures that will be selected at random when automated Buzz posts are generated. Once pictures are uploaded, you can add the merge field Picture Attachment, which will cycle through the pictures uploaded there at random.
- Note: Unless you add the merge field to the message, no pictures will appear within the Buzz post.
Example of Adding a Buzz Template
-
Buzz Content Filters
Content Filters are available to use for Buzz posts in Striven. These filters can be used to sift out specific words you would not like shown in any Buzz posts. For example, if Customer A prefers to keep their name confidential, you may want to add their name and any variations to the Buzz Content Filters. This way, when a Buzz post gets created referring to Customer A, a warning will be displayed to let the poster know the Company name cannot be used. To view or make changes to your Buzz Content Filters, you can use the Striven Search or follow the navigation steps below:
Company → Settings → Company → Collaboration → Buzz Content Filters

Example of Buzz Content Filters Page
-
Recap
With this guide, we’ve explored the Buzz feature within Striven. We discussed how Buzz can be used for your Company to keep your Employees notified of important dates and upcoming events, or even to recognize Employees for events such as promotions or birthdays. We also covered the configuration options for Buzz Templates, Buzz Audiences, and content filters within Striven.

Have a Question?
Ask the Striven Community
User-sourced how-to’s, feedback, and more!
FAQs
-
Is there a way to personalize a Buzz post Comment with more than just plain text?
If you click into the Leave a Comment field and then look at the lower right corner of the field, you’ll see there’s a link for the Advanced Editor. Clicking this link will open a popup with a more advanced text editor box with options for selecting fonts, font sizes, font colors, adding bullets or numbered lists, a table, hyperlinks, and inserting external videos or images to include in your Comment.