
Productivity Tools
Company Asset Management
Support Guide
-
Overview
If your Company provides equipment for Employees to use, Asset Management can be used to track the whereabouts and condition of the equipment. Asset management can also be used for tracking mileage and service history of Company fleet vehicles. You can choose to promote accountability through a checkout/check-in process, which visibly differentiates available Assets from those which are currently in use by other Employees. This guide will help with creating and managing Company Assets in your Striven system.
Read this guide if you are trying to:
✔ Enter Company or Fleet Assets into Striven.
✔ Set up a check-out/check-in system for use of Company or Fleet Assets.
✔ Monitor Company vehicle mileage and schedule maintenance.
-
Company Asset Creation
Creating Assets within Striven is the first step in managing your Company Assets, and this can be accomplished from the Company Assets List. From the Company Assets List, click the Add button to start creating a new Company Asset. There are two types of Assets designated to your Company: Company Assets and Fleet Assets. Company Assets can be anything from equipment, passwords, or materials that have a long term existence at your Company. Fleet Assets are Company vehicles that Employees use to commute or deliver goods or services to Customers. Fleet Assets will also grant the ability to document when maintenance is needed and the starting odometer reading. Below is a screenshot illustrating how the Add Asset page appears and descriptions of what can be accomplished there.
To view Company Assets, use the following steps below:
Company → Assets → List
- Type: Allows you to choose between adding a Company or Fleet type Asset. By selecting the Fleet Asset type, two additional fields are available for maintenance and odometer readings.
- Category: Helps differentiate Assets from each other. Categories can be added here by using the Plus icon (+) when hovering over the field, or from the Categories settings page.
- Date Purchased: Lists the date the Asset was purchased by your Company.
- Price & Value: Displays the price the Asset was purchased for and the estimated current value of the Asset.
- Fleet Options: There are two fleet options, which are described further below:
- Maintenance: Denotes the number of miles at which the Fleet Asset will need maintenance, such as an oil change.
- Odometer Reading: Displays the odometer reading as of the date the Asset was purchased by your Company.
- Checkout: There are two options here, which will note whether you require checkout or return confirmation for the Asset. This will activate two extra actions when checking out or returning the Asset. This is discussed further later in this guide in the Asset Reservation and Return section.
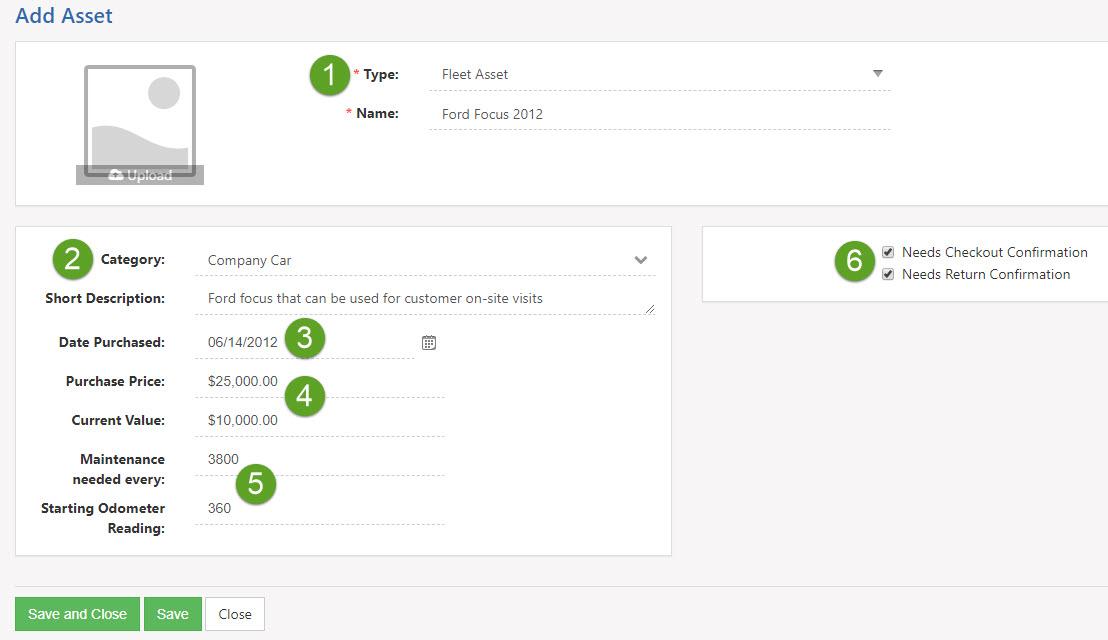
Example of Creating Company Assets

-
Company Asset Categories
Company Assets can include tangible items such as company vehicles and intangible assets like login credentials. Asset Categories can be utilized to efficiently classify and manage your Company’s assets.
Learn more about Company Asset Categories by reviewing the Category Management Guide.
To configure your Company Asset Categories, navigate Company → Settings → Company → Assets → Categories.
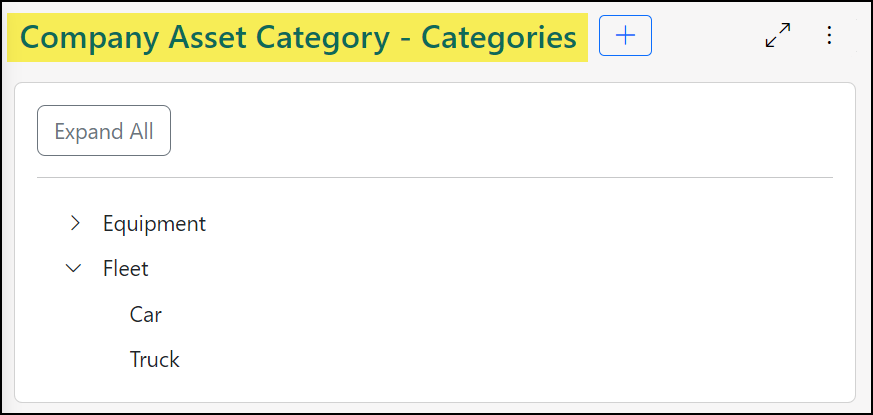
Example of the Company Asset Category Page
-
Company Asset Management
After adding Assets into your Striven system, you can manage them by using the Company Assets List. You can view availability, checkout, and reserve Assets there, as well by using hyperlinks located on the List. Below is a screenshot illustrating how the Company Assets List appears and a list describing what can be accomplished there.
Company → Assets → List
- Asset Name: The name of the Asset and will populate the Asset Info page.
- Asset Type: Lists what type of Asset (Company/Fleet) the Asset is.
- Category: Lists the Category the Asset has been assigned.
- Asset Status: Shows the status of the Asset. Statuses include the following:
- Pending: Notes the Asset is currently not in use by the Company, but may be in the future.
- In Service: Notes the Asset is currently in an “active” status and is available for check out and reservations
- Retired: Notes the Asset is no longer in service and has been retired from Company use.
- Availability: Lists if the Asset is currently available. If there is a name in this column, that indicates the Asset has either been checked out or reserved by the Employee listed.
- Calendar: Allows you to see the Asset Reservation Calendar, which shows when the Asset is checked out, reserved, and available.
- View Log: Lists out the history of changes made to the Asset, such as the status changing from checked out to reserved.
- Checkout: Allows you to check out the Asset. Entering the Employee name, Asset, related Customer, reservation date/time, expected return date/time, and notes are available to add while checking out an Asset for immediate use.
- Reserve: Allows you to reserve the Asset for a later date. Entering the Employee name, Asset, related Customer, reservation date/time, expected return date/time, and notes are available while reserving an Asset for future use.
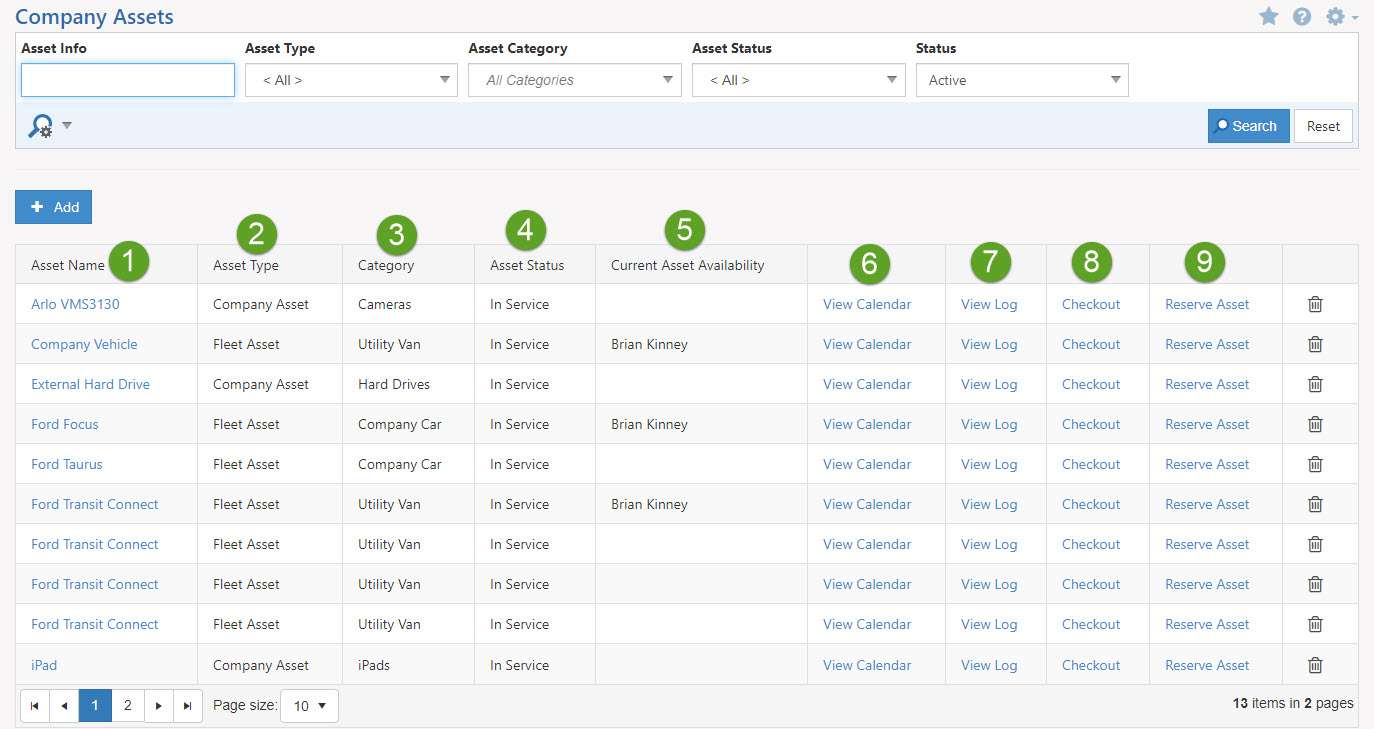
Example of Company Assets Page
-
Company Asset Checkout
If you have chosen to require checkout and return confirmation when creating your Company Asset, then users will have to check out and return the Asset between uses. Checking out a Company Asset will allow Employees to utilize the Asset at the time of check out until it is returned to the Company. As described above, you can check out an Asset by clicking the checkout hyperlink from the Assets List. This will initiate a popup where you can fill out the information pertinent to the Asset’s usage. Below is a screenshot of the Asset Checkout page and descriptions of what can be accomplished there.
- Employee: The Employee who is checking out the Asset. If an Employee has the permissions Assets – Reserve for all Employees or Assets – Checkout for all Employees, they will be able to change the Employee name as needed to complete actions for other users in the system.
- Asset: The name of the Asset being checked out. This field will be pre-populated from the Asset you chose from the list. This can be changed from the popup dialog window if needed.
- Please note from the drop-down menu the designated color icon will appear next to the Asset name indicating if it is currently reserved or available.
- Customer: If you are traveling to a Customer Location, you can associate a Customer by choosing one from the drop-down menu.
- Checkout Date/Time: When checking out the Asset, the check out time is locked as Striven captures what time the Asset is currently being checked out in real-time.
- Return Date/Time: Allows you to estimate when you will return the Asset.
- Notes: Allows you to enter notes to detail your usage of the Asset.
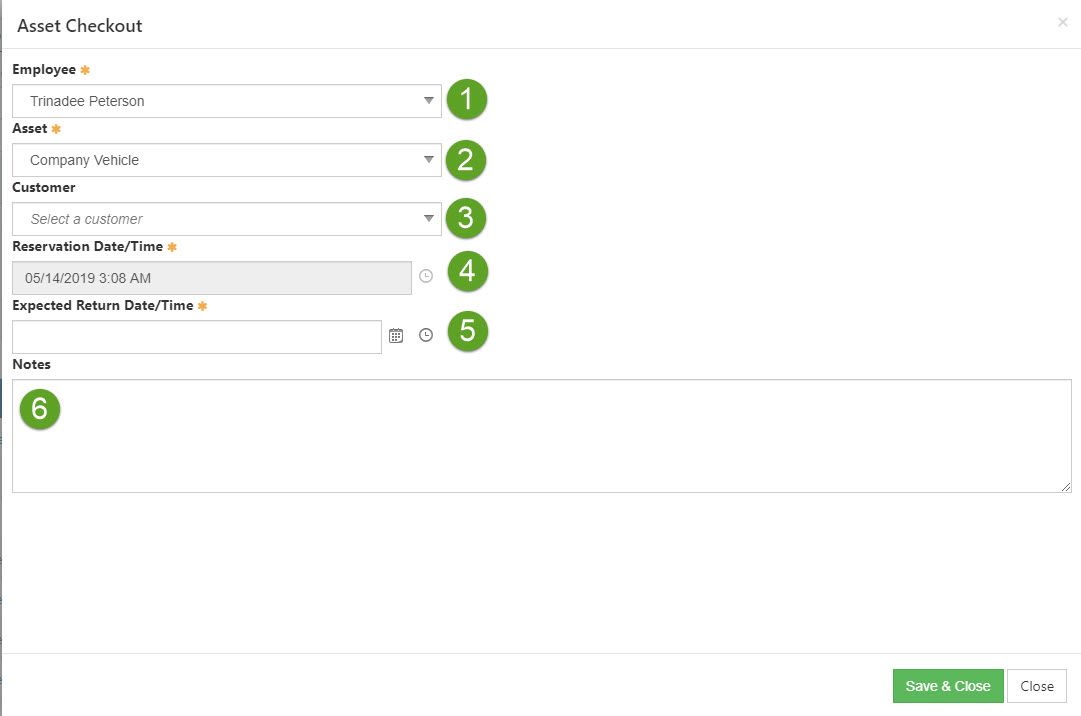
Example of Checking Out an Asset
-
Company Asset Reservation and Return
Reserving an Asset operates much the same as checking out an Asset, except for the reservation time. As previously discussed in the section above, checking out an Asset locks the reservation time and captures the time of check out. Reserving an Asset will allow you to choose a future date and time when you will use the Asset. All the other options, including entering notes, choosing a Customer, and estimating the return time of the Asset, are available when reserving an Asset. To manage all reservations, you can utilize the Company Asset Reservations List. There you can see all reservations and who is using the Asset for each submitted reservation. Below is a screenshot illustrating how the Company Asset Reservations appear and a descriptions of what can be accomplished there.
To view Company Asset Reservations, navigate to:
Company → Assets → Reservations

Example of Asset Reservations Page
- Asset Name: The name of the Asset and clicking on it populates the Asset Info page.
- Customer Name: If a Customer has been associated during reservation, it will appear here. Clicking on the hyperlinked Customer name will navigate you to the Customer’s information.
- Reserved By: The Employee who has reserved the Asset.
- Reserved For: The Employee the Asset has been reserved for. If an Employee has the permission “Assets – Reserve for all Employees”, they will have the ability to reserve Assets for other Employees.
- Reservation Date: Lists the date and time the reservation will occur in the future.
- Expected Return: Lists the date and time the Asset is expected to be returned.
- Status: Lists the status of the reservation, which is described below:
- Reserved: Indicates the Asset is spoken for at a future date/time, but is not currently in use.
- Checked Out: Indicates the Asset has been checked out, but is not yet in use by the Employee.
- Confirm Checkout: Indicates the Asset is currently in use.
- Returned: Indicates the Asset has been returned.
- Notes: Displays notes that were entered upon reserving the Asset.
- Actions: There are five actions here, which are described further below:
- Check Out: Begins the checkout process.
- Confirm Check Out: Confirms the Asset is checked out.
- Return: Begins the return process. After clicking return for Fleet Assets, you can enter the miles driven and the odometer reading prior to returning the Asset.
- Confirm Return: Confirms the return and removes the reservation from the list. This is described further below.
- Cancel Reservation: Cancels the reservation and removes the reservation from the list.
-
Company Asset Reservation Calendar
As Company Assets are being checked out and reserved, one tool that is very handy to use when managing Asset availability is the Asset Reservation Calendar. A link to the Asset Reservation Calendar is located within the Company Asset List. The Asset Reservation Calendar will show when the Asset has been checked out or reserved and who has use of the Asset at those times. There are three views, including Day, Week, and Timeline. The day view shows the hours of the day, the week view shows days of the week, and the timeline shows a three-day time span. By clicking into the Asset Reservation Calendar, you will begin the checkout process for the selected Asset. Below is a screenshot displaying how the Asset Reservation Calendar appears in Striven.

Example of Asset Reservation Calendar
-
Fleet Maintenance
Fleet Assets require occasional maintenance throughout their lifespan. Whether it is an inspection, oil change, or repair, Striven can help you track and manage that maintenance using the Company Fleet Maintenance List. The Company Fleet Maintenance List displays all Fleet Assets along with some actions you can take as well. Below is a screenshot displaying how the Company Fleet Maintenance List appears and a list describing what can be accomplished there.
To view the Company Fleet Maintenance List, navigate to:
Company → Assets → Fleet Maintenance
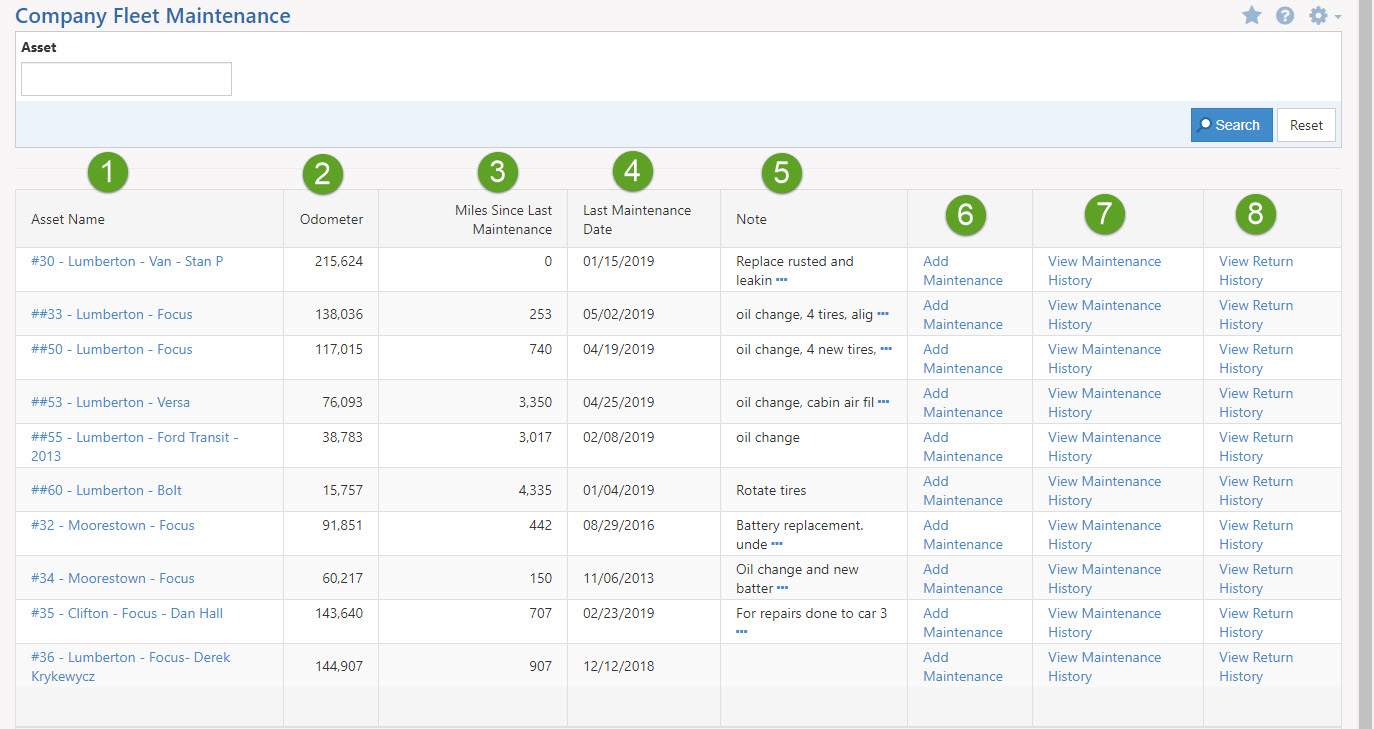
Example of Company Fleet Maintenance List
- Asset Name: Lists the name of the Fleet Asset. Clicking on the hyperlinked name will bring you to the Company Asset Info page for the selected Asset.
- Odometer: Displays the Asset’s current odometer reading.
- Miles Since Last Maintenance: Lists how many miles have been driven since the last maintenance has been entered.
- Last Maintenance Date: The date on which the Asset was last maintained and entered into Striven.
- Note: Shows notes that were entered when adding maintenance for the Asset.
- Add Maintenance: Allows you to add maintenance for a Fleet Asset.
- View Maintenance History: Shows a list of previous maintenance. Information such as the created by, maintenance date, and odometer reading will be listed after clicking to view an Asset’s maintenance history.
- View Return History: Lists how much the Fleet Asset has been driven and the entered odometer readings upon each return.
-
Adding Maintenance
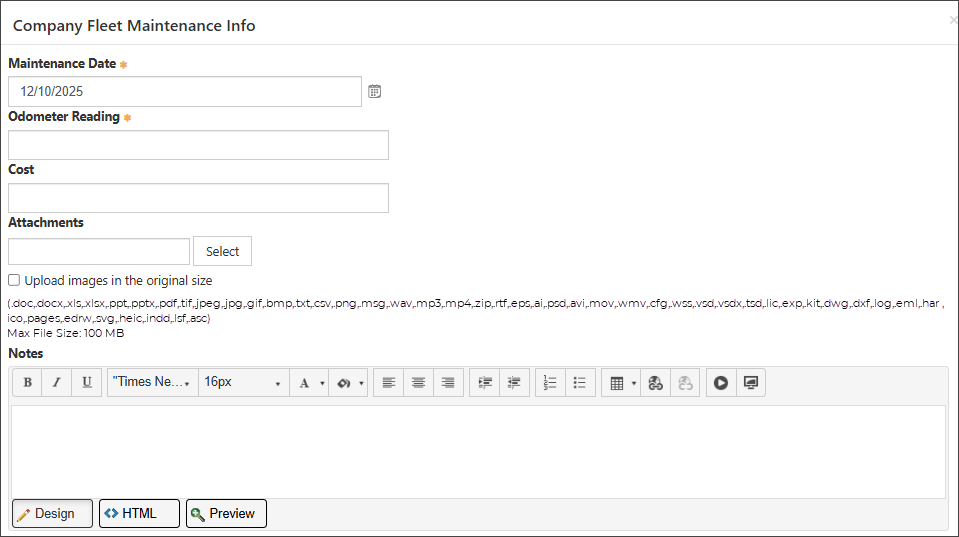
As discussed above, you can add maintenance on the Company Fleet Maintenance List using the Add Maintenance hyperlink. By clicking the hyperlink, a popup will appear in which you can fill out the information about the maintenance, including the date, cost, and the odometer reading. You can also add notes about the maintenance being added and add attachments, such as receipts or maintenance descriptions for record. Below is a screenshot of how the Company Fleet Maintenance Info appears and descriptions of what can be accomplished there.
- Maintenance Date: By clicking the Calendar icon, you can choose a date on which the Fleet Maintenance occurred.
- Odometer Reading: Stores the odometer reading that was present after the Fleet Maintenance was completed.
- Cost: Allows you to enter how much the Fleet Maintenance that is being entered in Striven cost.
- Attachments: Allows you to upload an attachment related to the Fleet Maintenance that was completed. This could be a receipt or image of what was done with the Fleet Asset.
- Notes: Allows you to enter notes of what was completed with the Fleet Maintenance. There is formatting available here, including numbering, hyperlink creation, and much more.
- Actions: There are two actions here, which are described further in the points listed below:
- Save & Close: Saves the Fleet Maintenance and closes the popup window, which will bring you back to the Fleet Maintenance List.
- Close: Will not save the Fleet Maintenance and closes the popup window, which will bring you back to the Fleet Maintenance List.
Example of Adding Company Fleet Maintenance
-
My Reserved Assets
To view a list of your current Asset Reservations, you can select the Reserved Assets option available from the Employee Actions menu.
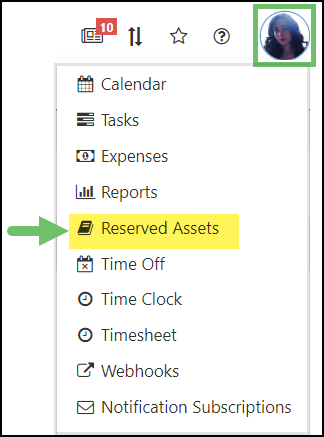
Example of Reserved Assets Option on the Employee Actions Menu
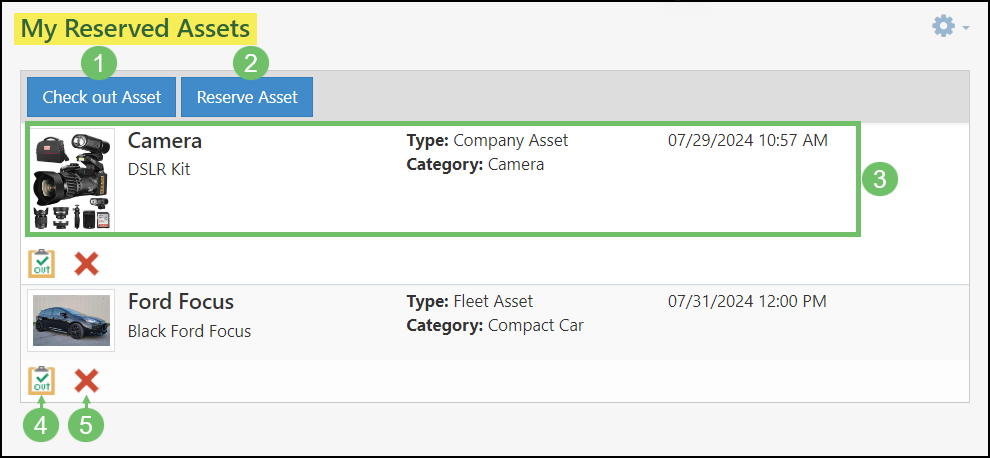
Once selected, you will be directed to the My Reserved Assets page, where you can complete actions and view information related to the Assets you have reserved.
- Check Out Asset: Selecting Check Out Asset will open a pop-up window, allowing you to select a Company Asset to checkout, regardless of if you have reserved it.
- Reserve Asset: Allows you to create a new Asset Reservation.
- Asset Reservation: Each current reservation will display the Asset’s image and description, the Asset Type, the Asset Category, and the time and date of the reservation.
- Quick Check Out: Selecting the Check Out button will quickly check out the Asset you have reserved. This option will automatically update to a Check In button after the Asset has been checked out.
- Cancel Reservation: You can quickly cancel your Asset Reservation by selecting the red “X ” button located on an Asset Reservation.
Example of the My Reserved Assets Page
-
Recap
With this Company Assets Guide, we’ve discussed how to add, check out, reserve, and return Company Assets to ensure all Company Assets are accounted for properly. We’ve also examined ways to add Fleet Maintenance, view Asset Reservation Calendars, and view all reservations to ensure the best user experience when managing Company Assets with Striven.

Have a Question?
Ask the Striven Community
User-sourced how-to’s, feedback, and more!
FAQs
-
What does reservation mean? I thought checking out an Asset/equipment was enough.
Reservations allow you to note that an Asset will be in use on a scheduled date/time. For example, entering a reservation ahead of time would be helpful to make sure a specific device is available to take on a Customer visit.