
Initial Setup
Company Setup
Support Guide
-
Overview
-
Company Settings
How to Configure Company Settings in Striven
Setting up your Company is one of the first things you should configure in your Striven system. Whether you are using all of Striven or just a portion, this area will pertain to your Striven management software experience. Here you can do a number of basic, but very important functions. These include uploading your Company logo, setting your global time zone, website, and much more. Information here will not only reflect your Company, but also appears in and affects a lot of functions throughout your Striven system. Below is an image displaying what this page looks like and a description of options you can configure here. To view Company Settings, you can use the Striven Search or follow the navigation steps below:
Company → Settings → Company → Settings
- Company Name: The name of your Company. This will be pulled in with merge fields throughout Striven as your Company-Name, which is available on entities like emails, Discussions, printable formats, and many more areas of Striven.
- Company Logo: An image of your Company logo can be uploaded here. This image will appear in the top left corner of every page throughout Striven and also in merge fields for Company-Logo.
- Allowed File Extensions: .jpeg, .jpg, .gif, .bmp, .png, .ico
- Max File Size: 10 MB
- Business Days: The days of the week your Company normally operates. Days selected will affect accuracy when reporting, such as the Project Burndown Report.
- Geocoded Addresses: Determines if your system will require all addresses to be geocoded in order to be saved.
- Time Zone: Designates times throughout Striven. This will affect scheduling Appointments, Tasks, etc.
- Note: An Employee can update their time zone individually on their My Profile page if they reside in a different time zone than the Company.
- Phone Country Code: Determines your system’s default Country Dial Code. See below on International Phone Numbers for more detail.
- Date Format: Dictates the format in which dates will display across your Striven system.
- Email: Used for sending notification emails to your users. This email will be used if the notification is not being sent out by an action of an Employee.
- Website: Associates your website with your Striven system.
- Personalized Link: This is a unique Striven URL assigned specifically for your company. You can change this link if desired, but the link must be unique to Striven. If it is not unique, an X will appear noting the link is not unique and cannot be used. If the link is unique, a checkmark will appear and the link can be used as your Company’s new Striven link.
- Note: If this is changed at a later date, users will be signed out and any saved links will be ineffective as the Striven link will have been changed and updated.
- Favicon: An image that will appear in each browser tab as an identifier when signed into Striven.
- Allowed File Extensions: .jpeg, .jpg, .gif, .bmp, .png, .ico
- Max File Size: 10 MB
- Default Editor Settings: This font will be set as default in all editors throughout Striven. When in an individual editor, this can be changed from the default set here, if desired.
- Permission Request Notification Recipients: Designates an Employee to receive requests from other users who request access for permissions to functions found in Striven. The Employee designated here will receive notifications whenever an Employee clicks the Request Access button for permission. After receiving the permission request notification, the Employee can then either approve or deny the request. To learn more about how permission requests work within Striven, review the Employee Setup & Info Guide.
- Happiness Rating: Allows ratings to be submitted for Tasks, Orders, and Projects by internal users or Customer/Vendor Contacts. Another rating for the Customer/Vendor Portal can be turned on as well for Customer/Vendor Contacts to submit a rating right from their Portal Dashboard.
- There are three ratings for Happy, Satisfied, and Unhappy. Each rating can be given a value to enable easier reporting on service or product satisfaction.
- Make sure to review your Notification and Portal Content to include the appropriate merge fields for the Happiness Rating that has been turned on.
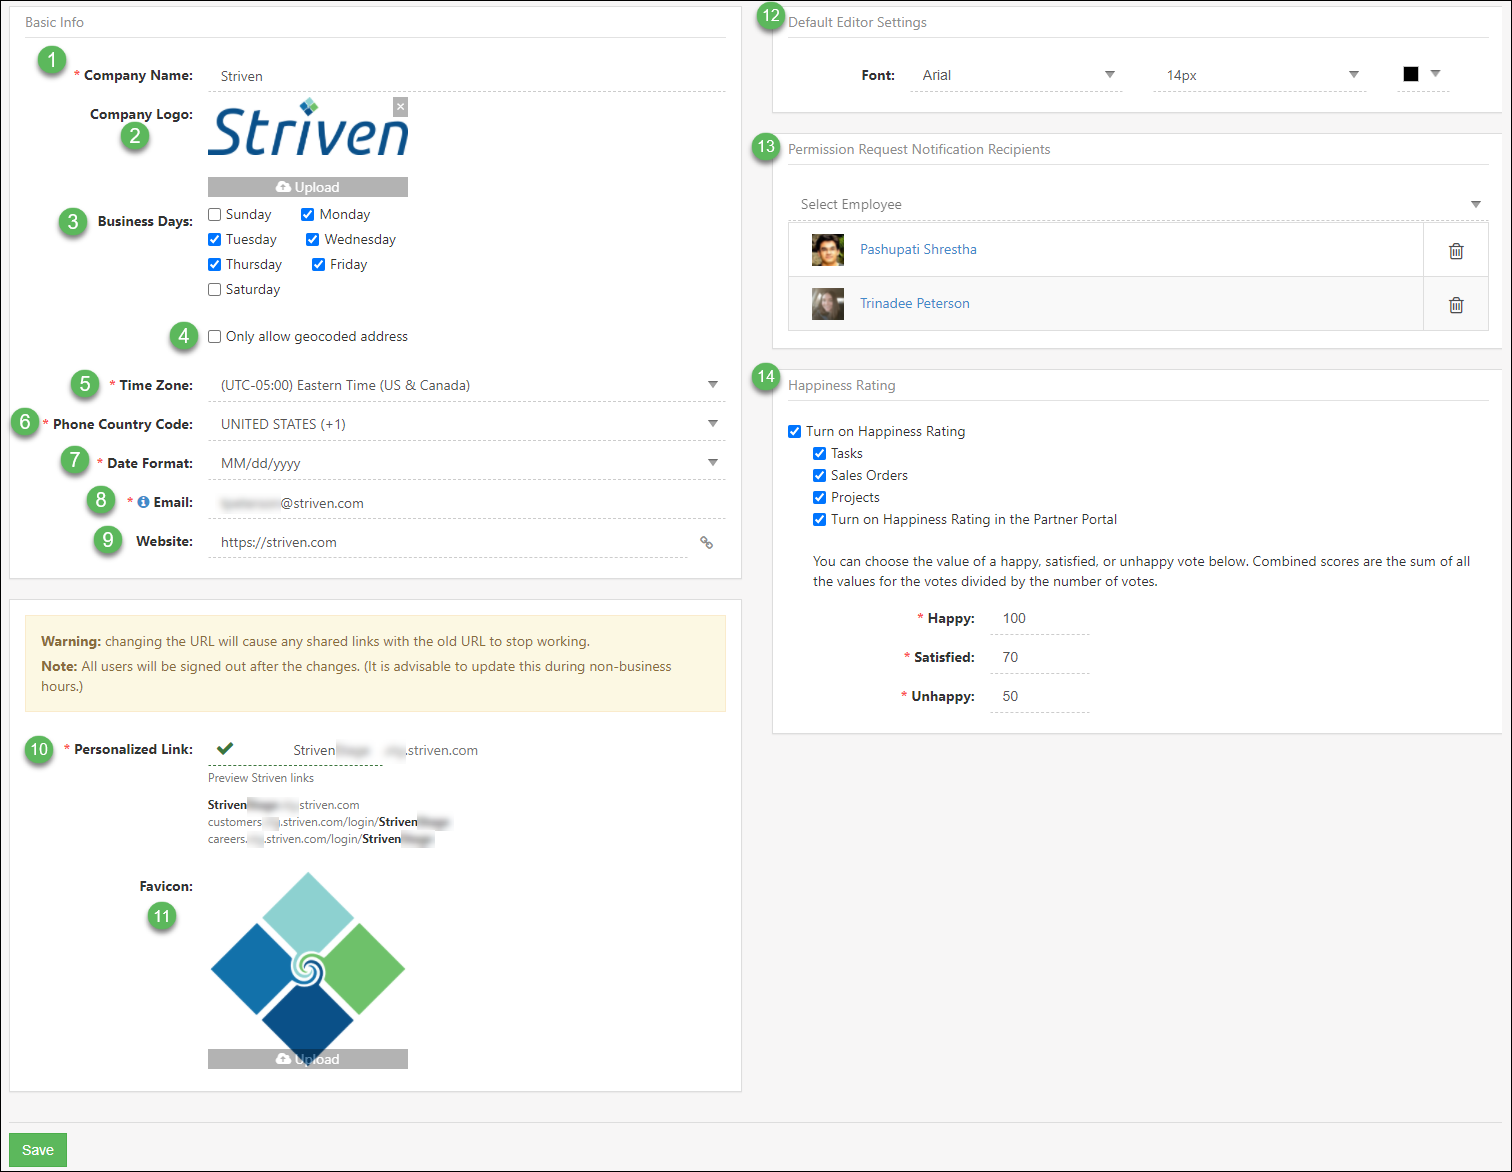
Example of Company Settings Page

-
International Phone Numbers
Striven provides the ability to store phone numbers with the appropriate Country Dial Codes. This will ensure accuracy of phone numbers saved within Striven and aid you with keeping in touch with all your Customers/Vendors, Contacts, and Employees around the world.
You can set your default Country Dial Code in the Basic Info section of the Company Settings in your Striven system.
When new Striven subscribers sign up, the Welcome screen will pre-select the Country Dial Code based on the country the subscriber signing up is using it from, which will then be saved as the system default.
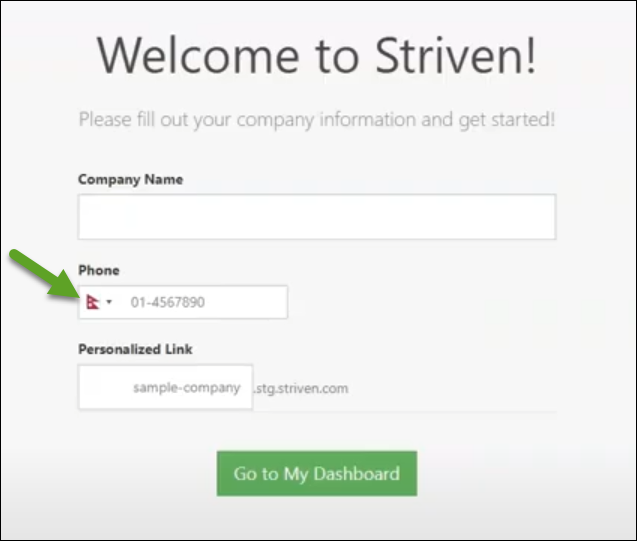
Example of Welcome Screen with Pre-selected Phone Country
-
Happiness Ratings
Happiness Ratings are a useful tool when you want to gauge how satisfied your Customers/Vendors and Contacts are with the services your Company is providing to them. These Ratings can be enabled for Tasks, Orders, and Projects to allow Employees, Customers/Vendors, or Contacts to express their level of satisfaction with them. The scores for these ratings can be predetermined in your Company Settings, as indicated in the example below.
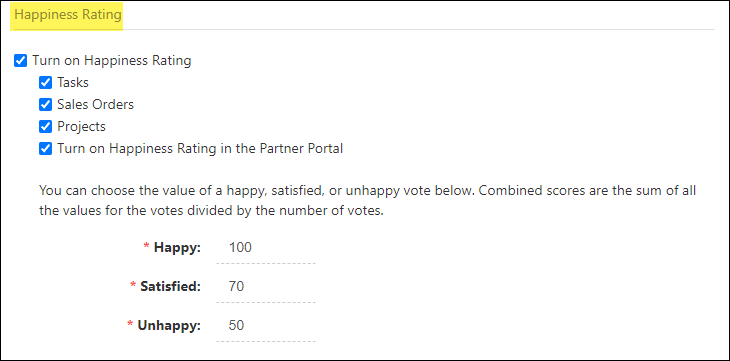
Example of Happiness Rating Settings Options
Notifications & Portal Content
In addition to enabling the Happiness Ratings in the Company Settings, the Notifications & Portal Content will need to be configured to include the proper merge fields for the Happiness Ratings.
- Note: Your Striven system will need to have someone assigned to receive the Task Status Update: Done notification, which can be configured in each Customer’s Notification Settings.
An email notification can be sent when a Task, Order, or Project is marked Done, giving the Customer/Vendor or Contact the ability to select whether they are Happy, Satisfied, or Unhappy with the work completed. An example of how this email appears to the recipient is below for reference.
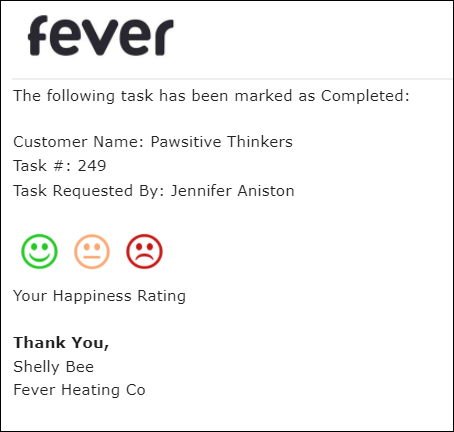
Example of Happiness Rating Email
As you can see from the image above, the recipient has the option to select the green Happy face, the yellow Satisfied face, or the red Unhappy face.
After clicking on one of the faces, their rating is submitted and a confirmation screen should open providing the option to submit feedback comments as well. The image below represents an example of this screen.
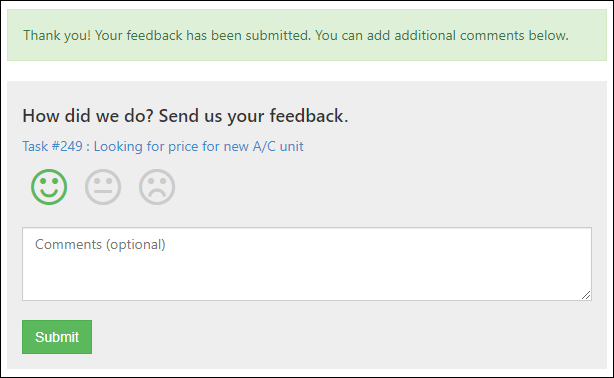
Example of Happiness Rating Feedback Screen
Here, your Customer/Vendor or Contact will have the opportunity to include comments to express more specifically what they were pleased or displeased with in regard to the work completed and provide feedback as to how improvements can be made. It also gives them a voice to be heard and share ideas or recommendations.
This feedback from your Customers/Vendors or Contacts can also be a helpful resource for determining when an Employee should be recognized for having made an exceptional effort or gone above and beyond for your Customer. A Buzz post is a great way to announce this accomplishment or share this recognition with others.
Customer/Vendor Portal
Employees, Customers/Vendors, or Contact with Portal access may also elect to submit their Happiness Rating through your Customer/Vendor Portal by clicking on the smiley face button on the top right corner of the Portal screen as indicated in the image below.
- Note: This submission will be an overall rating, as opposed to a specific Task, Order, or Project.

Example of Customer/Vendor Portal Happiness Rating Button
Reporting on Happiness Ratings
A custom report can be created in Striven to show the results of the Happiness Ratings based on many different variables. By selecting Report Builder from the Reports menu, you can create a custom report based on the Happiness Ratings dataset provided in the drop-down list. You may then select and configure the columns you wish to include in your report. There are a variety of search filters to choose from when creating your report, such as date created (period), Assignment, Customer/Vendor, Type, Response, Comment, and others. These filters can then be customized to report the results of your Happiness Ratings by determining what feedback has been provided, and what has not. This feedback is useful when determining how well your Employees are performing and/or where improvement is needed.
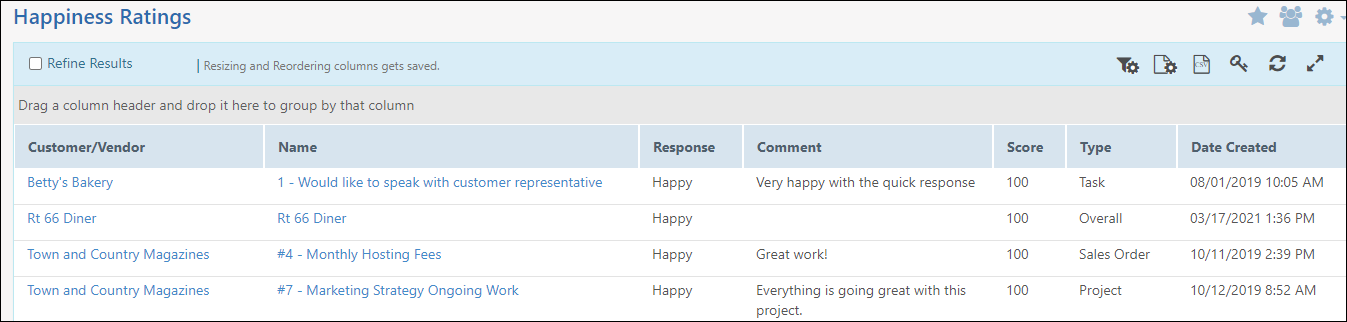
Example of Custom Report on Happiness Ratings
Additionally with the Report Builder, you can average the Happiness Ratings to get an overall Happiness for a particular Customer/Vendor or Contact.
-
Entity Relabeling
A powerful feature in Striven is the ability to Relabel the entities in your system with terms that fit more closely with your Company’s business terminology. This customization feature enables you to select the title of the entities in your system, such as Customers, Vendors, Tasks, and Sales Orders.
Clearly there are industry differences in terminology or lingo that may be confusing when trying to adapt to a different label in your Striven system. Relabeling these areas of the system can help you and your staff communicate more clearly and efficiently when referencing system entities.
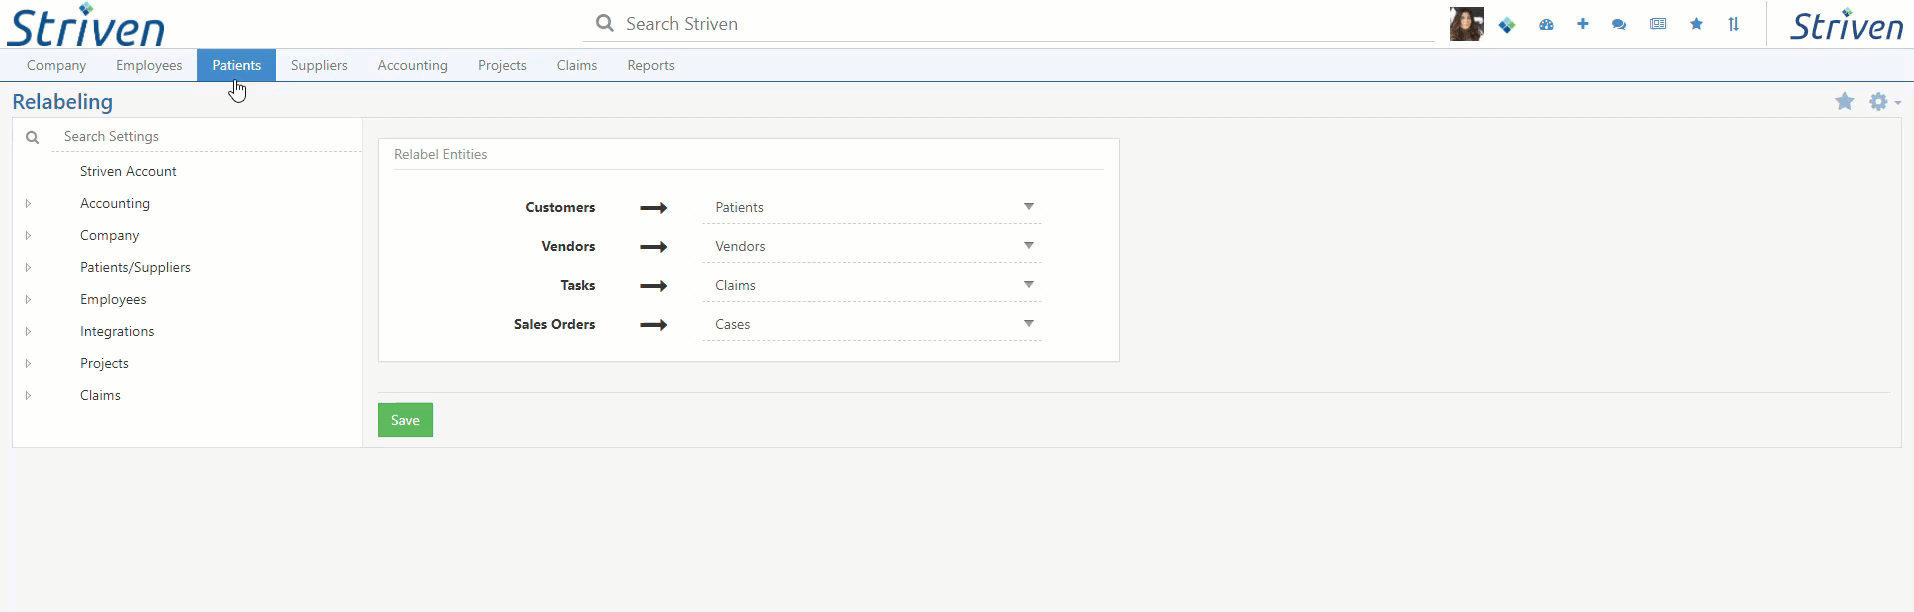
To get started, navigate to Company → Settings → Company → Customizations → Relabel.
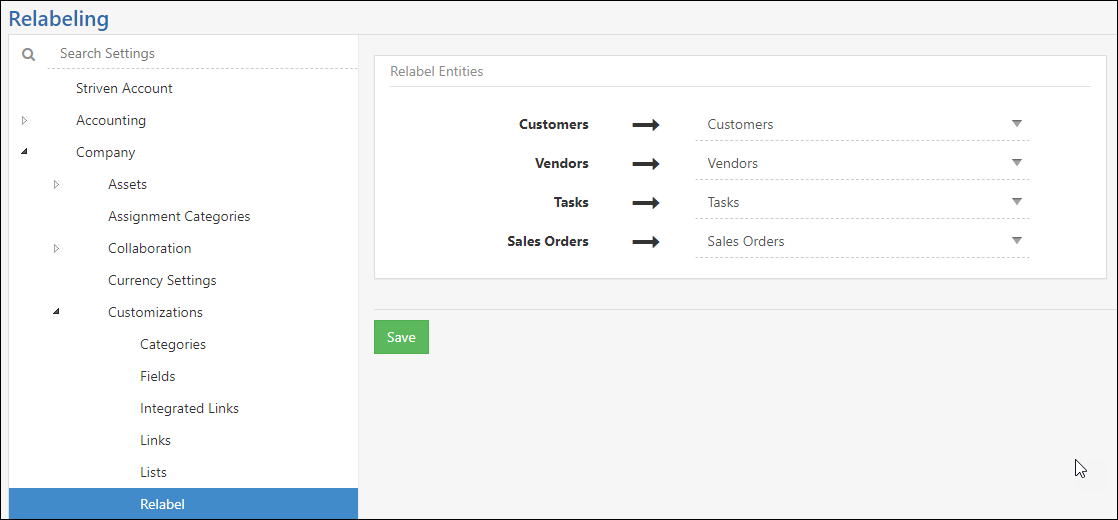
Example of Entity Relabeling Settings
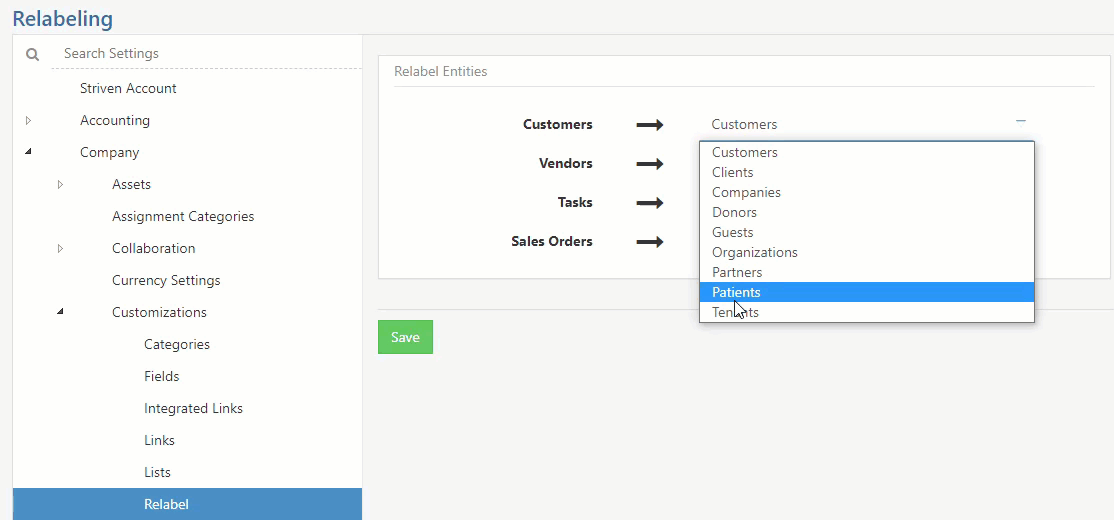
You can make your entity Relabeling selections from the drop-down menus for each entity and then click Save.
Example of Entity Label Selections
- Note: Once you click Save, a warning message will appear informing you that continuing with this change will cause all users to be logged out of the system in order for the Relabeling changes to take effect. To continue, click Yes.
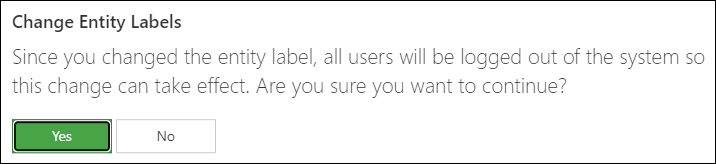
Example of Change Entity Labels Warning
This will automatically log you out of the system, but when you log back in, the Relabeling changes you made should be visible. These changes will immediately be noticeable in the Main Menu Bar, the Company Settings Menu, and the Striven Search filters, as demonstrated below.
Example of Menus Displaying Relabeling Options
Other areas of the system where the Relabeling will display include the Task Type settings, Tooltips and Validation Messages, Custom Report Columns and Filters, Notification & Portal Content, and Customer/Vendor Portal Menus. Even the Submit Task button will update with the Relabel selection for Tasks in the system.

Example of Relabeled Submit Task Button in Customer Portal
Custom Dashboard widget names will need to be manually Relabeled individually, as their settings are based on the user profile and are not Relabeled by design.
Alternatively, you can reset the Dashboard widgets defaults, which will update the widget names according to the Relabeling, but this may cause Dashboards to require reconfiguration.
Example of Relabeling Portal Dashboard Widgets
There will be some areas of the system that are not susceptible to Relabeling changes and the entity Relabeling will not be displayed. Examples of this include the Import Sample File columns, the URL of a Customer/Vendor Portal, email handles, System Notifications and Help Guides, API Merge Fields, as well as other general Merge Fields.
But while the Merge Field names will not display with the Relabeled settings, the information they merge into the content will reflect the Relabeled information. For example, the [[Task Description]] Merge Field will continue to say “Task”, but the information merged will display whatever the Task entity was Relabeled to.
This Entity Relabeling feature was developed to help our Customers feel more comfortable and familiar using Striven. With the ability to select a label more closely suited to your Company’s terminology, users will find learning and using the system is easier and navigating the system feels more natural.
-
Company Locations
How to Set Up My Company Locations in Striven
Another important component to set up in your Striven management system is Company Locations. You can have multiple Locations, but only one Location that can be marked as the Primary Location. Once Company Locations are set up, you can later assign entities to these Locations, including Employees, job postings, and more. To view Company Locations, you can use the Striven Search or follow the navigation steps below:
Company → Settings → Company → Locations
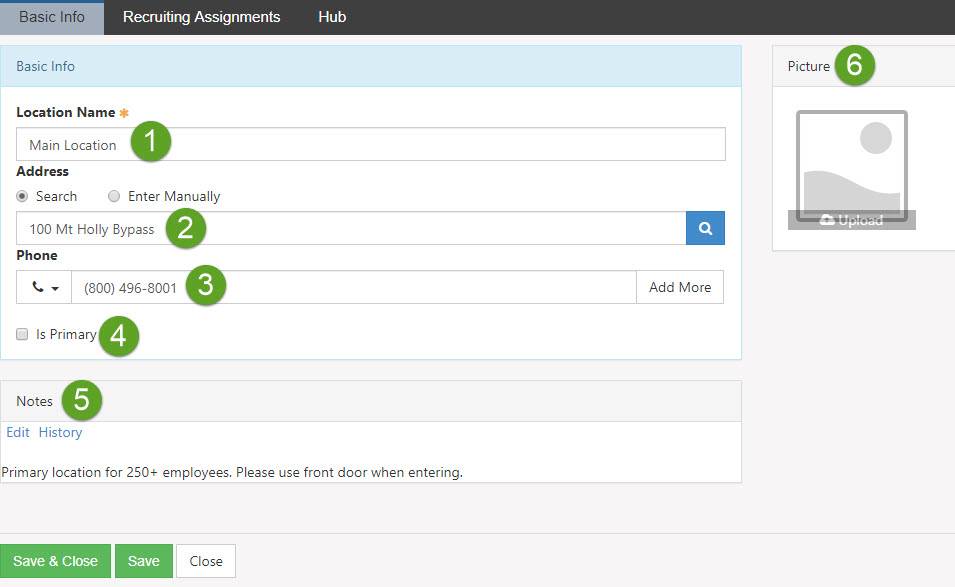
- Location Name: The name of the Location that is being added.
- Address: Associates your Location address using two methods:
- Search: Searches Google to try and match results to allow for a geocoded address. Once an address is matched, you can either select or select and edit to change an aspect of the address found.
- Enter Manually: By clicking this radio button, fields for address lines 1, 2, 3, city, state, zip, and the country will appear. This gives you the option to enter an address, however, the manually entered address will not be geocoded.
- Phone: The phone number for this Location.
- Is Primary: Notes whether the Location is primary or not. Once a Location is set as the Primary Location, this address will populate for merge fields titled Company-Primary-Address.
Note: There can only be one Primary Location for your Company in your Striven system. - Notes: Allows you to enter any notes about the Location that you would like to have on hand. An HTML dialog box is available as well for detailed editing and formatting.
- Picture: Allows you to upload an image of your Location.
- Allowed File Extensions: .jpeg, .jpg, .gif, .bmp, .png, .ico
- Max File Size: 100 MB
Example of Company Locations Page
-
Company Divisions
How to Set Up Divisions For My Company in Striven
When configuring your Company in Striven, one thing to think about replicating is your Company’s Divisions. To add New Divisions from the Divisions List, click the Add button, which will populate the image below. Setting up your Divisions will open up a lot of opportunities to customize the configuration of your system even more. After creating Divisions, you can associate a lot of entities in Striven to those Divisions, such as Items, Employees, and Projects. To view Company Divisions, you can use the Striven Search or follow the navigation steps below:
Company → Settings → Company → Divisions
- Division Name: The name of the Division you are adding to Striven. Divisions can be associated with entities throughout Striven, such as Projects, Items, etc.
- Division Leader: Allows you to select a Striven user from your system to be associated as the leader of the Division.
- Manager Email: Allows you to add the email of the Division leader or manager. This Employee will be notified about Division Assignments. This email can then be used as a merge field within the Notification & Portal Content for certain notifications, such as Task Marked as Completed to allow for your Customers to reach out to the manager, if needed.
- Save Options: Provides options to Save & Close, Save (to remain on the current page), or Close in order for no changes to take effect.
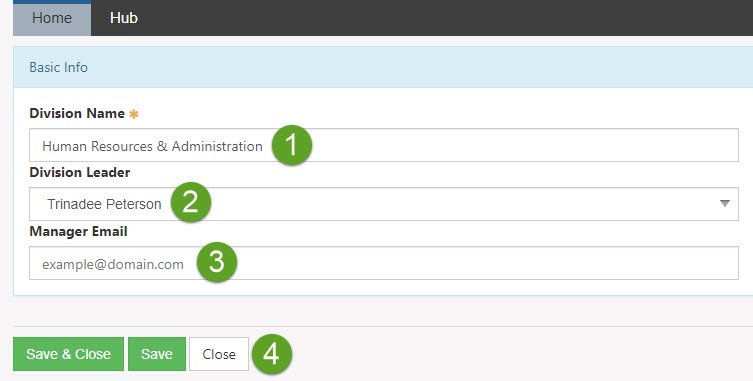
Example of Company Division
-
Notifications
Notification Subscriptions is where Employees will set up their notification preferences. This section can be found in the drop-down menu from the Profile icon. Housed within this section are preferences for Buzz post notifications, Task notifications, web push notifications, and text messaging notifications (Twilio integration required).
Profile icon → Notification Subscriptions
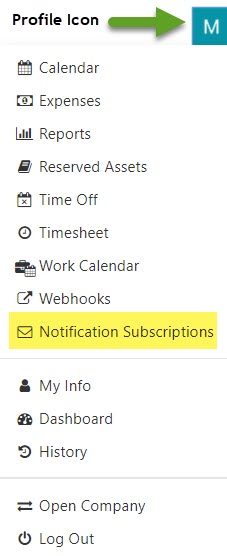
Example of Profile Icon Drop-down Menu
My Notifications
- Opt-Outs: Allows you to choose to opt-out of Appointment email notifications by selecting the checkmark in the Opt-Outs section.
- Web Push Notifications: You can check this box if you would like push notifications to show on the bottom right-hand side of your screen to notify you of upcoming Appointments. You will be notified fifteen minutes before the scheduled Appointment.
- SMS/Text Messages: This option is turned off by default, and requires a Twilio account. Once set up, you will have the ability to have text messages sent for Task Assignments.
- Time Off Notifications: Checking off any of the options in this section will subscribe you to be copied on the status-based time off notifications for all Employees that are subordinate to you within your Employee hierarchy.
- Expense Notifications: Checking off any of the options in this section will subscribe you to be copied on the status-based expense notifications for all Employees that are subordinate to you within your Employee hierarchy.
- Turn on Notifications for New Buzz Posts: The Buzz post notifications can be turned on and off by toggling Turn on Notifications for New Buzz Posts. If the message says, Turn on Notifications for New Buzz Posts, your settings are set to have notifications NOT sent.
- Manage Task Notifications: Allows you to configure which Tasks you would like to receive notifications for.
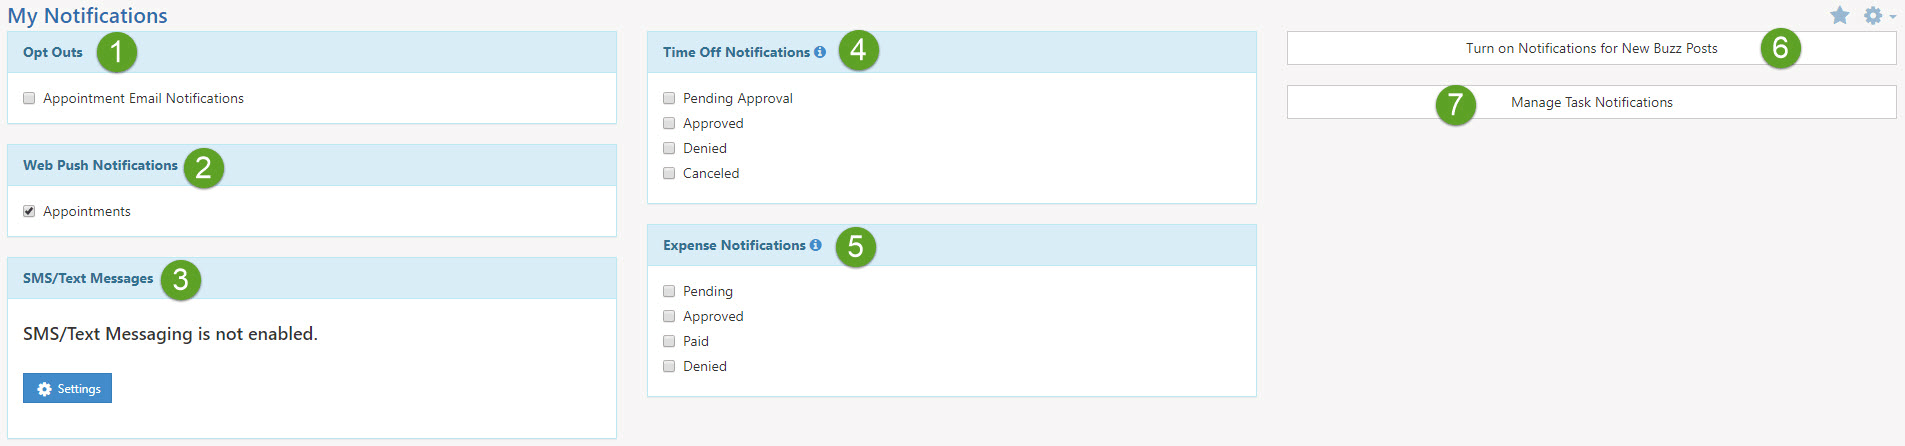
Example of My Notifications Page
Task Notifications
- Tasks Assigned to Me: Select the checkbox if you would NOT like to receive Task update notifications. If this box is unchecked, you can choose which events and statuses you would like to be notified of. Events and statuses available for notification are:
- Task Updated
- Task Viewed
- Notes Added
- Label Updated
- Status changed to – Open
- Status changed to – Done
- Status changed to – On Hold
- Status changed to – Canceled
- My Projects: Allows you to add Projects here if you would like to get notified of Tasks related to a particular Project. These notifications can be configured to specify certain events and statuses you would like to be alerted of. If you would like to be notified of changes to completed work within a Project, make sure to check Include Completed in the My Projects section. To turn notifications off, toggle the on switch to off.
- My Customers: Allows you to add Customers here if you would like to get notified of Tasks related to a particular Customer. These notifications can be configured to specify certain events and statuses you would like to be alerted of. To turn notifications off, toggle the on switch to off.

Example of Tasks Notifications Page
-
Email Clean Up
Email Clean Up is a quick and convenient way to remove certain email addresses from your Striven system. Non-deliverable email addresses can be added to the Email Clean Up page after a mass email is sent so you don’t accidentally email them again. This will help limit the non-deliverable responses you receive and allow you to focus on other important work. You can use the Striven Search to access the Email Clean Up, or follow the navigation steps below:
Company → Settings → Company → Email Clean-Up
-
Notification & Portal Content
The Notification and Portal Content contains the Emails, Hyperlinks, SMS/Text Messages, and Portal messages that are sent automatically from your Striven system. These messages and hyperlinks can be customized to better suit your company’s needs. It is a good idea to check into the Notification and Portal Content section to see where these messages are located and what you can modify here. To view the Notification and Portal Content, you can follow the navigation steps below:
Company → Settings → Company → Notification and Portal Content
The Notification and Portal Content list displays the messages and hyperlinks available with the following options and information:
- Search: Allows you to search the Notification and Portal Content for specific messages or links by Title, Content, or Type.
- Sort: You can sort the list by Title, Type, or by Last Modified.
- Title: Displays the name of the message or link. Selecting the title will allow you to edit the content within.
- Type: Displays the content type. The type options you will see listed are Email, HTML Content, Hyperlink, and SMS/Text Messages.
- Modified By: Allows you to view the user that last modified the content.
- Last Modified: Displays the date and time the content was last modified.
- Customized: If the content has been modified from the default settings, a “Customized” label will be displayed.
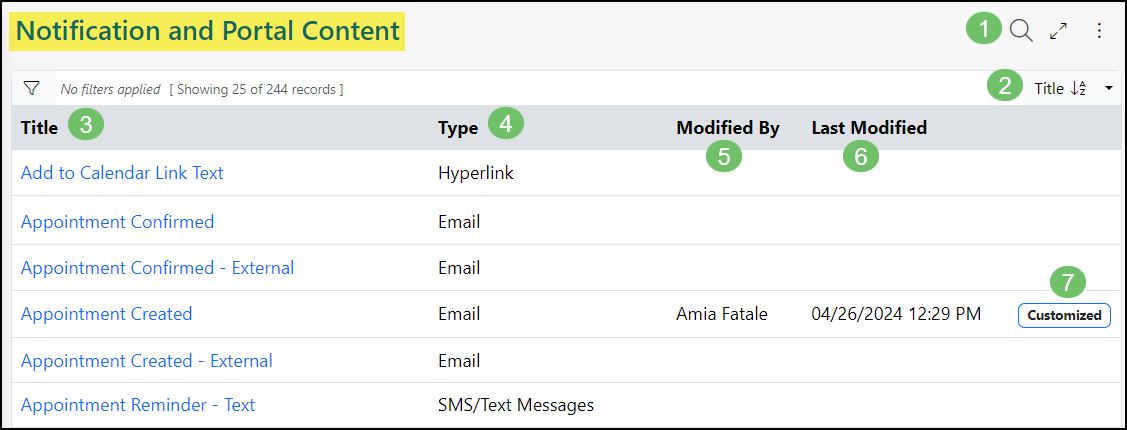
Example of the Notification and Portal Content List
Within each Email, SMS/Text Message, and Portal message, you are able to write your own content, insert images, and insert merge fields which will populate related customer, entity, and user information automatically. Below is an image illustrating how the Notification and Portal Content appears when editing and what actions are available.
- Title and Information: Hovering over the Information icon located to the right of the content Title will allow you to read more information about when this content is sent, or how it functions.
- Subject: You are able to determine the subject line that will accompany the sent email.
- Editor Menu Bar: The options contained within this menu allow you to format the body of your content. You may utilize this menu to insert images, links, and edit the HTML code for the content as well.
- Merge Fields: This drop-down menu allows you to select and insert merge fields, which populate information from the entity automatically to eliminate manual entry and streamline communication.
- Body: This section allows you to customize the written content and images within the message type.
- Save: Allows you to Save and Save and Close.
- Reset to Default: This option will only be displayed on Notification and Portal Content that has been edited by a user. This option resets the email to its default state. After choosing this option, a preview will appear which will show the default format to allow you to decide if you want to move forward. Once the email is set back to its default state, it cannot be reversed, but it can be customized once more.
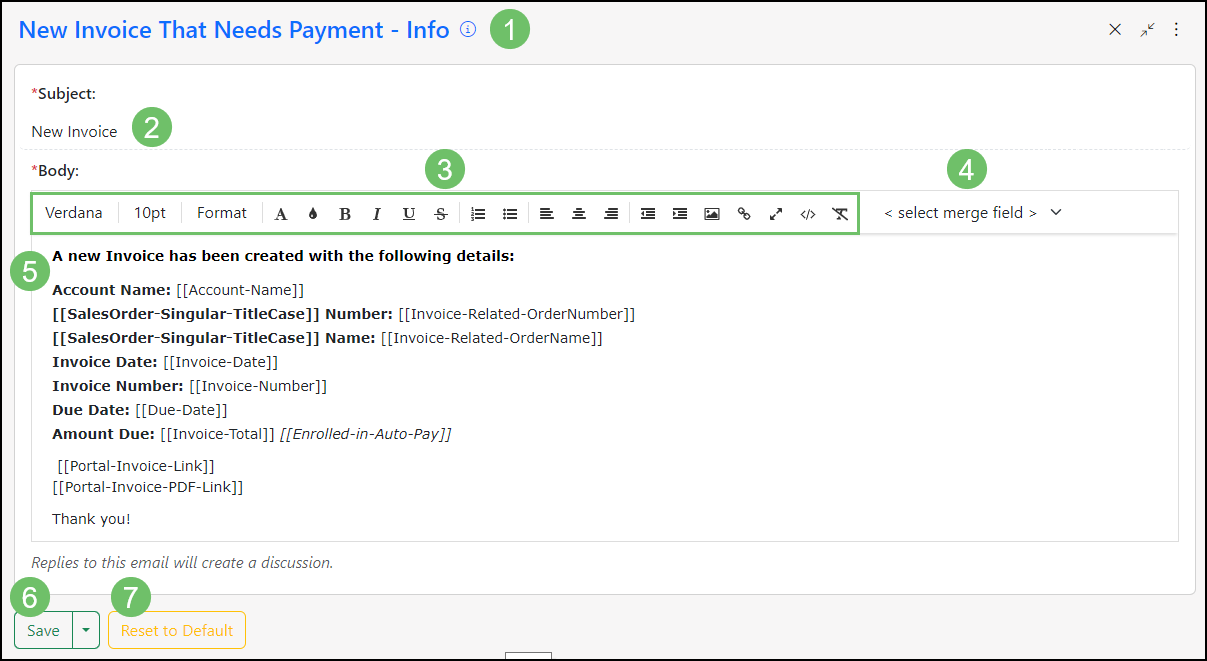
Example of Editing a Notification and Portal Content Message
-
Favorites
Favorites in Striven are similar to bookmarks in your browser. If you would like quick access to a particular page, you can add it to your Favorites icon bar and/or your Favorites list. Your Favorites can be links to pages inside and outside of Striven. To add a page within Striven to your Favorites, you can select the Add to Favorites star on the top right-hand side of the page (under the Striven logo). You can also add and manage your Favorites from the Star icon to the right of the Buzz icon on the top right area of your Striven window.
You can add pages you would like to make a Favorite outside of Striven by using the Add Custom Favorite option in the Favorites drop-down list. You can assign your Favorite a name, list the URL it should be linked to, and decide whether you want your Favorite to show in the Favoritesicon bar, the Favorites menu, or both. You can even choose the color associated with the Favorite on your icon bar.
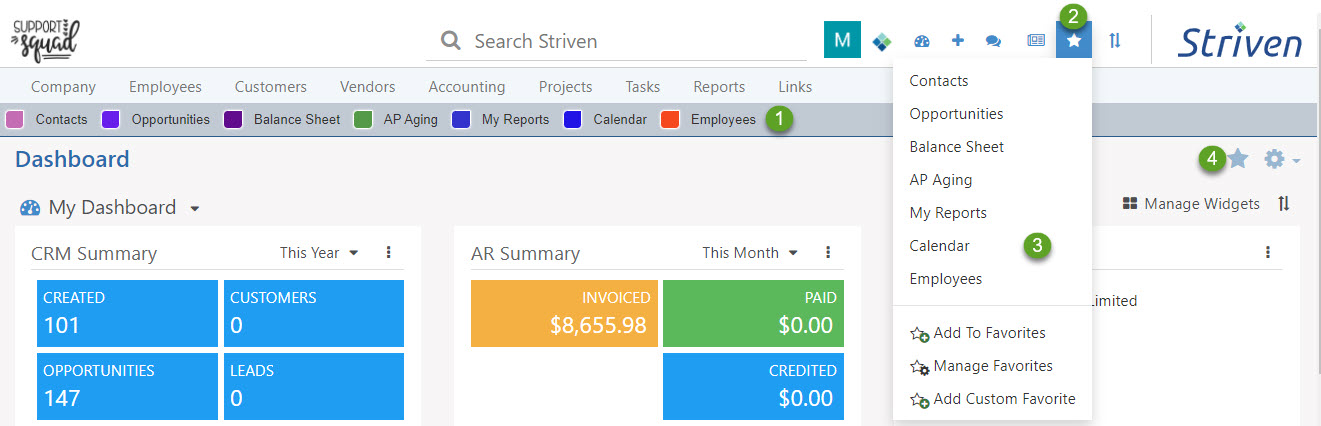
Example of Favorites Bar, Favorites List/Menu, Favorites Icon, & Add to Favorites Button
- Favorites Bar: Rests along the top of the Striven page providing quick access to Favorites. The title and color can be configured in the Favorites menu by selecting Manage Favorites.
- Favorites Icon: Click this Star icon to see a list of your Favorites, as well as your Favorites menu options.
- Favorites List/Menu: Your Favorites are listed at the top of this drop-down menu, while the menu options available below include Add to Favorites, Manage Favorites, and Add Custom Favorites.
- Add to Favorites Button: Enables you to quickly add that page to your Favorites and is available on all Striven pages.
-
Landing Page & Dashboards
Your Landing Page in Striven is similar to your homepage on your internet browser. This page displays when you log in to Striven. By default, the Landing Page is set to display the My Dashboard page. You can set a page as your landing page by selecting the Gear icon on the top right-hand side of the page under the Striven logo. Once you select the Gear icon, select Make Landing Page from the page you would like to make your landing page. To get to your Landing Page, you can select your Company logo in the top left of your Striven system.
Striven also has a feature that allows users with the “Employee Settings – Edit” permission in their User Role to designate a default custom Dashboard for all new users. Once the custom Dashboard is configured, you can navigate to the Manage Dashboards page from the Dashboards drop-down list.
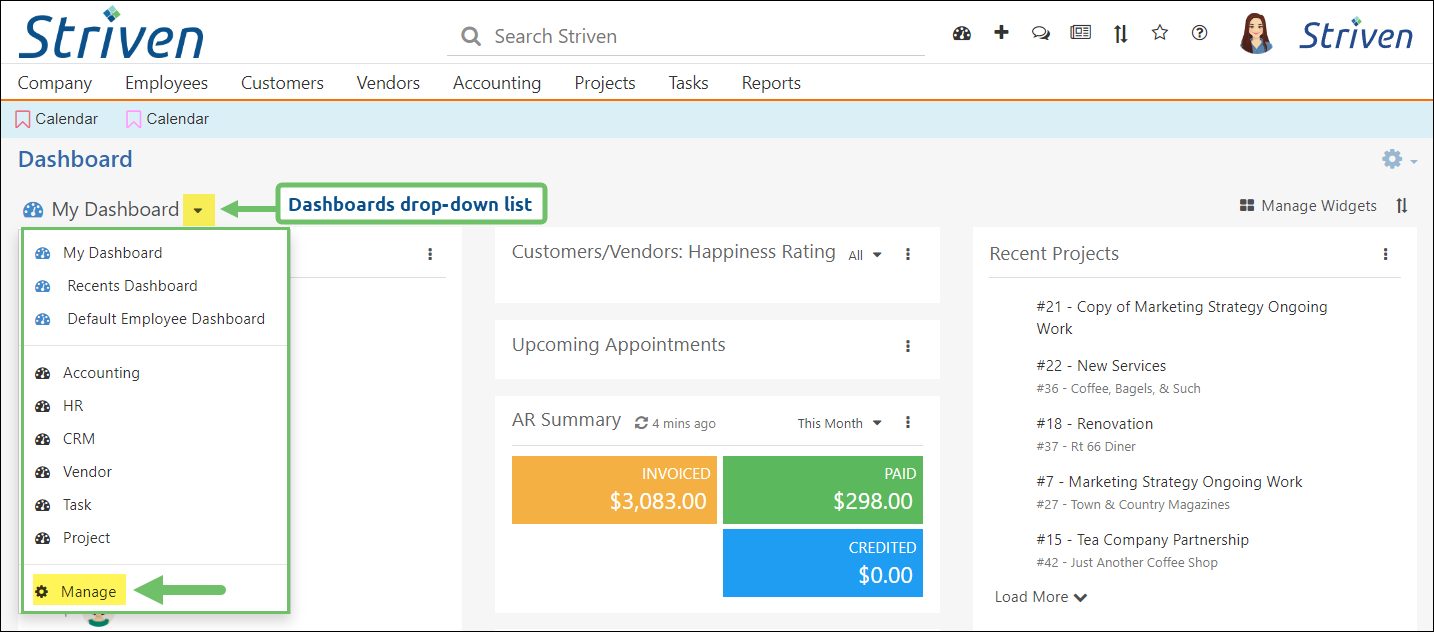
Example of the Manage Dashboards Option in the Dashboards Drop-Down List
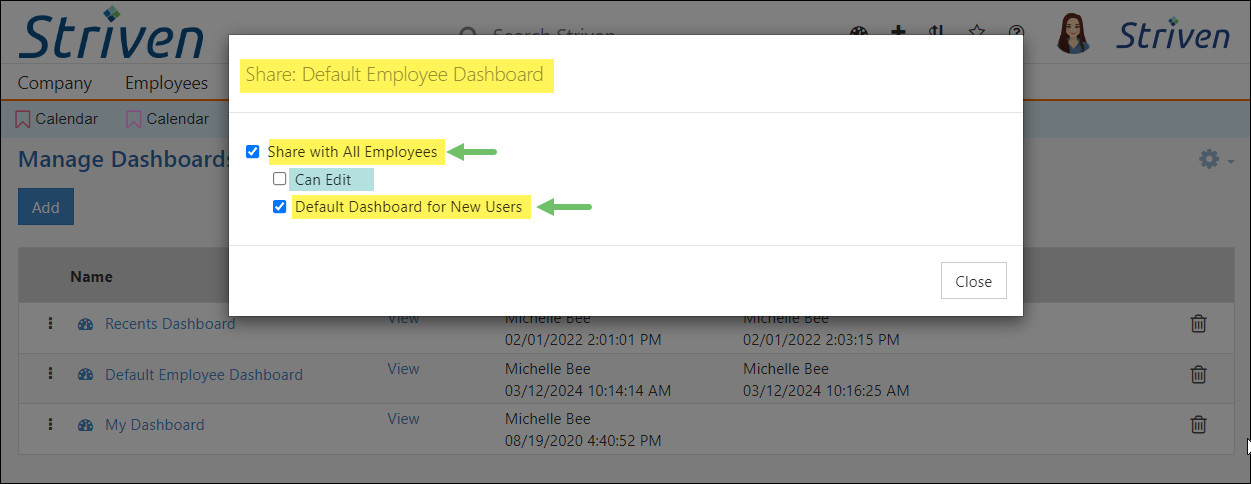
From there, you can select your default Dashboard by clicking on the kebab menu next to the Dashboard name and clicking Share.
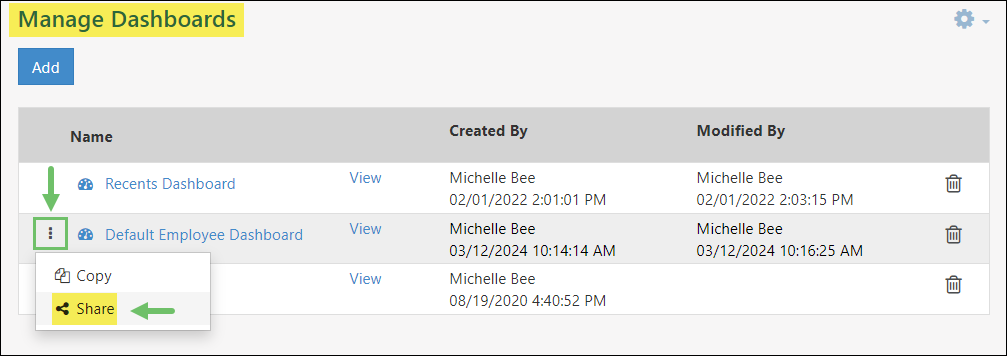
Example of the Share Option on a Custom Dashboard on the Manage Dashboards Page
Once you click on the Share button, a popup will appear with the options to Share with All Employees. If you check that box, a confirmation message will display to confirm you wish to share the Dashboard with all Employees. After you confirm you wish to share the Dashboard, two (2) new options will display:
- Can Edit: Provides the Employees this Dashboard is shared with to edit the widgets and configurations of the Dashboard.
- Default Dashboard for New Users: Sets this Dashboard as the default Dashboard when new users are added to the system.
Example of the Share Options Available for a Custom Dashboard
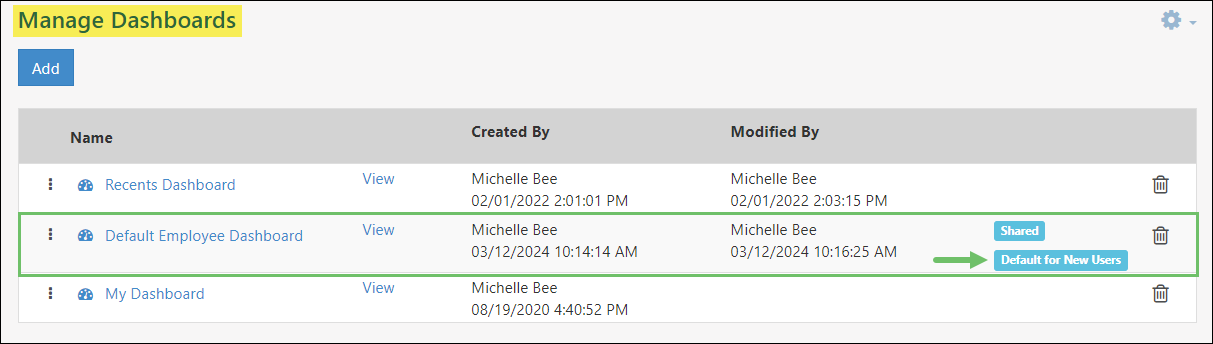
If a Dashboard is selected as the Default Dashboard for New Users, there will be a label that displays on the Manage Dashboards page indicating the same.
Example of the Default for New Users Label on the Manage Dashboards Page
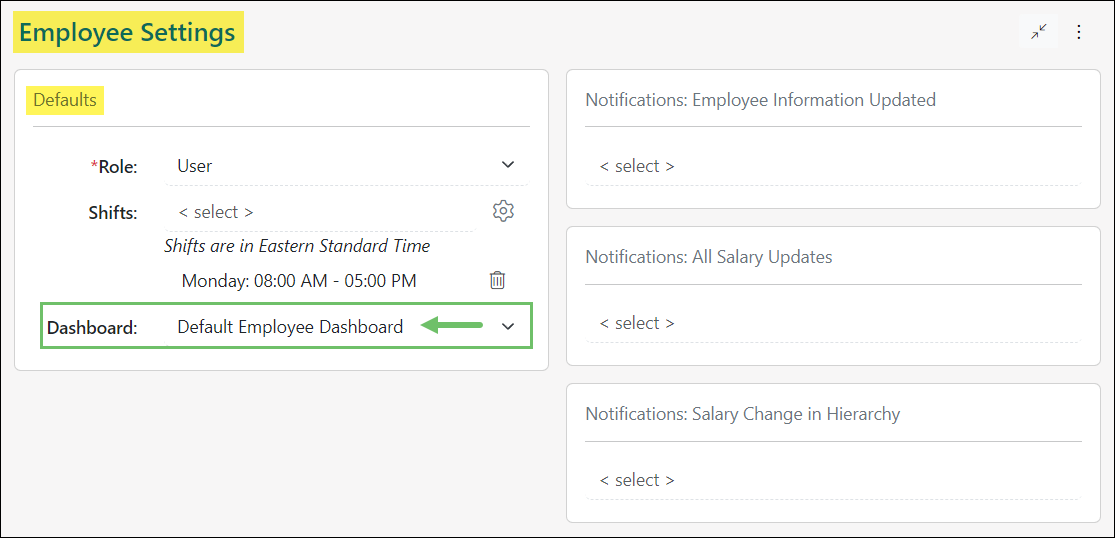
The Default Dashboard can also be set from the Employees Settings page by selecting the desired Dashboard from the drop-down list in the Defaults section of the page.
Example of the Default Dashboard Settings on the Employee Settings Page
-
How to Get Support Assistance in Striven
Striven offers unmatched Customer Support by providing a variety of ways to request assistance or ask questions of our knowledgeable and friendly Support Team. Located within the Help menu are the options for initiating Support Chat, submitting a ticket for support, as well as a link to our User Guides, Striven Community, and the Striven website.
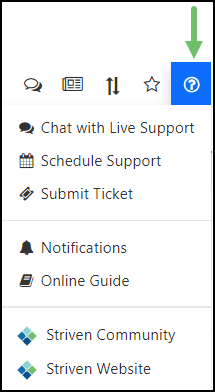
Example of the Striven Help Menu Options
Support Chat
Our live Support Chat feature is available Monday through Friday 8am to 8pm EST for any How-To questions our users may have. And you won’t be talking to a bot or automated system – our Support Team members are online and prepared to address your questions and requests.
To access the Striven Support Chat, you can select the Chat with Live Support option from the Help menu within your Striven system.
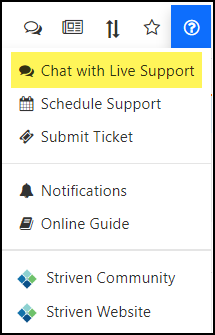
Example of the Chat with Live Support Option on the Help Menu
There is also a Live Chat option available from the Striven website in the lower right corner of the page.
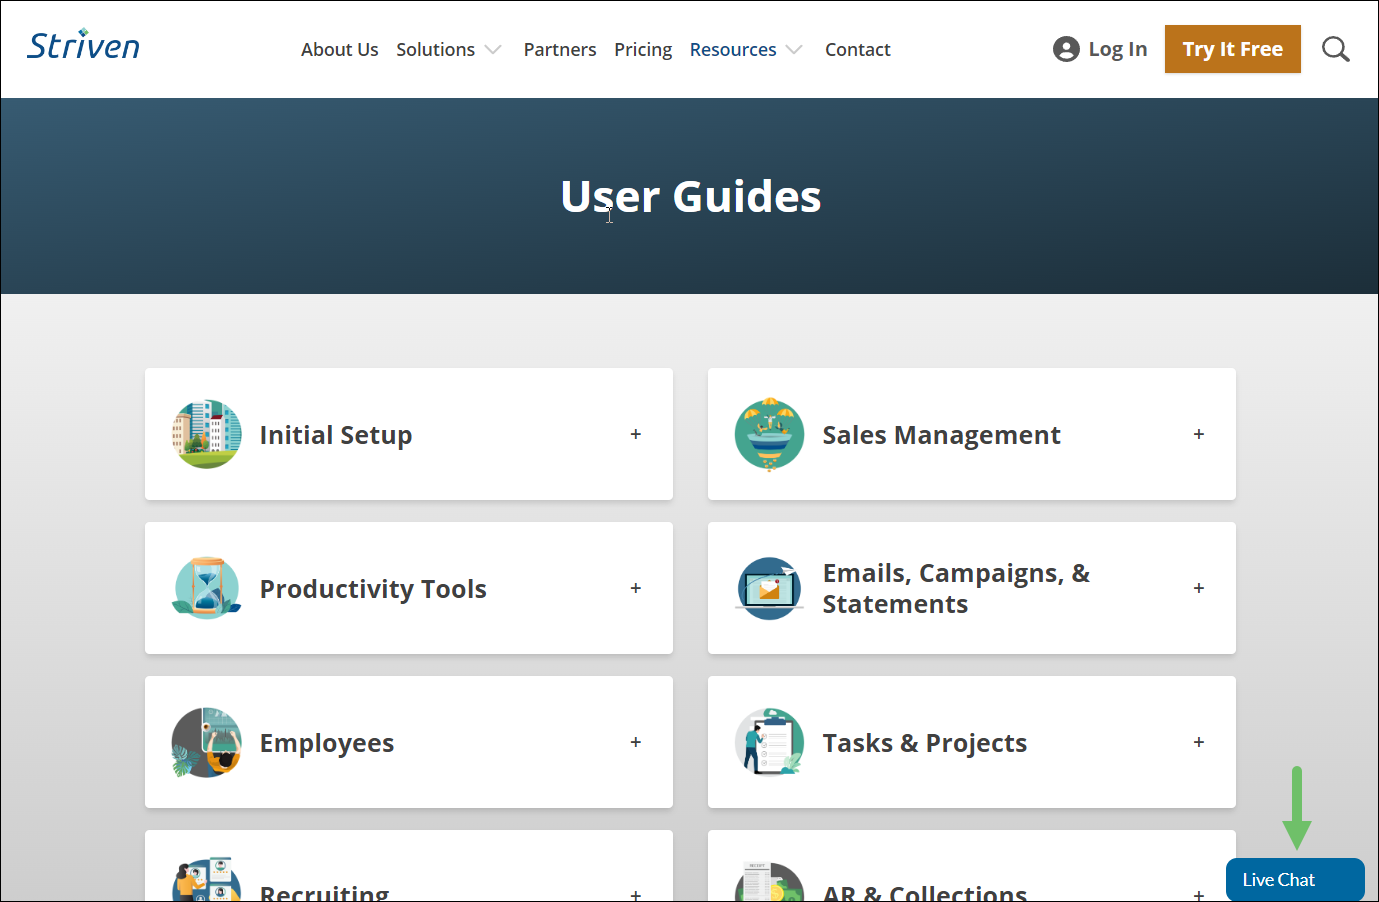
Example of the Live Chat Option from the Striven Website
Submit Ticket
If users within your Company find areas of Striven which are acting differently than expected they can use the Submit Ticket option. This option can be found by clicking the Help menu at the top of Striven and choosing Submit Ticket from the drop-down menu, which will populate the Striven Support page. Submitting requests using this feature will create a Task for a Striven Support Specialist to review and handle accordingly. All the information here, including attachments and content, will be captured in the Task that is created. Below is a screenshot displaying how the Submit Ticket option appears and a list describing what you can accomplish there.
- Subject (Required): The title of the request being submitted.
- Your Requests: Displays your previous support requests as links to view the Task in more detail through the Customer Portal.
- Content: Allows you to enter content and describe the Support request being submitted.
- Attachments: Allows you to upload images or documents when submitting your requests.
- Actions: There are two button options here:
- Submit: Presents the request for review.
- Close: Cancels the request.
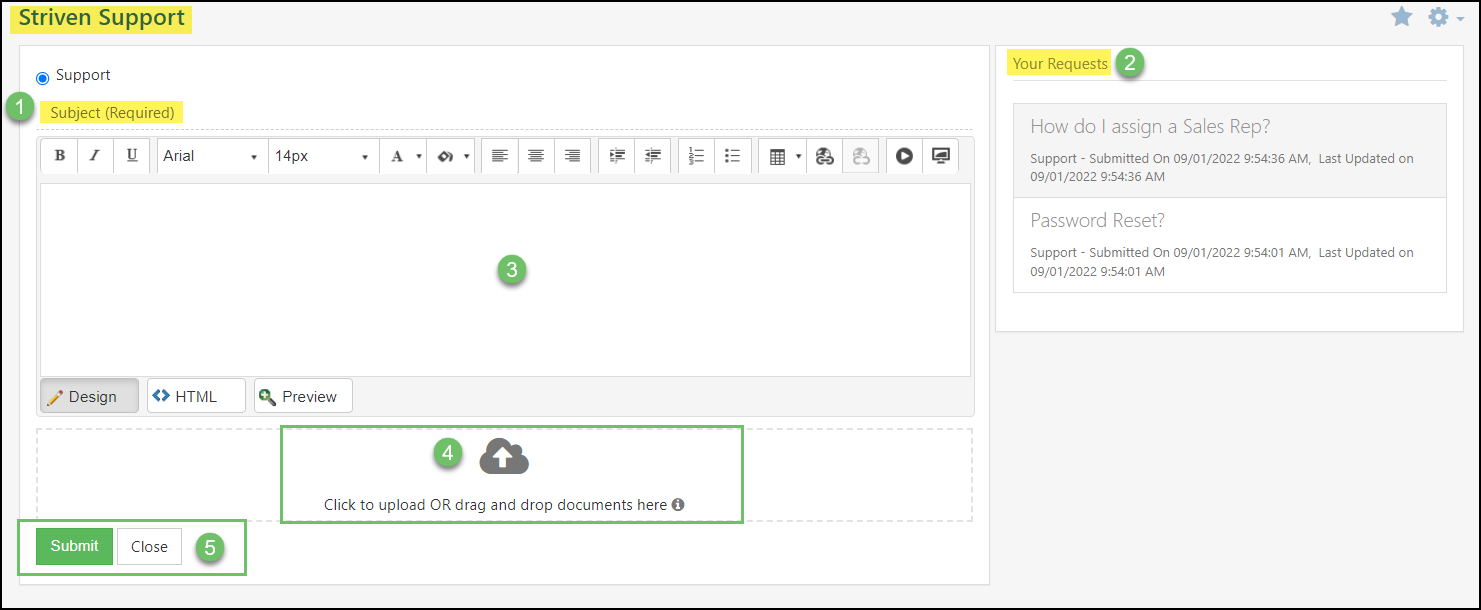
Example of the Striven Support Page
This option is also available at the top of the Live Chat popup on our website by clicking on the Submit a Ticket link in the chat window.
Schedule Support
We also have an option to schedule a brief meeting/screenshare with Striven Support if you prefer. Also located in the Help menu, you can click on the Schedule Support option. This will direct you to our Striven Support Scheduling Link where you will enter your information and select a date/time to meet with a member of our Support Team.
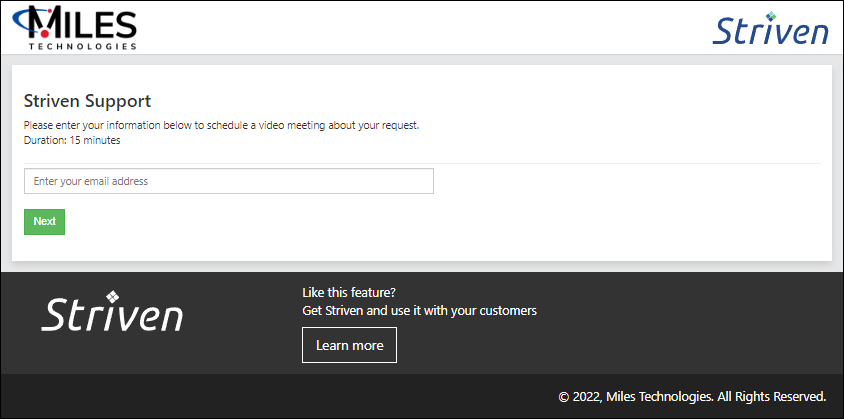
Example of the Schedule Support Page
This option can also be found on our website under the Contact menu and selecting Support, then clicking on the option to Schedule Now.
Example of Scheduling Support from Striven.com
Email to Task
Another easy option to get help that is not included in the Help menu is to create a Task via email. You can send an email detailing your request to Support@Striven.com, which will automatically create a Support Task and assign it to a Support Team member to assist you.
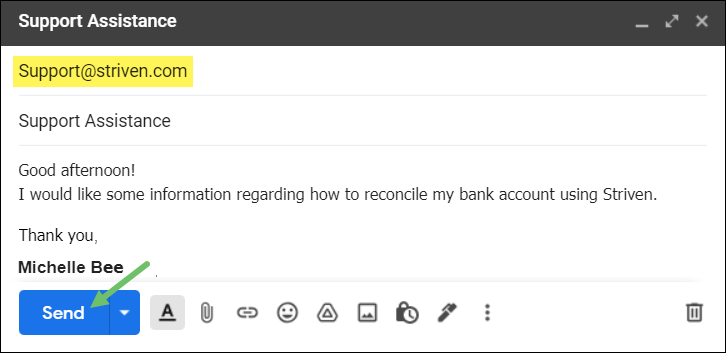
Example of an Email to Task Request for Striven Support
Additional Resources
Included with these practical and time saving Support options, we have a number of other available resources to reference, such as our Striven Community, our Striven User and Integration Guides, and our Striven YouTube channel.
- The Striven Community is an online forum to ask questions and share/discuss ideas or feedback about features within Striven. There is a wealth of information available by searching for your topic, or posting your own specific question.
To view the Striven Community page, visit https://community.striven.com/ or click here.

Example of the Striven Community Website
- The Striven User Guides and Integration Guides are available on our website under the Resources menu. These guides provide detailed information about the features within Striven, and include instructions for configuring the different components of your system as well as explaining how features work, and how/why users would benefit from using them.
To view the Striven User Guides, visit Striven.com and navigate to Resources → Support → Guides or click here.
To view the Striven Integration Guides, visit Striven.com and navigate to Resources → Support → Integrations or click here.
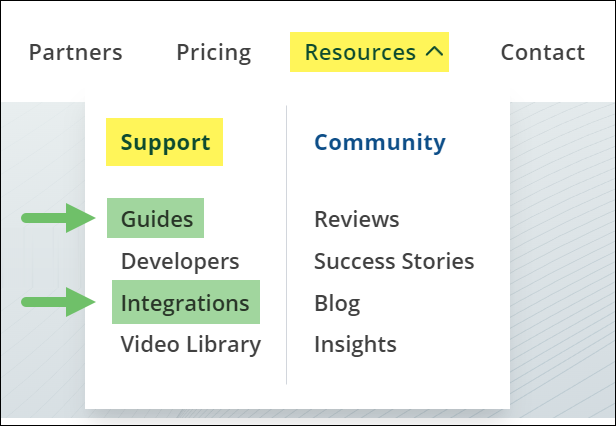
Example of Resources Menu on Striven.com
- The Striven Business Software YouTube channel offers a variety of helpful videos to browse or search, with topics like Customer testimonials, feature spotlights, how-tos, system updates, and new features.
Visit our Striven Business Software YouTube channel at https://www.youtube.com/c/StrivenBusinessSoftware or click here.
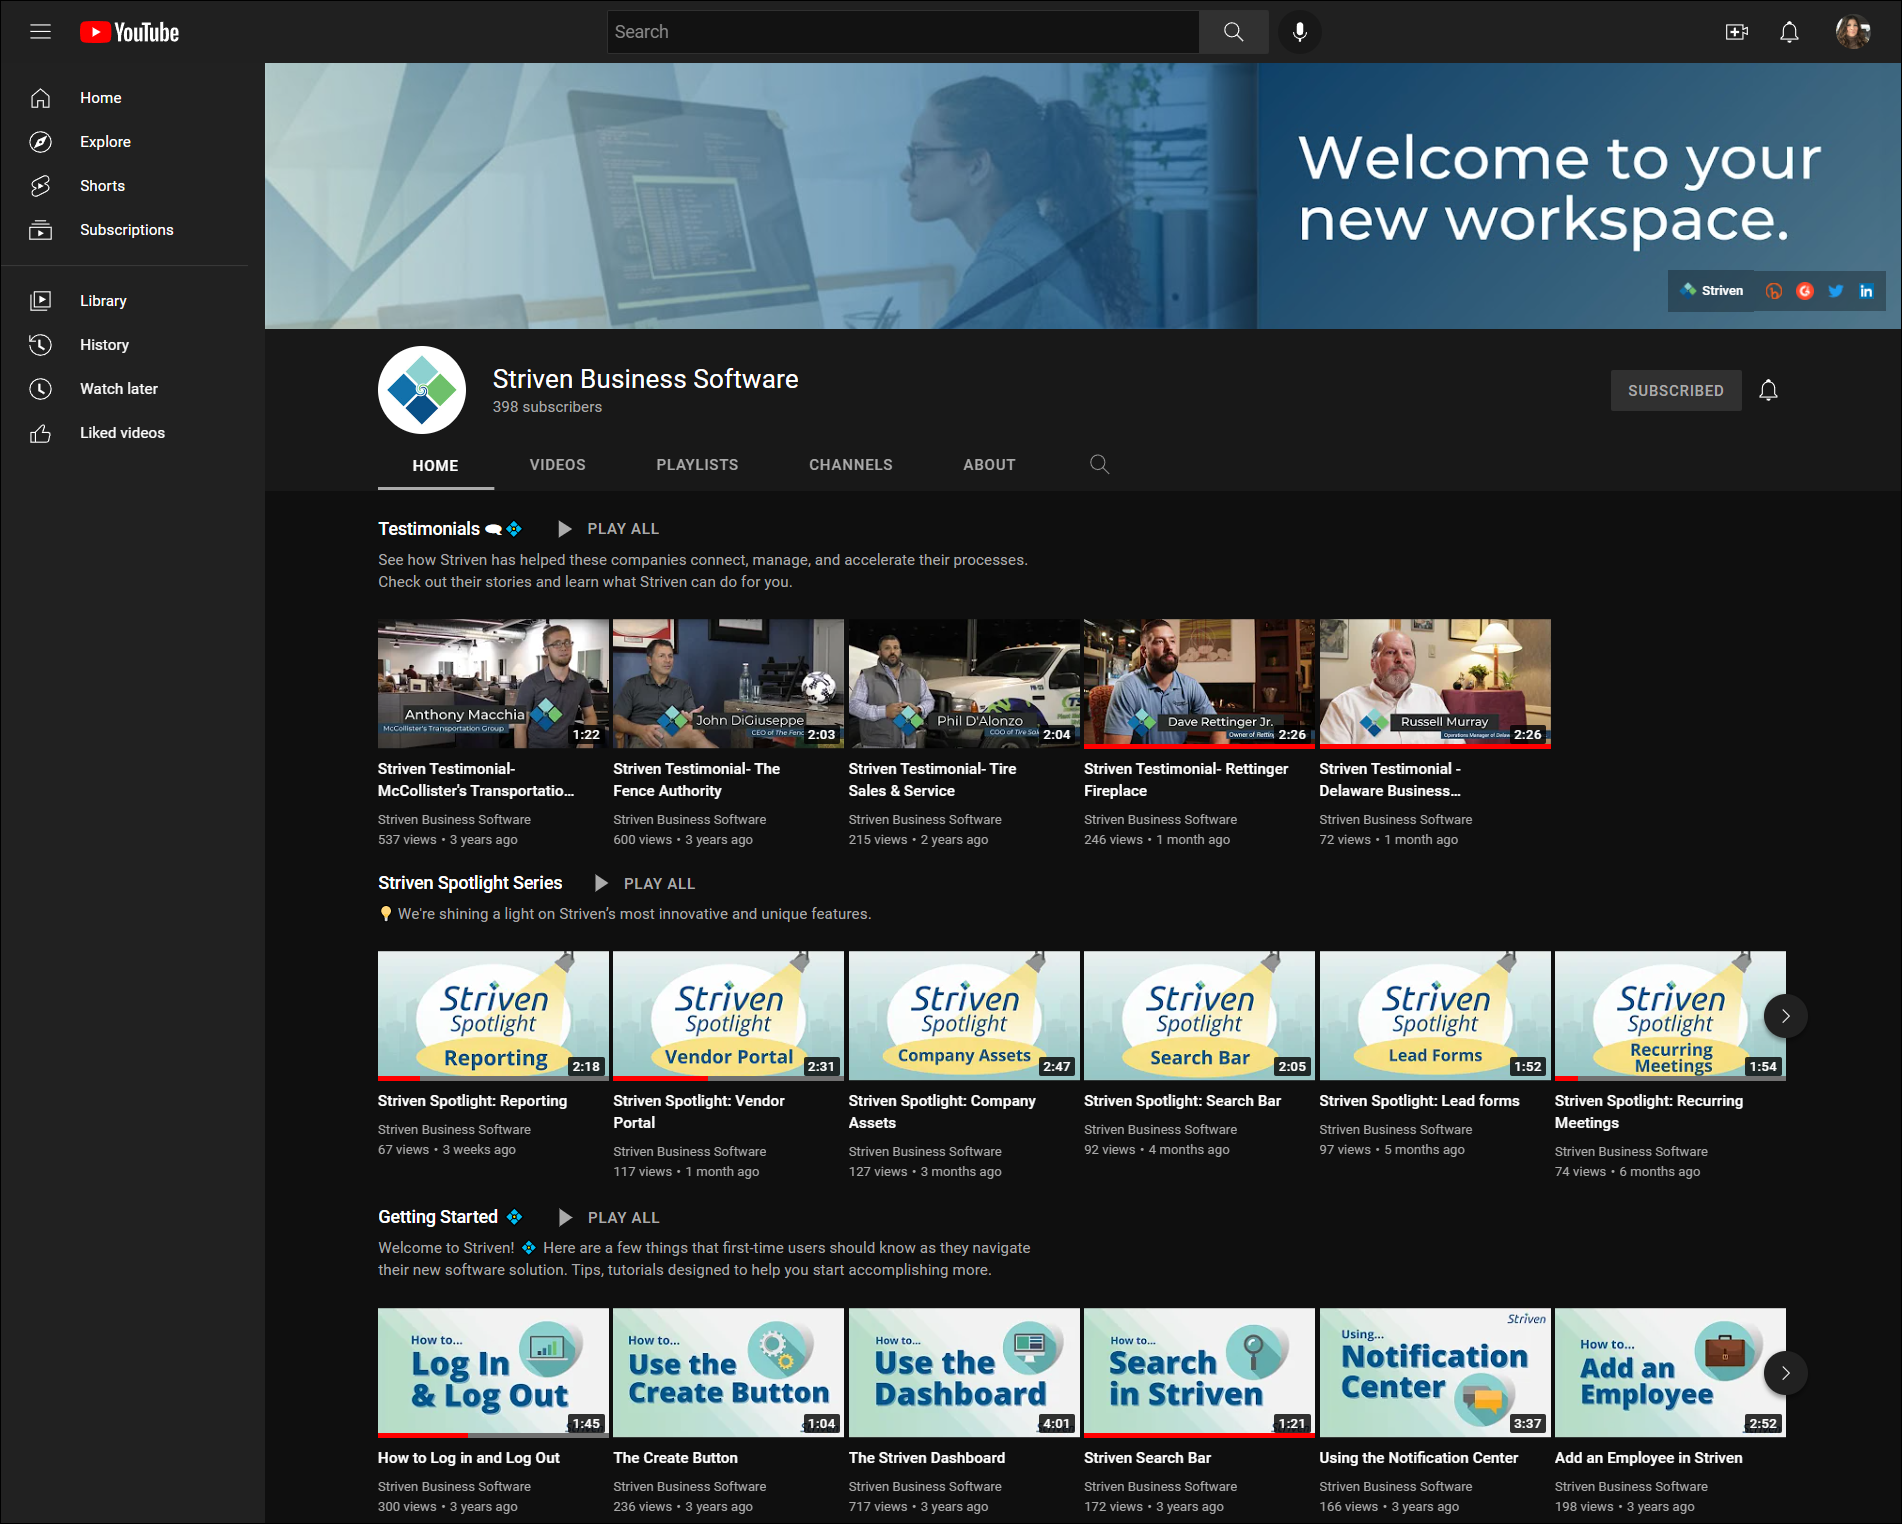
Example of the Striven Business Software YouTube Channel
-
Striven Subscription Settings
All of your Striven Subscription details are displayed together within your Striven Account page. You can navigate to this page by clicking on the Employee Actions menu in the top right corner of your screen. This menu contains the Subscription option for selection.
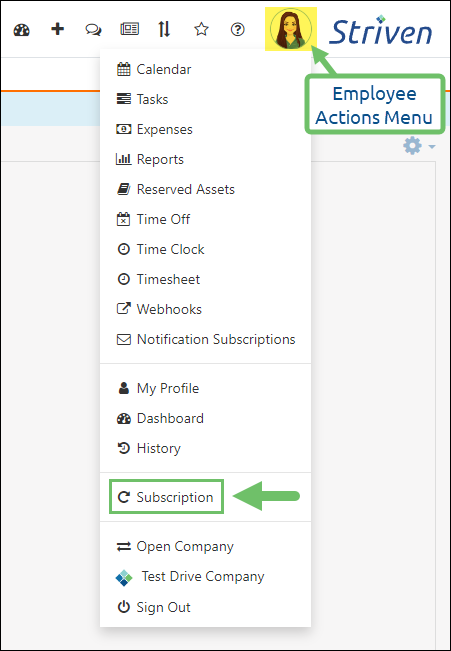
Example of the Subscription Option on the Employee Actions Menu
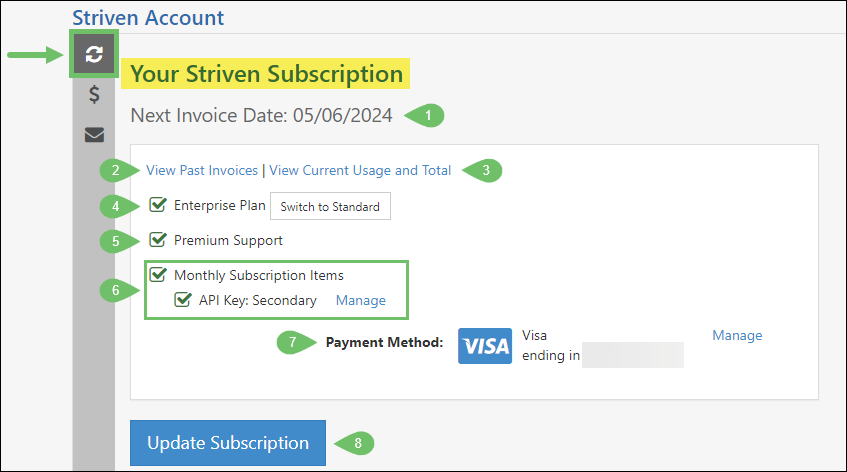
The Striven Account page holds all of your Striven subscription details and management options. Along the left side of the screen, you will see icons for the Subscription details page, Recent Transactions, and Notification Recipients.
Your Striven Subscription
The page loads on the Subscription view by default, indicated by the Circular Arrows icon at the top of the Left-side Menu Bar. The following details are displayed on this page:
- Next Invoice Date: Notes the date your next subscription invoice will be generated.
- View Past Invoices: Redirects you to the Recent Transactions page to view past invoices related to your Striven subscription.
- View Current Usage Total: Displays a popup window filled with details about your Current Usage, Current Subscription, Current Monthly Subscription, Premium Support, and the total monthly fee for your Striven subscription.
- Plan Selection: Displays whether you are subscribed to the Standard or Enterprise plan, based on your system usage and needs. There is also an option to switch between plan options.
- Premium Support: Displays if you are subscribed to Premium Support.
- Monthly Subscription Items: If you are subscribed to any Monthly Subscription Items, such as additional API Keys, those details will be displayed here. You can also click the Manage link to configure your Monthly Subscription Item settings.
- Payment Method: Displays the payment method you have set to use for your monthly subscription payments. You can also click the Manage link to configure your Payment Method settings.
- Update Subscription: Displays the options for switching plans and adding/removing Premium Support from your subscription.
Example of the Striven Account Page Options
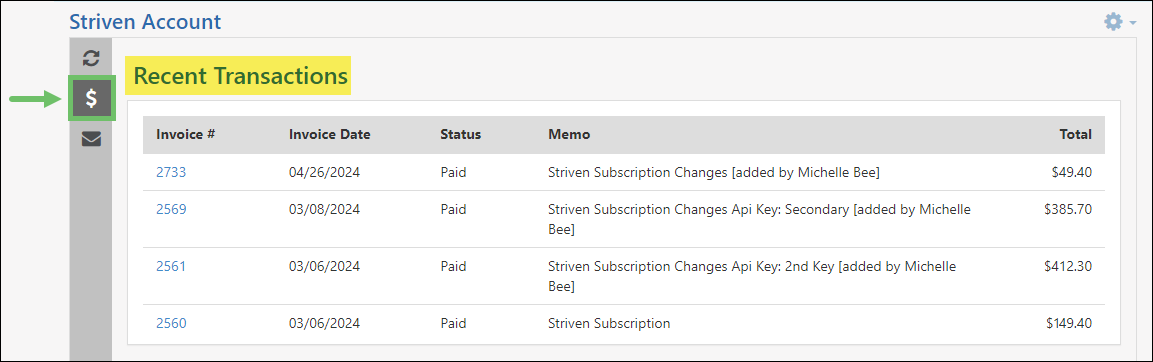
Recent Transactions
Selecting the Dollar Sign icon from the Left-side Menu Bar will display the Recent Transactions page. This page includes details related to your subscription Invoices, including the Invoice #, Invoice Date, Status, Memo, and Total. The Invoice #s are links to view the full Invoice details and provide the option to Print that particular Invoice.
Example of the Recent Transactions Page related to the Striven Subscription
Notification Recipients
The Envelope icon on the Left-side Menu Bar leads to the Notification Recipients settings. This is where you will select the recipient(s) you wish to receive notifications related to your Striven subscription.

Example of the Notification Recipients Settings for the Striven Subscription
-
Recap
With this Company Setup Guide, we’ve introduced you to your basic Company preferences and configuration settings. We’ve covered how to configure your Company Locations, Divisions, Notifications, email settings, and Notification & Portal Content. Configuring your Favorites and Landing Page were also reviewed. Additionally, we discussed the different ways you can get Support Help and manage your Striven subscription to get the most out of the user experience and accomplish more with Striven.
FAQs
-
Now that I have Company Locations, am I ready to start tracking inventory quantities?
Having Company Locations provides many benefits to tracking information in your Striven management software; however, inventory tracking is not one of them. To track inventory quantities you will need to create Inventory Locations, which are discussed further in our Item Management Guide.