
Customers
Contact Management
Support Guide
-
Overview
Customer/Vendor Management in Striven allows companies to track information for each Customer/Vendor. Contacts can be managed within the CRM of Striven as well. You can manage information including, but not limited to, Contact information, Portal Roles, and much more. This guide will explore how you can best manage individual Contacts and report on the Contact data within Striven.
Read this guide if you are trying to:
✔ Create or associate Contacts in Striven.
✔ Manage Contact information and assign permissions in the Customer/Vendor Portal.
✔ Communicate to Contacts and manage references in Striven.
-
Contact Management
There are two ways to view Contacts in Striven. These include the Contacts List and viewing Contacts under a specific Customer/Vendor. Both of these views offer valuable methods of managing Contact information, and this guide will help demonstrate how these two views can help you manage Contacts more easily. First, we will discuss managing Contacts through the Contacts List and then explore managing Contacts through the Customer/Vendor.
-
Contacts List
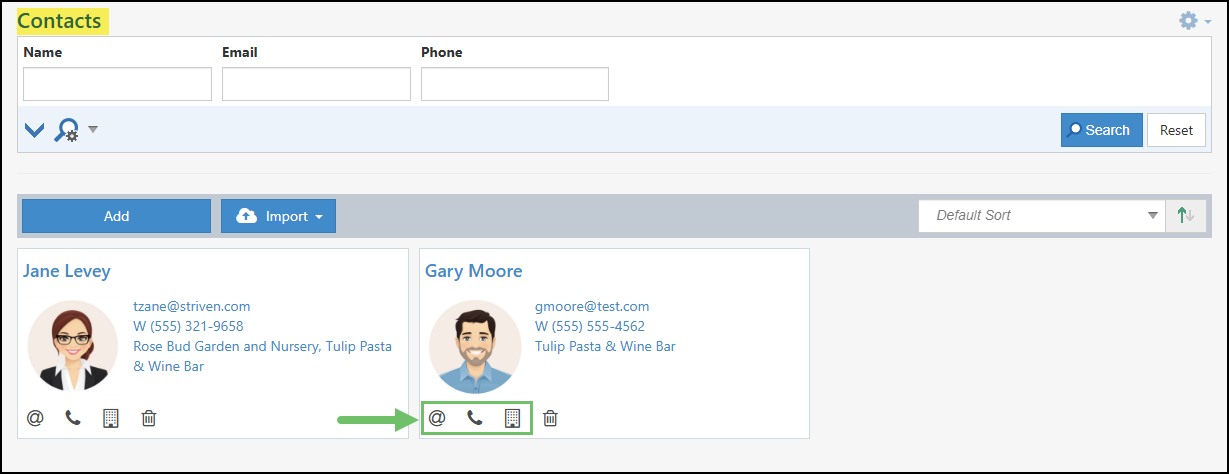
The Contacts List under the Customer tab allows you to view all the Contacts in your Striven system. There are also buttons to allow you to Add and Import Contacts (which will be discussed further in the following sections). Once a Contact is created from this screen, you can associate the Contact with an existing Customer. There are also icons per Contact to enable you to View, Edit, and Deactivate the Contact easily. Below is a screenshot illustrating how the Contacts List page appears and a description of what can be accomplished there.
Customers → Contacts
- Search Filters: Enables you to narrow down search results to find the Contact you’re looking for.
- Add Contact: The Add button will allow you to create new Contacts in Striven.
- Import: Populates a drop-down displaying two options including:
- Customers/Vendors: Enables you to import Customers and/or Vendors en masse.
- Contacts: Enables you to import Contacts into Striven in bulk. A sample file is provided on the import page for convenience.
- Note: To learn more about imports, please reference our Import Management Guide.
- Contact Information: Displays the Contact’s basic information including their name, primary email, primary phone, along with the Customer(s)/Vendor(s) with which they are associated. Clicking on the Contact’s name redirects you to a Contact Basic Info page where you can edit the Contact’s name, birthday, phone number(s), email address, or address as needed.
- Contact Options: The @, Phone, and Associations icons triggers a popup that allows you to view the Contact’s basic information, email book, phone book, Customer associations, or you can Deactivate the Contact by clicking the Trashcan icon. Deactivated Contacts can be searched by selecting Inactive under the Status drop-down and clicking Search.
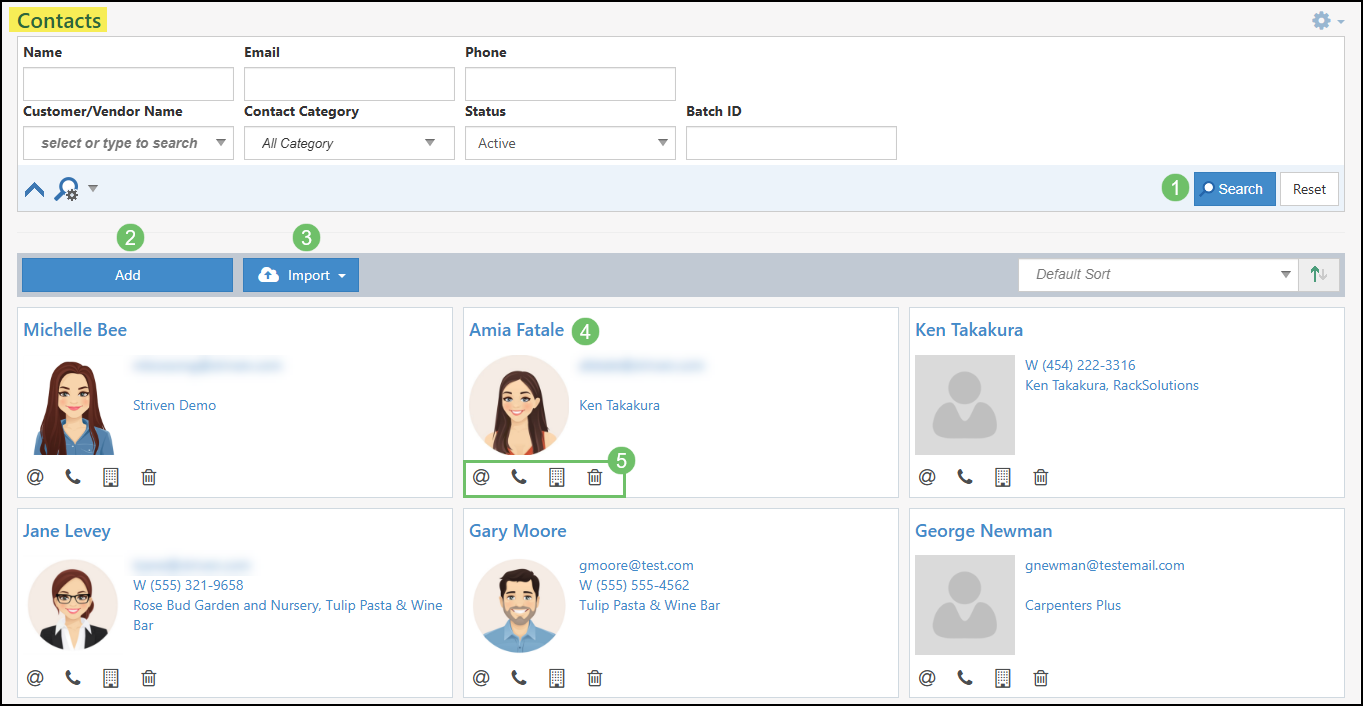
Example of Contacts List Page

-
Contact Info
By clicking on a Contact name from the Contact List you will be brought to a detailed version of the Contact information. It is important to note that when viewing a Contact Info screen from within the Customer’s information, additional features and settings are available through the correlating tabs. Below is a screenshot of a Contact’s info and a description of what can be accomplished there.
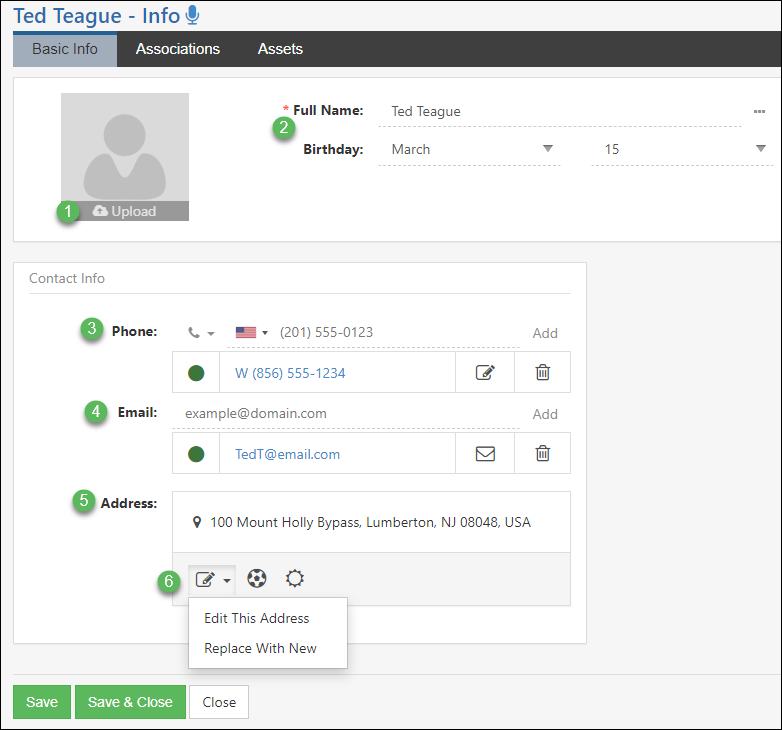
Example of Contact Info Page
- Upload Image: Provides ability to upload a Profile Image of the Contact.
- Allowed File Extensions: .jpeg, .jpg, .gif, .bmp, .png, .ico.
- Max File Size: 10 MB
- Basic Info: Documents the Contact’s full name and birthday.
- Phone: Allows you to add or view phone numbers for the Contact. If more than one number needs to be added, you can type the number in the Add field and click the Add button. If numbers need to be differentiated from each other, you can click the Phone icon and designate what type of number it is. Options include: Home, Mobile, Work, and Fax.
- Email: Allows you to add or view an email address for the Contact. If more than one email needs to be added, you can type the email address in the Add field and click the Add button.
- Address: Displays the Contact’s address. This address can be updated as described below:
- Edit this Address: Allows you to make manual changes to the address saved in the system.
- Note: This applies only to Address Line 1, 2, and 3. The other address fields cannot be manually changed. This option would be used for changes such as adding or removing suite, floor, or apartment numbers.
- Replace with New: Allows you to search Google for matching results to populate the address. Addresses added this way will be geocoded to allow you to find directions easily. You may also choose to enter the address manually in order to include information that may not be part of the geocoded address, such as a suite, floor, or apartment number.
- Edit this Address: Allows you to make manual changes to the address saved in the system.
Contact Associations
This tab will display all the Customers/Vendors the Contact has been Associated with. Here the Customers/Vendors will be displayed along with basic information about the Contact’s role related to the entity. There are tools to manage and view the Contact in their associated Customer/Vendors as well. Below is a screenshot, demonstrating how the Contact Associations page appears and a description of what can be accomplished there.
- Search Filters: Provides the ability to search for Associations related to the Contact.
- Associate: Allows you to associate the Contact with a Customer/Vendor by choosing the account name from the drop-down list.
- Customer/Vendor Info: The name of the Customer/Vendor that the Contact has been associated with. Below the Customer/Vendor name, the Contact’s Title is listed as well to let you know the Contact’s role within the Customer’s organization.
- Customer Status: Indicates whether the Associated Customer’s status is Prospect, Active, Deleted, or Lost.
- Go To: By clicking the Go To icon you will be brought to the Dashboard for the Customer/Vendor associated with the Contact.
- Deactivate: The Deactivate icon will deactivate the Contact. Deactivated Contacts can be searched by selecting Inactive under the drop-down search filter and clicking Search.
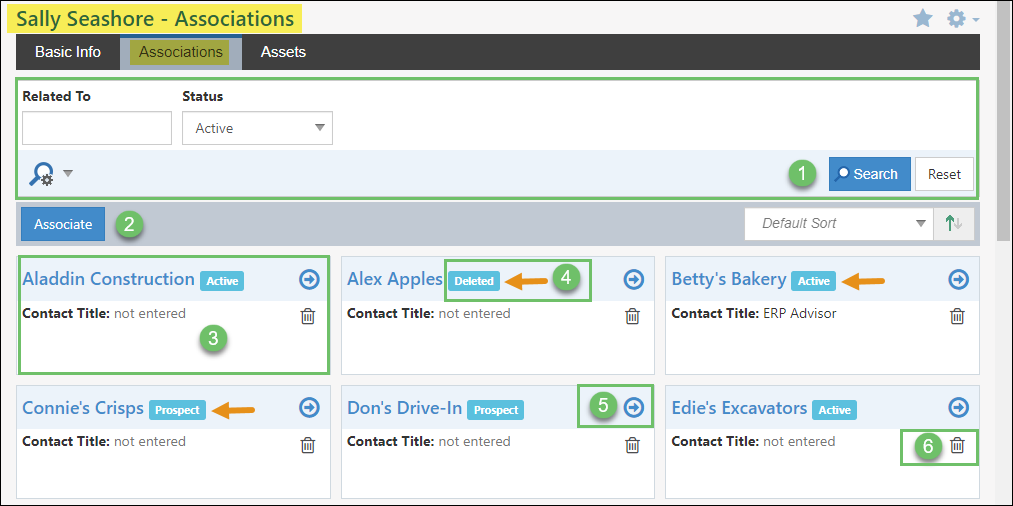
Example of Contact Associations Page
Contact Assets
Another section of the Contact information that you can manage is the Customer Assets related to the Contact. On this page, all the Assets to which the Contacts have been related will be listed. There are tools for you to view and manage all the Assets that are related to the Contact in a user-friendly way. To learn more about managing Customer Assets, review the Customer Asset Management Guide. Below is a screenshot displaying how the Contact Assets section appears and a description of what can be accomplished there.
- Status: Here you can choose to search for either Active or Inactive Assets.
- Asset Name: The Asset name for which the Contact has been associated with. Clicking the name of the Asset will populate the Customer Asset page to easily manage the Asset as needed.
- Go To: By clicking the Go To icon, you will be brought to the info page for that particular Asset.
- Deactivate: Sets the Contact Asset to an Inactive status. Deactivated Contact Assets can be searched by selecting Inactive under the Status drop-down and click Search.
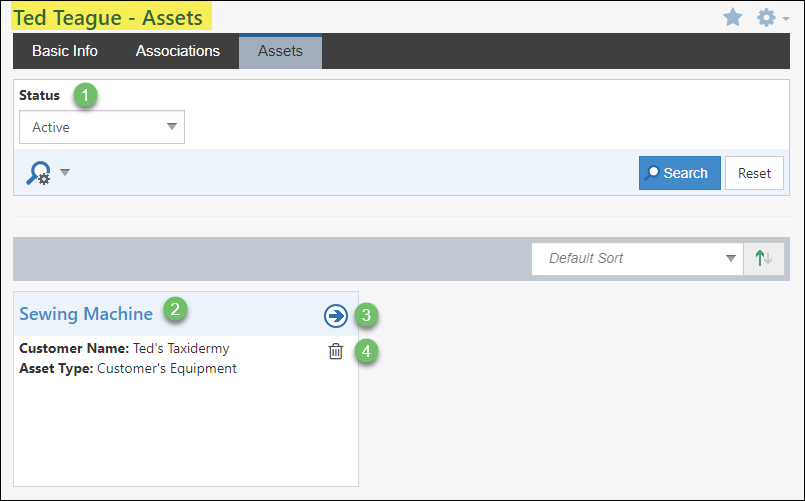
Example of Contact Assets Section
- Upload Image: Provides ability to upload a Profile Image of the Contact.
-
Customer/Vendor Contact Management
The Customer/Vendor Contacts List displays all the Contacts saved within the system that have been associated with the Customer/Vendor. You can locate a Customer/Vendor Contacts List by clicking on the Contacts option on a Customer/Vendor’s Navigation waffle menu.
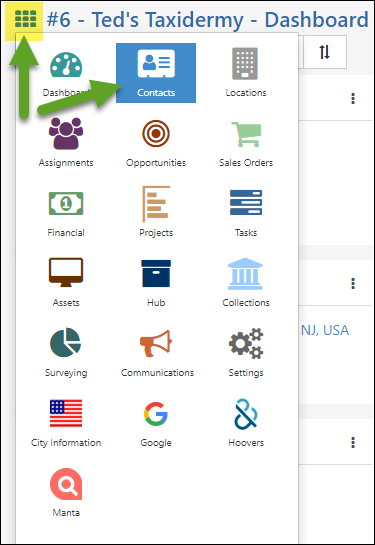
Example of the Contacts Option on a Customer/Vendor Navigation Waffle Menu
There you’ll find buttons to allow you to Add or Associate an existing Contact for the individual Customer/Vendor. If a Contact has a green Primary label, this notes that it is the primary Contact for the Customer/Vendor. There are also icons per Contact to enable you to Edit, Deactivate, and send a Discussion to Contacts easily.
Below is a screenshot of a Customer/Vendor Contacts page and a description of what can be accomplished there.
- Customer/Vendor: The Customer/Vendor’s name along with the Customer/Vendor Navigation waffle menu.
- Search Filters: Enables you to narrow down search results to find the information for which you’re looking.
- Add Contact: Provides the ability to add new Contacts into Striven.
- Associate Contact: Allows you to associate an existing Contact with the selected Customer/Vendor. In Striven, Contacts can be associated with several accounts with the same Contact information such as email, phone number, etc.
- Primary Contact: Notes that the Contact is the assigned primary Contact for the Customer/Vendor.
- Options: Links to communication options for the Contact, as well as one for the Contact’s Hub and one for related Assets. The option to Deactivate the Contact is also located here.
Example of Customer/Vendor Contacts Page
- Note: Clicking on the Contact Name will display the Contact Dashboard with all the Contact’s details as they relate to the associated Customer/Vendor.
-
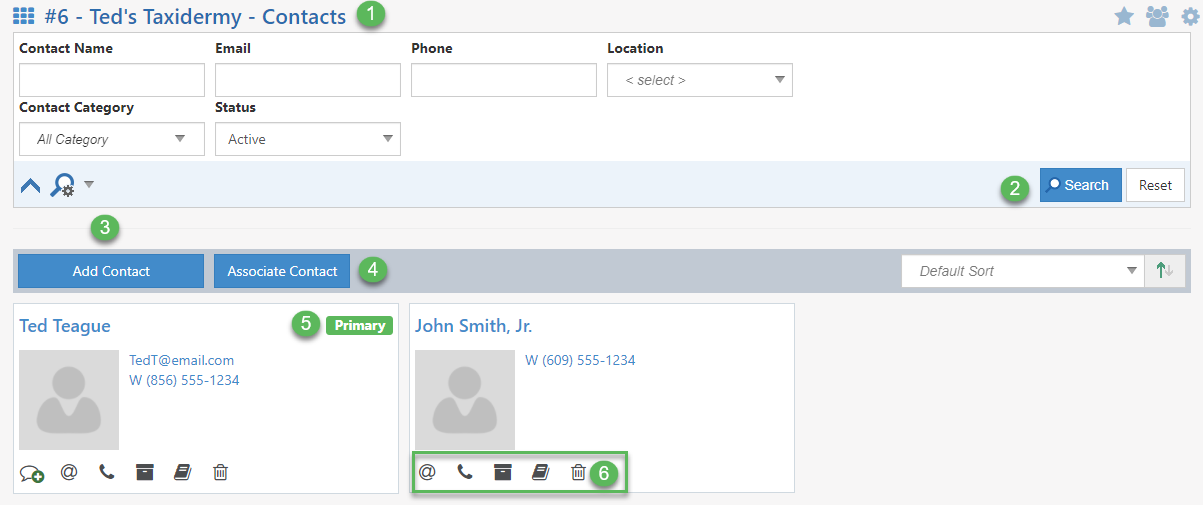
Customer/Vendor Contact Dashboard
By clicking on a Contact Name from the Customer/Vendor Contact List, a detailed view of the Contact’s information will be displayed in the form of the Customer Contact Dashboard. This page provides a centralized view of all Contact-related information through configurable widgets.
The Dashboard layout allows you to organize, manage, and interact with Contact data in a flexible way, using the same three-column design and configuration tools available across other Dashboards in Striven.
Example of a Customer/Vendor Contact Dashboard
- Note: Your access to information within the Contact Dashboard is directly tied to your existing user permissions. If you are unable to view certain data or access a particular feature, it is recommended to contact your Striven system administrator to review your User Role and associated permissions.
-
Contact Dashboard Management
There are four (4) main navigation tools on the Contact Dashboard to help you locate the appropriate Contact data.
- Customer/Vendor Navigation Waffle Menu: Provides links to navigate to areas of the Customer/Vendor account, such as Contacts, Locations, Tasks, Hub, etc.
- Customer/Vendor Contact Name: Displays the Customer/Vendor’s name along with the Contact’s name, identifying that you’re viewing the associated information specifically related to that Customer/Vendor Contact.
- Left Navigation Menu<: Offers quick access to the following different views related to the Contact:
- Switch Contact: Enables you to switch to another Contact Dashboard from a drop-down list. This list will include all Contacts linked to the same Customer/Vendor to instantly switch views without leaving the Dashboard.
- Dashboard: Loads the main Contact Dashboard view if a different view is currently selected.
- Hub: Displays Hub contents related to the selected Customer/Vendor Contact.
- Assets: Shows assets related to the selected Customer/Vendor Contact.
- Integrated Links: Provides quick access to connected resources related to the selected Customer/Vendor Contact.
- Dashboard Actions Menu: Provides quick access to the following Dashboard management tools:
- Copy Dashboard:
- From another user: Replace your Contact Dashboard display with another user’s layout. This option is available to all users.
- To other users: Copy your Dashboard layout with Employees, Job Titles, Teams, or Departments. This option requires the “Contact Dashboard – Copy to other users” permission for access.
- Manage Widgets: Opens the Dashboard Configuration popup window to add, remove, or rearrange widgets.
- Collapse/Expand All: Expands or collapses all widgets on the Dashboard with a single click.
- Audit Log: Tracks changes to sensitive fields, including Contact Portal Access and Subscriptions, providing accountability and a clear history of modifications. It also logs actions like adding/removing an Asset or marking a Contact as a Reference.
- Copy Dashboard:

Example of the Contact Dashboard Management Options
-
Default Dashboard Configurations
If a user has not personalized their Contact Dashboard, Striven automatically displays a default configuration tailored to the nature of the Contact’s relationship. These layouts are designed to present the most relevant and actionable information based on the Contact type, making the Dashboard functional from the very first use.
-
Customizing the Contact Dashboard
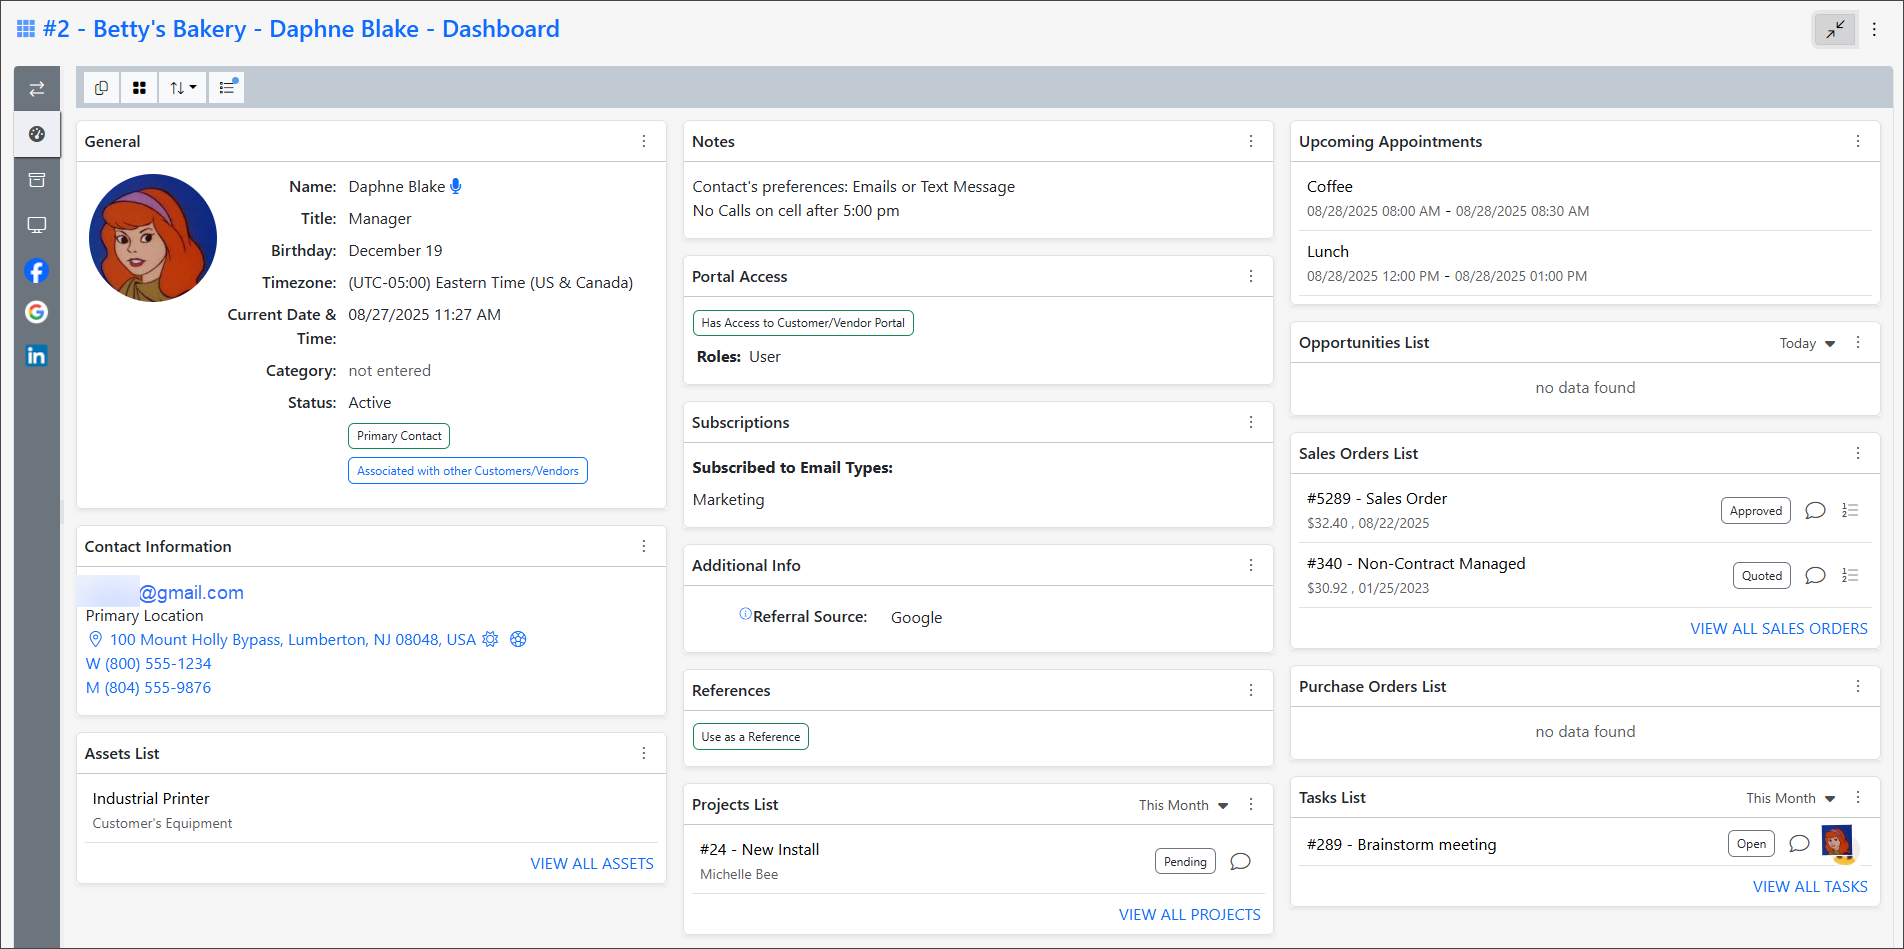
Like many of the other Dashboards found in Striven, the Contact Dashboard utilizes widgets to display Contact information. These widgets are arranged in a layout consisting of three (3) panels which can be customized to suit your viewing preferences.
- Widgets can be rearranged by dragging and dropping the widget block to any of the three (3) Dashboard panels in the settings. You can also move widgets within the panels to other positions as desired. This setting is accessed by clicking the Manage Widgets button on the Dashboard Actions menu.
Example of the Dashboard Configuration Popup
- Widgets can be removed from the Dashboard by clicking on the trash icon in the Manage Widgets popup and choosing Yes when asked to confirm.

Example of the Trash Icon on the Dashboard Configuration Popup
- In order to maintain optimal performance, there is a limit of 25 widgets for display on the Contact Dashboard.
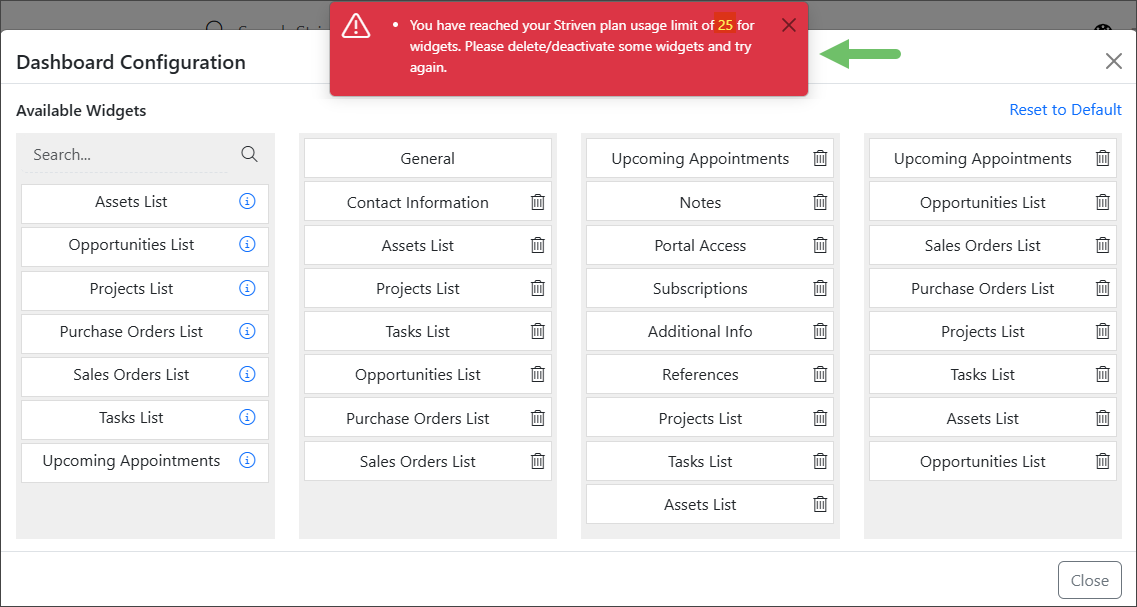
Example of the Usage Limit Warning on the Dashboard Configuration Popup
-
Widget Details
The Contact Dashboard is designed to provide a comprehensive and customizable overview of your Contact data. However, it’s important to recognize that not all widgets operate in the same manner, nor do they serve identical purposes for the information they present. This section of the guide aims to delve deeper into these distinctions, providing a more detailed understanding of how each widget contributes to the overall Dashboard experience.
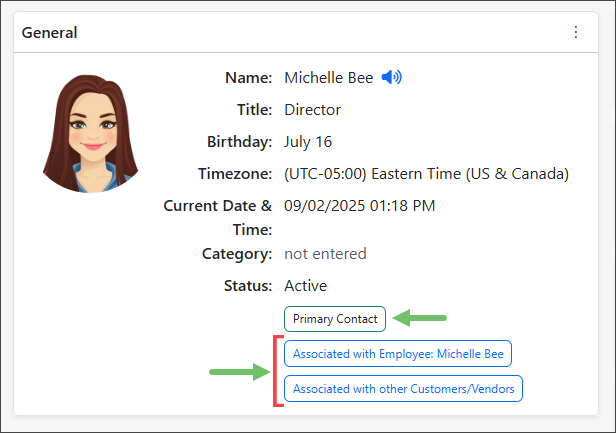
The General Widget
The General widget displays the core Contact information, such as the Contact’s Name, Title, Birthday, and more. This widget can be dragged to another position on the Dashboard, but cannot be removed.
To edit the General widget, click the Edit button that appears in the top-right corner of the widget when you hover over it or click within a blank area of the widget. This will enable you to make and save your changes to the Contact.
Example of the General Widget on the Contact Dashboard
- If a Contact is assigned as the Primary Contact for the Customer/Vendor, this will be noted in the General widget with a Primary Contact label.
- If a Contact is associated with multiple Customers/Vendors or to an Employee:
- An Associated with Employee button is displayed in the General widget, identifying the Employee. Clicking on this button shows the Employee Information popup, which includes employee-specific details.
- An Associated with other Customers/Vendors button is displayed. Clicking on this button will show the Contact Information popup set to the Contact Associations tab to view the other related records.
Single-Instance Widgets
Some widgets are designed to provide singular, critical pieces of information and can therefore only be added to the Dashboard once. These include:
- Contact Information: Stores and displays the email addresses, location, address, and phone numbers related to the Customer/Vendor Contact.

Example of the Contact Information Widget on the Contact Dashboard
- Notes: A dedicated space for capturing important remarks and observations related to the Contact.
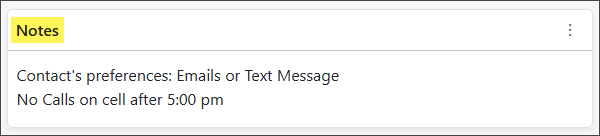
Example of the Notes Widget of the Contact Dashboard
- Portal Access: Management controls for the Contact’s Portal access, including Add/Remove Access and Portal Role selection.

Example of the Portal Access Widget on the Contact Dashboard
- References: Allows you to set whether or not the Contact can be used as a Reference.
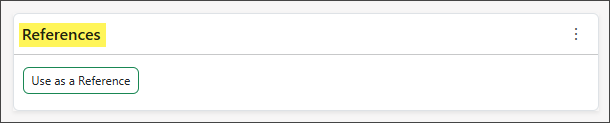
Example of the References Widget on the Contact Dashboard
- Subscriptions: Houses subscription settings for Workflow emails and other email types. There is also an option to Copy Subscription Settings to all Contacts to save time and ensure consistency in subscription management.
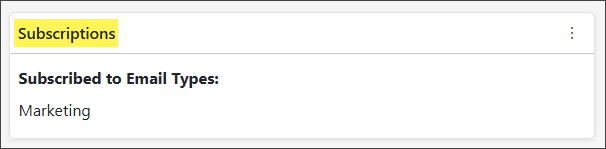
Example of the Subscriptions Widget on the Contact Dashboard
- Additional Info: A versatile widget displaying Custom Fields (set at the Global level for Contacts), allowing for the inclusion of unique, user-defined data points specific to your business needs.
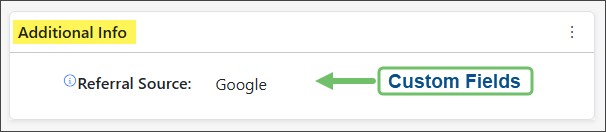
Example of the Additional Info Custom Field Widget on the Contact Dashboard
The information in these widgets can be configured by clicking the Edit button that appears in the top-right corner of the widget when you hover over it or by clicking within a blank area of the widget.
Multi-Instance Widgets
Other widgets have more dynamic configuration options and can be added more than once to the Contact Dashboard to display different data based on their particular settings. For example, the Upcoming Appointments, Assets, Sales Orders List/Purchase Orders List, Projects List, and Tasks List widgets operate with a similar logic to their counterparts on the Customer/Vendor Dashboard by filtering by both the Customer/Vendor and the Contact.
Within the kebab menus of those widgets, there’s a Settings option wherein you can further configure the filters for the widget or modify the widget Name as it displays on the Dashboard. Each widget has filter options relevant to the type of data presented in that particular widget type. Additionally, multiple instances of these widgets can be added to the Dashboard, each configured with different filters to display specific data.
- Upcoming Appointments Widget: Displays the upcoming appointments scheduled for the Contact. If the widget settings are filtered for a specific Employee(s) within your system, the widget will display upcoming appointments related to the filter(s) set.
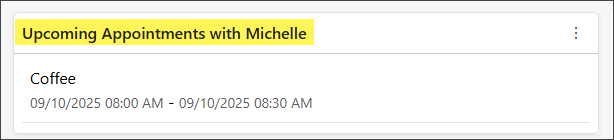
Example of a Customized Upcoming Appointments Widget on the Contact Dashboard
Widget Settings: Provides the ability to edit the Widget Name, or filter the results displayed in the widget by Employee. By selecting an Employee, the widget will display only upcoming appointments that include the selected Employee as an Attendee.

Example of the Upcoming Appointments Widget Settings Options
-
Contact Asset Associations
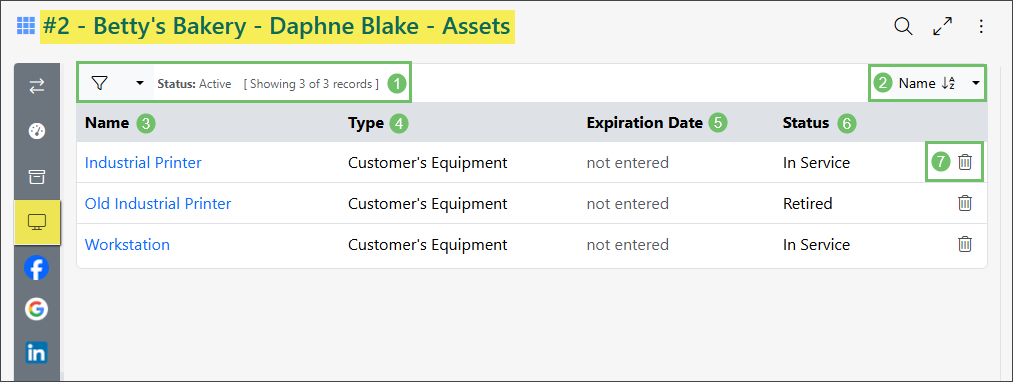
This section displays any Customer Asset that the Contact is associated with. Contacts can be associated with a Customer Asset by selecting them from the individual Customer Asset’s Associated Contacts section. In this section, a Customer Contact can be associated with the Customer Asset to note who should be related to things like Tasks related to the Customer Asset. For instance, on a Task related to a Customer Asset, the associated Contact can be added in the Requested By field for the Task so that they can receive updates about the Customer Asset. To learn more about managing Customer Assets, please reference our Customer Asset Management Guide. Below is a screenshot featuring how the Contact Asset Associations section appears and a description of what can be accomplished there.
- Filters: Displays the Filter button, Saved Searches menu, the current filter settings for the page, as well as the record count.
- Sort: Shows the available sorting options for the results on the page. These options include sorting by Name, Expiration Date, Type, and Status.
- Associated Asset Name: A hyperlink of the name of the Customer/Vendor Asset associated with the Contact. Clicking on this link will open the Asset Info page in another browser tab.
- Type: Displays the Asset Type set for the Asset.
- Note: Asset Types can be configured in the Company Settings under Customers/Vendors > Assets.
- Expiration Date: Optional Asset setting that allows you to designate an expiration date for the Asset in the event the Asset needs to be updated or replaced by a certain date.
- Status: Displays the current status of the Asset. Asset statuses are hard-coded and include options for In Service, Out of Service, Retired, Unsupported, and Inactive.
- Deactivate: Removes the association of the Asset to the Contact and will no longer show the Asset in the Contact’s Asset list.
Example of a Contact Asset Associations Page
-
Contact Information Cards
For a quick overview of a Contact’s Information, a Contact Information card can be accessed from your Company’s Contacts List, or the Contacts List for a specific Customer/Vendor. The Contact Information card will display slightly different information when accessed from various locations within Striven.
Accessing the Contact Information card from the Contacts List for your Company
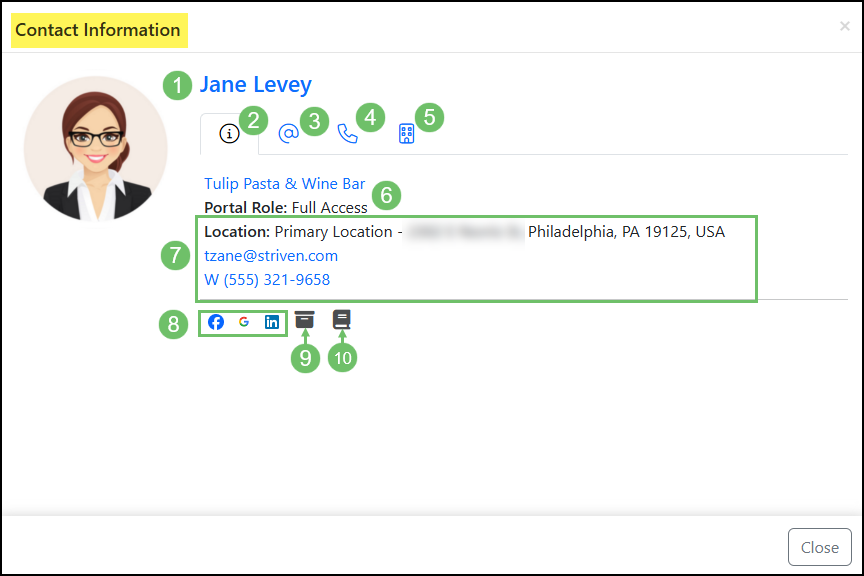
Clicking on the Email, Telephone, or Associations icons on a Contact from the Contacts list will display the Contact Information card.
Example of Accessing the Contact Information Card from the Contacts List
When viewing the Contact Information card, the following options are available:
- Contact Name: Displays the Contact’s name. Clicking the Contact’s name will navigate to their Contact Information page. If a Contact has added a recording for pronunciation of their name, the Speaker icon will appear next to their name allowing you to click and listen to their recording.
- Contact Info: The Contact Info tab allows you to view the Contact’s primary location, primary email address, and primary phone number.
- Email: Lists all of the Contact’s email addresses. The primary email address will be identified by a “Primary” tag.
- Telephone: Lists all of the Contact’s phone numbers. The primary phone number will be identified by a “Primary” tag.
- Contact Associations: This tab will list the Contact’s Customer/Vendor associations up to ten (10) results. A “View All” option will display if the Contact is associated with more than ten (10) Companies. Selecting “View All” will navigate you to the full Contact Associations list for the selected Contact. Clicking on an association will direct you to the Customer/Vendor’s Contact Information page for the selected Contact.
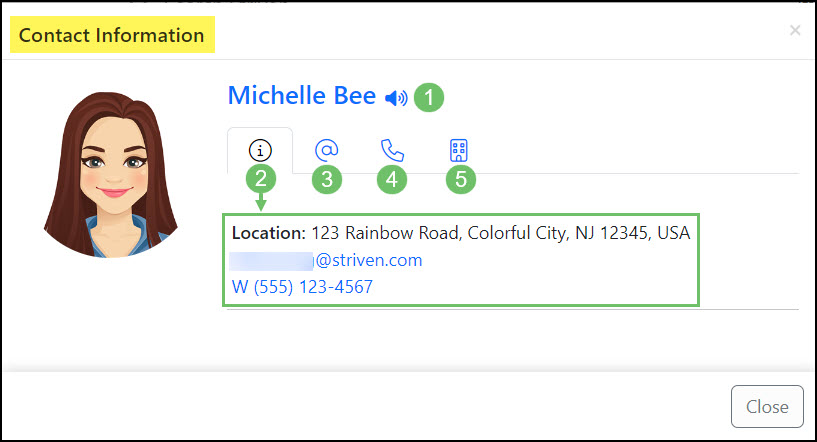
Example of a Contact Information Card when Accessed from the Contacts List
Accessing the Contact Information card from the Contact List for a Customer/Vendor
To view a Contact Information card from a Customer/Vendor Contacts List, click on the Contact’s Email icon or Telephone icon to access the Information card for the selected Contact.
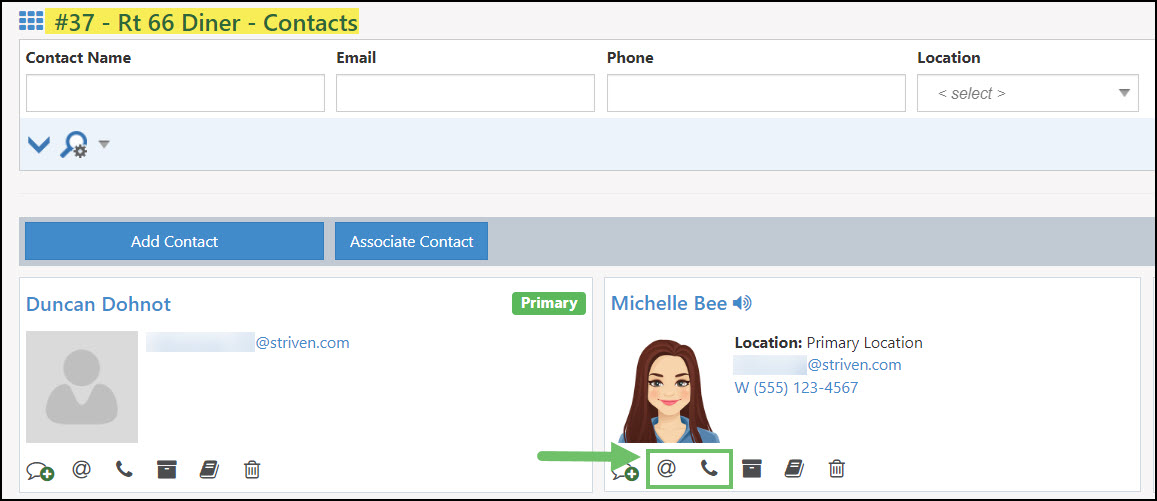
Example of Accessing a Contact Information Card from a Customer/Vendor Contact List
When viewing the Contact Information card from the Customer/Vendor Contact List, you can view the information listed below:
- Contact Name: Displays the Contact’s name. Clicking the Contact’s name will navigate to their Contact Information page. If a Contact has added a recording for pronunciation of their name, the Speaker icon will appear next to their name allowing you to click and listen to their recording.
- Contact Information: This tab allows you to view the Contact’s primary information, integrated links, and more.
- Email Book: Lists all of the Contact’s email addresses. The primary email address will be identified by a “Primary” tag.
- Phone Book: Lists all of the Contact’s phone numbers. The primary phone number will be identified by a “Primary” tag.
- Contact Associations: This tab will list the Contact’s Customer/Vendor associations up to 10 results. A “View All” option will display if the Contact is associated with more than 10 Companies. Selecting “View All” will navigate you to the full Contact Associations list for the selected Contact. Clicking on an association will direct you to the Customer/Vendor’s Contact Information page for the selected Contact.
- Company Information and Portal Access: The name of the Contact’s Customer/Vendor Association will be displayed just below the navigational tabs, clicking on the Customer/Vendor name will direct you to their Customer/Vendor Dashboard. If the Contact has a title at the associated Customer/Vendor, their title will be listed in plain text below the Customer/Vendor name. The Portal Role that the Contact has been given will be listed underneath the Customer/Vendor name.
- Contact Primary Information: Lists the Customer/Vendor location which the Contact is associated with, in addition to their primary email address and primary phone number.
- Integrated Links: These icons enable you to quickly access the Contact’s Facebook, Google, and Linked In links. These Integrated Links can be added and edited from the Customer/Vendor Contact Information page.
- Hub: The Hub icon will direct you to the Contact Hub for the Customer/Vendor Contact.
- Assets: The Asset icon will direct you to the Customer/Vendor’s Contact Asset List.
Example of a Contact Information Card when accessed from the Customer/Vendor Contacts List
-
Other Accessible Locations for Contact Information Card
Tasks and Opportunities
Contact Information cards can also be viewed from Tasks and Opportunities by clicking the “View Requested By”, or “View Contact”, options which will appear when hovering over a Contact’s name in the Task Requested By field and the Opportunity Contact field.
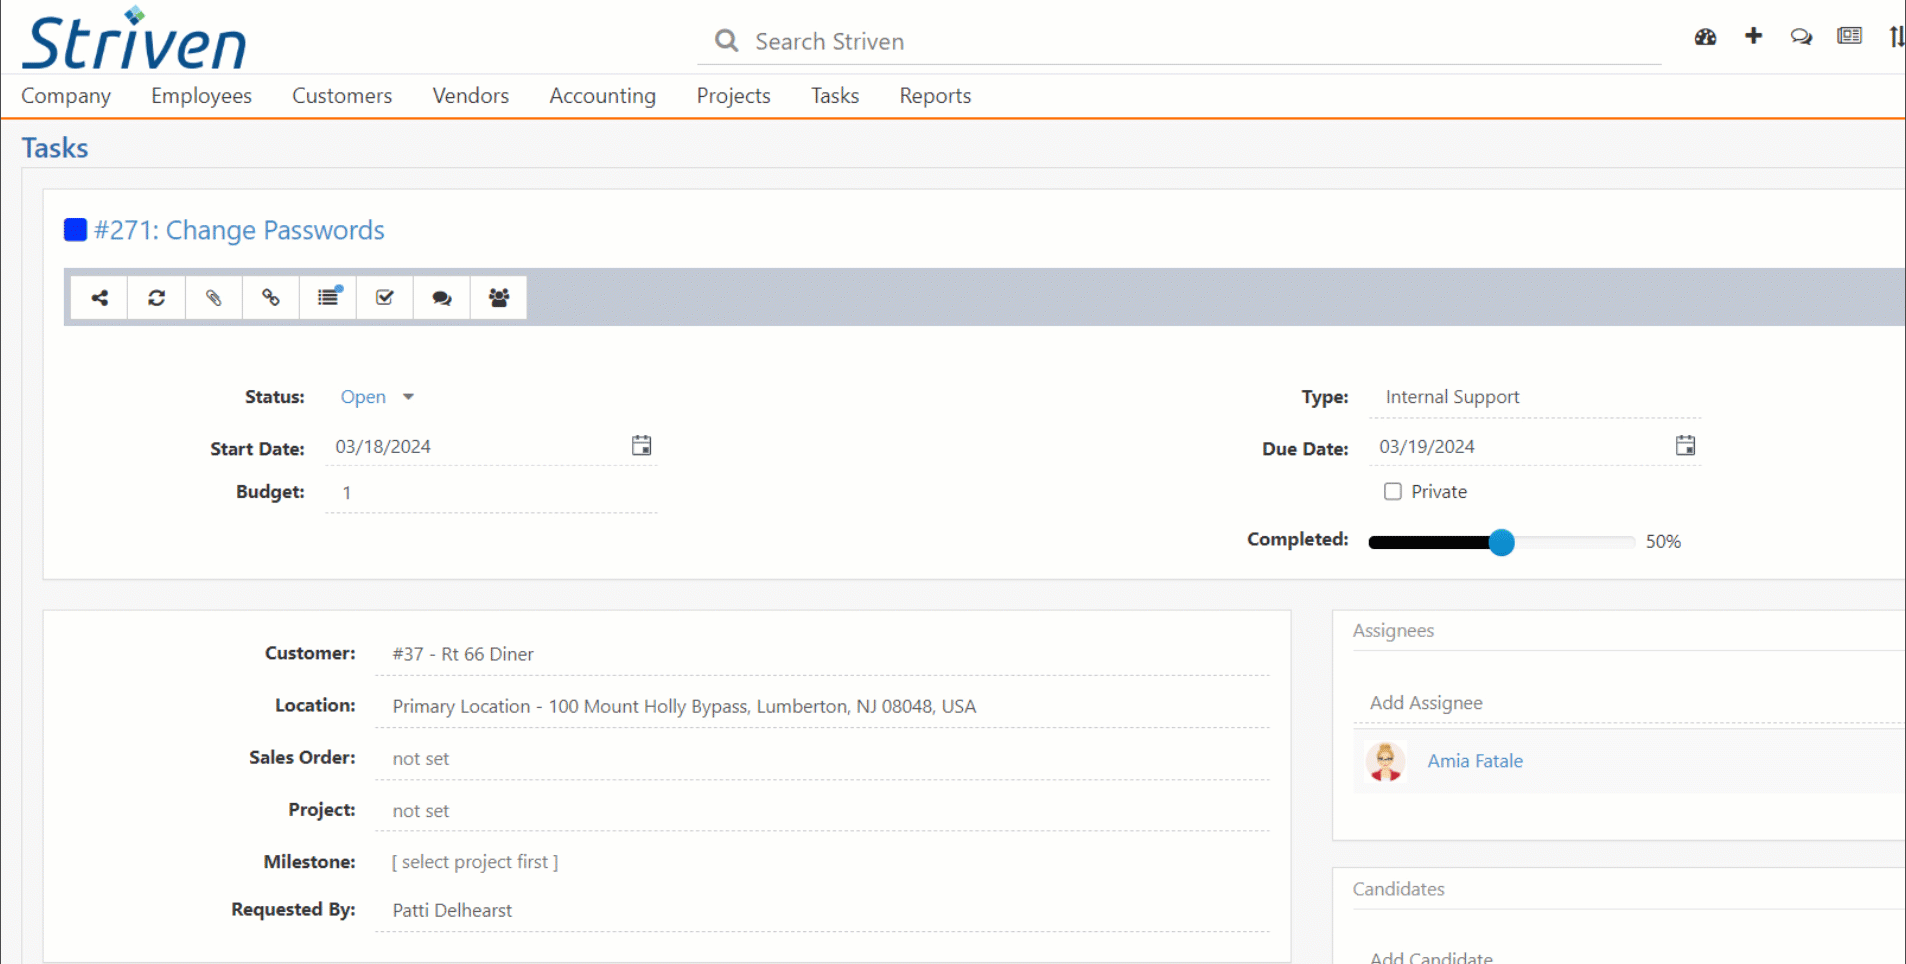
Example of Accessing a Contact Information Card from a Task
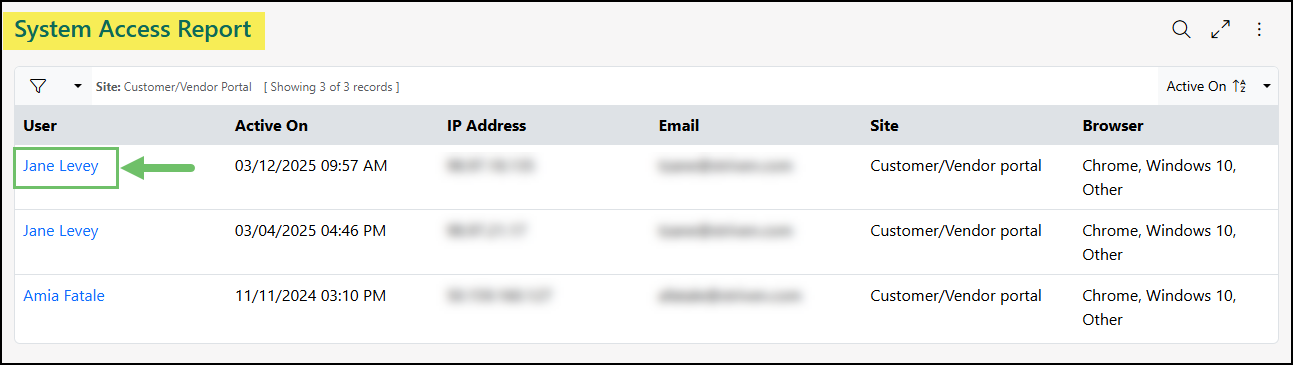
System Access Report
The Contact Information card is also accessible through the System Access Report. To access this report, navigate to Reports → Striven → System Access. Clicking on a Contact listed in this report will result in the Contact Information card to open.
Surveying Tab in My Profile
The Contact Information card can be found in the Surveying tab of My Profile. This is accessible when a survey, quiz, assessment, or form attached to a Send Email: Contacts email has been linked to an Employee.
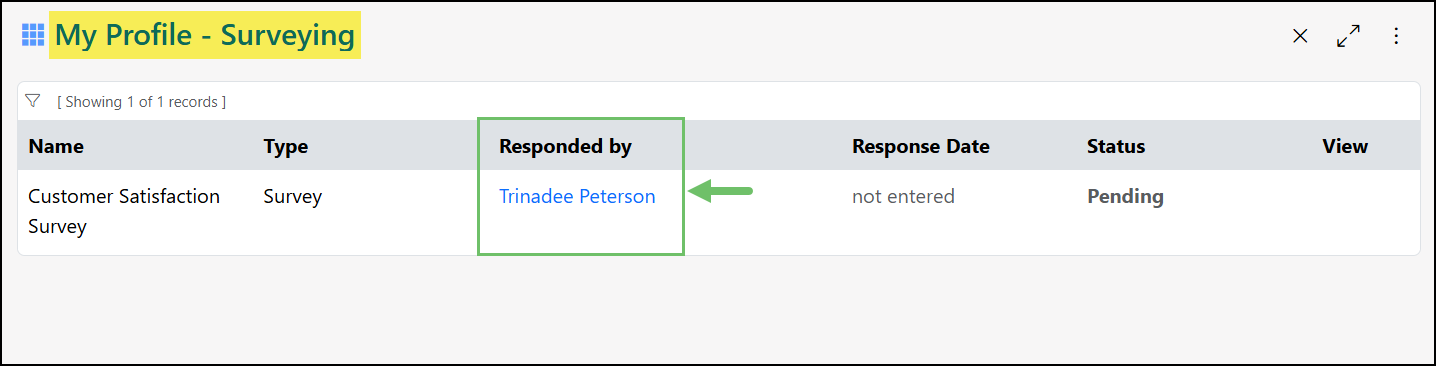
Example of the Surveying Tab in My Profile
When using the Send Email: Contacts feature, after checking on the option for Attach Survey/Quiz/Assessment/Form and selecting the feedback, the Configure Options button will allow the user to relate any responses to an Employee which will result in the feedback being listed under My Profile in the Surveying tab.
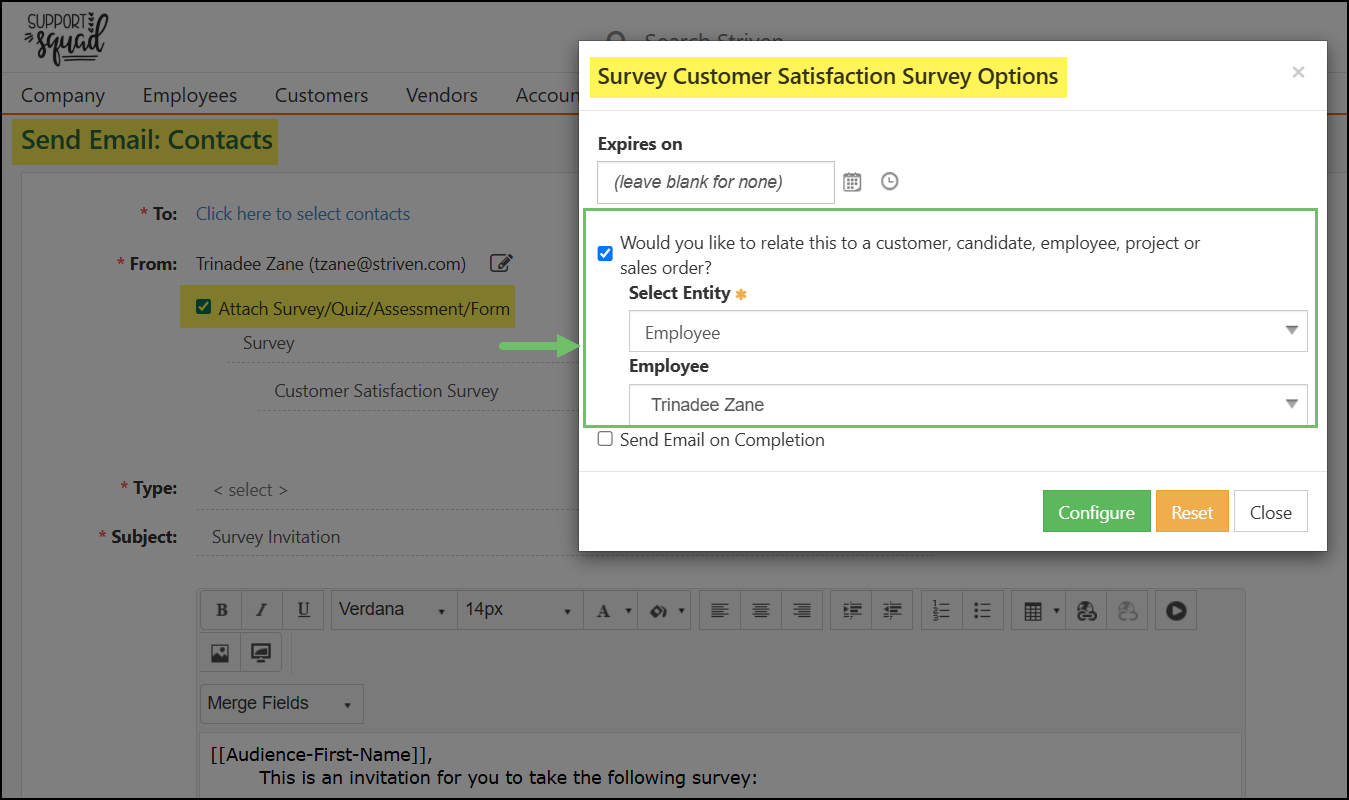
Example of Attaching Feedback with Send Email Contacts Feature
Dashboard
Accessing a Contact through the Dashboard will open the Contact Information card to view more information. Contacts may be listed on the Dashboard through the Recent Contacts widget.
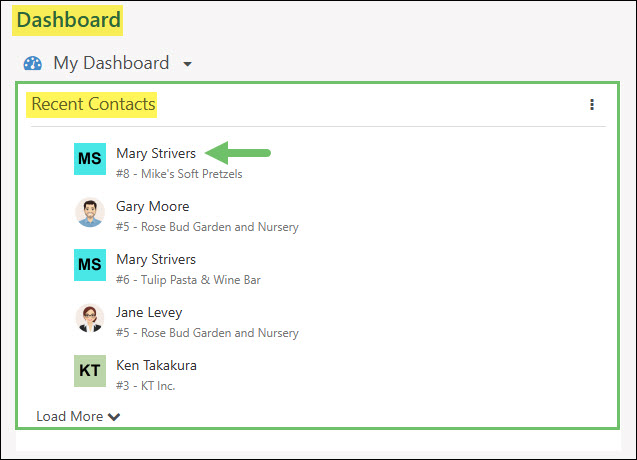
Example of Contacts Listed in the Recent Contacts Widget
Customer Settings Page
When adding Contacts to a Customer Settings page, the Contact Information card can be accessed by clicking on the Contact’s name.
This is available in the AR Notifications Settings page within the Customer’s Profile.
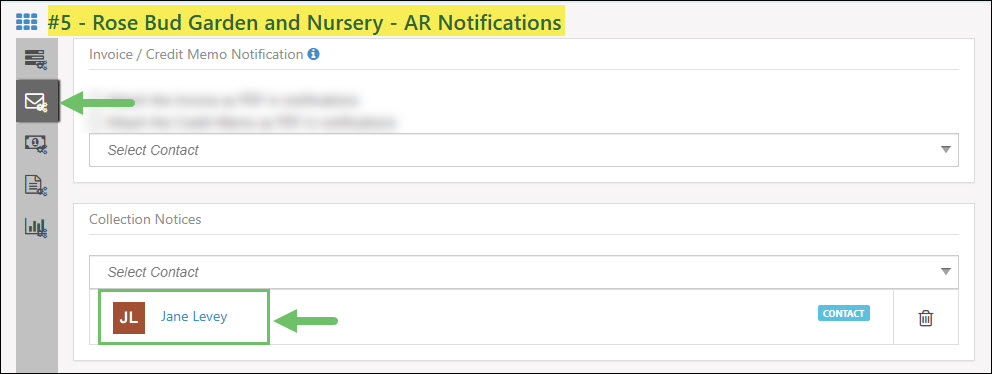
Example of Contact Listed on the Customer AR Notification Settings Page
This feature is also accessible through the Task Settings page located within the Customer’s Profile.
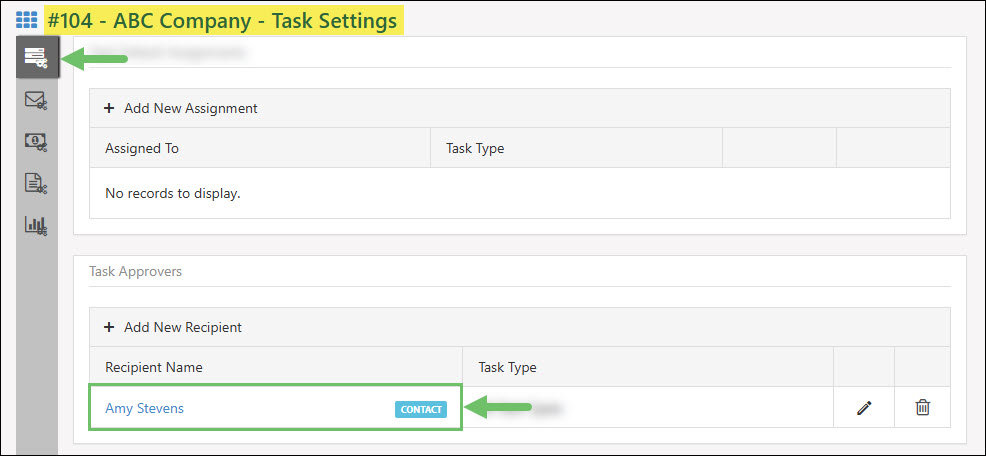
Example of Contact Listed on the Customer Task Settings Page
Striven Search
Clicking on a Contact within the Striven Search results will have a different outcome depending on how many Customer/Vendor associations are related to the Contact. For example, if you use the Striven Search to find:
- A Contact that has a single Customer/Vendor association, clicking on the Contact in the search results will display the Contact Dashboard, which will show the Contact’s details as they relate to the associated Customer/Vendor.
- A Contact that has multiple Customer/Vendor associations, clicking on the Contact in the search results will display the Contact Information page wherein the Associations tab will list all of the associated Customers/Vendors.
- A Contact that has no Customer/Vendor associations, clicking on the Contact in the search results will display the Contact Information page wherein the Associations tab will not have any Customers/Vendors to display.
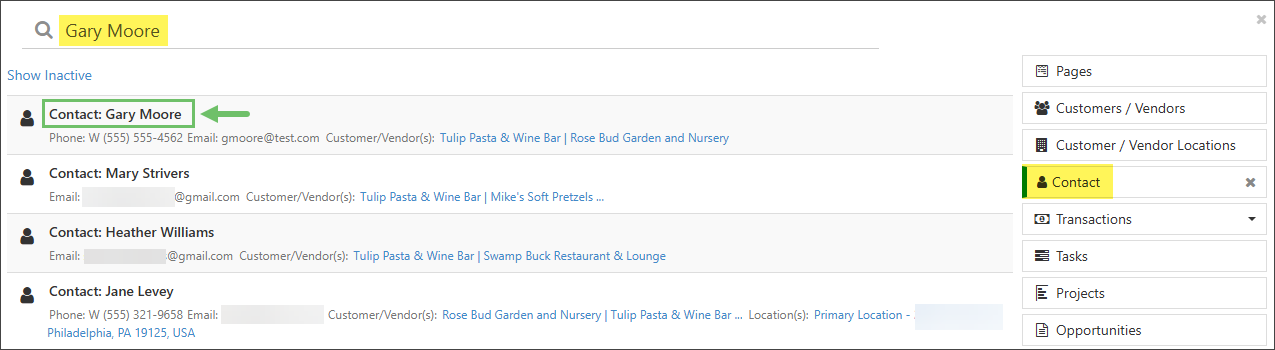
Example of a Contact Listed in the Striven Search
References
-
References List
The References List is an area of Striven in which all the Contacts who have been noted as references will be listed. Here each Contact will have information about them listed along with the Customer/Vendor they are associated with. You can use this list to send an email to one or multiple Contacts in order to list references for your Company. This can be achieved by selecting one or more Contacts using the checkbox and then clicking Send Email at the bottom of the list. Below is a screenshot demonstrating how the References List appears and a description of what can be accomplished there. To view the References List, use the following steps listed below:
Customers → Sales → References
- Expand Search Filters: The blue arrow icon will expand search filters so that you can select criteria that you would like to search for.
- Select: Indicates that you would like to include the reference in the email being sent. Once the checkbox is toggled, the Contact will be highlighted in green indicating it has been selected.
- Contact Name: Displays the name of the Contact who has been designated as a reference for your Company. Each name is a helpful hyperlink, which when clicked will populate the Contact Info page.
- Number of Sends: The Envelope icon shows how many times the Contact has been included in previous reference emails that have been sent from Striven.
- Title: Displays the Title of each Contact within their organization.
- Customer/Vendor: Displays the Customer/Vendor that the Contact is a reference for. A Contact may appear multiple times if they are associated with multiple Customers/Vendors and is a reference for some or all of those entities.
- City: Displays the city in which the Customer/Vendor’s primary address is located.
- State: Displays the state in which the Customer/Vendor’s primary address is located.
- Phone: Lists the Contact’s primary phone number.
- Email: Lists the Contact’s primary email address.
- Days Last Sent: Lists the date in which the Contact was most recently included in a reference email.
- Send Email: This will send a reference email that will include all of the Contacts that have been selected from the list using the select checkbox (discussed above in point 2). Once this button is selected, a popup will appear which is discussed further in the References Email section of this guide below.
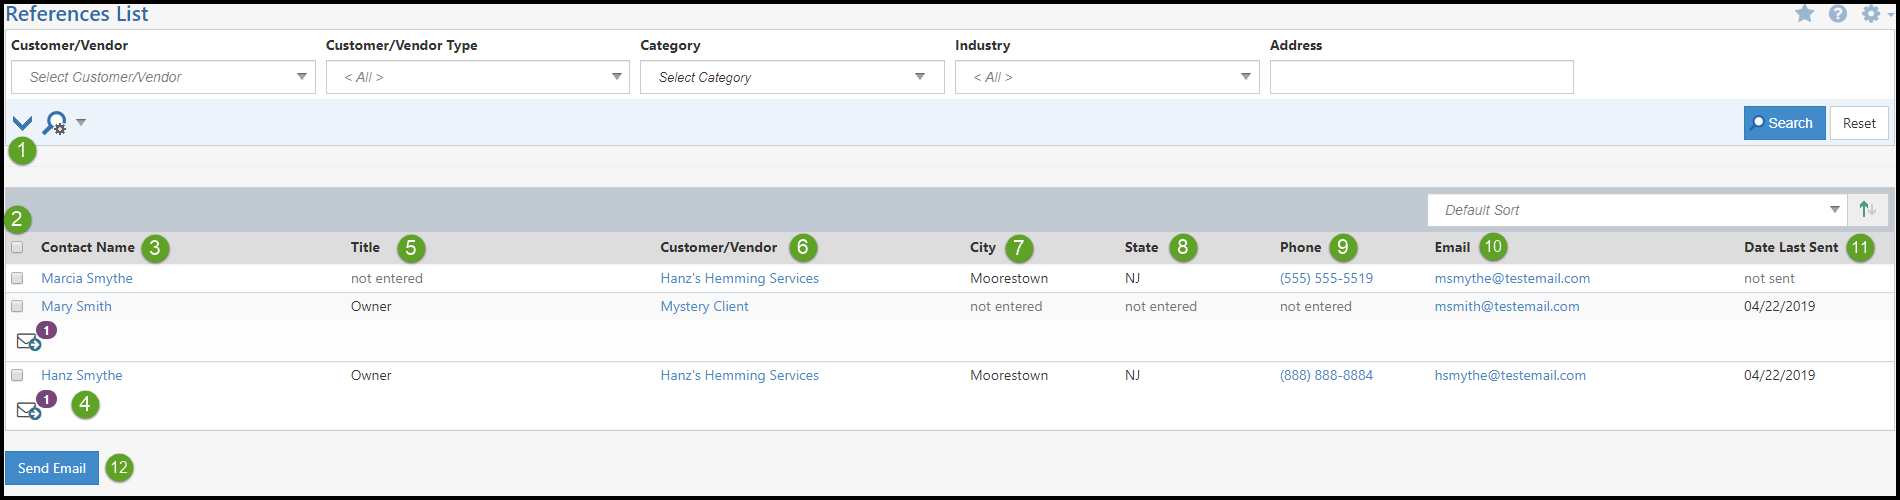
Example of References List Page
-
References Email
As stated in the above section, References List users can select Contacts they would like to send an email of references to. After clicking the Send Email button on the References List, a popup will appear displaying all of the references that the chosen Contact will receive. The email they receive will display each Contact’s name, Title, and Contact information. Below is a screenshot, which illustrates how the References Email appears and what can be accomplished there.
- Customer/Vendor: The Customer/Vendor you would like to market your Company’s reference list to.
- Contact to Send Reference: After choosing a Customer/Vendor, a Contact can be chosen from the Contact drop-down list. This is the Contact who will receive the list of references that you’ve selected to include on the References List.
- Subject: The subject line of the References Email which can be edited if desired.
- Listed Reference: This section lists all of the included references. Each reference will include information as long as it’s entered for each Contact or related Customer. The information listed for each Contact includes:
- Name
- Title
- Customer/Vendor Name
- City/State of Primary Company Location
- Phone
- Email Address
- Actions: There are two (2) actions here, which are described further in the points listed below:
- Send & Close: Sends the reference email to the selected Contact and closes the popup to bring you back to the References List. After an email is sent, the numbers on each selected Contact will increase in value.
- Close: Does not send the references and closes the reference email popup.
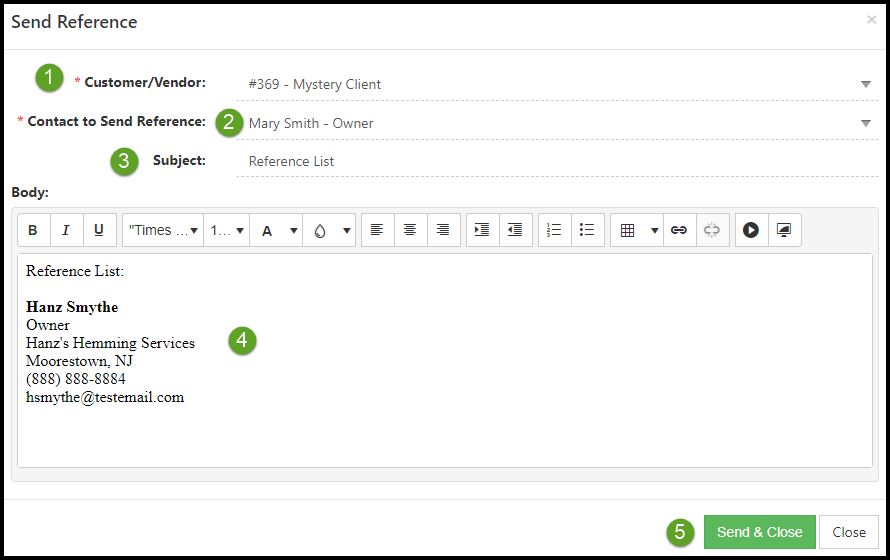
Example of Send References Email
-
Recap
With this Contact Management Guide, we’ve discovered how to create and manage Contact information ranging from basic information to noting whether or not they are a reference. We’ve also discussed ways to set a Contact’s Portal access and assign Portal Roles within Striven to ensure security is allocated to Contacts correctly. Lastly, we’ve discovered ways to send a list of references to prospective Customer/Vendor Contacts. All of this will help you manage Contacts better within your Striven system.

Have a Question?
Ask the Striven Community
User-sourced how-to’s, feedback, and more!
FAQs
-
Can a Contact be related to a Customer and a Vendor?
Yes, any Contact in the system can be associated with either a Customer or Vendor account. They can even be associated to an account that is both a Customer and a Vendor at the same time.