
Initial Setup
Custom Fields
Support Guide
-
Overview
Custom Fields in Striven allow companies to track information for certain entities that otherwise were not available previously. You can add Custom Fields on both a type-level and on a global-level to fit your needs when capturing data. Type-level Custom Fields will only appear for entities created of those types; for instance, Sales Order Types, Task Types, etc. Global-level Custom Fields will appear for the entity created regardless of type. Global-level Custom Fields can be created, viewed, and managed in the settings area and the following sections will walk through how these global-level and type-level Custom Fields can be easily managed.
Read this guide if you are trying to:
✔ Create or manage Custom Fields throughout Striven.
✔ Understand different Custom Field areas and their applications.
✔ Making Custom Fields required, encrypted, or visible on the Portal.
-
Global Custom Fields
As discussed above,Global Custom Fields can be added and managed in the settings. Custom Fields added here will appear on all the entities created on the related level. For instance, if you add a global Custom Field for Sales Orders, then all Sales Orders will feature the Custom Field as well as the Sales Order Type fields. Below is a screenshot demonstrating how the Custom Fields page appears in Striven. Global Custom Fields can be added in the settings by using the steps listed below:
Company → Settings → Company → Customizations → Fields
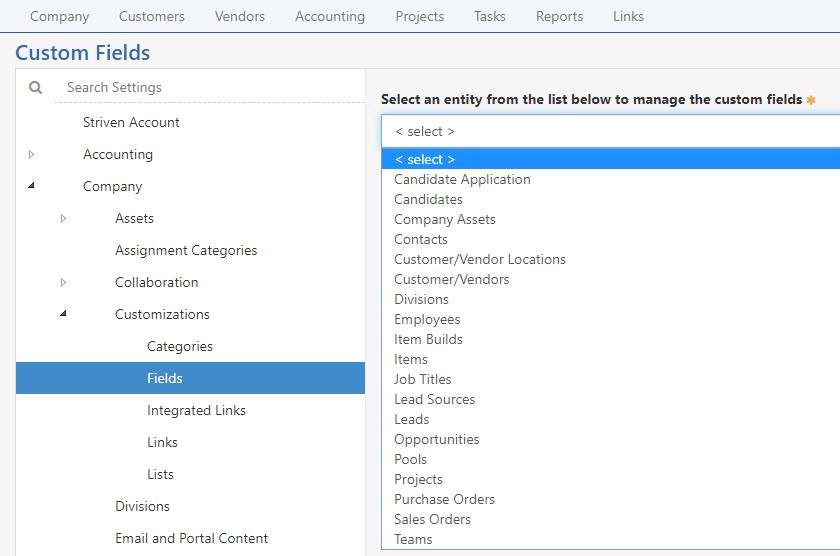
Example of Global Custom Fields page

-
Manage Global Custom Fields
When on the Custom Fields page, you can choose the entity you would like to add or manage Custom Fields for. There are many areas in Striven for which you can add Custom Fields, including Candidate applications, Customers/Vendors, Employees, and many more. As discussed above, Global Custom Fields appear on the associated entity regardless of a type chosen. Below is a screenshot displaying how the Custom Fields for a chosen entity appear and a description of what you can configure there.
- Choose Entity: Allows you to choose from the drop-down what area of the system you would like to add or manage Custom Fields for.
- Add Section: Enables you to add a new section to all entities of the corresponding area of the system. This allows for your field to be separated and organized while filling out the fields within your entity.
- Include Inactive Sections: Displays any sections that have been previously marked as inactive. Once viewing inactive sections you will have the ability to mark it active again.
- Section Actions: There are a few icons for Custom Field sections that can be used for different functions. Using the Edit icon, you can edit the section name. Using the Deactivate icon, you can deactivate the section if desired.
- Add Custom Field: Allows you to add a new Custom Field to the chosen section. This will initiate a popup of choices, which are discussed further in the section below.
- Name Column: Displays the name of all active Custom Fields in the section.
- Type Column: Displays what type of data is being captured in the related Custom Field. The different Custom Field types will be described below.
- Rearrange Tool: Allows you to rearrange the Custom Fields in the section by clicking the Arrow icon and dragging and dropping in the desired spot of the section.
- Custom Field Actions: There are two icons for individual Custom Fields that can be used for different functions. Using the Edit icon, you can edit the field name. Using the Deactivate icon, you can deactivate the field if desired as well.
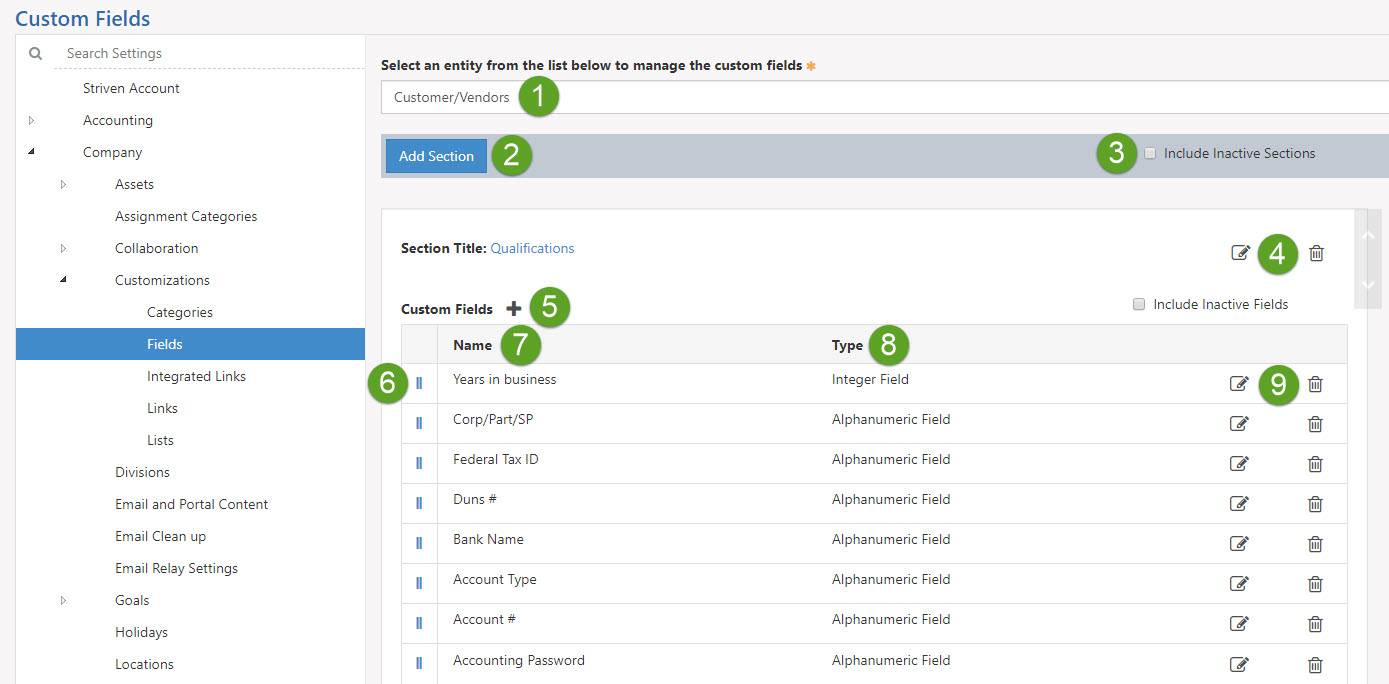
Example of Custom Fields Area
-
Custom Field Section Description
You may find that sometimes your Custom Fields could benefit from more details or instructions for gathering the information you’re seeking. Custom Field Section Descriptions can help with that!
When creating a new Custom Field Section, or editing an existing one, you will see that in addition to the Title field for the Custom Field Section, there is a field to enter a Section Description as well. This field can be used to describe the information you’re trying to gather within the related Custom Fields, instructions for filling out the Custom Fields, or any other descriptive information you wish to display there.
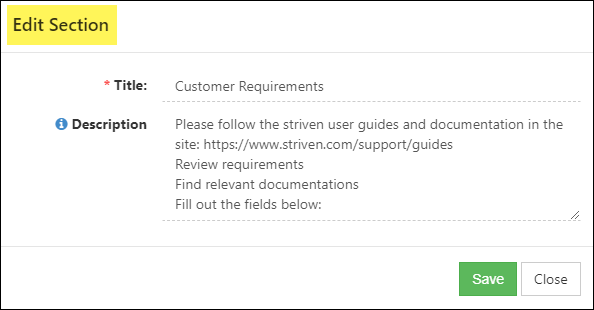
Example of the Edit Section Popup with Description Field
You can even include a URL linking to related documents, websites, or other practical links that might help users when entering responses to your Custom Fields.
The Custom Fields Section Description will display above the Custom Fields in the section while viewing or creating a Task. This Description field is for internal purposes only and will only display within your Striven system, not in read-only modes or in the Customer/Vendor/Career Portals.
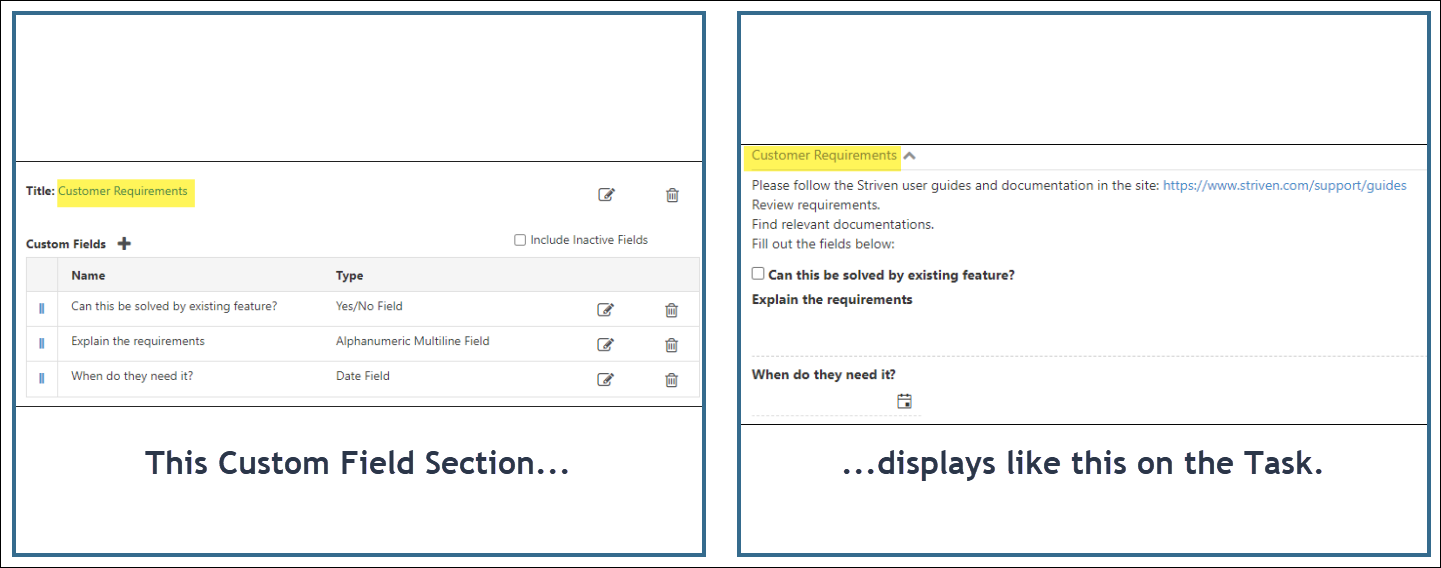
Example of How the Custom Field Settings Display on a Task
-
Custom Field Types
When creating a new Custom Field, you can click the Plus icon as discussed in the previous section to initiate a popup in which you can choose the field type you would like to use. It is important to know the desired outcome before choosing a field type. This will help you choose the appropriate type of Custom Field to add in order to capture the right data and achieve your desired goal. For instance, if you want to capture data related to a budget, then a currency field should be chosen as the field type. After a field type is chosen, you can then decide if you would like to make the field required and in some cases encrypted as well. Below are two screenshots illustrating how to add a new Custom Field and field type and descriptions of what you can configure there.
- Add Custom Field: Clicking the plus ( + ) icon on the Custom Fields list will trigger the popup shown in the example to appear for you to begin adding a new Custom Field in the section chosen.
- Field Name: Allows you to name the field being added.
- Field Type: Allows you to choose what type of data you would like to be input and captured for the Custom Fields being added. Choices include date, currency, alphanumeric, and many more. The different Custom Field types will be described below.
- Section Name: The name of the section in which the Custom Fields will be added to. When filling out Custom Fields, sections will allow for the fields to be organized and sectioned off.
- Field Options: Displays options available for the data type that has been chosen. Options that can appear are listed and described further below:
- Is required: When toggled on, this will make the field required on pages for which it appears.
- Is encrypted: When toggled on, this will make the field encrypted on pages for which it appears. If this is selected, then another field will appear in which you can choose who can access data entered in these fields. If no Employee is selected, then everyone can access the data accordingly.
- Include inactive records: When toggled on, this will allow you to search for anything marked as inactive for the chosen entity, for instance Employees, Customers, etc.
- Actions: There are two buttons here which will allow you to do different functions:
- Save & Close: Saves the Custom Field and closes the popup to take you back to the list of Custom Fields.
- Close: Does NOT save the field and closes the popup to take you back to the list of Custom Fields.
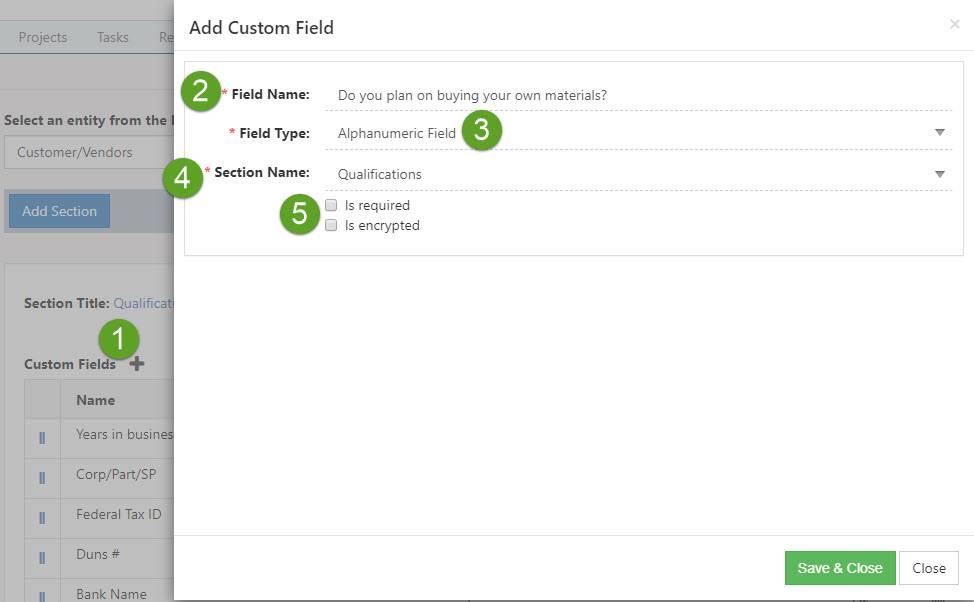
Example of Adding a Custom Field
Below is a list of the types of Custom Fields that are available in Striven and a brief explanation on each and how they can be used:
- Alphanumeric Field: Allows you to capture both alphabetical and numeric data entered in a line of text.
- Integer Field: Allows you to enter numeric data and a comma will be added to the numbers to note the correct number.
- Decimal Field: Allows you to enter numeric data and a decimal can be added to the numbers to note a decimal point.
- Currency: Allows you to enter numeric data, which will then be put into currency form with a $ symbol in front of the entered value.
- Date and Time Field: Allows you to click the Calendar icon to choose a date and the Clock icon to choose a time of day.
- Date Field: Allows you to click the Calendar icon to choose a date.
- Time Field: Allows you to click the Clock icon to choose a time of day.
- Yes/No Field: Allows you to choose Yes or No to select the correct value.
- Alphanumeric Multiline Field: Allows you to capture both alphabetical and numeric data and enter multiple lines of text as needed.
- Attachment: Allows you to upload documents into the Custom Field.
- Select Value from Custom List Items: Allows you to create a custom list. Once added you will be able to choose the correct option from the list to enter data in the field. Learn how to set up custom lists in the section below.
- Select Value from Existing List: Allows you to choose from an existing list in Striven including Employees, Customers, etc. Once added, you will be able to choose the correct option from the list to enter data in the field.
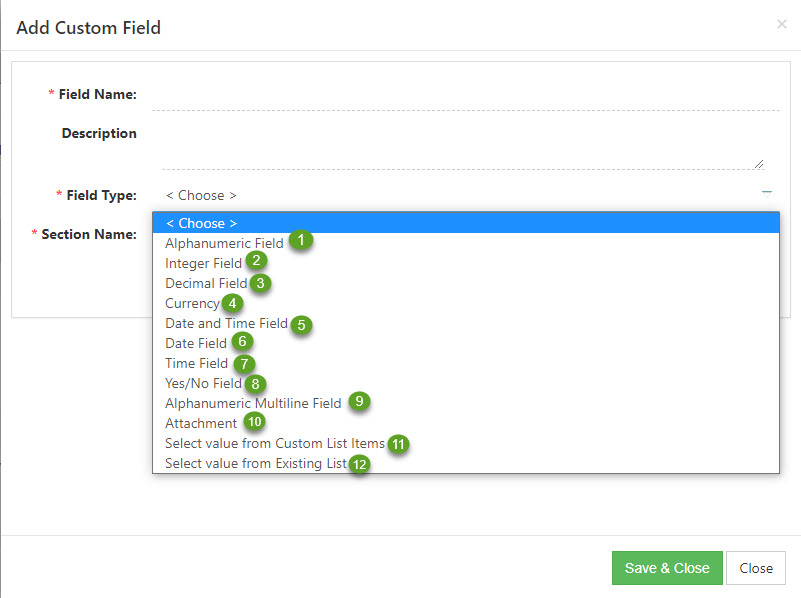
Example of Custom Field Types
-
Entity Level-Specific Custom Fields
As opposed to global Custom Fields that appear on all the entities created on the related level, type-specific Custom Fields only show up for entities created of that type. For instance, if you add a Custom Field for a specific Sales Order Type, then Sales Orders of that type will have the Custom Field present, while Sales Orders not using that type will not have the field available. Custom Fields on a type-level are found on a separate tab of the type page after it has been created.
- Type-specific Custom Fields are available for the following entities:
- Sales Order Types
- Purchase Order Types
- Task Types
- Project Types
- Opportunity Types
- Asset Types
- Goal Types
- Expense Types
- Job Postings
Below is a screenshot displaying how the Custom Fields tab appears on a Sales Order Type in Striven. This will help serve as an example of how type-specific Custom Fields can be found and how they appear. Following the screenshot is a description of what you can configure there.
- Basic Info: Displays the name of the entity you are viewing and holds the basic information about that entity for you to configure.
- Custom Fields: Allows you to View and Add Custom Fields to the entity type you are viewing.
- Add Section: Allows you to add a new section so that Custom Fields can be added within that new section.
- Add Custom Field: By clicking this Plus icon ( + ) on the Custom Fields list, the popup shown will appear for you to begin adding a new Custom Field in the section chosen.
- Field Name: Allows you to name the field being added.
- Field Type: Using this drop-down menu, you can choose what type of data you would like to be input and captured for the Custom Fields being added. Review the Custom Field types available in the guide above.
- Display Type: Houses different options to display the choices of the Custom Field. This is applicable for only certain fields including:
- Yes/No, Alphanumeric Multiline Field, and Select value from Custom List Items
- Section Name: The name of the section in which the Custom Fields will be added to.
- Options: Displays options available for the data type that has been chosen. Options that can appear are listed and described further below:
- Is Required: Makes the field required on pages for which it appears.
- Is Encrypted: Makes the field encrypted on pages for which it appears. If this is selected then another field will appear in which you can choose who can access data entered in these fields. If no Employee is selected, then everyone can access the data accordingly.
- Include Inactive Records: Allows you to search for anything marked as inactive for the chosen entity such as Employees, Customers, etc.
- Visible on Portal: Allows Portal Contacts to view the Custom Field data related to the chosen type (Order, Task, Project, etc.)
- Actions: There are two buttons here which will allow you to do different functions:
- Save & Close: Saves the Custom Field and closes the popup to take you back to the list of Custom Fields.
- Close: Does NOT save the field, but closes the popup to take you back to the list of Custom Fields.
- Note: The Description line is not required like most of the other lines, so it only needs to be completed if you wish to add additional information about the Custom Field you are adding.
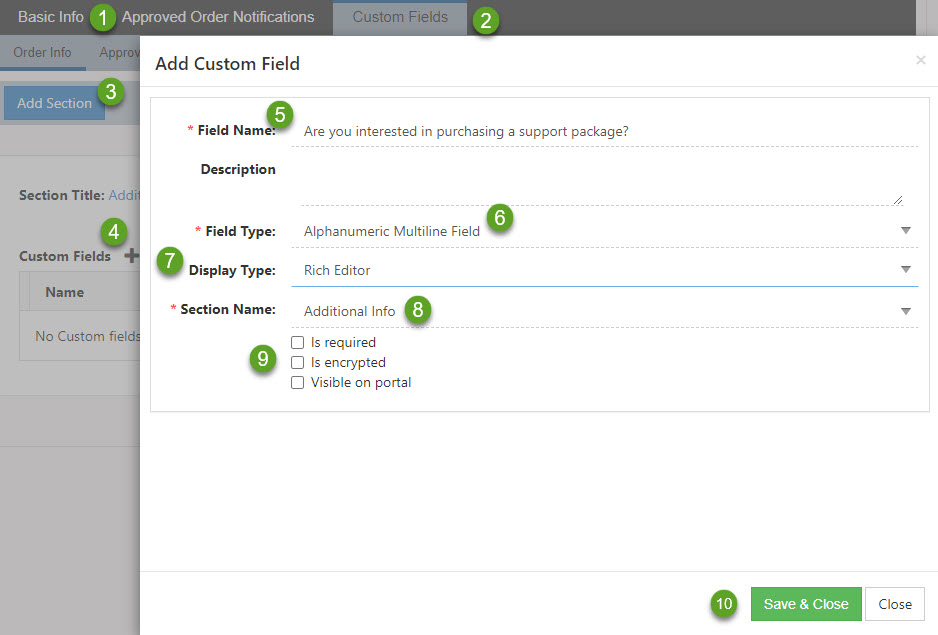
Example of Sales Order Type Custom Fields
- Type-specific Custom Fields are available for the following entities:
-
Custom Lists
As discussed previously, one data type you can utilize is Custom Lists. Once a list is created, it will be added to the global page of Custom Lists. Here you can view, create, and manage Custom Lists as needed. By clicking the Add button, you will be able to add a new Custom List, which will then be available for new Custom Fields that use the field type Select value from custom list. Below is a screenshot, demonstrating how the Custom Lists page appears and a description of what you can accomplish there.
Company → Settings → Company → Customizations → Lists
- Add: Allows you to create a new Custom List, which will then be added to the list.
- List Name: Initiates a popup as shown in the screenshot example and displays all the selections that have been added to the list. The list name will appear at the top of the popup and can be edited from here as well if desired.
- Tools: There are two tools available here, which are described further below:
- Alphabetize: Clicking the A to Z icon will automatically alphabetize the list Items in descending order (From A-Z).
- Add List Item: By clicking the Plus icon ( + ), you can add a new selection to the list. New selections will be added to the bottom but can be rearranged if desired as described below in Rearrange or Alphabetize feature described below.
- Rearrange: Allows you to drag and drop the selection up or down the list to organize the custom list selections to best fit your needs.
- Deactivate: Allows you to deactivate the selection from the list if desired.
- Actions: There are two buttons here which will allow you to do different functions:
- Save & Close: Saves the custom list and closes the popup to take you back to the list of Custom Fields.
- Close: Does NOT save the list, but closes the popup to take you back to the list of Custom Fields.
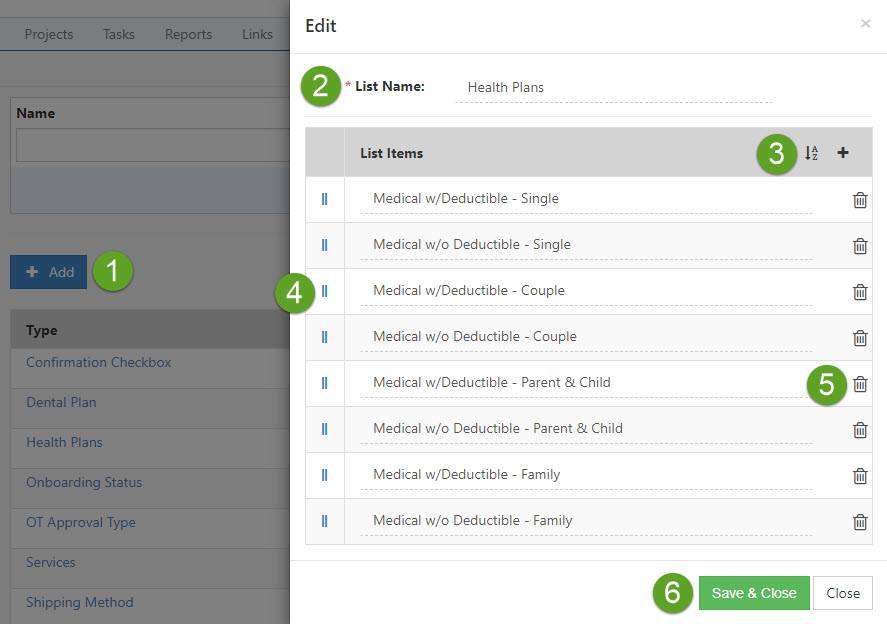
Example of Custom Lists Page
-
Completing Custom Fields
After your Custom Fields have been created, you can enter the relevant information in them when they display on the area of the system for which they were created. The example below shows how these fields will display in the system based on their settings.
- Global Custom Fields: Global Custom Fields appear above the level-specific Custom Fields.
- Required Custom Fields: Custom Fields that are marked required will have a red asterisk appear at the end of the Custom Field name. These fields must be completed before the entity (Order, Project, etc.) is created or saved. In the case of Tasks, required Custom Fields will need to be entered before the Task can be marked done.
- Encrypted Custom Fields: Once data is entered into encrypted Custom Fields the data will be protected with a line of asterisks with two hyperlinks below, which are described further below:
- View: Allows users with permissions (set at the Custom Field configuration) to view the data entered into the Custom Field.
- Edit: Allows users with permissions (set at the Custom Field configuration) to edit the data entered into the Custom Field.
- Level Specific Custom Fields: Below the global Custom Fields is where level-specific Custom Fields will be located and have the same functionality as global level Custom Fields.
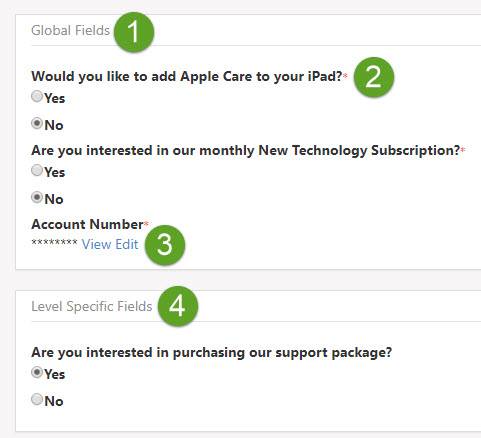
Example of Custom Fields
-
Recap
With this Custom Fields Guide, we’ve discovered how to create and manage both level-specific Custom Fields and global Custom Fields. We’ve also discovered all the types of data that can be captured when creating Custom Fields and the configuration options available including making fields required, encrypted, and more in Striven.
FAQs
-
I’d like to change the data captured in my Custom Field. How can I accomplish this?
Once a field is created the data type cannot be changed. To accomplish changing the data type, it is recommended that another field be added and the data from previous fields be copied over as to not lose any previously entered data.
-
I’ve created a Custom Field, but I would like to encrypt any data captured for it in the future. How can I accomplish this?
Encryption is something that must be configured when creating a new Custom Field. It is recommended that a new Custom Field be created and the older field be deactivated since encryption has its own security parameters as well.
-
I’ve created a Custom Field, but I would like to require users to complete the Custom Field. How can I accomplish this?
Marking a Custom Field required can occur at any time and can be done from the Custom Field either at the level-specific level or global level in the settings.