
Customers
Customer/Vendor Dashboards
Support Guide
-
Overview
Customer/Vendor Dashboards are a useful tool to organize and reference important information related to your Customers/Vendors in Striven. This guide will explore what information is available on these Dashboards, as well as how to configure the available widgets to display your preferred Customer/Vendor information all on one page.
Read this guide if you are trying to:
✔ Navigate through available Customer/Vendor Information
✔ Maintaining Customer/Vendor Information using widgets.
✔Configure widgets to meet your needs.
-
Customer/Vendor Dashboards
The Customer/Vendor Dashboard is a useful tool in Striven that enables you to view the most important details about your Customer or Vendor all in one place, with the option to edit or add information with ease.
Similar to the other Dashboards found in your Striven system, the Customer/Vendor Dashboard consists of 3 customizable columns that you can fill with practical widgets to meet your needs. These widgets can be added, rearranged, or removed to organize your Dashboard and display only the Customer/Vendor information you wish to display there.

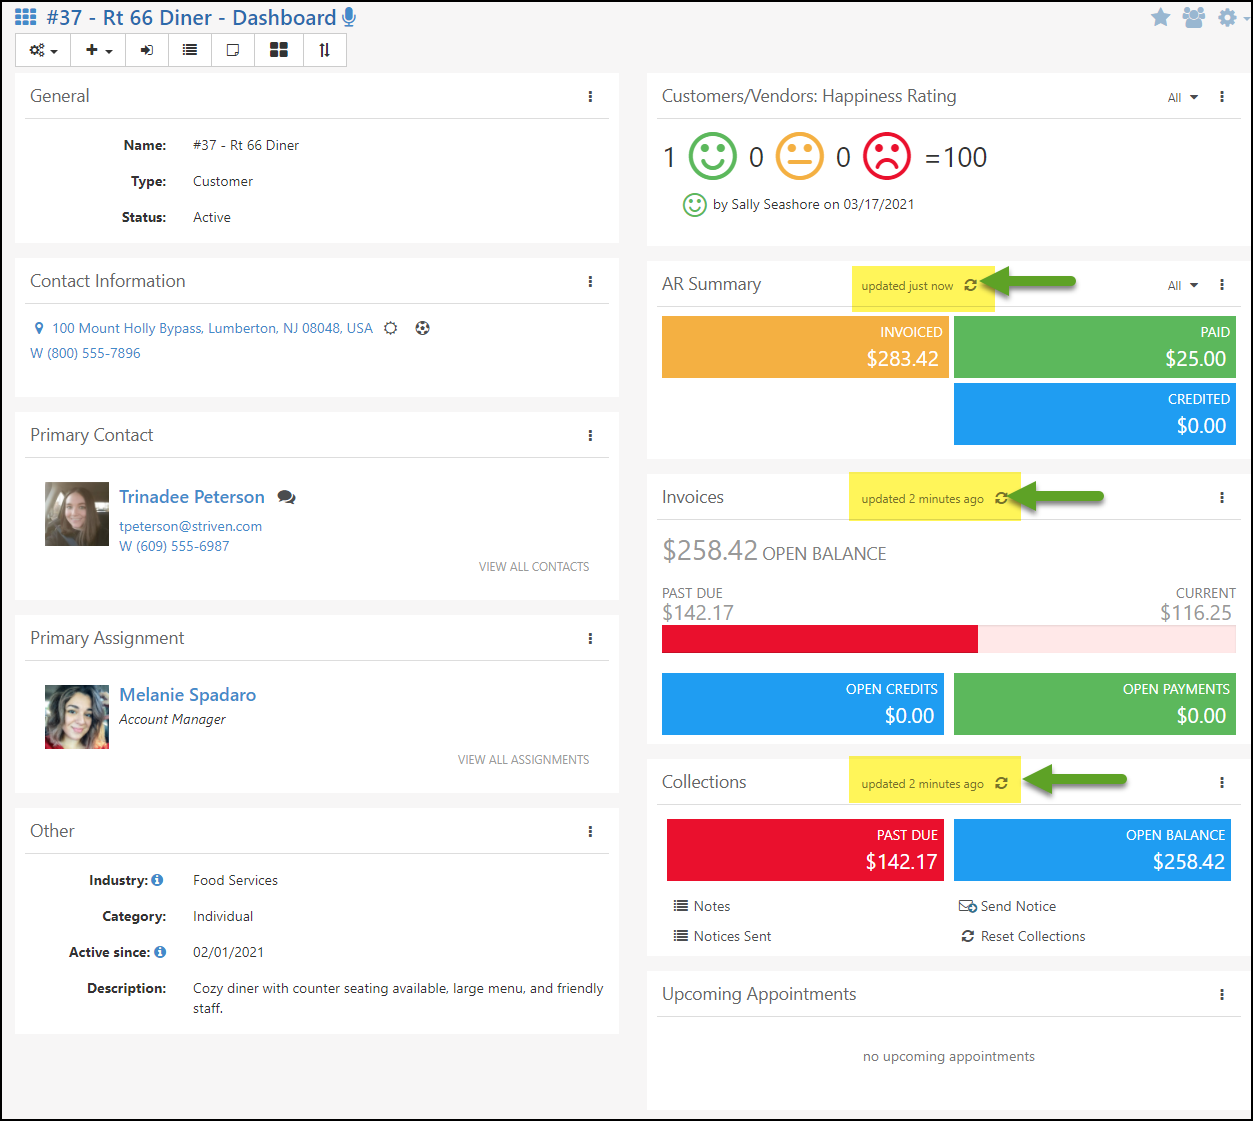
Example of a Customer Dashboard

The Dashboard starts off with a default arrangement of widgets. As a user edits the dashboard, it will become personalized for that user. For example, an Employee in Accounting may wish to see widgets for Invoicing and Collections, while an Employee in Customer Service might prefer to see widgets for Projects or Tasks. Each user can customize their own layout for the Customer/Vendor Dashboards, but that layout will display the same for each Customer/Vendor.
- Note: Changes made to the layout and selection of available widgets will differ between Customer and Vendor Dashboards, so they can have different views depending on how you configure each type of Dashboard.
Dashboard Widget Stored Data
Some of the more complex Dashboard widgets will store data for up to 60 minutes. This means the data will not refresh for up to 60 minutes, unless a manual refresh is triggered for the widget using the specified Widget Refresh button. This is meant to enhance the performance and speed of Striven, since these widgets can sometimes use a lot of resources to calculate and update frequently.
The amount of time since the data was last updated is displayed next to the Widget Refresh button so you know how long it has been since the Widget last ran its calculations with the most recent data available.
- Note: Refreshing the browser page will not update the data on all the Dashboard widgets. The Widget data will only update when the Widget Refresh button is clicked or when changes are made to the widget settings.
Example of Dashboard Widgets with Stored Data & Widget Refresh Button
-
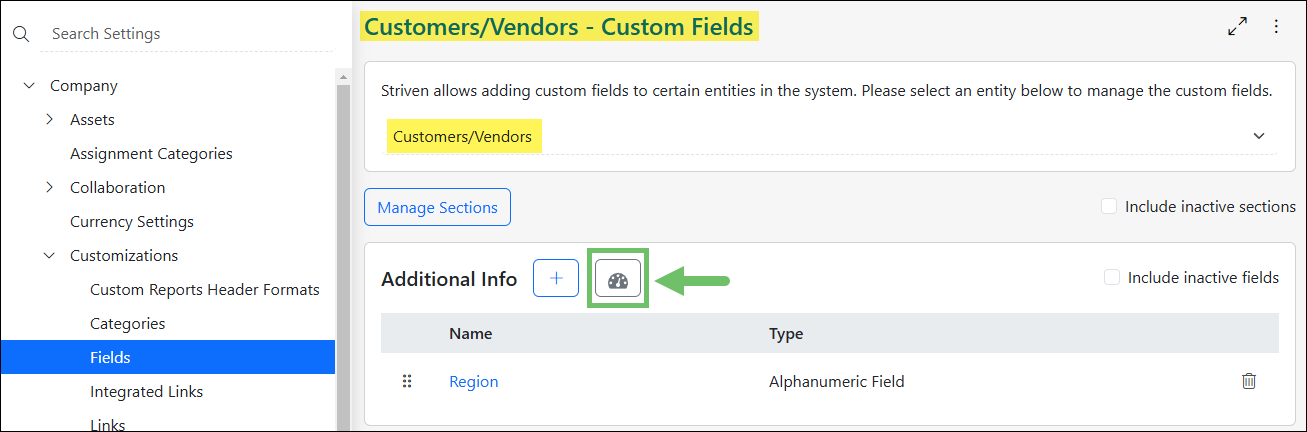
Customer/Vendor Dashboard Custom Fields
Customer and Vendor related Custom Fields can be published to the Dashboards and can be configured depending on the Customer or Vendor. The option to publish the Custom Fields to the dashboard can be found on the Custom Fields Settings in the Section Field related to those Custom Fields.
Example of Custom Fields Settings
By clicking on the little Dashboard Icon in the Custom Fields section you wish to add to the Dashboard, a popup will display allowing you to select which Dashboards you wish to publish the Custom Fields section on.
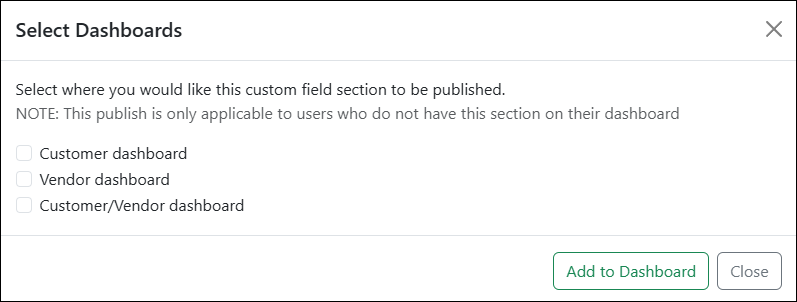
Example of Custom Field Dashboard Publication Selection Popup
-
Quick Add from Customer/Vendor Dashboard
Another great feature on the Customer/Vendor Dashboard is the Quick Add option from the Customer/Vendor menu bar. This drop-down menu will allow users to create Tasks, Contacts, Sales Orders, Invoices, Payments, and other operational or financial records right from the Customer or Vendor Dashboard, directly relating them to that particular Customer or Vendor.
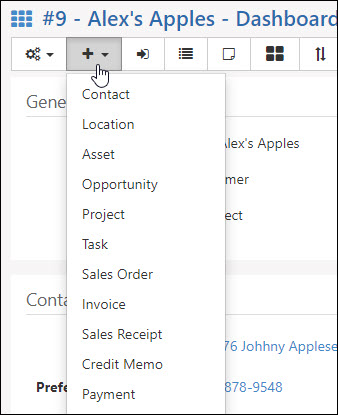
Example of Quick Add menu on Customer Dashboard
The design and customization of your Customer/Vendor Dashboards should improve your overall workflow and productivity when navigating through the Customer and Vendor information in your Striven.
-
Copy Dashboard
The Copy Dashboard feature on a Customer or Vendor’s Dashboard allows you to standardize the information Employees see in configured widgets. This is particularly useful for ensuring all Employees, or those within a specific group or Team, view consistent data. By eliminating the need for individual dashboard reconfiguration, this feature saves time, especially when onboarding new Employees or when an Employee’s role within the company changes.
There are two options available when using the Copy Dashboard feature:
- Copy Another User’s Dashboard to Replace Your Dashboard
- Copy Your Dashboard to Other Users
To begin the process of using the Copy Dashboard feature, click the Copy Dashboard button located in the Actions Menu of a Customer or Vendor’s Dashboard.
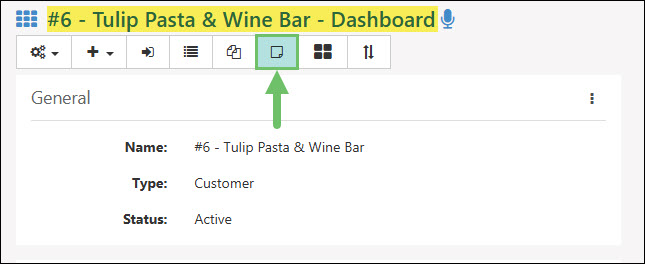
Example of the Copy Dashboard Button on a Customer or Vendor Dashboard
Copy Another User’s Dashboard to Replace Your Dashboard
In order to use another user’s Dashboard as your own Dashboard, use the option Copy Another User’s Dashboard to Replace Your Dashboard. In the Select Employee field, choose the Employee that you would like to make a copy of their Dashboard as your own. Once the Employee has been selected and the Save button has been clicked, you cannot undo the override and will need to reconfigure your Dashboard to revert it back to its original state. There is no permission needed in your User Role in order to copy another Employee’s Customer/Vendor Dashboard as your own.
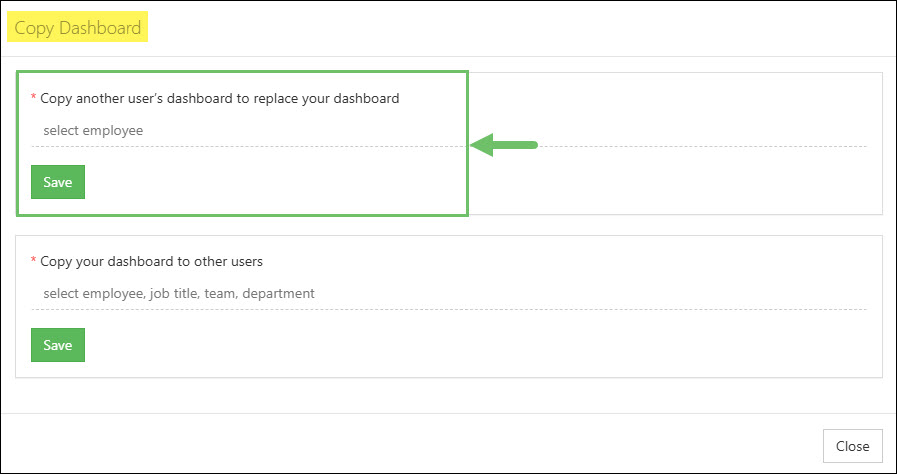
Example of the Copy Another User’s Dashboard Feature
Copy Your Dashboard to Other Users
To override other user’s Customer/Vendor Dashboard in order to replicate your own, use the Copy Your Dashboard to Other Users option. Your User Role will need to include the permission for “Customer/Vendor Dashboard – Copy to other users” in order for this option to appear in the Copy Dashboard window. Using this option gives you the choice of copying your Dashboard to an individual Employee, Employees who share a Job Title, a Team, or a Department. Once a Job Title, Team, or Department is selected, the individual Employees who are included in that group will be listed individually. Click the Save button to complete the copying of your own dashboard to the individuals selected.
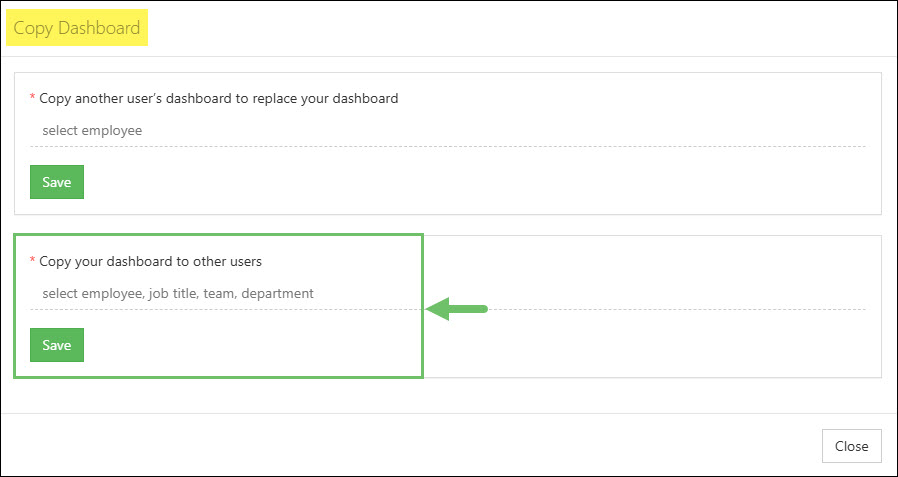
Example of the Copy Your Dashboard Feature
-
Customer/Vendor Dashboard Widgets
There are a variety of available widgets to choose from when configuring your Customer/Vendor Dashboards. Some widgets are available to both Customers and Vendors, and some will be available for the correlating entity. For example, Customer Dashboards will not have A/P related widget options since they don’t apply to Customers.
- Note: If an entity is designated as both a Customer and Vendor in your Striven system, then all the widgets would be available for their Dashboard configuration.
To configure the layout of your Customer/Vendor Dashboard widgets, you can click on the 4-square menu in the Customer/Vendor Menu Bar on the top left of a Customer or Vendor’s page (as shown below). This will trigger a popup with your Dashboard Configuration options.

Example of 4-Square Menu for Customer/Vendor Dashboard Widget Configuration
Settings for your Customer/Vendor Dashboards will be separate depending on the type of entity, but will be the same for all entities of that type. In other words, your Customer Dashboards will have separate settings from your Vendor Dashboards, but all Customer Dashboards will have the same settings. The only exception is if your entity is designated as both a Customer and a Vendor.
The image below is an example of what a default Customer Dashboard Configuration popup looks like as well as the available widget options on the left side column. These widgets can be added to the Dashboard by clicking and dragging them to the desired column location.
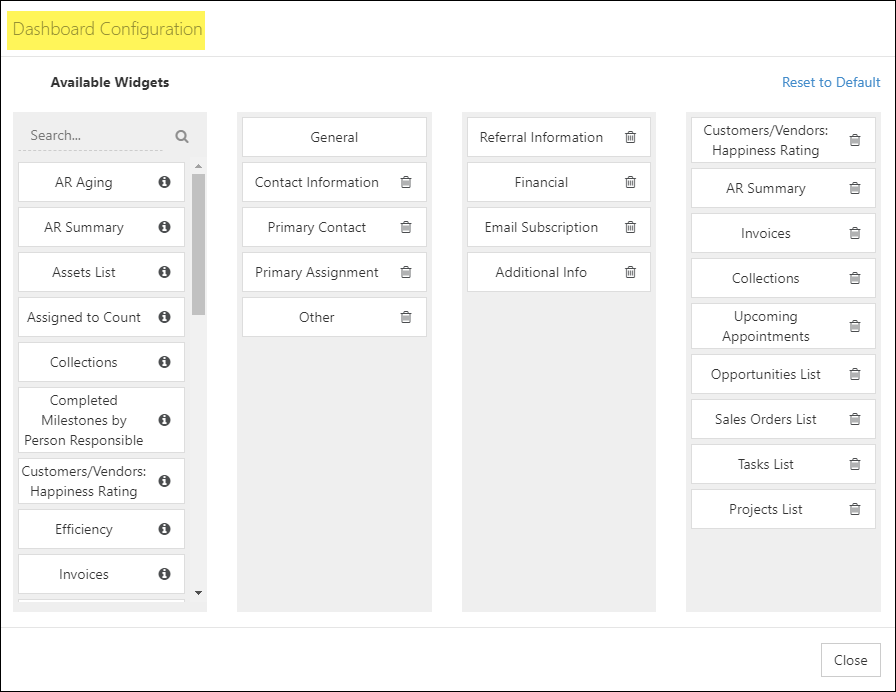
Example of a Default Customer Dashboard Configuration
The following sections of this guide will explain some of the available Customer/Vendor Dashboard Widgets in more detail.
-
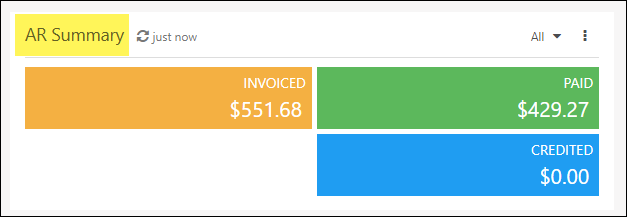
A/R Summary Widget
The A/R Summary widget on a Customer’s Dashboard is an easy way to gain insight into an overview of their financials. Clicking on any of the summary fields will pre-filter the A/R Transaction page for the selected Customer.
The following information will be included within the A/R Summary widget:
- The Invoiced box will include a total dollar amount of Invoices, Sales Receipts, and Journal Entries debiting Accounts Receivables related to the Customer for the selected date range.
- The Paid box will include a total dollar amount of Payments and Sales Receipts related to the Customer for the selected date range.
- The Credited box will include a total amount of Credit Memos and Journal Entries crediting Accounts Receivables that are related to the Customer for the selected date range.
To learn more about Accounts Receivables and Collections within Striven, review our Accounts Receivable Setup Guide or our Collections Guide.
Example of A/R Summary Widget on Customer/Vendor Dashboard
-
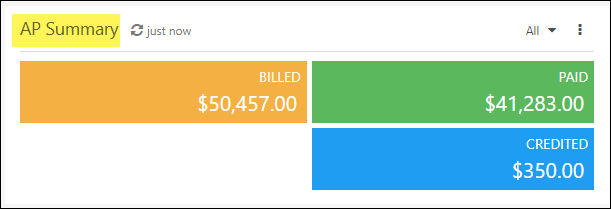
A/P Summary Widget
The A/P Summary widget on a Vendor’s Dashboard is an easy way to get an insight into an overview of their financials. Clicking into any of the summary options will pre-filter the A/P Transactions page for the selected Vendor.
The following information will be included within the A/P Summary widget:
- The Billed box will include a total dollar amount of Bills and Journal Entries crediting Accounts Payable related to the Vendor for the selected date range.
- The Paid box will include a total dollar amount of Credit Card Charges: Bill Payments and Checks: Bill Payments related to the Vendor for the selected date range.
- The Credited box will include a total dollar amount of Bill Credits and Journal Entries debiting Accounts Payable related to the Vendor for the selected date range.
To learn more about Accounts Payable and Purchasing in Striven, please review our Accounts Payable Guide or our Purchase Order Management Guide.
Example of A/P Summary Widget on Customer/Vendor Dashboard
-
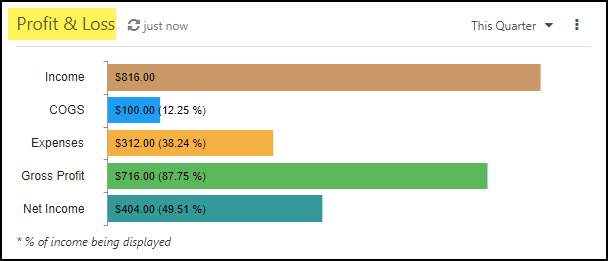
Profit & Loss Widget
The purpose of the Profit & Loss widget is to give a quick view on the Customer’s Dashboard that summarizes the revenues, costs, and expenses your business has incurred related to that particular Customer during a specified period of time . This widget can be sorted by a variety of different time periods and can even be filtered by GL Accounts to narrow down the results to show the health of a particular department within your company. This GL Account filter option is found on the Profit & Loss widget settings and will display the available account options in a tree structure. Available accounts will be nested under COGS, Expense, Income, Other Expense, and Other Income type accounts as these are the account types that are part of the Profit & Loss calculation. When accounts are selected as filters for the widget, only those account postings will be included in the P&L calculation and displayed in the widget. Otherwise, all accounts will be included. You will also have the ability to select a percentage of the total amount for the selected account. The Profit & Loss widget settings also include the options to Exclude Gross Profit Bar and Exclude Net Income Bar from the widget graph.
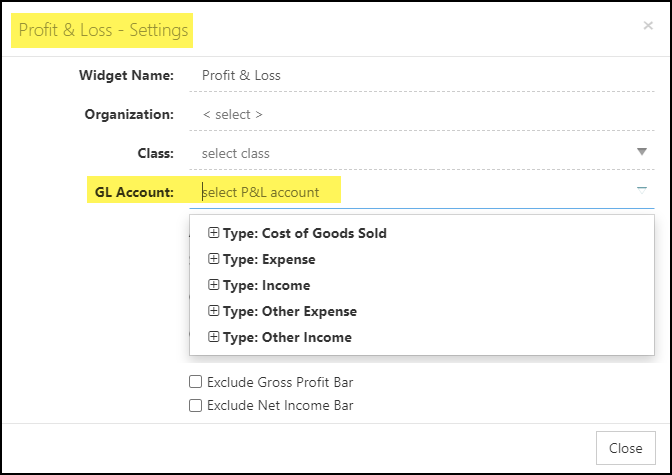
Example of the Profit & Loss Widget Settings for GL Account Filter
- Note: You can view the Profit & Loss Report in Striven at any time by clicking on one of the bars on the P&L Widget graph on your Customer’s Dashboard. However, the bars on the Profit & Loss widget graph will not hyperlink to the P&L Report if there are GL Account Filters selected in the widget settings.
Example of a Profit & Loss Widget for a Particular Customer in Striven
-
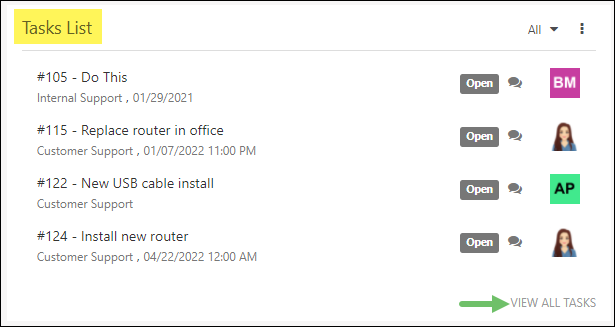
Tasks List
The Tasks List widget on the Customer’s Dashboard will provide a list of Tasks which can be filtered by when they are due , such as Today, This Week, This Month, etc. Beneath the Task name, the widget shows the Task Type and Due Date/Time if applicable. The widget also displays the status of the Task, the Employee Assigned to the Task, and provides a Discussion button to begin a message thread related to that particular Task. At the bottom of the widget, you’ll notice a View All Tasks link, which will redirect you to a Tasks List page filtered to show all Tasks for that Customer.
Example of the Task Widget on Customer/Vendor Dashboard
-
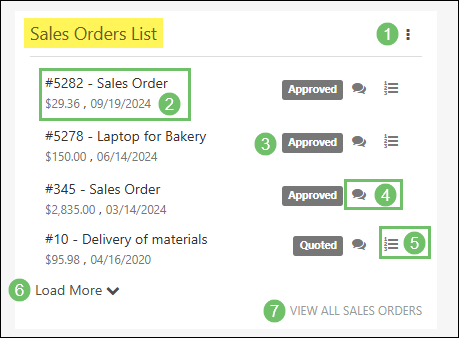
Open Work
Open work can also be displayed in different widgets depending on what it entails. This can include: Sales Orders, Projects, Opportunities and more. There are widgets available to quickly view information on the Dashboard relating to these entities. Below is an example of the Sales Orders List widget for reference.
- Widget kebab: Provides options for widget settings.
- Settings: Provides options to configure the widget settings. This includes Widget Name, Sales Order Type, Status, Sales Rep, as well as whether or not the Order is Recurring.
- Copy: Adds a duplicate of the widget to the Dashboard. This is useful when you want to display a similar widget with minor adjustments to the settings.
- Remove: Removes the widget from the Dashboard.
- Order Details: Displays Sales Order details such as Order Number, Name, Total, and Date.
- Note: In the case of Open Opportunities or Open Projects widgets, the details for those entities will display similarly.
- Order Status: Displays the status of the Order.
- Discussions: Allows you to quickly create a new discussion with regard to the related Order without having to navigate to the individual Order within Striven.
- View Line Items: Allows you to see the Line Item details related to the Order. This popup will display the Item Name, Description, Quantity, Price, Amount, S&H, Tax, Class, and Total relating to the Order.
- Load More: By default, the widget will automatically load five (5) Sales Orders, but clicking the Load More button will display more Orders.
- View All Sales Orders: Opens the Customer’s Sales Orders List in a new browser tab.
Example of a Sales Orders List Widget on a Customer Dashboard
- Widget kebab: Provides options for widget settings.
-
Upcoming Appointments
This widget will list any upcoming Appointments that are related to the Customer. A kebab menu is also available to configure the widget settings to edit the widget name or change the view to show appointments for a specific Employee. The date and time, along with the Appointment Location, if selected, will be listed within this list for convenience.

Example of Upcoming Appointments on Customer/Vendor Dashboard
-
Contacts List Widget
The Contacts List widget displays Contacts related to the Customer/Vendor without having to navigate to the Contacts list located within a Customer/Vendor’s profile.
The Contacts List widget will display the following information regarding each Contact:
- Profile Image
- Name
- Title
- Email Address
- Phone Number
- Location
When hovering over a Contact’s name from the Contacts List widget the following navigation and action menu options can be accessed:
- Viewed By: Lists the Employees who have last viewed the Contact and also who has most viewed the Contact.
- Share: Gives a direct link to the Contact Info page from the Customer or Vendor’s Contacts that can be given to others for easy access.
- Action Menu: By clicking on the vertical ellipsis icon the following options can be accessed:
- Info: Navigates to the Contact Info page located under the Customer or Vendor’s Contacts.
- Hub: Navigates to the Contact’s Hub page located under the Customer or Vendor’s Contacts.
- Asset Associations: Navigates to a list of Customer or Vendor Assets that have been related to the Contact through the Associated Contacts field located on the Asset.
- Portal Settings: Navigates to the Contact’s Portal Settings page to make updates as needed.
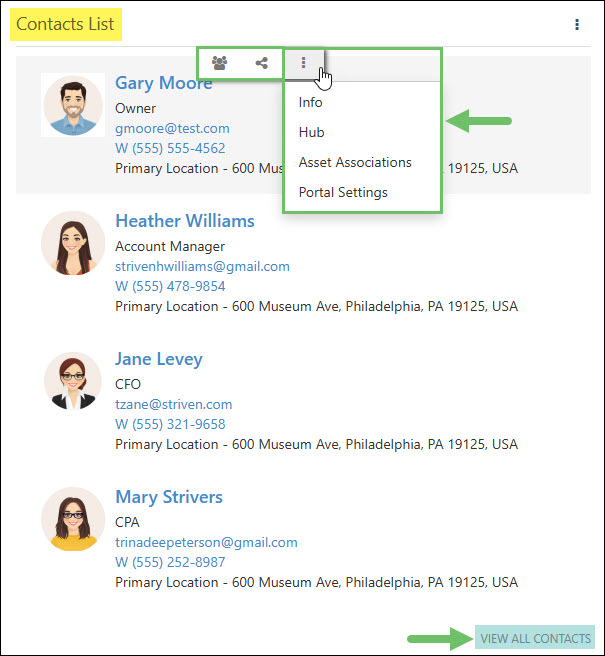
Example of the Contacts List Widget from a Customer or Vendor Dashboard
Click the View All Contacts button at the bottom of the Contacts List widget to access the complete Contacts list for the Customer/Vendor.
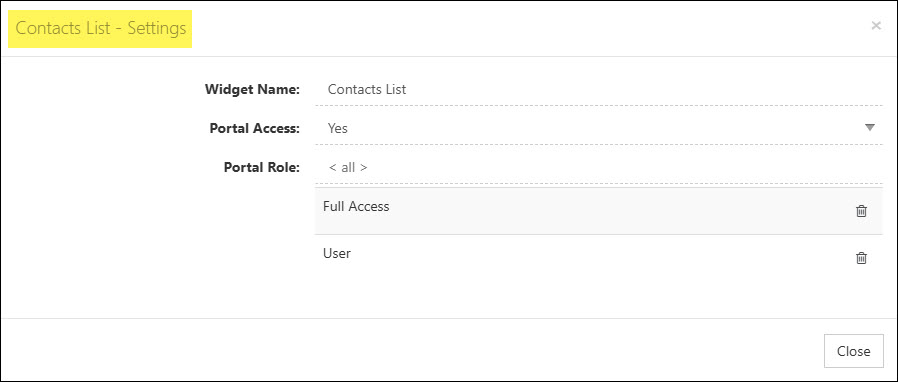
The following configuration options are available when editing the settings for the Contacts List widget:
- Widget Name: Changes how the widget’s name will be displayed when viewing the Customer/Vendor Dashboard.
- Portal Access: Allows you to filter the Contacts List widget based on whether or not the Contact has been granted access to the Portal.
- Portal Role: Allows you to filter the Contacts List widget based on specific Portal Roles that have been granted to the Contacts for the Customer/Vendor. Multiple Portal Roles can be selected in this field.
Example of the Contacts List Widget Settings
-
Assets Count Widget
The Asset Count widget will list how many Assets the Customer has stored in their profile per Customer Asset Type. By default, Assets that are In Service, Out of Service, Retired, and Unsupported will be included in the count. Assets that are set to the Inactive status will be excluded by default. Clicking on the Asset Type listed in the widget will open the Customer or Vendor’s Assets list with the Type prefiltered. To view the full list of Assets being stored with the Customer or Vendor, click the View All Assets button located at the bottom of the widget.
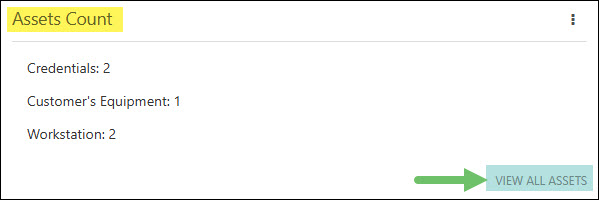
Example of the Assets Count Widget from a Customer or Vendor Dashboard
The following configuration options are available when editing the settings for the Assets Count widget:
- Widget Name: Changes how the widget’s name will be displayed when viewing the Customer/Vendor Dashboard.
- Asset Types: Narrows the results listed in the widget based on the Asset Type. By default, all Asset Types will be selected.
- Asset Status: Narrows the results listed in the widget based on the current status the Asset resides in. By default, Assets that are In Service, Out of Service, Retired, and Unsupported will be included in the count. Assets that are set to the Inactive status will be excluded by default.
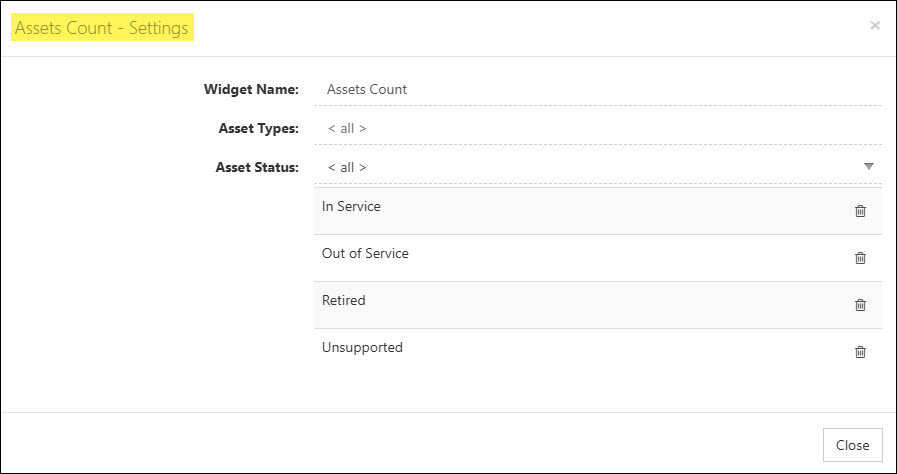
Example of the Assets Count Widget Settings
-
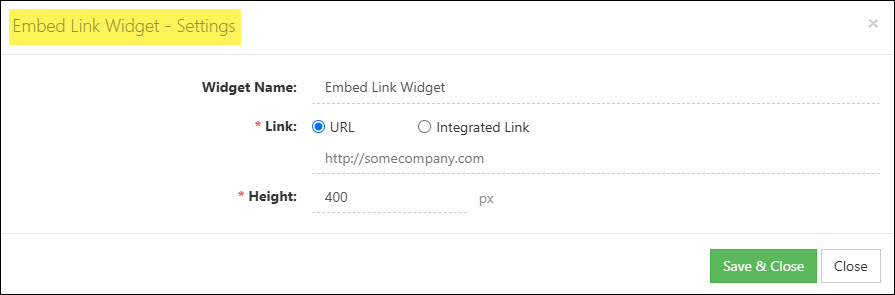
Embed Link Widget
The Embed Link widget will allow you to select a URL or Integrated Link to display in a widget on the Customer/Vendor Dashboard. When configuring the widget, you will have the option to change the display name for the widget and also enter the height in pixels to determine how big the widget should appear when viewing the Customer/Vendor Dashboard.
There are 2 available options for the Embed Link widget:
- URL: Allows you to enter the web address link used to direct your internet browser to a particular website.
- Integrated Link: Allows you to choose from the list of Integrated Links you have already set in your system. (This list can be edited by visiting Company → Settings → Company → Customizations → Integrated Links and selecting Customers/Vendors from the drop-down list).
Example of Configuring a Embed Link Widget for a Customer or Vendor’s Dashboard
Once you have completed the configurations for the Embed Link widget, the URL or Integrated Link selected will be displayed within the widget when viewing the Customer/Vendor’s Dashboard. Multiple Embed Link widgets can be added to the Customer/Vendor’s Dashboard in order to display or access different types of information or actions right from the Dashboard.
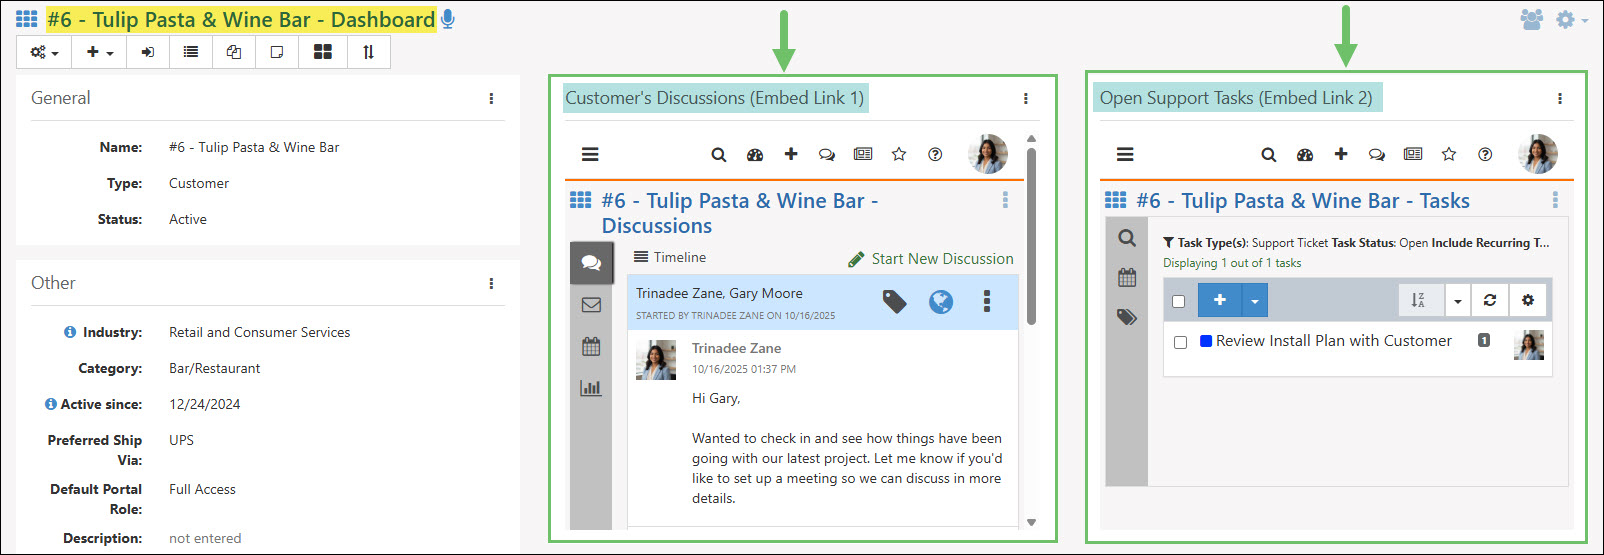
Example of Having Multiple Embed Link Widgets on a Customer or Vendor Dashboard
-
Assignments (Employees) Widget
The Assignments (Employees) widget will list the Employees that have been added as an Assignment to the Customer or Vendor. While Customer/Vendor Assignments can include Contacts, Customer/Vendors, Pools, or Teams, this widget will only include Assignment Types that have been designated as Employees.
The following information will be listed for each Employee included in this widget:
- Name
- Assignment Category
- Job Title and Department
To view a complete list of the Customer/Vendor’s Assignments, click the View All Assignments button at the bottom of the widget.
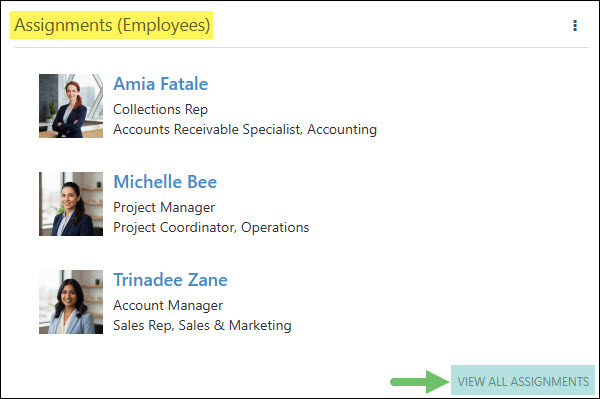
Example of the Assignments (Employees) Widget from a Customer or Vendor Dashboard
The following configuration options are available when editing the settings for the Assignments (Employees) widget:
- Widget Name: Changes how the widget’s name will be displayed when viewing the Customer/Vendor Dashboard.
- Assignment Category: Adjusts what type of Assignments are included in the widget based on the Assignment Category. Only Assignment Categories that have been configured as the Employee type will be included as an option to select for this field.
- Visible on Portal: Narrows results in the widget based on whether or not the Assignment has been marked as visible on the Portal.
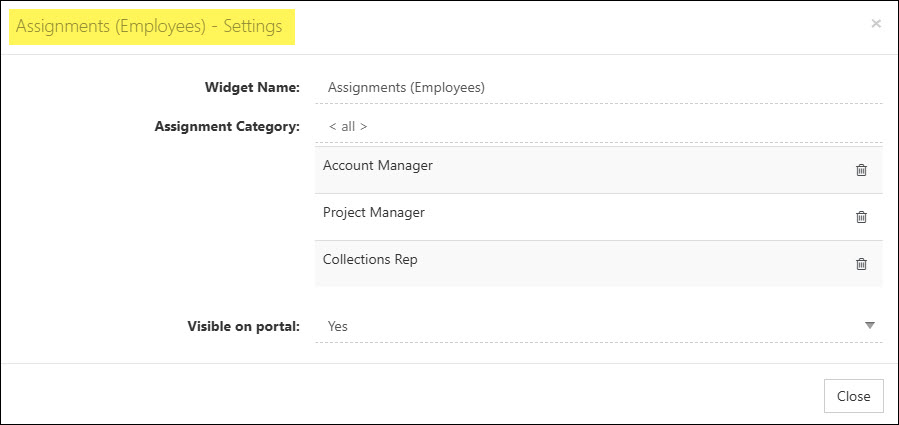
Example of the Assignments (Employees) Widget Settings
-
Price/Cost List Widget
Price and Cost Lists are utilized when a Customer or Vendor has specific prices or costs that are different from the standard price/cost of that item. The price or cost indicated on the assigned list will override the standing pricing of an item when creating Transactions, Sales Orders, or Purchase Orders.
Using the Price/Cost List widget, you can determine if Standard Item Pricing/Costing can be used, or if the Customer/Vendor should be assigned a Price/Cost list for adjusted item amounts.
When an Item is added to a Sales Order or an Accounts Receivable Transaction, Striven will first check if a Price List is applicable. If applicable, the price will then be set based on the specific Item that is included in the Price List. If the Item is not listed, then the system will check and adjust the price if the Item Category is included in the Price List. If the Item or Category are not included in the Price List, changes will then be made based on the Price All Items As option.
Setting Up Customer Price List
For Customer Price Lists, you can view all of the created Price Lists by navigating Customers → Pricing → Price Lists
- Add Price List: Allows you to create a new Price List. This process will be explained in more detail below.
- Import: Allows you to import an existing Price List using a TXT or CSV file type. The Price List Import page provides a Generate Sample File button which allows you to select the column headers for your import file. There is also an Import History button to view the Import Progress page filtered for Customer Price Lists to view previous import files.
- Export Standard List: Allows you to export a list containing the standard Price and Cost for all of the active Items you have within your system.
- Page Actions: There are three (3) options:
- Search Options: Provides filters to search for created Price Lists by Name, Item, Category, or Status. To repeat a search in the future without resetting the criteria, either save the search by checking the Save this Search box, or select from previously Saved Searches.
- Expand/Collapse: Extends or reduces the screen view to optimize and adjust to viewing the page on various device screen sizes.
- Settings Menu: Offers three (3) options:
- Settings: Displays your page access settings and provides a button to request access to permissions needed for access to the info on the page.
- Make Landing Page: Updates the current page to be your Landing Page when you sign in to Striven.
- Helpful Links: Links to useful resources outside of Striven to provide further information related to details on the current page.
- Filters: Displays the current filters applied to show the results on the page. You can also click on the Filter icon to edit the filters.
- Sort: Allows you to sort the list alphabetically in ascending or descending order.
- Price List Results: This section will display all of the Price Lists within your system that match the search results you have applied. The Price List Names are hyperlinked to view the details and settings of the Price List.
- Export: Downloads the particular Price List to your device.
- Deactivate: Enables you to deactivate a specific Price List. A confirmation message will appear asking if you wish to deactivate the Price List. Select Yes to continue, or No to cancel. Deactivated Price Lists can be viewed by filtering the Status field for Inactive in the Search popup.
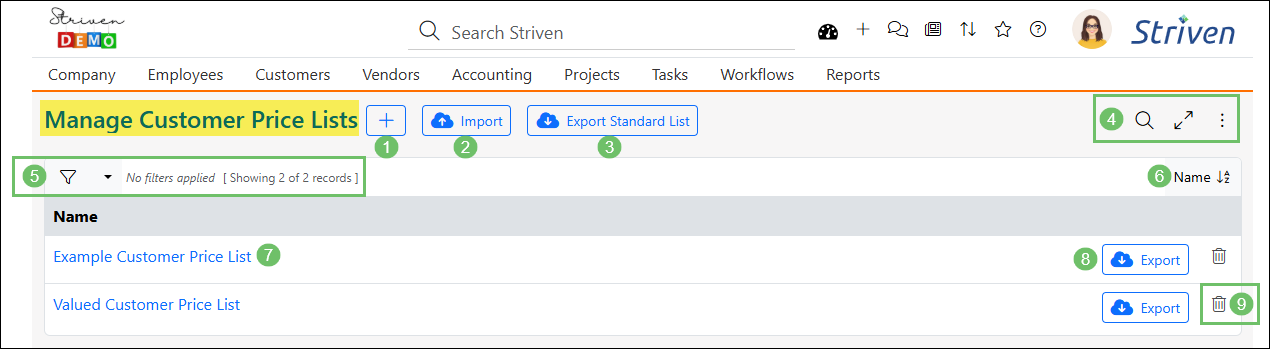
Example of the Manage Customer Price Lists Page
When adding a new Price List, you will be presented with the Add Customer Price List Info page.
- Name: Allows you to name the Price List so that it can be easily distinguishable when available for selection.
- Price All Items As: Allows for a percentage to be entered in order to adjust the price of all items listed stored in Striven. This option can be set based on either the Items’ price or cost. Once this option is checked, an additional option appears to Set Rounding Rule which has options for No Rounding, Two Decimals, or Nearest Whole Number.
- Note: Entering a negative number into the percentage field will allow for a decrease rather than an increase for the Item price.
- Add Items/Categories: Allows users to select which Items should be listed within the Price List. Options are available to select individual Items or based on Item Categories.
- Show Inactive: Displays results in the Price List for Items or Item Categories that have been previously deactivated from the Price List.
- Type: Lists if the result was added as an Item or as Category. If an individual Item was added to the list a hyperlink is available to quickly access the Item Info page.
- Column Name: Lists the name of the Item or Item Category that has been added to the Price List.
- Price Change: Options for updating the price for the Items included in the Price List are Price or Percentage +/-.
- Price Change Amount: With the Price option, a dollar amount can be entered which will override the Item’s price when a Customer is assigned the Price List. When the Percentage +/- option is selected, a percentage can be entered rather than a specific number amount.
- Price/Cost: Determines if the price change will be based on the Item’s listed Price or Cost. This dropdown is available when the price is being updated by the Percentage +/- option.
- Note: Entering a negative number into the percentage field will allow for a decrease rather than an increase for the Item price.
- Rounding Rule: Contains options on how to handle rounding when the Item’s price has been updated based on the Price List. Options include No Rounding, Two Decimals, or Nearest Whole Number. The [Configure] button is available when the price is being increased by the Percentage +/- option.
- Standard Cost/Price: Displays the Cost and Price that is listed within the Item Info for quick reference. These fields will only display information for individual Items that have been added to the Price List and will be blank for Categories listed.
- Deactivate: Removes the Item or Category from the Price List. These Items can be reactivated using the Show Inactive option at the top of the Price List.

Example of the Customer Price List Info Page
Setting Up Vendor Cost List
For Vendor Cost Lists, you can view all of the created Cost Lists by navigating Vendors → Purchasing → Cost Lists
When viewing the Manage Vendor Cost Lists page, you will be presented with a number of options, similar to the Manage Customer Price Lists page.
- Search Options: You can search for created Cost Lists by name, or by item. You can also choose to Include Inactive Lists. You can save a search by clicking the Magnifying Glass\Gear icon.
- Add Cost List: Using the Add Cost List button will allow you to create a new Cost List.
- Import: Allows you to import an existing Cost List.
- Export Standard List: Selecting this option will allow you to export a list containing the standard Price and Cost for all of the active items you have within your system.
- Sort: The Vendor Cost Lists can be sorted by the Default Sort and by name. You can use the Arrow icon to the right of sort options to organize the results in order of ascending or descending.
- Cost List Results: This section will display all of the Cost Lists within your system.
- Export: Allows you to export an individual Cost List.
- Deactivate: Using the Trashcan icon will allow you to deactivate a specific Cost List.
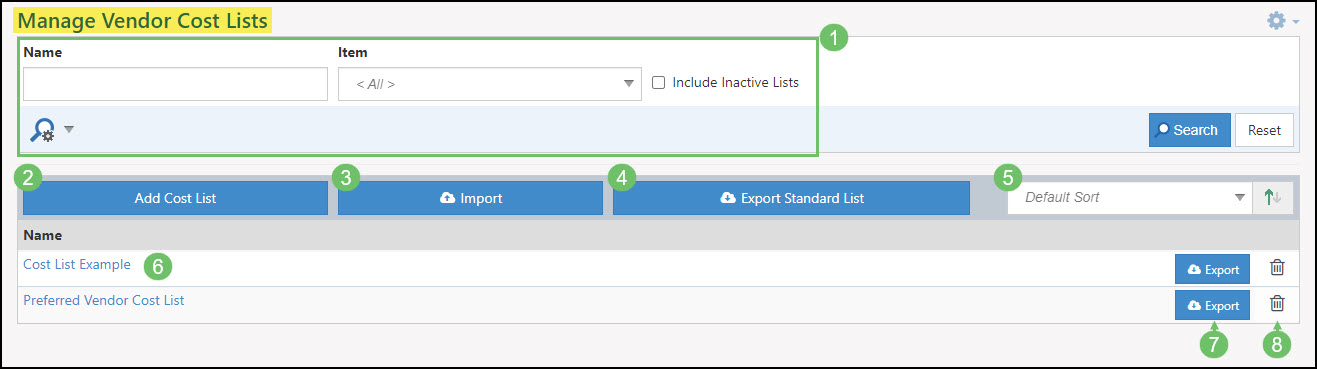
Example of the Manage Vendor Cost Lists Page
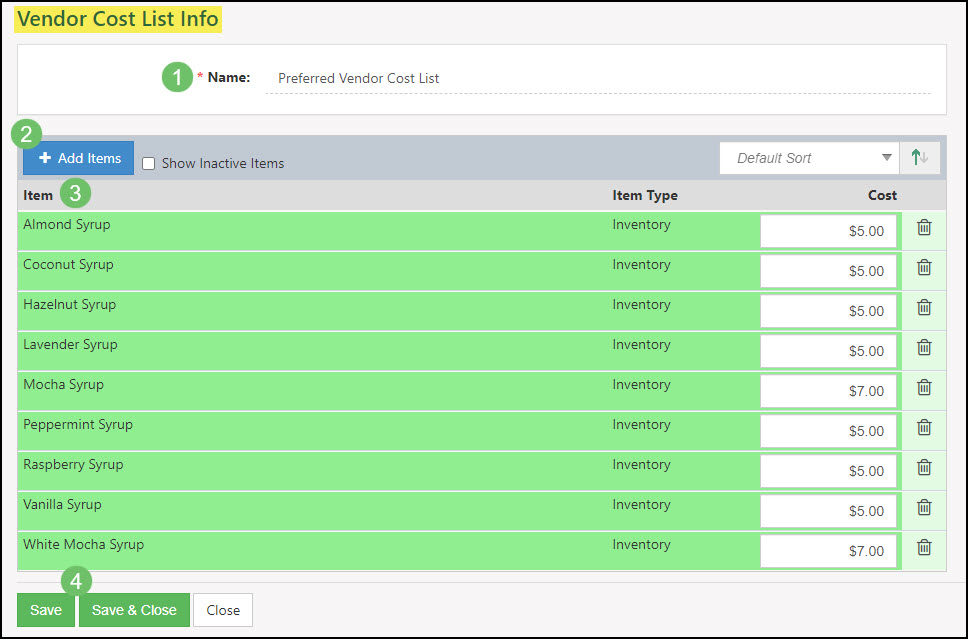
Adding a Vendor Cost List has the similar options as adding a Price List. The Vendor Cost List Info page has the following options:
- Name: Allows you to name the Cost List so that it can be easily distinguishable.
- Add Items: Allows you to choose which Items you would like to add alternate Costs for.
- Item List: This section lists the Items added to this Cost List and displays the Item Name, Item Type, and an editable Cost field so you can enter your custom price here. The Trashcan icon will allow you to remove an Item from the list.
- Note: The standard cost for each item will automatically populate in the Price field.
- Save: You can use the Save or Save & Close button to save the changes you have made to the Cost List.
Example of Adding a Vendor Cost List
Assigning Price/Cost List
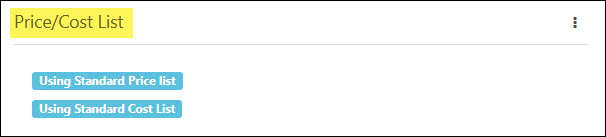
The Price/Cost List widget, located on the Customer or Vendor’s Dashboard, gives the option to assign specific Price or Cost Lists to be used on Orders or Transactions for the specific Customer/Vendor.
Unless the Price or Cost List was set up during the Customer creation process, the Price/Cost Widget will be configured with both Using Standard Price List and Using Standard Cost List.
Example of the Price Cost List Widget with Standard Price and Cost
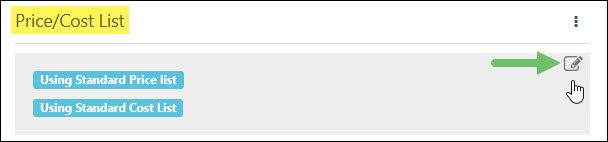
Hovering over the widget will display an edit icon that can be clicked to change the configurations of the Price and Cost List for the Customer or Vendor.
Example of the Edit Option for the Price Cost List Widget
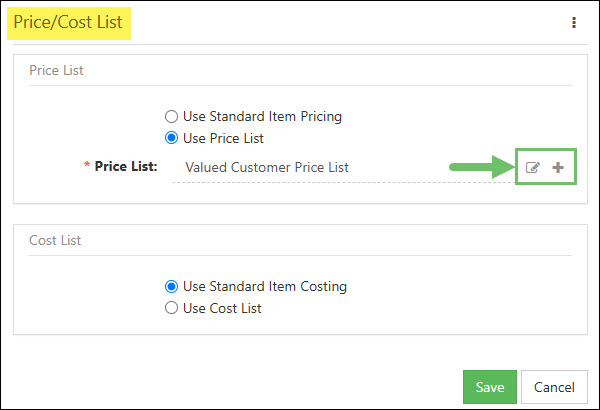
When editing the widget, a separate Price and Cost List will be able to be selected in order to specify what should be used when selling or purchasing to the Customer/Vendor. Changing the option from Use Standard Item Pricing/Costing to Use Price/Cost List will give the option to select from existing Lists that have been created.

Example of Selecting a Price List in the Price Cost List Widget
Once a Price or Cost List is selected, the List can be updated by clicking the edit icon. Clicking the plus-sign icon next to the selected Price or Cost List will open the Add Customer/Vendor Price Cost List Info page in order to create a new List.
Example of the Edit and Add Buttons Available in the Price Cost List Widget
If there have been no Price or Cost Lists previously created, a note will be listed stating There are no active Price/Cost Lists in the system with a button to Add Price/Cost List.
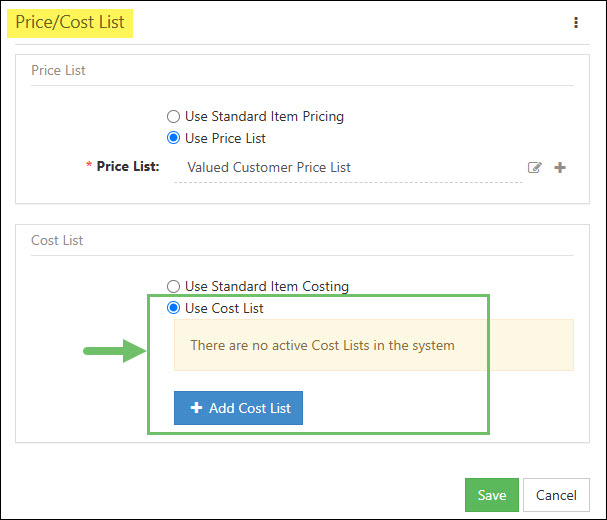
Example of No Price or Cost Lists Available from the Price Cost List Widget
Once the Price/Cost List widget has been configured the selected Price or Cost List will be displayed rather than the Standard Price/Cost List tag.
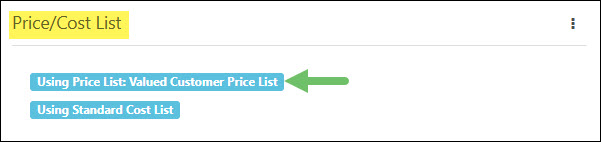
Example of the Price Cost List Widget After Configured
-
Recap
With this guide, we’ve discovered how to navigate and track the work being done for Customers within their information. We’ve also learned how to manage contacts for individual Customers/Vendors as well.

Have a Question?
Ask the Striven Community
User-sourced how-to’s, feedback, and more!
FAQs
-
I do not want financial information to be displayed on my Customer’s Dashboard. How can this be removed?
Widgets for a Customer’s Dashboard can be removed by clicking on the Add Widgets button at the bottom of the page or by clicking on the 4-Panel icon in the Customers menu bar.