
Productivity Tools
Import Management
Support Guide
-
Overview
Importing in Striven allows companies to bring in data into Striven in large quantities at a time. Importing is available for a lot of areas within Striven including, but not limited to Customers/Vendors, Tasks, Employees, and much more. All imports have the same basic functions, but mapping and requirements change based on what entities are being imported into Striven. Below are individual sections that will help explain the functionality related to importing and help you to utilize this invaluable feature in Striven.
Available Imports in Striven:


Read this guide if you are trying to:
✔ Understand how to find and use importing functions in Striven.
✔ How to use mapping and the download sample to help import your data.
✔ Import your data into Striven using the appropriate import tool.
-
Import Buttons
Striven provides multiple options for importing data into the system. On Lists, there will be an Import button located at the top, which when clicked will bring you to the Import Page to begin the process of importing data into Striven.
Note: If an Import button is not located on the top of a List, this could be due to not having a specific import permission included in your User Role.
Once the Import button is clicked, the Import Page will appear, which is discussed in the next section. You can also find imports by using the Striven Search feature. Below is a screenshot displaying how the Import button appears on the Customers/Vendors List and a description of what you can accomplish there.
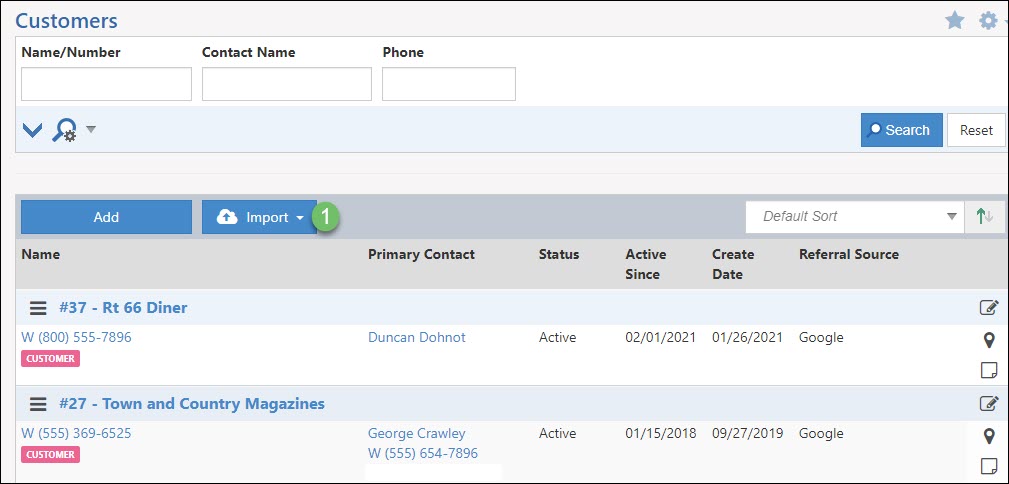
Example of Import Button on Customers/Vendors List Page
- Import Button: Populates the Import Page where you can begin the process of importing your data into Striven en masse.
-
Import Process
After an Import button is clicked you will be brought to the appropriate Import Page to begin the process of importing. The Import Page has tools that you can utilize to better understand how to import and search for a spreadsheet that you can choose to import into Striven. You can bring your data into Striven using either a .TXT file or a .CSV file. Below is a screenshot depicting how an Import Page appears and a description of what you can accomplish there:
- Generate Sample File: Generates a sample import file, allowing you to select the columns and fill in the information for import. (This will be explained in more detail in the following sections of this guide).
- Get Existing Data: Enables you to create a report to pull specific information from your system to generate a file.
- Import History: Directs you to the Import Progress Page where you can filter and search for files previously imported and check the status of those imports.
- Select: Allows you to select a file to upload that includes the data you would like to import into Striven.
- Update matching data: This checkbox needs to be toggled on in order to update any existing data in the system that matches data in the spreadsheet being imported. If this checkbox is not toggled, new data will be created in Striven from the information in the spreadsheet selected.
- Actions: There are two buttons here which allow you to do different functions:
- Next: Brings you to the next page in the importing process, which would include mapping the fields in your spreadsheet to the appropriate fields in Striven.
- Close: Closes the Import Page and brings you back to the selected entity’s list.
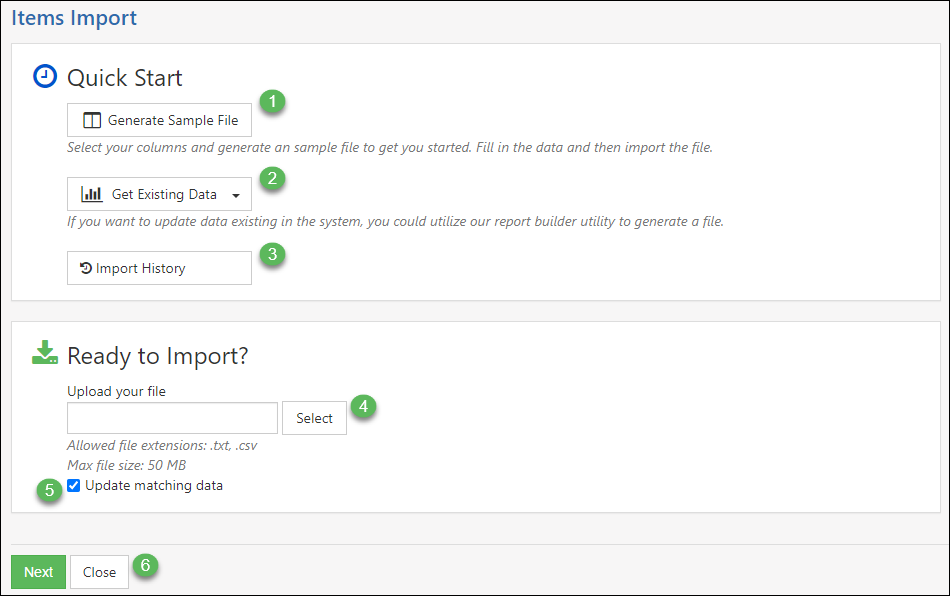
Example of Items Import Page
-
Data Capturing
By clicking on the Generate Sample File button on the Import Page, the Import Mapping popup will display providing you with a list of available import columns to include in your import file. This popup will include information regarding the Column Headers, the data type for that column, the max length of the column field, and the description of what information should be included under that Column Header.
Once your columns are selected, you can click the Download Sample button to generate the sample format file for the import. Below is a screenshot demonstrating how the import mapping appears and a description of what information is available there.
Generating a Sample Import File
- Column Header: Identifies the information in the column below. It is best to match the Header names on your import file to the ones selected or required for the import so as to not confuse the mapping of the information within Striven.
- Data Type: Describes the type of information contained in this column. This helps you identify the correct formatting for the information in the import, such as Integer fields, Alphanumeric fields, Decimal fields, Currency fields, Yes/No fields, etc.
- Max Length: The maximum number of characters that will fit in this field in Striven.
- Description: Explains the Column Header’s meaning and the information accepted in this column. Also includes information for situations regarding hierarchical data or default values if the column is left blank.
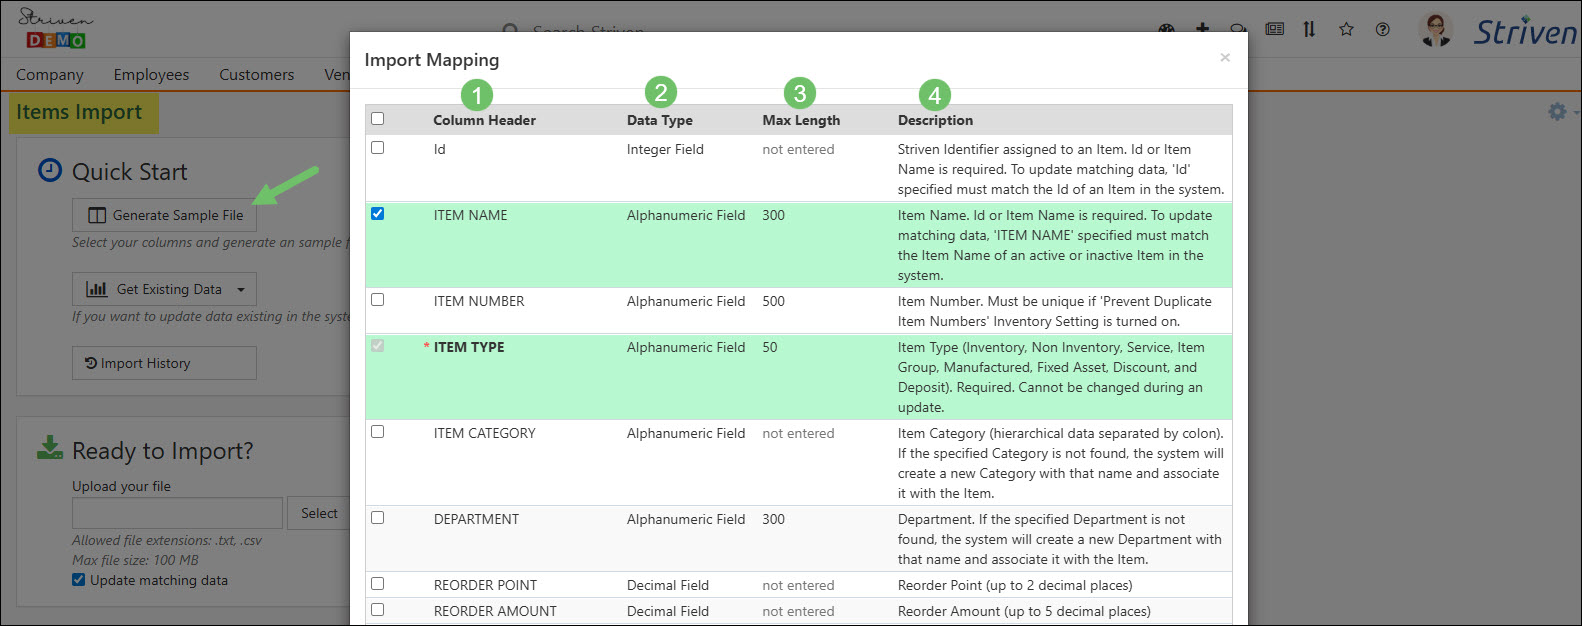
Example of Items Import Mapping Popup for Sample Import File
-
Using Sample File to Create Import
Add the related import data in the columns beneath the appropriate Column Headers and save your import file in a .CSV or .TXT file format. Now you’re ready to upload the file to Striven.

Example of a Sample Items Import File
-
Mapping Your Data
Once an import file is uploaded on the Import Page, you can click the Next button which will populate the screenshot shown below. This page lists the Column Headers on the import spreadsheet and allows you to map the data to the appropriate mapping name. Once the mapping is matched to the Column Header, you can click Next to resume the import process or Back to go back and choose a different file to import. Below is a screenshot demonstrating how the Import Mapping Page appears and a description of what you can accomplish there:
- Reset Mapping: Resets the mapping so that all fields are blank for you to choose mapping yourself or resets the mapping from previous import attempts.
- Source: Lists the Column Headers within your import file.
- Map To: Allows you to to select the data you would like to map the Source to. These fields are usually filled in based on the Source listed, but you can choose the mapping if the field is blank.
- Data Type: Lists what type of data is captured with the related Source.
- Max Length: Lists how many characters can be captured with each Source listed.
- Description: Lists the description for each Column Header listed.
- Actions: There are 4 buttons here which will allow different functions:
- Back: This will take you back to the previous page of the importing process.
- Next: This will take you to the next step of the importing process.
- Preview: Displays a preview of the information from the import file.
- Close: Closes the mapping screen, does not save import progress, and returns to the Import Page.
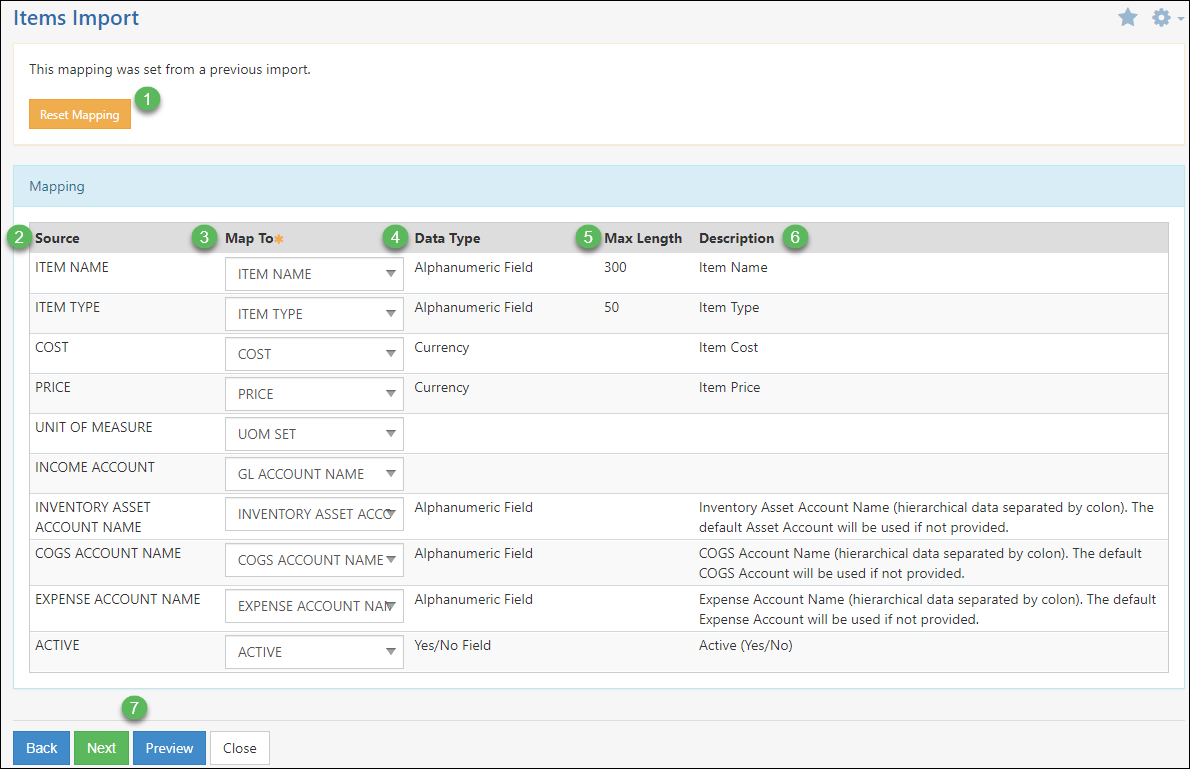
Example of Items Import Mapping Page
-
Import Confirmation
After the mapping is set and you click the Next button on the mapping page, Striven will attempt to import the captured data from the uploaded spreadsheet into the system. If any data is not captured correctly, there will be a list of rows that cannot be imported so that the you can make the necessary changes prior to re-importing. If the data matches, the system will present an import confirmation page, which lists how many new entities will be brought into Striven. If the import is updating existing information the confirmation will list what data will be updated in Striven.
After clicking the Finish button, the data will begin to import and you will receive an email once the import is completed. Below is a screenshot illustrating how the Import Confirmation Page appears and a description of what you can accomplish there:
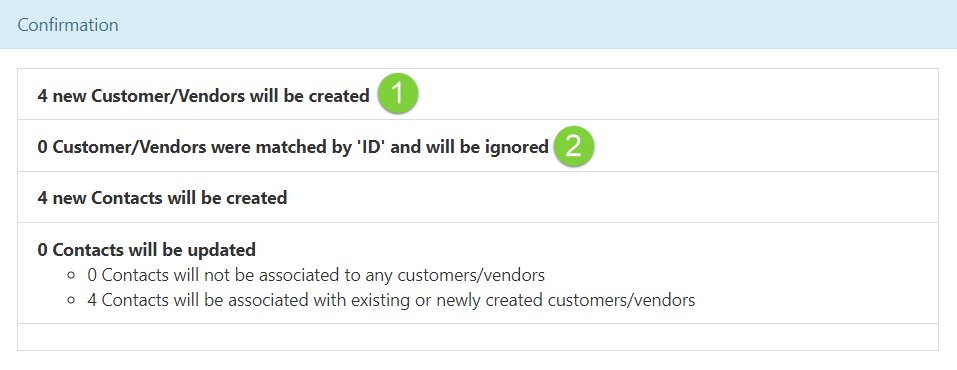
Example of Import Confirmation Page
- Creating New Data: Lists what new data is going to be created once the import is processed and completed.
- Updating Existing Data: Lists any data that was matched, but ignored. This is based on whether or not the checkbox Update matching data is toggled on. If it is not, then any matching data will be ignored.
-
Import Completed
After clicking Finish on the Import Confirmation page, the import file will process in the background. This will enable you to continue your daily workflow without losing time waiting for the import to complete. Once the import is successful and fully completed, you will receive an email verifying the import. This email will list what data has been created and/or updated in your Striven system with helpful hyperlinks to view the new data inside Striven with one click. Below is a screenshot displaying how the Import Complete email appears and a description of what you can accomplish there.
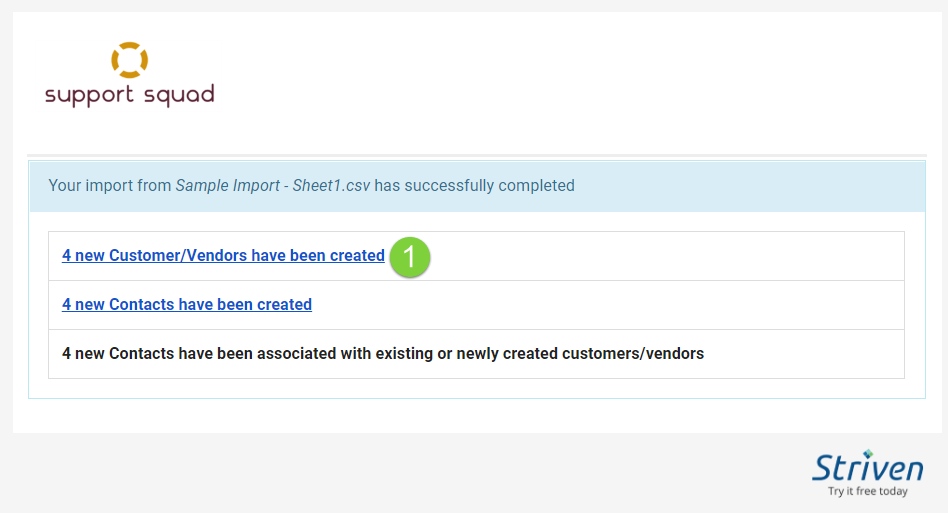
Example of Import Complete email
- Helpful Hyperlink(s): Allow you to view the information that was successfully imported into your Striven system.
-
Recap
With this Import Management Guide, we’ve discussed how to import data into your Striven system. We’ve explored ways to view mapping, generate a sample import file to use when importing, and how to import data into Striven. By using the information learned here, you can start importing data for things like Customers, Items, Accounts, and more.

Have a Question?
Ask the Striven Community
User-sourced how-to’s, feedback, and more!
FAQs
-
What is the ID column for in my Generate Sample Import File?
The ID column is the Striven ID given to an individual entity as a unique identifier and can be ignored unless trying to update data in Striven using an entity’s ID to do so. This may not always coincide with an assigned number, such as an Employee Number or Customer Number.
-
Can I import Contacts for a specific Customer rather than for Customers/Vendors Contacts?
Yes, there is an import function located on a Customer/Vendor’s Contacts Page that can help you import Contacts related to a specific Customer/Vendor if desired.