
Customers/Vendors
Merging Customers/Vendors
Support Guide
-
Overview
There may be times where you wind up with duplicate Customers/Vendors saved in your Striven system. Rather than having unnecessary records cluttering up your Customer/Vendor Lists or losing any data by deleting one, you can use Striven’s Merge Customer/Vendor option to combine the duplicate records and save important financial transactions and Customer/Vendor information in one record.
Read this guide if you are trying to:
✔ Merge duplicate Customers/Vendors into one record.
✔ Determine which data is and which is not copied over during a Customer/Vendor Merge.
✔ Retain Dashboard widget information from one Customer/Vendor record to the merged one.
Before the Merge
-
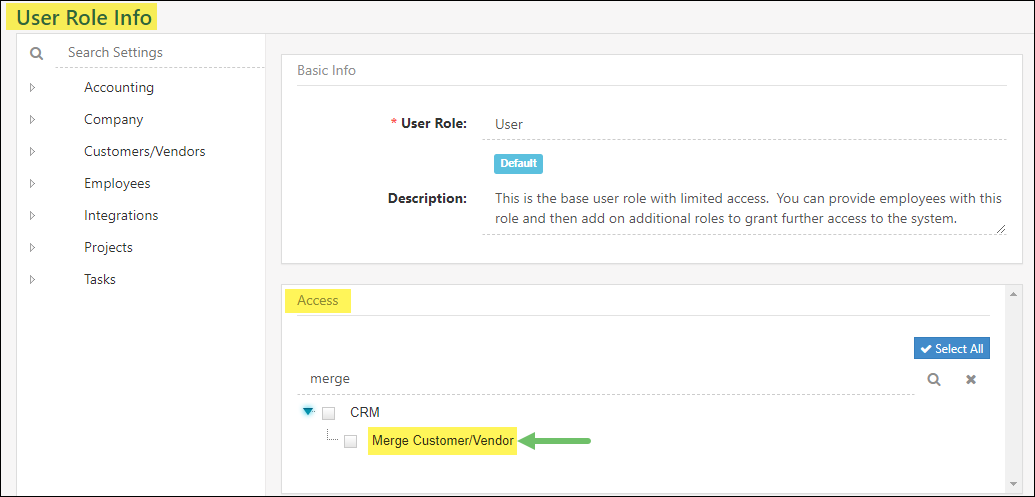
User Role Permission
It is important to note that the “Merge Customer/Vendor” permission is required for your User Role in order to have access to perform a Customer/Vendor Merge in Striven. If you do not have access, you may wish to contact your system Administrator for further assistance.

-
Helpful Recommendations
This user guide will explain the steps and details involved in performing a Customer Merge in Striven. The process is basically the same for Vendors, so the steps can be followed accordingly.
To start, it is strongly suggested that the following factors be examined before beginning a Customer/Vendor Merge.
The TO and FROM Records
It is recommended that you merge FROM the newer Customer record TO the older record, unless there is an active Payment Profile attached to one of the records. In that case, you should merge into the record with the Payment Profile.
- If both records have a Payment Profile, merge TO the record with the most activity.
- If the FROM record has a Payment Profile, a warning message will display when attempting to merge the records. If this occurs, you can cancel the merge before completion to switch the records so the TO record is the one with the Payment Profile.

Example of the Warning Message that the Source Record has a Payment Profile
- To confirm whether either of the records has an Active Payment Profile before you begin a merge, you can click on the Customer’s waffle menu and select Financial.
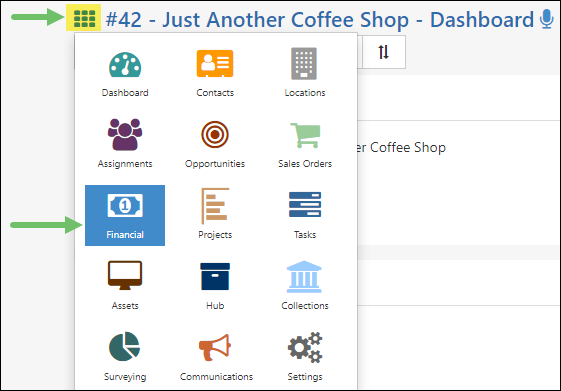
Example of a Customer’s Waffle Menu with Financial Option Selected
- This will display the AR Transactions page for the Customer, with a Left Navigation Menu option for Payment Profiles. From this page, you will be able to determine if there is an established Payment Profile and ensure you choose the correct TO and FROM records for your merge.
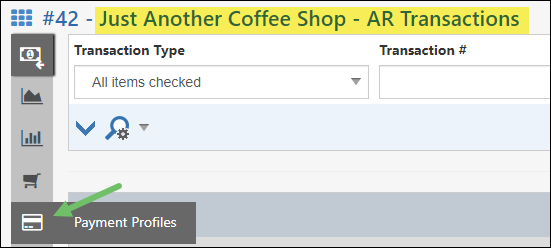
Example of Payment Profile Settings Option
Information that Merges
Striven’s Customer/Vendor Merge feature ensures that you keep essential information when combining 2 records. The following is a list of data that is included when performing a Customer/Vendor Merge:
- Projects
- Tasks
- Opportunities
- AR/AP Transactions
- Journal Entries
- Sales Orders
- Purchase Orders
- Assets
- Locations saved in the FROM record will be copied over to the TO record, but something to keep in mind is that the merge will not add or change a Primary Location.
- If the TO record already has a Primary Location set, it will remain as is. If there is no set Primary Location for the TO record, none will be set during the merge.
- If the FROM record has a Primary Location set, it will not overwrite or be set as the Primary Location in the TO record, but will be saved as an additional Customer/Vendor Location in the TO record. The same goes for any additional Locations in the FROM record.
- Contacts will be copied over, but the Primary Contact for the TO record will not be affected.
Copying Dashboard Widget Information
There is some Customer/Vendor information that does not copy over when performing a merge. Most notably are the following:
- Dashboard Widget Info
- Custom Fields Data
- Payment Profiles
- Appointments
In order to keep this information or these settings in the TO record after the merge, you will need to manually enter the data by editing the widgets on the TO record’s Dashboard before completing the merge.
Performing the Merge
-
Steps for Merging
Now that you’ve taken all of that information into consideration, you can begin the merge.
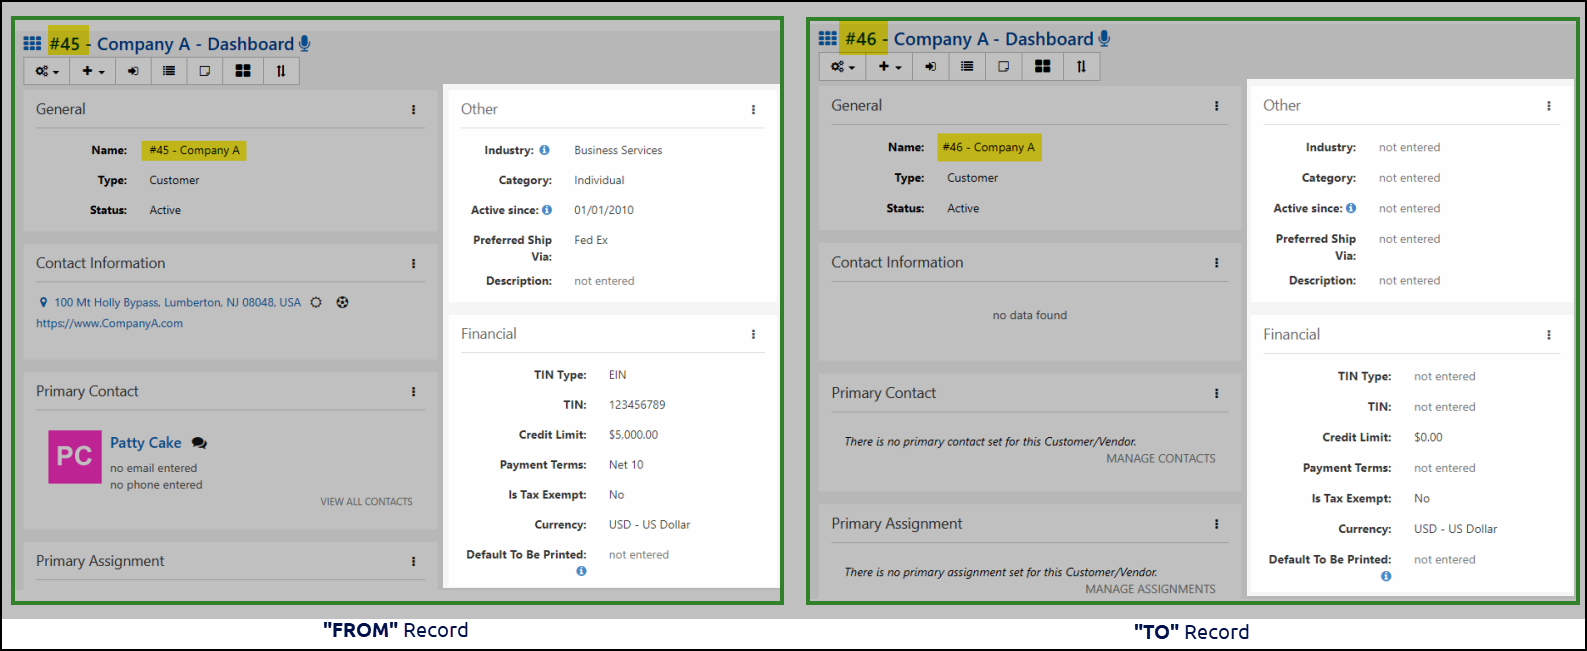
Step 1: Make note of the Customer Account ID of both records you are merging.
When you are working with 2 Customer records, you will need to ensure that you keep track of which record you are merging FROM and which you are merging TO. The easiest way to do this is to make note of the Customer Account ID number which can be found next to the Customer Name.
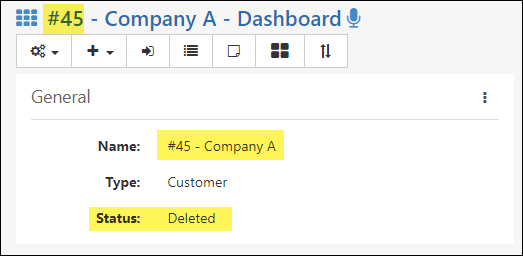
For demonstration purposes, this guide will use Company A (Customer Account ID# 45) as our FROM record and Company A (Customer Account ID# 46) as our TO record.
For demonstration purposes, this guide will use Company A (Customer Account ID# 45) as our FROM record and Company A (Customer Account ID# 46) as our TO record.
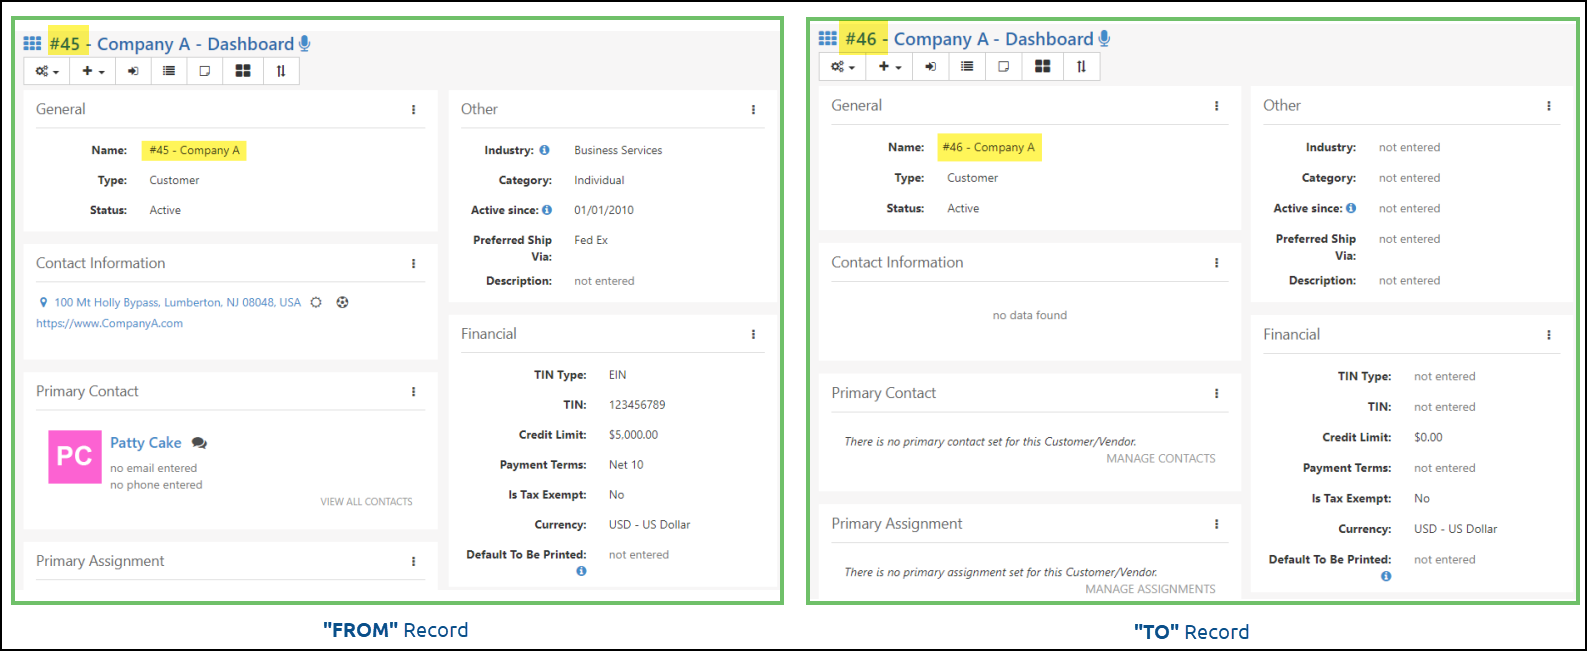
Step 2: Enter any information that will not be included in the merge from the Dashboard widgets of the FROM record to the Dashboard widgets in the TO record.
For instance, #45-Company A (our FROM record in this merge example) has some data saved in the Dashboard widgets that needs to be retained for this Customer. This information will need to be manually entered in the widget fields of #46-Company A before the merge is performed in order to save these details.
- Note: It is recommended that you keep a browser tab open for each record’s Dashboard during this step to make it easier to copy over the necessary widget data.
Step 3: Click the Actions menu located in the top left corner of the screen on the Customer record you intend on merging FROM.
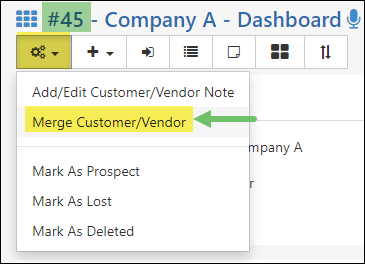
Example of Action Menu Option to Merge Customer/Vendor
Step 4: Click Merge Customer/Vendor.
This will display the Merge Customer/Vendor page wherein you will confirm the SOURCE record and select the DESTINATION record.
- The SOURCE record will be the FROM record.
- The DESTINATION record will be the TO record.
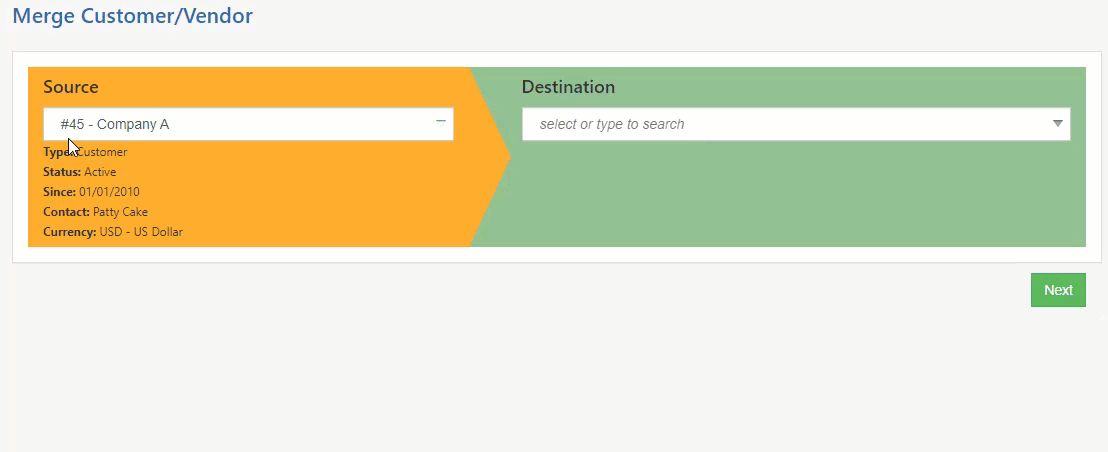
Example of Selecting Destination Record for Customer Merge
In this example merge, the FROM record is #45-Company A, so that will be the SOURCE record. To select the DESTINATION record, you can easily type the Customer Account ID in the field to populate the exact record you want set as the TO record, which in this example is #46-Company A.
Step 5: Click Next to proceed with the merge.
This will display a list of all of the information that will be moved from the SOURCE record to the DESTINATION record. Once you have confirmed the data from the list is accurate, you’re ready for the final step.
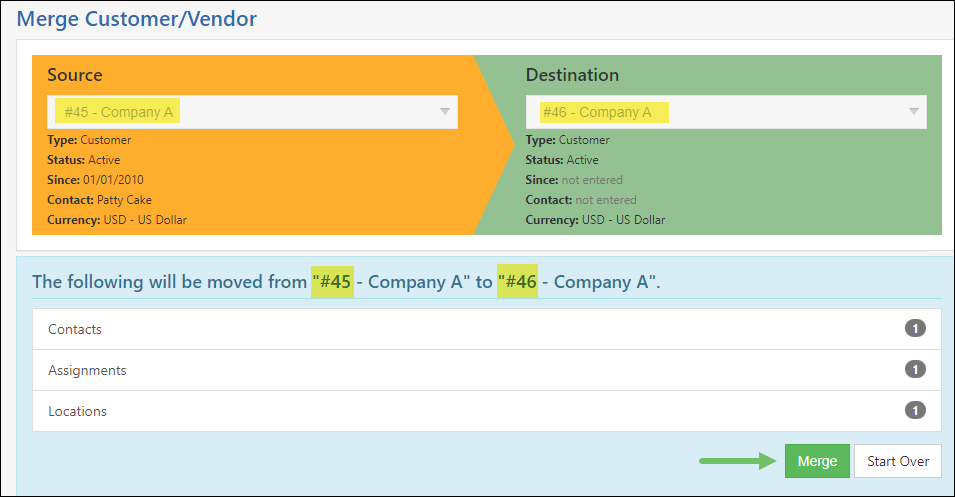
Example of the Data Being Moved During a Customer Merge
Step 6: Click the Merge button to complete the process.
Clicking the Merge button will trigger a warning popup that notifies you that the merge CANNOT be undone and asks if you’re sure you want to continue. Click OK to complete the merge.
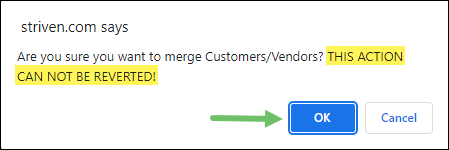
Example of Warning Popup that Merge Cannot be Undone
When the merge is complete, the TO record’s Customer Dashboard will display with all the information that was transferred during the merge process or added manually beforehand.
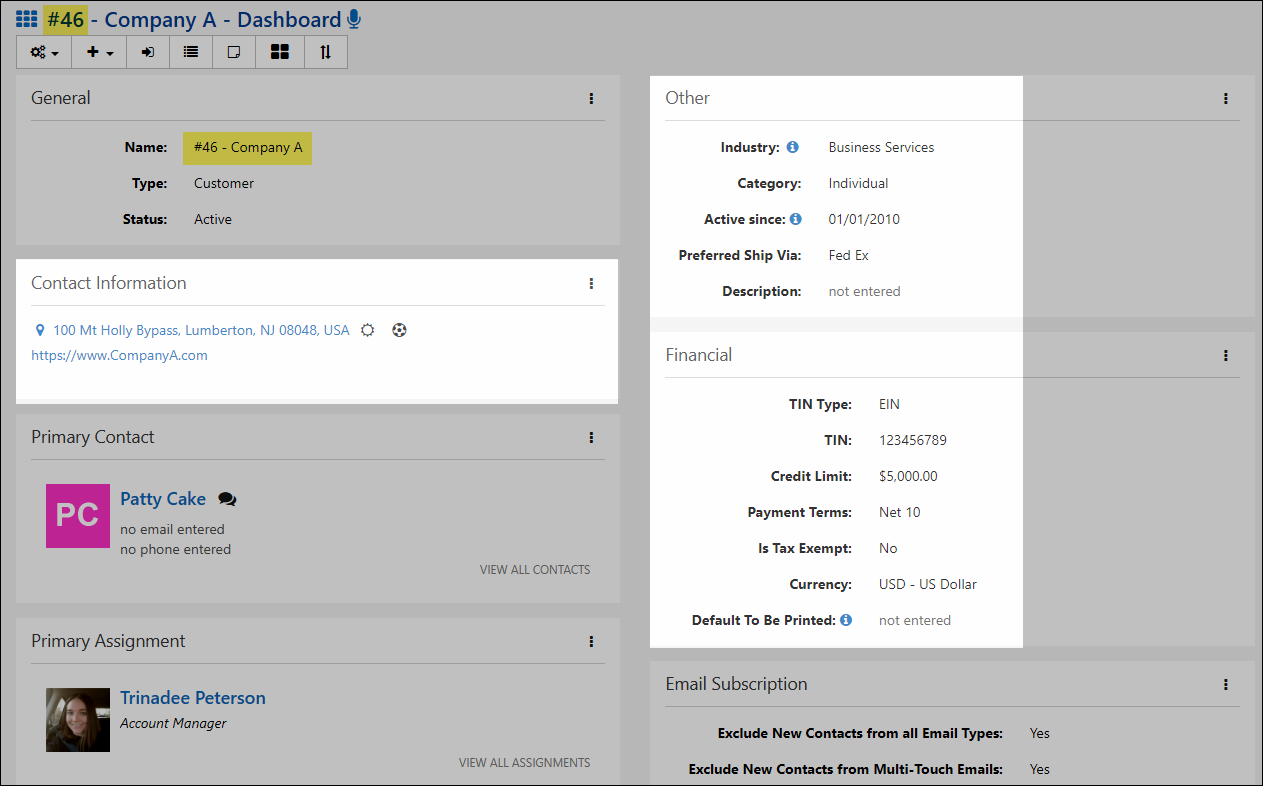
Example of the Final Resulting Record after the Merge is Completed
- Note: The FROM record doesn’t completely disappear, but is marked as Deleted in your system. You can still view the record if you search for it using the Deleted status filter on the Customer List search.
-
Recap
With this guide, we’ve learned how to prepare for and perform a Customer/Vendor Merge in Striven. The process is pretty straightforward, but you have to make sure you are merging FROM and TO the correct records so that there is no loss of important details or data. This process will ensure your Customer/Vendor records are accurate and complete, while helping to keep your Striven system neat and organized.

Have a Question?
Ask the Striven Community
User-sourced how-to’s, feedback, and more!