
Scheduling & Communication
Monthly Statements
Support Guide
-
Overview
Monthly Statements allow companies to send a summary of the work provided to their Company within a previous month. Monthly Statements help to not only keep Customers up to date, but also serve as an illustration of the value they have received from doing business with you. This guide will help you create, manage, and send Monthly Statements to your Customers so that your Company can benefit from using Monthly Statements in your Striven system.
Read this guide if you are trying to:
✔ Create and edit Monthly Statement Templates.
✔ Construct Monthly Statement content using Merge Fields.
✔ View, email, and print Monthly Statements.
-
Statement Templates List
To view the Monthly Statements List use the following steps listed below:
Company → Settings → Customers/Vendors → Portal → Statement Templates
- Add Template: Enables you to begin adding a new statement template as described in the section Creating Statement Templates below.
- Name: Differentiates Statement Templates when being selected in the system when sending to Customer/Vendors.
- Tags: Denotes which Statement Template has been set as the Default. If a Customer/Vendor does not have a Statement Template selected within their Customer/Vendor Profile, then the Default listed here will be selected when sending out Monthly Statements from Striven.
- Deactivate: Removes the Statement Template as an available option when sending out Monthly Statements to Customers/Vendors.
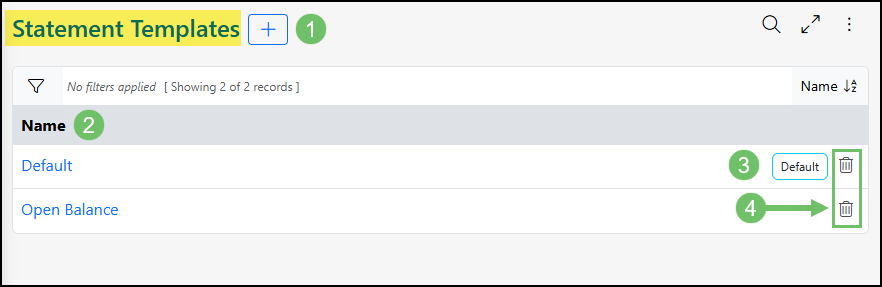
Example of the Statement Templates List

-
Creating a Statement Template
After clicking the Add New Template button on the list, you will be brought to the Add Statement Template page in which you can configure how you would like your statement to look and function. You can choose what sections you would like to track on the statement such as transactions, Orders, Appointments, and much more. By including sections, anything related to the Customer dated in the previous month will show on the statement. For instance, if a Customer had a Sales Order last month and your statement template has an Orders section, at the end of the month the Customer will see that Sales Order on their statement. You can also choose which Employee the statement should appear to come from. This will show the email and name to your Customers so that it appears more personal and familiar. Below is a screenshot, illustrating how the Add Statement Template appears and a description of what can be accomplished there.
- Name: Allows you to type in the name of the template, which will be available to choose from when sending or printing a Monthly Statement in Striven.
- Available After: Notes how many days after the month ends that templates should be available in the Striven Customer/Vendor Portal.
- Is Default: Notes whether or not the template is your system’s default statement template. This means when you go to generate or email a Monthly Statement for a new Customer it will be of this template unless changed.
- Notification From: The selected category will determine from whom the emails are sent. If no employee is assigned to the category for the Customer/Vendor the From Employee will be used instead.
- Section Formatting: Sets the formatting for the sections that will be included in the monthly statement. Header background, header font color, and the general font and size can be determined in this section.
- Sections: Allows you to choose what information you would like to include with your statements. By choosing a section this will include any information related to that entity for a Customer dated for the statement month.
- Options Include: Appointments, content, documents, links, notes, Opportunities, Projects, Sales Orders, service metrics, Tasks, transactions, transactions with open balance.
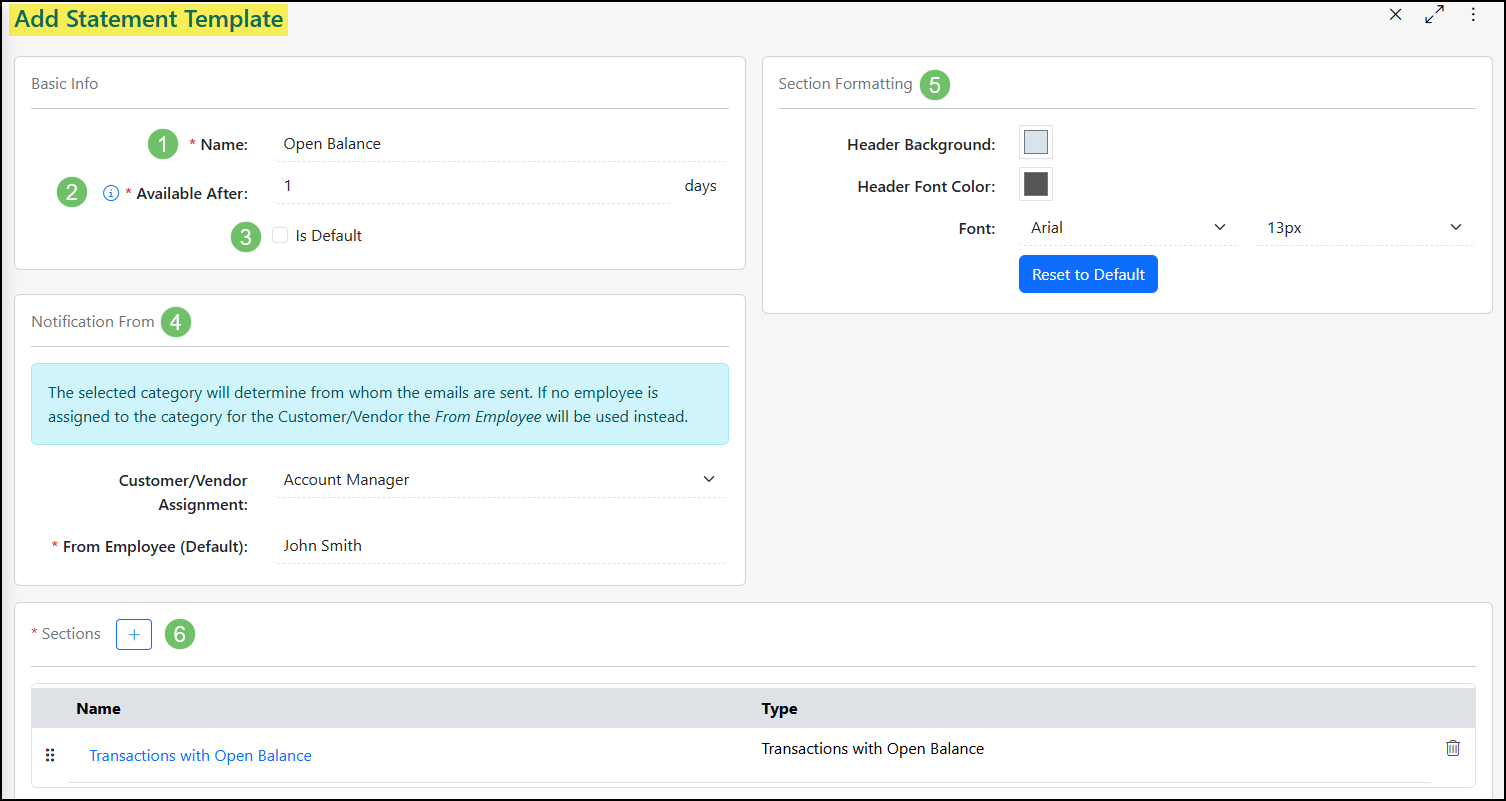
Example of the Add Statement Template Page
-
Editing Content for Templates
Content sections can be added to a Monthly Statement Template in order to create a statement header or footer. Within Content sections, you can add images, hyperlinks, and more to customize what your Customers see on Monthly Statements. Merge fields are another tool that can be utilized to populate information automatically with no manual entry required. Merge fields in the Content sections can populate information related to your Company, the Customer, the Customer’s open balance, and statement details like date, month, and/or year. Below is a screenshot featuring how a Content section appears and a description of what can be accomplished there.
- Name: Displays the name of the section being viewed and can be edited here.
- Formatting Tools: There are several formatting tools available to format the template Content section including a hyperlink manager, video manager, image manager, and table wizard.
- Merge Fields: Allows you to add a merge field onto your statement template Content section. Merge fields auto-populate related data to limit any manual entry. For instance, the merge field Account Name will populate the Customer name automatically.
- Content: The Content section is where you can type information, format the Content section, or add HTML content to configure the section to fit your needs.
- Actions: There are two actions here, which are discussed further below:
- Save: Saves any changes made to the Content section.
- Close: Closes the popup and does not save the Content section.
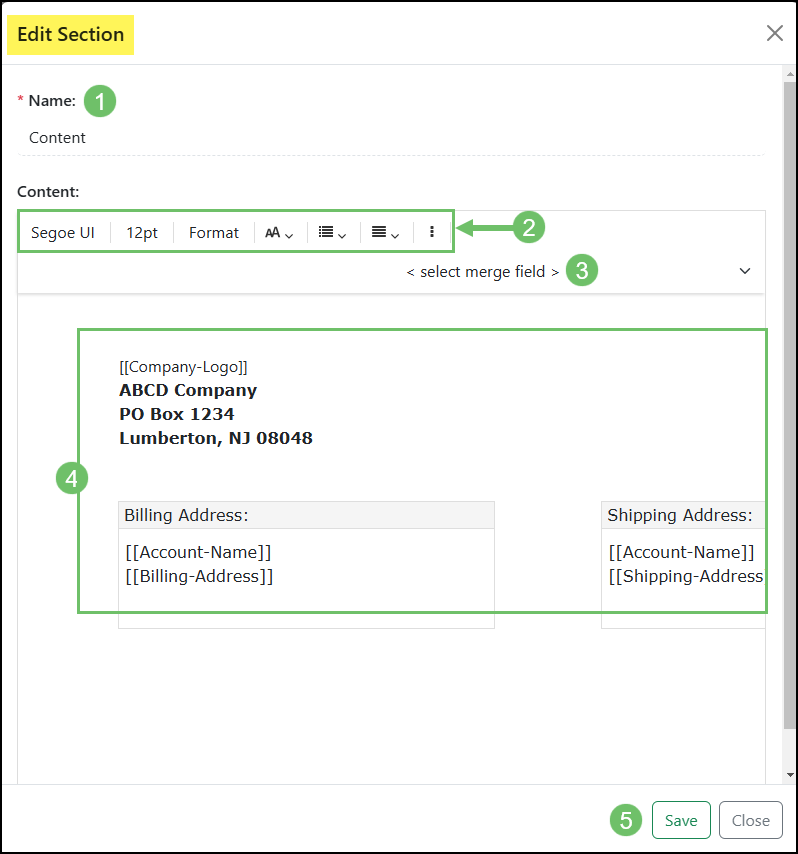
Example of a Content Section Within a Statement Template
-
Customer Monthly Statements
Once statement templates are created, you can View, Email, and Print Monthly Statements related to an individual Customer by going to the Customer’s Financial tab. There is a subsection called Monthly Statements in which you can view a statement for a given previous month. There are also tools there to either print or email the statement as well so that if an individual Customer wants a Monthly Statement you can provide one on demand. Below is a screenshot displaying how the Customer Monthly Statements appear and a description of what can be accomplished there.
- Template used: Shows which statement template is being used and there is also an Edit button so that you can choose another template if desired.
- Customer/Vendor Assignment: Shows which Customer/Vendor Assignment the statement will come from. This means that the Customer has an Employee assigned to them who is their Account Manager and the statement will appear to come from that Account Manager.
- Month/Year: Allows you to click the Calendar icon and choose a year and month for which you want to provide a statement.
- Search: Searches for the month and year chosen and show any data assigned to the Customer for the related sections on the template that occurred within the selected time range.
- Print: Downloads a PDF version of the statement so that you can print it off on your local printer in order to mail it to the Customer.
- Email: Initiates a popup in which you can choose to email a Customer Contact their Monthly Statement. The email contains a merge field so that the Customer Contact can view the statement.
- Section Information: These are sections included in the statement template. Below each section name, related items will be listed, which occurred over the course of the month being reported on.
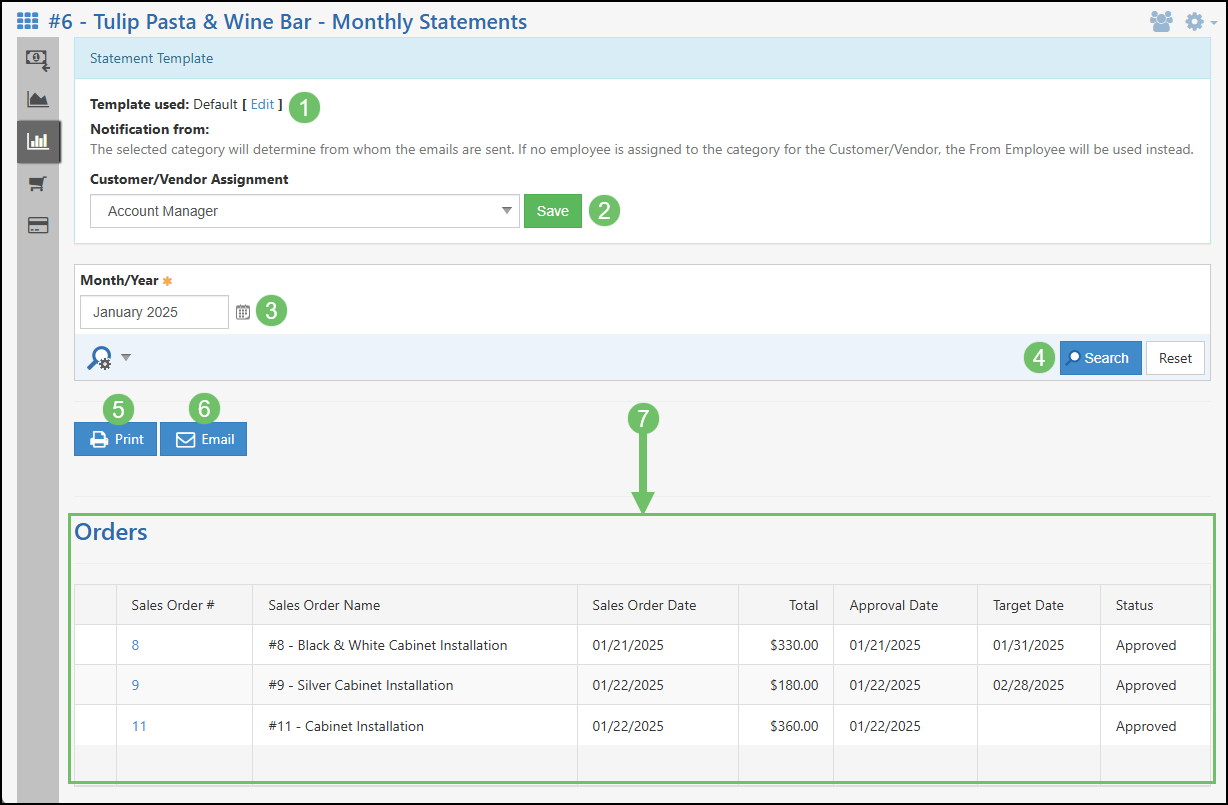
Example of a Customer’s Monthly Statement
-
Sending Mass Monthly Statements
Other than sending statements to Customers individually or as requested, you can also send Monthly Statements out en masse by utilizing the Monthly Statement Request List. Here you can view queued Monthly Statement campaigns and add a new Monthly Statement campaign as well. These campaigns work similarly to how Multi-touch campaigns send emails containing content automatically to limit needed manual entry.
To add a new Monthly Statement campaign, simply click the Add button from the request list. This will populate the Monthly Statement Request page in which you can begin the process of sending out Monthly Statements. Functions here include filtering for your audience, managing templates, setting a recurrence, and more. Below is a screenshot demonstrating how the Monthly Statement Request Page appears and a description of what can be accomplished there. To view the Monthly Statement Request page, please use the following steps:
Customers → Monthly Statements
- Customers Selected: Allows you to filter for Customers you would like to send Monthly Statements to. For instance, you can filter for Customers with an open balance greater than zero to target only Customers that match that criteria.
- Template: Notes whether the default template is used for the statements that get sent out. If this box is left unchecked then you will be able to select which template to use. If a Customer has a template chosen, that will take precedence over the chosen option or default template.
- Manage Templates: Populates the Statement Template List in a new tab so that you can View, Edit, or Deactivate templates as needed.
- Set as recurring: If this checkbox is toggled on, you can choose how many days after the month ends on which the statements will be sent out automatically.
- Days: Designates how many days after the month ends that statements will be sent out to Customers.
- Notify on completion: Allows you to choose who should be notified when Monthly Statements are sent out to the target audience. This person will receive an email with a hyperlink which when clicked will populate the Monthly Statement Request page in Striven.
- Send Via: Allows you to choose whether to Print or Email Monthly Statements to the Contacts selected. If Email is selected, the email’s subject and body will populate (as discussed in #8 and #9 below) to format an email to the Contacts, along with the option to include the Monthly Statement as an attachment. If Print is selected, the notification recipient will receive an email containing a batch of PDF Monthly Statements for them to download and print in their local printer and send out to the Contacts.
- Subject: The subject of the email that gets sent out to the Contacts and can be changed here.
- Body: Allows you to format the body of the email for Monthly Statements that the selected Contacts will receive if Email was chosen for the Send Via option. You can format by adding hyperlinks, images, and merge fields as needed to make the body of the email fit your needs. Merge fields help to populate related data without having to manually enter information for each Contact’s email.
- Actions: By choosing the send option, Monthly Statements will be queued up to send out on the designated day after the next month ends. Once the Monthly Statements are sent, the notification recipient will receive an email either providing them with a batch of PDF statements if Print was chosen for Send Via or notifying them that the emails were sent to the selected Contacts if Email was chosen for the Send Via option.
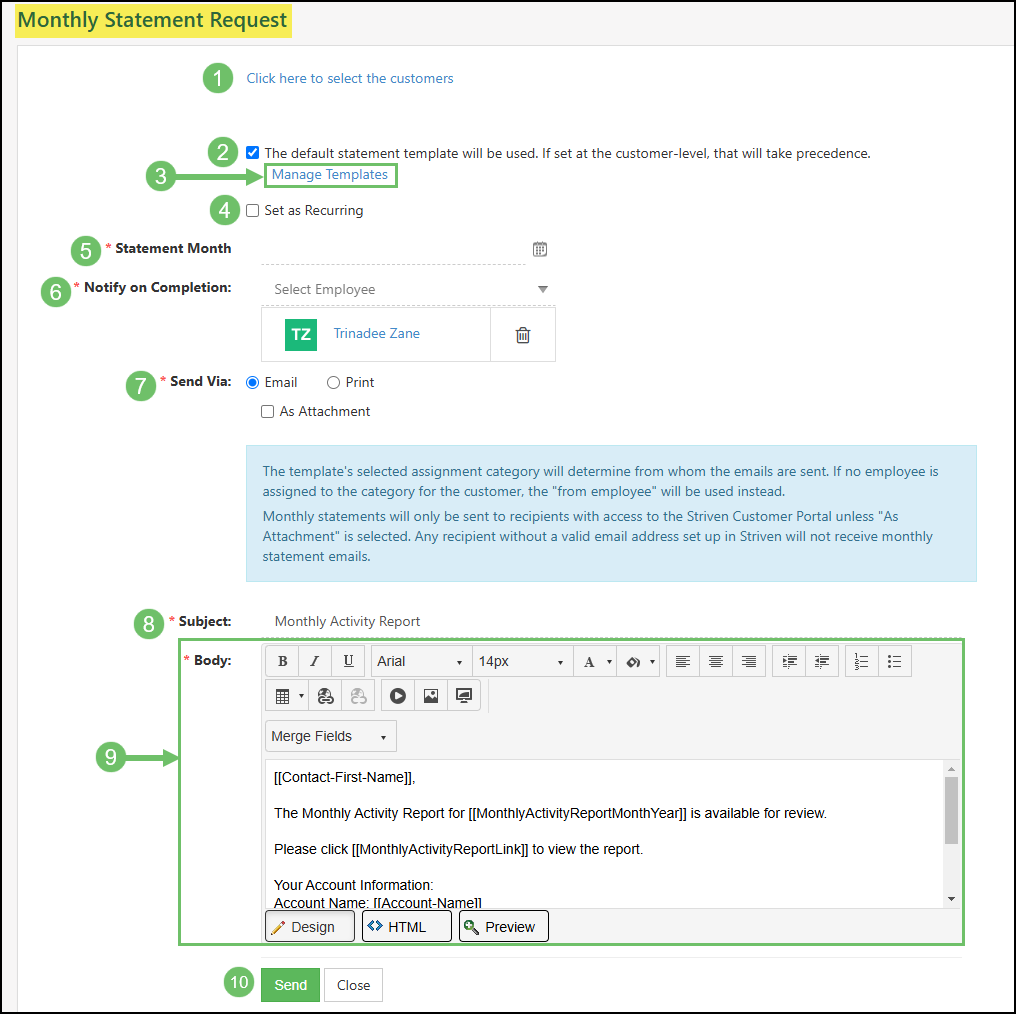
Example of the Monthly Statement Request Page
-
Recap
With this guide, we’ve learned how to create Monthly Statement Templates in the Company Settings so that our Monthly Statements have a set structure and content. We’ve also learned how we can view and send Monthly Statements for an individual Customer using their A/R tab. Lastly, we’ve learned how we can send out Monthly Statements en masse to a list of Contacts and how we can filter for the Contacts we’d like to target. All of this will help you create, manage, and send Monthly Statements out to your Customers using Striven.

Have a Question?
Ask the Striven Community
User-sourced how-to’s, feedback, and more!
FAQs
-
I used the Monthly Statement Request feature but it seems that not all of my Contacts received their statement even though they were set up as the recipient. Why is this?
Only Contacts who are set up as a Monthly Statement recipient and have Customer/Vendor Portal access will receive their Monthly Statement.