
Scheduling & Communication
Send Email
Support Guide
-
Overview
Striven offers multiple ways to communicate with your Employees and Customers with Workflows, Discussions, and the Send Email feature. The Send Email feature is useful for sending one-time announcements, updates, and collecting feedback with Surveying options. This guide will outline how to utilize this feature in communication with Customers/Vendors and Employees.
Read this guide if you are trying to:
✔ Send mass communications to your Employees and Customer/Vendor Contacts.
✔ Learn how to send emails to recipients within Striven.
✔ Send announcements with Surveying options attached.
-
Email Types
In Striven, Email Types will enable Unsubscribe controls. Recipients can choose to unsubscribe from specific Email Types, preventing them from receiving further communications within that category. This flexibility allows for more targeted and nuanced customer communication based on the content and sensitivity of each email type.
To create and edit Email Types in Striven, navigate to Company → Settings → Customer/Vendors → Workflow → Email Types.

Example of Email Types Settings Location

When editing or adding an Email Type a name can be set within the Type field which is required in order to save the configuration. An additional option is available to check if the recipient Can Unsubscribe.

Example of Adding an Email Type
Recipients of emails with an unsubscribe option will find a dedicated Manage your subscriptions hyperlink at the bottom of the message, facilitating a convenient self-service process for managing their email preferences.

Example of Email with Manage Subscription Option
-
Email Templates
Email Templates in Striven are pre-written messages with merge fields available to automatically populate recipient information. Easily select your desired template when using the Send Email feature or within Workflows to save time.
To manage Email Templates, navigate to Company → Settings → Customers/Vendors → Workflow → Email Templates.

Example of Email Templates Settings Location
While editing or creating a new Email Template information can be added or merged in order to have a tailored message for the recipient. Below lists out the information that is to be entered when creating an Email Template in Striven.
- Email Type: Determines whether the recipient can unsubscribe from future emails of the selected type.
- Subject: Displays as the subject line when the recipient receives the message in their inbox.
- Body: Contains the content of the message which includes formatting options including but not limited to font, font size, and alignment.
- Merge Fields: Pulls in the information based on the recipient that is receiving the message.

Example of Adding an Email Template
-
Send Email to Contacts
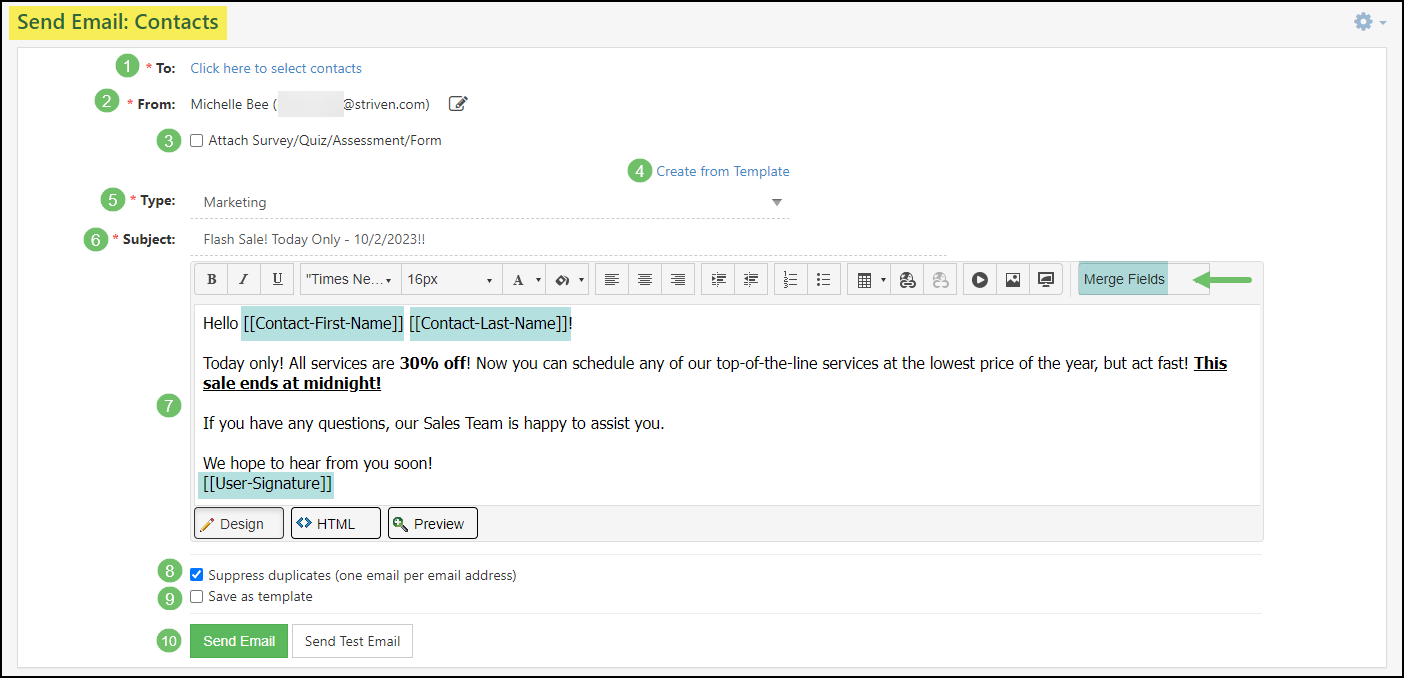
The Send Email option will allow you to filter for Customer/Vendor Contacts using the To hyperlink. The Content section allows you to add merge fields which will populate Customer data automatically. You also have the option to add Surveys, Forms, and more. Below is a screenshot of the Send Email: Contacts page and how it appears.
To send an email to Customer Contacts, follow these steps:
- Customers → Email
To send an email to Vendor Contacts, navigate to:
- Vendors → Email
- To: Opens the Select Contacts popup window wherein you can set the filters to narrow down the results and select the recipients of your email.
- From: Populates the default sender as the logged in user’s name and email, however this can be changed by clicking the Edit icon on the right side of the field.
- Attach Survey/Quiz/Assessment/Form: Allows you to attach a Surveying option to your email. Once selected, you will then decide what type of surveying request is to be included in your email, such as Survey, Quiz, Assessment, or Form. Once the type has been selected, the Survey/Quiz/Assessment/Form can be chosen from the available options listed.
- Note: If you are attaching a Surveying option to your email, the merge field will need to be added for the Contacts to gain access.
- Create From Template: If you have templated emails saved, select this option to quickly add your template into the text editor box.
- Message Type: The template that is set up in the settings under Email Types. The Email Type is what determines whether or not a Contact can unsubscribe from future emails of this type.
- Subject Line: Enables you to enter a headline to describe the purpose of the email to the recipient.
- Message Content: Allows you to customize content that you wish to send to your Customer Contact. It is recommended to format these emails, including the appropriate merge fields when possible, to convey the most accurate information.
- Merge Fields: Merge fields can be added to the body of the email as well. For Contact emails, the merge fields are primarily limited to Contact and User related information, unless a Surveying option has been added to the email.
- Suppress Duplicates: If you have Contacts that are associated with more than one Company, this setting can be used to make sure each Contact only receives one of these messages.
- Save as Template: Enables you to save an email as a template before sending it.
- Send Email/Test Email: There are two (2) options to choose from when you are ready to send your email to your Contacts:
- If you wish to have a test email sent to yourself first, choose the Send Test Email button. This will allow you to preview how your email will display to a Contact and see their information merged into the email.
- If you prefer, you can just send your email directly to the designated recipients by clicking on the Send Email button.
Example of the Send Email: Contacts Page for Customers
-
Send Email to Employees
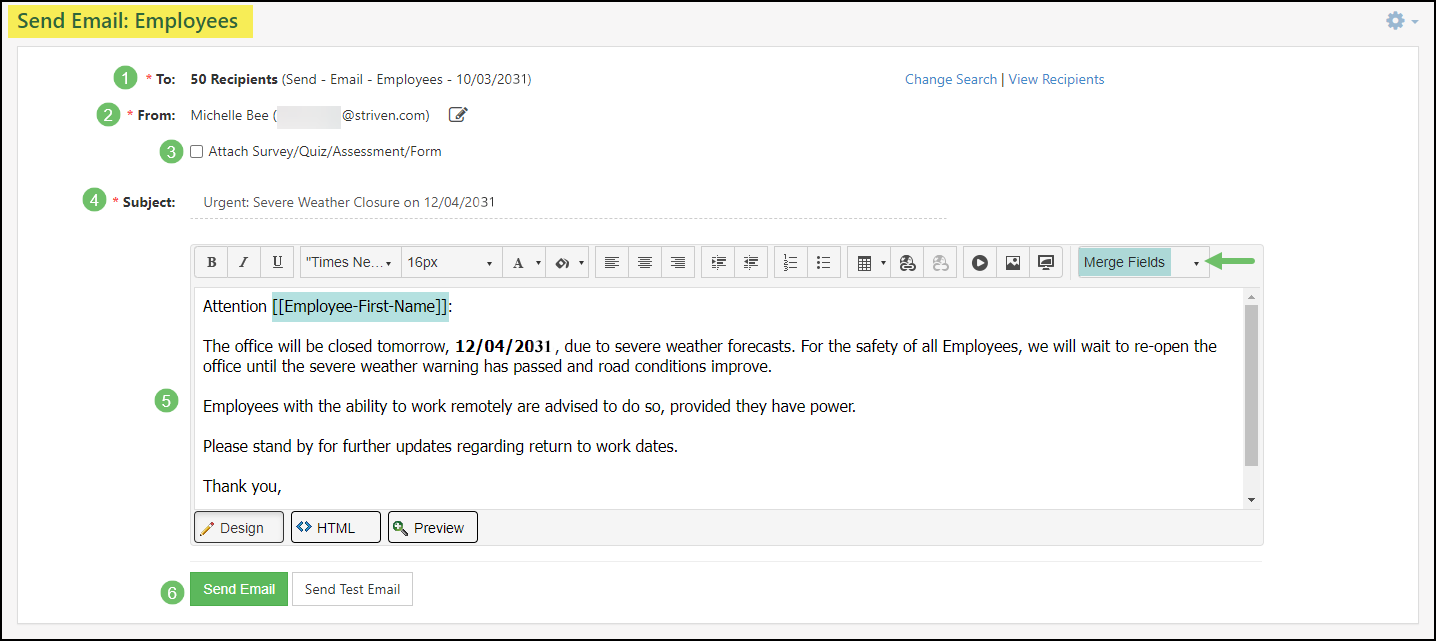
The Send Email tool can also be used to send important announcements and updates to your Employees. It can be used to gather feedback from your team using Surveying options as well. Below is a screenshot of the Send Email: Employees page and how it appears.
To send an email to Employees, follow these steps:
- Employees → Email
- To: Opens the Select Employees popup window wherein you can set the filters to narrow down the results and select the recipients of your email.
- From: Populates the default sender as the logged in user’s name and email, however this can be changed by clicking the Edit icon on the right side of the field.
- Attach Survey/Quiz/Assessment/Form: Allows you to attach a Surveying option to your mass email. Once selected, you will then decide what type of surveying request is to be included in your email, such as Survey, Quiz, Assessment, or Form. Once the type has been selected, the specific Survey/Quiz/Assessment/Form can be chosen.
- Note: If you are attaching a Surveying option to your email, the merge field will need to be added for the Employees to gain access.
- Subject Line: Enables you to enter a headline to describe the purpose of the email to the recipient.
- Message Content: Allows you to customize content that you wish to send to your Employees. It is recommended to format these emails, including the appropriate merge fields when possible, to convey the most accurate information.
- Merge Fields: Merge fields can be added to the body of the email as well. For Employee emails, the merge fields are primarily limited to Employee and User related information, unless a Surveying option has been added to the email.
- Send Email/Test Email: There are two (2) options to choose from when you are ready to send your email to your Employees:
- If you wish to have a test email sent to yourself first, choose the Send Test Email button. This will allow you to preview how your email will display to an Employee and see their information merged into the email.
- If you prefer, you can just send your email directly to the designated recipients.
Example of the Send Email: Employee Page
-
Filtering Recipients
When sending emails, the Report Builder tool allows you to narrow down the recipient list by filtering based on criteria you define. Learn more about using the Report Builder with our Report Builder Guide.
To begin filtering recipients, click the link labeled Click here to select contacts.
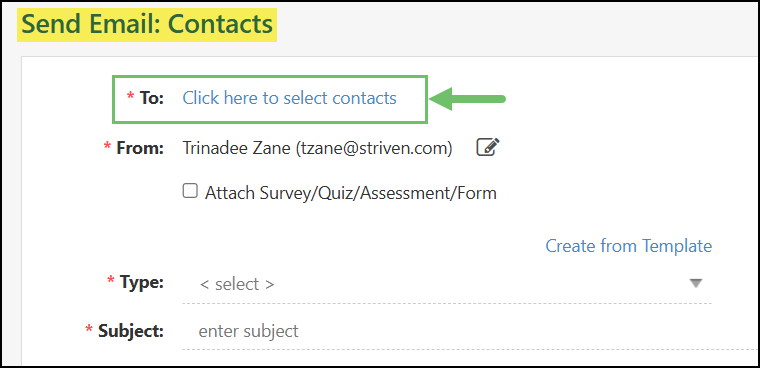
Example of the Send Email for Contacts Page
- Search Name: Allows you to enter a name for the Contact search you have configured.
- Filter Type: Clicking this drop-down menu lets you choose how you want to filter your report results.
- Add Filter: Adds another filter to the existing group to narrow report results.
- Add Group: Allows you to select another filter type.
- Dataset Lookup: Using the Dataset Lookup tool allows you to view available filters.
- Select Filter: Enables you to choose a filter from the drop-down list, or use the type-ahead functionality to search for a filter.
- Delete: Allows you to delete a configured filter.

Example of the Send Email: Contacts Page for Customers
Once your filters have been configured, you will have the following options available from the Send Email page.
- Change: Allows you to reconfigure your filters.
- Refresh: Refreshes the results compiled by your filters.
- Remove: Allows you to remove the filters you have configured.
- View Recipients: Selecting this option allows you to view and edit the list of Recipients for the Email.

Example of the Contact Filter Options
-
Email Log
The Email Log will allow you to view emails that have been sent from within Striven to a Customer/Vendor Contact or Employee. You may view certain communications such as New Invoices notifications, Workflow notifications, and more from up to the past 90 days. The Log will display the Subject of the email, if the email is related to a specific entity or Customer/Vendor, the Email address it was sent from, the Status of the email, and the Date/Time the email was sent. Selecting the hyperlinked results from the Subject column will allow you to view the content of the email and any attachments that were sent.
To view the Email Log navigate to Reports → Communications → Email.
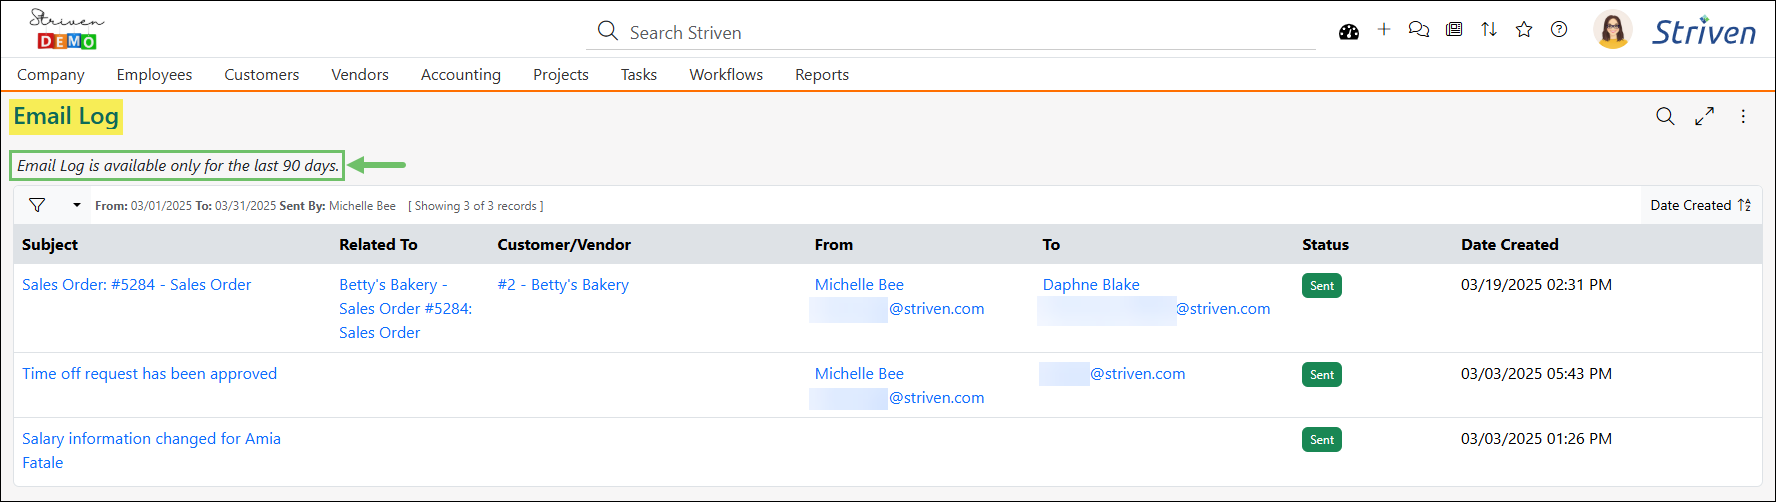
Example of the Email Log
-
Recap
With this guide, we’ve discussed how to create and manage emails for one-time communications to Customer/Vendor Contacts and Employees. We have covered the steps of creating emails, adding feedback options and merge fields, and how to send a test email before sending.

Have a Question?
Ask the Striven Community
User-sourced how-to’s, feedback, and more!
FAQs
-
I want to send follow up emails to my Customers, is this the best tool to use?
You can absolutely use the Send Email feature to send a one-time follow up email. However, utilizing the Workflows tool will allow you to automate the process of Sales follow ups for a more efficient process! You can learn more about our Workflows and how to create them here.