
Employees
User Roles
Support Guide
-
Overview
At Striven we understand that information security is important for keeping your Customers feeling safe and confident their personal details or financial information is protected. There are many permissions that can be used to configure User Roles that provide access to areas of Striven for the appropriate users, while restricting access to those who do not need to view confidential data related to Customers, Vendors, or even your own Company’s financial or personnel details. This guide will explain how User Roles help you control which Employees have access to sensitive information saved within Striven.
Read this guide if you are trying to:
✔ Create User Roles for Employees.
✔ Manage security and permissions.
✔ Setup Employees as Non-System Users.
-
User Roles
User Roles are comprised of many different available permissions found within Striven. The User Role indicates which of the available permissions are enabled. When a Striven user is assigned a User Role, they are then given access to the permissions within that User Role. If a user does not have access to a page or function, they can request access as needed. Requests for permissions will be either approved or denied by the Employee designated as the Permission Request Notification Recipient in the Company Settings. To learn more about permission request recipients, please reference our Company Setup Guide. Below is a look at the User Roles Management page. You may use the Search icon to narrow the User Roles listed on this page by Role (Name), Status, and if whether they can assign other User Roles. To view User Roles, navigate through the following:
Employees → Security → Roles
- Add: Allows you to create a new User Role.
- Role: Lists the names of each User Role in Striven. You can view and edit the User Role by clicking on the name.
- Users: Displays how many users are currently assigned the User Role. Clicking on the number will allow you to view the Employees that currently have the selected User Role.
- Default: Indicates which User Role is set as the default in your Striven system for when Employees are first created.
- Deactivate: Allows you to deactivate the selected User Role. If any Employees currently have the User Role assigned to them, the role will not be able to be deactivated.

Example of User Roles Management

As mentioned above, clicking on the name of the User Role will allow you to view the permissions found within that role. Once you have clicked on the User Role name you will be brought to a User Role Info page as shown below.
- User Role: The name of the User Role you are viewing.
- Description: The description of the User Role and is left blank by default.
- Access: Allows you to determine whether or not Employees with this User Role can assign selected User Roles to other Employees.
- Permissions: Allows you to search for and view specific permissions within the User Role. This is where you will select the permissions you wish this User Role to have in order to provide Employees with particular Striven access.
- Restrictions: Setting to restrict users with this User Role assigned from using a Username and Password to sign in to Striven. Users with this Role will only be able to sign in to Striven using the Single Sign On (SSO) option for either Google or Microsoft.
- Note: If a user attempts to sign in to Striven using a Username and Password after this feature has been enabled, the user will receive a message stating that they must use Single Sign On to sign in.
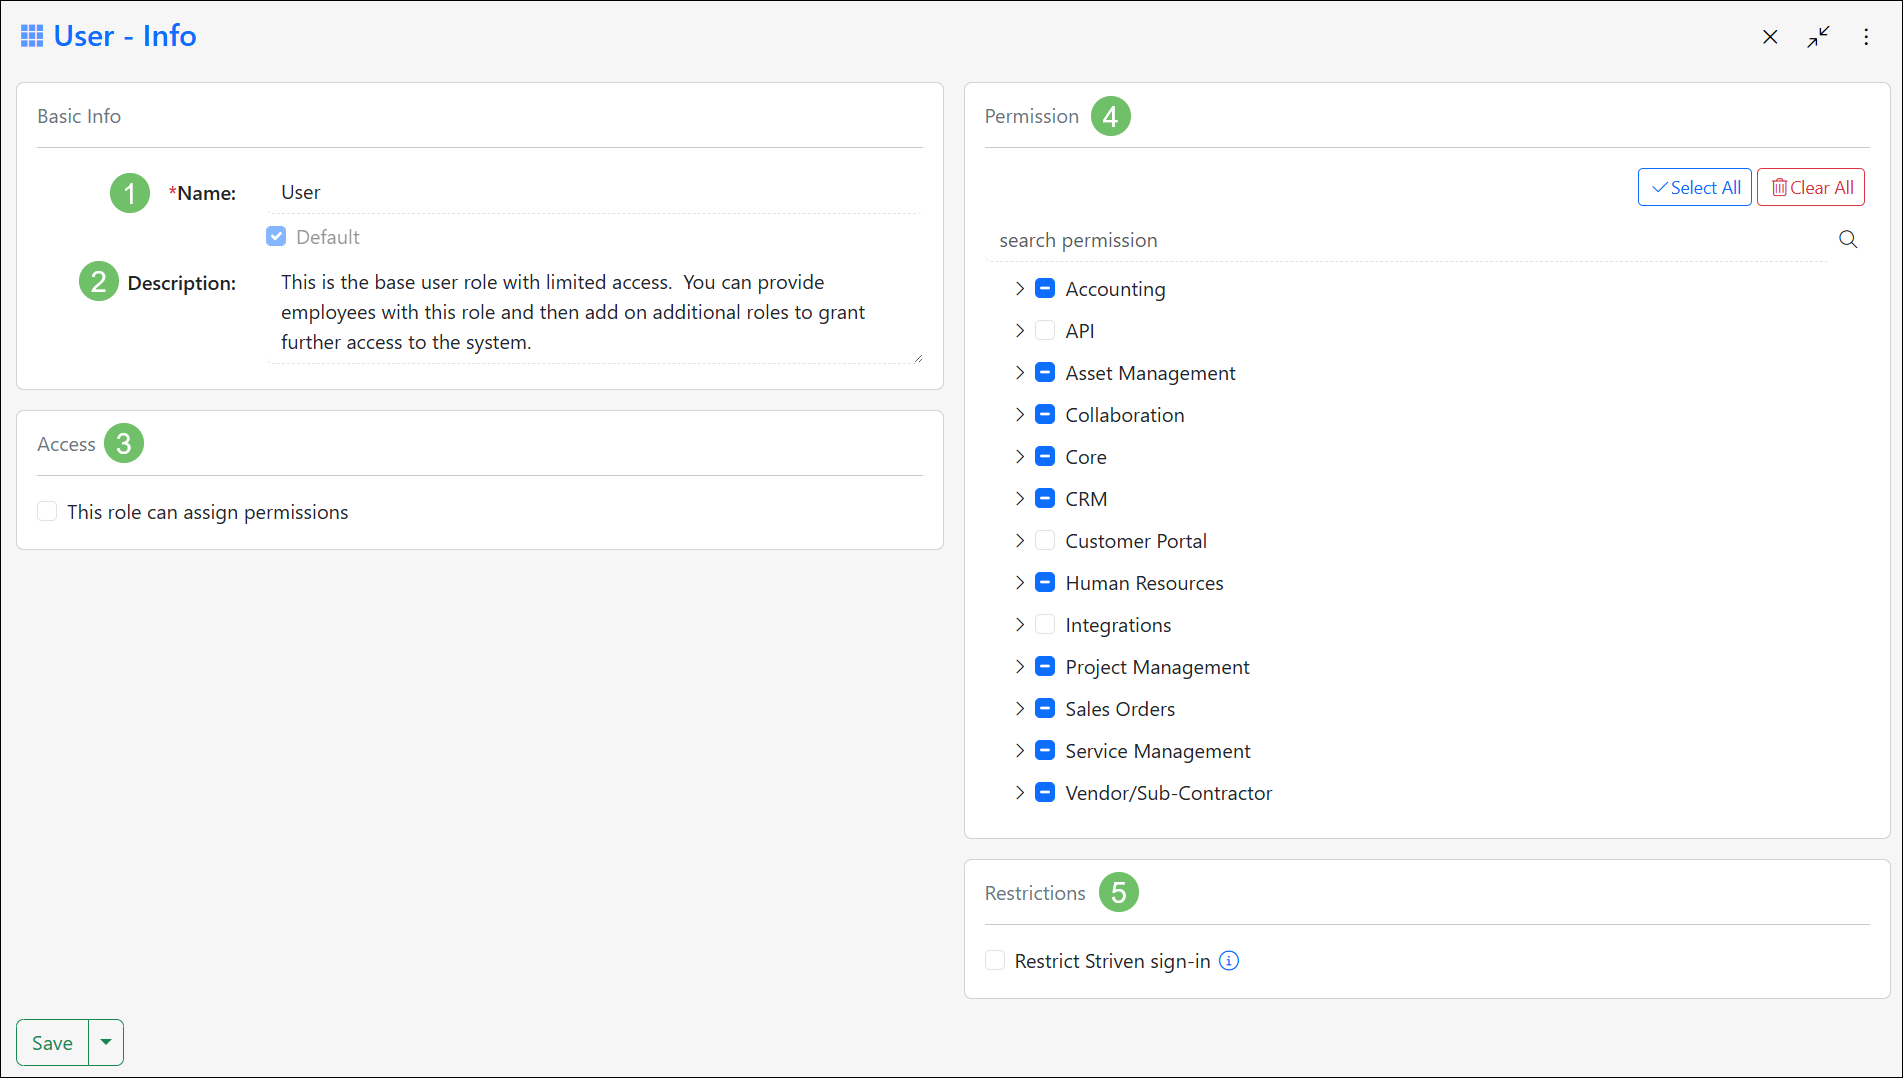
Example of User Role Info Page
Note: There are three colors to be mindful of while viewing or editing a User Role as each one has different meanings. The three colors and their meanings are explained below:
- Blue indicates that the user has access to the individual permission.
- White indicates that users DO NOT have access to the individual permission.
- Gray is for parent/child permissions and indicates that users have access to some, but not all, individual permissions within the parent/child hierarchy.
Selecting the Waffle menu located in the top left-hand corner of the page allows you to navigate between the User Role Info page and the Employee Access page. The Employee Access page allows you to view and manage the Employees which have been added to a specific user role.
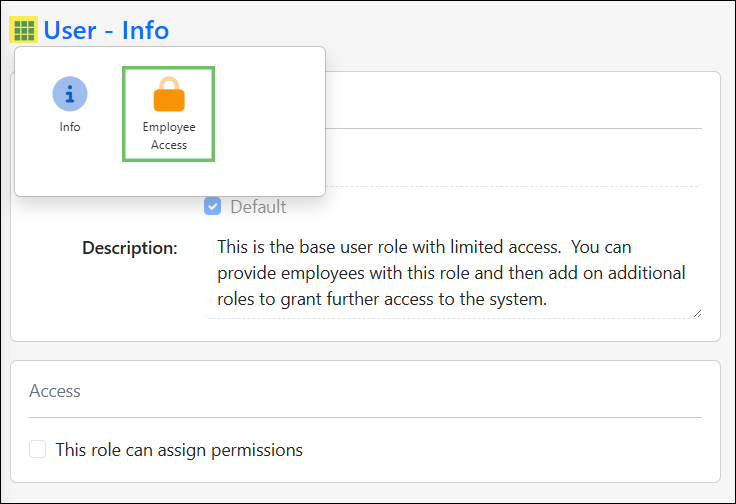
Example of the User Role Waffle Menu
- Add Employee to This Role: Using this field, you may select individual Employees or Job Titles to be added to this User Role. If adding a Job Title, all system users with the selected Job Title will be added to the User Role.
- Employee Name: Displays the name of the Employee added to the Role. Selecting the Employee name will open the Employee Summary card for more information.
- Job Title: Displays the Employee’s Job Title.
- View Effective Access: Displays a popup showing all of the permissions the Employee has access to based on their assigned User Roles.
- Remove: Selecting the Trashcan icon will allow you to remove an Employee from the User Role.
- Note: If the Employee you are attempting to remove only has one active User Role assigned to them, you will not be able to remove them from the Role.

Example of the Employee Access Page
-
Permissions
Individual permissions represent functions within Striven. Turning them on or off either enables or disables users to the specific function in Striven. There are many individual permissions within Striven which you can view all at once using Manage User Access. Where User Roles allow you to group permissions together, singular permissions can be given out as well. Below is a screenshot representing how Manage User Access appears and a description of what you can configure here. To view Manage User Access, use the following steps below:
Employees → Security → Permissions
- Parent/Child Functions: These are in black font and house child and individual function permissions. These are not considered permissions but instead a way to organize the permissions for you to more easily view.
- Individual Functions: These are in blue font and once clicked they display a summary of the function permission.
- Manage Access: Allows you to select an Employee or User Role to grant the function permission to.
- View Access: Displays Employees who currently have this permission and assigned User Role(s).

Example of Manage User Access
-
View Direct Permissions
Generally speaking, Employees in Striven get their system access and permissions from their designated User Role. However, sometimes there are individual or direct permissions assigned to an Employee in order to augment the Employee’s system accessibility. These direct permissions do not need to be part of their User Role and can be assigned as stand-alone permissions.
To view the Manage User Access page, you will need to have the “User Roles – Add/Edit” permission. This allows you to see which Employees have a particular permission assigned to them by clicking on the View Access link for the permission. You also have the option to edit which Employees or User Roles have access to the permission by clicking on the Manage Access link.
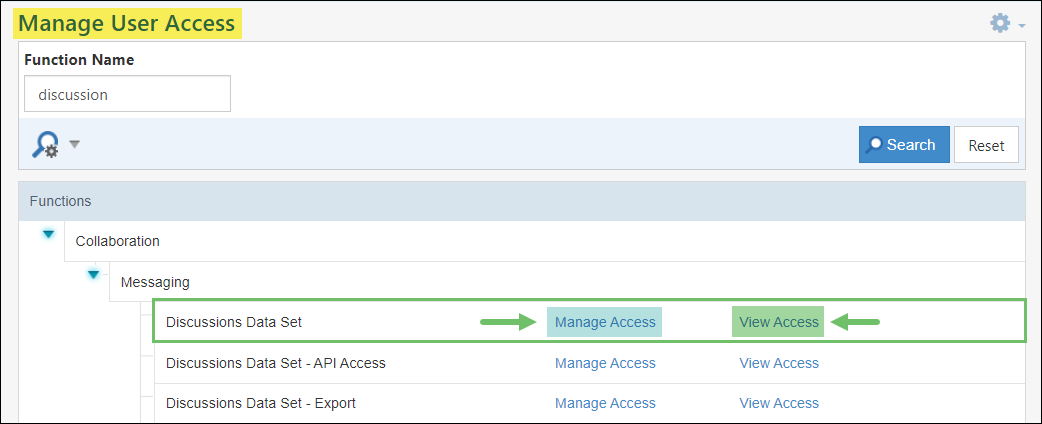
Example of a Manage User Access Page with Options to Manage Access or View Access
Likewise, you can view which permissions are assigned to an Employee from their Employee Info page. Under the User Access section of the page, you will have the ability to:
- View Effective Access: Displays a popup showing all of the permissions to which the Employee has access based on their assigned User Roles. If the Employee has more than one User Role assigned to them, this tree format will display all of the permissions combined from all of the User Roles assigned to them.
- View Direct Permissions: Displays a popup showing all of the direct permissions assigned to the Employee. These permissions are not assigned as part of a User Role and, therefore, are separate from the User Role permissions listed in the Effective Access list.
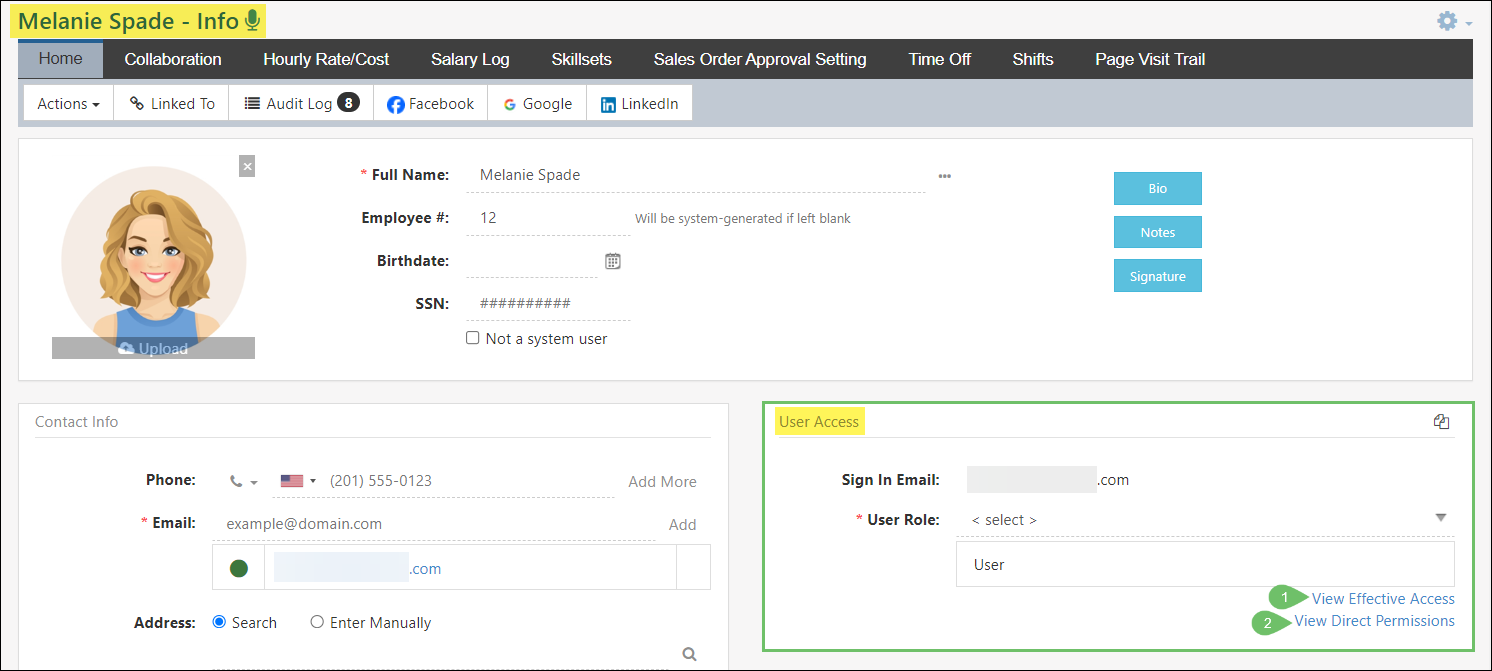
Example of the View Effective Access and View Direct Permissions Options on the Employee Info Page
Additionally, if you have the “User Roles – Add/Edit” permission, you will have the ability to remove direct permissions from the Employee’s access by clicking on the Trashcan icon next to the permission you wish to remove.
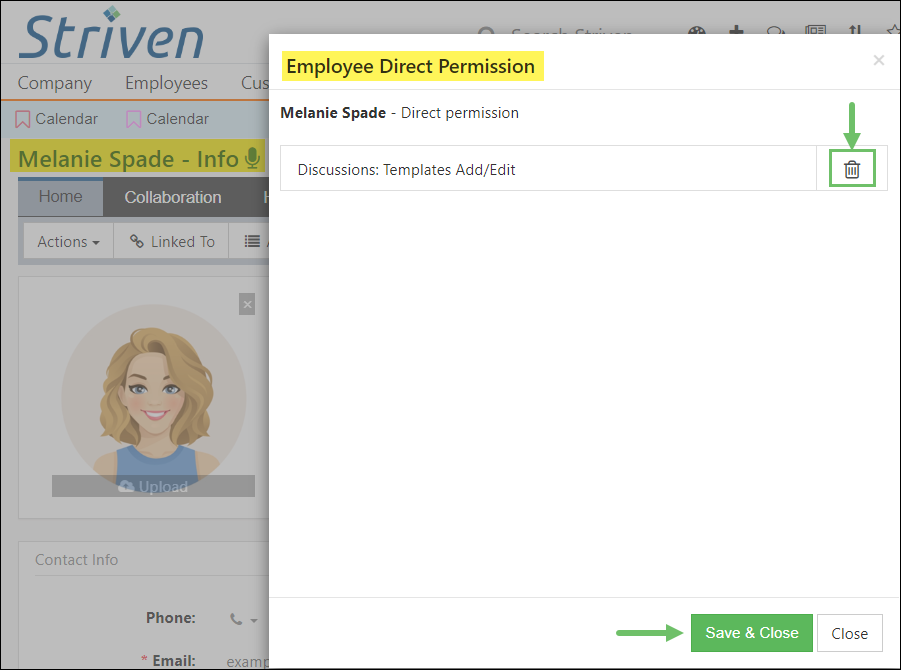
Example of the View Direct Permissions Popup
-
Request Access
As Employees navigate through Striven, they may come across a page where they do not have access. Striven has different avenues through which Employees can request permission as it comes up naturally. Users can request access on an individual page level or through retrieving an Access Denied page and requesting access accordingly. It is important to note that the permission Can Request Access dictates whether or not an Employee can request access to a permission in Striven.
-
Page Level Request
At any point while on pages within Striven, you can use the Settings Options on the top right corner to view permissions affecting the page and request access for each permission as needed. Below is a screenshot of a page’s settings options and descriptions of actions that users can take.

Example of Page Settings to Request Access
-
Access Denied Page Request
If a user happens upon a page they do not have access to they will be notified as such. When on this page, the user can then choose to Return Home or to request access to the page.

Example of an Access Denied Page
Once access has been requested, the user set in the Permission Request Notification Recipients in the Company Settings section will receive an email in which they can then grant or deny access.
- Grant Access to Employee: Allows you to give the singular permission to the Employee who is requesting it.
- Assign Employee a Role: Instead of granting the Employee the singular permission, this option allows you to grant the Employee a new User Role which may already include the requested permission.
- Add Permission to Role: Allows you to add the requested permission to a User Role, such as one the Employee requesting may already have been assigned to them.
- Create New Role: Allows you to create a new User Role and include the permission that is being requested.
- Deny Access: If the Employee should not have access to the permission they are requesting, you can deny them access right from this page.
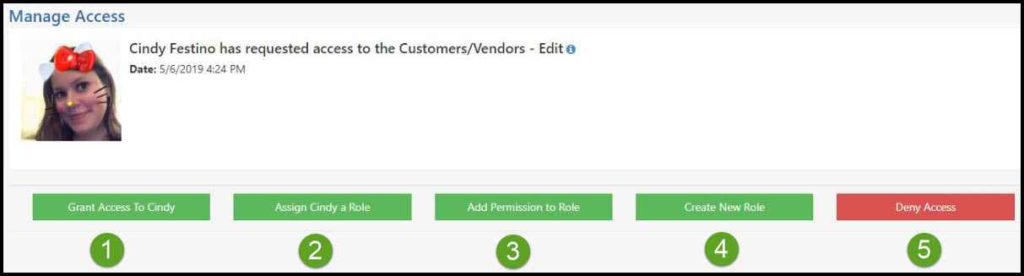
Example of Granting a Permission Request
-
Non-System Users
As discussed earlier, there are User Roles with permissions that one can assign to Striven users to enable them to access within the system. However, there is also a way to disable access to Employees in Striven while still reporting and tracking Employee information. These Employees are called Non-System Users. Non-System Users are unable to log in since they do not have any permissions assigned to them within Striven, but you can still report on their information for human resources purposes. It is also important to note that because Non-System Users do not log in, they DO NOT count toward your monthly Striven subscription rate.
To toggle on/off the Non-System User option, you can check the Not a System User box on the Employee page (shown in the image below).

Example of Non-System User Option on Employee Page
-
Recap
With this User Roles Guide, we’ve discovered how to manage and assign permissions and User Roles within Striven to ensure security is allocated to Employees correctly. We’ve reviewed the processes for requesting access within Striven. We’ve also explored the option of saving Employees as Non-System Users in order to store Employee information without giving them access to Striven.

Have a Question?
Ask the Striven Community
User-sourced how-to’s, feedback, and more!
FAQs
-
If I request access in Striven, how will I know if my request has been granted?
You should receive an email notification informing you whether your request for access was granted or denied once the individual responsible for granting access has reviewed and responded to your request.