
Workflows Management
Workflows
Support Guide
-
Overview
The Striven Workflows feature was designed to help automate processes and communication between you and your Customers/Vendors through Striven. Workflows is a powerful tool that includes options for automating processes, such as sending emails, creating Discussions, sending text notifications, and creating Tasks.
Read this guide if you are trying to:
✔ Learn how Workflows operate in Striven.
✔ Create Workflows with Triggers and Actions.
✔ Manage Workflows using the Workflow Queue and Workflow Action Log.
-
Introduction to Workflows
Workflows is a dynamic feature that provides an option for automating processes and contact with Customers using Striven.
Workflows allows users to create a process of steps, which are called Actions, to be executed when a certain event occurs, which are referred to as Triggers.
Users with the required User Role Permissions will be able to access Workflows from the Workflows menu located on the Striven Navigation menu bar at the top of the page. This menu provides options for:
- Workflow Queue: Displays Workflow Actions that are not set to automatically process. This page will list Actions that have been triggered and are ready to be processed manually.
- Manage Workflows: Provides a variety of options for Workflow management. This page allows you to search for a specific Workflow, Add Workflows, or View the Log of the listed Workflows.
- Add Workflow: Creates a new Workflow based on the settings you choose to configure.
- View Log: Displays the Workflow Action Log with details related to Workflow Actions.

Example of the Workflows Menu in Striven

-
Workflow Triggers
Workflows were introduced with eight (8) Trigger options available for selection, although more options may be added in future system updates. A Trigger may be created relating to a custom search based on the following options:
- The Customer Dataset
- The Vendor Dataset
- The Sales Order Dataset
- The Opportunities Dataset
- The Projects Dataset
- The Tasks Dataset
- The Purchase Order Dataset
- The Customer Assets Dataset
Example of the Workflow Triggers Available in Striven
When defining your Workflow’s trigger, the enhanced filtering options are used from the Report Builder. The Report Builder allows you to select filters via drop-down menu, or by typing in the “Select filter to add” field. The Dataset Lookup tool may be used to see what filters are available for the chosen dataset. Learn more about using the Report Builder in Striven by reading the Report Builder Guide.
Example of the Define the Filters for the Trigger Step
-
Trigger Actions
For each of the Triggers, there are five (5) Actions available for selection. These options include:
- Send Email
- Create Discussion
- Send Text
- Create Task
- Create Opportunity
Example of Available Action Types for Triggers in Workflows
Note: When choosing to create a Task via Workflow, Task Description Sizes are restricted to 1MB. To learn more about Task Description restrictions, visit our Task Management Support Guide.
Striven’s Twilio Integration will need to be activated in order for the Send Text Action to be accessed and selected.
-
Trigger From Options
When the Action Type has been set to either Send Email or Create Discussion, the following options are available to have the email or Discussion appear to come from rather than the Workflow Manager.
- Customers/Vendors: Specified Employee or Customer Level Assignment
- Customer Assets: Specified Employee or Customer Level Assignment
- Sales Orders: Specified Employee, Sales Rep, Customer Level Assignment, or Sales Order Level Assignment
- Opportunities: Specified Employee, Opportunity Assigned to Employee, or Customer Level Assignment
- Projects: Specified Employee, Primary Employee Assigned to the Project, Customer Level Assignment, or Project Level Assignment
- Tasks: Specified Employee, Task Assigned to Employee, or, Customer Level Assignment
- Purchase Orders: Specified Employee, Purchase Order Level Assignment, or Vendor Level Assignment
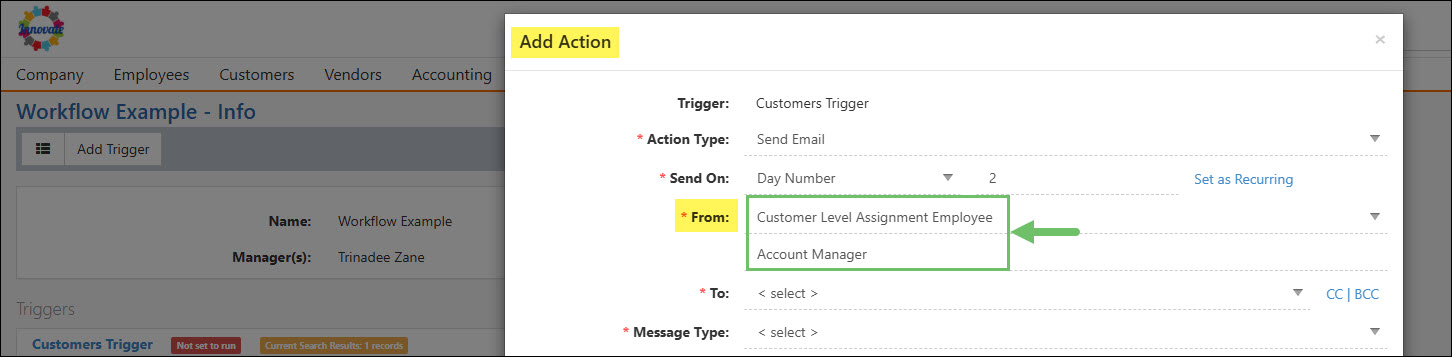
Example of a From Options on a Workflow Trigger
If an assignment type has been selected in the From field but no assignment has been set, the Workflow will then come from the Employee set as the Workflow Manager.
-
Action Recipients
The recipients for your Trigger Actions depend on the selection of the Trigger + Action configuration. These options be determined by the user creating or managing the Workflow. The available recipient choices are:
- Primary Contact
- Contacts filtered by Category
- One or More Employees
- Customer Level Assignment Employee
- Anonymous Email
- Anonymous Phone (for texts)
- Requested By
- Task Assigned to Employees
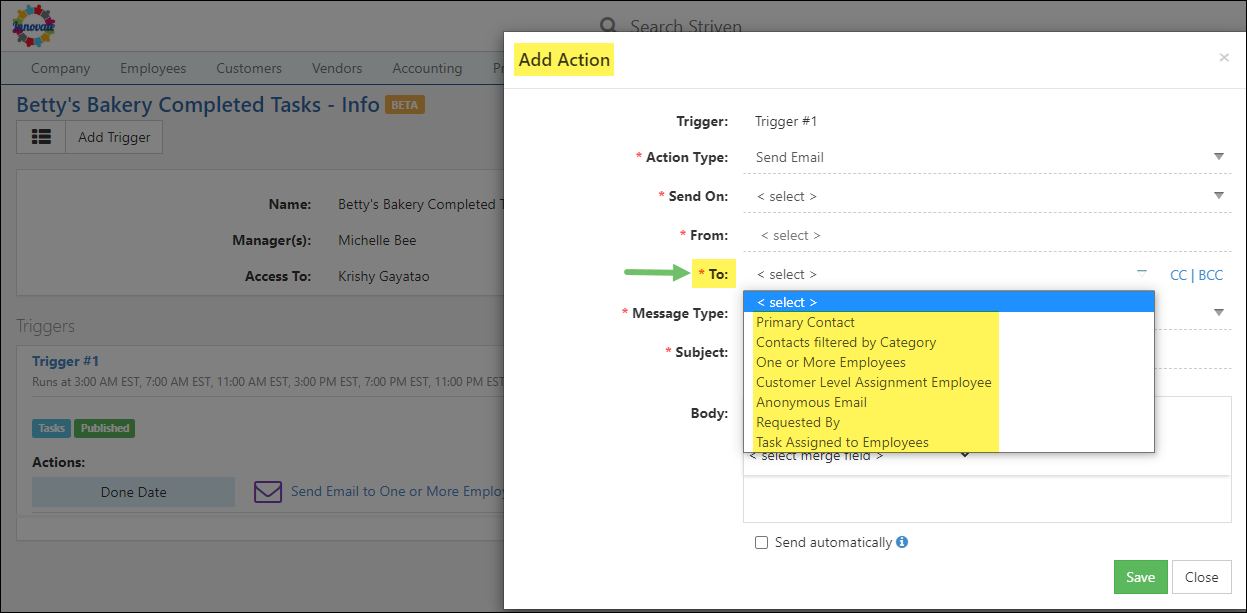
Example of the Recipient Options for a Send Email Action Type
Note: Depending on the Trigger configuration, additional or alternative recipient options may be displayed for selection. (i.e. a Contact related to the Opportunity if an Opportunity based Trigger is created).
-
Sending Options for Actions
Actions are independent of each other and will be processed based upon the Trigger + Action configuration of the Workflow. There are multiple choices for when Actions are processed based on the selected Trigger criteria (i.e. Customers/Vendors, Sales Orders, Opportunities, Projects, Tasks, or Purchase Orders):
- On a specific Day Number (Day 1, Day 2, etc.)
- On a Fixed Date
- On a Fixed Day
- On certain special Days (i.e. a Follow up Date for Opportunities; Start or Due Dates for Tasks, etc.)

Example of Sending Options Available for a Tasks Related Trigger Action
Workflows have the option to automatically send the selected Actions, or they can be manually sent from the Workflow Queue page, which has options to Skip or Snooze Actions in the queue.
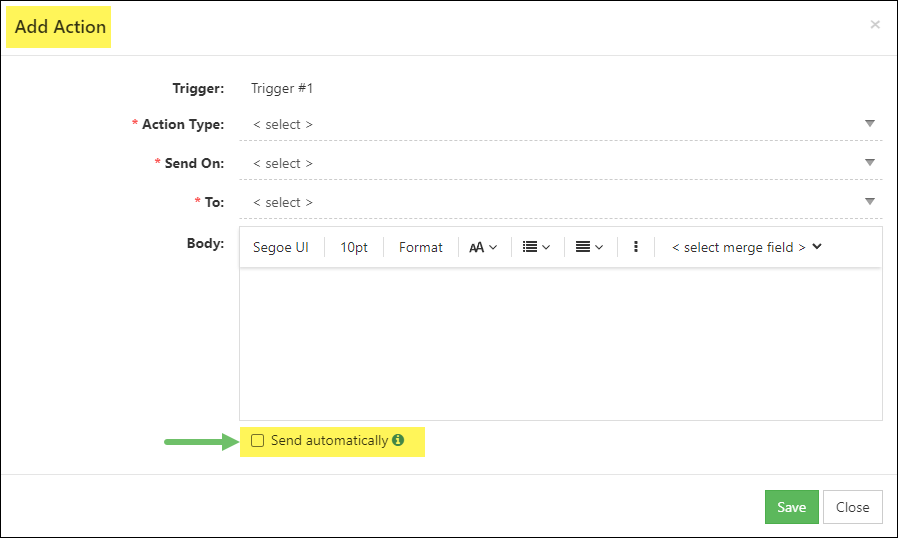
Example of the Checkbox Option to Send Actions Automatically
-
Workflow Management
Permissions
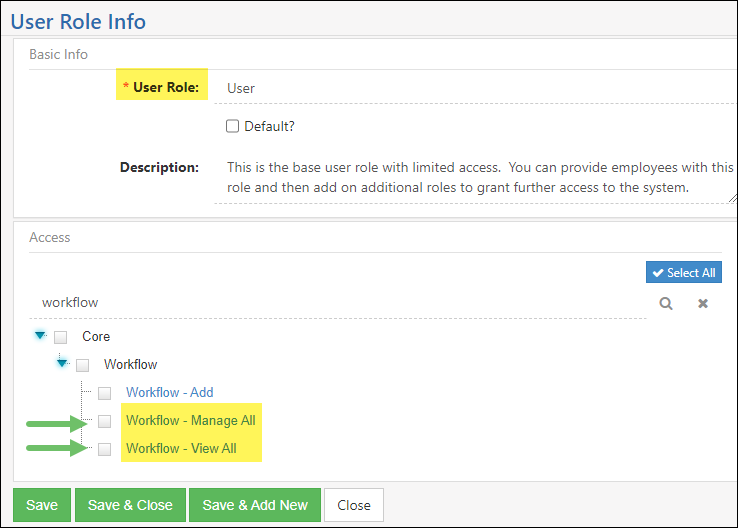
Before you get started working with Workflows in Striven, you will need to ensure that your User Role includes the proper permissions. There are three (3) permissions related to Workflow Management:
- “Workflow – Add”: Provides the ability to add new Workflows in Striven.
- “Workflow – Manage All”: Provides the “superpower” to view and manage all Workflows in Striven.
- “Workflow – View All”: Provides the ability to view all Workflows, but can only take actions on their own Workflows.
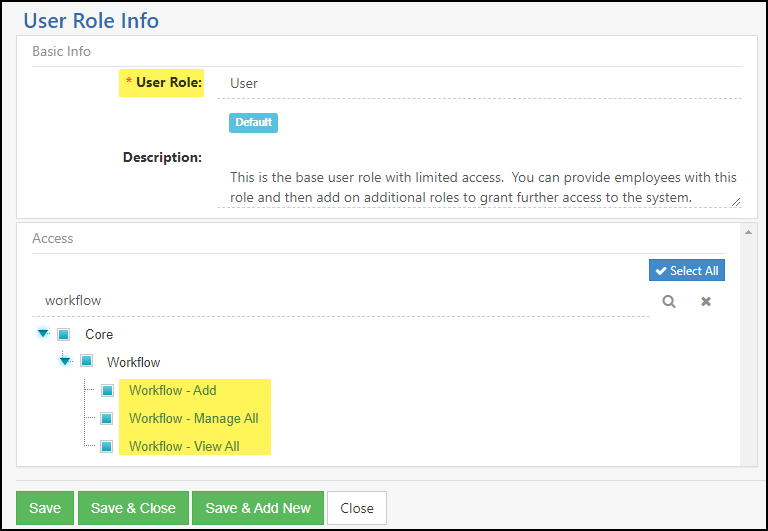
Example of the User Role Permissions Required to View or Edit Workflows
Workflow Queue Page
Once you have determined your User Role has the required permissions, you can locate a link to the Workflow Queue page from the Striven Navigation menu bar at the top of the screen. This page will provide options to search Workflows by Name, Manager, Based On, Action Type, or Status. You will also find options to Manage Workflows or view the Workflow Action Log from the Workflow Queue page.
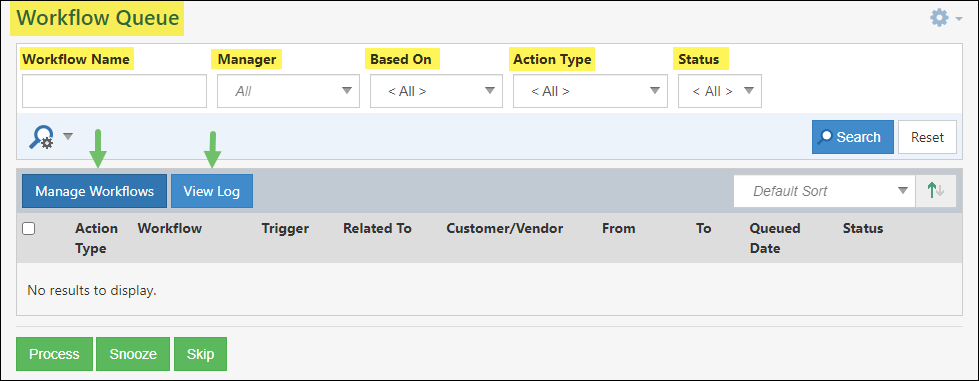
Example of the Workflow Queue Page
The Workflow Queue page will be discussed in more detail in its own guide section below.
-
Creating a Workflow
The steps for creating a Workflow are straightforward and should be easy to follow. To begin, click on the Manage Workflows button from the Workflows Queue page which will navigate you to the Workflow Management page.
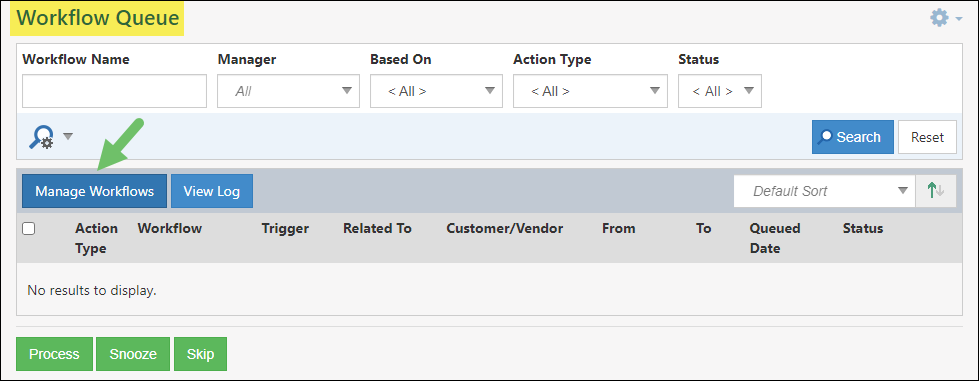
Example of the Manage Workflows Button on the Workflows Queue Page
From there, click the Add Workflow button on the Workflow Management page to determine the configuration settings for your Workflow. This will cause the Add Workflow page to display.
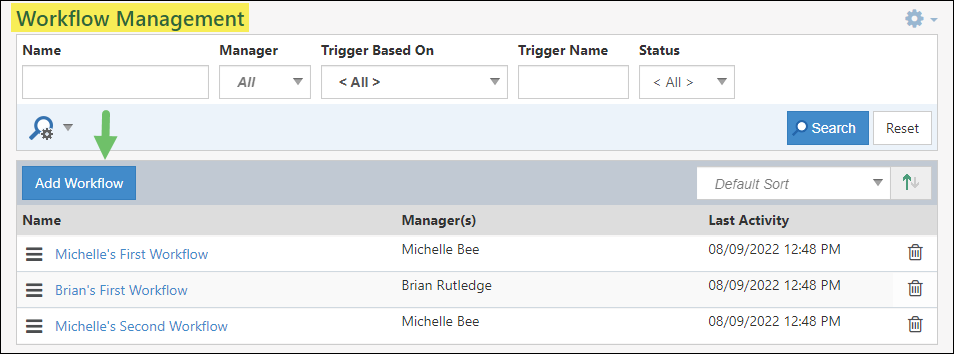
Example of the Add Workflow Button on the Workflow Management Page
This page is where you will name your Workflow, set the Manager(s) of the Workflow, and provide access to the Workflow for any Employees you wish to have access. Once an Employee has been added to the Access To section, you will have an additional option where the Employee Can Process Queue. Without this option enabled, the Access To Employees will only be able to edit a Workflow’s setup without being able to process the Workflow in the Workflow Queue. There will also be an option to Copy from an Existing Workflow in the top right corner of the Add Workflow page.
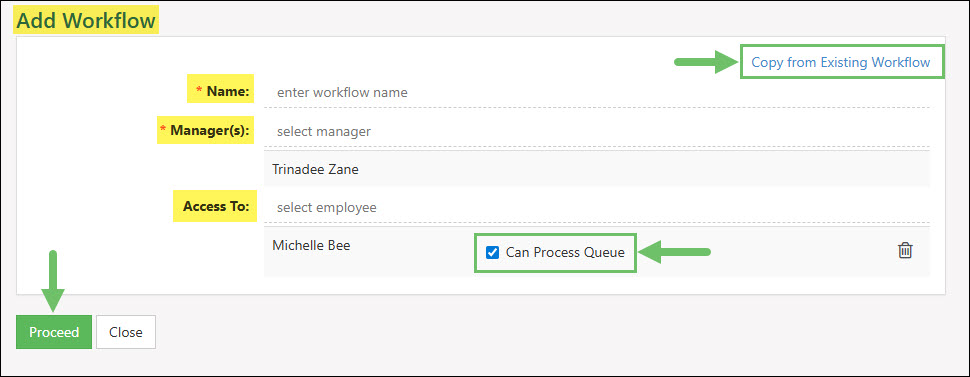
Example of Adding a New Workflow
Click the Proceed button to continue, which will navigate you to the Workflow Info page wherein you can see the info settings you set when creating the Workflow, as well as edit or copy them.

Example of the Copy & Edit Options on a Workflow Info Page
-
Creating Triggers
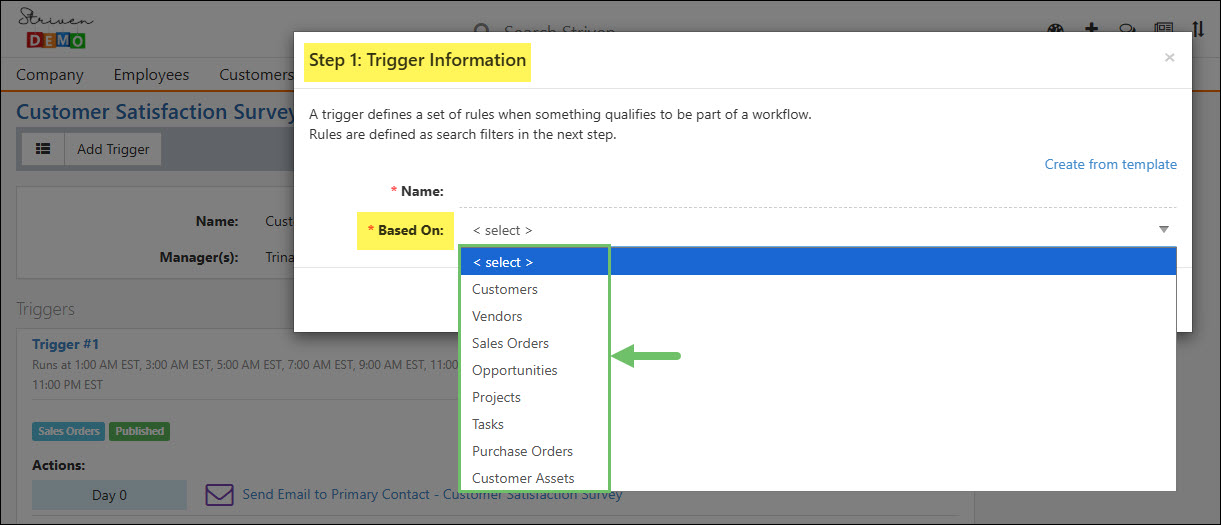
Triggers define a set of rules when something qualifies to be part of a Workflow. The rules are defined as search filters in the next step. To add a Trigger to your Workflow, click the Add Trigger button.
Name your Trigger and then select the entity which the Trigger will be based on, such as Customers, Vendors, Sales Orders, Opportunities, Projects, Tasks, Purchase Orders, or Customer Assets and then click Next.

Example of the Settings Options for Step 1: Trigger Information
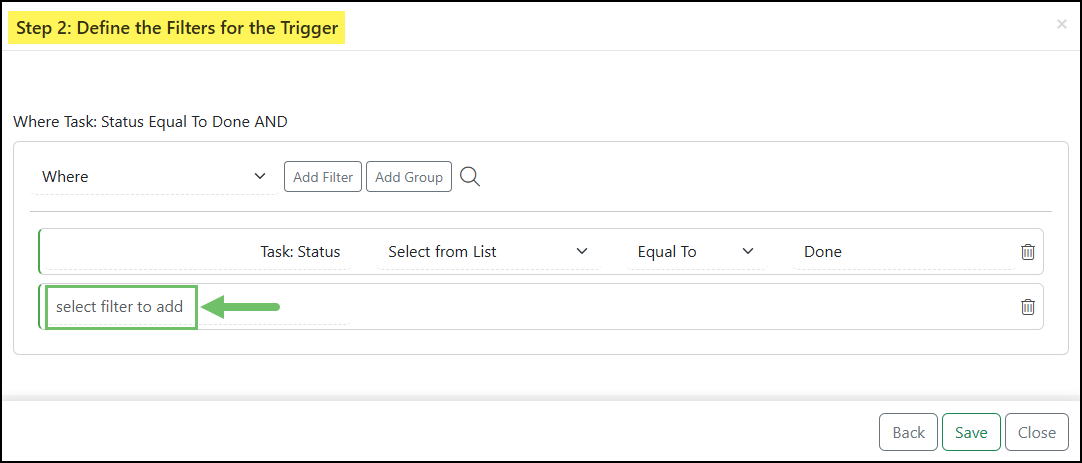
Search filters can be customized in order to narrow down results for the Workflow recipients. Review the image to the side to learn how search filters can be as granular as needed while setting up your Trigger.
- Filter Type: Clicking this drop-down menu lets you choose how you want to filter your trigger.
- Add Filter: Adds another filter to the existing group to narrow results.
- Add Group: Allows you to select another filter type.
- Dataset Lookup: Using the Dataset Lookup tool allows you to view available filters.
- Select Filter: Enables you to choose a filter from the drop-down list, or use the type-ahead functionality to search for a filter.
- Delete: Allows you to delete a configured filter.
- Save Options: You may choose to Save the filter configurations, Close the window without saving, or choose to go Back to Step 1.
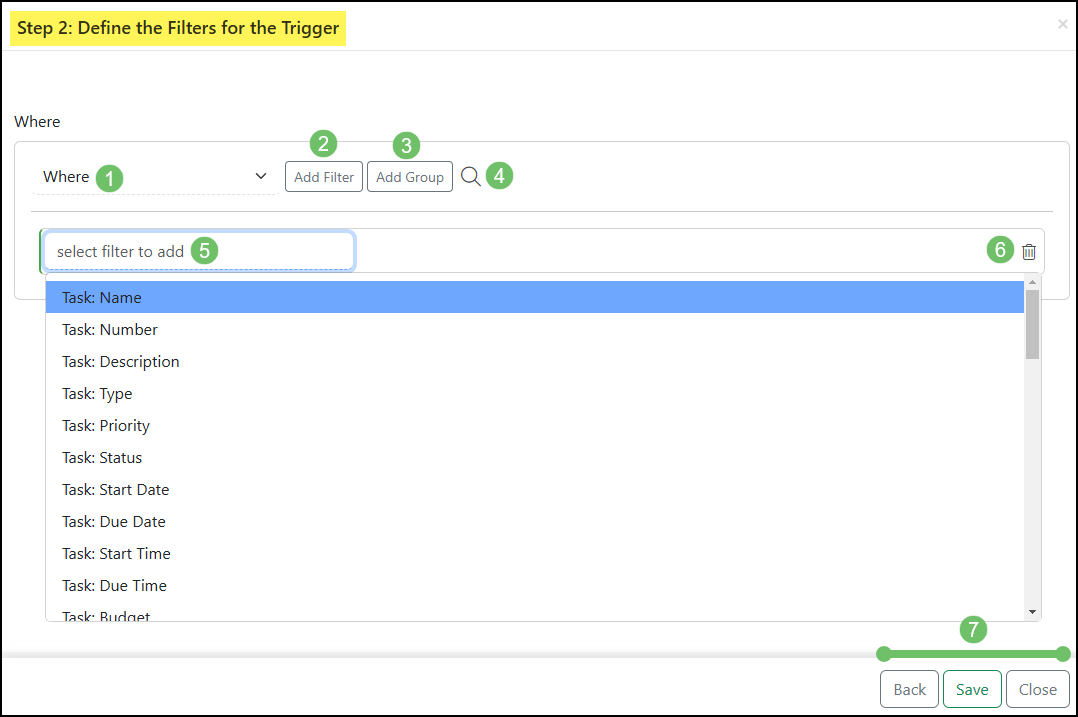
Example of the Settings Options for Step 2: Define the Filters for the Trigger
Once all your search criteria are selected, click Save.
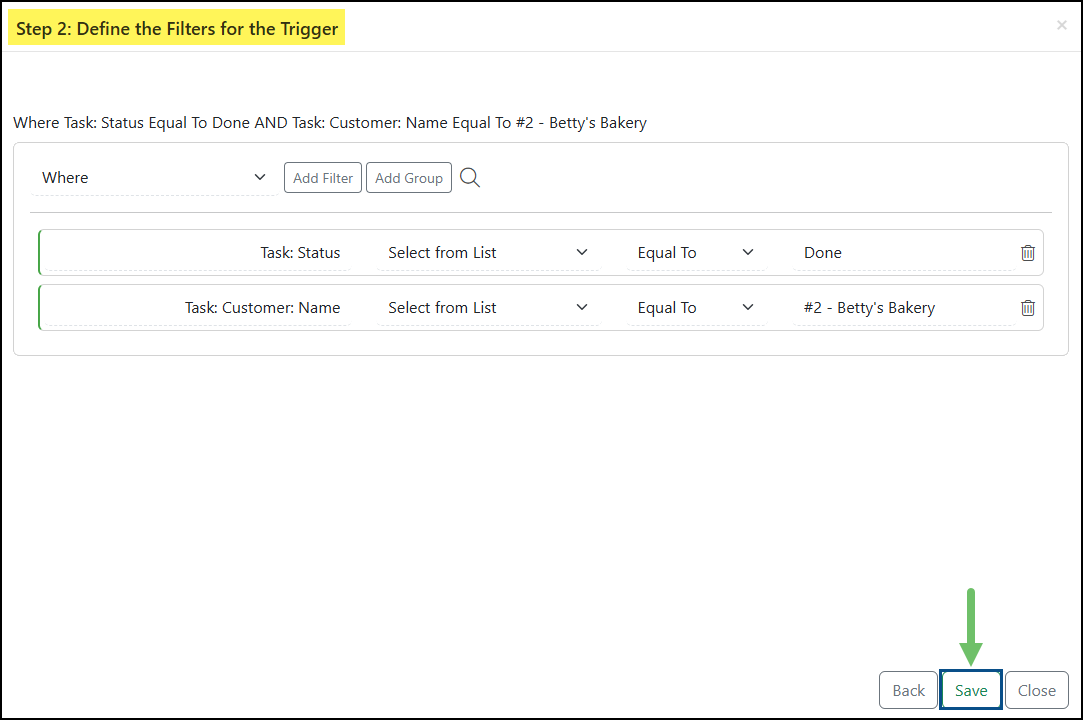
Example of the Settings Options for Step 2: Define the Filters for the Trigger
The Workflow Info page will display again with the Trigger you just created. Keep in mind that Workflows can have multiple Triggers, each with different search criteria defined.
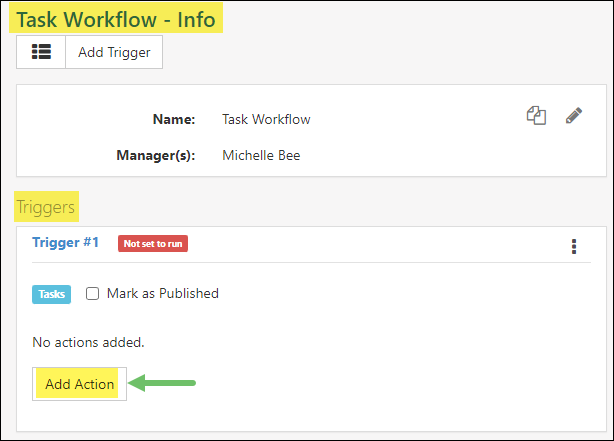
Example of the Add Action Button in the Trigger Section of a Workflow Info Page
-
Creating Actions for Triggers
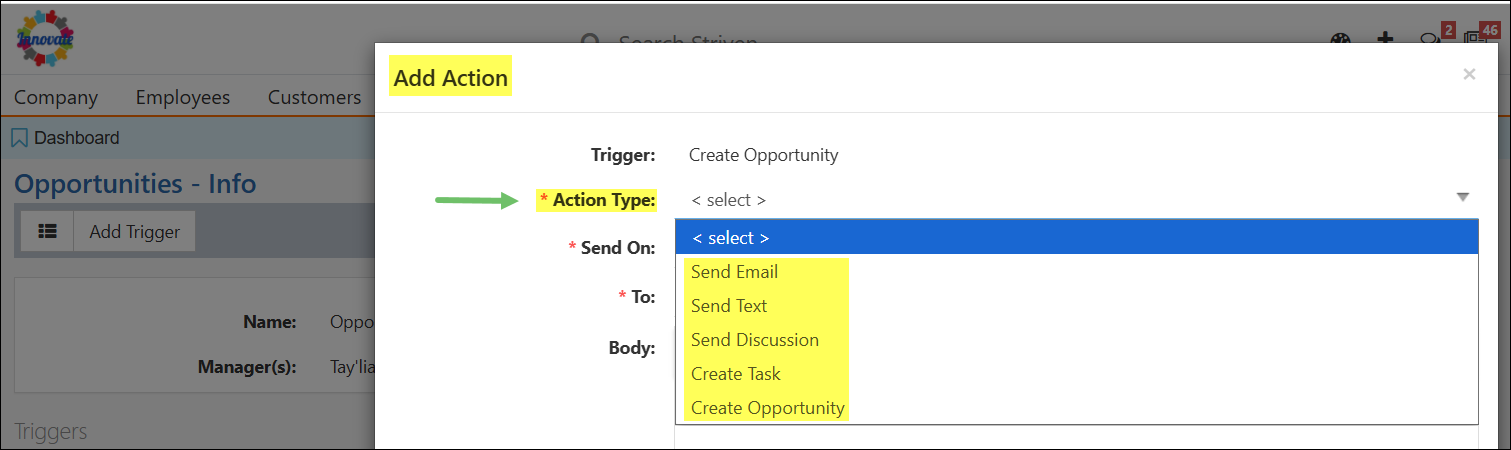
Next, you’ll want to add an Action to your Trigger. Clicking on the Add Action button in the Trigger section of the Workflow Info page will open a popup window with fields to fill in for the following:
- Action Type: Send Email, Send Text, Send Discussion, Create Task, or Create Opportunity.
- Send On: Day Number, Fixed Date, Fixed Day, Start Date, Due Date, Done Date. You may also configure the action to be Recurring, with a maximum recurrence of 2000 days.
Different configuration options can be set depending on which Send option is selected. - To: Primary Contact, Contacts filtered by Category, One or More Employees, Customer Level Assignment Employee, Anonymous Email, Requested By, Task Assigned to Employees.
- Body/Discussion/Description of the Action: Depending on which Action Type is selected, this field will have a different name, but will serve as basically the same thing – an Editor field wherein you can type information related to the Action, including bulleted or numbered lists, links, and tables. You may also choose to insert merge fields from the drop-down list to auto-populate particular details in this field depending on the entity the Trigger was based on (i.e. Customers, Vendors, Sales Orders, Opportunities, Projects, Tasks, or Purchase Orders).
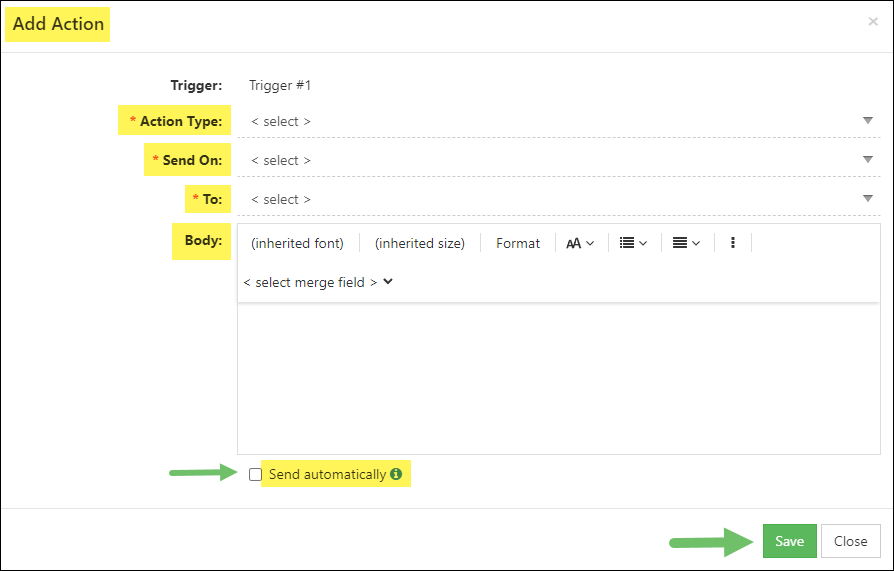
Example of the Settings Options on an Add Action Popup
Other field options may become available depending on the Action Type selected, such as From, Subject, Message Type, etc.
If you wish to automate this Trigger + Action, you can check the Send Automatically box. This will perform the Action at the processing times automatically. If you leave the box unchecked, the Actions will be put in the Workflow Queue and the next steps would need to be performed from the queue.
Once you’ve filled in all the fields required for the Action, click Save to complete the setup.
Repeat these steps if you wish to add other Actions to your Trigger.
-
Publishing Triggers
Triggers need to be marked as Published in order to run. There are two (2) requirements for marking Triggers as Published:
- An Action needs to be defined for the Trigger.
- A Processing Time needs to be set for the Action.
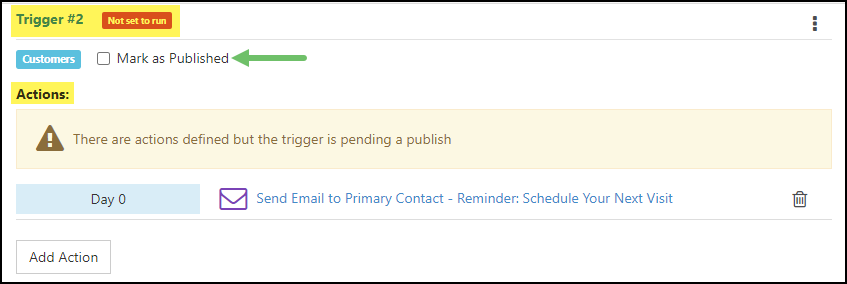
Example of Option to Mark a Trigger as Published
You can set the Processing Time by either clicking on the checkbox to Mark as Published, or you can select the option to Set Processing Time from the Trigger kebab menu.
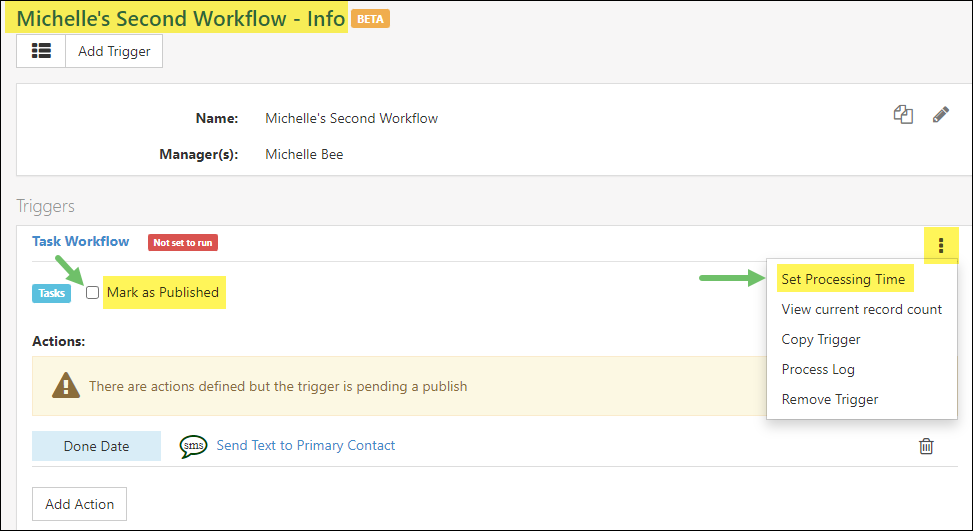
Example of Options to Set Processing Times for Actions on a Trigger
Workflow jobs execute twelve (12) times every day. By checking the corresponding box, you can choose from the following times for your Workflow to process:
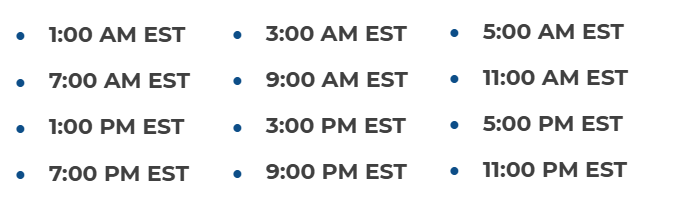
Note: If 3:00 AM EST or 5:00 AM EST are selected, Workflow triggers will not be sent out or queued up for Saturdays.
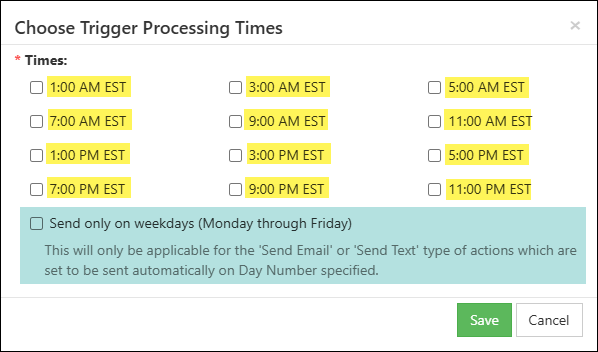
Example of the Available Trigger Processing Times
There is also an option to Send Only on Weekdays for the Send Email or Send Text type Actions set to be sent automatically on a Day Number specified.
When the Send Only on Weekdays option is selected:
- If a message is supposed to be sent on a weekend based on the Day Number specified, it will be sent on the following Monday along with all the other messages that are supposed to be sent that day.
- If a message was supposed to be queued, it will still be queued on the correct day.
Click Save & Publish once you’ve selected the time(s) you wish your Triggers to be processed. This will cause a popup window to appear that will display the Current Search Results from your Trigger and will ask if you want to publish the Trigger in this Workflow. Click Yes to continue.
Other available Trigger kebab menu options include:
- View Current Record Account: Shows how many results meet the Trigger at the present time and which will be sent at the next processing time set.
- Copy Trigger: Allows you to copy a Trigger to the same Workflow or to another Workflow.
- Process Log: Shows the Process Log for that particular Trigger.
- Remove Trigger: Removes the Trigger from the Workflow and cancels all pending or unprocessed Actions for the Trigger.
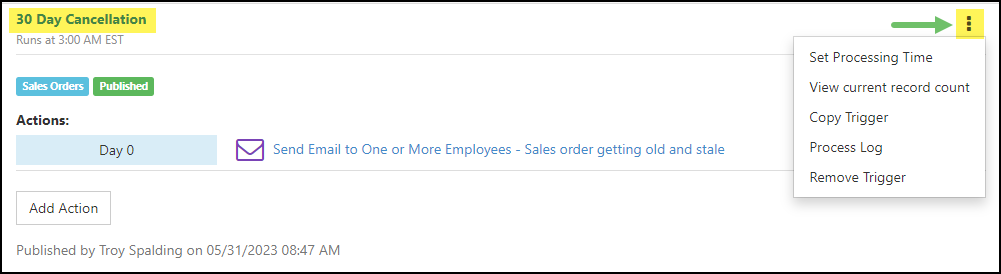
Example of the Trigger Kebab Menu Options
-
Trigger Templates
If your User Role includes the “Trigger Templates – Manage” permission, you can add Trigger Templates to your Striven system. To configure and manage your Workflow Trigger Templates, navigate to Company → Settings → Company → Workflow → Trigger Templates.
From the Workflow Trigger Templates page you can click on the Add button to open a popup for Step 1: Trigger Information. Enter the Trigger info the same as when you created a Trigger within your Workflow by entering a Trigger Name and select what you wish the Trigger to be based on, then click Next.
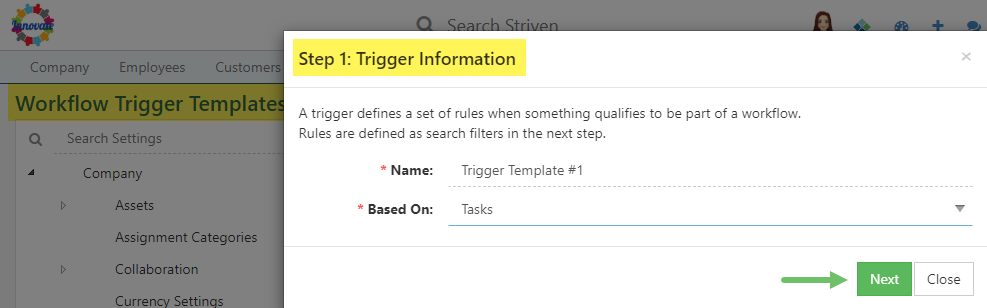
Example of Step 1 when Creating a Trigger Template
For Step 2: Define the Filters for the Trigger, select the search options you wish to include in this Trigger Template and click Save to keep the template so you can then select it from a drop-down list when creating a new Workflow or adding Triggers to an existing Workflow.
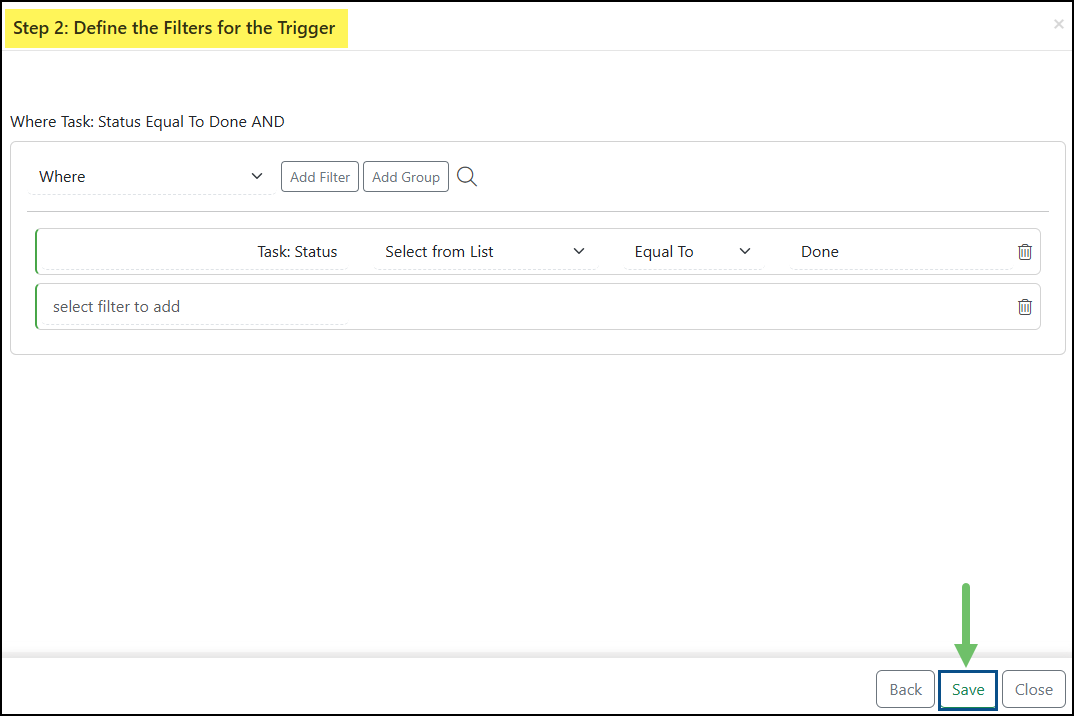
Example of Step 2 when Creating a Trigger Template
-
Workflow Queue
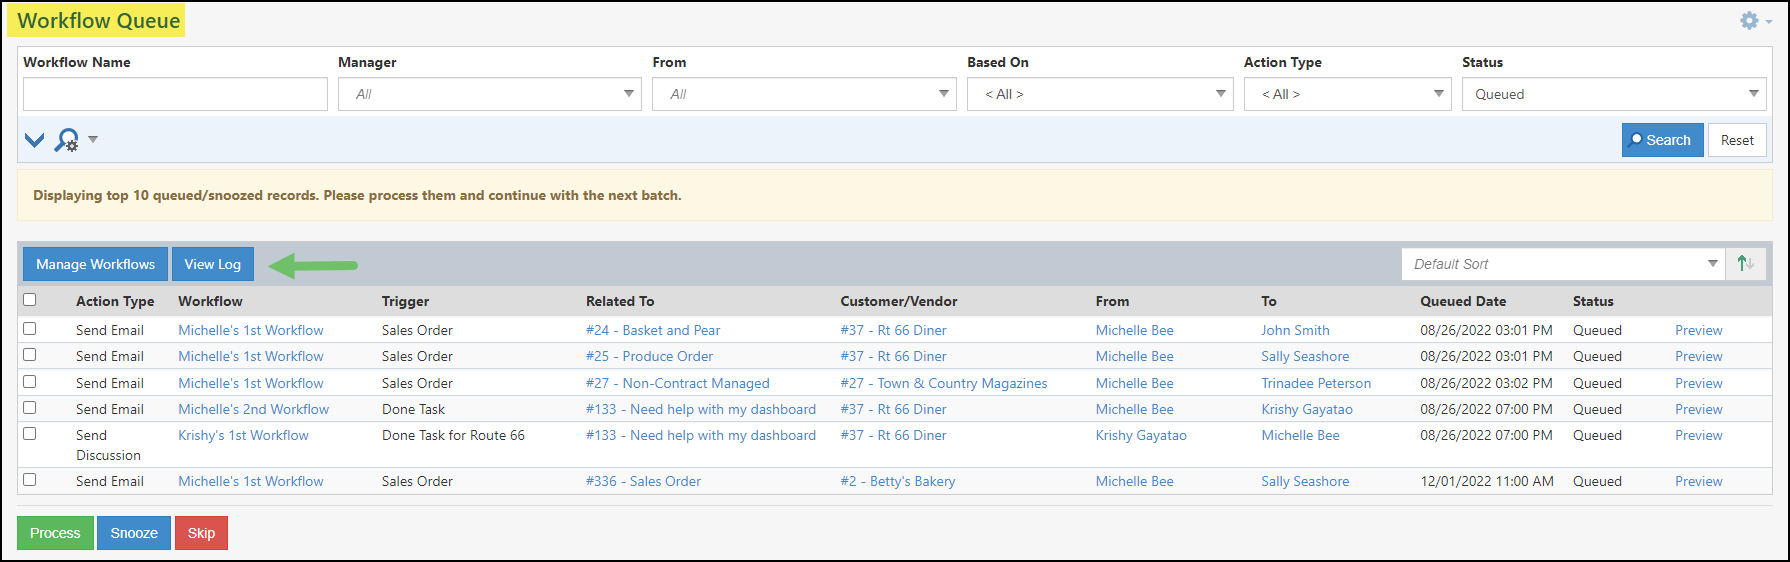
The Workflow Queue page displays all of the Actions that are presently queued and have not been executed yet. This allows users to manually execute Actions, as well as choose to Snooze or Skip them as desired. This page also provides the ability for Workflow Managers to preview and edit the message of each Action in the queue before processing it.
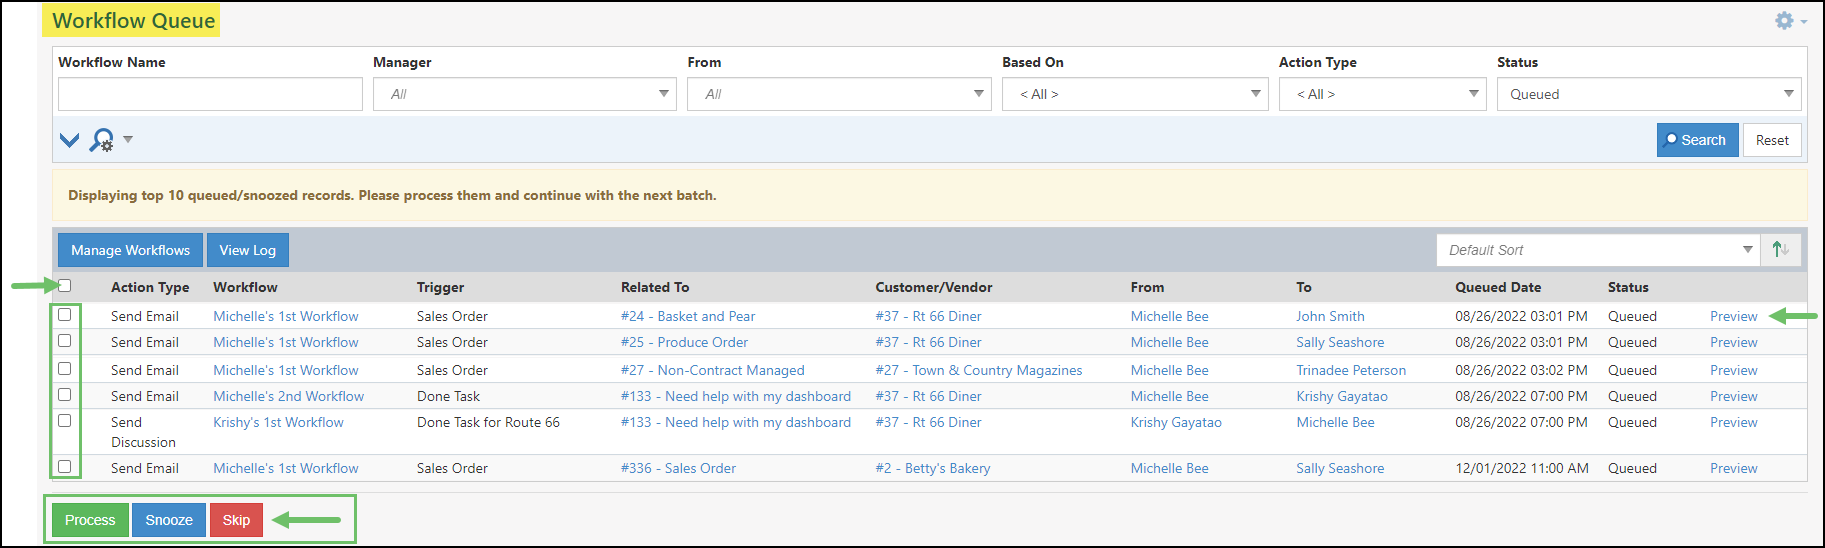
Example of Unprocessed Actions Listed on the Workflow Queue Page
The activities performed from the Workflow Queue are only accessible to users with the “Workflow – Manage All” permission in their User Role. Other users will not be able to Process, Snooze, or Skip any Actions in the queue unless they are the Manager of, or have been given access to, the Workflow.
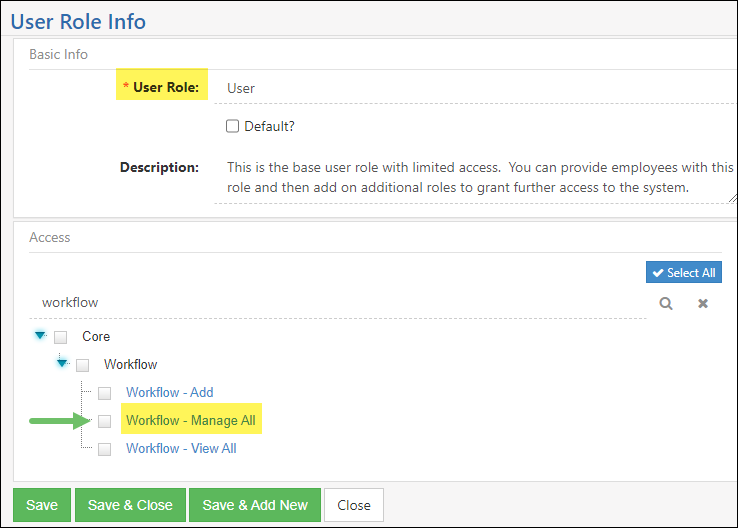
Example of the User Role Permission for Full Workflow Queue Access
The search options for the Workflow Queue include Workflow Name, Manager, Based On, Action Type, Status, or Queued Date Range and can be utilized to filter the page to find exactly which Actions you wish to act upon.
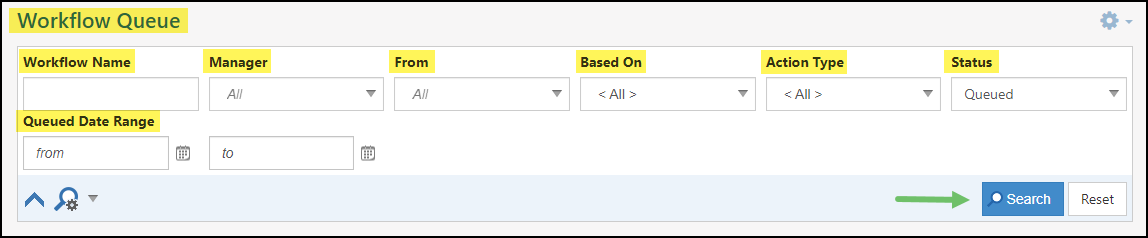
Example of the Available Search Options on the Workflow Queue Page
-
Workflow Action Log
The Workflow Action Log lists every Action in Workflows within your Striven system. This includes everything Queued, Processed, Snoozed, Cancelled, and Skipped. You can use the search options provided at the top of the page to filter the results to locate the Action(s) for which you’re looking. These search options include Workflow, Manager, Action Type, Based On, From, To, Status, and Processed Date Range.
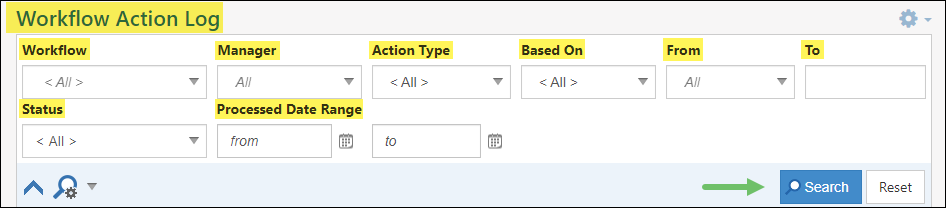
Example of the Search Filters Available on the Workflow Action Log Page
The Workflow Action Log is available for users with the “Workflow – Manage All” or “Workflow – View All” permission included in their User Role. Again, Workflow Managers and those provided Access to the Workflow will have access to the Action Log as well.
Example of the User Role Permission for Full Workflow Action Log Access
There are two (2) ways to access the Workflow Action Log:
- Click on the View Log button on the Workflow Queue page
Example of the View Log Button on the Workflow Queue Page
- Navigate to Workflows → View Log

Example of the Menu Location of the Workflow Action Log in Striven
Other details available on this page include a view of the Actions that were processed, including the ability to view the Tasks or Discussions that were created by those Actions, and whether the Actions were processed manually and by whom, or if they were processed by the system.
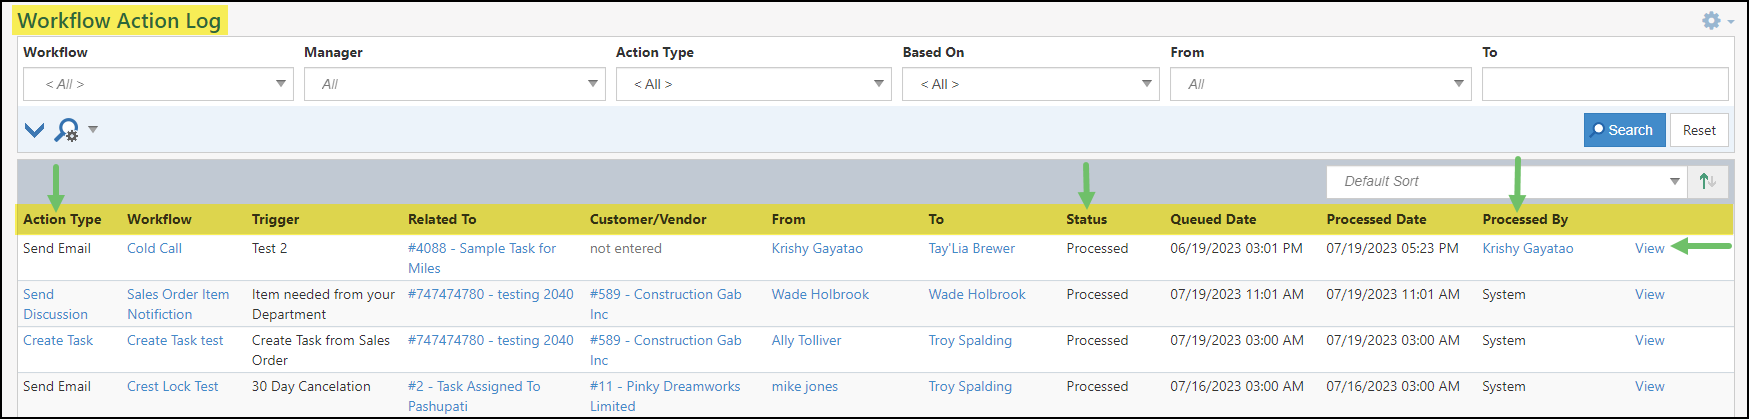
Example of the Details Displayed on the Workflow Action Log
-
Recap
With this guide, we’ve discussed how Workflows can help automate processes and communication with your Customers. We’ve also explored ways to configure your Workflows, Triggers, and Actions. Lastly, we covered how to manage your Workflows, Triggers, and Actions in Striven.

Have a Question?
Ask the Striven Community
User-sourced how-to’s, feedback, and more!
FAQs
-
Can Workflows be used for internal communications?
Yes, Workflows are highly effective for internal communications. You can use them to automatically send notifications to Employees, create internal Discussions, or assign Tasks within your team.
-
Can I create Workflows for other Employees?
Yes, when creating a Workflow the From can be set as any Employee, not just the Manager of the Workflow. This allows for flexibility with regard to a designated person managing and configuring the Workflows versus who the Workflow communications will come from.
-
I have created a Workflow but nothing is sending out or being added to the Workflows Queue. Did I miss a step?
In order for your Workflow to begin processing, you will need to make sure that each Trigger within the Workflow has the option checked for Mark as Published. This will indicate to the system that the Trigger is ready to be processed and is no longer in a configuration phase.