
Striven Integrations
ShipStation Integration
Guide
-
Overview
ShipStation is a useful web-based shipping software commonly used by eCommerce merchants. Striven provides a ShipStation Integration to allow you to send Sales Orders with an Approved or In Progress status to ShipStation for packaging and shipping. This will help streamline and automate your fulfillment process.
The following steps should be taken in order to begin using ShipStation with Striven.
-
User Role Permission
In order to access the ShipStation Integration settings in Striven, your User Role will need to include the “ShipStation Settings” permission. Once you have established that your User Role has the required permission, you may begin the process of setting up the ShipStation Integration. If you do not have the necessary permission, you can contact your Company’s Striven System Administrator to request access.
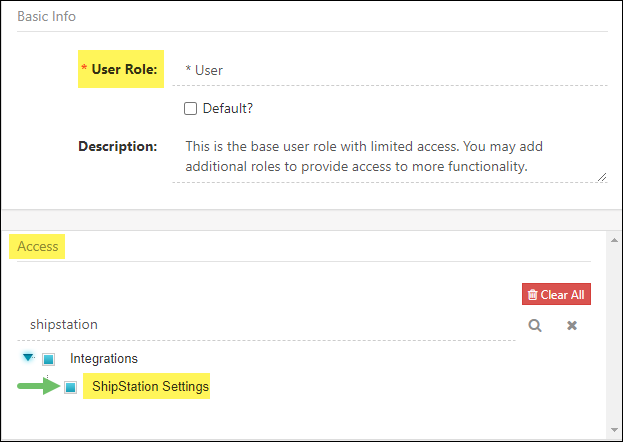
Example of User Role Permission Required for Access to the ShipStation Integration

-
ShipStation Integration Setup in Striven
The first step in activating the ShipStation Integration involves turning on the integration in Striven. The Striven settings to initiate the ShipStation Integration can be found by navigating to Company → Settings → Integrations → ShipStation.
-
Turning On the ShipStation Integration
On the ShipStation Settings page, you will see a button labeled Turn On ShipStation Integration. Clicking the button will display the settings options required to configure the integration.
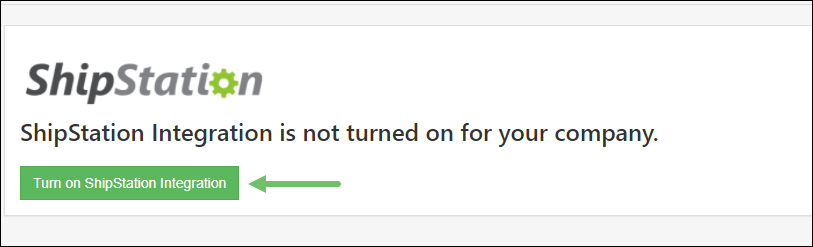
Example of Turn On ShipStation Integration Button
When you click on the Turn on ShipStation Integration button, the ShipStation settings page is displayed. From there, you will copy the mapping information over to ShipStation, assign a Resource Owner, and enable Shipping Cost Calculation. These steps will be explained in more detail below.
- ShipStation URL Settings Section: The following fields will store the URL and details required for connecting Striven to ShipStation with the integration:
- URL to Custom XML Page: The link that ShipStation will use to establish the connection with Striven.
- Username: Generated by Striven for ShipStation to use to identify and authenticate the connection.
- Password: Generated by Striven for ShipStation to use to authenticate and secure the connection.
- Resource Owner: The Employee that will be responsible for monitoring and verifying that the ShipStation integration is working correctly.
- Enable Shipping Cost Calculation: Once this box is checked, the integration settings to get shipping costs from ShipStation will display. Required fields include the API Key, API Secret, Default Shipping Method, and Default Ship From Location.
- API Key: This will be filled in from the ShipStation API Settings page located under Account → API Settings in the ShipStation menu.
- API Secret: This will be filled in from the ShipStation API Settings page located under Account → API Settings in the ShipStation menu.

- Default Shipping Method: Select from the list of Shipping Methods set up in Striven and can be changed later.
- Max Weight Per Box (lbs): Sets the default weight per box to be used in calculating how many boxes are needed.
- Default Ship From Location: Select from the list of Company Locations set up in Striven.
- Default Markup: Enables you to select a default markup as a Percentage or Rate, with a field to enter the relevant amount of the markup depending on which option you choose.
- ShipStation Quote Statuses Table: Table used to map Order statuses between Striven and ShipStation.
- Unpaid: ShipStation status and should be mapped to Striven’s Pending Approval status.
- Paid: ShipStation status and should be mapped to Striven’s Approved and In Progress Statuses.
- Shipped: ShipStation status and should be mapped to Striven’s Completed status.
- Cancelled: ShipStation status and should be mapped to Striven’s Cancelled and Lost statuses.
- On-Hold: ShipStation Status and should be mapped to Striven’s Quoted status.
- Save & Disable ShipStation Integration Options:
- Save: Saves the changes to the ShipStation settings page.
- Disable ShipStation Integration: Disables the ShipStation Integration and no longer displays the settings options.
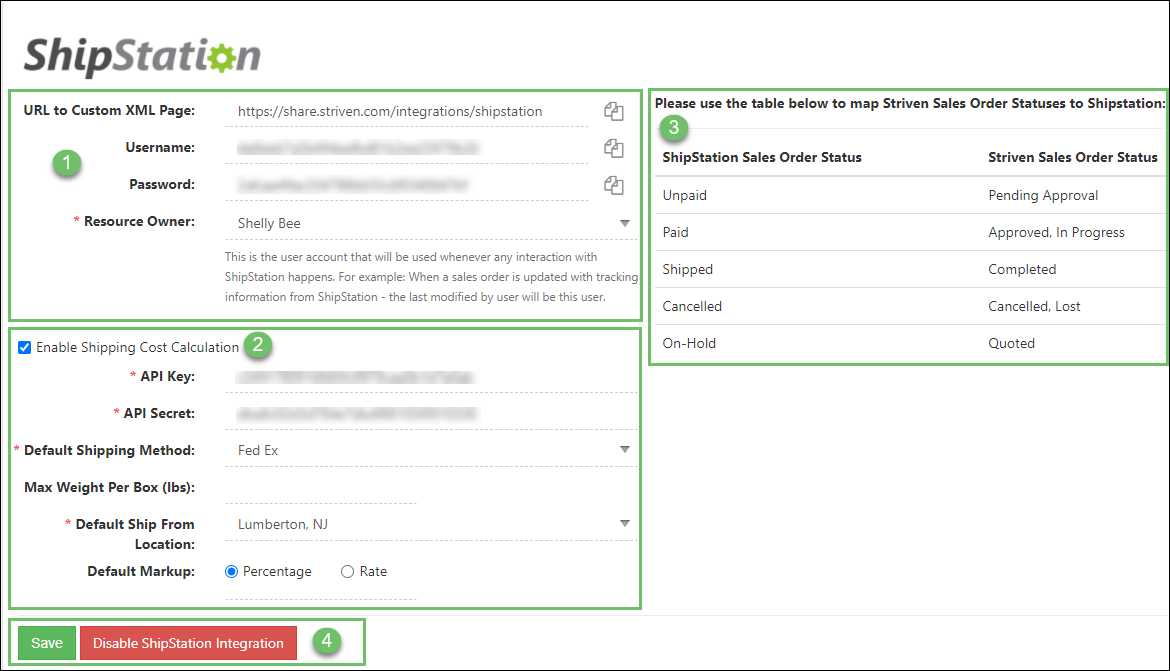
Example of ShipStation Settings Page in Striven
Now that you have your Striven side of the ShipStation Integration configured, you will go into the ShipStation website and complete the integration setup on that side.
- ShipStation URL Settings Section: The following fields will store the URL and details required for connecting Striven to ShipStation with the integration:
-
Striven Integration Setup in ShipStation
Provided you already have your ShipStation account established, you will want to follow these steps to configure your ShipStation settings for this integration with Striven.
- Note: If you are new to ShipStation, you may need to verify your ShipStation account via email before you are able to configure the following settings in ShipStation to complete this integration setup.
Example of Selling Channels Settings in ShipStation
-
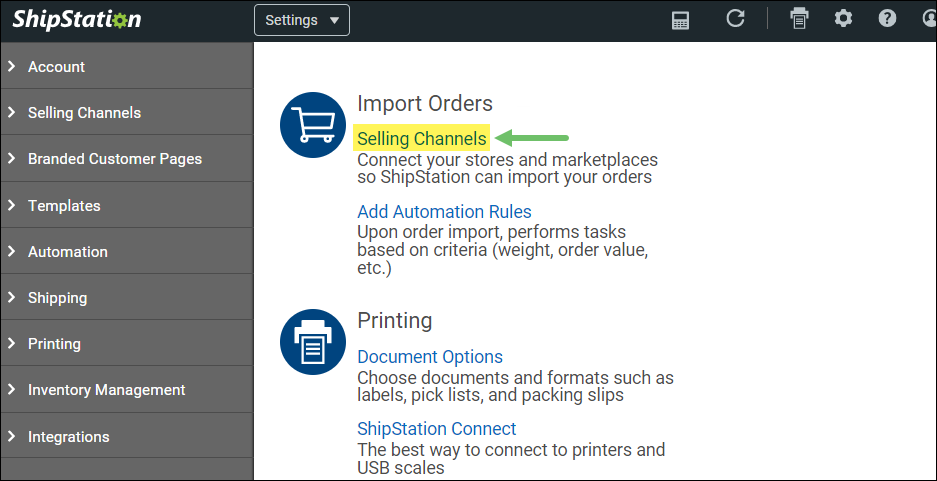
Selling Channels
Once your account is verified and you’re ready to get started in ShipStation, you will see the Welcome to ShipStation page. If you look at the top right corner of the page you will see the Gear icon for the settings. Clicking on the Gear icon will display all of your settings options along the left side of the screen.
Now you can navigate to Selling Channels → Store Setup in the left-side menu to continue the integration setup.
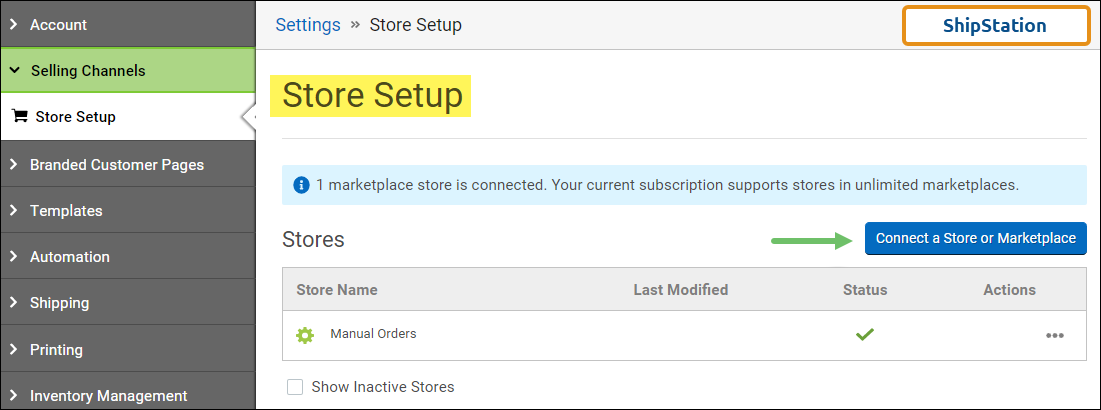
Example of Store Setup Page in ShipStation
From that screen, you should see a Connect a Store or Marketplace button. Clicking that button displays the Connect a Marketplace popup. Enter “custom” in the search field at the top of the popup and then click on the Custom Store option that appears. The Custom Store option allows you to import orders from Striven.
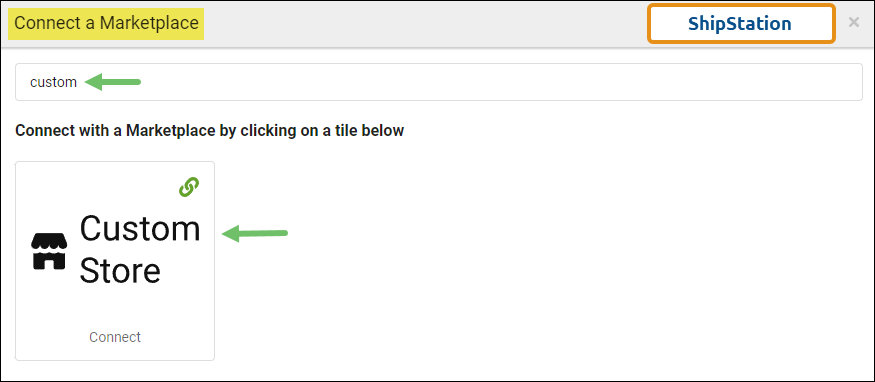
Example of Connect a Marketplace Popup in ShipStation
Next, you will see the Custom Store Connection screen where you will enter the API credentials from Striven and map the Sales Order Statuses between Striven and ShipStation. The information needed to fill the fields on this page can be found on your ShipStation Settings page in Striven.
- URL to Custom XML Page: The link ShipStation will use to establish the connection with Striven. You can copy/paste the URL from Striven to this field.
- Username: The username generated by Striven that ShipStation will use to authenticate the connection. You can copy/paste this from the Striven ShipStation settings page as well.
- Password: The password generated by Striven that ShipStation will use to authenticate the connection.
- Awaiting Payment Status: ShipStation’s “unpaid” status should be changed to match Striven’s “Pending Approval” status.
- Awaiting Shipment Statuses: ShipStation’s “paid” status should be changed to match Striven’s “Approved, In Progress” statuses.
- Shipped Status: ShipStation’s “shipped” status should be mapped to match Striven’s “Completed” status.
- Cancelled Status: ShipStation’s “cancelled” status should be mapped to match Striven’s “Cancelled, Lost” statuses.
- On-Hold Status: ShipStation’s “on_hold” status should be mapped to match Striven’s “Quoted” status.
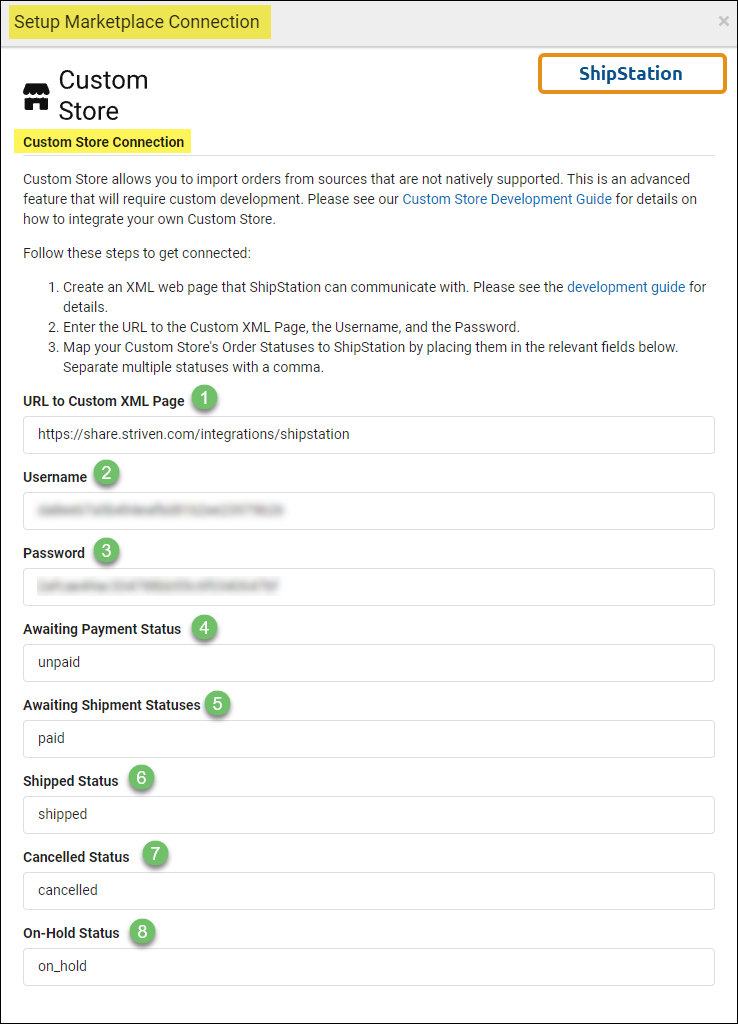
Example of Custom Store Connection Settings in ShipStation
After all the settings are copied over from your Striven system, you are ready to complete the setup. At the bottom of the Custom Store Connection page, you will see the following options:
- Back: Returns you to the Connect Market Place page.
- Test Connection: Tests the connection between ShipStation and Striven.
- Cancel: Cancels the setup and takes you back to the Store Setup page.
- Connect: Completes and saves the setup to connect ShipStation with Striven.

Example of Custom Store Connection Page Options in ShipStation
Once you have the store created and the connection saved, the Store Setup page will display showing the New Custom Store you just created.
- New Custom Store Kebab Menu: Offers the following editing options for the store:
- Edit Store Details: Provides edit options for that particular Store.
- Edit Marketplace Connection: Provides the option to edit the Custom Store Connection fields.
- Set Store to Inactive: Deactivates the Custom Store and will only display it if the Show Inactive Stores box is checked.
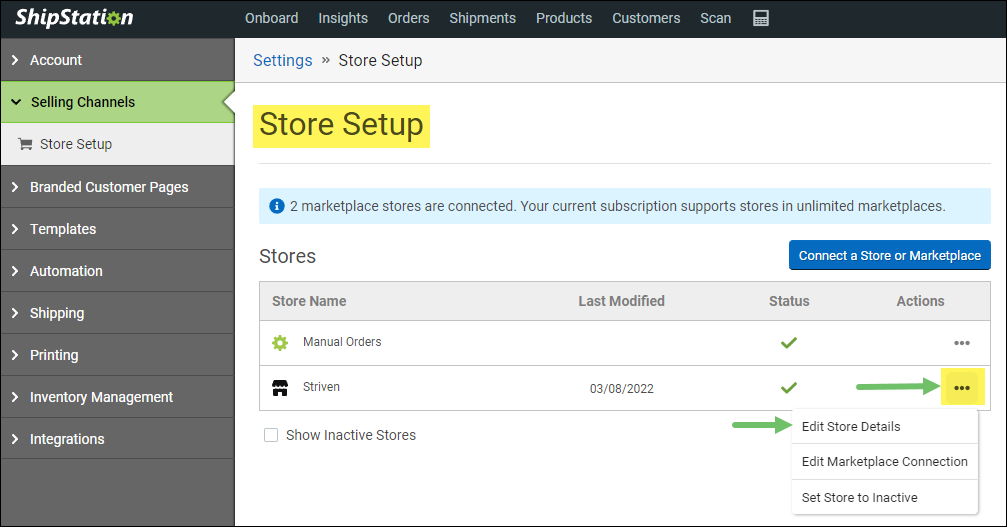
Example of New Custom Store Kebab Menu Options in ShipStation
Clicking on the option for Edit Store Details will direct you to the New Custom Store page. From that page, you will have access to the following tabs: Store Settings, Branding, Tracking Page, Returns, Emails, Packing Slips, Products, Shipping Services, and Activity.
- Note: Remember to save your changes as you go so you don’t lose any settings or configurations if you leave the page before completing the New Custom Store settings.
Store Setup in ShipStation
-
Store Setup in ShipStation
Now you’re ready to customize your New Custom Store. There are a variety of settings tabs involved in this portion of the integration setup which will be explained in more detail in this section of the guide.
-
Store Settings
The Store Settings tab is where you will set your Store Name and modify your Custom Store Status Settings if desired. These settings details are explained below:
- Store Name: Edit the Display Name for the Store Connection to “Striven”.
- Is Active?: Sets the Active/Inactive setting for the store connection.
- Allow ShipStation to refresh your stores while you’re away: Gives permission to ShipStation to refresh the connection when no one is signed in. This keeps the integration communicating.
- Automatically standardize and correct all US addresses when verified?: Gives ShipStation the ability to update the United States addresses coming in from the store connection with correct information when the addresses are verified.
- Automatically standardize and correct supported non-US addresses when verified?: Gives ShipStation the ability to update non-US addresses coming in from the store connection with correct information when the addresses are verified. Supported countries include CA, GB, AU, DE, FR, NO, ES, SE, IL, and IT.
- Edit Custom Store Settings: Enables you to modify your Marketplace Settings to identify the mapping of your custom order statuses.
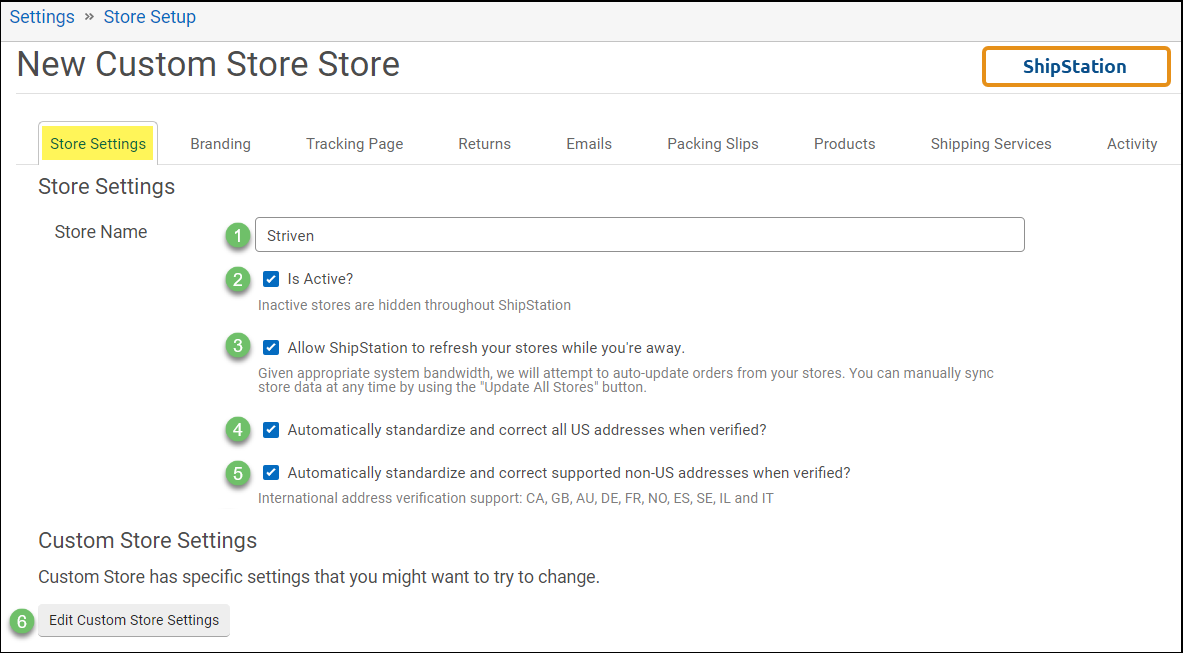
Example of New Custom Store Settings in ShipStation
-
Branding
The Branding tab has many settings considerations for general and custom settings with regard to your store’s brand and its use on your Packing Slips, Custom Tracking Pages, Returns Pages, and Shipment Notification Emails within ShipStation.
- Company Name: Enter your Company name for brand recognition.
- Always use Company Name on the Return Address printed on outbound labels: Check this box to use your Company name in the return address for outbound items labels.
- Phone: Your Company’s phone number.
- Email: The email address of the Employee responsible for responding to emails related to your ShipStation account.
- Store Logo: Your Company logo for display on documents printed out of ShipStation.
- Website: Your Company website or the store website you would like to have displayed.
- Social Links: Add your social media links for Facebook, Twitter, and Instagram.
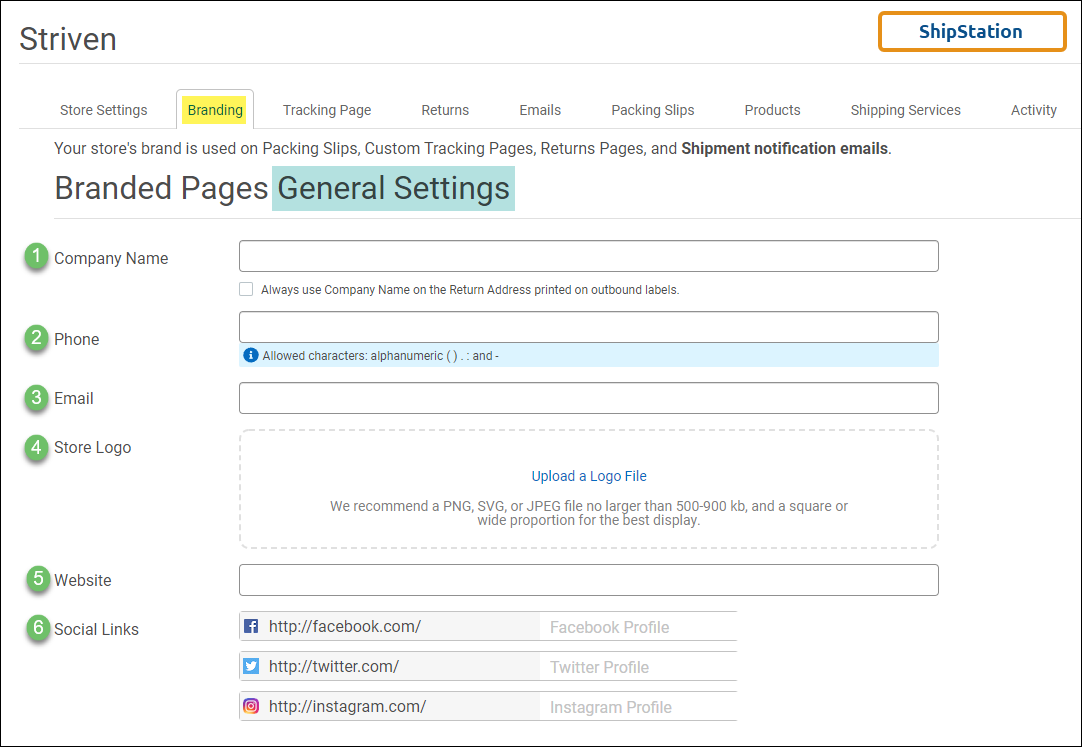
Example of the Branded Pages General Settings in ShipStation
For further customization, you can activate and use the following Branded Pages Custom Settings:
Override Default Branded Customer Pages settings: Activates and overrides general settings with the following customizable settings:
- Show Store Logo: Toggle Store Logo display on and off.
- Custom Colors: Set custom colors to be used on your documents such as Tracking Page Background, Expected Delivery Date, Service Menu & Social Media Links.
- Show Social Media Links: Toggles the Media links you set up earlier on and off.
- Show Service Menu: Toggles on/off the Service Menu where you can display the Website for each store, and up to 3 additional links, the Return Policy, and Contact Us options as well.
- Show Order Details: Shows Items that were ordered; options include showing Item images, Item SKUs & Options, and Prices.
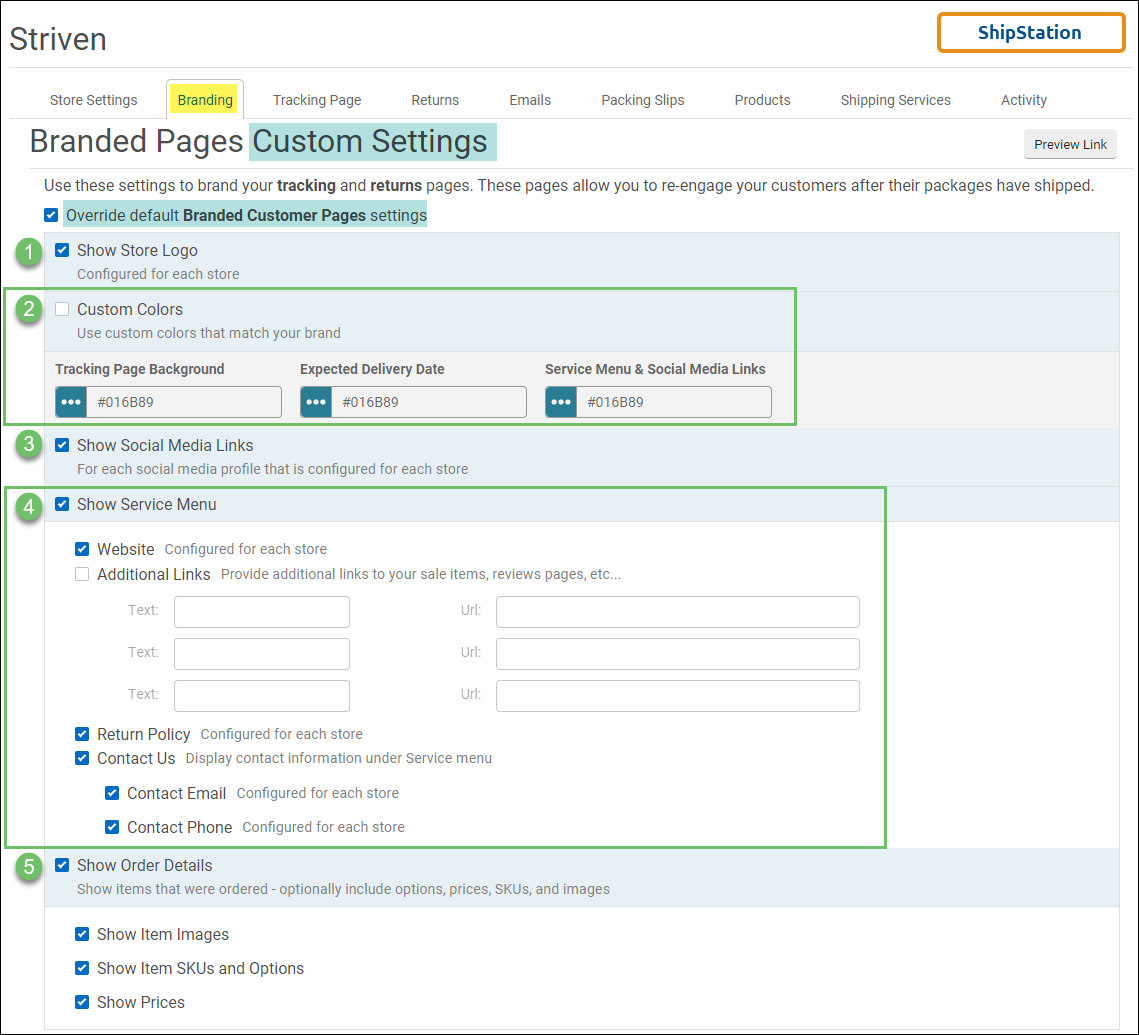
Example of Branded Pages Custom Settings in ShipStation
- Company Name: Enter your Company name for brand recognition.
-
Tracking Page
The Tracking Page tab is where you’ll determine whether you want to link to the Branded Tracking Page or the Carrier’s tracking page in your Shipment Confirmation emails. You are presented with 2 options from which to choose:
- Tracking Page: These options include:
- Use Branded Tracking Page: Sends a link to the Branded Tracking Page in your Shipment Confirmation emails.(Choosing this option activates additional options below for SMS Notifications).
- Use Carrier Tracking Page: Sends a link to the Carrier’s Tracking Page in your Shipment Confirmation emails.
- SMS Notifications: These options include:
- Enable Branded SMS Shipment Notifications (show this on my Branded Tracking Page).
- Disable Branded SMS Shipment Notifications (keep it hidden from Customers).
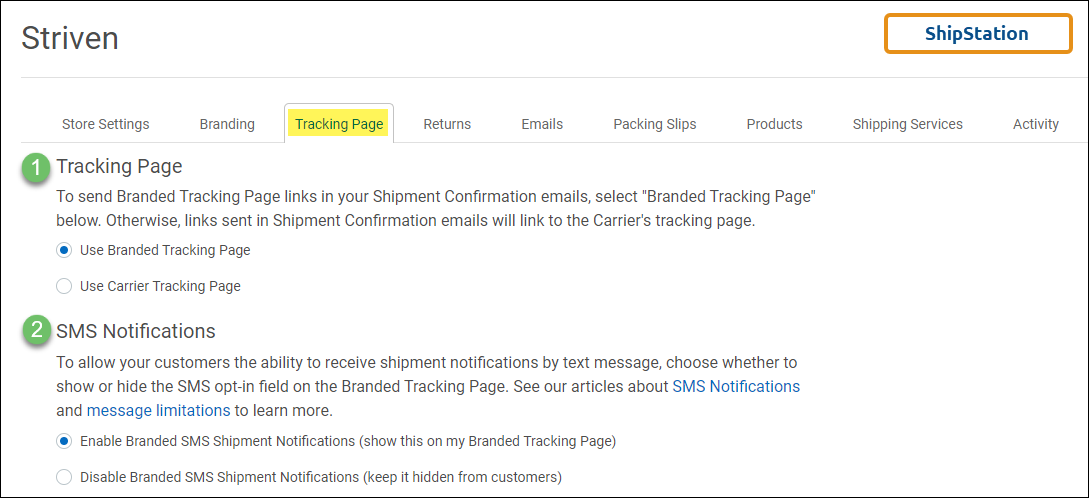
Example of the Tracking Page Settings in ShipStation
- Tracking Page: These options include:
-
Returns
Next, you’ll want to click on the Returns tab to continue configuring your settings. Using the Branded Returns Portal will save you time by allowing your Customers to initiate their own returns, leaving less work for you.
For more information about the benefits of using the Branded Returns Portal, you can click on the How does this work? link on this page.
- Branded Returns Portal: Activates a Branded Return Portal to basically create a self-serve return process for your Customers.
- Return Exceptions: Determines how many days from the ship date you provide for a Customer to file a return.
- Return service and package type: The default Carrier Service and Package type settings for the return label:
- Service: Select the Carrier and Service you want to be set as default for return labels.
- Package: Select the default package you want to be set as default for return labels.
- Branded Returns Portal URL: A URL you can use in emails or on your website to link Customers to the Branded Return Portal.
- Return policy message: Enter the message you wish to be displayed on the return policy page; this will usually contain the specific details of your return policy.
- Return email message: Enter the email message you want to be sent with the return label.
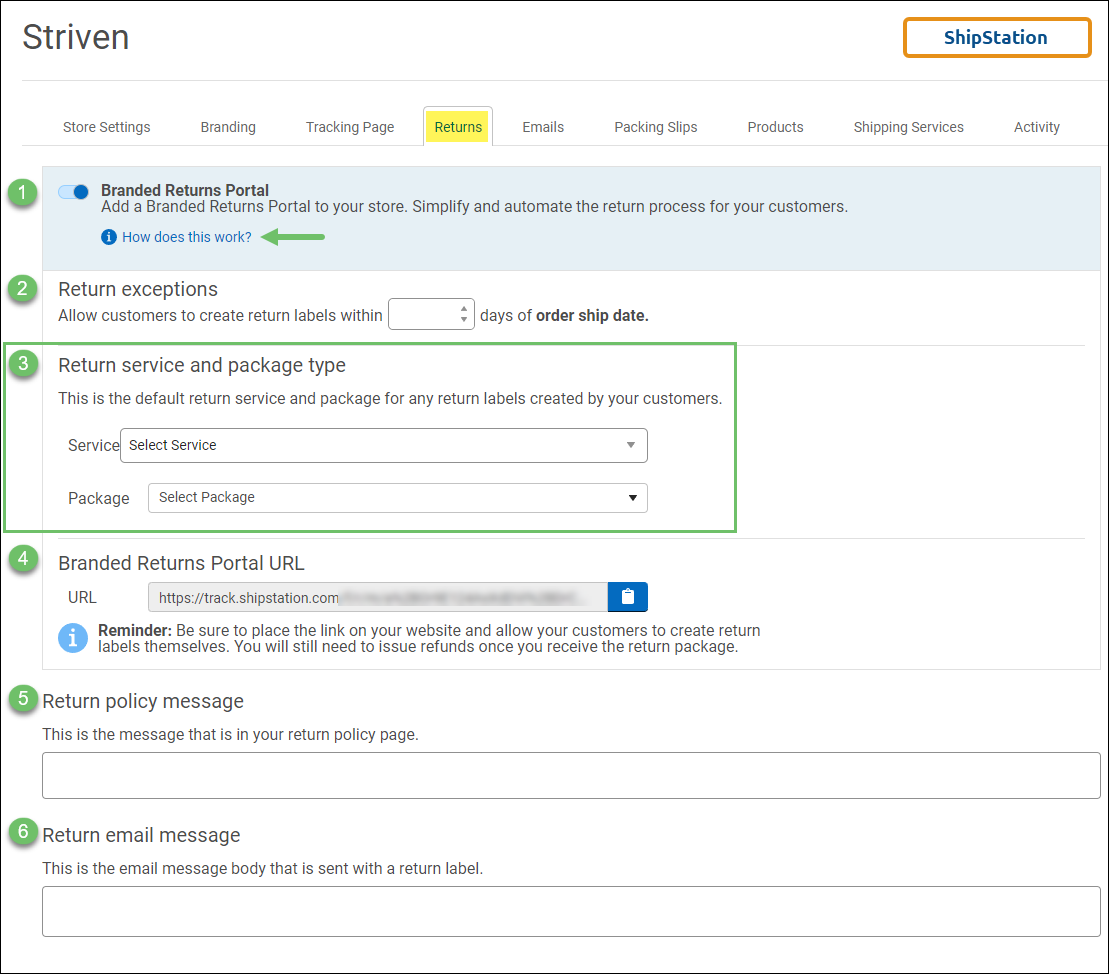
Example of the Returns Settings in ShipStation
-
Emails
The Emails tab displays ShipStation’s options for sending email and marketplace notifications at specified points in time or once certain conditions are met.
- Note: ShipStation also provides the ability to create custom email templates by clicking the hyperlink provided.
- Shipment Confirmation Email: Enables you to select the email template to be used for the Shipment Confirmation, or to send no notification at all.
- Send email and Marketplace notification when: Enables you to select to send the email to the Customer when the specified criteria are met. Available options include:
- Shipping Label is Created: Sends the email notification as soon as the label is created.
- The first of these conditions is met: Sends the email notification when the first of the selected conditions is met:
- This shipment first hits the mail stream: Notification is sent when the package is identified as active or in transit.
- Note: If the package is sent via an un-trackable carrier or service, this option is not viable. Therefore, you also have the option to set the notification to be sent when the label is created or when the first of the next two conditions is met.
- At a specific time on the ship date: Provides a Time field where you can specify the specific time of day (based on your account time zone) when the email notification will be sent.
- Number of hour(s) elapsed after label creation: Enables you to specify the number of hours after the label is created that the email notification will be sent.
- This shipment first hits the mail stream: Notification is sent when the package is identified as active or in transit.
- Delivery Notification Email: Enables you to select the email template to be used for the Delivery Notification.
- Blind Copy on Shipment and Delivery Email: Provides a field wherein you can list all of the emails you would like to be Blind Copied on shipment confirmation emails. (Use a comma to separate the email addresses).

Example of Emails Settings in ShipStation
Emails will be sent based on supported carriers and services. All other carriers and services would fall under the Un-trackable Carriers and Services referenced above. This page also provides a link to ShipStation’s Track Shipments Help Guide for further details.
-
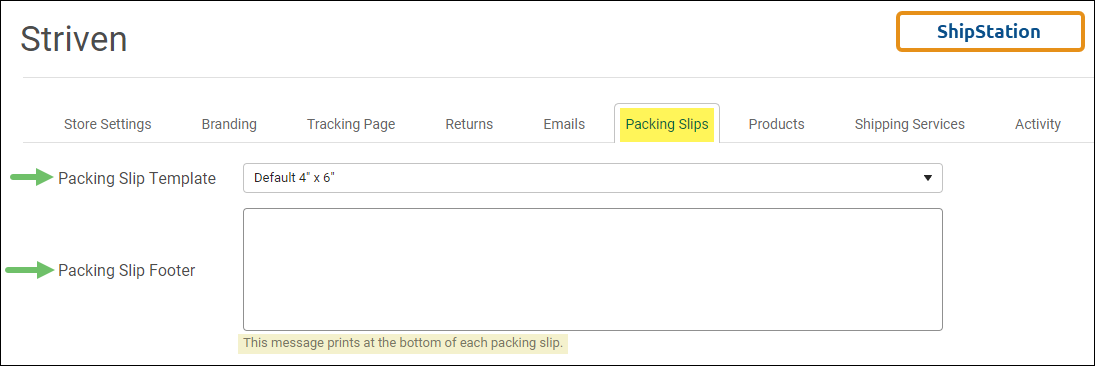
Packing Slips
The Packing Slips tab stores your settings for your Packing Slip Template, as well as the Packing Slip Footer message you wish to have displayed on the bottom of each packing slip.
Example of Packing Slip Settings in ShipStation
For further assistance, please review ShipStation’s documentation to Create Custom Packing Slips.
-
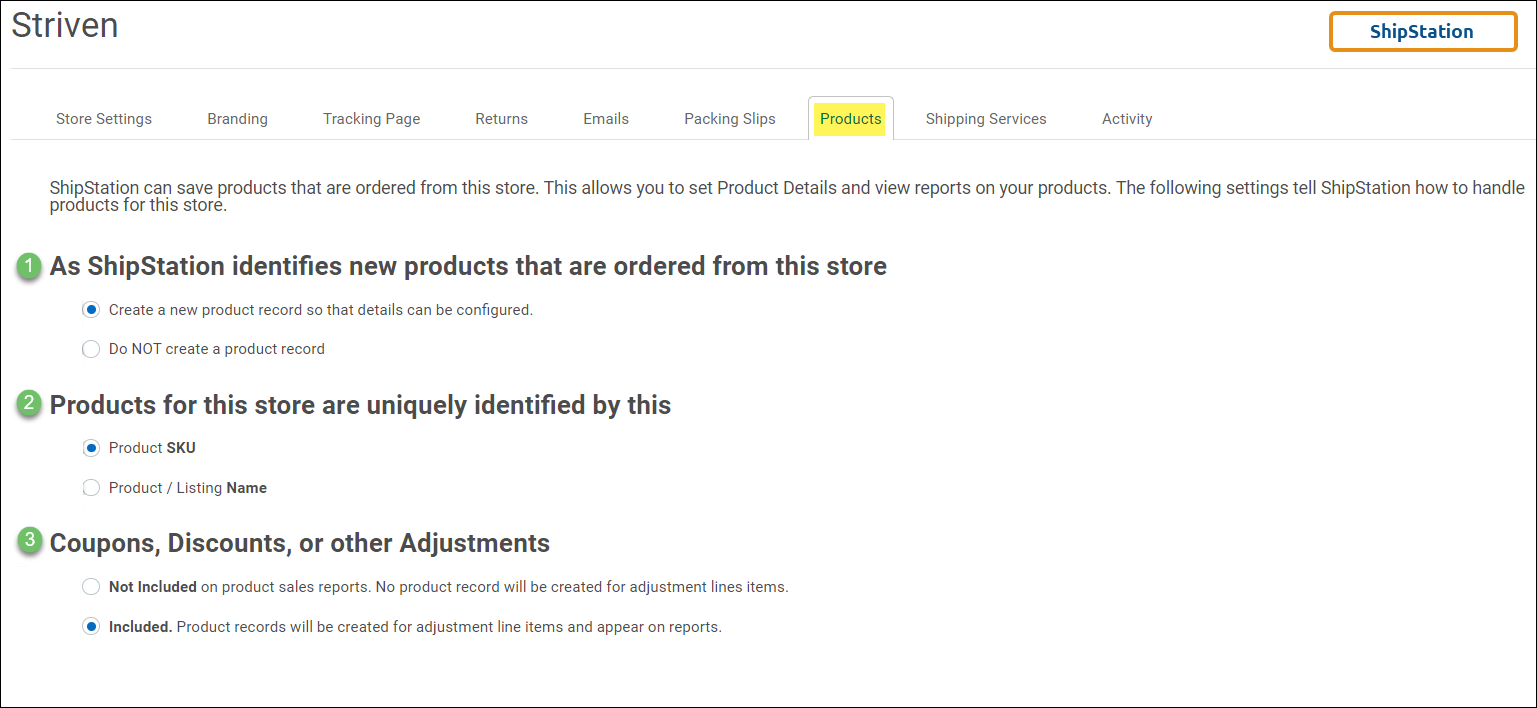
Products
ShipStation enables you to set Product Details and view reports on your products. The settings on the Products tab will tell ShipStation how to handle products for this store.
- As ShipStation identifies new products that are ordered from this store: Allows you to select what ShipStation will do when new products are identified on order from this store. The available options are:
- Create a new product record so that details can be configured.
- Do NOT create a product record.
- Products for this store are uniquely identified by this: Allows you to select how ShipStation will identify new products on orders from this store.
- Product SKU(This will be the Item Name in Striven).
- Product/Listing Name (This will be the Item Name in Striven).
- Coupons, Discounts, or other Adjustments: Allows you to choose how ShipStation will handle coupons, discounts, and other adjustments on an order.
- Not Included on product sales reports. No product record will be created for adjustment line items.
- Included. Product records will be created for adjustment line items and appear on reports.
Example of Products Settings in ShipStation
- As ShipStation identifies new products that are ordered from this store: Allows you to select what ShipStation will do when new products are identified on order from this store. The available options are:
-
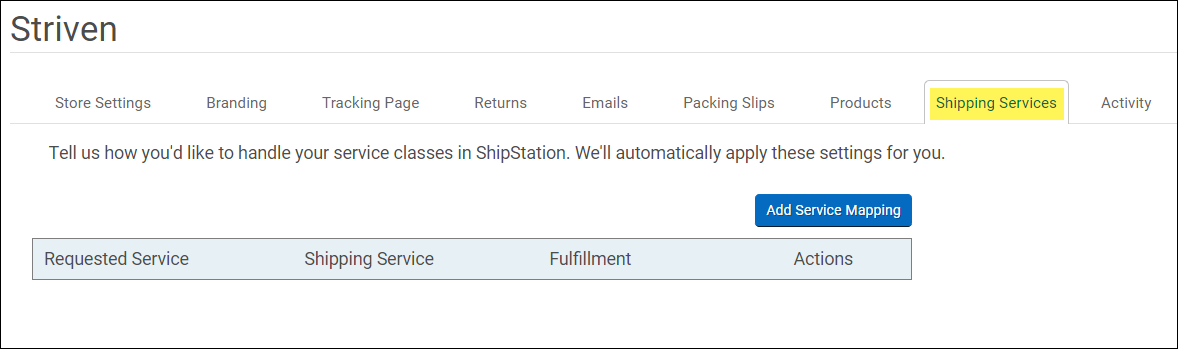
Shipping Services
On the Shipping Services tab, you will find the Add Service Mapping button where you will be able to add carrier services that are already created in ShipStation to the store channel. For further assistance, here is the link to the ShipStation documentation to Connect a Postage Provider and Edit Services & Package Types.
Example of Shipping Services Settings in ShipStation
The Shipping Services settings will be set simultaneously between Striven and ShipStation. Let’s begin by opening the Shipping Methods page in Striven.
The page can be found by navigating to:
Company → Settings → Accounting → Inventory → Items → Shipping Methods
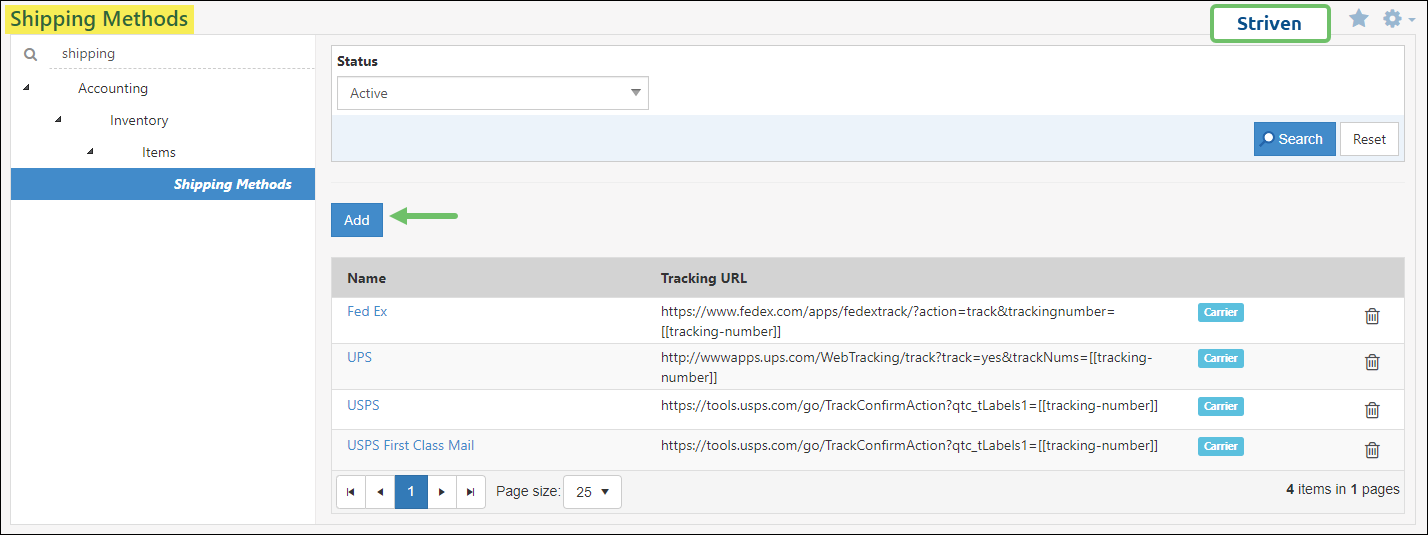
Example of Shipping Methods Settings in Striven
Clicking on the Add button opens the Add Shipping Method popup where you can enter a new shipping method and include the Tracking URL, Carrier Code, or look up the Code by clicking the Lookup ShipStation Codes link. The Lookup ShipStation Codes link will display the available Carrier Codes for ShipStation.
- Note: The Lookup ShipStation Codes link will only display if you selected to Enable Shipping Cost Calculations on the ShipStation Integration Settings page (at the beginning of this guide) and entered the relevant API Key, API Secret, Default Shipping Method, and Default Ship From Location.
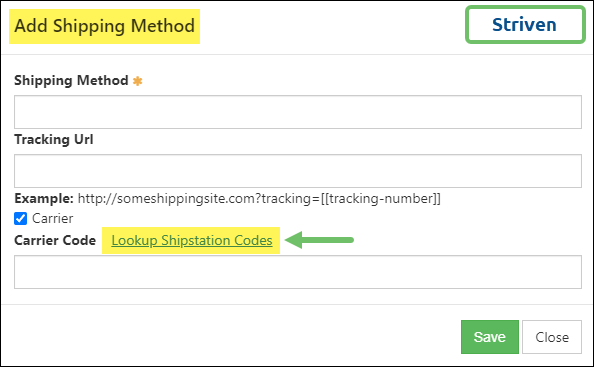
Example of Add Shipping Method in Striven
From the ShipStation Codes Lookup page, you will use the codes to fill in both the new Shipping Method in Striven as well as the Service Mapping in ShipStation for your Store Channel.
For demonstration purposes, this guide will use the Stamps.com Carrier information to go through the steps for this setup. To get started, click on the Get Services link for Stamps.com. This will display the services available and their related codes to use in ShipStation.
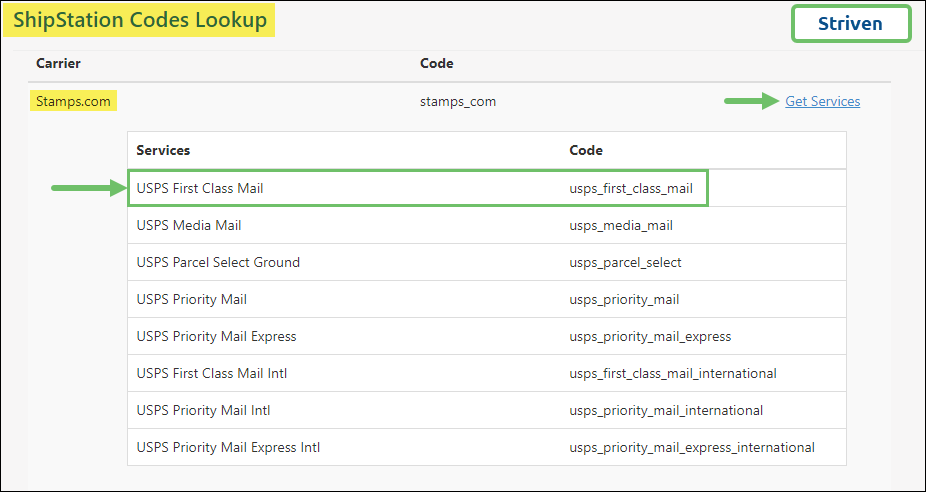
Example of ShipStation Codes Lookup in Striven
Add Service Mapping in ShipStation
Starting with the USPS First Class Mail option in the Services column in Striven, you will add this Service Mapping in ShipStation.
Click on the Add Service Mapping button on the Store Setup – Shipping Services page in ShipStation.
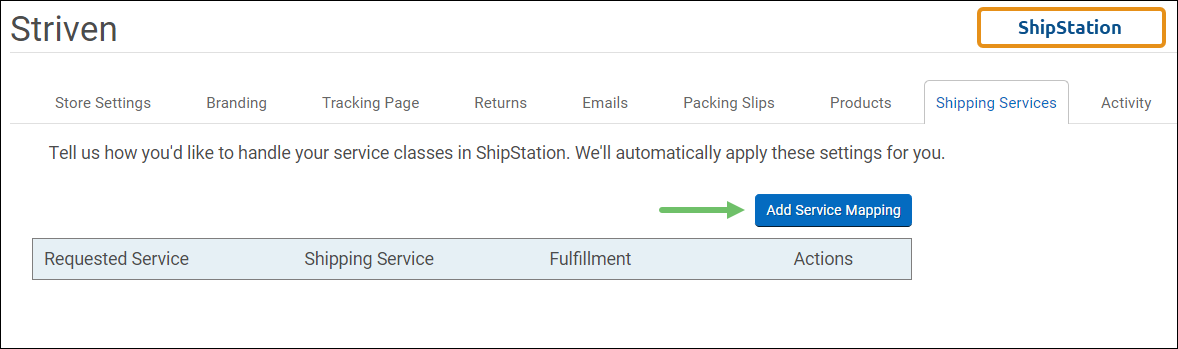
Example of Add Service Mapping Option in ShipStation
This will display the Add Service Mapping popup with the following options:
- Service Key: Should match the Service name from the ShipStation Code Lookup page in Striven (in this case, USPS First Class Mail).
- Fill Method: Offers the option for Shipping -OR- Fulfillment.
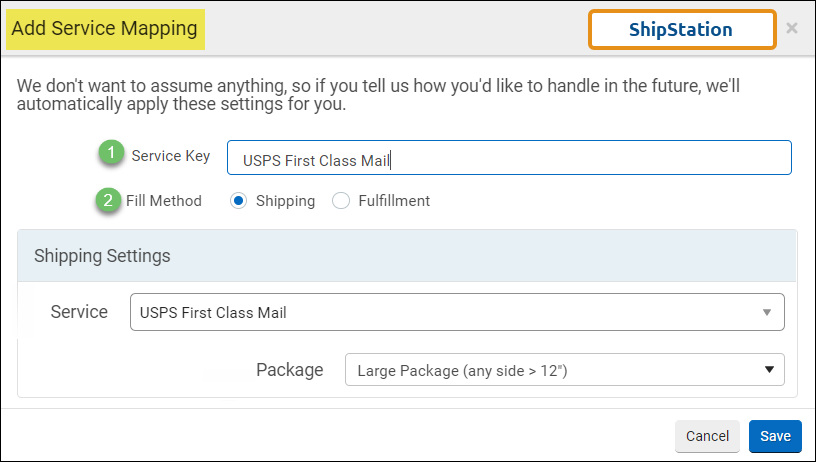
Example of the Add Service Mapping Popup in ShipStation
Under the Shipping Settings section, you’ll see the following options:
The Service field provides a drop-down list of options for the Service on the ShipStation Code Lookup page in Striven. From the list, you can select the service you wish to add. For purposes of this example, we’ll select USPS First Class Mail.
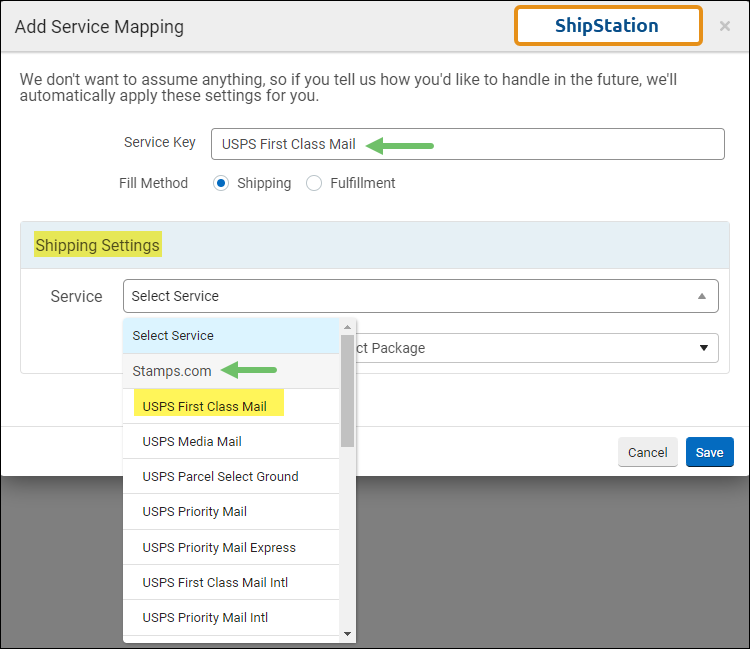
Example of Stamps.com Shipping Settings Option in ShipStation
The Package field provides a drop-down list of packaging options to choose from. Selecting one of these options sets the default packaging to be used for this service.
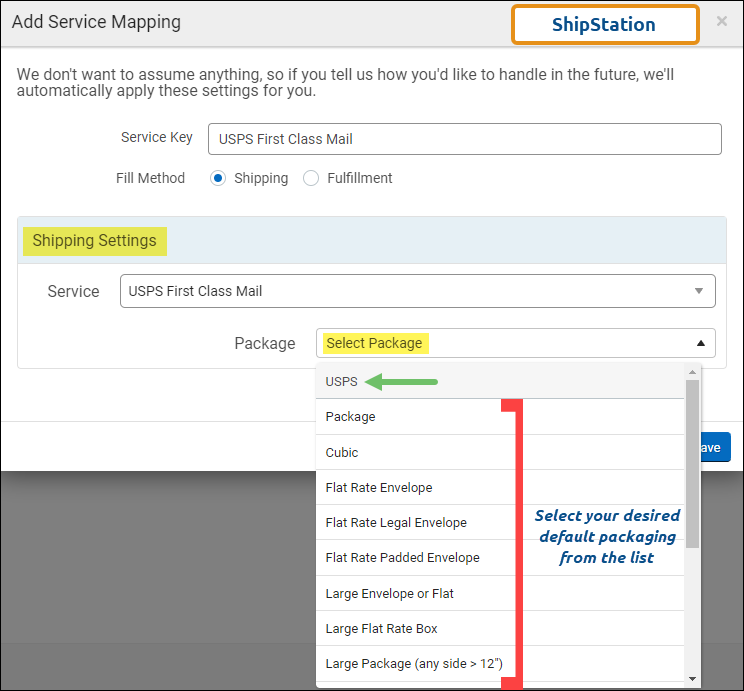
Example of USPS First Class Mail Service Options in ShipStation
Now you can return to Striven to continue the setup.
Add Shipping Method in Striven
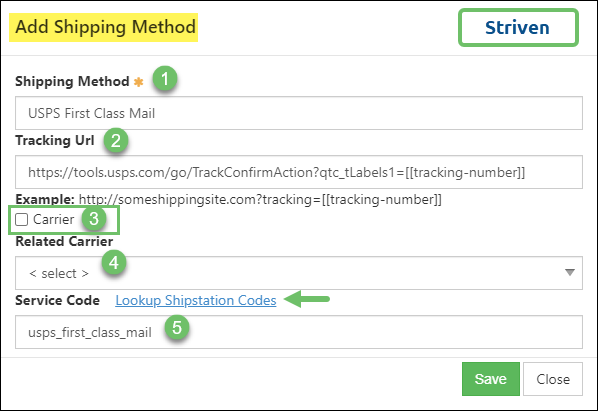
In Striven you’ll want to return to the Add Shipping Method popup from the Shipping Methods settings page you were viewing before. (This is the popup that displays the Lookup ShipStation Codes link). There you will see the following options:
- Shipping Method: Should match the Service name from the ShipStation Code Lookup page in Striven (in this case, USPS First Class Mail).
- Tracking URL: Enables you to embed the Carrier’s tracking link using the merge field [[tracking-number]] in the URL.
- Carrier: This checkbox identifies whether or not the shipping method is a Carrier. When checked, the method is a Carrier. When unchecked, the method is not a Carrier and can be associated with a Service Code.
- Related Carrier: Provides a drop-down of Carriers already configured in your Striven Shipping Methods.
- Service Code: Field in which to enter the Carrier Code from the ShipStation Code Lookup page in Striven for the related service. (For our example, it will be “usps_first_class_mail”).
Example of New Shipping Method Settings in Striven
That should be all the details needed to create your Service Mapping in ShipStation. You may also elect to add more Service Mappings as needed.
-
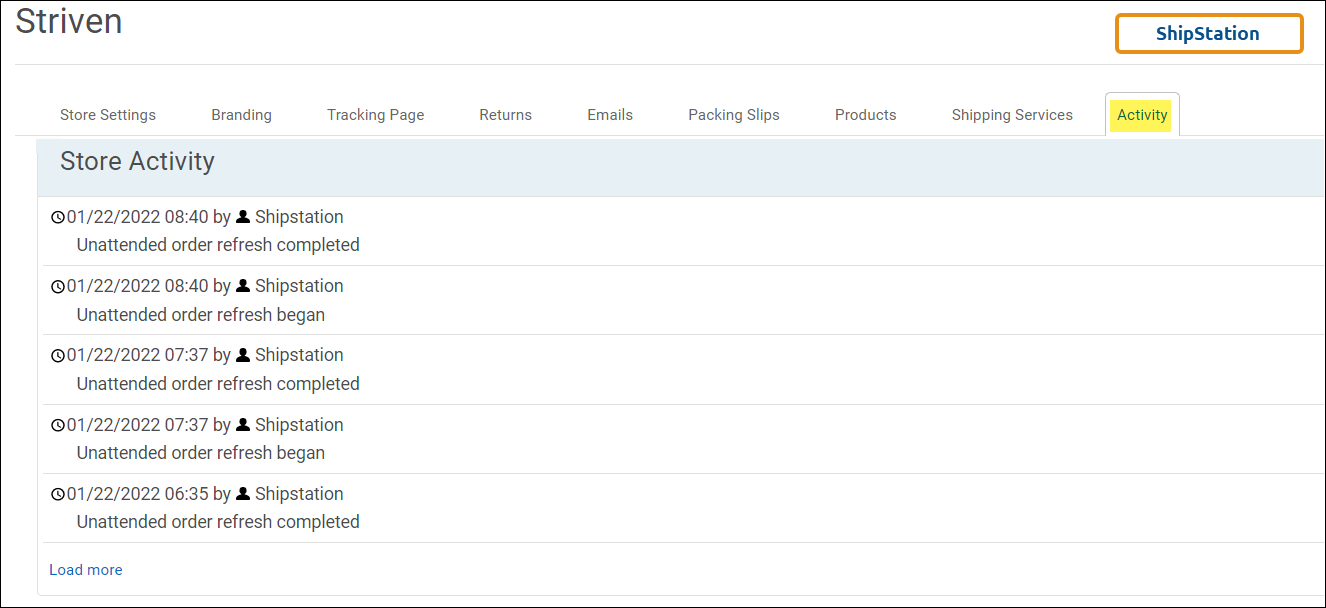
Activity
The last tab in the ShipStation Store Setup is the Activity tab. The information displayed on this tab will include all the audited activities made to your Store details.
The Store Activity Log contains a detailed history of each store’s update activity and documents a few changes that may have been made to the store connection itself. For further assistance, here is the link to the ShipStation documentation for Store Activity Log.
Example of the Store Activity Log in ShipStation