
Recruiting
Applications & Onboarding
Support Guide
-
Overview
Effectively managing the flood of applications is crucial to hiring success. When processing applications submitted by Candidates, you have access to a powerful suite of tools designed to streamline your workflow and ensure no top talent slips through the cracks. By utilizing the Recruiting Dashboard, the Application Queue, and the Application Trending Report, you can gain control over your hiring process. This guide will provide a detailed walkthrough, demonstrating exactly how you can effectively manage, process, and close Candidate applications from initial submission to final decision.
Read this guide if you are trying to:
✔ Process Applications in Striven and manage Candidate activities.
✔ Learn how to contact multiple Candidates at once using the mass email tool.
✔ Report on the analytics of trends occurring with Candidate applications.
-
Permissions
The following permissions will need to be configured for the Employee’s User Role if they will be processing Candidates or reporting on Candidates in Striven:
- “Candidate Tracking”
- “Candidates – Delete”
- “Candidates – Email”
- “Candidates – View Salary”
- “Application Trending Report”
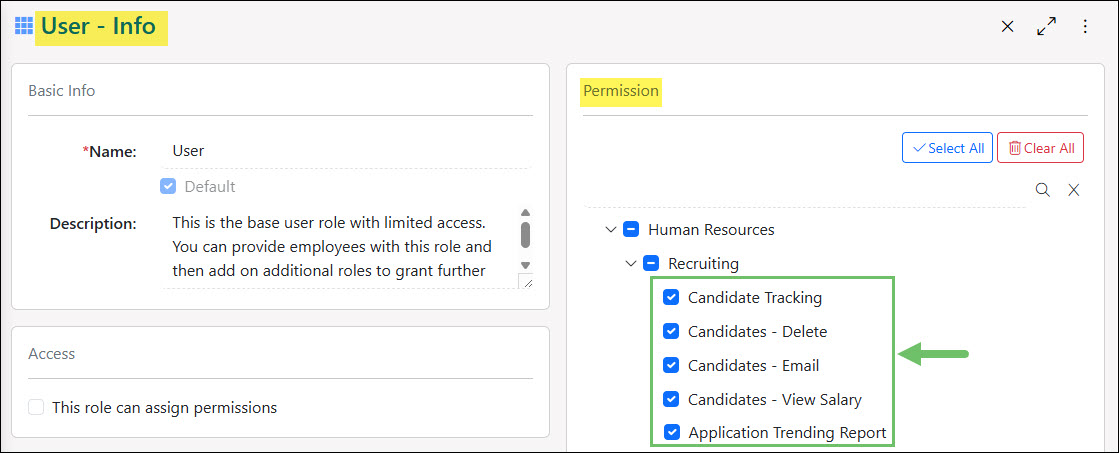
Example of Permissions Related to Processing Candidates and Reporting on Candidates

Learn more about managing User Roles and Permissions in Striven by reviewing the User Roles Guide.
-
Application Queue
The Application Queue is a very helpful tool that you can utilize to process Applications and communicate with Candidates all in one spot. You can also choose follow-up dates and enter notes to track progress as workflow continues. As steps are completed by either the Candidate or recruiter, the Job Steps will progress based on the Job Posting the Candidate is applying for until all steps are completed accordingly. Once all steps are completed, recruiters can close the Application and choose the result of the Application (Hired, Not Hired, etc.)
To view the Applications Queue, navigate to Employees → Recruiting → Process Applications.
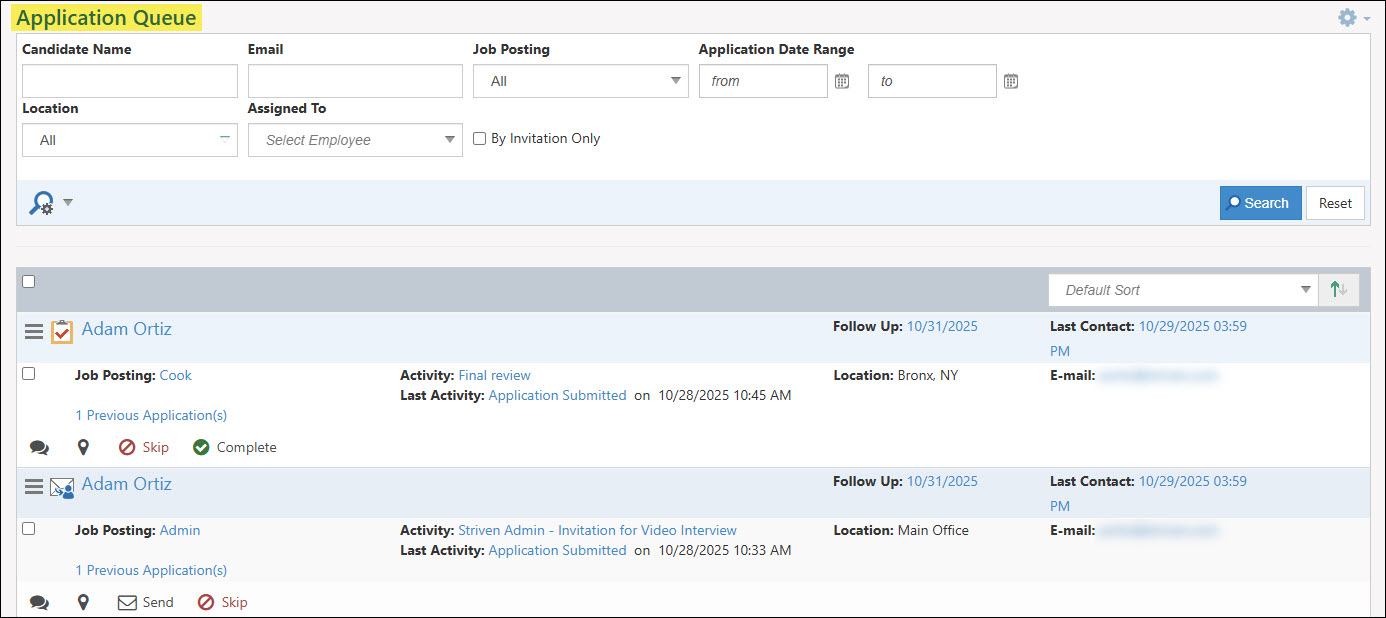
Example of the Application Queue
Below is a screenshot illustrating how the Application Queue appears and a description of what can be accomplished there.
- Actions: Contains a variety of actions for recruiters to use, including Create Appointment, View Application, Close Application, and more.
- Job Step Type: Indicates what type of Job Step the Candidate is on. Job Step Types include the following:
- Manual: Recruiters are responsible for these step types.
- Email: Recruiters are responsible for sending an email to Candidates.
- Feedback: Candidates are responsible for completing feedback.
- Documents: Candidates are responsible for uploading documents.
- Complete: Recruiters are responsible for closing Applications.
- Name and Job: Lists the names of the Candidate and job position.
- Step Actions: Allows recruiters to complete actions based on the Job Step. Available actions include the following:
- Message: Recruiters can message Candidates easily.
- Map: Displays the Candidate’s Location. This will search Google Maps for the Location of the Candidate on file.
- Send: Recruiters can send an email to the Candidate. Once a step has been sent to a Candidate, it cannot be undone.
- View: Recruiters can view uploaded documents. If attachments have been added, then a number will appear to indicate the number of attachments.
- Skip: Recruiters can skip the current step. This action cannot be undone.
- Complete: Recruiters can complete the current step. This action cannot be undone.
- Activity: Lists the current and last Job Step the Candidate is on. Clicking on the hyperlink will bring you to a list of all steps the Candidate is currently completing for the selected Job Posting.
- Follow-Up: Entering a follow-up date into the Candidates List is a fantastic way for recruiters to stay on top of their work. As long as the follow-up date is being entered with accurate dates, then sorting can be done based on these dates to get a working list for recruiters within your Company.
- Contact: Allows a recruiter to add in a note regarding the last correspondence they had with their potential hire. Once a note has been entered, the last contact date will update accordingly within the Candidate List. The note will also include who entered the note, as well as the date and time it was added to the system.
- Processing Options: Enables a recruiter to process steps in an Application either individually by checking the box related to the particular Candidate, or in bulk by checking multiple boxes to include multiple Candidates. There is even a checkbox at the top of the list to select all Candidates to apply the processing action to at one time. These processing options include:
- Send Selected: Sends the next available step to the selected Candidate(s).
- Skip Selected: Skips the next step in the Application Process for the selected Candidate(s).
- Complete Selected: Completes the Application Process for the selected Candidate(s).
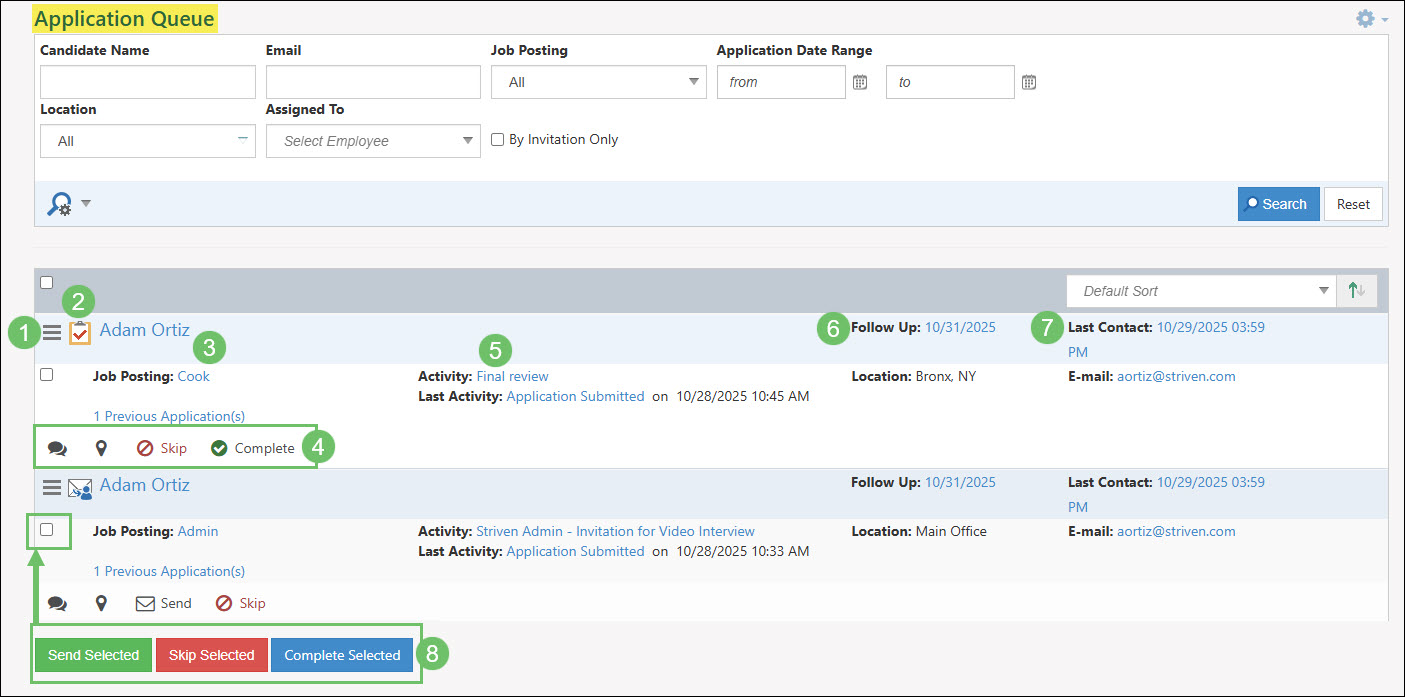
Example of the Actions and Information Available from the Application Queue
-
Recruiting Dashboard
The Recruiting Dashboard is a way for recruiters to manage Applications and Candidates. This Dashboard is separated into two columns, including Open Applications and To Dos. Open Applications lists how many Candidates have applied to individual Job Postings that are still open and To Dos lists how many Candidates are on individual steps of the Application process. By clicking on the Application name or the Job Step, recruiters will be able to view only the Candidates who have applied to those entities. These options will prefilter the Application Queue for a quicker search experience.
To view the Recruiting Dashboard, navigate to Employees → Recruiting → Dashboard.
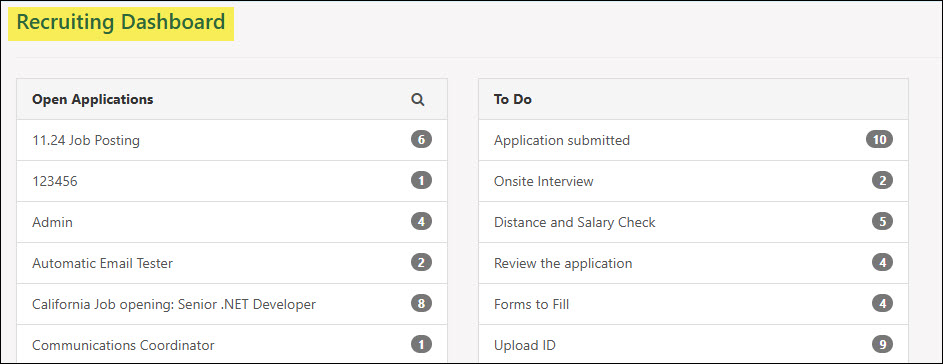
Example of the Recruiting Dashboard
-
Send Email: Candidates
The Send Email tool can be used to send important announcements and updates to many Candidates at once rather than individually. It is also an effective way to gather feedback from your potential hires using Surveying options.
To use the Send Email tool for Candidates, navigate to Employees → Recruiting → Email.
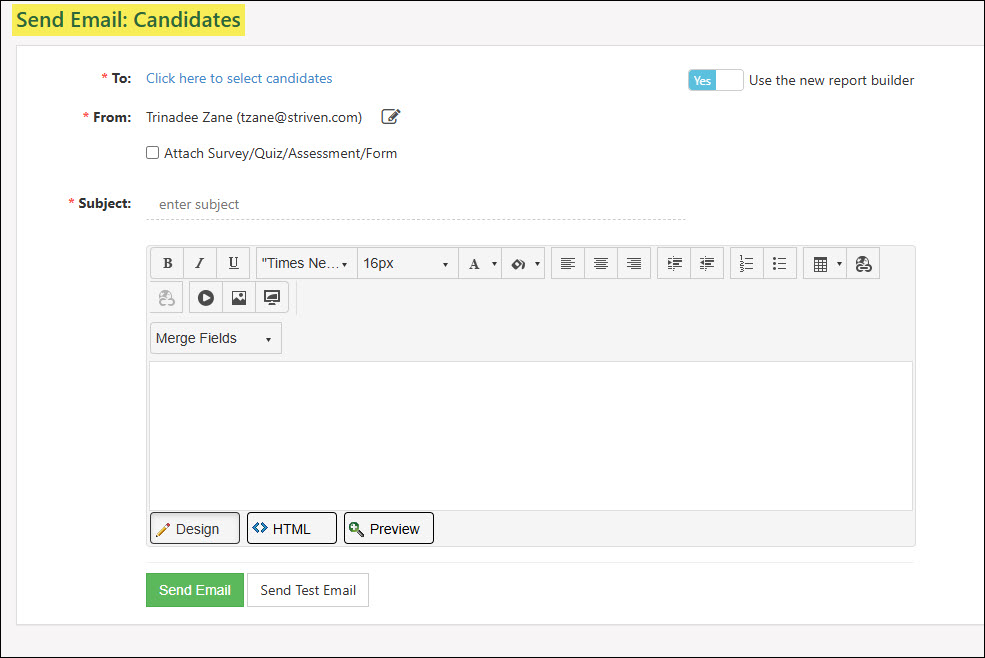
Example of the Send Email Tool for Candidates
Below is a screenshot illustrating how the Send Email tool for Candidates appears and a description of what can be accomplished there.
- To: Will open the Select Candidates popup window wherein you can set the filters to narrow down the results and select the recipients of your email.
- From: Populates the default sender as the logged in user’s name and email, however this can be changed by clicking the Edit icon on the right side of the field.
- Attach Survey/Quiz/Assessment/Form: Allows you to attach a Surveying option to your mass email. Once selected, you will then decide what type of surveying request is to be included in your email, such as Survey, Quiz, Assessment, or Form. Once the type has been selected, the specific Survey/Quiz/Assessment/Form can be chosen.
- Note: If you are attaching a Surveying option to your email, the merge field will need to be added for the Candidates to gain access.
- Subject Line: Enables you to enter a headline to describe the purpose of the email to the recipient.
- Message Content: Allows you to customize content that you wish to send to your Candidates. It is recommended to format these emails, including the appropriate merge fields when possible, to convey the most accurate information.
- Send Email/Test Email: There are two (2) options to choose from when you are ready to send your email to your Candidates:
- Send Email: If you prefer, you can just send your email directly to the designated recipients.
- Send Test Email: If you wish to have a test email sent to yourself first, choose the Send Test Email button. This will allow you to preview how your email will display to a Candidate and see their information merged into the email.

Example of the Information and Actions Available with the Send Email for Candidates
-
Application Trend Report
A helpful report recruiters can run is the Application Trending Report. This report shows all of the advertising sources that your Company is utilizing to attract Candidates and how many Applications come from each source. With this report, recruiters can better determine what advertising sources are working and which ones are not.
To use the Candidate Application Trend Report, navigate to Employees → Recruiting → Trends.
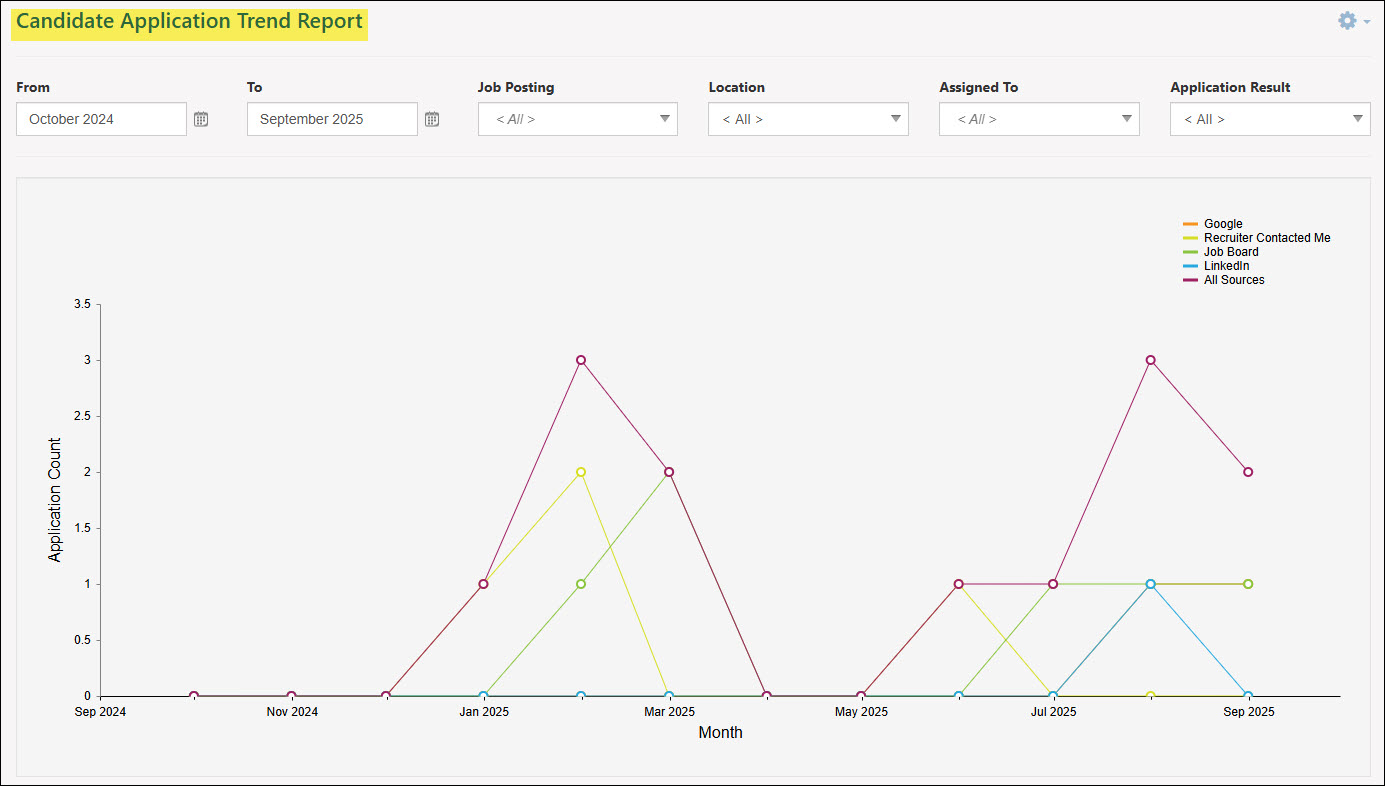
Example of the Candidate Application Trend Report
Below is a screenshot illustrating how the Candidate Application Trend Report appears and a description of what can be accomplished there.
- From/To: Adjusts the report based on a specific starting and ending month and year.
- Job Posting: Updates the report to display results based on a specific Job Posting that Candidates had applied for.
- Location: Changes the report to display results based on a specific location where Candidates applied to.
- Assigned To: Adjusts results in the report based on the recruiter that was assigned to the Job Postings that Candidates had applied to.
- Application Result: Will only show results in the report based on a specific result that was selected for closed Applications that Candidates applied to.
- Report Results: Displays results based on the search filters that are selected from the top of the report.
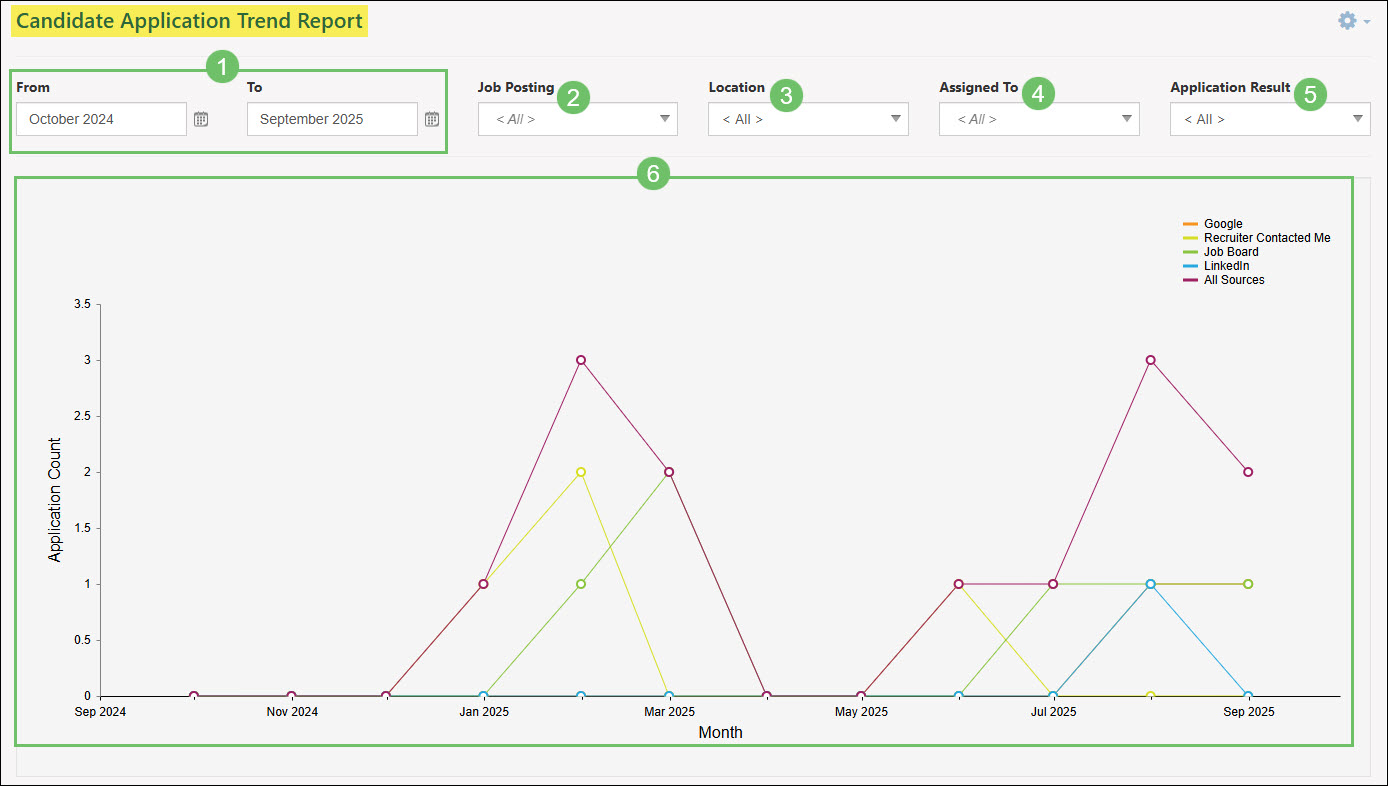
Example of the Actions and Information Available from the Candidate Application Trend Report
-
Recap
So with this guide, we’ve discovered how to gain control over your hiring workflow by leveraging essential tools like the Recruiting Dashboard, the Application Queue, and the Application Trending Report to manage the volume of submissions efficiently. We’ve also learned how to streamline the entire application lifecycle, ensuring you can effectively spot top talent and process applications without missing crucial steps. And finally, we reviewed steps for managing, processing, and closing Candidate Applications, providing a detailed walkthrough from a candidate’s initial submission all the way through to the final decision.

Have a Question?
Ask the Striven Community
User-sourced how-to’s, feedback, and more!
FAQs
-
I accidentally completed a recruiting step from the Applications Queue. How can I undo this step?
Since recruiting steps are taking an action which can include sending an email to the potential Candidate, steps completed cannot be undone. If needed, you can send a follow up message or email to your Candidate to explain the mishap and inform them of next steps to be taken.
-
We want to send out Welcome emails as part of the onboarding process when we create the Employee file in our system. How can we do this?
A Welcome email is automatically generated for each Employee when their Profile is initially saved. This email can be resent from the Employee Info page as well so the Employee can use the link within to sign into Striven.
-
How can I make the Application Queue only show Job Postings that I am assigned when I navigate to the queue?
Using the Saved Search option is a great tool for this. After you have updated the Assigned To search filter on the Application Queue, click the small down arrow underneath the search filter area and choose to Save This Search. Marking the Saved Search as the Default will make sure every time you access the Applications Queue only your Job Postings will be listed and others will be filtered out.

Example of the Saved Search Option from the Applications Queue