
Customers
Customer/Vendor Management
Support Guide
-
Overview
Customer/Vendor Management in Striven allows Companies to track information for each Customer/Vendor, including but not limited to Contacts, Sales, document storage, A/R and/or A/P History, and much more. This guide will explore how you can best manage individual Customers/Vendors while also report on the data in Striven.
Read this guide if you are trying to:
✔ Navigate Through Customer/Vendor Information.
✔ Tracking Customer-Related Work.
✔ Report on Customer Financial Information & Transactions.
-
Customer/Vendor Management
Once you have selected a Customer/Vendor from the List view, there is an abundance of information about them available within the Customer/Vendor Summary Dashboard view and then by drilling into the details in each individual page. The information stored within your Customer/Vendor record is listed below.
-
Customer/Vendor Navigation
Striven has helpful tools and features to make navigating through a Customer’s/Vendor’s account easy. All of your Customer/Vendor information is easily viewable through the use of the Customer/Vendor Navigation Waffle Menu on the Page Title Bar at the top left of the page.
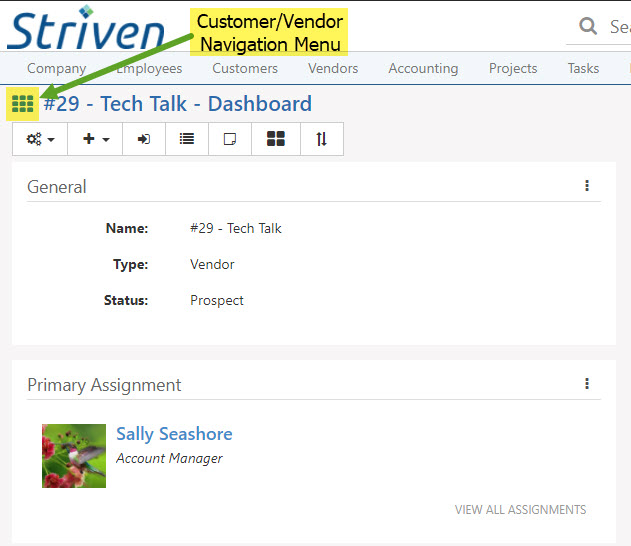
Example of the Customer/Vendor Navigation Menu

Customer Navigation
First we’ll look at the Customer Navigation Waffle Menu. This includes links to the various areas of information related to your Customer. These options include:
- Dashboard: Opens the Customer Dashboard to view Customer Info, AR Summary, Tasks, as well as any other Dashboard Widgets you have configured to show on the page.
- Contacts: Opens the Customer Contacts page to view all Contacts related to the Customer’s account where you can add new Contacts or associate existing Contacts to the Customer.
- Locations: Displays the list of Customer’s Locations page wherein you have the ability to add new Locations, edit existing Locations, or deactivate a Customer’s Locations.
- Assignments: Navigates you to the Customer’s Assignments page. On the left side of the screen is a menu bar with options to view Assignments related to the Customer, or Assign the Customer to another entity in your Striven system.
- Opportunities: Loads the Opportunities List for your Customer.
- Sales Orders: Displays the Sales Orders List for your Customer where you can search for, view, and edit existing Sales Orders for your Customer, or you can create a new Sales Order.
- Financial: Opens the AR Transactions List. On the left side of the screen is a menu bar with options to view the Customer’s Transactions, Financial Summary, Monthly Statements, Preferred Vendors, or Payment Profile.
- Note: If your Customer is also a Vendor, both AR and AP Transactions are available on this page.
- Projects: Loads a page listing the Projects related to the Customer where you can search for, view, edit or add Projects related to the Customer. Other options exist here to create Orders, create Opportunities, or view a Burndown Report.
- Tasks: Displays the Customer’s Task List.
- Assets: Navigates you to the Customer’s Asset List with options to add or import Assets and create Asset Labels, as well as search for, view, or edit existing Assets.
- Hub: Brings you to the Customer’s Hub.
- Collections: Opens the Customer’s Collections Info page where you can view the A/R Log, view the Collection Log, send notices, or reset Collections.
- Surveying: Navigates you to the Customer’s Surveying options, which include a menu on the left side with links to Surveys, Quizzes, Assessments, and Forms.
- Communications: Brings you to your Customer’s Email Log by default, with options to view Discussions, Calls, Appointments, and the Service Metrics Report.
- Settings: Opens your Customer Settings page. Here you can view or edit your Task Settings, AR Notifications, Price/Cost List, Terms & Conditions, and Service Metrics by clicking on the appropriate left side bar menu option.
- Links: The bottom section of the Customer Waffle Menu houses various integrated Links that can be used to find more information about your Customer, including options like a Google search button, Hoover business directory, and the Manta small business directory. When clicked, each link will use the Customer’s information to search.
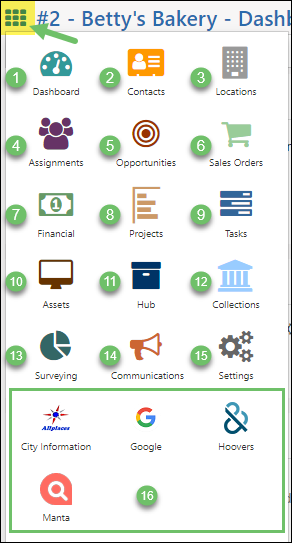
Example of Customer Navigation Waffle Menu
Vendor Navigation
The Vendor Navigation Waffle Menu is similar to the Customer Waffle Menu, except for the absence of the Sales Order option, and the addition of the Purchase Order menu option.
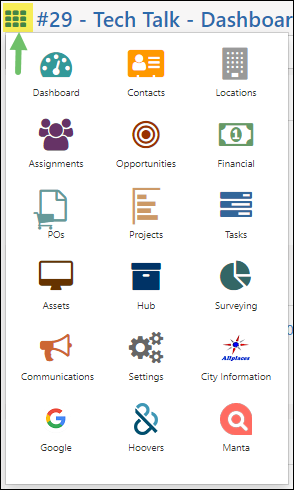
Example of Vendor Navigation Waffle Menu
-
Actions
By clicking on the Actions Menu button, there are important functions that can be completed there. The actions have been listed below:
- Add/Edit Customer/Vendor Note: Displays anytime an action is to be taken for the Customer/Vendor such as adding a Task, creating an Order or Invoice, and more. This is a convenient way to keep all Employees informed of important information regarding the Customer/Vendor. This can also be set from the Set Alert! Message button on the Customer Info page.
- Merge Customer/Vendor: If two Customers/Vendors have been added to the system by mistake, merging them together will combine their data into one account. This will copy over any Transactions, Contacts, and more to allow for clean Customer/Vendor Lists.
- Update Status: Allows you to change the Customer’s/Vendor’s status. Choosing the status can be done right from the Customer’s Dashboard and is a quick and easy way to update as needed. These options include marking the Customer as Prospect, Active, Lost, or Deleted.
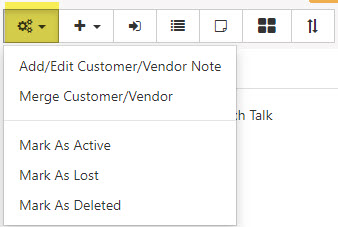
Example of Customer/Vendor Dashboard Actions Menu
-
Customer/Vendor Info
Knowing where to find general information, Contact information, or financial information regarding your Customers/Vendors is important when trying to keep a steady workflow. This is why general and financial information about your Customers/Vendors can be found on the Customer/Vendor Dashboard using specific widgets for those purposes.
The example below displays a Customer Dashboard with widgets displaying some of this important data and demonstrates how easily you will be able to find his information quickly just by glancing at your Customer/Vendor Dashboard.
- General widget: Houses your Customer’s Name and Number, Type, and Status. This widget is on all Customer/Vendor Dashboards by default. To edit the Customer’s general information, click on the small Edit button (highlighted in the image) in the top right corner of the widget.
- Note: This Edit button will only display when your cursor is over the widget you’re trying to edit. If there’s no Edit button when you hover over a widget, you will not be able to edit the information provided by the widget in this way.
- Contact Information widget: Houses the Customer address, phone number, and website information. You can edit or delete this information using the Edit button. See below for further information regarding International Phone Numbers in Striven.
- Financial widget: Houses more specific financial information for the Customer, such as their TIN Type, TIN (Tax ID Number), Credit Limit, Payment Terms, Tax Exemption, and Currency. All of these fields can be edited, except for the Currency field if transactions, Sales Orders, Purchase Orders, or Payment Profiles have already been related to the Customer. This widget will also contain the setting to mark all new Sales Orders and Invoices To Be Printed by default.
- Other widget: Houses information about the Customer such as their Industry, Category, Active Since date, Preferred Ship Via, and a description of their business.
- Primary Contact widget: Displays the Primary Contact associated with the Customer, along with their Contact information as saved in the system. This widget has some additional features, such as a hyperlink to the Contact’s email address, a Discussions (double-bubble) icon to start a new Discussion thread with them, and a link to View All Contacts related to the Customer.
- If you hover your cursor over the Contact’s name, you’ll see the hover menu with options to see a Viewed By log, an link to share the Contact’s information, or a cabob menu with links to the Contact’s Info, Hub, Asset Associations, and Portal settings.
- Primary Assignment widget: Displays the Primary Assignment associated with the Customer, along with their Category. There is also a link to View All Assignments which will display a list of Assignees related to the Customer.
- This widget also has a hover menu with the same options as the Primary Contact’s widget.
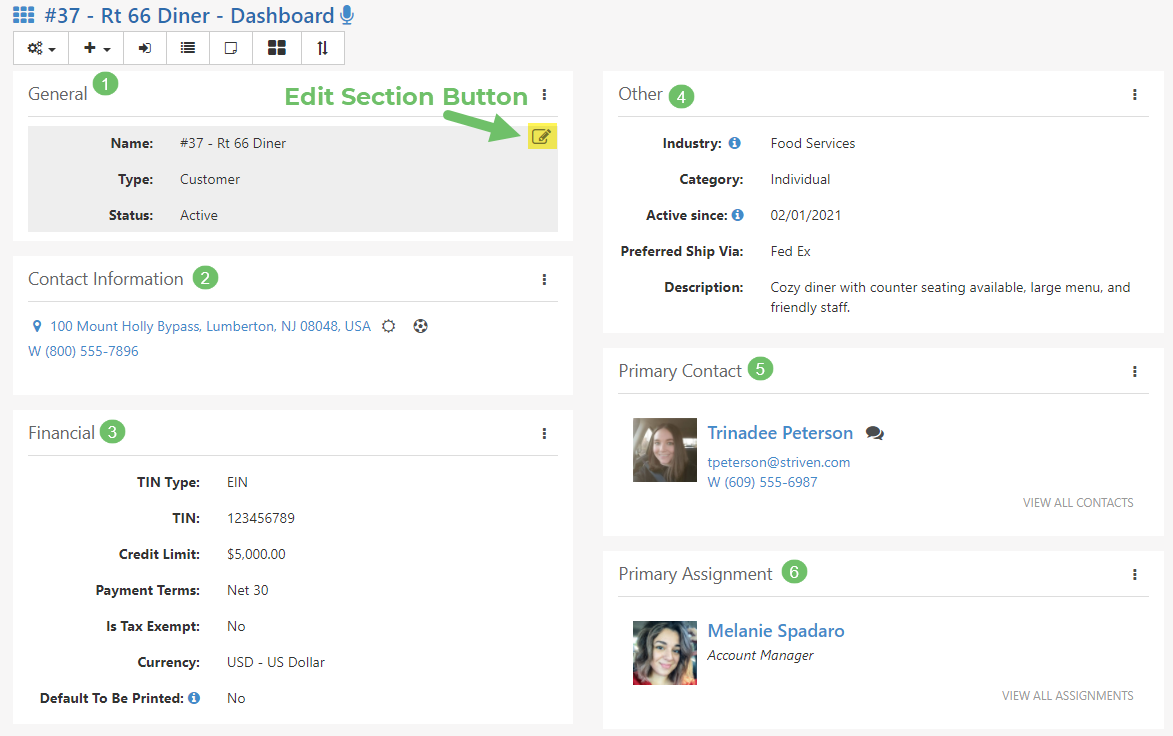
Example of Customer Info Dashboard Widgets
International Phone Numbers
This feature displays a Flag icon along with the phone numbers throughout Striven. Clicking on the Flag will provide the selection of Country Dial Codes to choose from when entering a phone number.
When adding a new phone number in the system for an Employee, Customer/Vendor, Contact, etc., the default Country Dial Code will automatically populate to match the system’s default, but can be changed to the actual Country Dial Code for the entity being entered.
- Note: If a Customer/Vendor, Contact, or Employee already has an address entered for them, the Country Dial Code will default to match the country of the address.
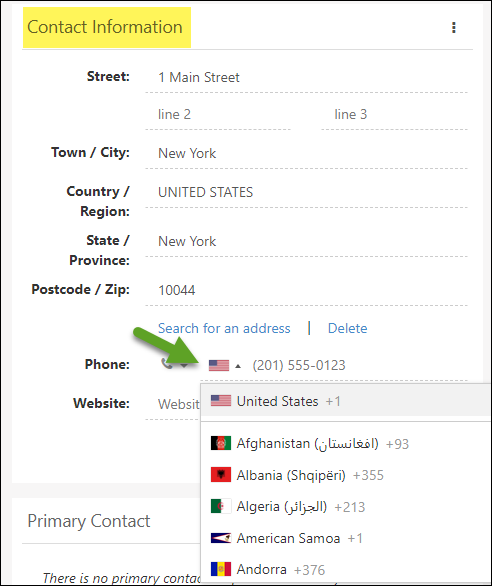
Example of Flag Icon when Entering a New Phone Number
Additional phone numbers will display in either the national or international format to distinguish between them.
- General widget: Houses your Customer’s Name and Number, Type, and Status. This widget is on all Customer/Vendor Dashboards by default. To edit the Customer’s general information, click on the small Edit button (highlighted in the image) in the top right corner of the widget.
Customer/Vendor Locations
-
Locations Page
The Locations Info page lists each Location that has been created for the selected Customer/Vendor within Striven. Clicking on a Location Name will bring you to more information about the Location with additional left side menu options detailed below.
- Note: Viewing an individual Locations Info page will allow you to determine if it is the default Bill To, Ship To, or the Primary Address for the Customer/Vendor.
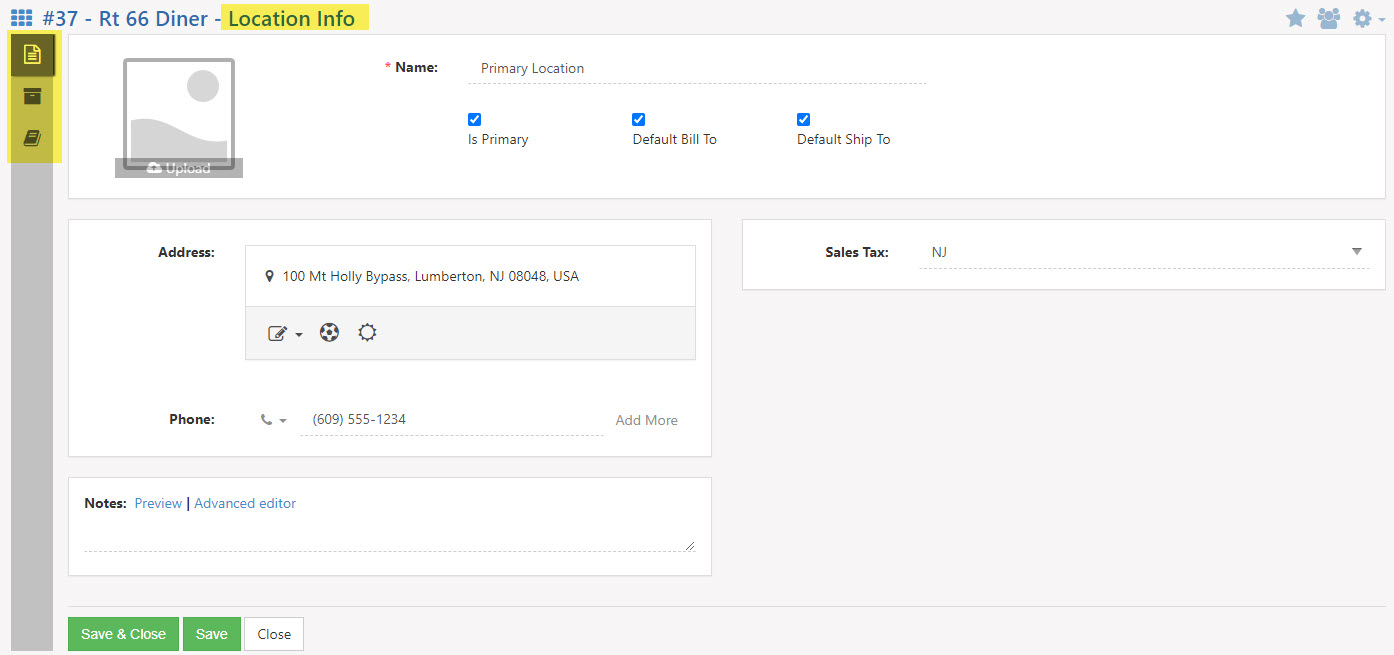
Example of Locations Info Page
-
Locations Hub
Any documents that are to be stored with regard to the Location can be stored within the Location’s Hub for convenience. To learn more about Hub, please visit the Hub Guide.
-
Asset Association
Any Assets that have been associated with the selected Location will be listed within this page. To learn more about how to set up and manage Customer Assets, please visit the Customer Asset Management Guide.
-
Location Settings
If the selected Location would not receive the tax that is set against the address entered, then an override option can be selected here. Striven will set the tax rates according to the Location selected unless an option is selected within these settings. To learn more about how to set up Tax Agencies within your Striven system, please visit the Accounting Setup Guide.
Customer/Vendor Assignments
-
Assignments Page
The Customer Assignments section shows internal Employees, Pools, or Teams in your Striven system that have been assigned to the Customer/Vendor along with accounts that have been assigned as well. There is also a Globe icon that indicates whether or not the Assignment is visible on the Customer/Vendor Portal or not. A gray globe indicates that the Assignment is not visible, while a blue globe indicates that the Assignment is visible on the Customer/Vendor Portal. Below is a screenshot of a Customer Assignments page. If you would like to learn more about Assignments in Striven, please review the Assignments Guide.
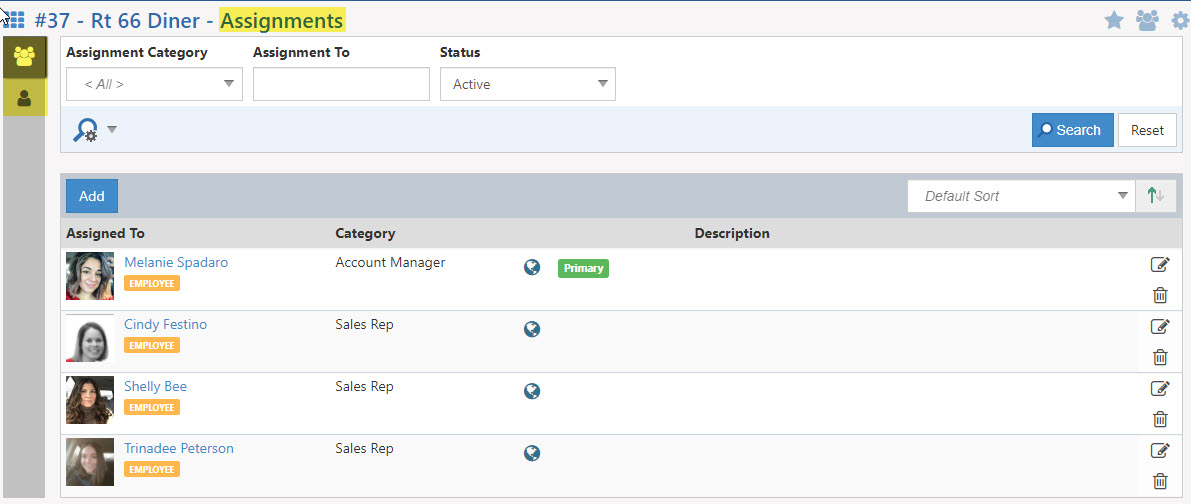
Example of Customer Assignments Page
Customer Assignment Level Security
Striven’s Customer/Vendor Assignment Security feature allows for sales representatives to only access Customers they have been assigned to manage.
- This feature can be enabled within the Customer/Vendor Settings and is turned off by default.
- Note: Once enabled, an additional option will appear to Default all new Customers/Vendors to limit access based on Assignments to automate the restriction.
- An option to have a default Assignment based on who is creating the Customer/Vendor is included on the Customer/Vendor Settings page, which allows you to select which Assignment Category should be set during this process.
Example of Customer/Vendor Settings
- Once this feature has been enabled within the settings, each Customer will have an option within their Assignments Page to Limit access to this Customer/Vendor based on Assignments below.
- Note: Users with the permission “Customer/Vendor: Access All” will be able to view all Customers/Vendors regardless of this configuration.
- If a user who does not have access to view all Customers/Vendors selects to limit access to a specific Customer, they will be warned if they will lose access based on their current Assignments.
- When access is limited, this will also affect the Customer/Vendor list when selecting on entities such as Tasks, Opportunities, etc.
- If a user navigates to a Customer they do not have access to, they will receive a message letting them know the “Customer/Vendor Not Found” which states the Customer/Vendor does not exist or the user does not have permission to view.
- Note: If the Customer/Vendor access has been removed after a user has already viewed the account information, it will appear within their Customer/Vendor list as most recently viewed.
Example of a Customer’s Assignments Page
- This feature can be enabled within the Customer/Vendor Settings and is turned off by default.
-
Assigned To
If any of your Striven Assignment Categories have been configured to have an account assigned to another account, they will be displayed within this list for convenience. This allows you to quickly access the Customers/Vendors that the account is assigned to currently.
-
Customer/Vendor Security Based on Assignments
Striven has the functionality to limit access to your Customers/Vendors based on their Assignments. In other words, only those Assigned to your Customer/Vendor will have access to their information in your Striven system.
There are 2 settings involved in managing this type of access:
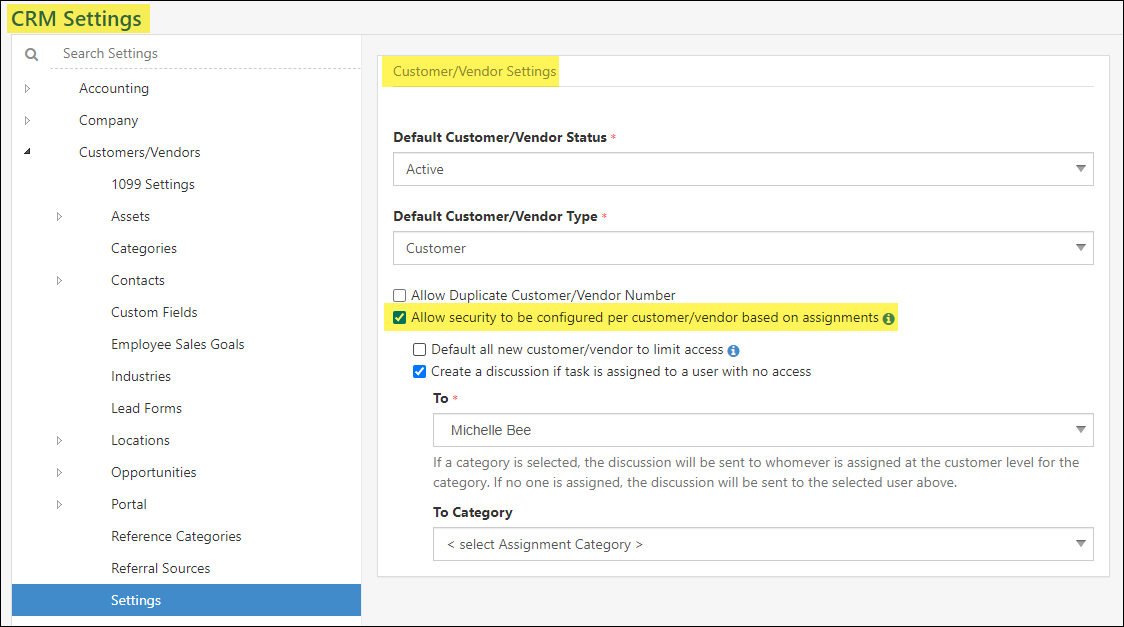
- The settings to Allow Security to be configured per Customer/Vendor based on Assignmentscan be found by navigating to: Company → Settings → Customers/Vendors → Settings.
Example of the Customer/Vendor Security Based on Assignments Settings
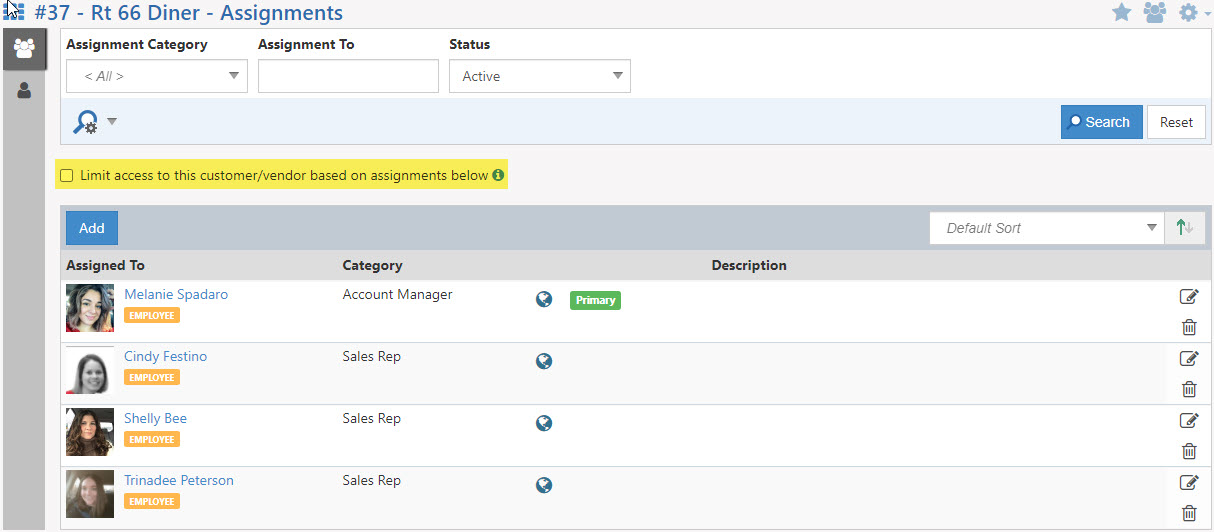
- The settings to Limit Access to the Customer/Vendor based on Assignment can be found on the Customer’s Assignments Page.
Example of Limit Access to Customer/Vendor Based on Assignments Setting
- Note: Any users with the permission “Customer/Vendor: Access All” will still have access to ALL Customers/Vendors, regardless of these security settings. The “Access All” permission will override these access settings.
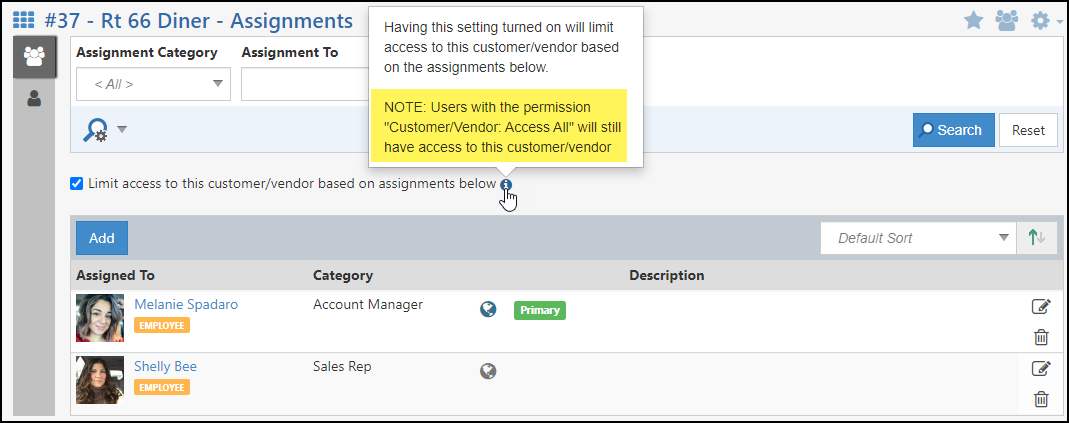
Example of Note Regarding “Customer/Vendor: Access All” Permission
-
Assigning Tasks with No Access
When the Customer/Vendor access is limited based on the Assignments and if a particular Customer/Vendor has the Limit Access option enabled, assigning a Task to an Employee who is not assigned to that particular Customer/Vendor will trigger a warning message that the Assignee will not have access to the Task because they are not assigned to the Customer/Vendor.
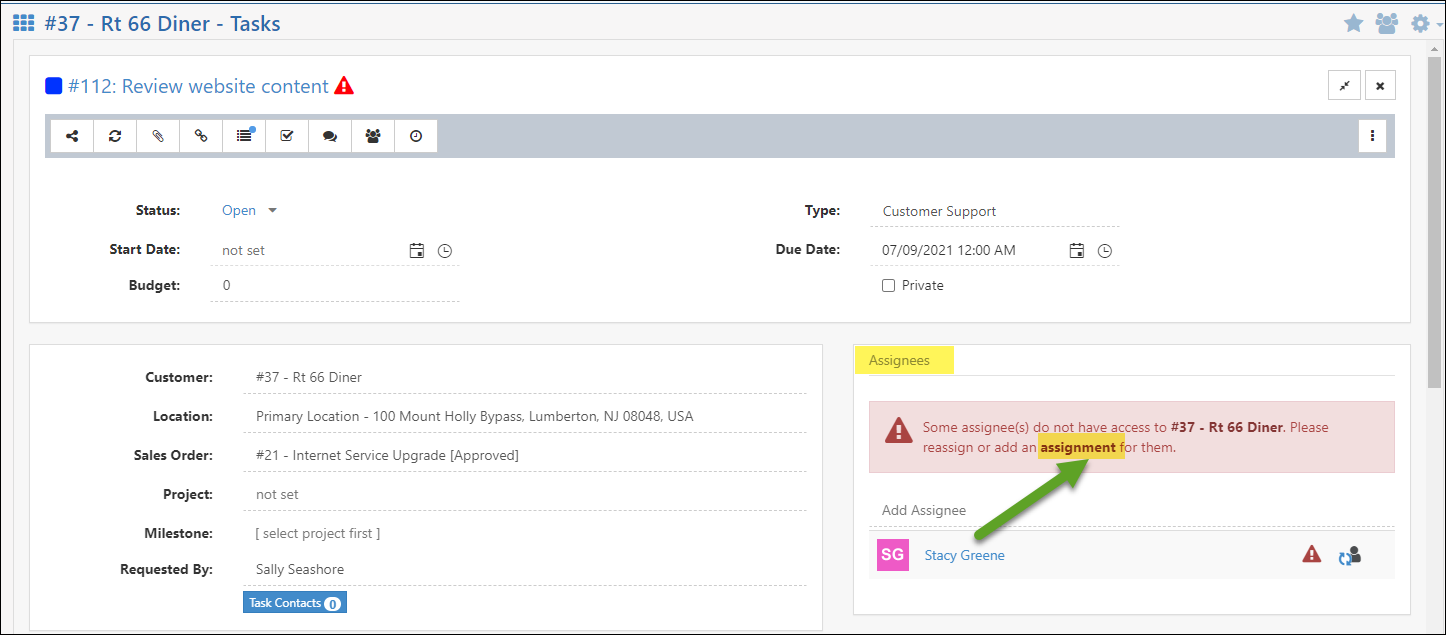
Example of No Access Warning Message with Link to Customer/Vendor Assignments Page
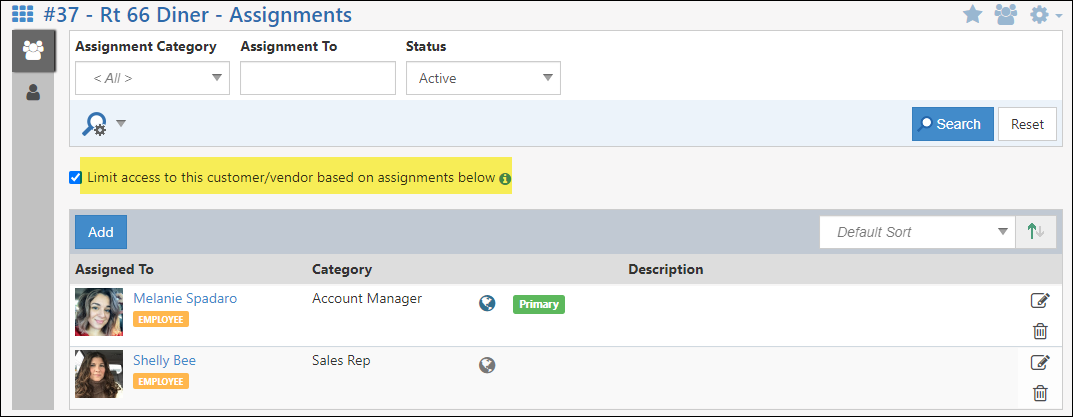
This warning message provides a link to the Customer/Vendor’s Assignments page where you can add that Employee as an Assignment.
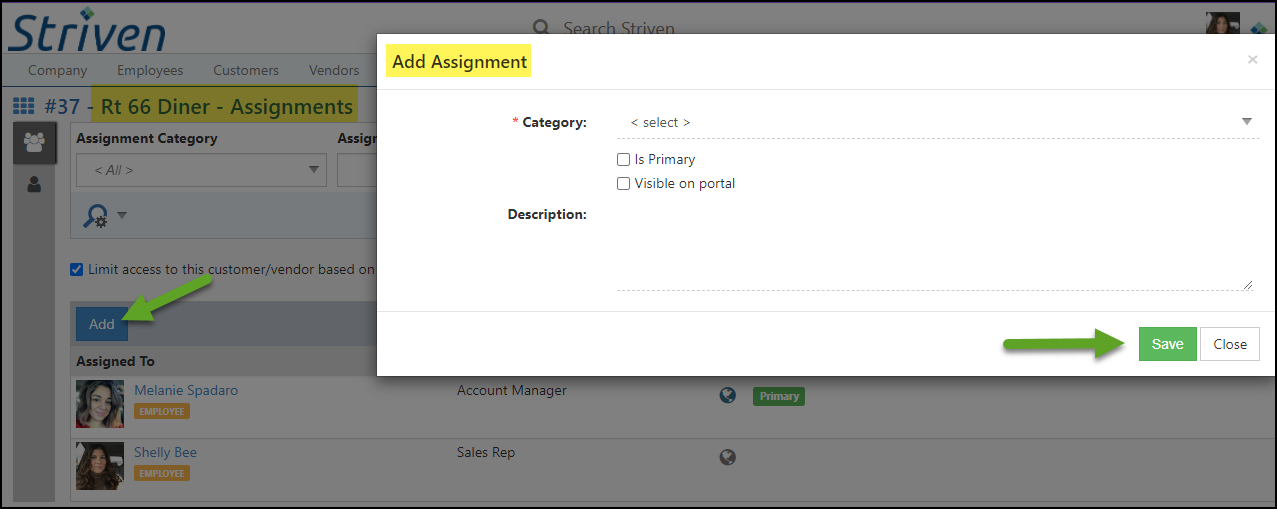
Example of Adding an Assignment to a Customer/Vendor
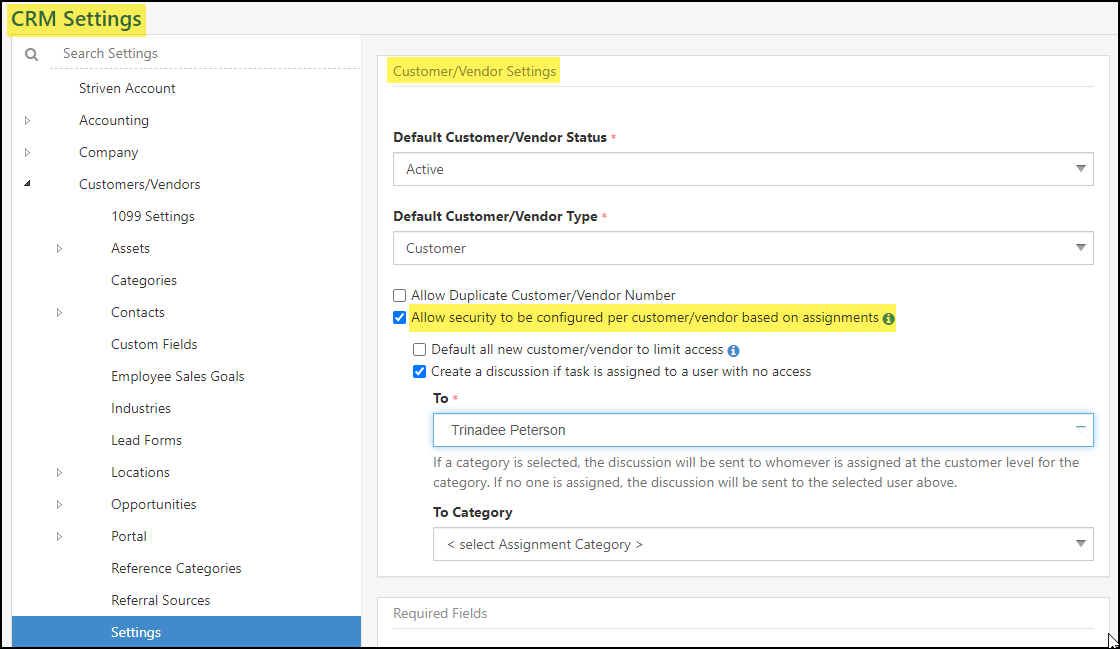
As long as the option is configured in your CRM settings, this warning message will also create a Discussion message for the person set in your system to receive a notification if a Task is assigned to a user with no access.
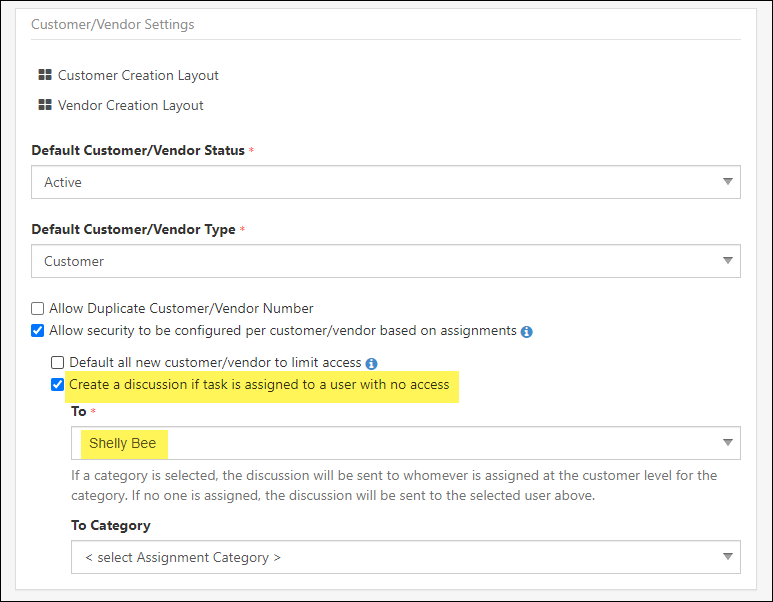
Example of Customer/Vendor Settings to Create Discussion for No Access Task Assignment
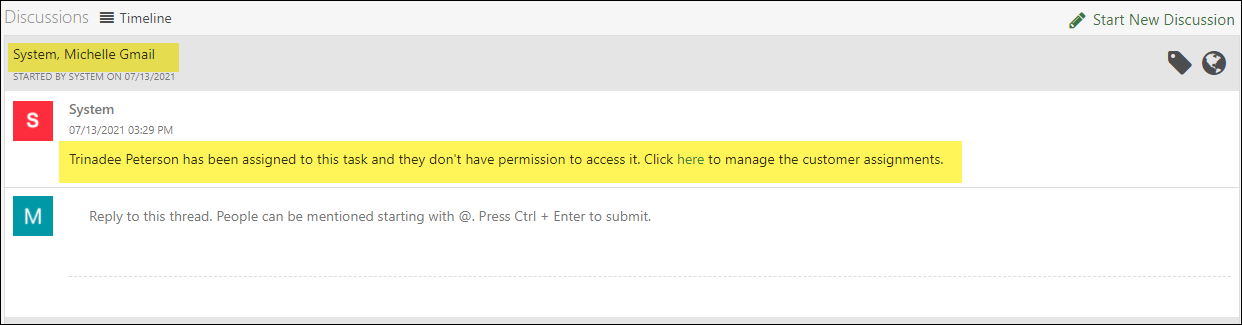
Example of System Discussion “No Access” Notification Message
This feature has also been included in the Task Dispatch screen, so if a Task is dispatched to an Employee who does not have the necessary Customer/Vendor Assignment, an Alert message will be displayed at the top of the Task Dispatch screen to warn that the Employee assigned does not have permission to access the Task and also provides the link to the Customer/Vendor’s Assignments Page to add the Assignment.
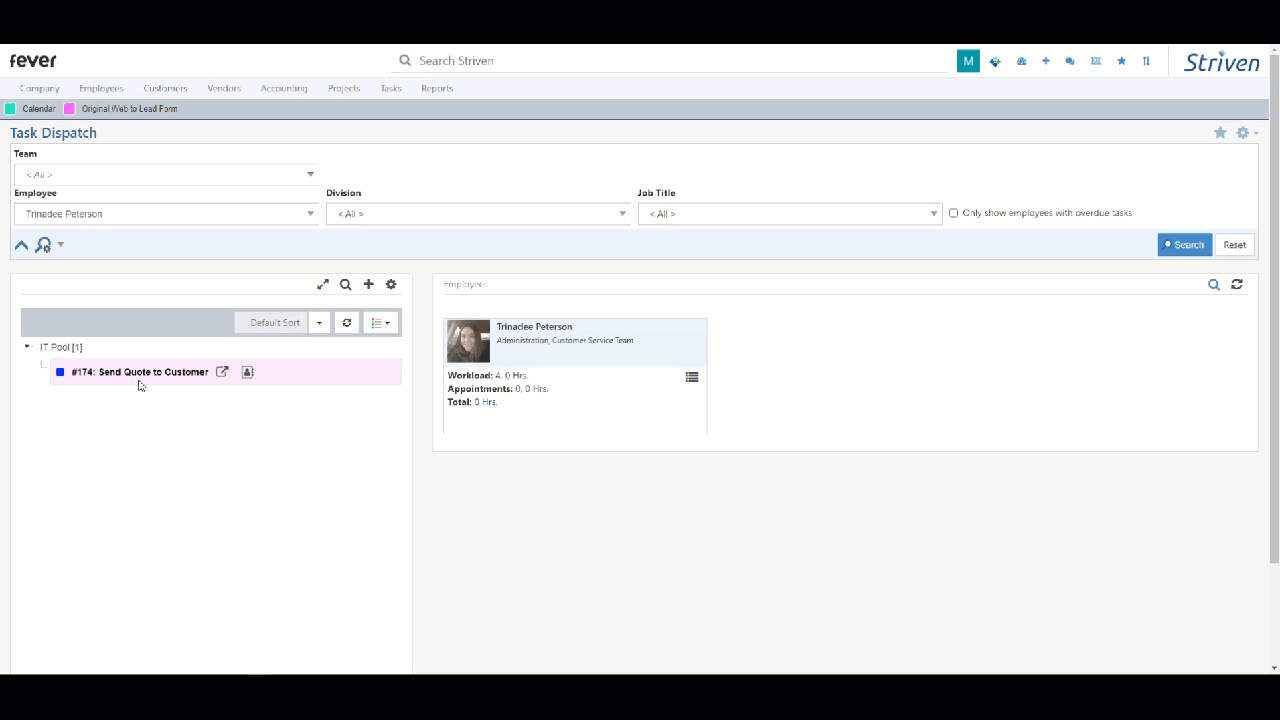
Example of Task Dispatch Assignment to Employee Without Access to Customer
Customer/Vendor Assets
-
Assets Page
Customer/Vendor Assets are entities that are created in Striven and assigned to the appropriate Customer/Vendor. These can be anything ranging from pieces of equipment that you inspect and service to passwords. A Customer/Vendor Asset can capture a lot of information including its status, Location, and more. To learn more about how to set up and configure Customer/Vendor Assets, please review the Customer Asset Management Guide. Below is a screenshot displaying what the Customer/Vendor Assets section includes.
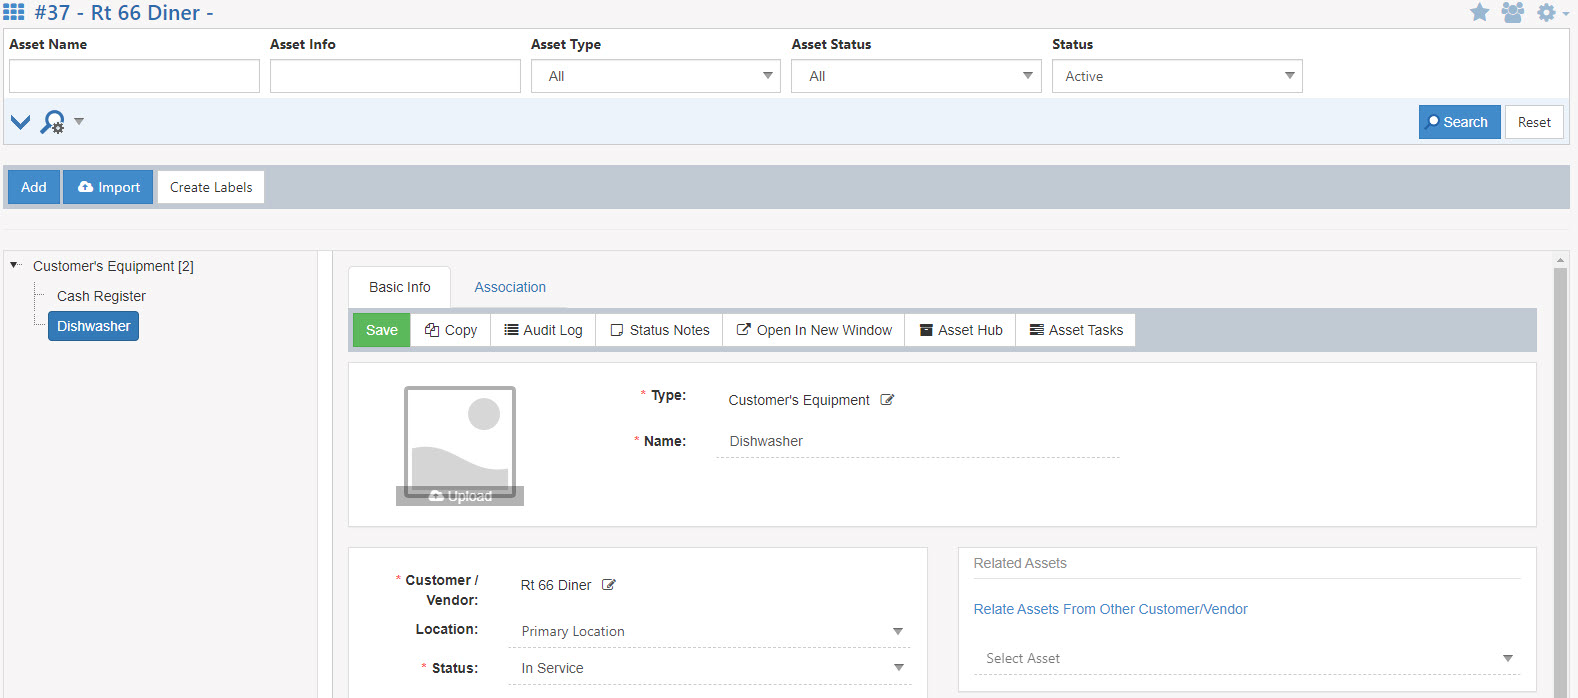
Example of Customer/Vendor Assets Page
Customer/Vendor Collaboration
-
Customer Hub Page
The Customer Hub page can hold folders, documents, and more related to the associated Customer. Hub is a digital filing cabinet in which you can store folders, links, posts, and documents which can also be made visible to the Customer. The screenshot below illustrates how a Customer’s Hub appears.
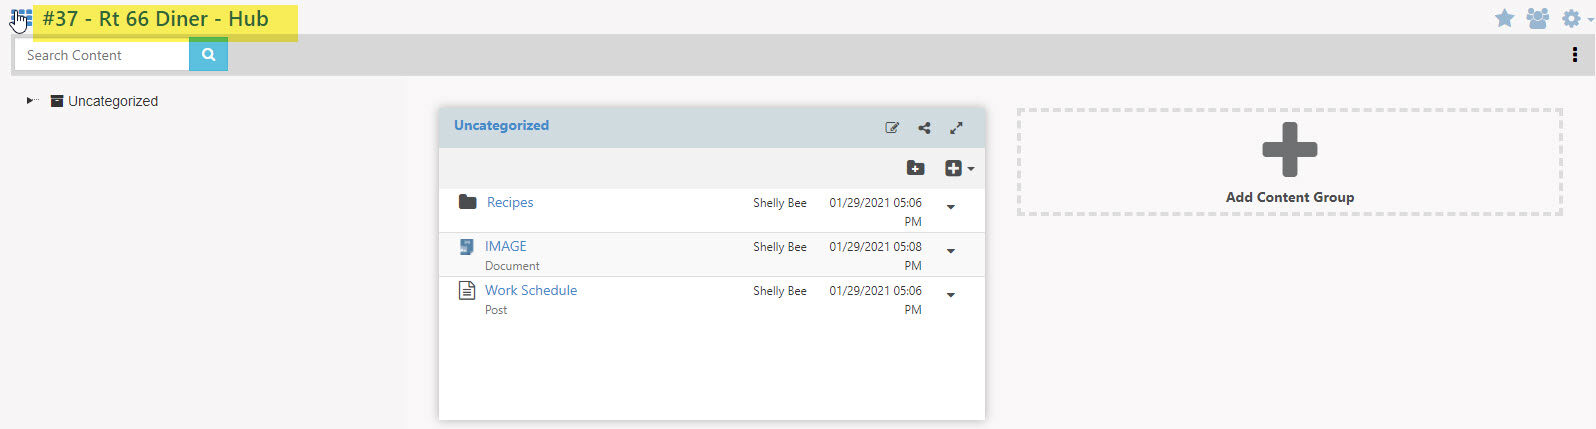
Example of Customer Hub Page
-
Customer/Vendor Hub
The Customer/Vendor Hub is a great tool to make documents related to your Customer/Vendor readily available to both internal Employees as well as external Contacts for the selected Customer/Vendor. Additionally, deciding what is visible to external Contacts allows for the flexibility of storage options with regard to Striven’s Customer/Vendor Hub. The following actions are available within the Customer/Vendor Hub:
- Search Content: Allows you to search the contents stored within the Customer/Vendor Hub.
- Manage Content Groups: Allows you to determine which group will be the default for when Customers/Vendors add documentation into the Customer/Vendor Hub through the Customer/Vendor Portal. Adding, editing the content group name, and deleting a content group are also available options within the Manage Content Group options, which can be accessed from the Actions menu within the Customer/Vendor Hub section.
- Add Content Group: Allows you to create a new content group and name it accordingly. After the content group has been created, editing the group will allow you to set it as a default for the Customer/Vendor Portal document additions.
- Add Folder: Within a content group, the option to add a folder is available for additional organization.
- Add Documentation: There are three types of documentation available to add to the Customer/Vendor Hub:
- A Document will allow you to upload a file from your local hard drive.
- A Post will allow you to add content to the page with an editable content editor.
- The Link option will allow you to link to an external source such as a Google Doc or another form of sharing platforms.
Hub Security
While adding or once a document has been added to the Customer/Vendor Hub, there are additional security options you can apply to the folder or documentation that has been added. This allows you to determine who within your Company can view such documents as it relates to them.
- Restrict Access to the following people/Manage Access: While adding documentation, the Restrict Access to the following people section can be utilized to set security. The Manage Access option can be accessed from the down arrow icon next to an individual folder or document within a Customer/Vendor Hub. If no one has been selected within this section, the Customer/Vendor Hub content is available to all Employees who have access to Hub. Alternatively, an Employee, Team, or Division can be entered here instead to restrict the access to those only entered here.
- Note: If a user has the “Hub Contents – View All” permission, any security set here will be overridden.
Visible on Portal
While adding a document, marking it Visible On Portal will allow the document to be accessed by your Customer/Vendor within the Customer/Vendor Portal. This allows for easy collaboration between you and your Contacts while completing work for them. Editing the Portal visibility settings can be done after documentation has been added by editing the option for the selected document.
-
Surveying Page
Any Surveying such as Surveys, Quizzes, Assessments, or Forms that have been submitted and related to the Customer/Vendor will be listed within the Customer Surveying page for easy viewable access. The name, generate date, and the expiration date will be displayed in the list within each page. Access to the generated link and the responses are available from this list as well. To learn more about Surveying within Striven, review our Surveying & Feedback Guide.
Customer/Vendor Contacts
-
Contacts Page
The Customer/Vendor Contacts section stores all the Contact information for the Customer/Vendor. There are also buttons to allow you to add, associate, and import Contacts (see Importing Customer/Vendor/Contacts section above) for the individual Customer/Vendor. If a Contact has a green Primary icon, this notes that it is the Primary Contact for the Customer/Vendor. There are also icons per Contact that enable you to Edit, Deactivate, and send Discussions to Contacts easily. Below is a screenshot of the Customer/Vendor Contacts section of a Customer’s page.
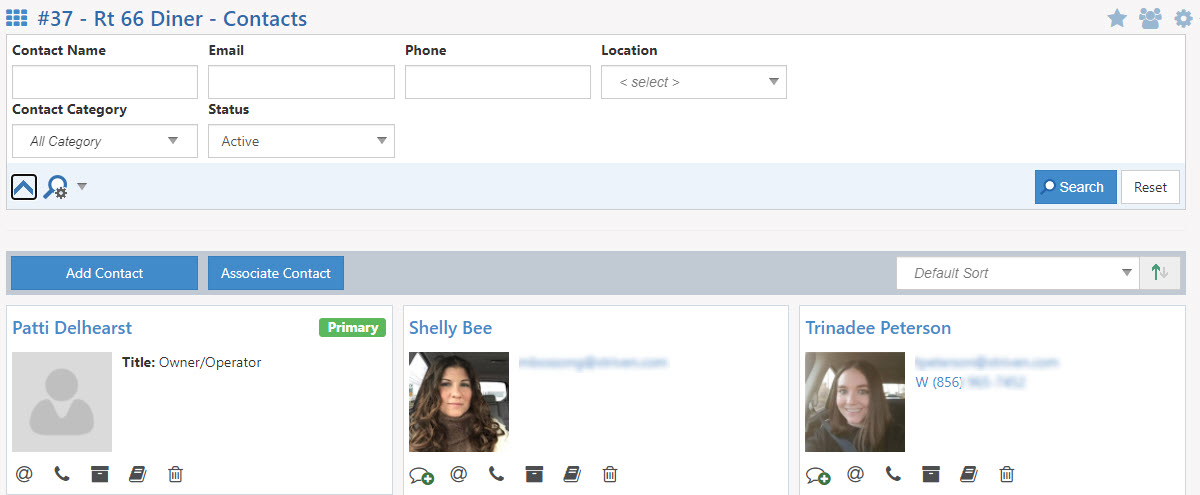
Example of Customer/Vendor Contacts Page
-
Contact Info
By clicking on a Contact name from the Customer/Vendor Contact List, you will be brought to a detailed version of the Contact Information. When viewing a Customer/Vendor Contact Info screen from within the Customer/Vendor’s information, additional features and settings are available from the Side Menu Bar, such as Contact Hub, Contact Assets, References and Integrated Links. To learn more about how Customer/Vendor Contacts can be set up and utilized in Striven, check out our Contact Management Guide.
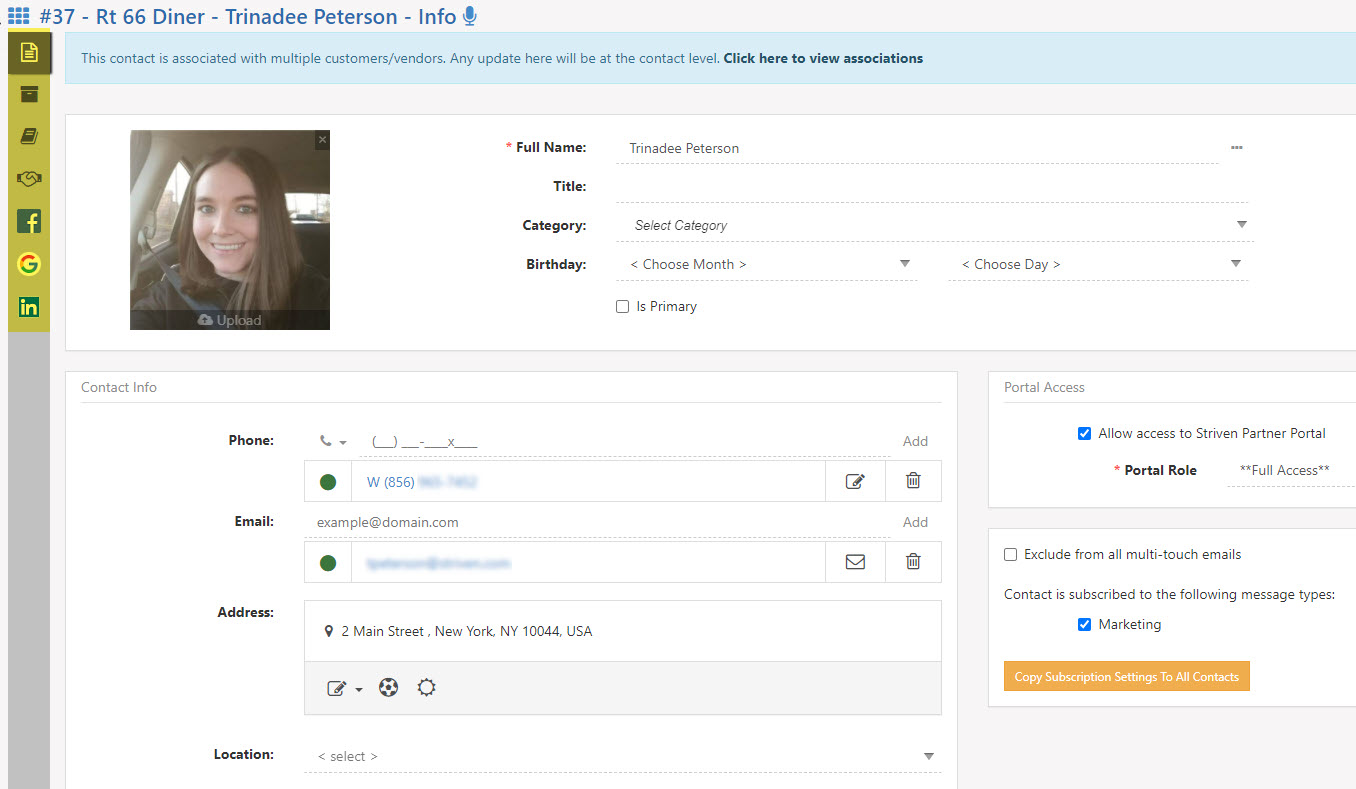
Example of Customer Contact’s Info Page
Opportunities, Projects, & Tasks
-
Opportunities Page
The Opportunities section is where all sales Opportunities are stored under the Customer. Opportunities are potential sales dealings with Customers. The data captured here includes notes, probability percentage, and Calendar dates. To learn more about Opportunities, please reference our Opportunities Guide. Below is a screenshot displaying the Opportunities section of the Customer’s page.
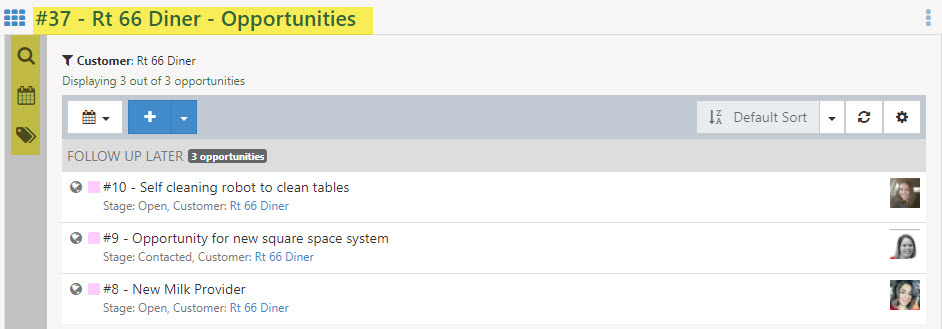
Example of Customer Opportunities page
-
Projects Page
The Projects section under the Customer Information lists the Projects that are assigned to the Customer. The list shows valuable information including the Project Type, Division, status, budget, and more. To learn more information about Projects in Striven, please reference our Project Management Guide. Below is a screenshot illustrating the Projects section of the Customer’s page.
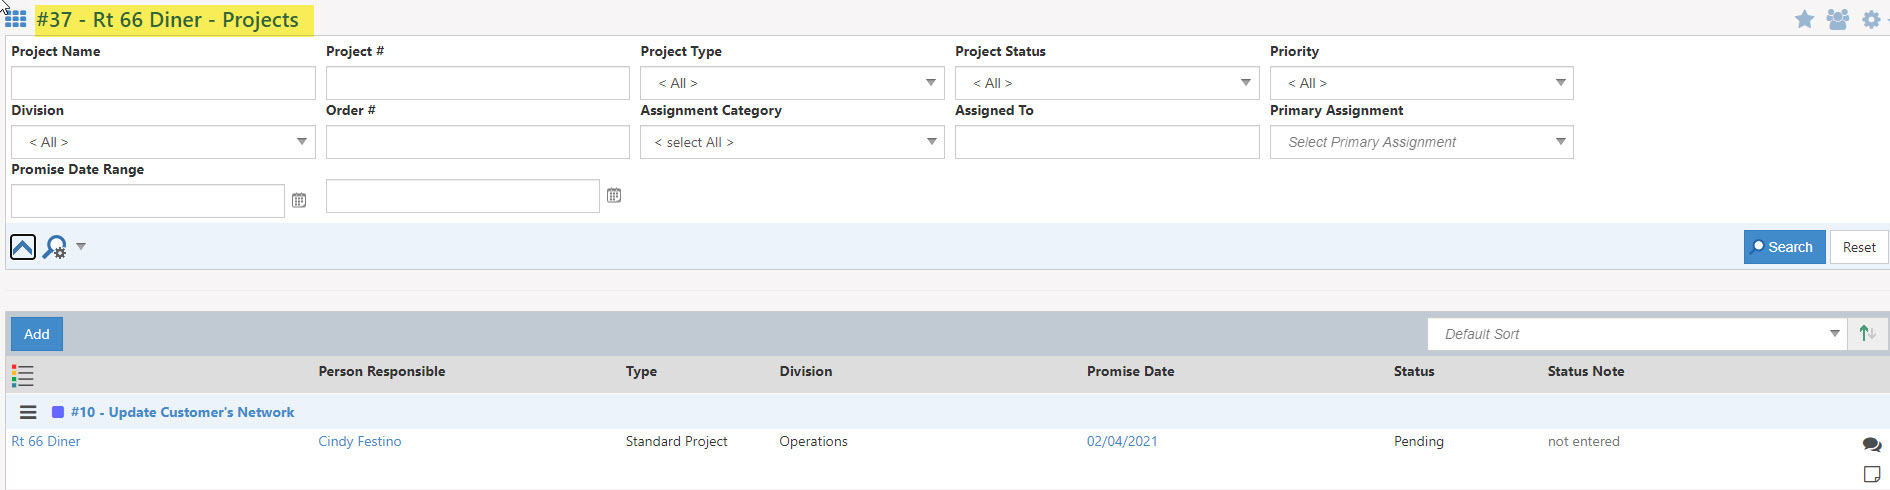
Example of Customer’s Projects Page
-
Tasks Page
This section lists Tasks that are associated with the Customer and allows you to view and manage the Tasks as needed. There are also options that allow you to create and assign Labels, create and assign due dates/durations, and search for Tasks. To learn more information about Tasks, please reference our Task Management Guide. Below is an example of a Customer’s Tasks page.
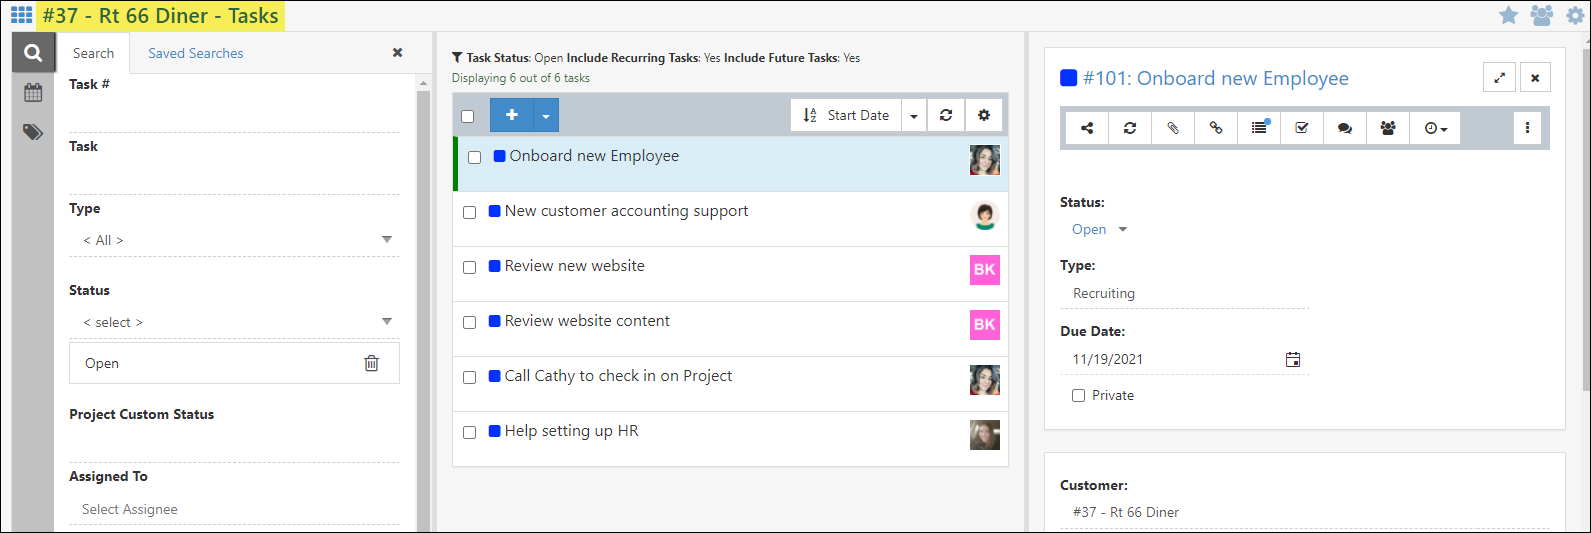
Example of Customer’s Tasks Page
Service Metrics
Service Metrics are useful for calculating productivity and efficiency when completing Tasks for your Customers. Settings for Service Metrics can be configured on a global level or at a Customer level. To view or edit the Global Service Metrics, you can navigate to:
Company → Settings → Tasks → Service Reports Setup → Service Metrics Settings
There you can establish your default Service Metrics settings, which will apply across the board in your Striven system. Changes made to the Global Level Service Metrics settings will also apply across the board, but can be overridden by configuring the Service Metrics Settings individually at the Customer level.
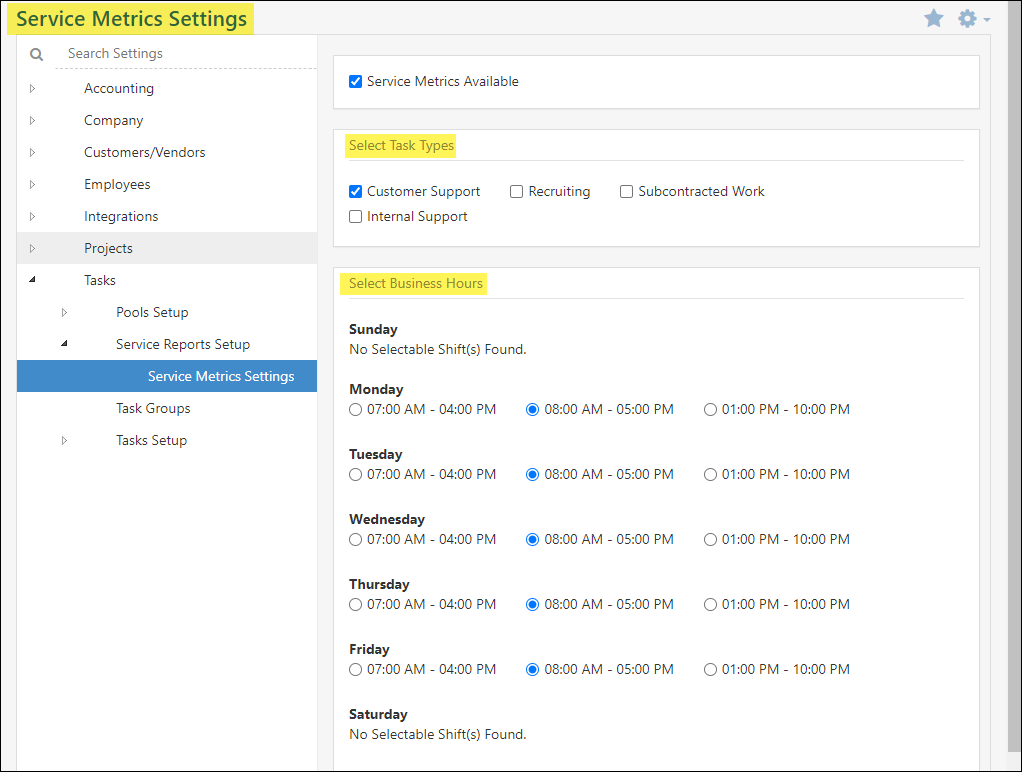
Example of Global Service Metrics Settings
Should you desire to set specific Service Metrics settings per Customer, you can do so by using the Customer Navigation waffle menu and select Settings, and then click on the Service Metrics Settings icon on the bottom of the Left Side Menu Bar.
At the top of the page, you will see the Customer’s name to indicate you are viewing that particular Customer’s Service Metrics settings page. The Selected Task Types options can be toggled on/off, and the Select Business Hours selection can be set to include these Service Metrics for that specific Customer.
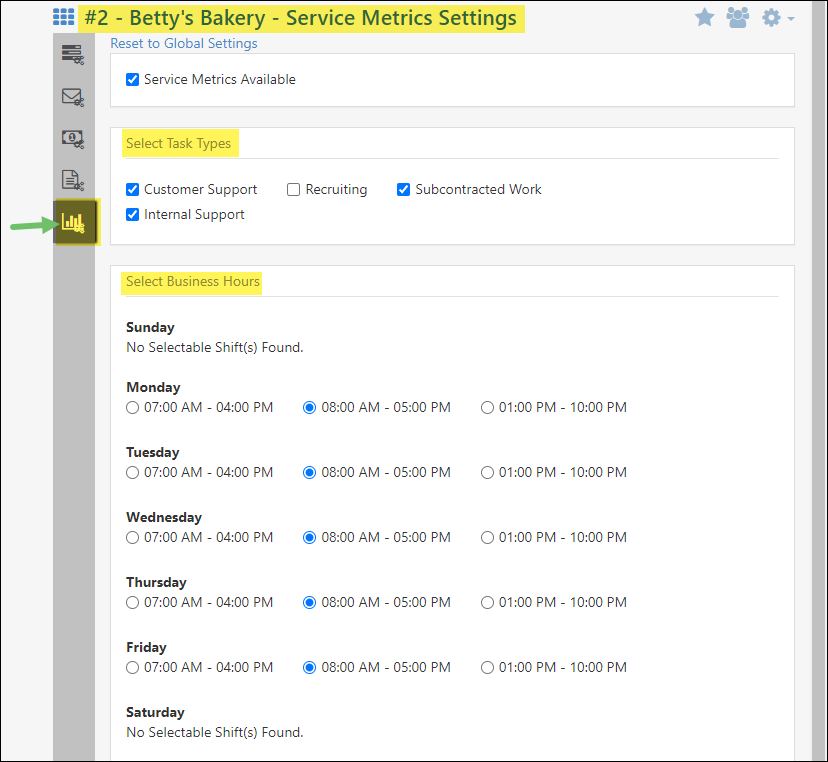
Example of Customer Level Service Metrics Settings
If you would like to see your Service Metrics that are not specific to an individual Customer, use the Team Efficiency Report.
- Note: For more information about how Task Service Metrics are calculated, review the Workload Management section of our Task Management Guide.
Customer A/R
-
Customer A/R Page
The A/R page under the Customer Information lists all of the Accounts Receivables associated with the Customer. There are five subsections of A/R, which are discussed in more detail below. Transactions is the initial subsection that appears, which lists all of the Transactions the Customer is responsible for.
-
Transactions
This lists A/R Transactions that the Customer is responsible for including Invoices, Credit Memos, Payments, Sales Receipts, Check: Refunds, and Journal Entries. Search filters are available on this page as well to query what Transactions are needed at any given moment. Important data displayed on this page or functions that can take place are listed below.
- Only show transactions with an open balance: Filters results to only display Transactions that are still open. This will hide any Transactions that have been paid or closed.
- Voided Status: To view voided Transactions for the selected Customer, use the voided status search filter. By default, this filter will be set to not Voided for convenience.
- Sorting: Displays your list in the order of what is important to you. Sorting by information such as the Invoice Status, Transaction Date, or Due Date can help in reviewing the list as needed.
- Total Amount: Summarizes the total of all Transactions. Depending on the choice of Transaction within the list, it will be calculated as a negative or a positive in order to have the total amount to reflect correctly.
- Open Balance: Shows you the total amount that is open within the Customer’s Transactions. Having the Total Amount column and the Open Balance column side by side allows you to see at a glance how much has been invoiced versus how much is still currently open.
- Resend Invoice: If you need to resend an Invoice Notification to a Customer Contact, the Actions menu will allow this function to take place. A confirmation question will be asked before the email is sent. The Contact(s) that will receive this notification are listed within the Customer’s Settings page for notifications.
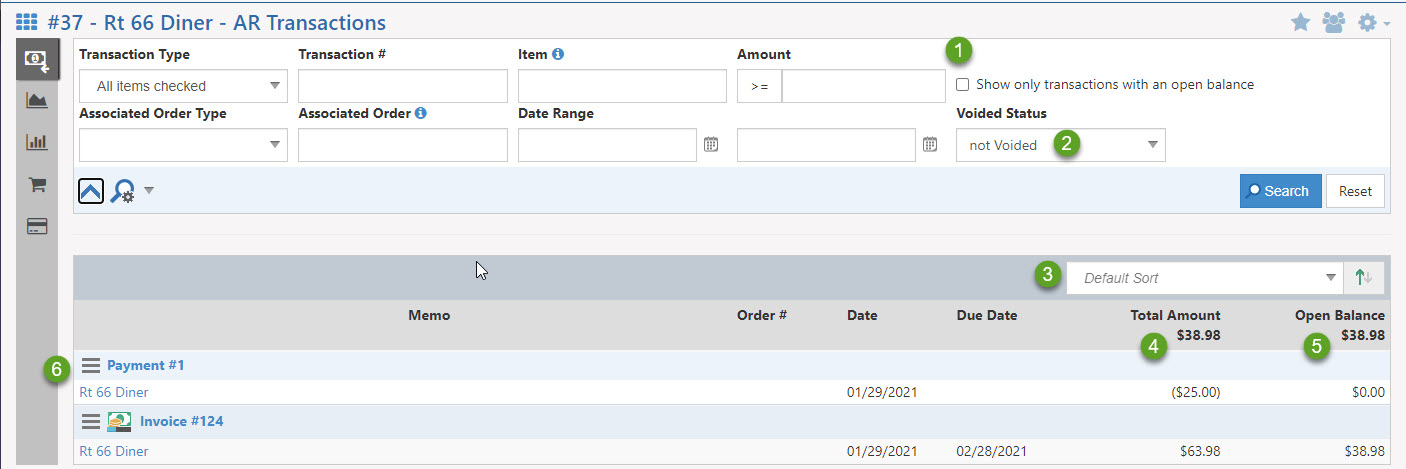
Example of Customer’s Transactions Page
- Note: To learn more about Accounts Receivables within Striven, please review the Accounts Receivable Guide.
-
Sales Orders
The Sales Order page within the Customer Information will allow you to review all Sales Orders related to the Customer. Search filters are available on this page as well to query what Sales Orders are needed at any given moment. Important data displayed on this page or functions that can take place are listed below.
- Search Filters: Search filters can be utilized to find the Sales Orders that meet the criteria that you need to see at any given time. Viewing the Sales Orders list from within the Customer’s Information will pre-filter so you are only searching and filtering their Sales Orders.
- Add Sales Order: A Sales Order for the Customer can be created right from their Sales Order List by selected Add Sales Order on the top of the list. This button will take you to the Sales Order creation screen.
- Actions: From the list of Sales Orders, the Actions menu can be used to quickly view information regarding the Sales Order as well as creating an Invoice for the Sales Order. Using the Create Invoice option from the Actions menu will take you to the Invoice creation page with information filled out from the Sales Order.
- Sorting: Sorting options are available to display your list in the order of what is important to you. Sorting by information such as the Target Date, Sales Order total, or Due Date can help in reviewing the list as needed.
- View Log: If a Customer has viewed the Sales Order, a magnifying glass will appear to the right of the Sales Order with the number of Contacts that have viewed the selected Sales Order. Clicking on the Magnifying Glass icon will list the Contacts along with when the Sales Order was viewed.
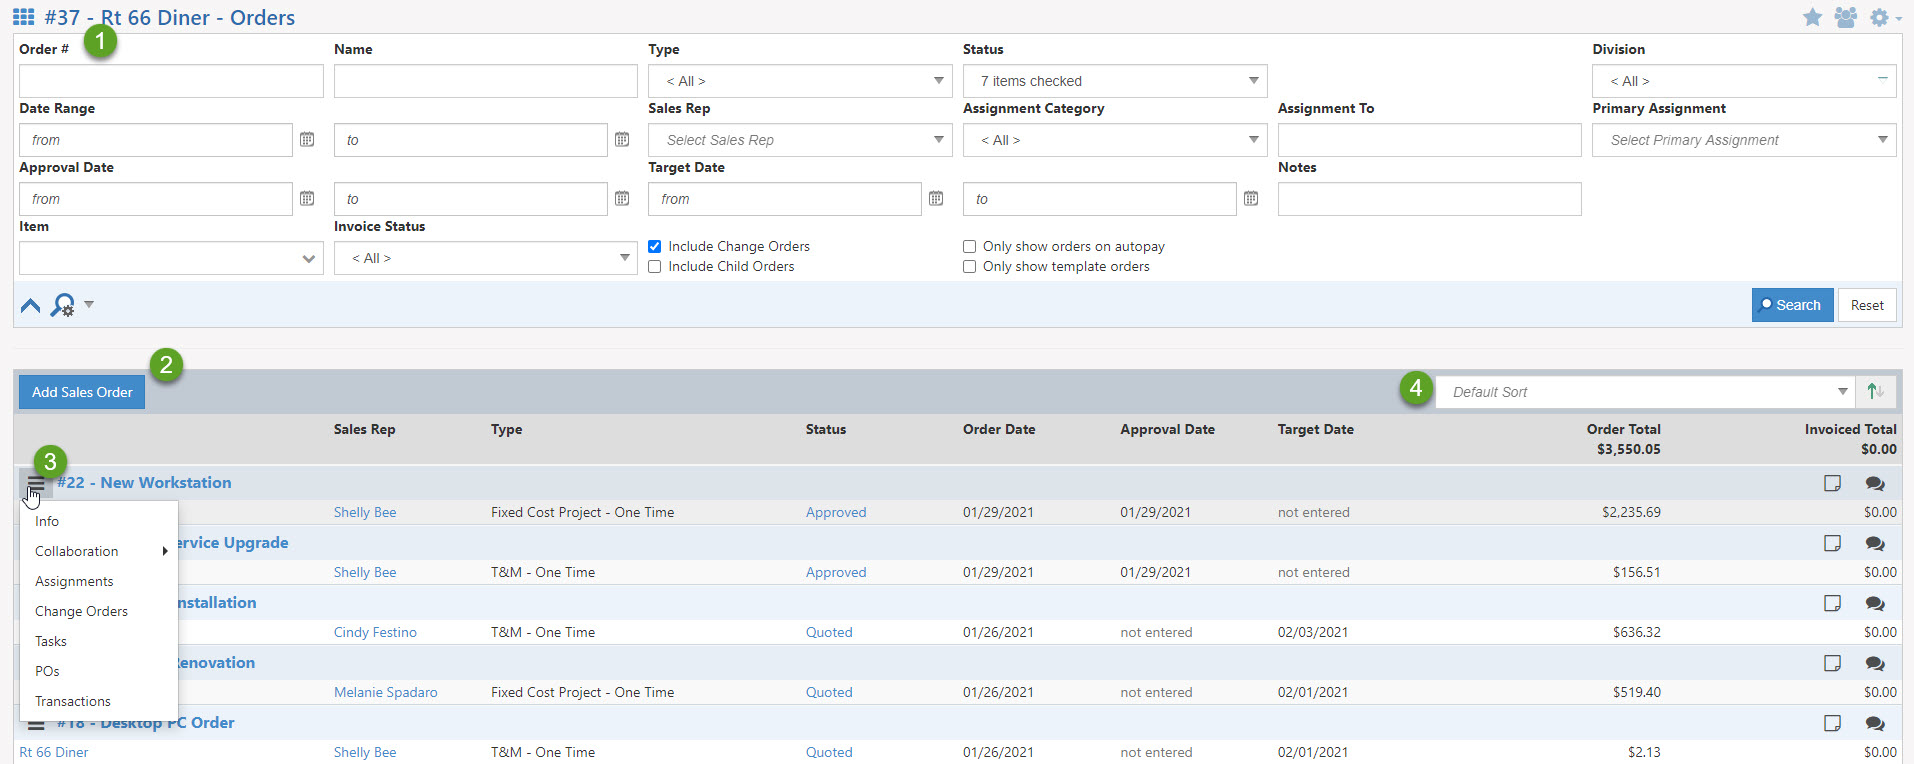
Example of Customer’s Sales Order Page
-
Collections
The Collections page within the Customer’s Information will allow you to take important action on an individual Customer basis. While the Collection Queue can be used to send notices en masse, the Collections page for the Customer allows you to focus on that particular Customer. It is recommended to review our Collections Guide if you plan to use the collection features within Striven.
- Actions: There are a number of actions that can be taken from the Collections page from within the Customer information to make sure the collection process moves smoothly:
- View A/R Log: Allows collections reps to enter in a note as they work with the Customer to collect late payments. This is a great way to make sure everyone is informed as to what is being done with the Customer. When a note is entered the person who created the note will display along with the date and time the note was created.
- View Collection Log: Lists all notices from the collection workflow that has been sent to the Customer. This will display the notice, date, status, as well as who took the action to send the notice.
- Send Notice: If you wish to send an individual notice, no matter what notice the Customer is currently on, then this action can be taken. Once Send Notice has been clicked you will have the option to choose which Notice you wish to send. Once sent, this notice will appear in the View Collection Log list.
- Reset Collections: Used to reset a Customer’s collection and have them start at the beginning of the process again. It is important to keep in mind if a Customer has gone through the entire Workflow they will need to have their collections reset if you wish to have them appear in the Collections Queue again.
- Options: There are additional options that are related to Customers within the collection process:
- Don’t send collection emails: If you do not wish for the Customer to receive any notices from the collections workflow then this option can be turned on with this checkbox. This will exempt your Customer’s from the Collections Queue.
- Exempt from finance charges: If you do not wish for the selected Customer to receive finance charges then this option can be selected to make them exempt from such Transactions.
- Collection Queue Note: Indicates a note that should be visible easily on this page. This is a great place to add in an important note such as “Currently working with this Customer on getting their open balance down. Have marked exempt for now from collections.” This will allow anyone who views the page to know what is currently going on with the Customer in regards to collections.
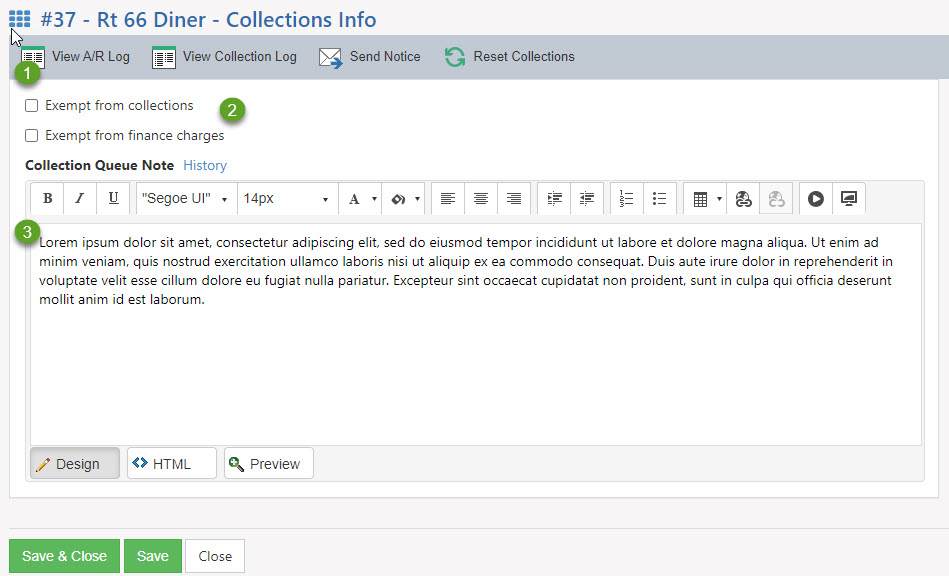
Example of Customer’s Collections Page
- Actions: There are a number of actions that can be taken from the Collections page from within the Customer information to make sure the collection process moves smoothly:
-
Financial Summary
The Financial Summary page will give you a summary of important financial information which is described below.
- Start & End Dates: To filter for the range you wish to view the summary of enter the start and end date here and select search.
- Financial Summary: A list of financial information is listed below within the selected date range chosen:
- Total Invoiced Amount
- One-Time Invoiced Amount
- Recurring Invoiced Amount
- Total Credited Amount
- Total Paid Amount
- Recurring Orders: A list of Recurring Sales Orders will be displayed to review what recurring revenue is ongoing for the selected Customer.
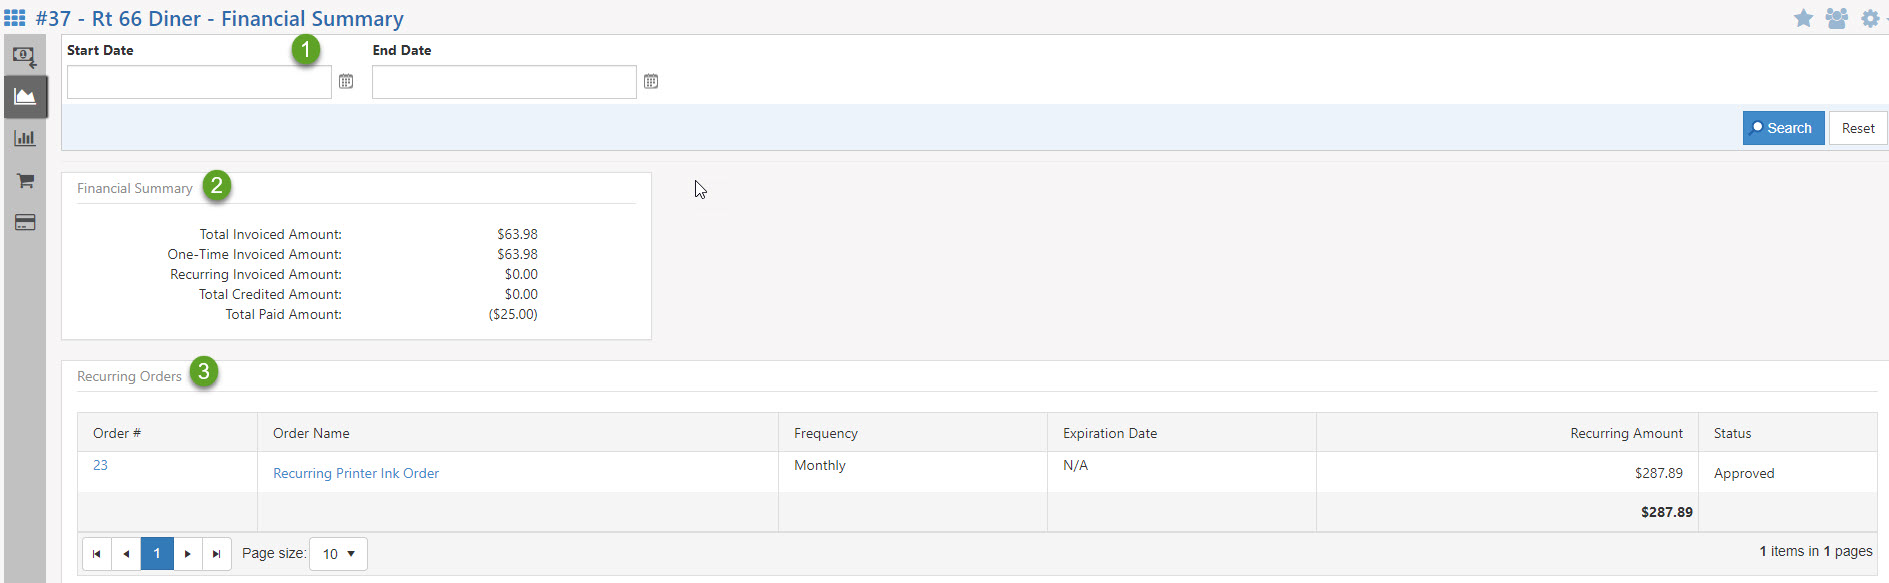
Example of Customer’s Financial Summary Page
-
Monthly Statements
Monthly Statements within Striven are a great way to send a summary of work that has been completed within a given month. With different templates that can be used, there is no limit to what can be set up and accomplished with Monthly Statements in Striven. Summarizing Tasks, Transactions, Projects, and so much more can all be done by sending your Customer a Monthly Statement. Monthly Statements can be sent en masse based on Customer conditions set by search filters. Below is information regarding the Monthly Statement page from within a Customer’s information.
- Template Used: The template that will be used for the Monthly Statement. The template that is set as a default will be selected automatically. Clicking Edit will allow you to select a different template to be sent or printed.
- Notification From: Allows you to select whom the statement will be coming from. This is done based on the Assignment saved for the Customer.
- Month/Year: Allows you to choose what month you would like included in the Monthly Statement by selecting the month and the year here to reflect accordingly.
- Print/Email: Choosing either Print or Email will determine how the Customer will receive their Monthly Statement. The email option will display an editable templated email for the Customer regarding their Monthly Statement and will then be sent from the system to whoever is set within the Customer’s notification settings to receive Monthly Statements. The print option, on the other hand, will generate a PDF to be saved on your local hard drive to then be printed.
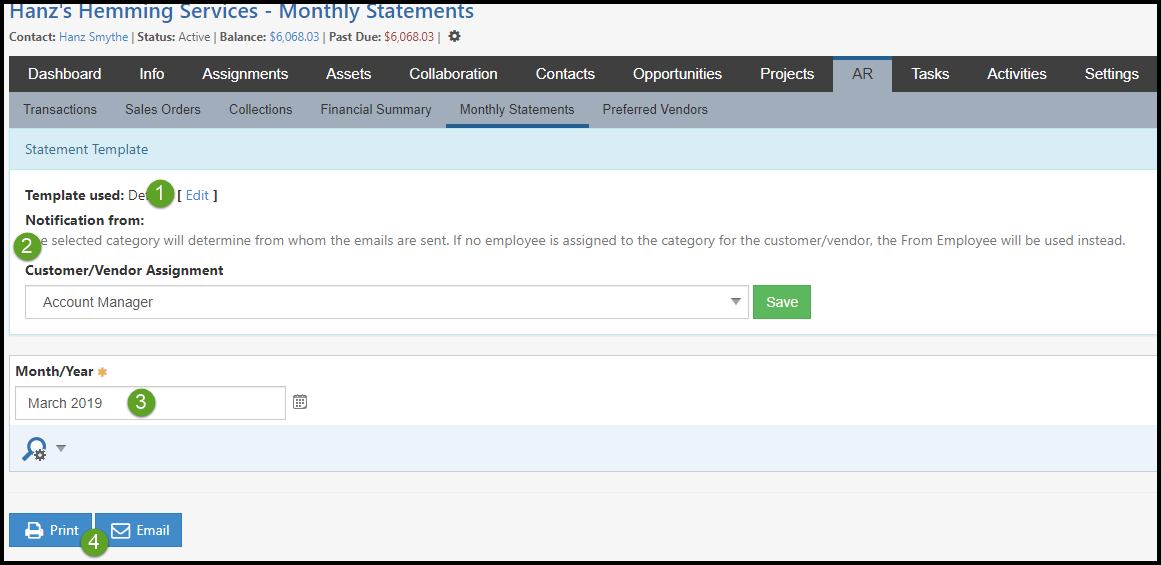
Example of Customer’s Monthly Statements
-
Preferred Vendors
This section will allow you to choose Vendors that the Customer prefers to do business with. When a Vendor is set to be a Preferred Vendor for the selected Customer, they will be included in the top of the list when choosing Vendors on Purchase Orders. A Star icon will appear next to their name in the Vendors List when selecting multiple Vendors on POs.
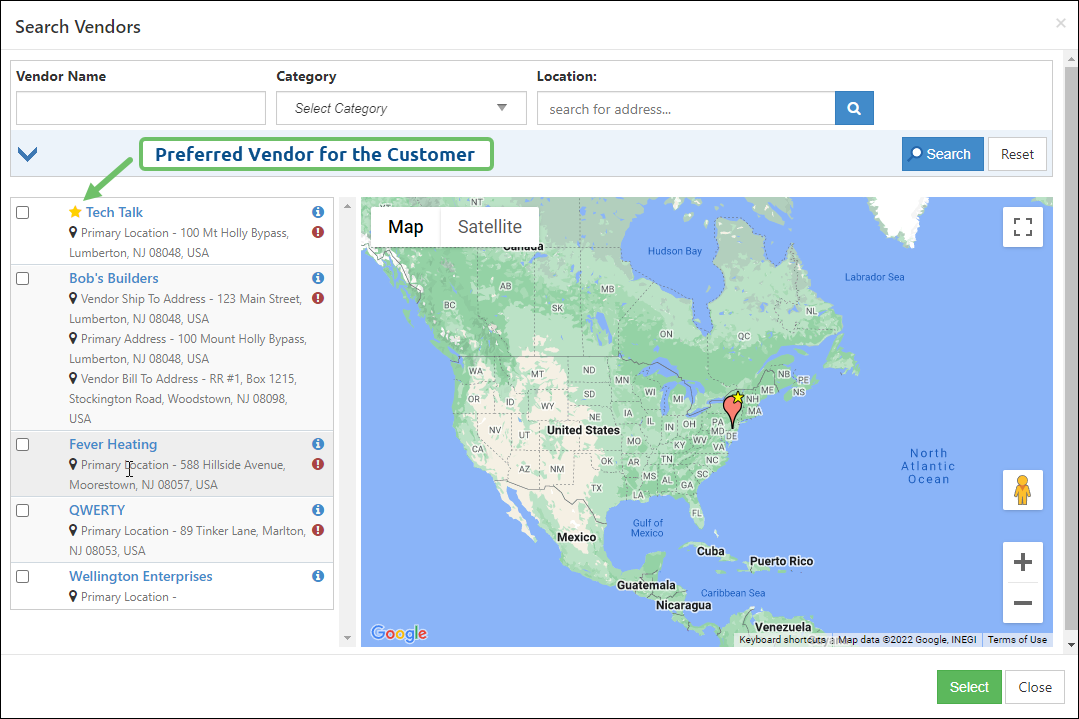
Example of a Preferred Vendor on the Vendors List for a Purchase Order
Vendor A/P
-
Vendor A/P Page
The A/P page under the Vendor Information lists all of the Accounts Payable associated with the Vendor. There are two subsections of A/P and POs. POs list all of the Purchase Orders associated with the Vendor and Transactions include Bills, Bill Payments, Bill Credits, and Journal Entries. Transactions is the initial subsection that appears, which lists all of the Transactions your Company is responsible for with regard to your Vendor.
-
Transactions
This lists A/P Transactions that the Vendor is related to for Bills, Bill Credits, Checks: Bill Payments, Credit Card Charges: Bill Payments, and Journal Entries. Search filters are available on this page as well to query what Transactions are needed at any given moment. Important data displayed on this page or functions that can take place are listed below.
- Only show transactions with an open balance: Displays only Transactions that are still open. This will hide any Transactions that have been paid or closed.
- Voided Status: To view voided Transactions for the selected Customer, utilize the voided status search filter. By default, this filter will be set to not Voided for convenience.
- Sorting: Displays your list in the order of what is important to you. Sorting by information such as the Open Balance, Transaction Date, or Due Date can help in reviewing the list as needed.
- Total Amount: Summarizes the total of all Transactions. If the choice of the Transaction is within the list, it will be calculated as a negative or a positive in order to have the total amount to reflect correctly.
- Open Balance: Displays the total amount that is open within the Vendor’s Transactions. Having the Total Amount column and the Open Balance column side by side allows you to see at a glance how much has been billed versus how much is still currently open.
- Note: To learn more about Accounts Payable within Striven, review the Accounts Payable Guide.

Example of Vendor Transactions Page
-
Purchase Orders (POs)
The PO Page within the Vendor’s Information will allow you to review all Purchase Orders related to the Vendor. Search filters are available on this page as well to query what Purchase Orders are needed at any given moment. Important data displayed on this page or functions that can take place are listed below.
- Search Filters: Finds the Purchase Orders that meet the criteria that you wish to see at any given time. Viewing the Purchase Orders list from within the Vendor’s information will pre-filter so you are only searching and filtering their Purchase Orders.
- Add Purchase Order: A Purchase Order for the Vendor can be created right from their Purchase Order List by selected Add Purchase Order on the top of the list. This button will take you to the Purchase Order creation screen.
- Actions: Can be used to quickly view information regarding the Purchase Order, as well as changing the fulfillment method, closing, or canceling the Purchase Order. Using the Create Bill option from the actions list will take you to the Bill creation page with information filled out from the Purchase Order.
- Sorting: Displays your list in the order of what is important to you. Sorting by information such as the Promised Date, Purchase Order Total, or Due Date can help in reviewing the list as needed.
- Note: To learn more about Purchase Orders within Striven, review the Purchase Orders Guide.
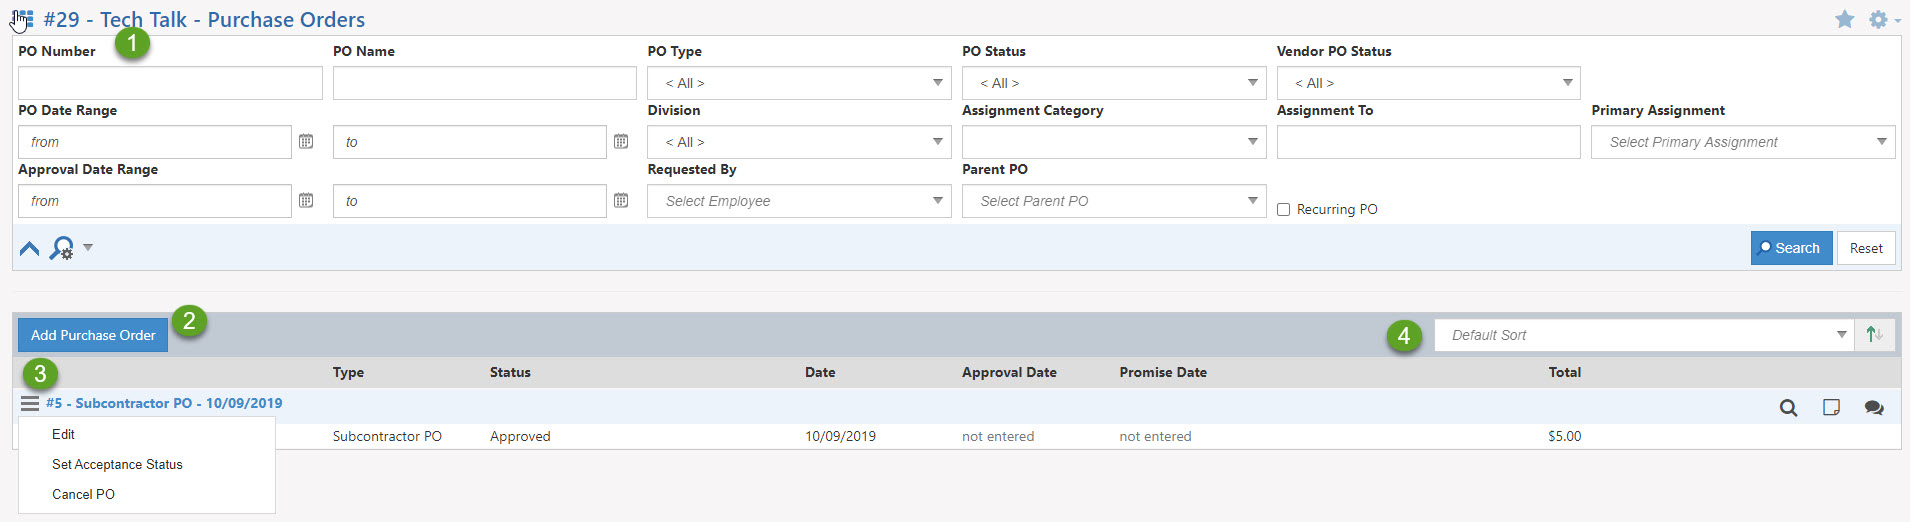
Example of Vendor’s Purchase Order Page
Customer/Vendor Settings
-
Settings Page
The Settings section contains four subsections including Notifications, Service Metrics, Price List, and Terms & Conditions. The Notifications section will allow you to designate who gets notified for certain entities in Striven. The Service Metrics section will allow you to designate which Task Types and business hours you track for the Customer. Price Lists will allow you to add custom pricing for selected Items for the Customer. Terms & Conditions will allow you to see the history of the Terms for that Customer. Below is a screenshot displaying how the Customer’s Settings appear.
Example of Customer Settings Page
-
Notifications
Setting default Notifications for your Customers is a sure way to make sure they are staying informed every step of the way. Within the Notifications settings, there are options for both financially impacted Notifications as well as Task-related Notifications. Setting the flexibility on which Contact receives which type of notices allows for you to customize and meet your Customer’s needs to keep them informed.
Financial Notifications
Automatically Generated Invoices/Credit Memos
Any Invoices or Credit Memos that are system generated will send an automatic Notification to any Contact listed here. System-generated Notifications include Contract Managed Orders with Invoice on approval or completion, Recurring Orders, and Progress Invoicing. It would be ideal to add an A/R Representative from your Customer’s Company. It is best to review the following Notification & Portal Content to ensure it meets your Company’s needs:
- New Invoice That Needs Payment
- New Credit Memo
- Note: Manually created Invoices and Credit Memos will not be sent automatically; instead they can be sent with the Email button available on Invoices and Credit Memos.
Invoice Payment Receipt
If your Company has the Invoice Payment Receipts box checked and a recipient set up in the individual Company Settings, they’ll receive notice once a payment has been received in Striven. It is ideal to add a Purchasing Representative to this list to keep them informed of the receipt of the Payment. It is best to review the following Notification & Portal Content to ensure it meets your Company’s needs:
- Payment Notification
Collection Notices
The Contacts listed here will receive a Notice when they are sent from the Collection Queue within Striven. It is ideal to review your Collection Workflow setup within your Striven system to ensure it meets your Company’s requirements. Collection Notices will only be sent out when a Customer is behind in making a payment. The amount of time a Customer is behind and the most recent Notice to them will determine where they fall in the Collections Workflow.
Payment Notices
Once payment has been received from a Customer, such as a deposit or a prepayment, the Contact(s) listed here will receive a notice informing them of such. It would be ideal to add a purchasing representative to this list to keep them informed of your receipt of their payment. It is best to review the following Notification & Portal Content to ensure it meets your Company’s needs:
- Payment Notification
Monthly Statements
Monthly Statements are a great way to keep your Customer informed of the work you are doing for them on a monthly basis. Monthly Statements Configurations can be made on a template base to show work entities that of your choice. It is best to review the following Notification & Portal Content to ensure it meets your Company’s needs:
- Monthly Statement Contract
________________________________________________________________________________________________________________________________________________
Task Notifications & Options
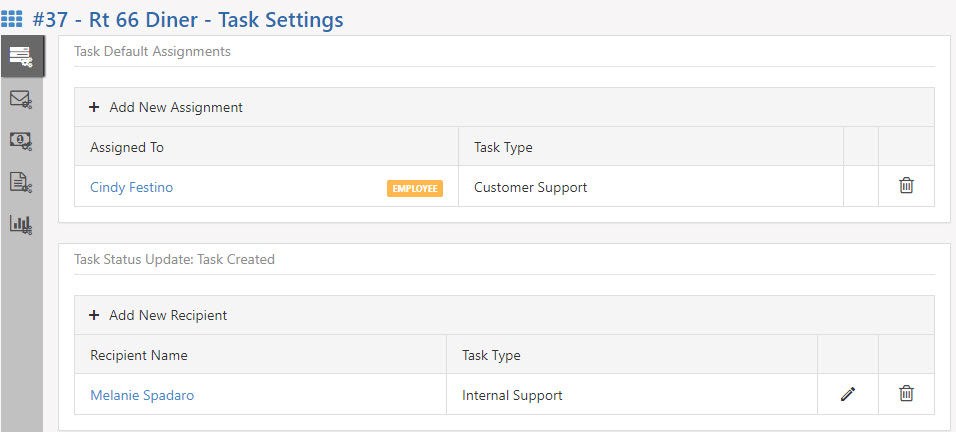
Task Default Assignments
Task default Assignments allow you to set on a per-Customer basis who is assigned Tasks that are related to the selected Customer. Having the ability to set on a per-type basis allows for complex structures of Task Assignments to be set up within Striven. Default Assignments for Tasks can be set to individual Employees, Pools, Teams, or even the Assignments set at the Customer level.
Task Status Update: Task Created
If there is a Contact or Employee who should be notified when a Task is created for the selected Customer, they should be listed within this section. It is best to review the following Notification & Portal Content to ensure it meets your Company’s needs:
- Task – Task Created
Task Status Update: In Progress
If you would like either a Contact or Employee to be notified when a Task is In Progress then they should be listed within this section. A Task can not be manually marked In Progress; instead, it is an action taken by the system. A Task is considered In Progress once the person assigned to the Task has logged into the system and viewed the Task. It is best to review the following Notification & Portal Content to ensure it meets your Company’s needs:
- Task – Marked as In Progress (To Contact)
Task Status Update: Done
Once a Task has been marked as Done, an email will be sent to the individual(s) listed within this section letting them know. This is a great email to add in a possible link to a survey or even enabling the happiness rating and merging it into this email is an ideal way to gain feedback from your Customers. It is best to review the following Notification & Portal Content to ensure it meets your Company’s needs:
- Task – Marked as Done (To Contact)
Task Approvers
If you would like to set up a process for your Customer or another Employee to first approve a Task before work can begin on it then add them to this list. Once a Task is created, an email notification will be sent to whoever is in this list with a link to approve the Task. There will be no requirement to log in to the Customer Portal to approve a Task. It is best to review the following Notification & Portal Content to ensure it meets your Company’s needs:
- Task Approved – To Internal
- Task Approval – To Contact
- Task Approval Link
Task Happiness Rating
The Happiness Rating in Striven is a great way to gauge your Customer’s reactions to your services. Setting someone within this notification setting is ideal for Account Managers. If you want to make sure you are notified every time a Contact from the selected Customer gives a rating on a Task for all or certain types of Tasks then add yourself to this list.
-
Vendor
If your account is set to be a Vendor, then a separate Vendor page will be available for additional settings and options. You can set on this page whether the Vendor can allow partial fulfillment and whether they can submit a Bill without a Purchase Order related. An Item Cost List is also available to set custom pricing for Vendors.
-
Service Metrics
This section will allow you to determine for the selected Vendor if the Service Metric Report in the Vendor Portal is available. Determining what data is displayed to the Vendor in this report is configured here as well. Service Metrics can also be configured on a global level in the settings.
-
Price & Cost Lists
Price and Cost Lists are utilized when a Customer or Vendor has specific prices or costs that are different from the standard price/cost of that item. The price or cost indicated on the assigned list will override the standing pricing of an item when creating a Sales Order or Purchase Order.
For Customer Price Lists, you can view all of the created Price Lists by navigating Customers → Pricing → Price Lists
When viewing the Manage Customer Price Lists page, you will be presented with a number of options.
- Search Options: Provides filters to search for created Price Lists by Name or Item. You can also choose the option to Include Inactive Lists. You can save a search by clicking the Magnifying Glass/Gear icon.
- Add Price List: Allows you to create a new Price List.
- Import: Allows you to import an existing Price List.
- Export Standard List: Clicking this option will allow you to export a list containing the standard Price and Cost for all of the active items you have within your system.
- Sort: The Customer Price Lists can be sorted by the Default Sort and by Name. You can use the Arrow icon to the right of Sort Options to organize the results by ascending or descending.
- Price List Results: This section will display all of the Price Lists within your system.
- Export: This option allows you to export an individual Price List.
- Deactivate: Using the Trashcan icon will allow you to deactivate a specific Price List.
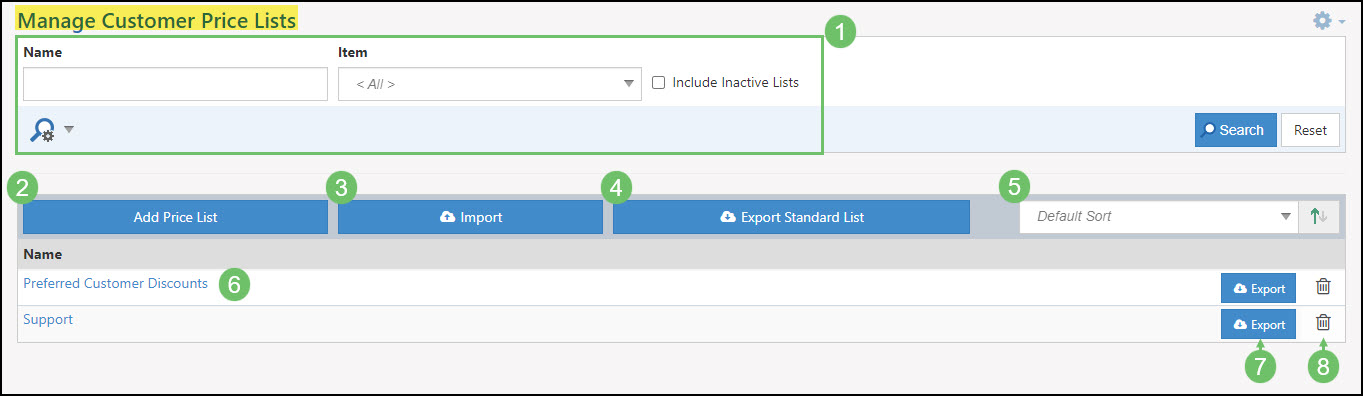
Example of the Manage Customer Price Lists Page
Adding a Customer Price List
When adding a new Price List, you will be presented with the Customer Price List Info page.
- Name: Allows you to name the Price List so that it can be easily distinguishable when available for selection.
- Add Items: Using the Add Items option will allow you to choose which items you would like to add alternate prices for.
- Item List: This section lists the items added to this Price List and displays the Item Name, Item Type, and an editable Price field so you can enter your custom price here. The Trashcan icon will allow you to remove an Item from the list.
- Note: The standard price for each item will automatically populate in the Price field.
- Save: You can use the Save or Save & Close button to save the changes you have made to the Price List.
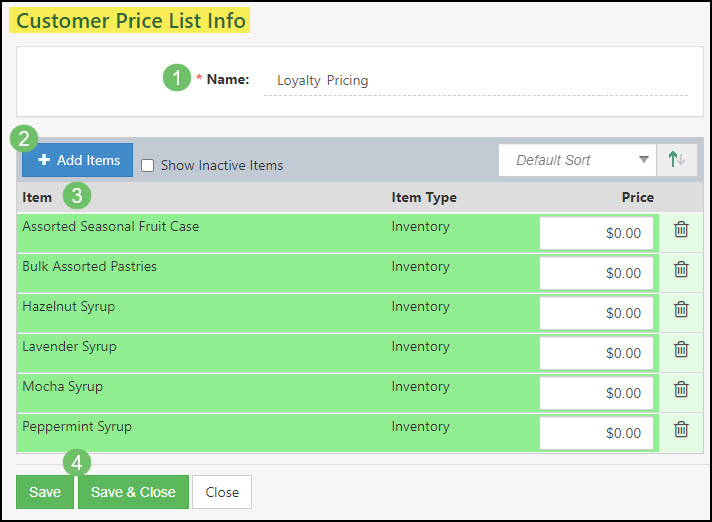
Example of Adding a Customer Price List
For Vendor Cost Lists, you can view all of the created Cost Lists by navigating Vendors → Purchasing → Cost Lists
When viewing the Manage Vendor Cost Lists page, you will be presented with a number of options, similar to the Manage Customer Price Lists page.
- Search Options: You can search for created Cost Lists by name, or by item. You can also choose to Include Inactive Lists. You can save a search by clicking the Magnifying Glass\Gear icon.
- Add Cost List: Using the Add Cost List button will allow you to create a new Cost List.
- Import: Allows you to import an existing Cost List.
- Export Standard List: Selecting this option will allow you to export a list containing the standard Price and Cost for all of the active items you have within your system.
- Sort: The Vendor Cost Lists can be sorted by the Default Sort and by name. You can use the Arrow icon to the right of sort options to organize the results in order of ascending or descending.
- Cost List Results: This section will display all of the Cost Lists within your system.
- Export: Allows you to export an individual Cost List.
- Deactivate: Using the Trashcan icon will allow you to deactivate a specific Cost List.
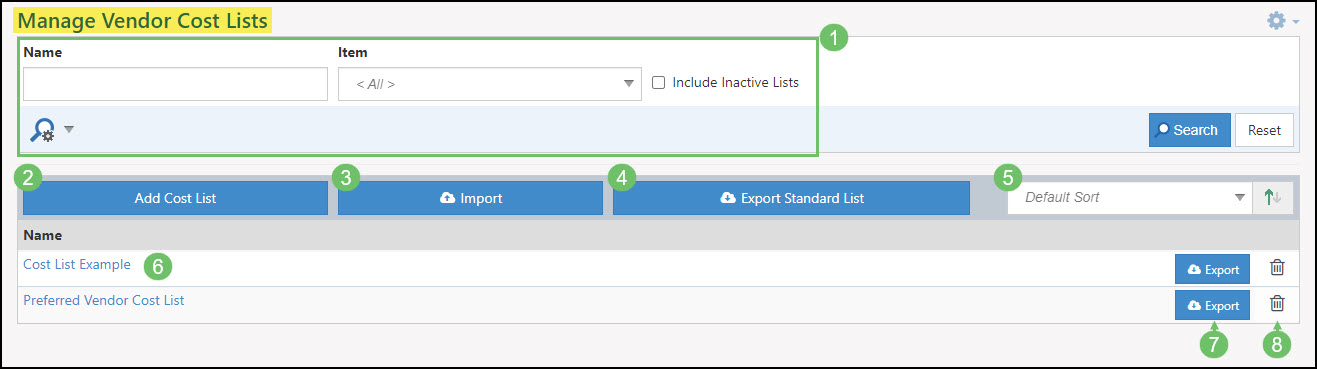
Example of the Manage Vendor Cost Lists Page
Adding a Vendor Cost List
Adding a Vendor Cost List has the similar options as adding a Price List. The Vendor Cost List Info page has the following options:
- Name: Allows you to name the Cost List so that it can be easily distinguishable.
- Add Items: Allows you to choose which Items you would like to add alternate Costs for.
- Item List: This section lists the Items added to this Cost List and displays the Item Name, Item Type, and an editable Cost field so you can enter your custom price here. The Trashcan icon will allow you to remove an Item from the list.
- Note: The standard cost for each item will automatically populate in the Price field.
- Save: You can use the Save or Save & Close button to save the changes you have made to the Cost List.
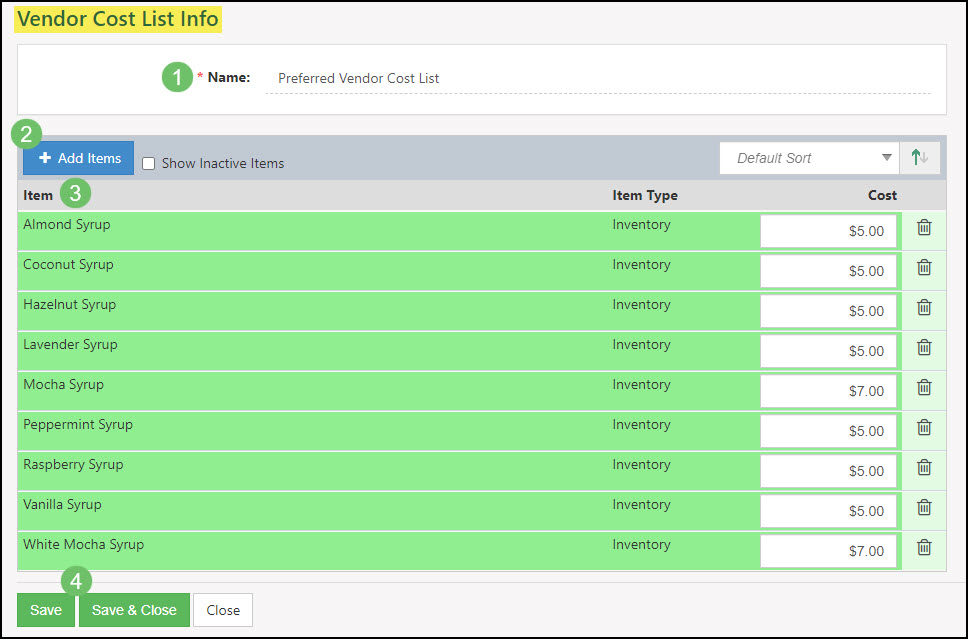
Example of Adding a Vendor Cost List
-
Terms & Conditions
If the selected Customer has Terms & Conditions separate from your average Customer, this can be configured on this page. This will make sure that the correct Terms & Conditions are selected during certain events, such as approving Sales Orders. Terms & Conditions can be created in the settings and be designated for the appropriate entity, such as Sales Orders or Purchase Orders.
Customer/Vendor Reports
-
Reports Page
There are a number of built-in reports in Striven which are designed to help you gain insight into your Customer activity and profitability. Below are details on reports in Striven which can help gain insight in regards to how they are categorized as well as where new Customers are coming from based on the referral set.
-
Customer Category Report
The Customer Category Report breaks down the close ratio per Category based on how and when a Lead was marked as a Customer. Categories can be created for Customers within the Company Settings. They are meant to help you group Customers with certain similarities. Categories can be used in whatever way would benefit your Company most. A date range filter is included to filter based on when the Customer was set as a Customer in Striven. Below is an example of the Customer Category Report.
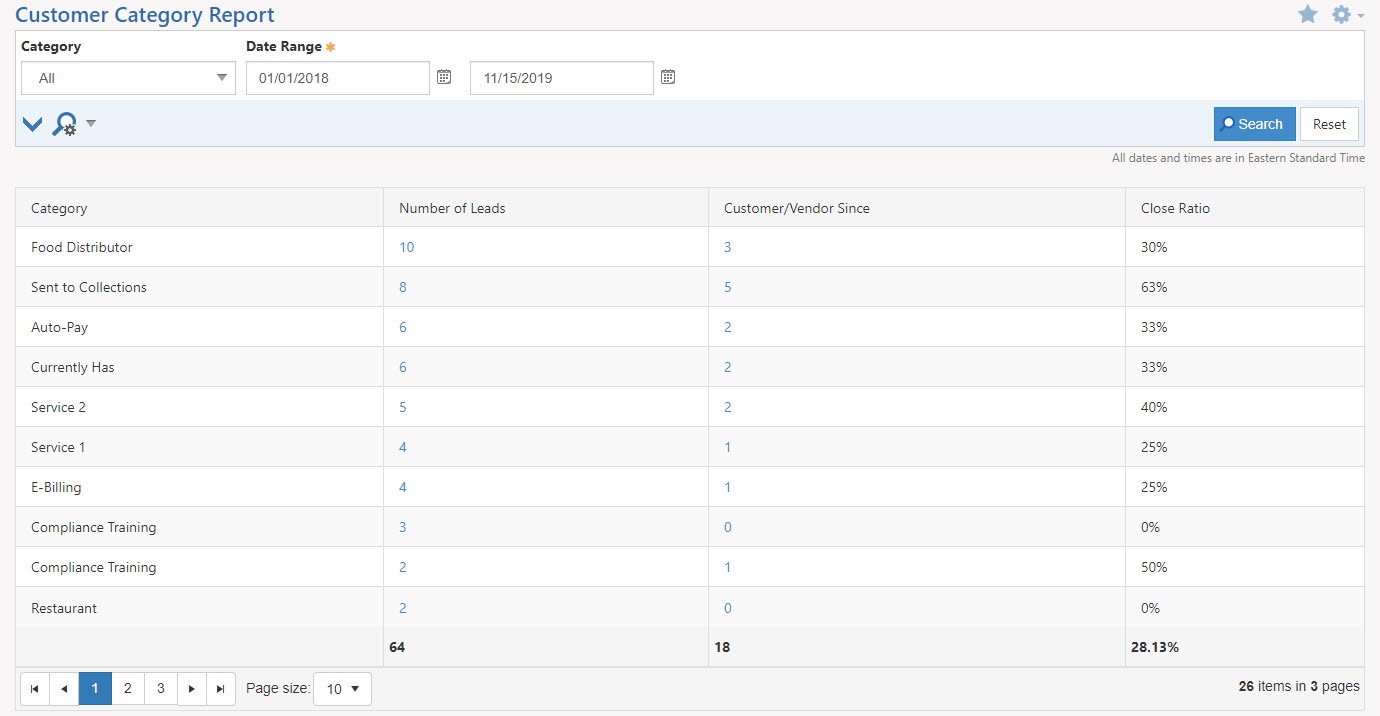
Example of Customer Category Report
-
Referral Source Report
The Referral Source Report is a great way to get a visual representation of how your Customers heard about you. There are some Referral Sources set up in your Striven system by default. You can also add/edit Referral Sources if you would like. Referral Sources can be set up in your Company Settings. If you choose to make any Referral Sources public, they can be added to your Lead forms. This will allow your Customers who are completing the Lead forms to indicate how they heard about you. You can also set a Referral Source for a Customer from their Customer Information page.
Once sufficient data is gained, this report can allow you to see which Referral Sources are leading to the most successful close rates. You can also view this data in bar graph and pie graph visuals.
To access the Referral Source Report, the path you can follow is:
Reports → Sales → Referral Source
-
Recap
With this guide, we’ve explored ways to gather and store Customer/Vendor information within Striven, how to navigate Customer/Vendor accounts and where to find the related information using the waffle menu, and how to create or manage Customer/Vendor Assignments. We’ve discussed Striven’s Customer/Vendor collaboration tools and financial transactions, as well as available reporting options related to Customers/Vendors. All of these features will enable you to manage your Customers/Vendors more smoothly, ensuring successful relationships with those you do business with on a regular basis or even just occasionally.
FAQs
-
I do not want financial information to be displayed on my Customer’s Dashboard. How can this be removed?
Widgets for a Customer’s Dashboard can be removed by clicking on the Add Widgets button at the bottom of the page or by clicking on the 4-Square icon in the Customer Menu Bar.