
Scheduling & Communication
Discussions
Support Guide
-
Overview
The Striven Team understands how important it is for your Company to be able to communicate and stay up-to-date on what’s happening with your Customers and the work you’re completing for them. Discussions is a feature designed to assist with doing just that. With Discussions, you will be able to easily communicate with your Employees and Contacts, while keeping these messages together within Striven so no details are lost or inaccessible to those who need to be kept in the loop.
Read this guide if you are trying to:
✔ Locate and view your Discussions List.
✔ Communicate effectively using Discussions and Templates.
✔ Configure your Discussion views, labels, and Portal visibility.
Discussions
-
Discussions
Discussions are located throughout the Striven system to enable users to easily communicate with other users, Contacts, and Portal users. You can use them to communicate with Customer/Vendor Contacts and Candidates as well. Discussions users create in Striven will not only be received in the recipient’s email inbox, but Striven will also track replies and allow users to view the history. Historical Discussion tracking is available throughout Striven, whether from a Task, Project, Order, or just creating a Discussion from the quick add menu.
Discussions are also a great option for leaving notes on a Task or Project, as opposed to having a conversation with another participant. If you desire to just make a note on the Task, you do not need to add anyone else to the Discussion, unless you wish to bring it to their attention and have them notified of the submission. You can also label the Discussion to clearly identify that the particular thread is for note taking.
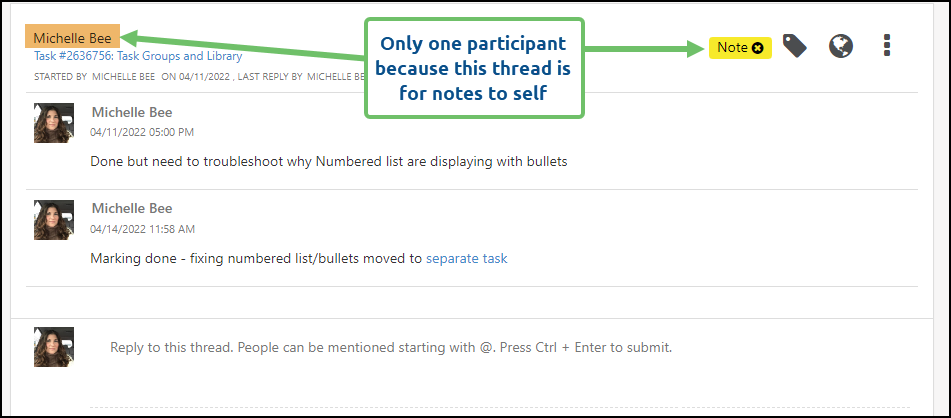
Example of Using a Task Discussion Thread for Note Taking Purposes

All Discussions related to Tasks, Projects, Orders, etc. are viewable by anyone in Striven who has permission to view those areas of Striven. If a Discussion is not related to any Tasks, Projects, etc., only the people involved in that Discussion can view the thread.
-
Discussions Settings
The topic related to a Discussion will be displayed when the recipient receives a notification through their email regarding the communication. This allows for easy access as the related topic will be hyperlinked.

Example of Task Discussion Email Notification
To have this information not displayed to the recipient configurations can be completed within the Discussion Settings.
To configure the Discussion Settings navigate to Company → Settings → Company → Collaboration → Discussion → Settings.
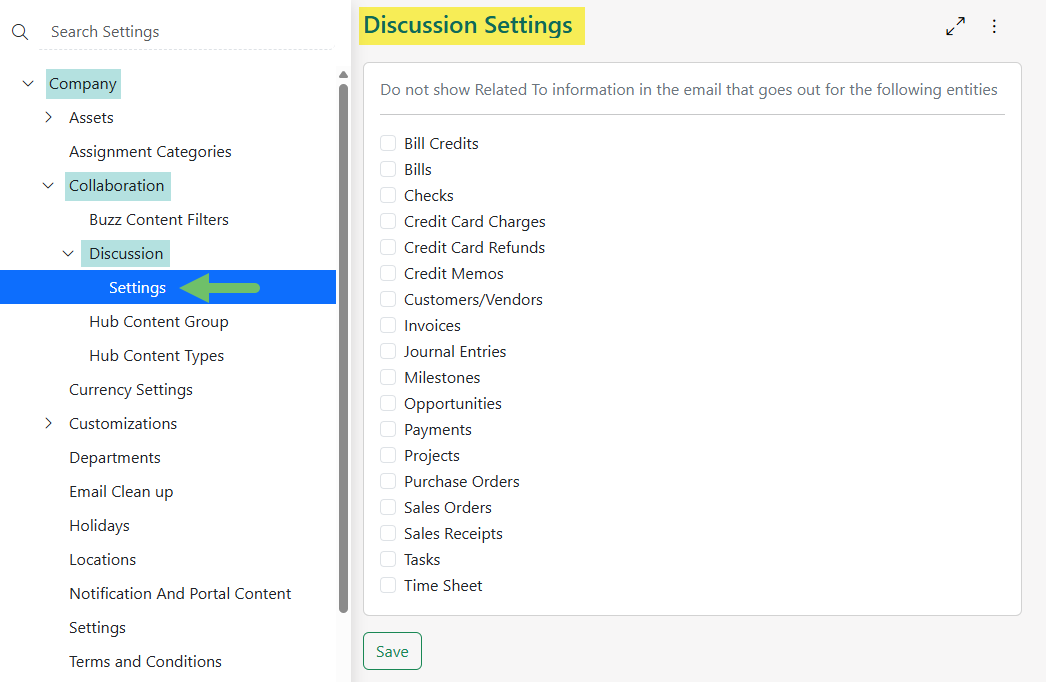
Example of the Discussion Settings Page
-
Discussions List
Clicking on the Discussion icon on the upper right side of the Striven Menu Bar (next to the Striven logo) will display the Discussions List.

Example of the Discussions Icon on the Striven Menu Bar
This will show a list of all the Discussions you are involved in, whether you created them, were tagged in them by other users or contacts, or made a participant in the Discussion. Clicking on the Discussion in the list will open the Discussion thread in the read panel to the right of the list. Below is an example with a description of some of the features available on this page:
- Select All: Selects all the Discussion threads in the list at once. Discussion threads can be individually selected by checking the boxes next to the particular Discussion thread you wish to select.
- Start a Discussion: Opens a window to start a new Discussion, unrelated to any particular Task, Project, or Order.
- Note: In order to create a Discussion related to a particular Task, Project, Order, etc. you would need to create it from the Task or Project you want the Discussion related to.
- Archive: Selected Discussions from the list will be archived.
- Search Discussions: Search field to enter specific text to perform a general search of the all Discussions.
- Note: This will show results for Active Discussions, as well as the Archived ones. Archived Discussions will display in the results with a system label noting they are Archived.
- Customized Search: Displays a popup window wherein you can select filter options to narrow down and refine your search. This feature offers filters for Employee participants, Contact participants, Related To (such as Tasks, Projects, Sales Orders, etc.), Date Ranges, and Discussion Labels. Results listed for the Custom Search will sort based on first the last reply date and then the date created regardless if the Discussion has been read or unread.
- If you wish to include matches for both Active and Archived Discussions in one view in a Customized Search, you will need to check the box for Include Archived.
- To cancel a search, click the X button next to the Search Discussions field, or switch between Active and Archived Discussion views from the kebab menu.
- Refresh: Refreshes the Discussions List so the most recent submissions will be displayed.
- Kebab Menu: Houses the option to display the Discussions that have been archived as well as settings for Discussion Notifications.
- Discussion Thread: Example of the details displayed in the Discussion List for each Discussion thread. This includes, the participants, last updated date and time, and associated Tasks, Projects, Sales Orders, etc., if applicable.
- Discussion window: Window pane to the right of the Discussions List that displays the selected Discussion thread. If no Discussion is selected, the pane is blank with the notice to Select a thread to read.
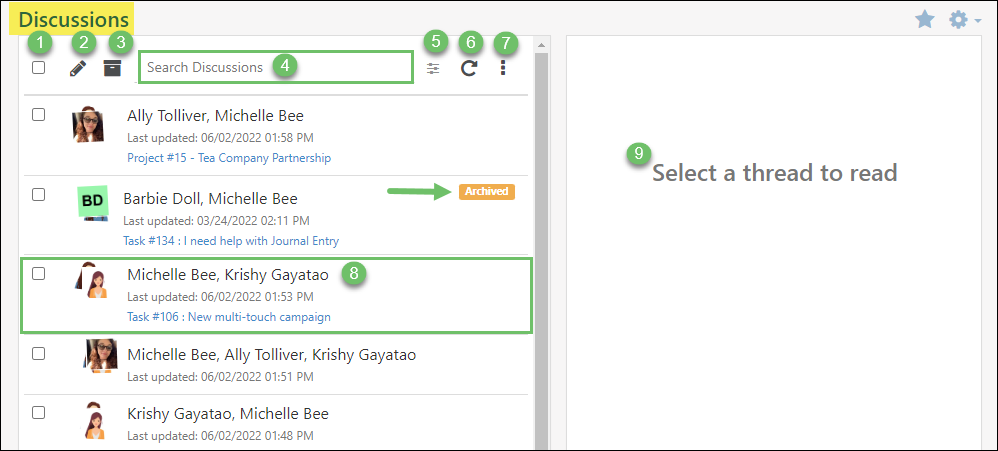
Example of the Discussions Page
-
Creating a Discussion
When creating a new Discussion from a Task, the default setting will include the “Requested By” Contact or the Contact related to the Project, Task, or Order in the conversation. You can change this by removing them from the Discussion by clicking the X next to their name, or by adding other participants by clicking the Add button. If the creator has not selected the “Requested By” or “Contact” on the Project, Task, or Order, the Discussion will only include the creator and any participant they choose to include in the thread, if any.
Another way to add a participant to an already existing Discussion is to tag them in the Discussion. This can be accomplished by typing the @ symbol before their name or email address in a message within the Discussion thread. This will also trigger Striven to send a notification to the participant that they have been tagged in a Discussion.
- Requested By: Automatically sets the Task Requested By as the contact for a new Discussion. If no one is set as the Requested By, or if you need to include other Contacts or Employees, you can simply add them with the Add button.
- Add: Allows you to include additional Contacts or Employees to the new Discussion
- Task: If the Discussion is related to a Task, the Task Name will be displayed here. If a Customer is associated with the Task, the Customer Name will be listed as well.
- Visible on Portal: Determines if this new Discussion will be visible on the Customer/Vendor Portal. If you are sending a Discussion to a Customer or Vendor this cannot be unchecked.
- Content & Options: The Discussion message content with options to change font styling, bulleting, add attachments, create hyperlink, insert a Template, or Label the new Discussion.
- Post: Sends the Discussion message to the selected recipients.
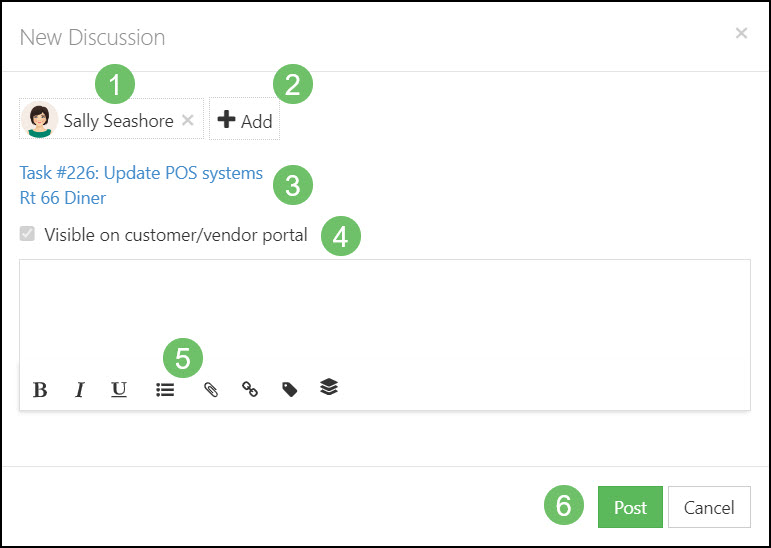
Example of a New Discussion
-
Discussion Size Restrictions
Discussion sizes are limited to 1MB to enhance system performance and ensure better readability when viewing Discussions. The size limit is present across your Striven system, and in the Customer/Vendor Portal. When attempting to send a Discussion exceeding the 1 MB limit, a red pop-up Error message will appear stating that the Discussion has not been saved due to the size restriction.

Example of the Discussion Size Limit Exceeded Error
The Discussion cannot be sent when exceeding the 1MB size restriction. You may reduce the size of the Discussion, or send the content of your Discussion as an attachment to proceed.
If a Discussion reply exceeding 1MB has been sent via Email, the content of the reply will be automatically converted to a PDF document, and attached to the Discussion. Workflows utilizing the Send Discussion action will receive the same size restriction. If a Workflow Discussion exceeds 1MB, the content of the reply will be attached to the Discussion as a PDF document. The generated PDF will be named “Discussion.pdf”, and will be available for selection at the bottom of the Discussion.

Example of the “Discussion.pdf” Attachment on a Discussion
-
Archiving Discussions
Discussions may be archived and unarchived from the Global Discussions page, or at the individual Discussion level. Archiving your Discussions allows you to keep your ongoing or important conversations at the forefront, while saving all other Discussions for reference at a later date.
To archive a Discussion from the Global Discussions page, use the checkbox to select the Discussion Thread you wish to archive, then select the Archive button from the top of the page.

Example of Archiving a Discussion Thread
You may view your archived Discussions by selecting the kebab icon, then choose Show Archived from the available options.
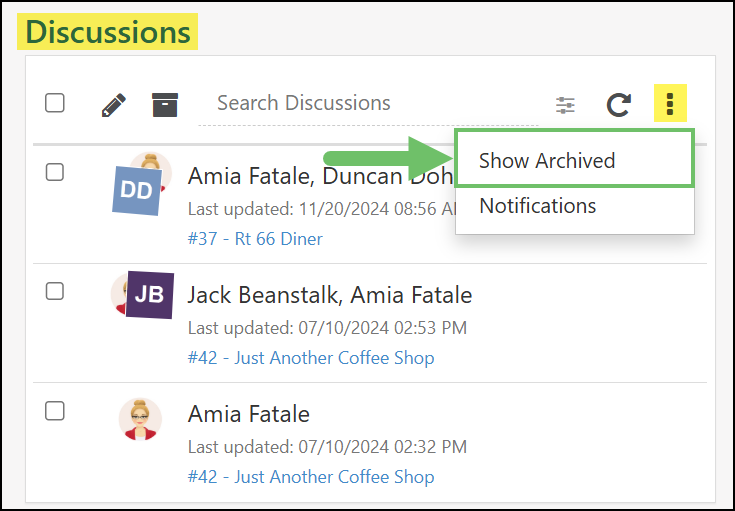
Example of the Show Archived Option
You may also archive a Discussion from the Discussion Thread level by selecting the Archive button located on the Thread header.

Example of the Archive Option at the Discussion Level
-
Deleting Discussions
In cases where a Discussion contains sensitive or incorrect information, users with the appropriate User Role permission can now delete an entire Discussion thread.
To delete a Discussion thread, your User Role must include the permission “Discussions – Delete“.
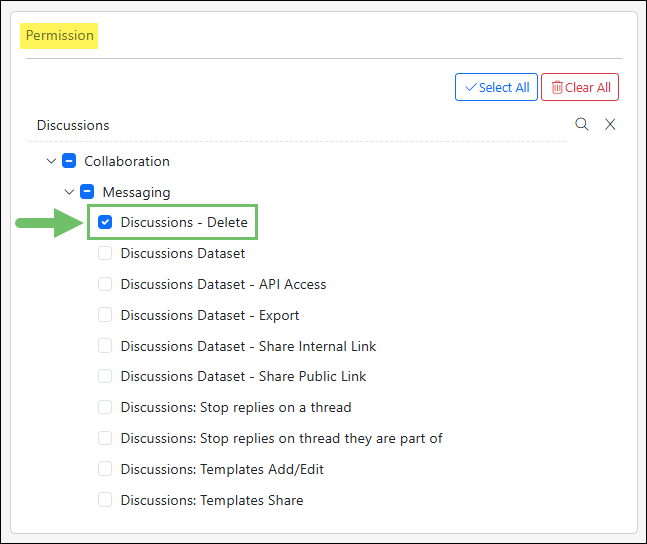
Example of the User Role Permission to Delete Discussion Threads
Deleting a Discussion thread is quick and easy. Simply click the kebab menu icon in the top-right corner of the Discussion thread you wish to delete. From there, select the Delete Thread option from the drop-down menu.
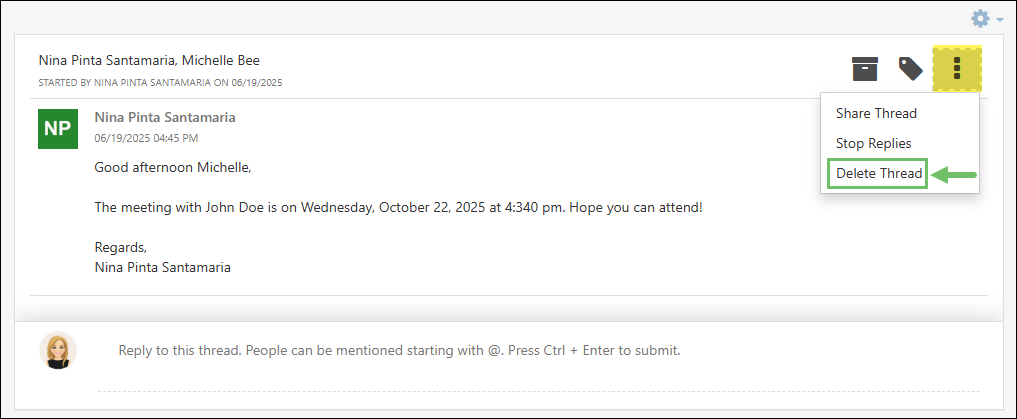
Example of the Delete Thread Option on the Discussion Thread Kebab Menu
A confirmation message will appear asking: “Are you sure you want to delete this Discussion thread? This action CANNOT be undone.” Click Yes to confirm or No to cancel.
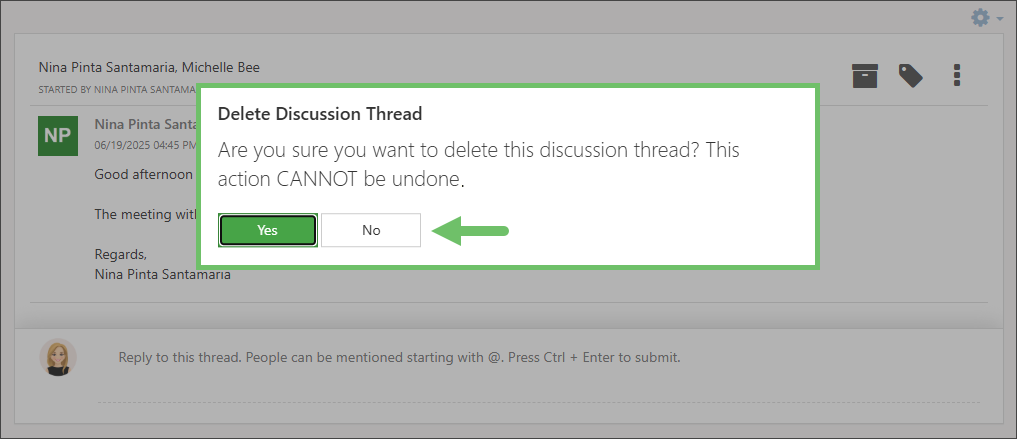
Example of the Delete Discussion Thread Warning Message
- Notes: Only entire threads can be deleted. Individual messages within a thread cannot be removed.
Deleting a Discussion thread will remove all messages, participants, images, and attachments. Additionally, the thread will also be removed from the Global Discussions page.
If a user has the Discussion thread open while someone else deletes it, they will not be able to take any actions on the Discussion. Refreshing the page will clear away the Discussion thread that has been deleted.
Discussion Email Notifications
While Discussion threads can be deleted from within Striven, any email notifications that were sent before deletion cannot be recalled. Email delivery typically occurs within a few minutes of posting, so if sensitive information was included, it is best to delete the thread promptly in Striven to prevent further visibility within the system.
For Discussion emails that are delivered, the deleted Discussion will not be accessible from the link and will display a “Resource not found” page when clicked.
Additionally, any email replies sent to a deleted Discussion thread will not be processed or saved in Striven.
-
Discussion Templates
Users are able to create Discussion Templates for commonly used reminders, follow up messages, and responses to be used in Discussions on Opportunities, Orders, Projects, and Tasks. Templates can include merge fields to quickly insert Customer and Contact information, Employee signatures, and more.
Permissions
There are three (3) permissions related to Discussion Templates that can be added to a User Role.
- Discussions: Templates Add/Edit: Allows users to create new Discussion Templates and edit existing Templates which they have created.
- Discussions: Templates Manage All: Allows users to view and edit ALL Discussion Templates in your Striven system, regardless of whether the user has the individual Add/Edit or Share Discussion Template permissions.
- Note: This is a powerful permission and care should be taken when applying this permission to users.
- Discussions: Templates Share: Allows users to share Templates they have created with other users.
Users without these User Role permissions will still be able to utilize Discussion Templates that have been shared with them.

Example of the Permissions Related to Discussion Templates
Creating Discussion Templates in Settings
Discussion Templates can be created in the Settings under the following options:
- Company > Settings > Customers/Vendors > Opportunities > Discussion Templates
- Company > Settings > Accounting > Sales > Sales Orders > Discussion Templates
- Company > Settings > Projects > Discussion Templates
- Company > Settings > Tasks > Discussion Templates
From the Discussion Templates list, existing templates can be clicked on to be edited as needed. From the list the Name and Shared By can be viewed with actions to make a copy of an existing discussion template or deactivate the template. By clicking the plus icon at the top of the Discussions Templates list, a new template can be created.
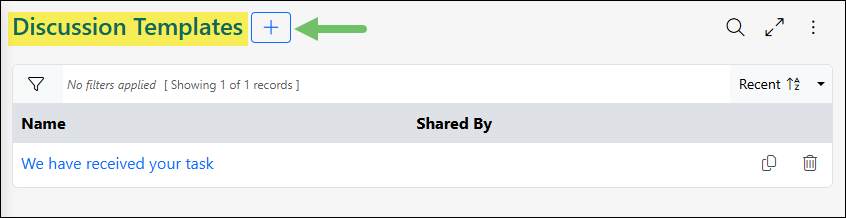
Example of the Discussion Templates List
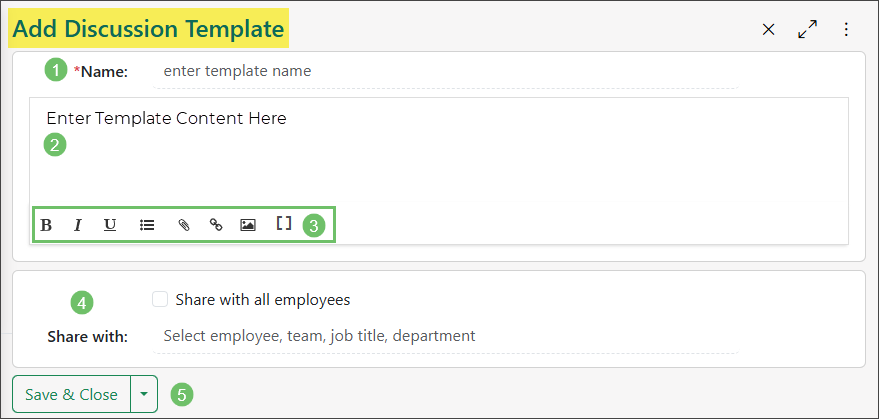
Below is a screenshot illustrating how the Add Discussion Template page appears and a description of what can be accomplished there.
- Name: Displays as the name of the template when selecting a Discussion template on an entity in Striven such as Opportunities, Tasks, Projects, and Sales Orders.
- Content: What will populate as the content when the Discussion template is selected within an entity in Striven such as Opportunities, Tasks, Projects, and Sales Orders.
- Formatting Options: An array of formatting options are available to add for the content that is being set within the template such as the following:
- Bold: Will make any of the selected text from the content bold.
- Italic: Will make any of the selected text from the content italic.
- Underline: Will add an underline for any of the selected text from the content.
- Insert Unordered List: Gives the option to add a bulleted list into the content.
- Attachment: Adds an attachment which will be added each time a Discussion is created from the template.
- Link: Allows for any of the text from the content to be hyperlinked to another page.
- Image: Adds an image which will be added each time a Discussion is created from the template.
- Merge Fields: Allows for information regarding the entity such as Opportunities, Tasks, Projects, and Sales Orders to be added to the content in order to make sure the Discussion is referring to notable information.
- Sharing Options: Gives the option to share the template with all or a select group of people with the following options:
- Share With All Employees: Will make the template available to all Employees who can create Discussions.
- Share With: Will make the template only available to a certain group of people such as certain Employees, Teams, Job Titles, and Departments.
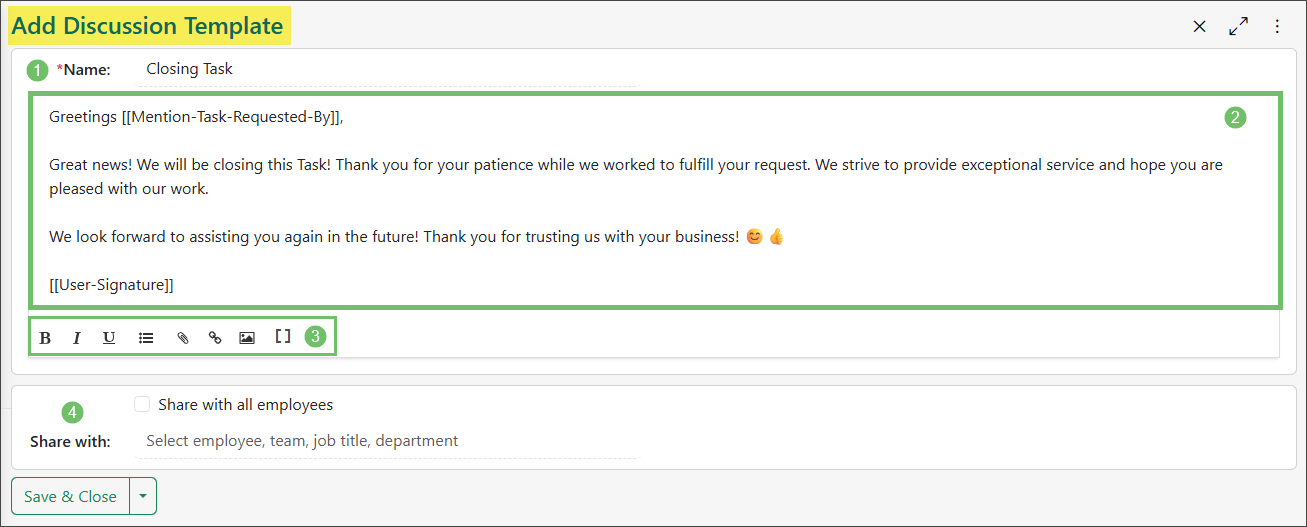
Example of the Add Discussion Template Page
Create Discussion Templates When Creating Discussion
Discussion Templates can also be created and managed at the Discussion level. Discussion Templates are entity specific, meaning a Template may only be used on the entity for which it was created. For example, a Discussion Template created for Task Discussions will only be available for use in Discussions related to a Task.
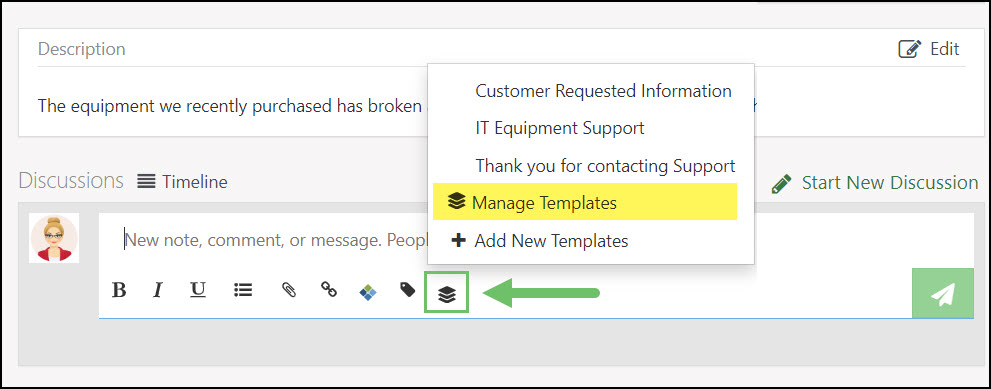
When creating a Discussion, a Template icon is displayed on the Actions bar once the user clicks into the text box.
Clicking the Discussion icon displays the options to choose an existing Discussion Template to use, Manage Templates, and Add New Templates.
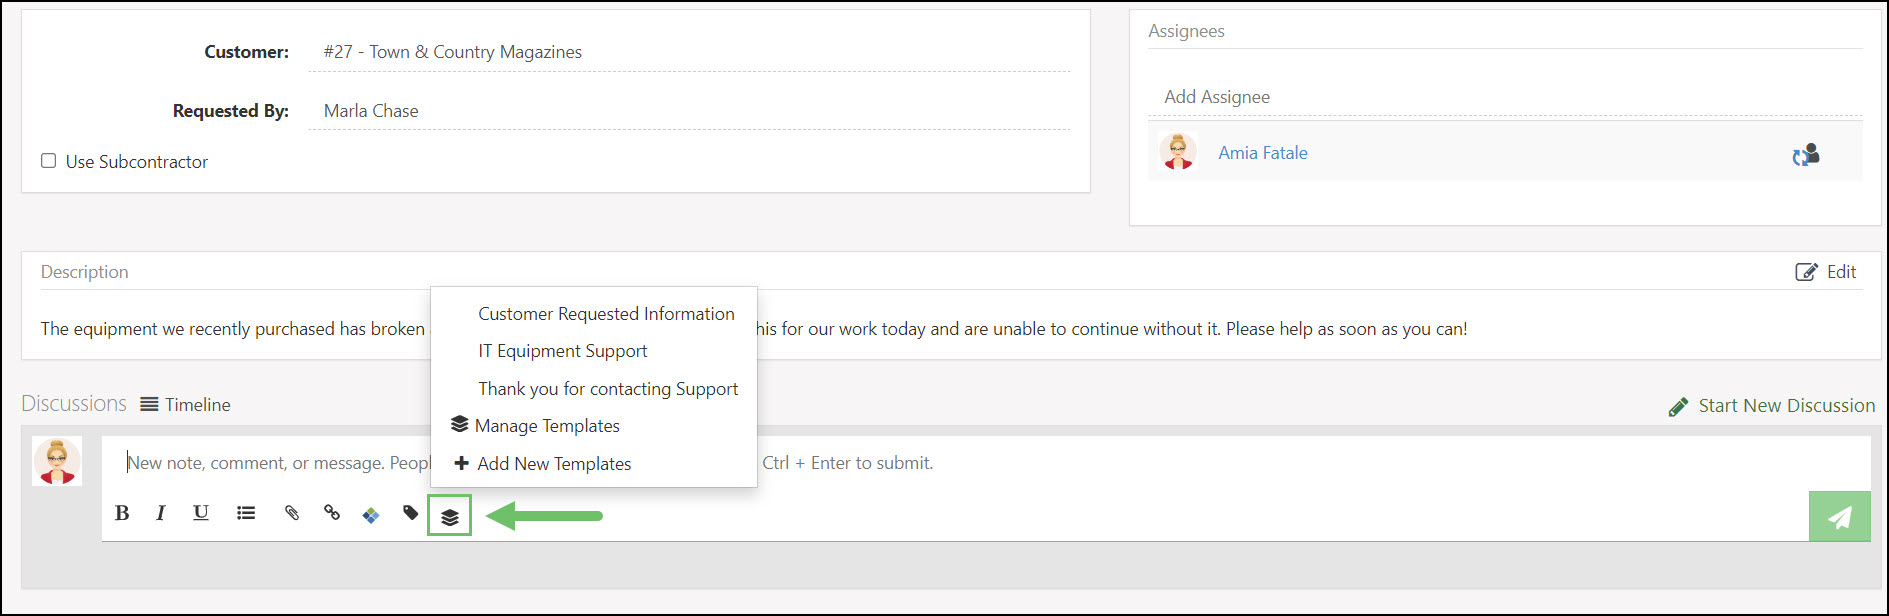
Example of the Templates Icon on the Discussion Actions Bar
-
Creating a New Discussion Template
To create a new Template, you can click the Add New Templates option from the Template icon menu, or you can use the Plus (+) button located on the Discussion Templates List page.
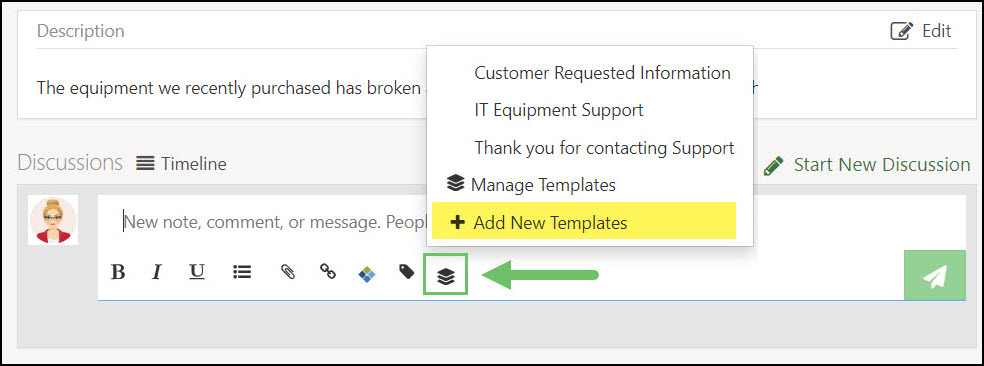
Example of the Add New Template Option
When choosing to add a new template, you are brought to the Add Discussion Template screen.
- Template Name: Enables you to enter a name for the new Discussion Template.
- Template Content: Allows you to enter the body of the Template you are creating. This body can include hyperlinked text and merge fields that can be added using the Editing Actions.
- Editing Actions: Allows you to format the body text of the Discussion Template by adding unordered lists, hyperlinks, attachments, and merge fields. The available merge fields are limited to information specific to the entity for which you are creating the Template.
- Sharing Options: Allows this Template to be used by all Employees with access to write Discussions. If you do not want all Employees to access this Template, you can use the field below it to type ahead to select specific Employees, Teams, Job Titles, or Departments to share with. If you choose to share the Template with others, a Can Edit checkbox will appear, allowing you to dictate whether those you shared the Template with can edit it.
- Note: If you do not select anyone to share the Template with, it will remain private for your personal use and will not be available for selection or viewable by other users.
- Save Options: You can Save, Save & Close, or Save & Add New when saving your Template
Example of Adding a Discussion Template
-
Managing Discussion Templates
To manage and edit your existing Discussion Templates, simply click the Template icon and select the Manage Templates option from the menu.
Example of the Manage Templates option
When viewing the Discussions Template List page, you will only be able to view the Discussion Templates for one entity at a time. As an example, clicking to Manage Templates from a Discussion on a Task will only allow you to manage Templates related to Tasks.
The Discussion Templates List page offers multiple options for managing your Discussion Templates:
- Add Template: Clicking the Plus (+) button will allow you to add a New Template.
- Search: You can search for a Template by Name and/or Status.
- Sort: The Discussion Templates List can be sorted by Name or Recent.
- Name: The Discussion Template’s name is displayed in blue text, which can be clicked to view and edit the content of the Template.
- Shared By: If a Template is shared with you by another user, their name will be displayed in the Shared By column so you can easily identify the creator.
- Copy and Deactivate: Clicking the Copy icon will copy the Template information and content into a new Template. To deactivate a template, simply click the Trashcan icon.
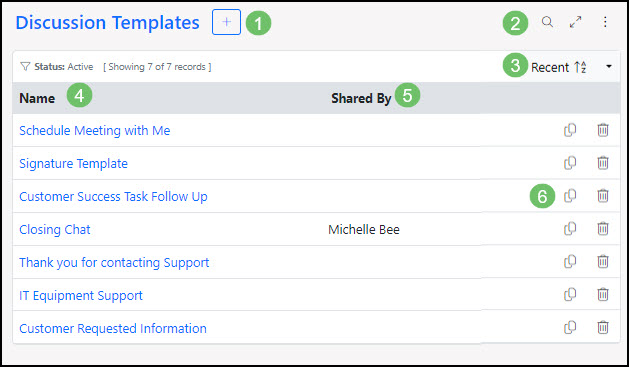
Example of the Discussion Templates List Page
-
Using Discussion Templates
When selecting a Template to use in a Discussion, the first Template listed under the Template icon menu is the most recently used Template. This is followed by up to nine (9) other existing Discussion Templates in alphabetical order. To select a template from this list, click on the name of the Template you would like to use, and it will be inserted into the discussion you are writing.
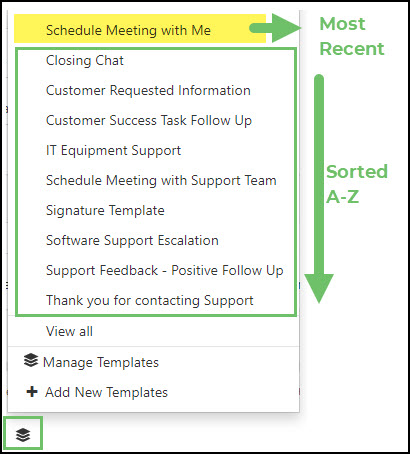
Example of Discussion Templates Sorted
If you have more than ten (10) Templates created or shared with you, the View All option will need to be selected.
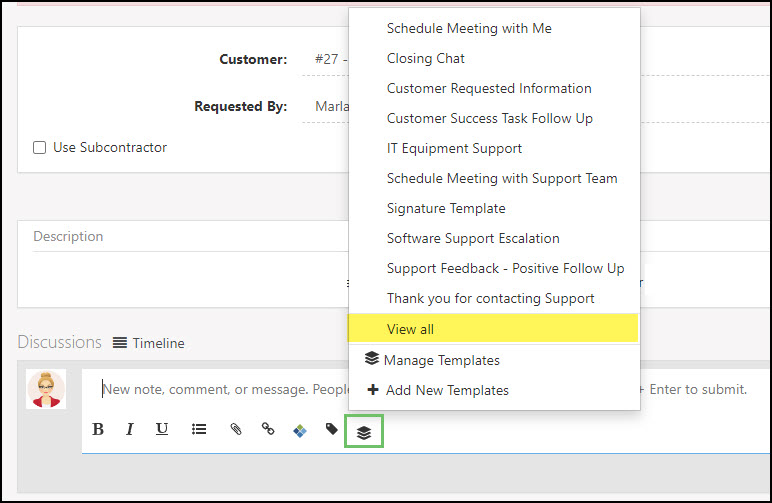
Example of the View All Option for Templates
The View All option will prompt a pop-up window that allows you to search for the Template you would like to use, or scroll through the list of Templates that are available to you in the Discussion you are writing. To insert a Template into your Discussion from this list, click the blue Select button on the far right of the Template you would like to use.
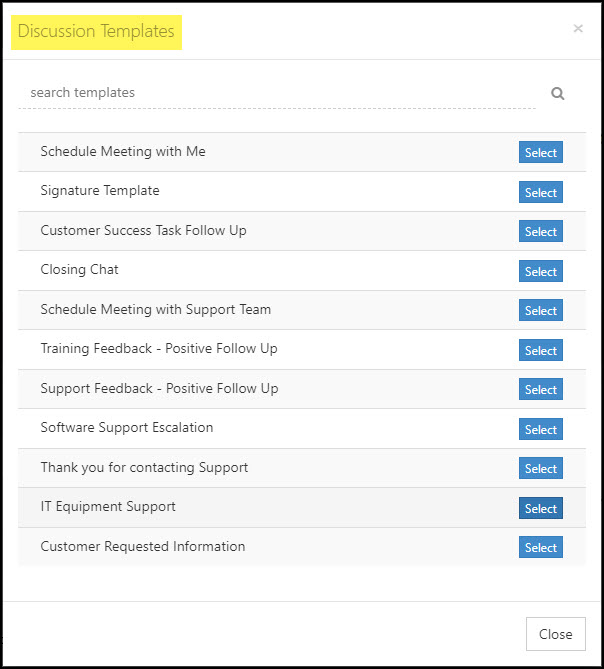
Example of the View All Discussion Templates Pop-Up Window
When a Template that contains merge fields is selected, the merge fields will populate the related information into the Discussion as seen in the example below. Within this example, the Mention Task Requested By and the User Signature merge fields were utilized.
The Mention Task Requested By field has inserted the name of the Customer’s Contact that requested the Task and mentioned them in the Discussion.
When the User Signature merge field is utilized, it will insert the configured signature of the Striven user that is creating the Discussion. The Signature that displays can be edited within the My Profile menu of the user, or at the Company level under Company > Settings > Employees > Settings.
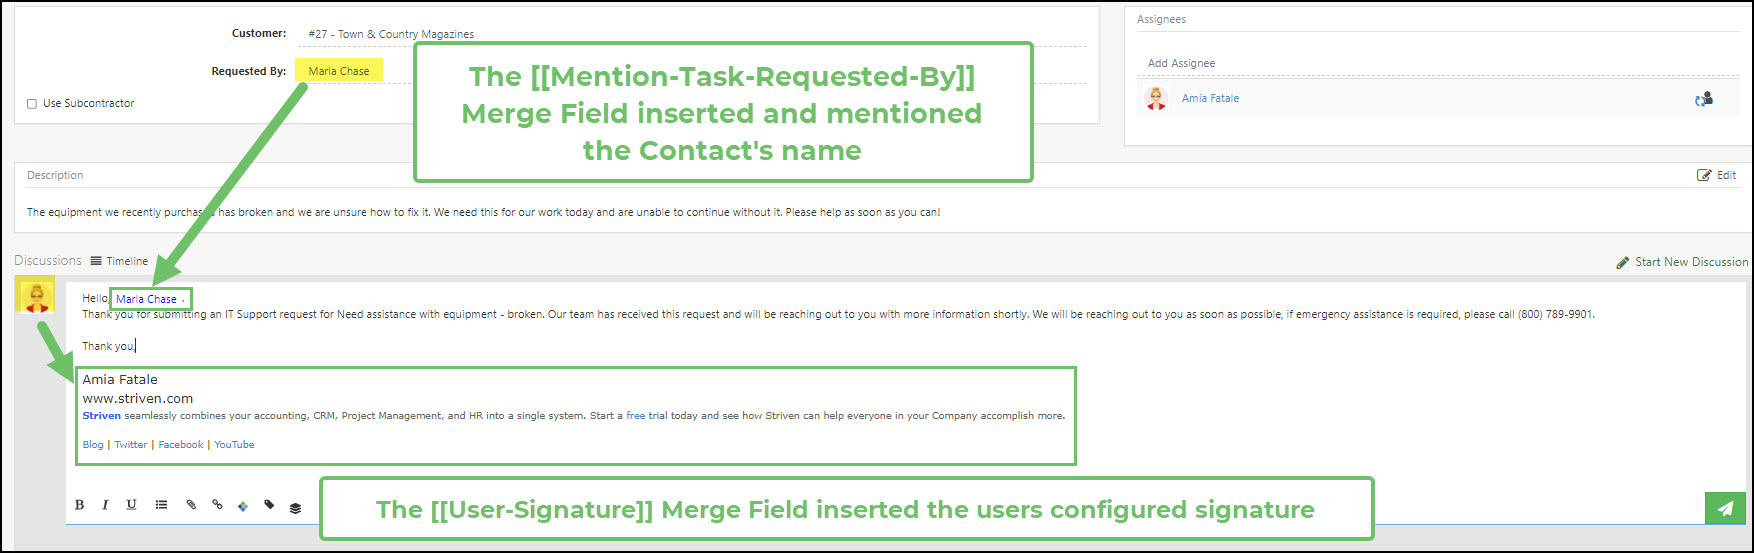
Example of a Discussion Template Containing Merge Fields Inserted into a Discussion
-
Discussion Notifications
Striven has provided the ability to choose and manage your Discussion Notifications. This is an important settings feature to have to improve your attention to time-sensitive communications, while also allowing you to focus and determine how and when you are notified of new Discussion messages.
To review and configure your Discussion Notification settings, navigate to the Discussions List page. Click on the Discussions List kebab menu and select Notifications.
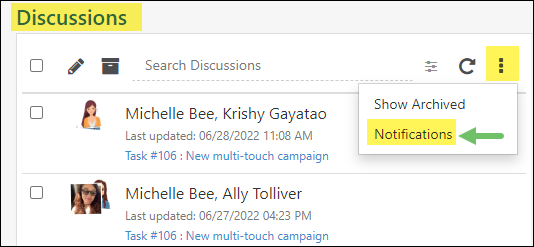
Example of the Discussion Notifications Settings Option
This will activate a popup window with Discussion Notifications options to select. These options include:
- Turn on browser notifications: Turned on by default. This is the flashing notification on the title bar and the chime sound when a new Discussion is received.
- Turn on email notifications: Turned on by default. This is an email notification that is sent automatically if a new Discussion is not viewed after five (5) minutes.
- Turn on text notifications: This notification works like the email notification, but sends a text message automatically if a new Discussion is not viewed after five (5) minutes.
- Notes:
- This option requires the activation of the Twilio Integration within Striven.
- This option also requires the Discussion participants to have a mobile number listed on their profile.
- Notes:
- Turn on auto responder: This feature works similarly to how a Vacation Responder works for emails. Turning this on will set the system to send an automatic Discussion reply on your behalf (based on your configuration) in response to a new Discussion Thread or reply message. This auto-response will send once, then not again for 24 hours, per Discussion Thread. If you are sent messages in multiple Discussion Threads, the auto-response will send once per thread, per 24 hours, regardless of how many replies are sent to the thread after the initial one that triggered your auto-response.If you are going on vacation or will be out of contact for some time, check the box to turn the Discussions Auto Responder feature on. You will then be presented with a field to configure your auto responder message to inform others of your unavailable status. It will take approximately 1-2 minutes for the auto responder reply to display in the Discussion Thread.
- Note: Remember to uncheck the box and click Save to turn off the auto responder when you return from vacation or become available once more.
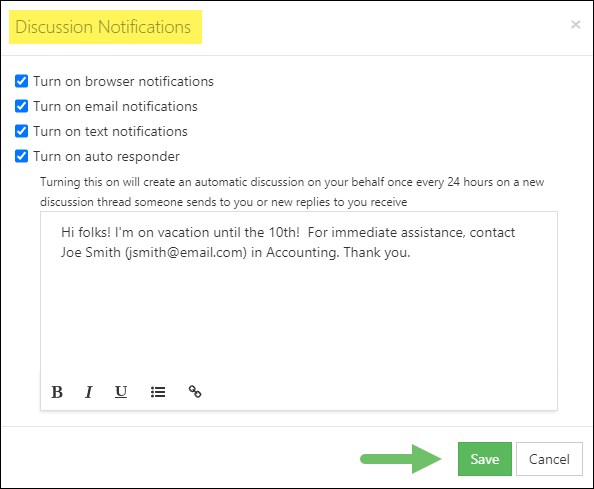
Example of Discussion Notifications Settings Options
Text Notifications Settings
When starting out with the text notifications option, you will probably want to customize and configure your Notification & Portal Content for the following content:
- New Discussion (SMS/Text Messages)
- New Discussion Reply (SMS/Text Messages)
These notifications are editable and provide merge fields for Company Name, Discussion Link, Manage Preferences Link, Related To, and User Full Name.

Example of the Notification & Portal Content for Text Notifications for Discussions
In order to send text message notifications, the setting for Send SMS/Text for Discussions needs to be selected at the Customer level on the Customer Contact Info page. This preference can also be edited through the Customer Portal from the My Info page.
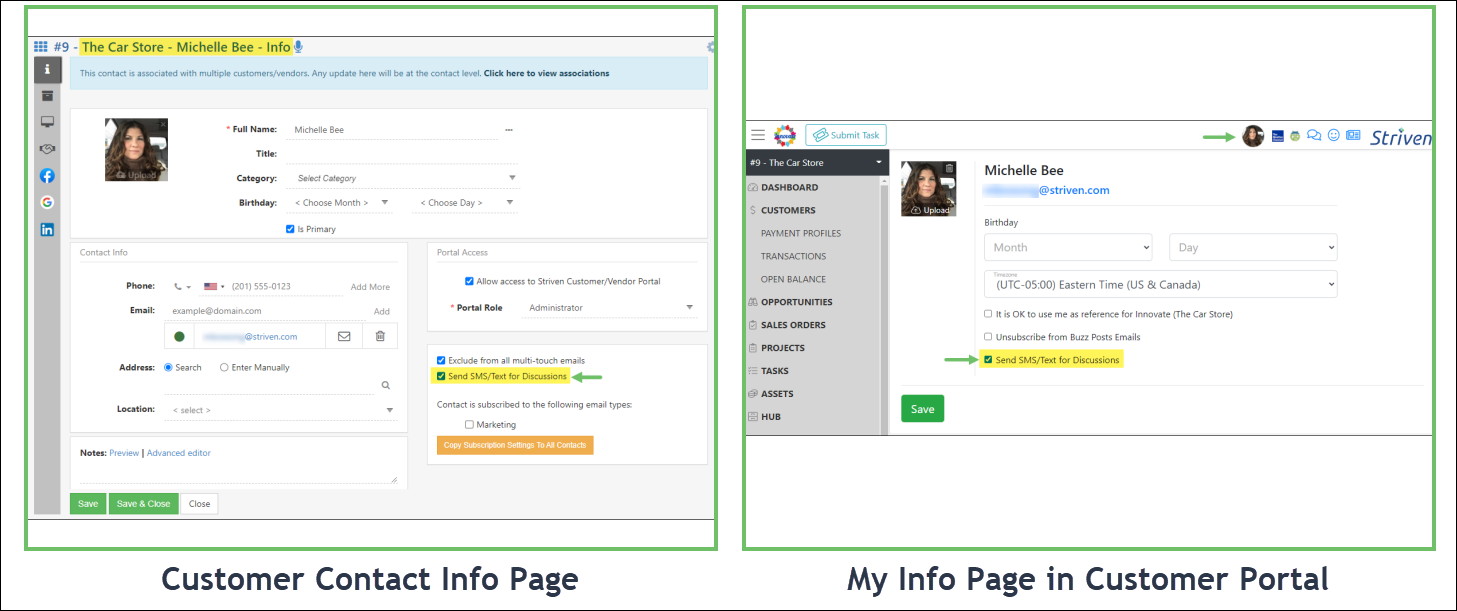
Example of System Locations for Text Message Notifications Settings
-
Discussion Views
There are two viewing options for Discussions in Tasks Striven. You can choose from the Thread or Timeline view options. You may also select to have the Discussion visible on the Portal by clicking on the Globe icon on the right side of the Discussion.
- The Thread view lists the Discussions as separate conversations, displaying the latest reply at the bottom of the list of conversations.
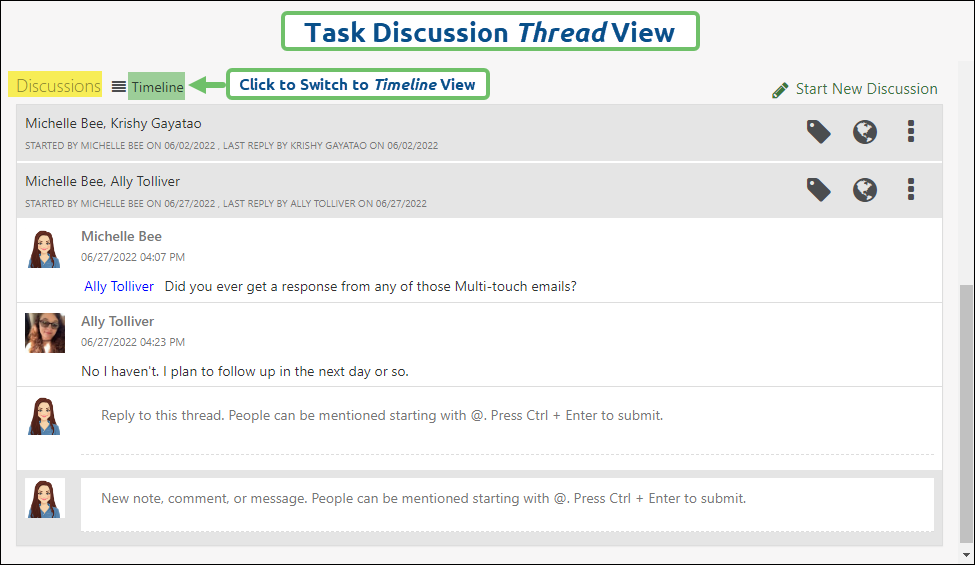
Example of Discussion Thread View on a Task in Striven
- The Timeline view displays the Discussion messages with the most recent submission at the top, regardless of which thread the message relates to. There is an option at the bottom of the message to view the entire related thread.
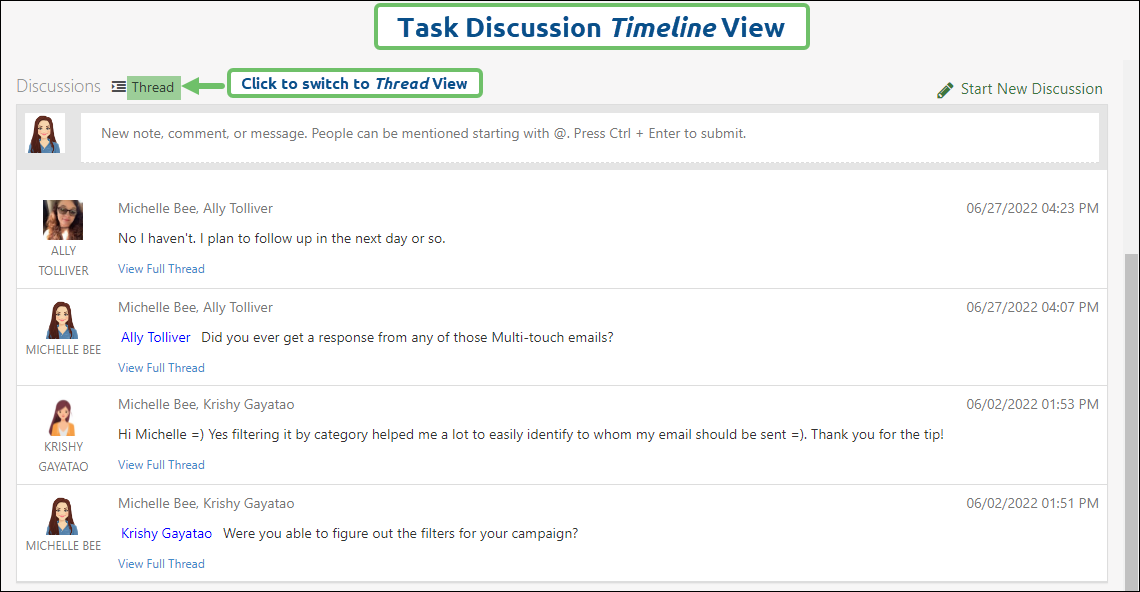
Example of Discussion Timeline View on a Task in Striven
Note: To switch between views, you can click on the Thread/Timeline view option to select the alternative. Whichever term is displayed, that is the view you will be switching to, not the current view. For example, it Thread is displayed, you’re currently viewing the Discussions in Timeline view, and clicking Thread will switch to the Thread view.
-
Discussion Labels
Sorting through Discussion threads can be simplified by using Labels. Labels can help identify the type or topic of a thread at a glance without having to read through the thread to find what information you are looking for, which can be time-saving when there are multiple threads in a particular Discussion.
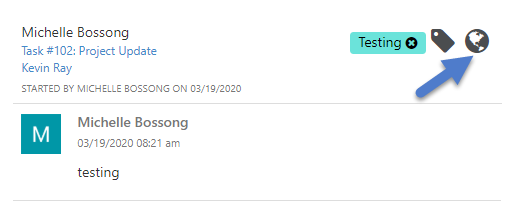
You can apply Labels to Discussions by clicking on the label button on the top right corner of the Discussion thread (noted in the example below with a red arrow) and selecting the label you wish to apply to your Discussion thread. Here you can also create new labels or edit existing ones.

Example of Discussion Thread
-
Visibility in Customer/Vendor Portal
You may decide to make a Discussion visible on the Customer/Vendor Portal by toggling this option on or off. This is accomplished by clicking on the Globe icon to make it blue. If the Globe icon is gray, only internal users will be able to see the Discussion as it will not be displayed in the Customer/Vendor Portal.
Example of Discussion Thread
-
Discussions in Customer/Vendor Portal
If a Discussion is made visible on the Customer/Vendor Portal, a Customer, Vendor, or Contact will be able to log into the Portal and view the Discussion. To do so, they would log into the Portal and click on the Global Discussions button located on the top right of the Portal screen, next to their Profile icon.

Example of Global Discussion Button on Portal
From here, they will be able to view all their Discussions, regardless of whether they’re related to Tasks, Projects, Opportunities, Orders, or any other area of Striven. Discussions related to entities such as Tasks, Projects, Opportunities, etc. can also be accessed directly from the entity itself.
-
Stop Replies in a Discussion Thread
If you find a particular Discussion thread is receiving many unwanted emails, such as Spam or Junk mail, you can use the Stop Replies setting to remedy this issue.
-
Permissions & User Roles
This feature will display for all users, but only those with the required permissions included in their User Role will be able to activate the setting.
- NOTE: It is recommended that the use of this feature be limited to Discussion threads that are experiencing extreme spamming or other such issues since there are no notifications or indications to the email sender that the Discussion replies have been stopped and/or that their email replies are not being delivered to the thread.
- The choice is up to the system administrator/subscriber, of course, but it is also recommended that permissions to this feature be reserved for higher level access or security users in your Striven system.
For users that do not have access to this feature, an alert message will display advising them that their User Role does not include the necessary permissions and to contact their system administrator for further assistance.
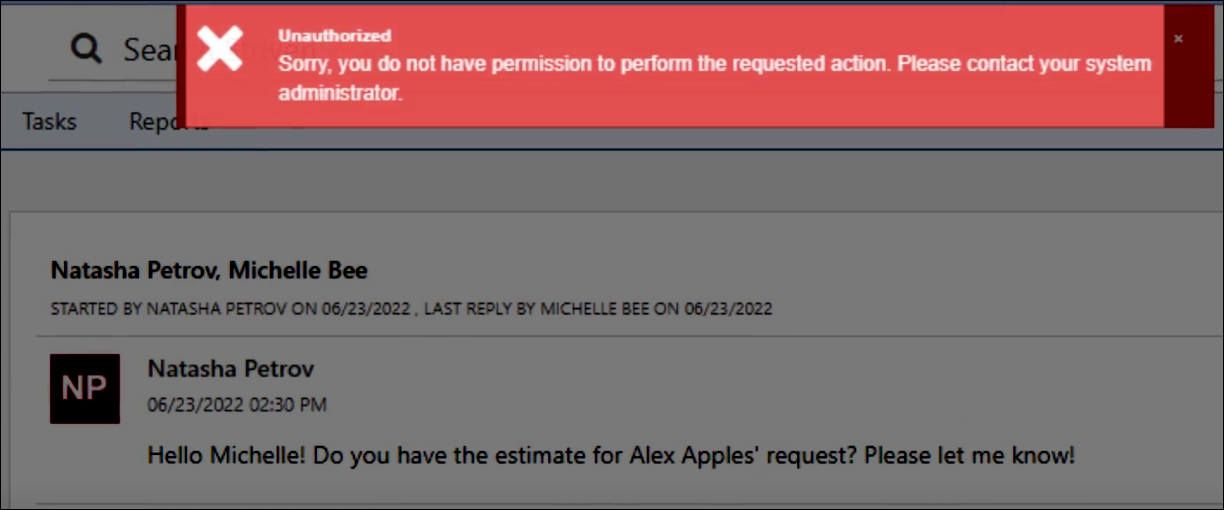
Example of No Access Alert Message for Feature
This feature requires 1 of 2 User Role permissions to Stop Replies on a Discussion thread. The 2 permission options are as follows:
- “Discussions: Stop replies on a thread” – A user with this permission can stop replies on ANY Discussion thread.
- “Discussions: Stop replies on thread they are part of” – A user with this permission can stop replies ONLY on Discussions threads in which they are a participant.
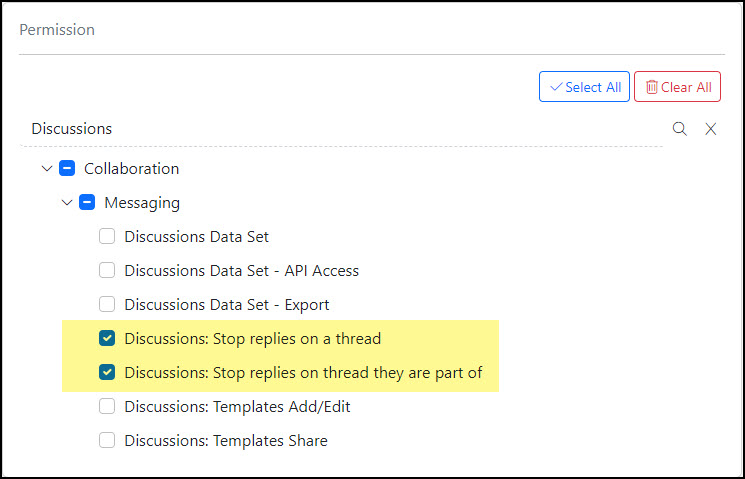
Example of Available Permissions for Stopping Replies on a Discussion Thread
-
Activating the Stop Replies Feature
To enable the Stop Replies feature on a Discussion thread, click on the kebab menu on the thread in Striven and select Stop Replies. This will trigger a warning message that will prompt you to confirm that you want to stop replies on the thread. Clicking Yes will result in the removal of the text field where a user would type a response, effectively making responses to the Discussion thread inaccessible.
Example of Activating the Stop Replies Feature on a Discussion Thread
At the top of the Discussion thread you will see a notation that the replies were stopped on this particular thread, the date they were stopped, and by whom.

Example of Discussion Thread with the Stop Replies Feature Enabled
If an email response is sent to this particular Discussion thread, it will be ignored by Striven and will not create a Discussion message from the email to the thread.
-
Allowing Replies Again
If this feature is enabled by accident, or if you wish to allow replies to this thread again, you can reverse the setting by clicking on the Discussion kebab menu and selecting Allow Replies.
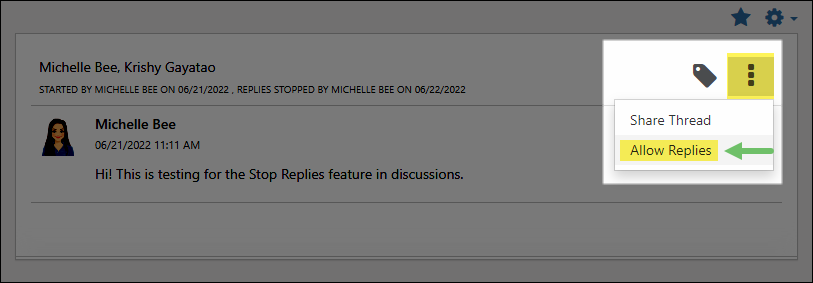
Example of Deactivating the Stop Replies Feature on a Discussion Thread
-
Recap
With this guide, we’ve explored the Discussions feature in Striven and reviewed a variety of details related thereto. We covered how to create Discussions and tag additional Contacts. Additionally, we’ve summarized the different viewing options available and described the ability to Label Discussions for organizational purposes within Striven.

Have a Question?
Ask the Striven Community
User-sourced how-to’s, feedback, and more!
FAQs
-
I receive a lot of Discussions and keep many Striven browser tabs open while I’m working. If I click on the Discussion in the list to stop the blinking, it marks the Discussion as “Read” and then I lose track of which ones I’ve actually read. How do I resolve this?
Since Discussion messages cannot be marked as Unread in the same way that email messages work, a simple way to resolve this by creating Discussion Labels to identify whether you read a Discussion or not. Not everyone can just stop the work they’re doing to read an incoming Discussion on the spot, and if you click on it to make the tabs stop blinking, you won’t know which Discussions you’ve read and which you haven’t.
To alleviate this, you can create a Label for “Need to Read” or “Unread” and apply it to the Discussion so that you know which messages you need to give your attention to at your earliest convenience. This is just an example of one of the many handy uses for Discussion Labels in Striven.