
Inventory & Items
Item Management
Support Guide
-
Overview
Item management functions can be found underneath the accounting tab in Striven. This guide will help you to create and manage Items using these functions within your Striven system and allow you to jump-start your purchasing and ordering process in Striven. Before continuing, please reference our Accounting Setup Guide to ensure you have set up your Chart of Accounts as this is vital to creating Items.
Read this guide if you are trying to:
✔ Understand Item Types within Striven.
✔ Create and manage Items within Striven.
✔ Setting up financials for Items using GL Accounts in Striven.
-
Items List
Keeping an accurate record of all Items you offer for sale is imperative for success and maintaining Customer satisfaction. Managing your Items in Striven is easy with the use of the Items List, which provides options to Search, Add, Import, or Deactivate Items. Other useful information is displayed on the Items List, such as the Item Name, Item Number, Item Type, Quantity on Hand, Item Category, Department, Price, and Cost. Further details about a specific Item on the Item List can be found by clicking on the Item Name.
The Items List can be accessed by navigating to Accounting → Inventory → Items.
The screenshot below illustrates how an Items List appears in Striven.
- Search: Filters the Items List based upon the criteria specified to narrow down and display only the Items for which you are looking. You can search by Item Name, Item Type, Status, Item Category, Manufacturer, Department, Manufacturer Part #, or Batch ID.
- Add: Redirects you to the Add Item page wherein you can enter the Item Name, Type, Category, Department, Item Description and other details about the Item.
- Import: Redirects you to the Items Import page wherein you can Generate a Sample File, Get Existing Data, view your Import History, or upload a file to add Items en masse or update existing Items.
- Sort: Provides the option to sort the Items List by Name, Type, Number, Category, Department, Price, or Cost. You can also choose whether to display the results in ascending or descending order.
- Item Name: Identifies the Item and links to the Item Info page of that particular Item for further information. Before the Item Name is an Actions menu with options to view the Item Quick Report or Copy the Item.
- Item Number: Identifies the Item by its designated Item Number.
- Description: Displays the Item Description saved at the Item level.
- Item Type: Identifies the Type of Item as it is recorded in your system. Available Item Types include Inventory, Non-Inventory, Service, Item Group, Discount, Fixed Asset, and Manufactured.
- Qty on Hand: Identifies the number of that particular Item you have on hand and links to the Item’s Quick Report for further stock-related information about that Item.
- Category: Displays the designated Category for the Item, if applicable.
- Department: Displays the designated Department for the Item, if applicable.
- Price: Displays the Price set in the Item Info page.
- Cost: Displays the Cost set in the Item Info page.
- Deactivate: Deactivates the Item. The Item is still saved in your system, but it is put into an Inactive status so it cannot be utilized without reactivating it. You can view your deactivated Items by selecting the Inactive status when searching on the Items List.
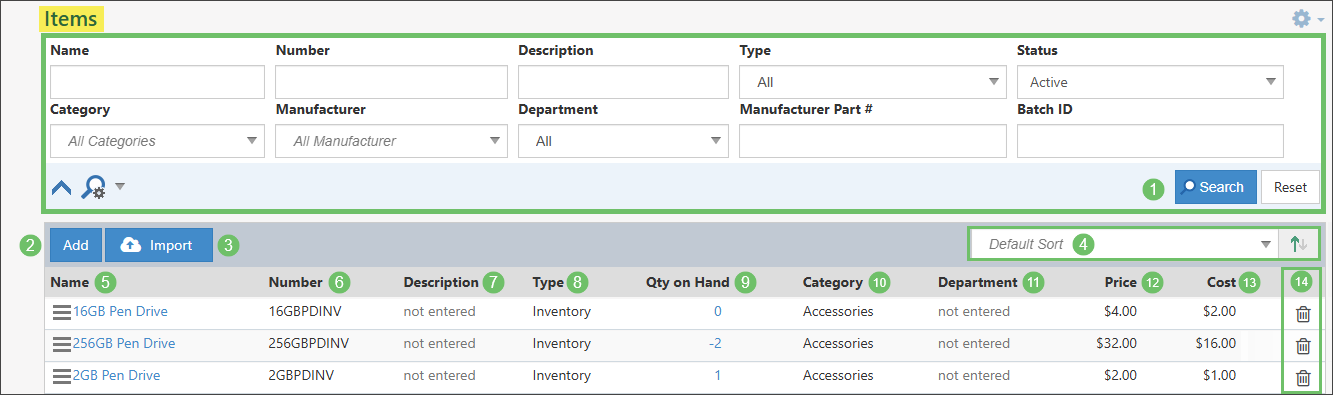
Example of Items List

-
Item Types
In Striven, the Item Type will determine what is required with regard to accounting information. For example, a Service Item may need an Expense Account, whereas an Inventory Item will have a COGS Account (Cost of Goods Sold) associated with it. Below details each of the Item Types in Striven.
-
Inventory Items
Inventory Items are tangible Items with which you track the quantities you have on hand at physical locations. These Items are generally ordered from Vendors, delivered, and then later counted and stocked. To begin utilizing this functionality, first you need to add an Inventory Item via the Items List. Once on the Add Item page, select Inventory as the Item Type. Once selected, more options will be presented to you which we’ll discuss further. Located below is a screenshot of an Inventory Item and details on what you can configure there.
- Name: The designated name of the Item in your Striven system.
- Number: The number entered to identify this particular Item in your Striven system.
- Type: Identifies the Type of Item as it is recorded in your system. Available Item Types include Inventory, Non-Inventory, Service, Item Group, Discount, Fixed Asset, Manufactured, and Deposit.
- Category: You can categorize your Items to fit your needs in Striven, which is discussed in more detail further on in this guide.
- Department: Allows you to assign the Item to one of your Departments in Striven.
- Reorder Point: Allows you to note the minimum reorder point for the Item. You can report on this number to see how long before you have to order more of the Item.
- Reorder Amount: Allows you to designate a set amount for when the Item is reordered instead of just using the existing reorder formula. This amount can be overridden if desired when creating a Purchase Order.
- Max. Quantity: Determines the maximum quantity of this Item that should be on-hand.
- Preferred Vendor: Designates a Vendor in your system that you prefer to order the Item from.
- Manufacturer: The Vendor that manufactures the Item.
- Manufacturer Part #: The part number supplied by the manufacturer.
- UOM Set: If you have Units of Measure enabled in your Striven system, this field enables you to select the default Unit of Measure for the Item.
- Billing Options: There are two checkboxes present when configuring an Inventory Item that allows you to dictate whether the Vendor can add the Item to a bill, and if the Item is taxable for your Customer facing transactions. A Configure option is available next to the Taxable checkbox, allowing you decide which taxes the Item is subject to.
- Description: Entering a description of the Item here will automatically populate the description onto Orders and transactions when the Item is present.
- Pricing: The following pricing information can be saved with the Item:
- Cost: The amount of money required to make or purchase the Item.
- Markup: The amount of money added to the cost of goods to cover overhead and profit.
- Price: The amount of money you charge Customers for the Item.
- Shipping Info: Here you can require shipping and also enter the Item’s weight. There are two options for shipping as shown below:
- Flat Rate: A flat fee you charge for shipping.
- Percentage of Price: Entering an amount will take a percentage of the price for which you sell the Item for shipping.
- Accounting: The following financial information must be entered with your Item:
- Income Account: The Income Account which will be posted to when the Item is purchased or sold.
- Asset Account: The Asset Account which will be posted to when the Item is purchased or sold.
- COGS: The Cost of Goods Sold Account which will be posted to when the Item is purchased or sold.
- Default Class: The default GL Class that the Item will be posted to by default (only if you choose to track GL Class).
- Default Location: The Inventory Location that the Item will be allocated to by default.
- Inventory Settings: The following options can be used for tracking your inventory. Once enabled, these options provide a link to Advanced Settings to designate settings specific to this Item. These settings include requiring Serial/Lot numbers when creating Bills/Received Items, Contracts, Invoices/Sales Receipts, or Item Builds.
- Enable Serial Number Tracking: Must be enabled when Item is created and before it is used on a transaction in Striven. Once an Item has be used on a transaction, you will no longer be able to enable this option. The same is true for disabling this feature – once an Item is used on a transaction you cannot turn off the Serial Number Tracking.
- Learn more about managing Serial Numbers in Striven by reviewing the Serial Number Management section in the Inventory Management Guide.
- Enable Lot Number Tracking: Must be enabled when Item is created and before it is used on a transaction in Striven. Once an Item has be used on a transaction, you will no longer be able to enable this option. The same is true for disabling this feature – once an Item is used on a transaction you cannot turn off the Lot Number Tracking.
- Learn more about utilizing Lot Numbers in Striven by reviewing the Lot Number Management section in the Inventory Management Guide.
- Barcode Value: Identifies the type of barcode scanner you use to add Items to a transaction.
- Learn more about the Barcodes feature in Striven by reviewing the Barcodes section in the Inventory Management Guide.
- Enable Serial Number Tracking: Must be enabled when Item is created and before it is used on a transaction in Striven. Once an Item has be used on a transaction, you will no longer be able to enable this option. The same is true for disabling this feature – once an Item is used on a transaction you cannot turn off the Serial Number Tracking.
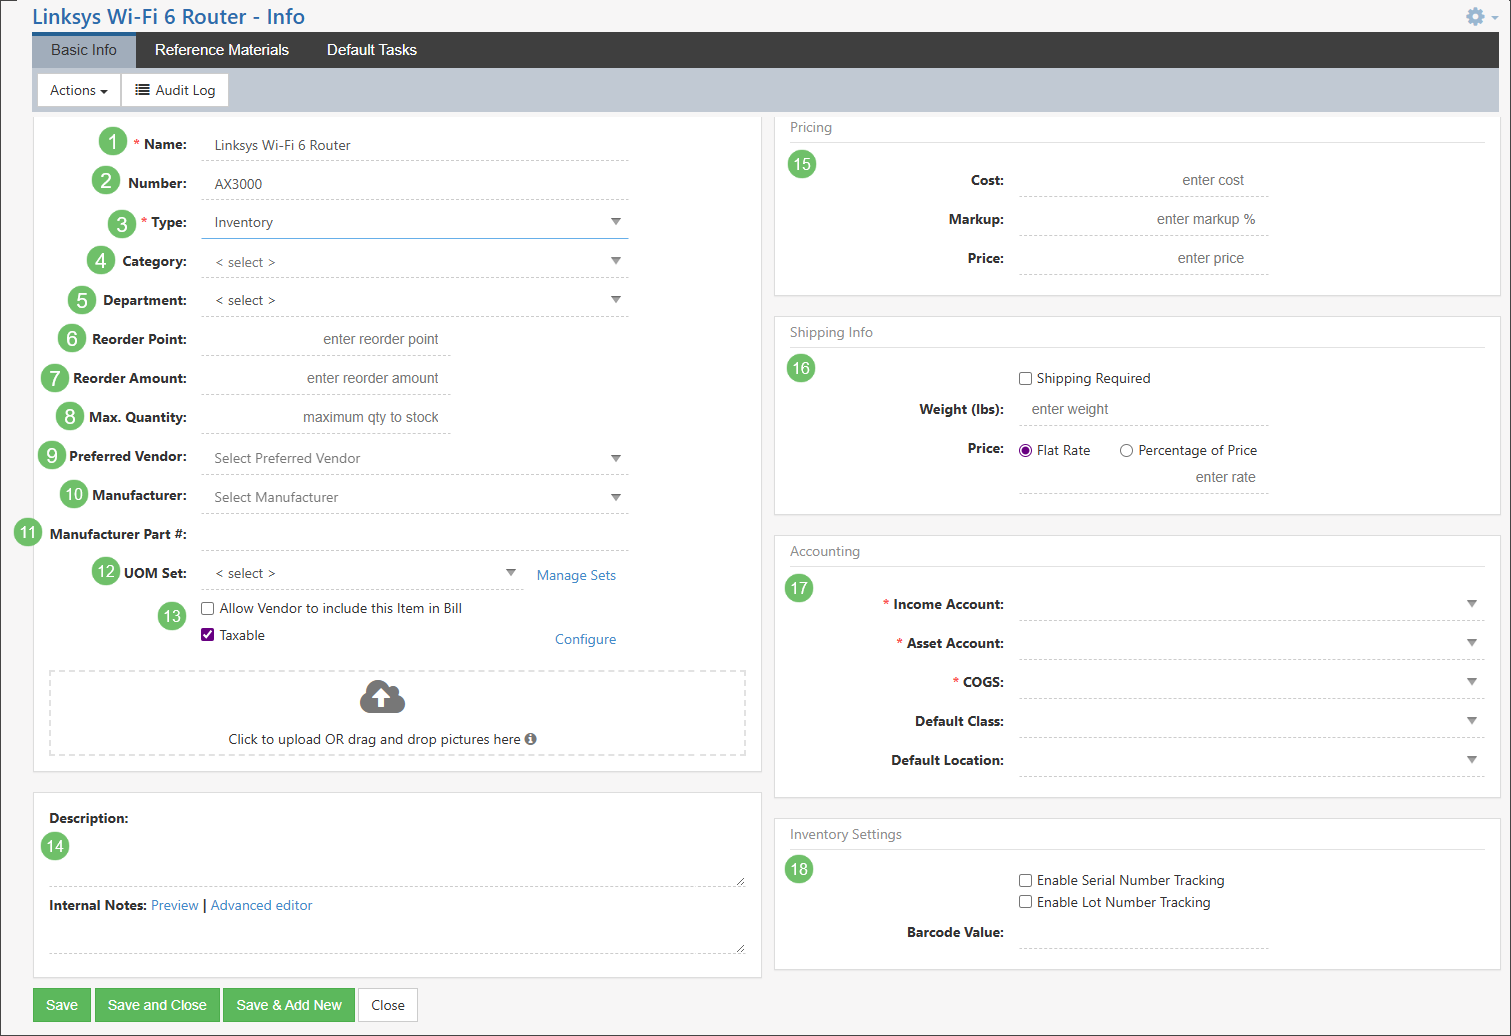
Example of an Inventory Item Info Page
Inventory Locations
As discussed above, Inventory Items are stocked in physical locations, referred to in Striven as Inventory Locations. Inventory Locations will allow you to allocate Inventory when purchasing and relinquishing stock when selling them. This is not to be confused with Company Locations, which cannot hold Items in stock and are used for different functions in Striven. Inventory Locations will also come into play when creating Inventory Adjustments and Transferring Inventory between Locations. Below is a screenshot demonstrating how Inventory Locations appear. To view Inventory Locations use the following steps below:
Company → Settings → Accounting → Inventory → Locations
- Add New Location: Initiates the popup shown above to add a new Inventory Location.
- Location Name: The name of the Location being added or edited.
- Parent Location: Allows you to note a parent Location for the Location being added (Parent Locations must exist in Striven prior to this step).
- Description: The description of the Inventory Location being added.
- Barcode Value: If you utilize barcodes in your Inventory tracking, you can use this field to assign a Barcode Value to this location.
- Learn more about the Barcodes feature in Striven by reviewing the Barcodes section in the Inventory Management Guide.
- Actions: There are three actions, which are discussed further below:
- Save & Close: Saves the Inventory Location and close the popup.
- Close: Closes the popup, but does not save the Inventory Location.
- Deactivate: Deactivates the Inventory Location. Deactivated Locations can be managed by searching for Inactive statuses.
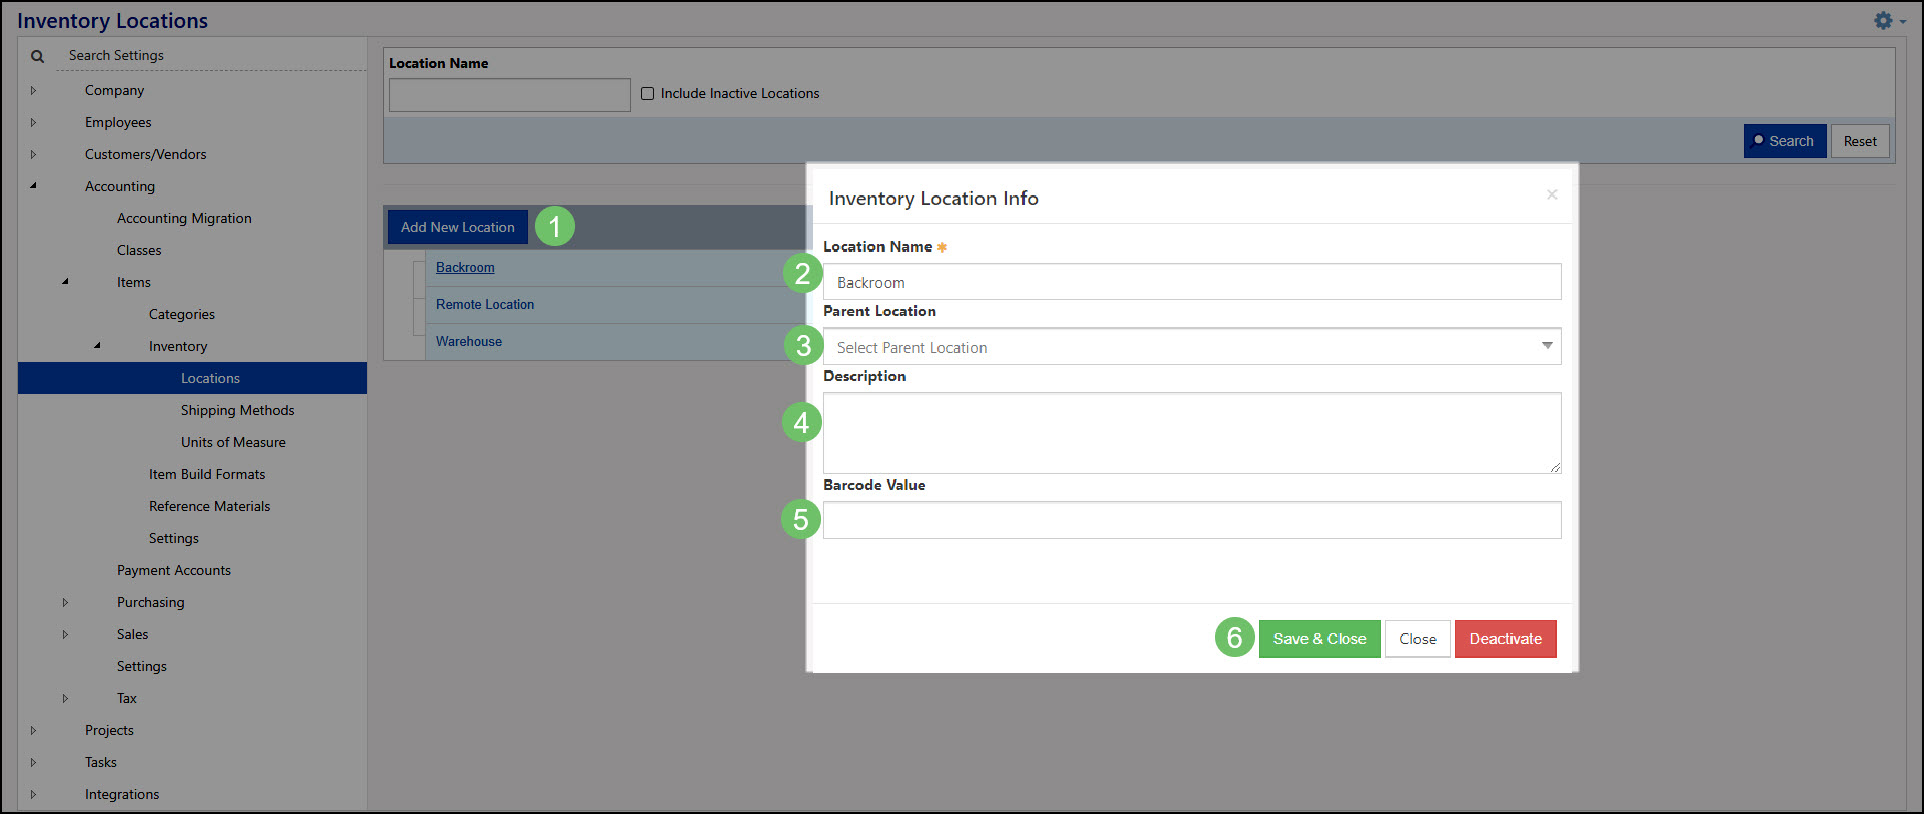
Example of Inventory Locations Page
Inventory Transfers
Inventory Transfers allow you to move stocks of the chosen Inventory Item(s) from one existing active Inventory Location to another in order to reflect where physical stock is located. From the Inventory Transfers List, you can View, Edit, existing transfers or Add new Inventory Transfers using the Add button. Below is a screenshot displaying how Inventory Transfers appear with details about what can be accomplished there. To view Inventory Transfers, use the following steps below:
Accounting → Inventory → Transfers
- Transfer Date: The date on which the quantities will be transferred.
- From Location: Choosing a Location from the drop-down menu here will designate where inventory will be transferred from for all Items selected on the Inventory Transfer.
- To Location: Choosing a Location from the drop-down menu here will designate where inventory will be transferred to for all Items selected on the Inventory Transfer.
- Item: Lists the Items that will have quantities transferred. A quick add option is available to easily add a new item or search for existing inventory utilizing the barcode feature.
- From and To Location: Allows for specific items to be moved from one location to another rather than all items on the transfer going from or to the same place.
- Qty on Hand and Qty to Transfer: Displays how much inventory is currently on hand based on the location selected with a field that can be overridden in order to set the amount that needs to be transferred.
- From and To Class: Allows for the Class to be set for both the From and To in order to reflect this correctly per GL Class that is being tracked in Striven.

Example of Adding an Inventory Transfer
Inventory Adjustments
Inventory Adjustments are used to either increase or decrease the quantity on hand for Inventory Items to reflect accurate quantities. Inventory Adjustments can help reflect Item quantities that have been lost to damages and theft in order to reflect accurate totals. Using the Inventory Adjustments List you can View, Edit, or Add new Inventory Adjustments. Below is a screenshot exhibiting how adding an Inventory Adjustment appears and details on what you can accomplish there. To view Inventory Adjustments use the following steps below:
Accounting → Inventory → Adjustments
- Type: Allows you to choose the type of adjustment you would like to use including Quantity, Quantity & Value, or Value.
- Account: Allows you to choose what GL Account will be posted to when the adjustment is created.
- Adjustment Date: The date on which the Item quantities and/or values will be adjusted.
- Import Adjustment: Initiates a popup from which you can view mapping or download a sample .CSV file. Choosing an Inventory Adjustment Type will change the mapping and download sample accordingly.
- Total Qty on Hand: Lists the Item’s total quantity for all Inventory Locations.
- New Unit Value: Allows you to enter the new unit value for the Item being adjusted. This will override an Item’s current value one posted.
- Location: Lists the Inventory Locations in your system.
- Qty on Hand: Lists the Item’s quantity for each Inventory Location.
- New Quantity: Displays the new amount after a quantity is entered in the Qty Adjustment field for the Item. This sums up the total quantity on hand and the quantity adjustment.
- Qty Adjustment: Lists the amount that is being adjusted for the Item and at each Inventory Location.
- Recent Cost: Lists the current cost of the Item and will show the Item’s Cost History when clicked.
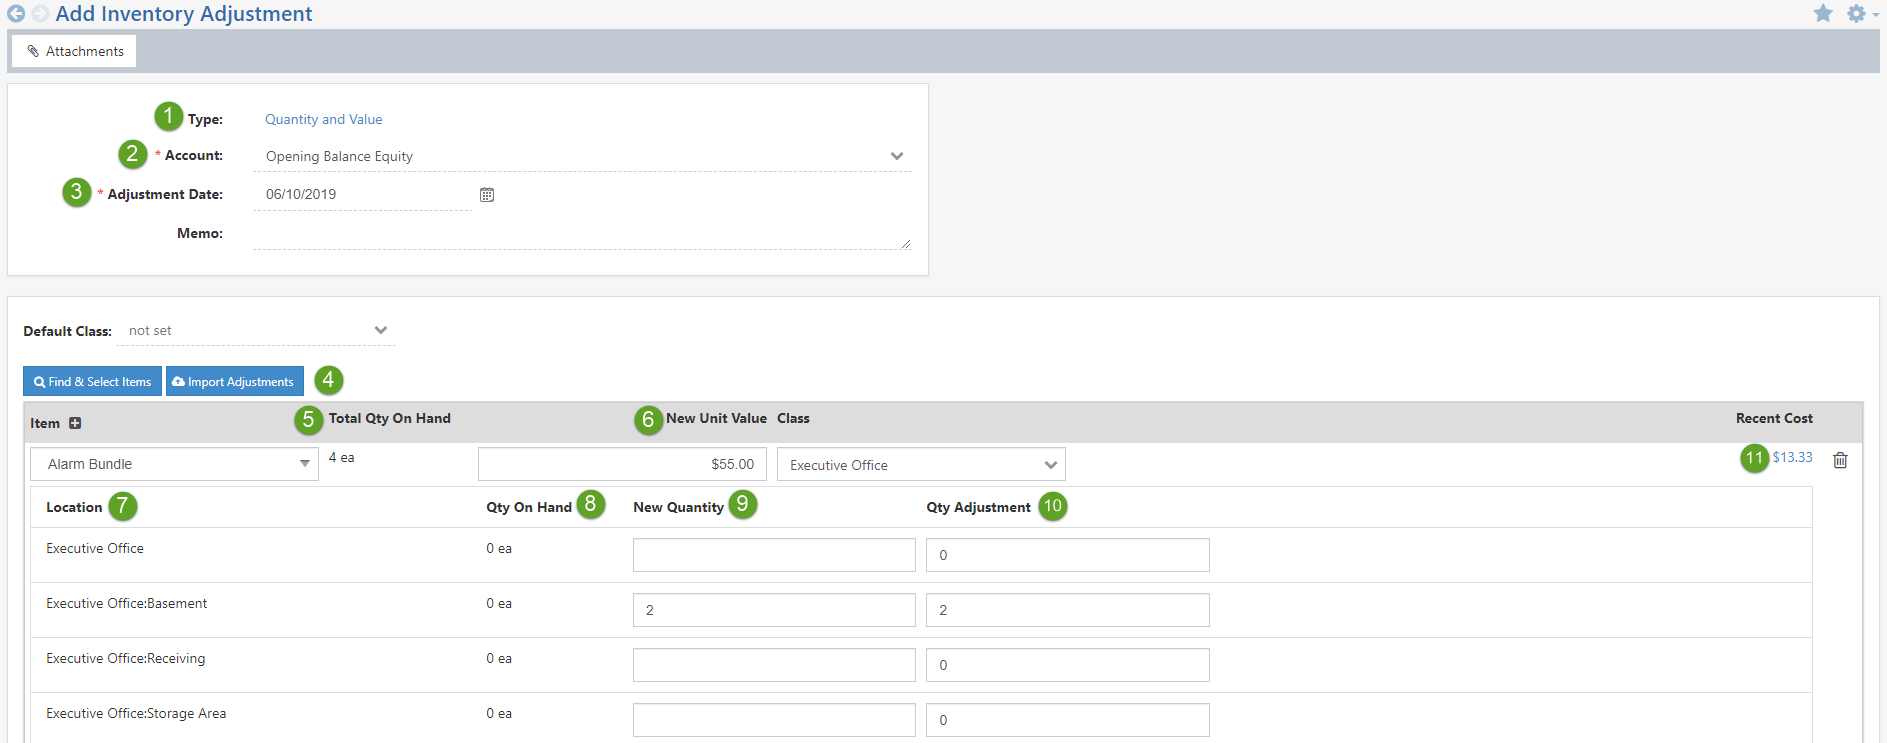
Example of Adding an Inventory Adjustment
Please review our Performing Inventory Adjustments Community Post for further details.
-
Manufactured Items
Manufactured Items are comprised of a Bill of Materials or other individual Items that are constructed into one finished Item which can then be sold at a later date. To create Manufactured Items and create a positive quantity on hand, you need to create an Item Build which we will discuss in further detail later in this guide. Once you have built the Manufactured Items, they act much like Inventory Items. Striven allocates them to an Inventory Location and relinquishes them from the Location when they are sold.
To begin unlocking this functionality, first you need to add a Manufactured Item via the Items List. Once on the Add Item page, choose Manufactured as the Item Type. Once selected, you will be presented with more options, which we will discuss further. Located below is a screenshot of an Inventory Item and details of what you can configure there.
- Name: The name of the Item you are adding into Striven.
- Category:You can categorize your Items to fit your needs in Striven, which is discussed in more detail prior to this.
- Department: Allows you to assign the Item to one of your Departments in Striven.
- Description: Entering a description of the Item here will automatically populate the description onto Orders and transactions when the Item is present.
- Bill of Materials: Raw materials or Items that make up the Manufactured Item once it is built.
- Pricing: The following pricing information can be saved with the Item:
- Cost: The amount of money required to make or purchase the Item.
- Markup: The amount of money added to the cost of goods to cover overhead and profit.
- Price: The amount of money you charge Customers for the Item.
- Accounting: The following accounting information must be entered for the Item:
- Income Account: The Income Account which will be posted to when the Item is purchased or sold
- Asset Account: The Asset Account which will be posted to when the Item is purchased or sold
- COGS: The Cost of Goods Sold Account which will be posted to when the Item is purchased or sold
- Item Defaults: The following defaults can be saved with the Item:
- Default Category: The default GL Category that the Item will be posted to by default (Only if you choose to track GL Categories).
- Default Location: The Inventory Location that the Item will be allocated to by default.
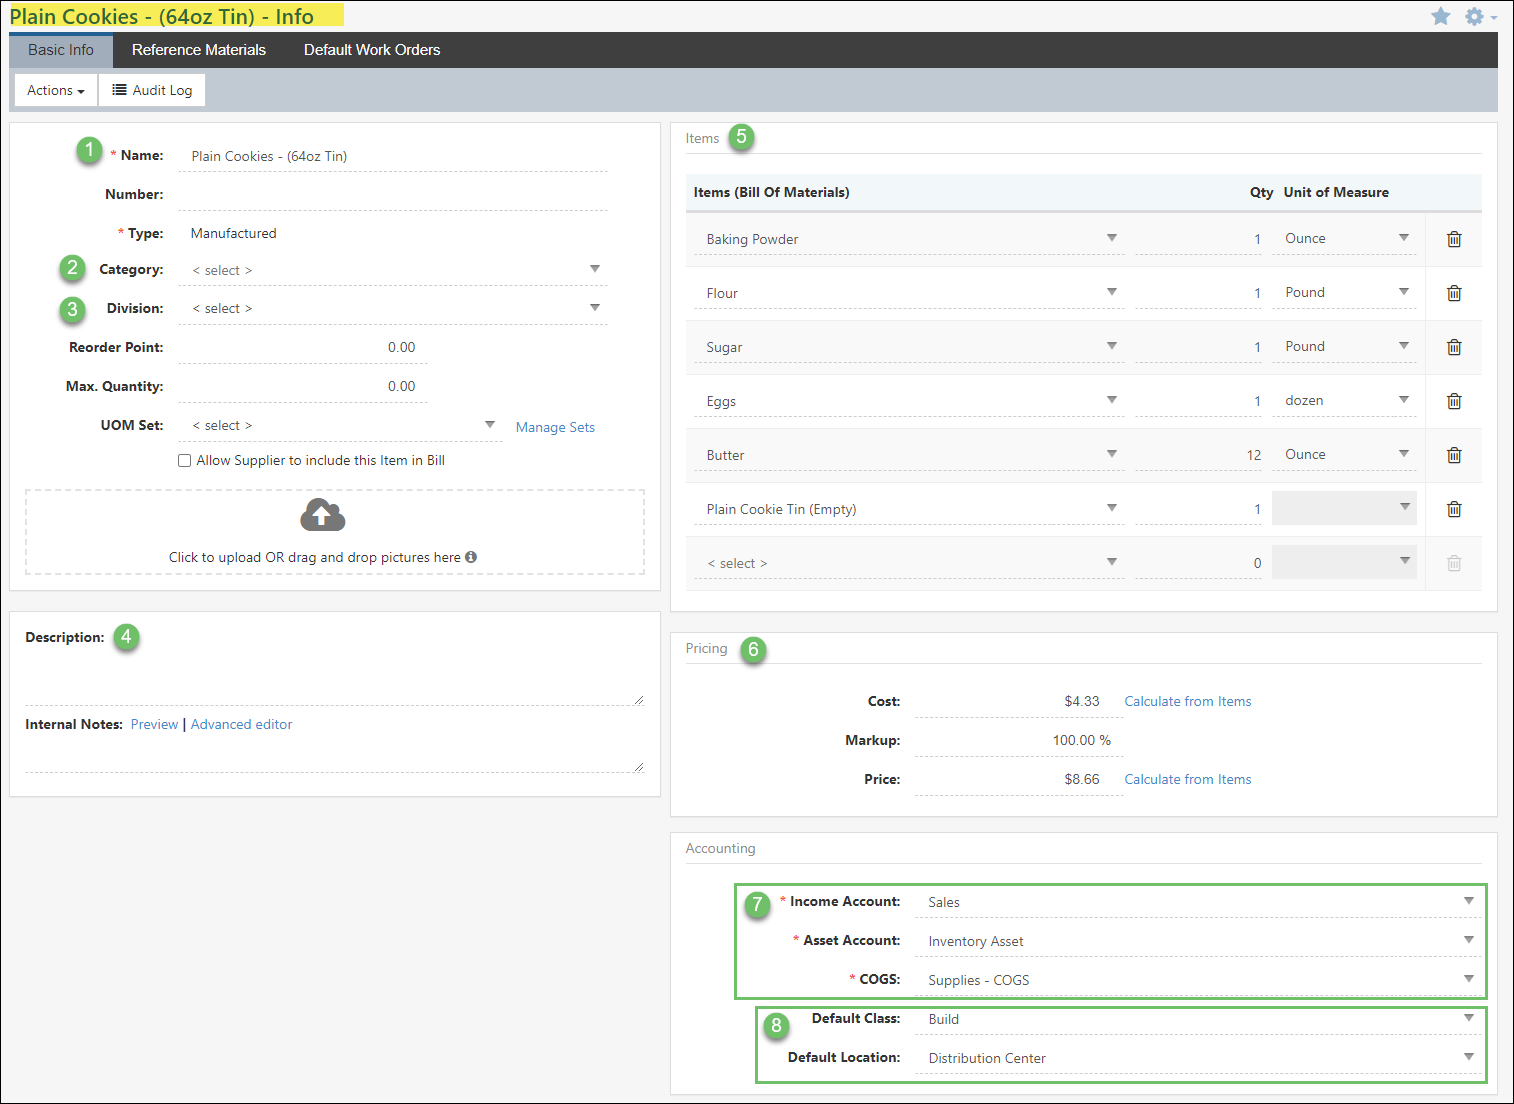
Example of Manufactured Item Page
-
Item Builds
As discussed above, Item Builds in Striven will enable you to build Manufactured Items and allocate stock on hand after the selected quantities are built. Here you can choose from the list of existing Manufactured Items you would like to build. Once an Item is chosen, the Bill of Materials will be displayed along with each Item amount that makes up the Manufactured Item. If there are Inventory Items in your Build, Inventory Locations can be chosen to relinquish stock from in order to build the Manufactured Item. Below is a screenshot featuring how Builds appear and list describing what can be accomplished there. To view Builds in Striven, use the following steps below:
Accounting → Inventory → Builds
- Item: Allows you to choose which Manufactured Item you are going to build.
- Qty to Build: The quantity you want to build of the chosen Manufactured Items.
- Location: The Location in which the built quantities will be stocked once built.
- Date: The date in which the build will take effect. (This affects Inventory Items’ quantities in the Bill of Materials).
- Bill of Materials: The Items that make up the Manufactured Item.
- Type: Lists each Item’s Type in the Bill of Materials.
- Qty: Lists each Item’s quantity which is designated on the Manufactured Item’s Bill of Materials.
- Qty on Hand: Shows how much materials you have in Striven for any individual Manufactured or Inventory Items in the Bill of Materials.
- Qty Needed: Multiplies the Quantity to Build by the Quantity of each Item to show how much of each Item in the Bill of Materials is needed to successfully build the desired amount of the Manufactured Item.

Example of Adding an Item Build
Build Statuses
Striven has 4 Build Statuses available for use when working with Inventory Builds in the system. These statuses are listed below with details related to their use:
- Incomplete: A non-posting, non-validating status; basically like a draft. This status would be used when you are not ready to complete the Build as it is missing particular details or information, such as the quantity of Builds needed or Items needed to complete the Build.
- Pending: A non-posting, but validating status. All quantities will be validated affecting the Qty Available for the Items involved in the Build. This status would be used when you’re ready to submit the Build for assembly.
- Finalized: A completed Build; posted and validated.
- Voided: A cancelled Build.

Example of Build Statuses Available in Striven
Editing Item Builds
A Manufactured Item’s Bill of Materials (BoM) can be edited when creating an Item Build in the event that an Item needs to be replaced or removed from the original list of components.
Users must have the permission “Item Builds – Edit Items/BoM” added to their user role in order to edit the Item components for a Manufactured Item.
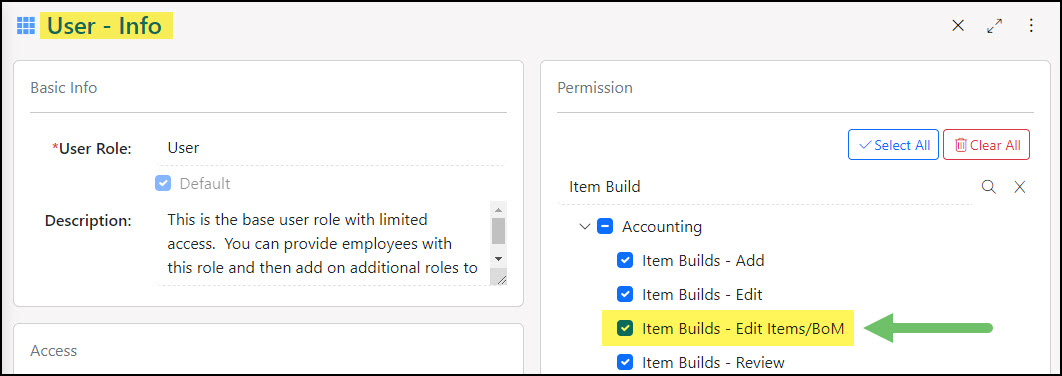
Example of the User Role Permission Needed to Edit the BoM on an Item Build
When creating an Item Build, the following options are available to you for editing the Bill of Materials required to complete the Build:
- Item: By typing in the Item field, you can replace a listed Item with a different Item in your Items List.
- Quantity: You can modify the quantity of an Item needed for the Build using this field.
- Delete: Using the Trash Can icon allows you to remove a component from the Item Build.
- Search Items: This field allows you to add an Item as a new component of the Build.
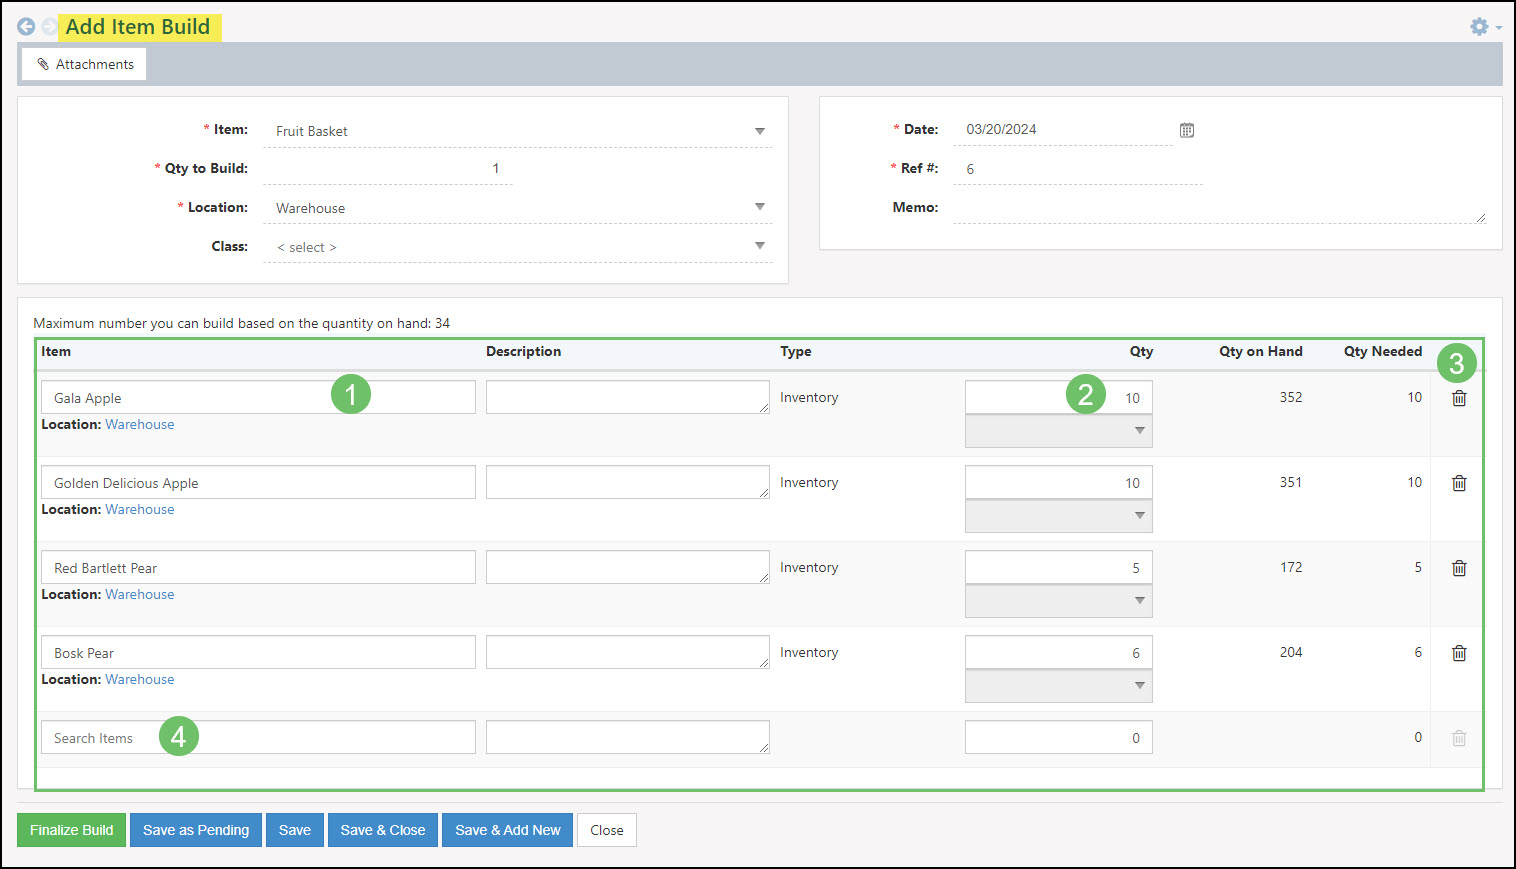
Example of the Editable BoM Fields when Creating an Item Build
Once the Item Build has been saved, it can continue to be edited while in the statuses of Incomplete and Pending. Once the Build is Finalized, the components can no longer be edited.
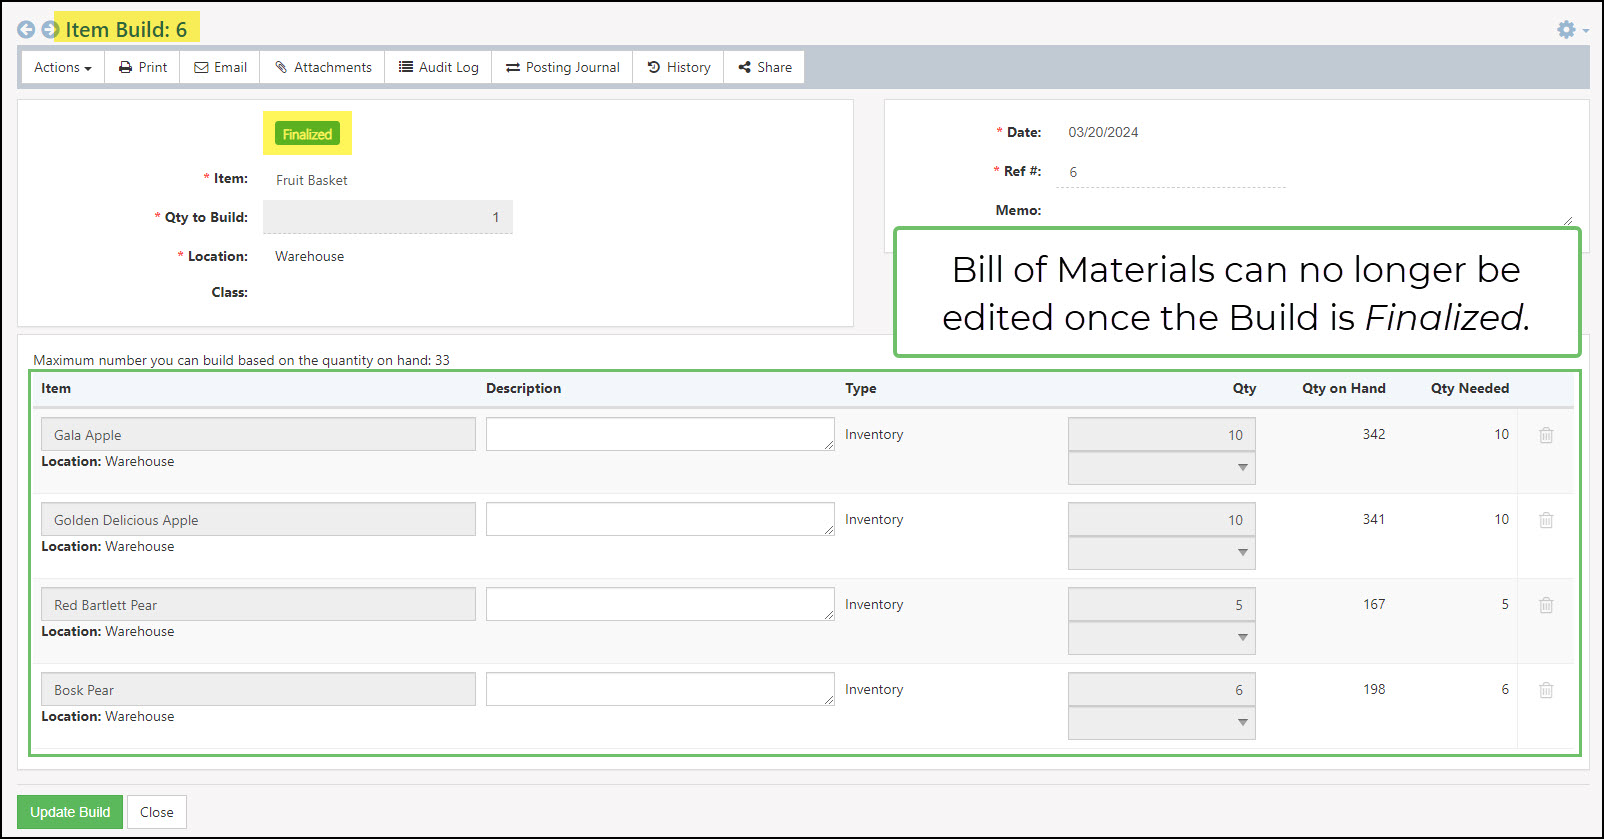
Example of a Finalized Item Build
Save Options for Item Builds
When creating a new Item Build, you will have multiple options for saving your progress. The Save, Save & Close, and Save & Add New buttons will all save your Build in an Incomplete status. The Save as Pending button will save your Build in a pending status, as long as you enter a Qty to Build.
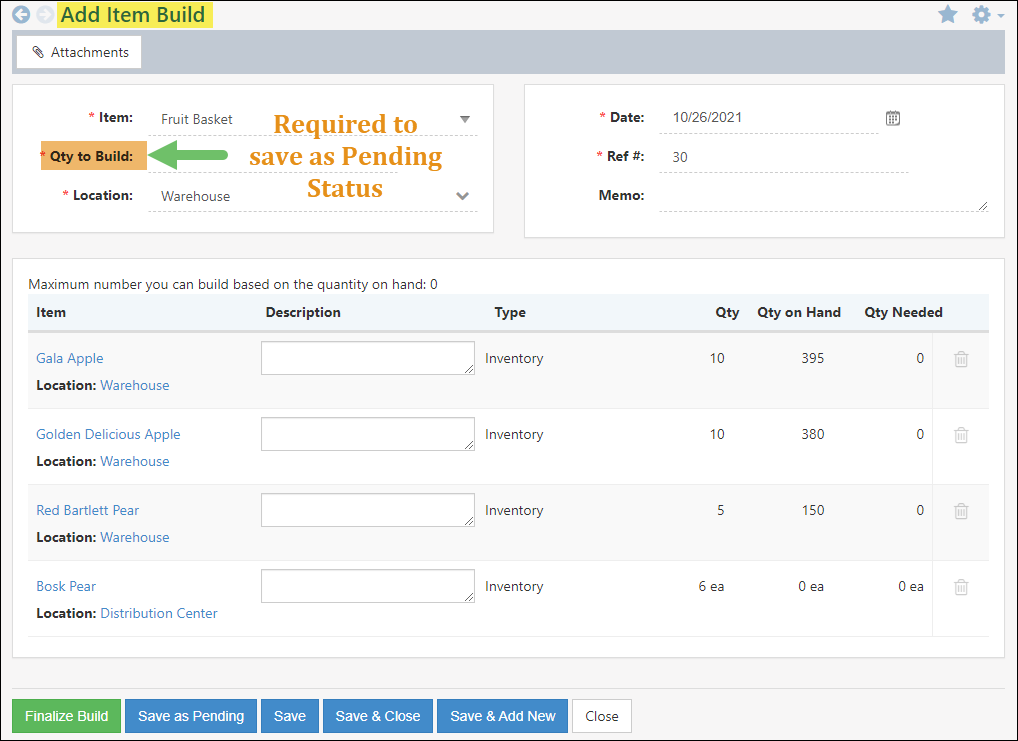
Example of Save Options for Builds
Classes for Item Builds
While adding an Item Build to the system, you can select a Class which will apply to both Manufacturing Items and BOM Items.
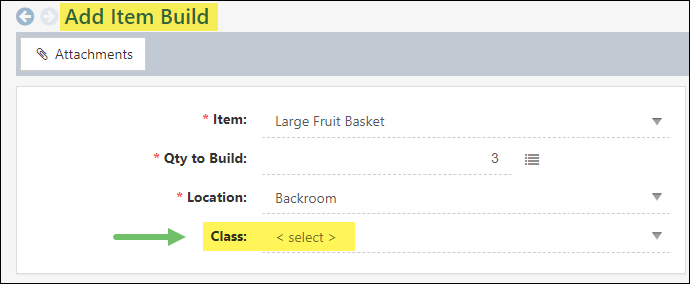
Example of Class Selection on an Add Item Build Page
If Class Tracking is set as required in your Inventory Settings, you will have to select the Class in order to finalize the Build. Once the Build is finalized, the selected Class will reflect in the Build GL Postings and can be viewed through the History tab on the Item Build page.
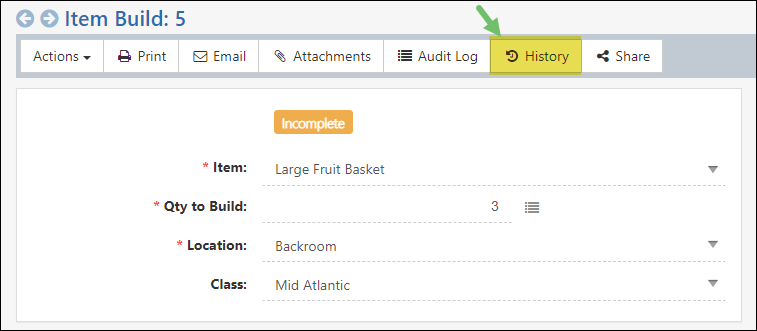
Example of the History Button on an Item Build Page
The History page will also track and display any changes to the Class being selected while the Build is editable.
-
Item Groups
Item Groups are composed of multiple Items hidden underneath one name and can include any type of Item. When Item Groups are added to Orders and transactions, you can configure the individual Item’s pricing and quantities that belong to the group. Once updated, the Line Item will have the sum price of the group of Items, while hiding all the details from the Customer.
- Name: The name of the Item Group you are adding into Striven.
- Category: You can categorize your Item Groups to fit your needs in Striven, which is discussed in more detail prior to this.
- Department: Allows you to assign the Item Group to one of your Departments in Striven.
- Description: Entering a description of the Item Group here will automatically populate the description onto Orders and transactions when the Item Group is present.
- Items: The Items that make up the complete Item Group, and on Orders and transactions you can adjust these Items’ prices and quantities.
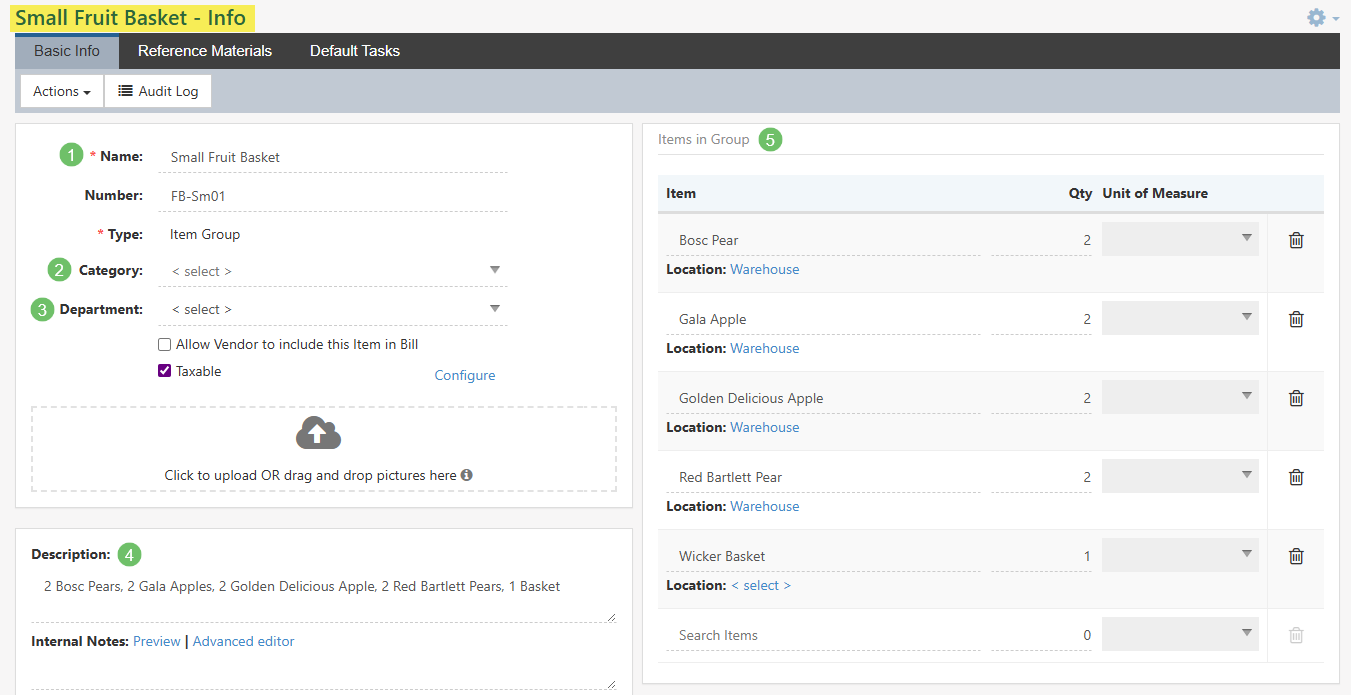
Example of Item Group Info
As discussed above, once Item Groups are created you can configure the pricing at the Order and Transaction level by selecting the Configure button on the line item. The Configuration window allows you to view details such as the Item Name, Description, Location, Cost, Markup, and Price.

Example of Configure Button for Item Group on a Sales Order
The information listed for the Item Group can be edited, such as the Quantity, Markup, and Price. Items can be added or removed from the Item Group as well to make adjustments as needed.
- Note: To make these configurations to an Item Group when creating a Sales Order or AR Transaction, users will need to have the permission “Items – Edit Item Group Configuration on Transactions” included within their User Role. For detailed information on User Role management, please refer to our User Role Guide.

Example of Editing an Item Group on a Sales Order
-
Fixed Assets
Fixed Assets are tangible, meaning they have a physical existence, but also generate revenue for your Company. Fixed Assets are generally pieces of property that are considered long-term, meaning the Company will use them for an extended period of time. When adding a Fixed Asset Item, you can also relate a Company Asset to the Item as well to purchase maintenance or labor for the Asset.
Let’s look at an example: A bakery has an oven, and that oven bakes the products, which generate revenue. The oven is an example of a Fixed Asset and can be recorded on the Balance Sheet with the GL Account and a Company Asset of the Oven can be related at the Item level. Below is a screenshot illustrating how adding Fixed Assets appear.
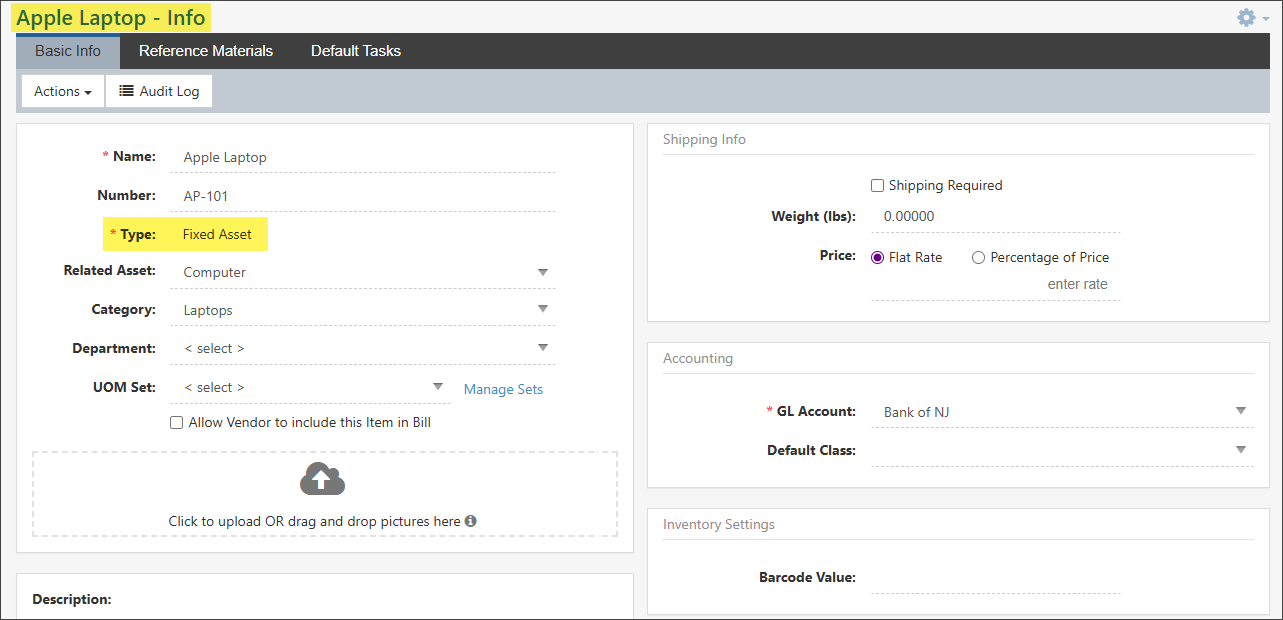
Example of Adding a Fixed Asset Item
-
Service & Non-Inventory Items
There are two other types of Items that you can utilize within Striven that serve separate purposes, but use much of the same accounting principles. Both Item Types require one Income and one Expense Account to post to when the Items are sold or purchased. These Item Types are Service and Non-Inventory Items, and each is briefly described below:
Service Items are intangibles your Company provides for Customers such as labor or maintenance. Below is a screenshot of a Service Item and what you can configure there:
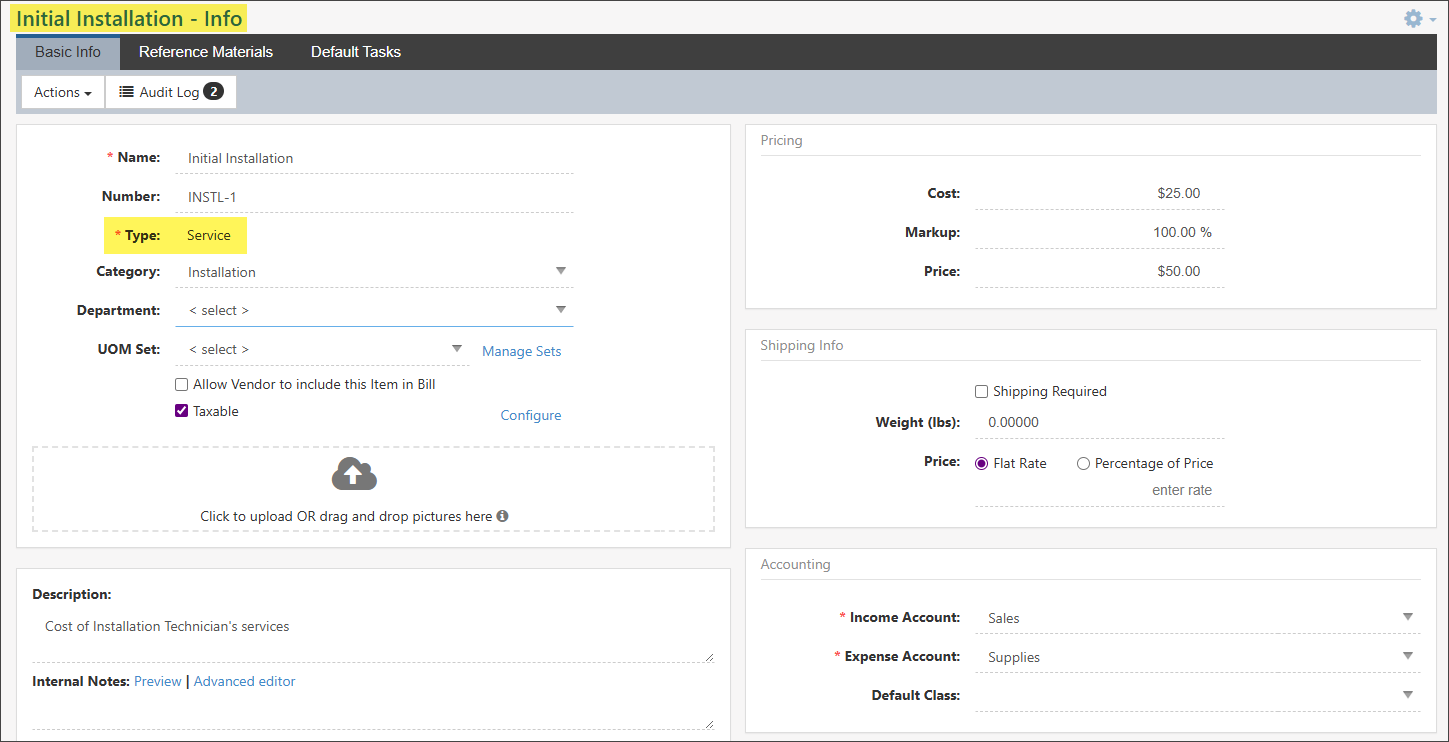
Example of a Service Item
Non-Inventory Items are products that are sold or purchased and no quantities are tracked for these Items. Below is a screenshot of a Non-Inventory Item and what you can configure there:
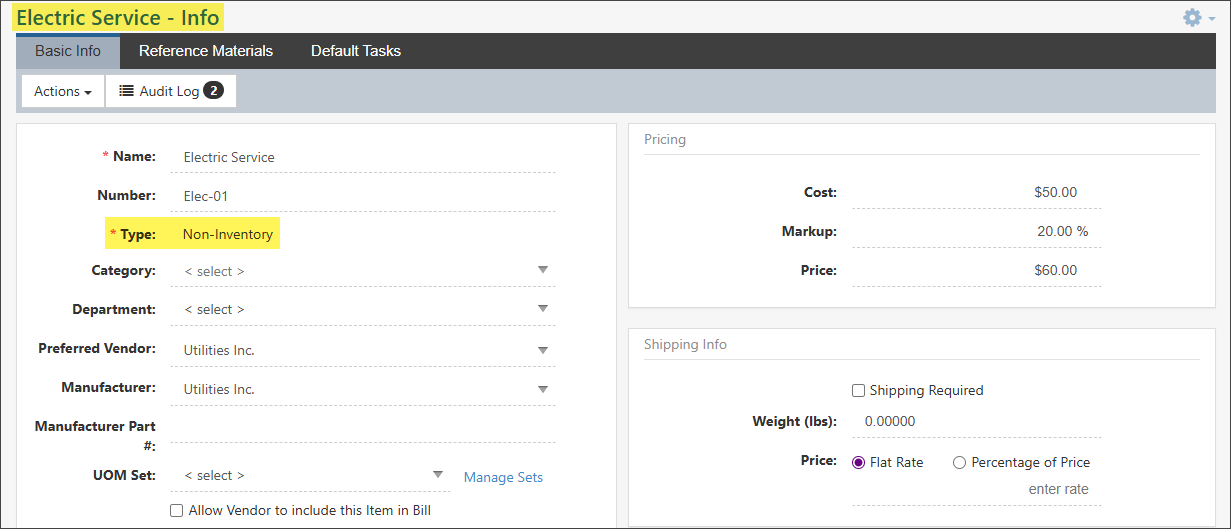
Example of a Non-Inventory Item
-
Units of Measure (UOM)
Once Units of Measure (UOM) have been turned on in the Accounting Settings, you can add Measurement Sets from the Units of Measure Sets area in the Settings. Measurement Sets are ways to note how the UOM is calculated. There are two options available when adding sets, including Count and Length. The following sections will explore how to set up measurement sets for both Count and Length measurement types. Once sets have been created, you can assign them to individual Items. Below is a screenshot representing how the Units of Measure Sets list looks and details on what can be accomplished here. To view Units of Measure Sets, use the following steps below:
Company → Settings → Accounting → Units of Measure
- Add: Allows you to add a new count or length Unit of Measure Set (which are each discussed further in the following sections below).
- Set Name: The name of the set that has been created. The set name is a hyperlink and the set can be viewed and edited by clicking it.
- Base UOM: The smallest UOM in the set. For Count, this will be each and for length, this will be millimeter.
- Sales UOM: The default UOM that will appear on Sales Orders when an Item using this set is added to the Order.
- Purchasing UOM: The default UOM that will appear on Purchase Orders when an Item using this set is added to the Purchase Order.
- Copy or Deactivate: Using the Copy button will copy the UoM set. Using the Trashcan icon will deactivate the set.

Example of Units of Measure Sets Page
-
Count Sets
As discussed above, there are two set types with which you can create a new Unit of Measure Set. One type that you can utilize to create a new set is Count. Count has a base unit (generally the smallest unit) of each, but the set can be configured to have multiple UOM to fit different Item measurements such as package, case, etc. After adding a new UOM, you can select Count from the drop-down menu. After count is selected, a few Related Units will populate below such as dozen (12), package (8), box (16), and case (80). Each of these can be edited to fit your needs, but you can also add more measurements if desired. The measurements selected for these Related Units can be less than one. Below is a screenshot demonstrating how the Set Info appears and details on what you can accomplish there.
- Set Name: The name of the set, which can be associated with an Item.
- Base Unit Name: The name of the base UOM, by default this is each.
- Base Unit Abbreviation: The abbreviation for the base UOM. Since the default base unit is each, the abbreviation is ea.
- Sales Default: The UOM that will be used to sell Items that can be chosen from the drop-down menu.
- Purchasing Default: The UOM that will be used to purchase Items that can be chosen from the drop-down menu.
- Related Units: Lists the related units of the Count Measurement Set.
- Name: Lists the name of the related UOM. Defaults here include: pair, package, box, and case.
- Abbreviation: Lists the abbreviations for each of the related units. Defaults here include: pr (pair), pkg (package), bx (box), and cs (case).
- # of Base Units: Lists the number of base units within each of the related UOM. Defaults here include: 2 (pair), 8 (package), 16 (box), and 80 (case).
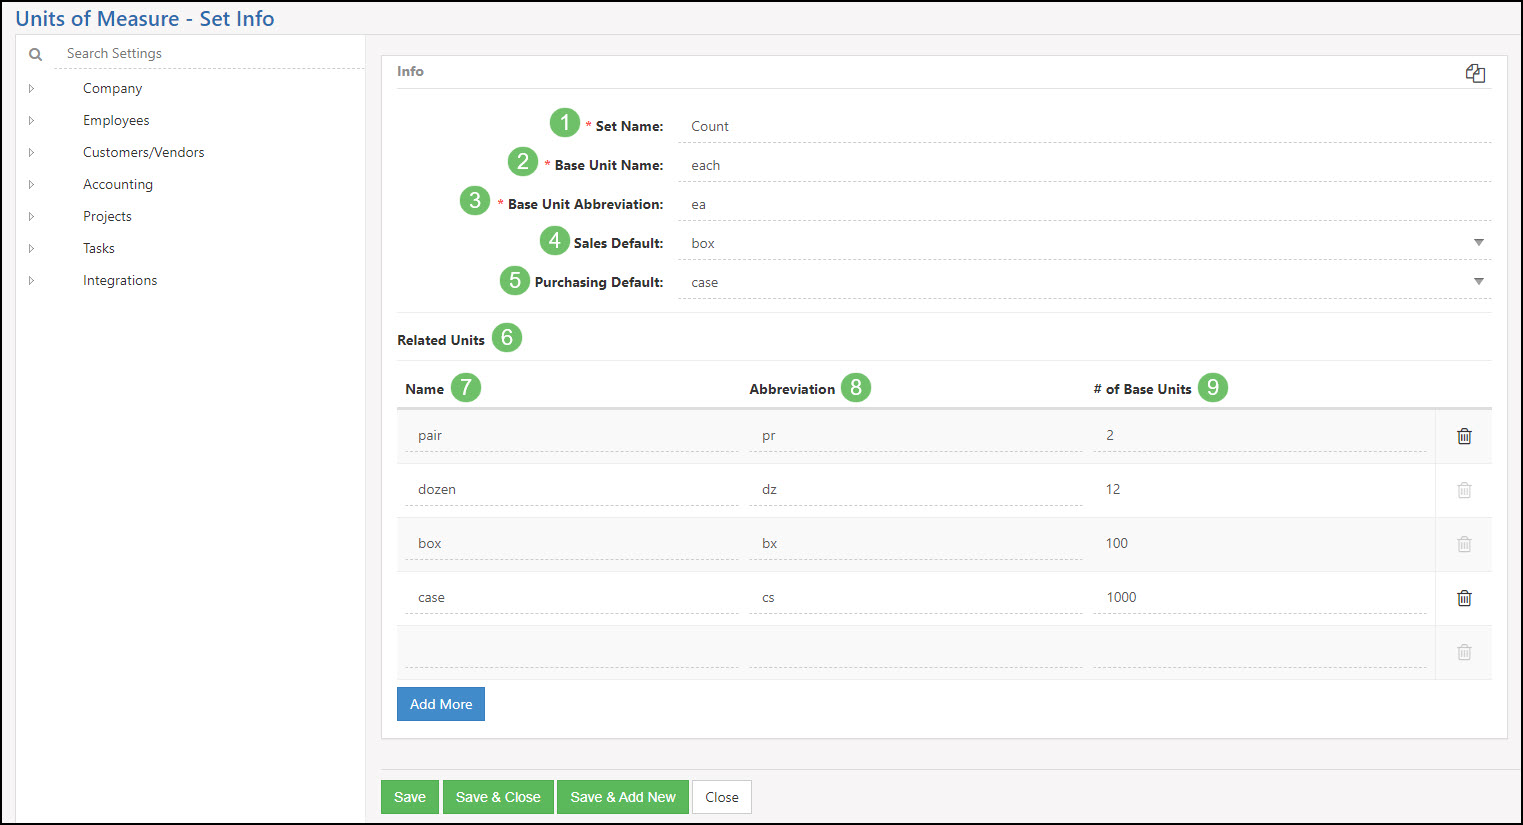
Example of Count Units of Measure Sets
-
Length Sets
As discussed above there are two set types with which you can create a new Unit of Measure Set. One type you can utilize to create a new set is Length. Length has a base unit of a millimeter, but the set can be configured to have multiple UOM to fit different Item measurements such as centimeter, inch, decimeter, etc. As previously mentioned, the additional UoM may have values smaller than the base unit. After adding a new UOM, you can select Length from the drop-down menu. After length is selected, a few example measurements will populate below such as centimeter (10), inch (25.4), decimeter (100), foot (304.8), etc. Each of these can be edited to fit your needs, but you can also add more measurements if desired. Below is a screenshot exhibiting how the Set Info appears and details on what you can accomplish there.
- Set Name: The name of the set, which can be associated with an Item.
- Base Unit Name: The name of the base UOM, by default this is millimeter.
- Base Unit Abbreviation: The abbreviation for the base UOM. Since the default base unit is millimeter the abbreviation is mm.
- Sales Default: The UOM that will be used to sell Items and can be chosen from the drop-down menu.
- Purchasing Default: The UOM that will be used to purchase Items that can be chosen from the drop-down menu.
- Related Units: Lists the related units of the Length Measurement Set.
- Name: Lists the name of the related UOM. Defaults here include: centimeter, inch, decimeter, foot, yard, meter, kilometer, and mile.
- Abbreviation: Lists the abbreviation of the related UOM. Defaults here include: cm (centimeter), in (inch), dm (decimeter), ft (foot), yd (yard), m (meter), km (kilometer), and mi (mile).
- # of Base Units: Lists the number of base units within each of the related UOM. Defaults here include: 10 (centimeter), 25.4 (inch), 100 (decimeter), 304.8 (foot), 914.4 (yard), 1000 (meter), 1000000 (kilometer), and 1609344 (mile).
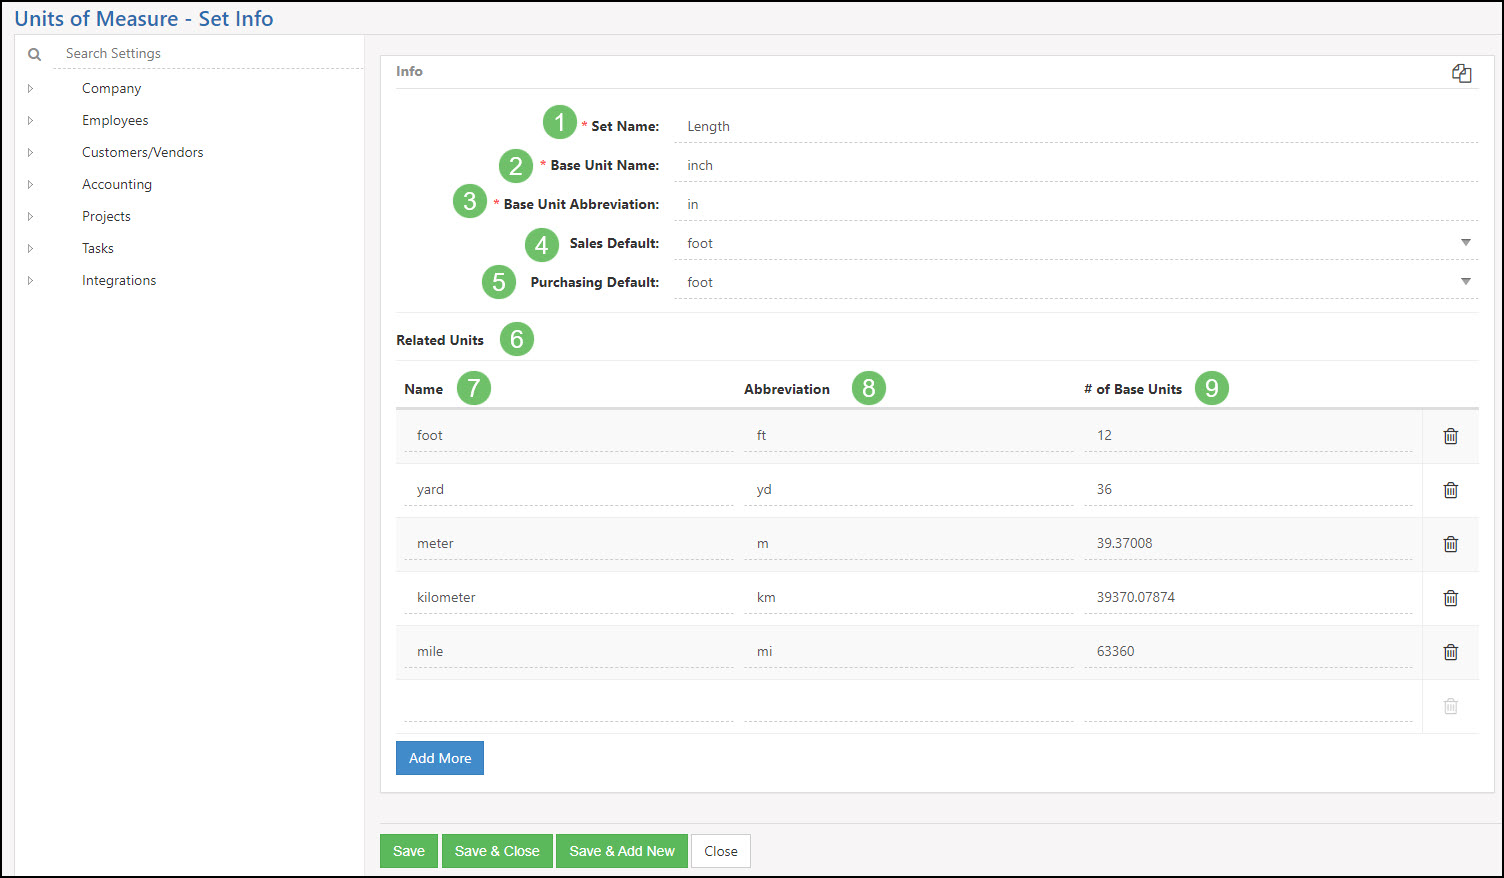
Example of Length Units of Measure Sets
-
Item Level Taxable or Non-Taxable Per Tax Agency
Items in Striven can be designated as taxable or non-taxable at the Item level, but sometimes that designation will depend on the related Tax Agency.
This is why Striven has included a Configure option when setting your Item as Taxable to determine for which Tax Agencies the taxable designation is applicable.
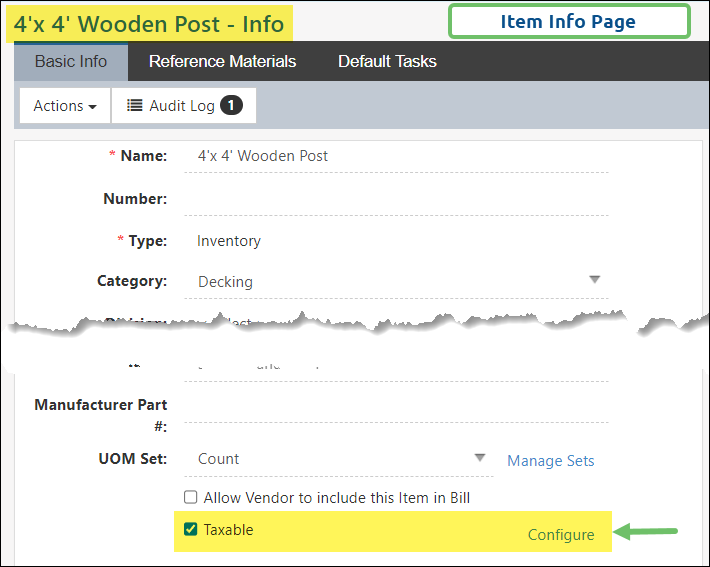
Example of Configure Option for Taxable Setting on Item Info Page
From the Item Info page, you can check the box to set an Item as Taxable by default. Clicking on the Configure link will open the Taxable Configuration popup wherein you can specify the following settings:
- Item is taxable for all Tax Agencies: Designates the Item as taxable by default for all Tax Agencies.
- Item is taxable for the following Tax Agencies: Provides the ability to select specific Tax Agencies to designate the Item taxable depending on the Ship To Location selected.
- Note: The appropriate Tax Agencies will need to be entered into your Striven system in order to appear in the list for selection.
- Item is taxable for all except the following Tax Agencies: Provides the ability to select specific Tax Agencies to exempt the Item from being taxable based on the Ship To Location selected.
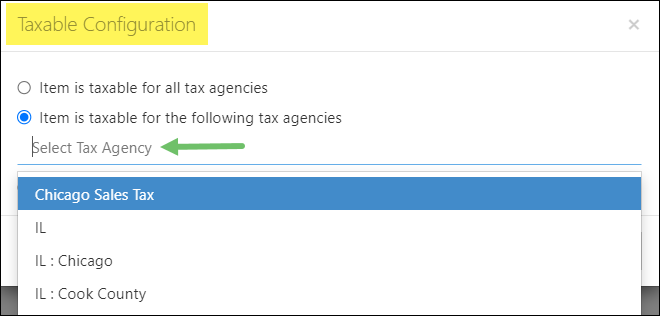
Example of Setting Item as Taxable for Selected Tax Agencies
The Taxable checkbox is checked on A/R Transactions pages, as well as Sales Order pages, based on the Item only. If the Taxable Configuration is set for an Item, the Taxable checkbox will be checked based on the combination of the Tax Agency and the Item.
For instance, if a Tax Agency is changed based on the Ship To address on an Invoice or if it is changed manually, you will be prompted to select whether the Taxable box needs to be updated.
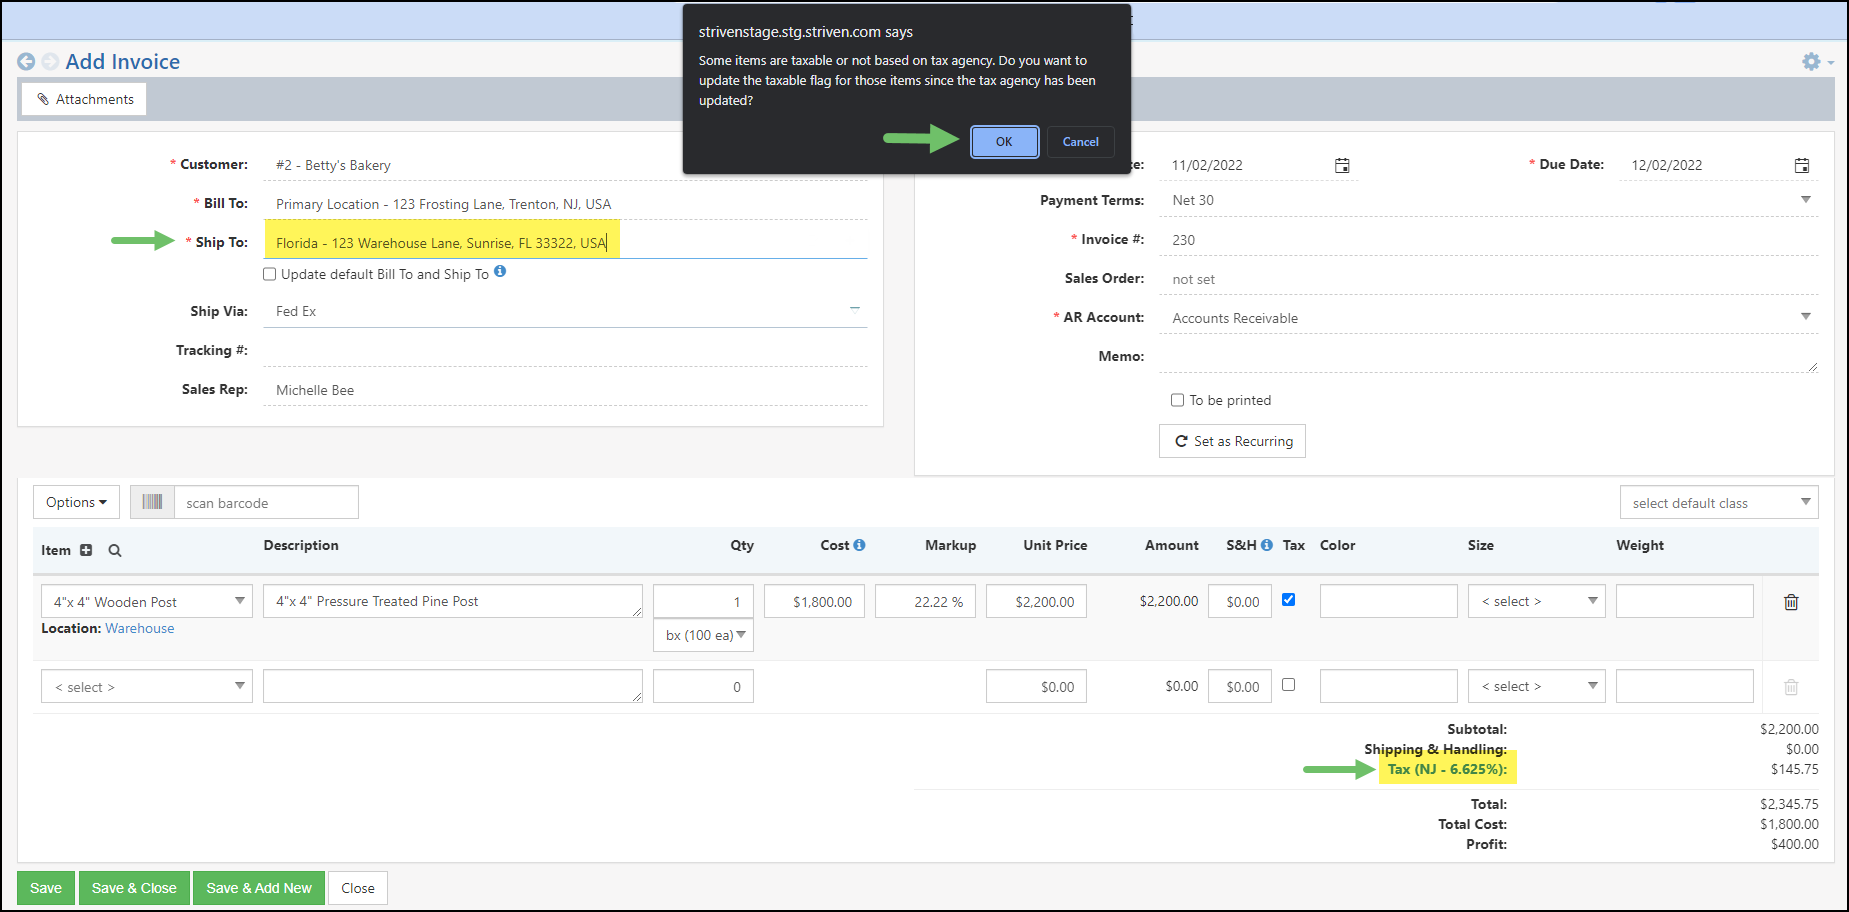
Example of the Prompt when the Ship To Address Changes the Taxable Designation
- Note: Changing the Taxable Configuration at the Item level will apply to future transactions, and will not affect existing ones already created within your system.
-
Copying Taxable Configurations
You may choose to copy the Tax Configurations from an Item when creating a new one. To copy an Item’s Taxable Configurations, select the Configure option located next to the Taxable checkbox. Within the Taxable Configuration window, you can select the Copy from Item option. Doing so will allow you to search for the Item you would like to copy the Taxable Configurations from.

Example of the Copy from Item Option
Once the Item whose settings you would like to copy has been located, you can select the Copy button located to the right of the item name, then select Save.

Example of Copying an Item’s Taxable Configurations
-
Importing Items
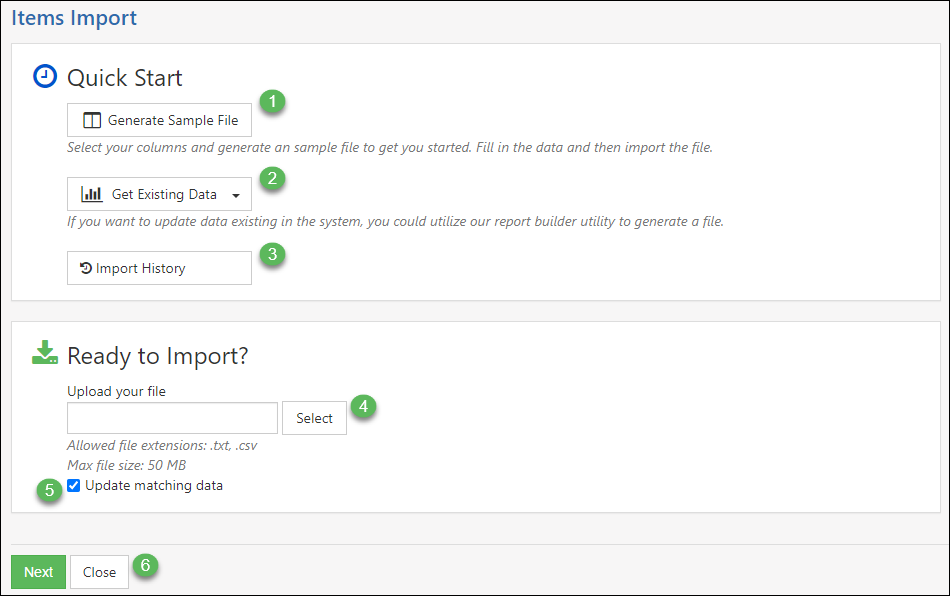
Items can be brought into Striven en masse by utilizing Striven’s Items Import. This can be done for large and small databases to bring in multiple Items at once. When on the Items List, you can click the Import button, which will populate the Items Import page. The Items Import page has tools that you can utilize to better understand how to import and search for a spreadsheet that you can choose to import your Items into Striven. You can bring your data into Striven using either a .TXT file or a .CSV file. Below is a screenshot depicting how an Item Import Page appears and a description of what you can accomplish there:
- Generate Sample File: Generates a sample import file, allowing you to select the columns and fill in the information for import.
- Get Existing Data: Enables you to create a report to pull specific information from your system to generate a file.
- Import History: Directs you to the Import Progress Page where you can filter and search for files previously imported and check the status of those imports.
- Select: Allows you to select a file to upload that includes the data you would like to import into Striven.
- Update matching data: This checkbox needs to be toggled on in order to update any existing Items in the system that matches data in the spreadsheet being imported. If this checkbox is not toggled, new and possibly duplicate Items will be created in Striven from the information in the spreadsheet selected.
- Actions: There are two buttons here which allow you to do different functions:
- Next: Brings you to the next page in the importing process, which would include mapping the fields in your spreadsheet to the appropriate fields in Striven.
- Close: Closes the Import Page and brings you back to the selected entity’s list.
Example of Item Importing Tool
-
Deleting Component Items Using the Import Tool
Having the ability to remove Component Items from Item Groups or Manufactured Items can make things easier when you encounter changes to stock or Item availability, discontinued Items, or upgraded Items. Using Striven’s Item Import feature will make these changes seamless and in bulk to save you time while using Striven.
When preparing the Import Mapping for your Import File, you will need to select the Remove Component Item column to use this feature.
The Data Type for this column is a “Yes/No” field, so if the Item is a component of a Manufactured Item or Item Group, setting this column to “Yes” will remove the Item from the specified Manufactured Item or Item Group that you have selected in the Manufactured Item Name or Item Group Name columns of your import file.
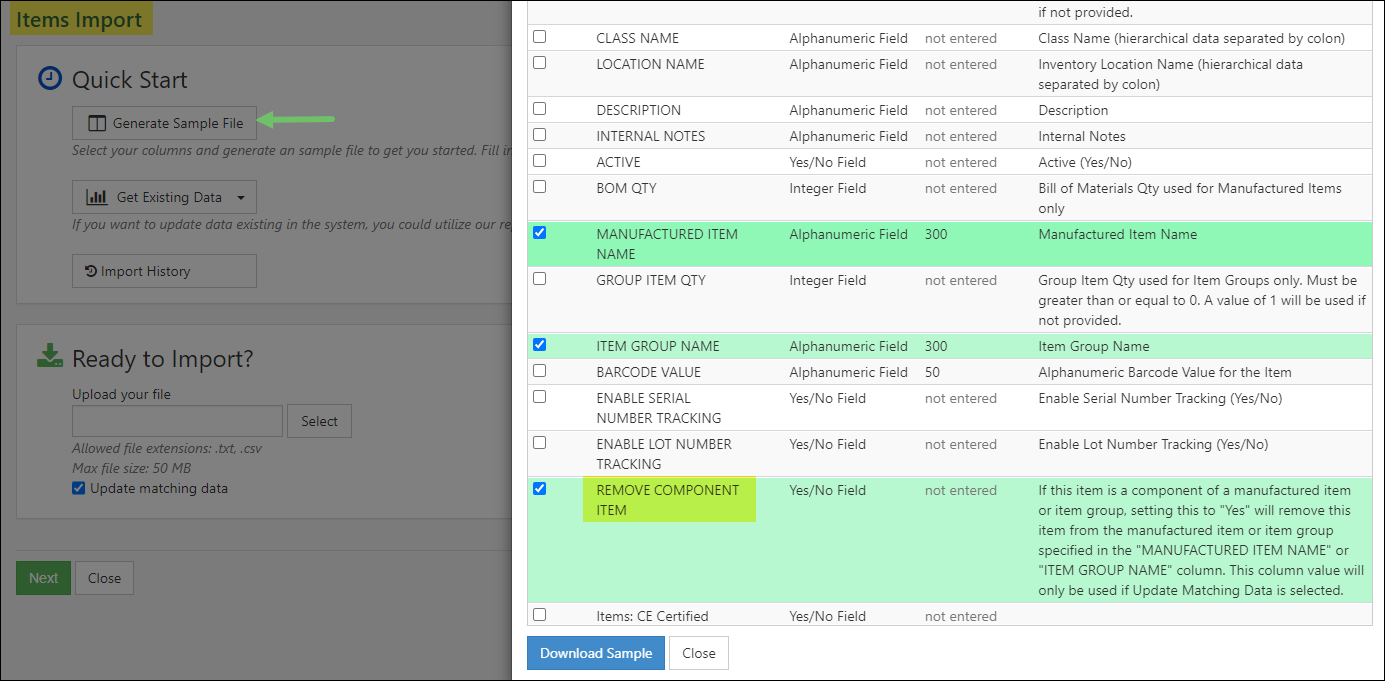
Example of the Import File Columns Related to Deleting Component Items
- Note: The Update Matching Data checkbox will need to be selected when performing the import to remove Component Items.
To make this process easier, there are two (2) Report Builder Datasets that can be used to identify Items and assist when using this feature. The Builds Details Dataset and the Item Components Dataset can be utilized to create custom reports that will help expedite and simplify the exporting/importing process when Deleting Component Items.
-
Item Categories
A helpful way to easily distinguish Items in Striven is to categorize them. Categories will help organize and separate Items for reporting and also when adding Items onto Orders and transactions. You can also designate a Parent and Child relationship if desired.
Learn more about Item Categories by reviewing the Category Management Guide.
Below is a screenshot featuring how Item Categories appear. To add Item Categories use the following steps: Company → Settings → Accounting → Inventory → Items → Categories.
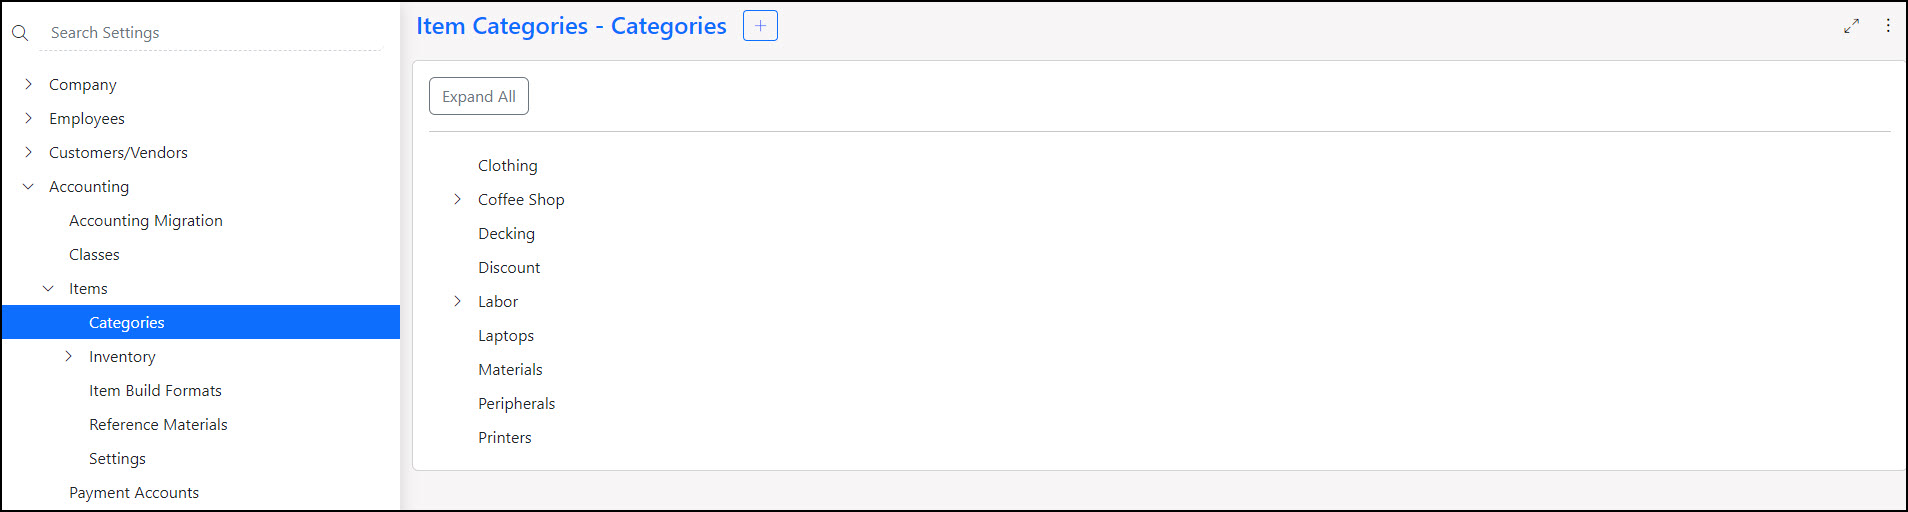
Example of Item Categories Page
-
Item Reference Materials
Item Reference Materials are resources that provide information regarding the Item being ordered. These materials can be instructions, schematics, warnings, and more. Once related to an Item, the Item Reference Materials may be viewed at the Item or Sales Order level.
Item Reference Materials can be created by navigating Company → Settings → Accounting → Items → Reference Materials.
The Reference Materials List page allows you to create and edit Reference Materials. The options available from this page are detailed in the section below.
- Add: Allows you to create a new Reference Material.
- Search: You may use the Search options to narrow the results listed on the Reference Materials List page.
- Reference Material Information: The Reference Materials List page will display the Reference Material Name, Type, and Category (if applicable). Selecting the hyperlinked Reference Material Name will allow you to view and edit the created resource.
- Reference Material Options: Selecting the View icon will allow you to download or open the selected Reference Material. If you would like to deactivate the selected Reference Material, select the Trashcan icon.

Example of the Reference Materials List
-
Creating Item Reference Materials
Select the Add button from the top of the Reference Material List page to begin creating a new Reference Material. The Add Reference Material page allows you to enter the following information:
- Name: Enables you to enter a name for the Reference Material.
- Type: You may choose to add Documents, Links, and Notes as Item Reference Materials.
- Category: The Category field uses a drop-down menu to allow you to organize your Reference Materials by designating a Category. Hovering over this field will prompt a plus button that can be used to create a new Category.
- Material Upload: This field will appear once a Reference Material Type has been chosen. Choosing the Document type will prompt an Upload field as seen in the example image. The Note type will prompt a rich text editor, and choosing a Link type will allow you to paste a link into the text field.
- Save Options: Allows you to Save, Save and Close, and Save and Add New.

Example of Adding a New Reference Material
-
Item Reference Material Management
Item Reference Materials can be associated at the Item level, ensuring that the Reference Materials are easily accessible. Once an Item with associated Reference Materials has been added to a Sales Order, the Reference Materials may be viewed from within your system, or the Customer Portal. To associate Reference Materials, navigate to the Item – Info page of the selected Item. Select the Reference Materials tab which is available from the Item Menu Bar.

Example of the Reference Materials Tab on the Item – Info Page
If no Reference Materials have been associated with the Item, the Item – Reference Materials page will display no results. Select the Associate Reference Materials button to choose the Reference Materials relevant to the Item.

Example of the Associate Reference Materials Option
A window will appear stating the name of the selected Item, and allows you various options regarding the Reference Materials available.
- Search Options: If there are a large number of Reference Materials available to choose from, the Search options can assist you in narrowing the results listed within this window.
- View Reference Materials: Enables you to view the Reference Materials to ensure you select the correct listing.
- Select Reference Materials: The checkboxes allow you to select each relevant Reference Material. Once selected, the Reference Materials will be highlighted in green.
- Associate & Close: Selecting this option saves your selections and associates the Reference Materials to the Item.

Example of Associating Reference Materials to an Item
After you have associated your Reference Materials to the Item, they will display on the Item – Reference Materials page. You may select the Trashcan icon to remove the Reference Material’s association to the Item, if necessary.

Example of Associated Reference Materials
When viewing a Sales Order containing an Item with associated Reference Materials, you may select the Reference Materials option from the Sales Order Menu Bar. The number located next to the Reference Materials text will indicate how many Item Reference Materials are available for viewing.

Example of the Reference Materials Option on a Sales Order
Once you have selected the Reference Materials option, you are able to view the Reference Materials pop-up window. The name and Reference Material type will be listed. If you would like to view the Item Reference Materials, you may do so by selecting the hyperlinked Reference Material Name.

Example of the Reference Materials Pop-Up Window
If a Sales Order contains Item Reference Materials, they may be viewed through the Customer Portal. To view the Reference Materials, select the View Item Reference Materials button located on the Sales Order Information page. Selecting this option will prompt a pop-up Item Reference Materials window, which allows you to view the Reference Material Name, and Type. The Reference Materials may be opened for viewing by clicking the hyperlinked Reference Material Name.

Example of Viewing Item Reference Materials from the Customer Portal
-
Default Tasks
When viewing the Item Info page a tab is available for Default Tasks which will allow users to add Tasks from the Tasks Library. When a Sales Order contains an Item with Default Tasks, the Create Default Tasks option in the Actions Menu of a Sales Order can be used to pull from this list.
Learn more about adding Tasks to the Tasks Library by reviewing the Task Groups & Task Library section in the Tasks Management Guide.

Example of the Default Tasks Tab in an Item
-
Default Tasks List
When viewing the Default Tasks tab in an Item key information and actions can be taken from the list which is reviewed below.
- Search Filters: Narrow down the results of Default Tasks that have been added to the Item.
- Add Task: Allows users to add a Default Task to an Item from the Tasks Library.
- Task Name: Lists the name of the Default Task. The recurring icon that may appear next to the Task name will indicate if a recurrence has been set up when the Task was added as a Default Task for the Item. Clicking on the Task name will allow users to configure the recurring setup for the Task.
- Task Type: Lists the Task Type that was set for the Task within the Task Library.
- Desired Hours: Lists the Desired Hours that were set for the Task within the Task Library.
- Deactivate: Removes Default Tasks that were added to the Item.

Example of the Default Tasks List in an Item
-
Adding Default Tasks to an Item
To add a Task as a Default Task for an Item, click the Add Task button from the Default Tasks tab. The following configurations can be made when selecting a Task to become a Default Task for an Item.
- Task Name: A drop-down menu that will allow you to select Tasks that are stored with the Tasks Library.
- Is Recurring?: When toggled on, the frequency, recurring options, and when the recurrence should end can be set for the Task.
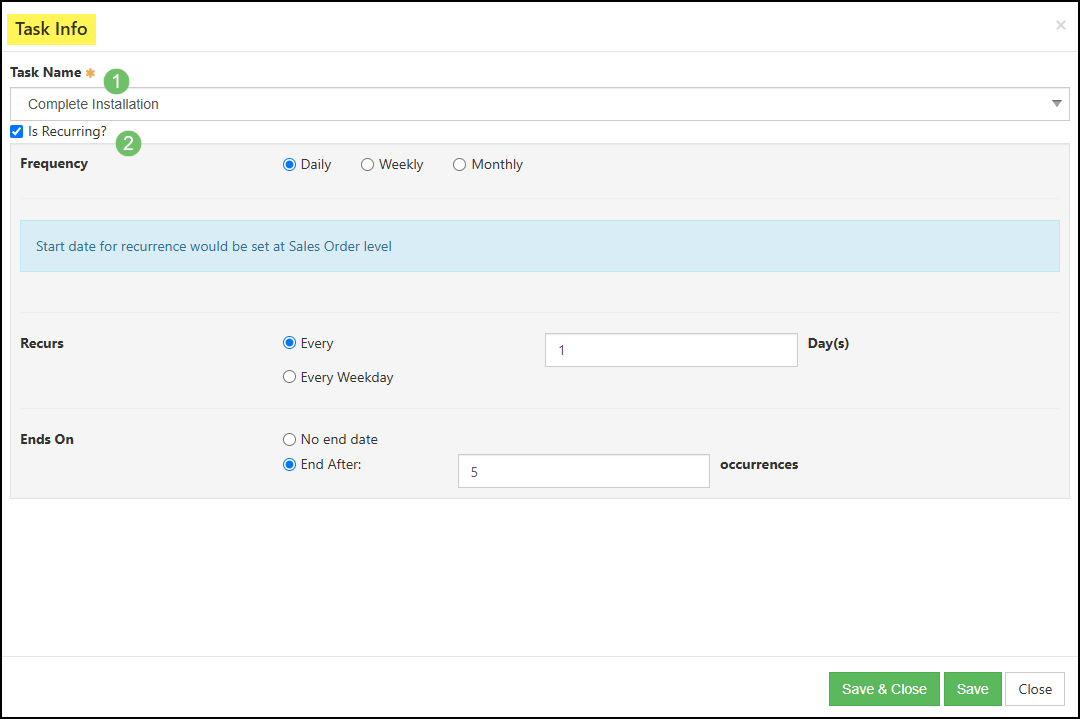
Example of Adding a Default Task to an Item
-
Reports
There are a number of reports that are built into Striven that help gain insight into your Company’s Items. From knowing the income you make per Item to an Item Quick Report, there is a lot of information to be viewed right from these reports. Below are reports in Striven that are designed to inform based on Items sales.
-
Income by Item
The Income by Item report offers a detailed financial analysis of company performance by product or service. Analyzing Transaction data, it reveals sales patterns and profitability across all inventory. Analyzing profitability by Item highlights high-margin offerings, crucial for focusing sales, promotions, and product/pricing strategies to maximize profitability. This report is a powerful tool for strategic decision-making to refine offerings and improve financial success.
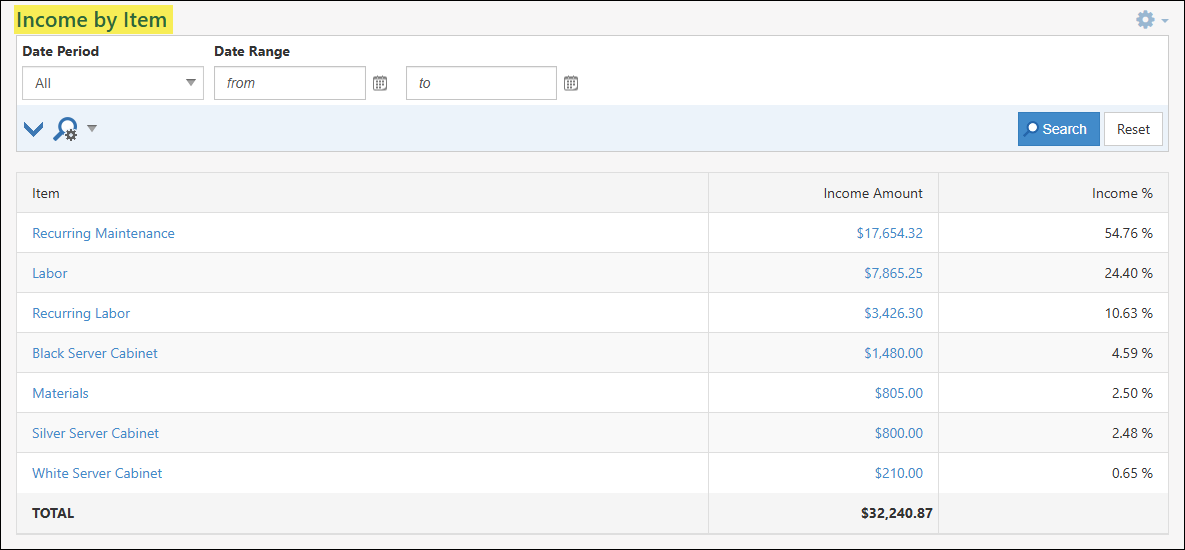
Example of the Income by Item Report
Permissions
There are two (2) User Role permissions related to the Income by Item Report.
- “Income By Item – Export”
- “Income By Item – View”
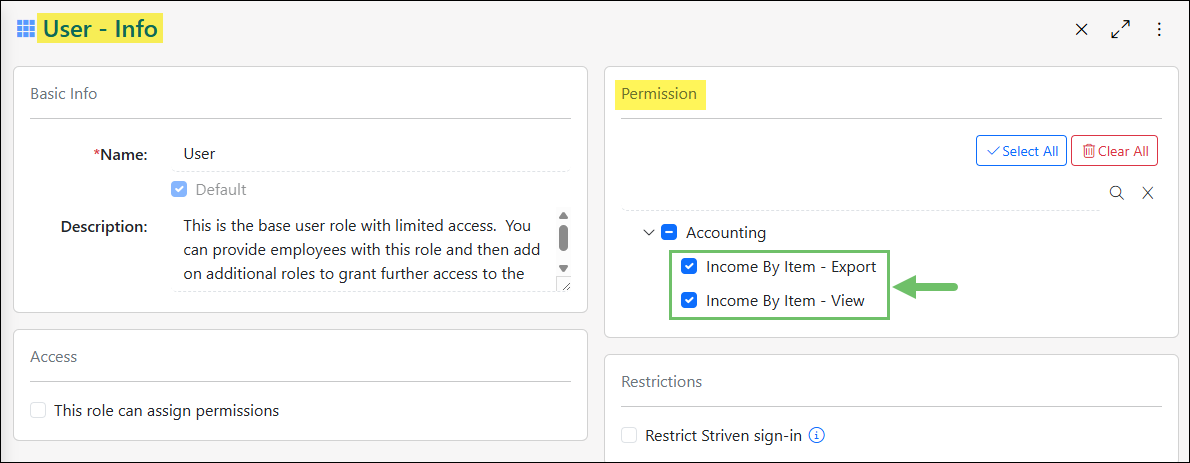
Example of Permissions Related to the Income by Item Report
Learn more about managing User Roles and Permissions in Striven by reviewing the User Roles Guide.
Viewing the Income by Item Report
To access the Income by Item report, navigate to Reports → Income & Receivables → Item.
Below is a screenshot illustrating how the Income by Item report appears and a description of what can be accomplished there.
- Search Filters: Narrows down results listed in the report based on available search filters. Search filters include selecting a date period or entering in a specified date range.
- Item: Lists the Item that has income associated with it based on related Transactions. Clicking on the Item name listed in this column will open the Item Info page for more information regarding the product.
- Income Amount: Calculates the total income based on related Transactions to the Item listed in the report. By clicking on the amount listed here, an Income by Item – Detail report will open to see which Transactions are being used to calculate the amount per Item.
- Income %: Calculates the total percentage amount that the Item is making up for the total amount of income being reported per Item.
- Total: Calculates the total amount listed from the Income Amount column in order to see the total amount of income being reported on in this report.
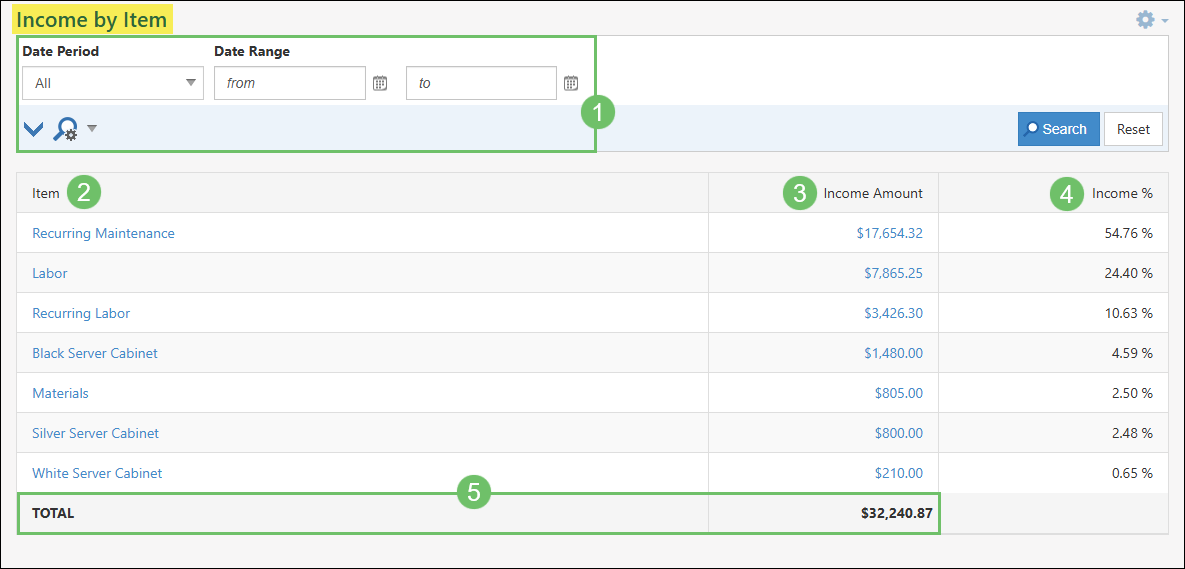
Example of the Information Available on the Income by Item Report
Income by Item – Detail
As mentioned above, clicking on the amount listed in the Income Amount column will open the Income by Item – Detail report which will display a more detailed report on how that amount is being calculated based on the related Transactions to the Item.
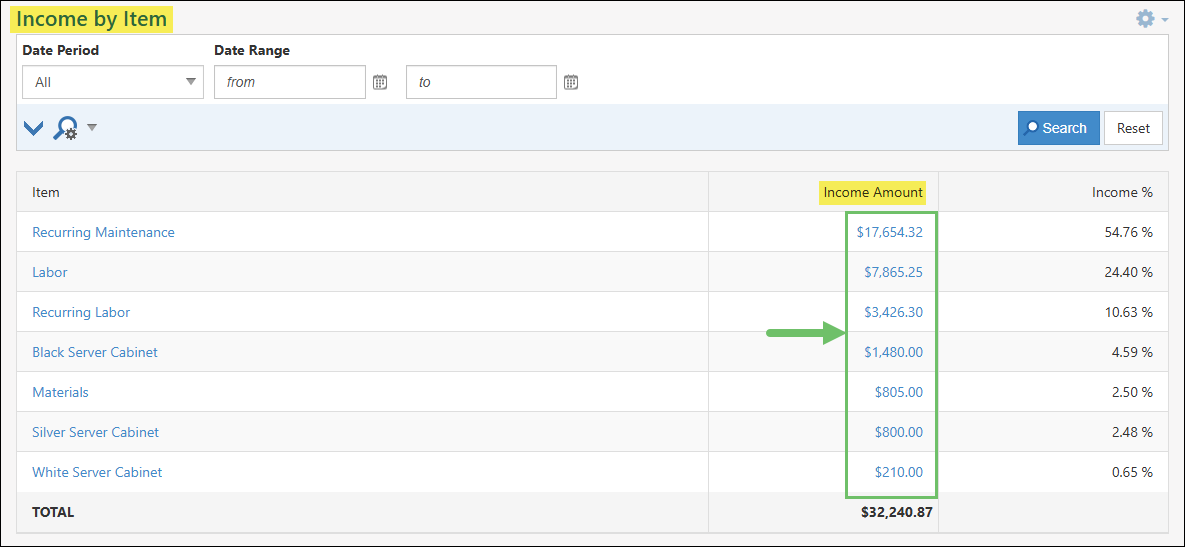
Example of the Location of the Income by Item – Detail Report
Below is a screenshot illustrating how the Income by Item – Detail report appears and a description of what can be accomplished there.
- Search Filters: Narrows down the results listed in the report based on the following criteria:
- Date Period: Adjust results based on a selected date period selected here.
- Date Range: Updates results based on a specified beginning and ending date range.
- Item Category: Allows you to filter the report based on the Item Category.
- Class: Will only display Transactions with a specific Class or multiple Classes selected.
- Show 0 Income: Includes Transactions in the report that do not have an amount associated and is listed on the Transaction as $0.
- Type: Lists the type of Transaction that is being included in the calculation for the Item’s income.
- Transaction #: Displays the Transaction number which can be clicked on in order to view the Transaction in more detail.
- Sales Order: If the Transaction has a Sales Order related, the Order number and name will be shown in this column. Clicking on the Sales Order listed will open the Order for additional details.
- Customer: Lists the Customer that is related to the Transaction included in the report’s results. Clicking on the Customer’s name will open their Customer profile page for more information.
- Date: Presents the date that is listed on the related Transaction.
- Memo: Shows the memo that is entered on the related Transaction.
- Amount: Displays the total amount that is calculated based on the related Transaction.
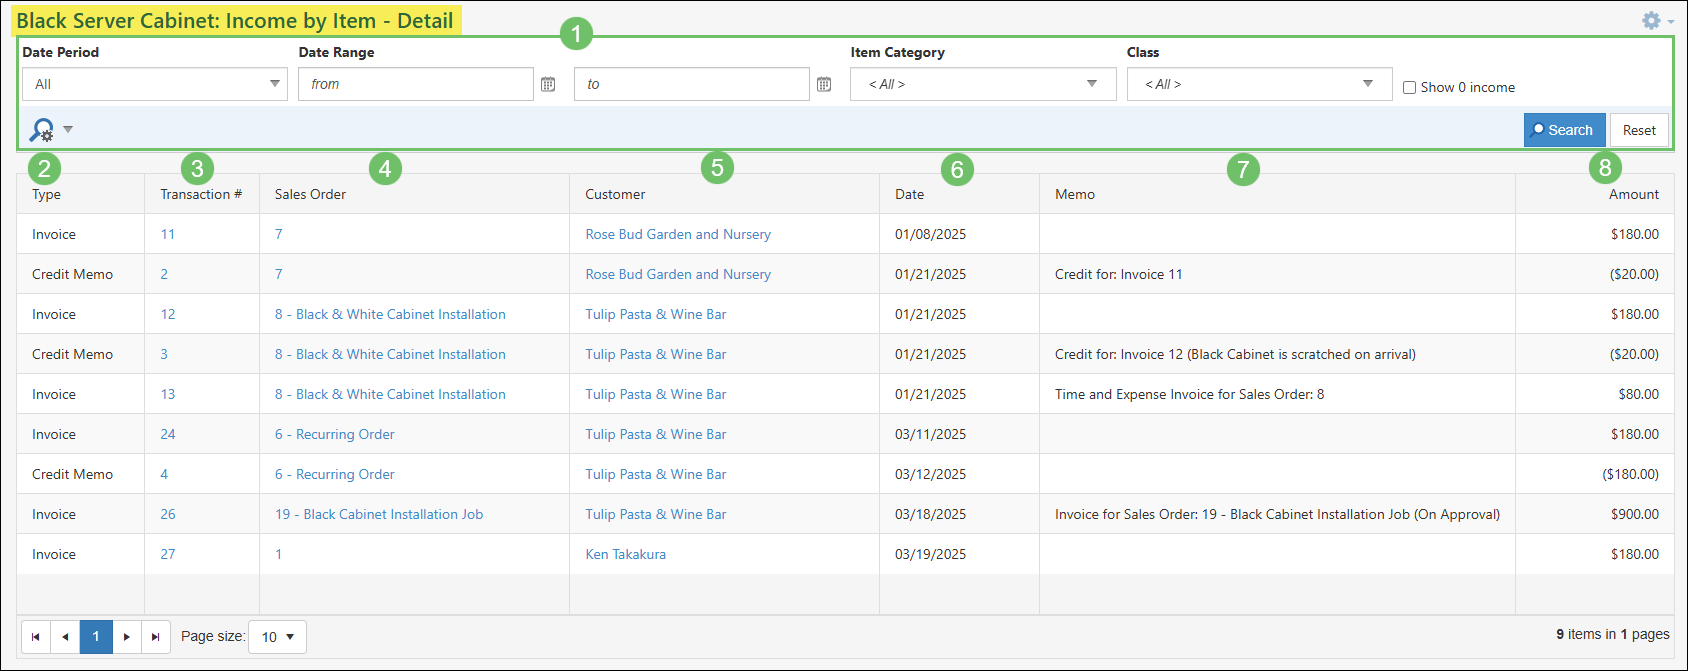
Example of the Income by Item – Detail Report
-
Item Quick Report
The Item Quick Report is a feature accessible within the Items list by selecting the numerical value displayed in the Qty on Hand column. It’s important to note that this quantity will only be present for items categorized as either Inventory or Manufactured types. Clicking this number will open the Item Quick Report, providing a more detailed view related to the on-hand quantity of that specific item.

Example of the Item Quick Report Links from the Items List
This report provides a quick overview of the current on-hand quantity of a specific Item. It calculates this quantity based on Transaction data within a chosen date range, directly from the Items list, eliminating the need to navigate elsewhere. This efficient feature streamlines the process of checking inventory levels for Inventory and Manufactured type Items.
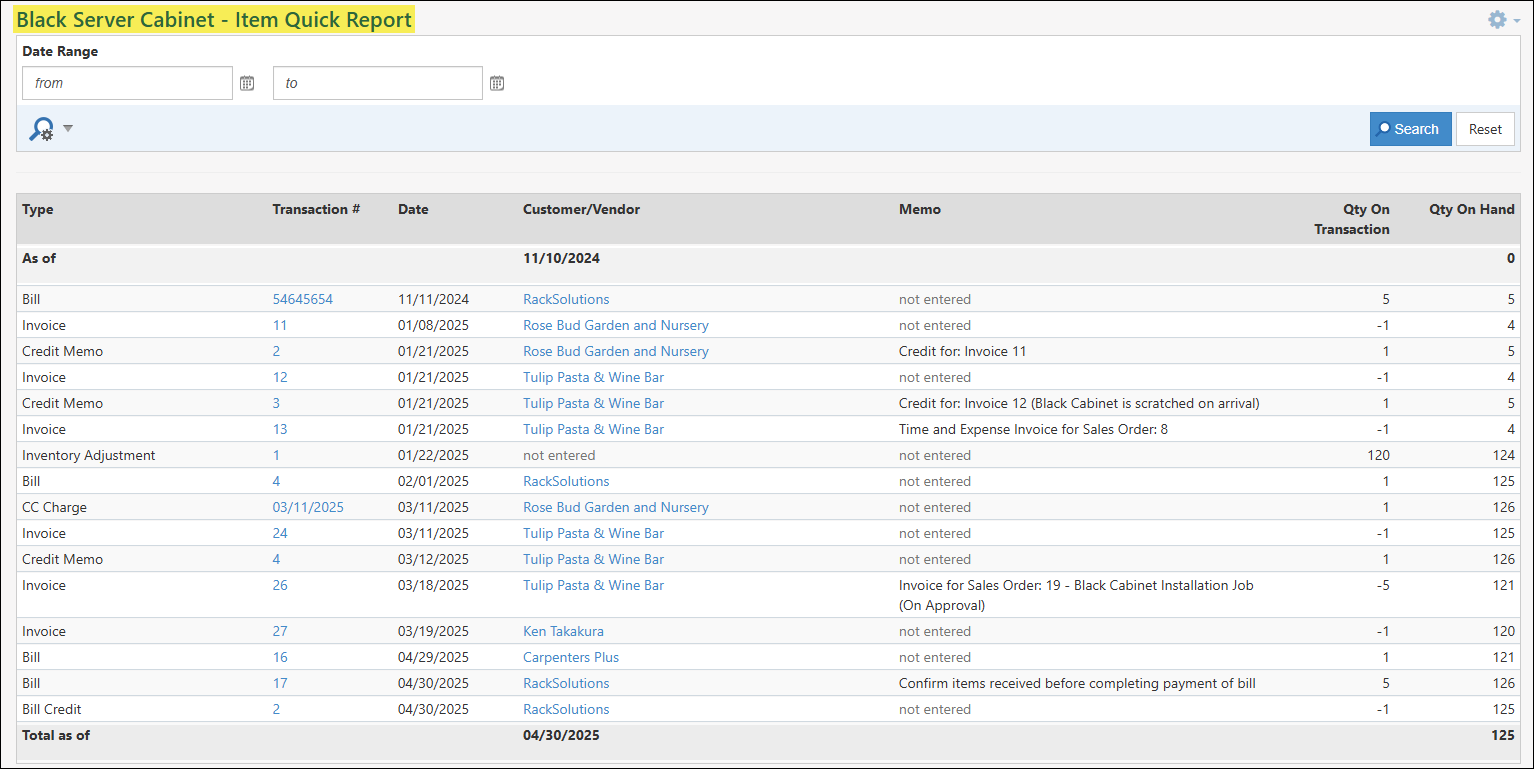
Example of the Item Quick Report
Viewing the Item Quick Report
The Item Quick Report displays an array of details about related transactions, including the associated Customer or Vendor and the memo from the transaction, alongside quantity information.
Below is a screenshot illustrating how the Item Quick Report appears and a description of what can be accomplished there.
- Date Range: Narrows down the results listed based on the specified date range selected within these search filters. Based on the date range selected, the beginning quantity and total quantity will adjust accordingly.
- Type: Lists the type of Transaction that has the Item listed. Depending on whether the Transaction is an Accounts Receivable or Accounts Payable type of Transaction will determine if the quantity is being raised or lowered for the overall quantity on hand within the system.
- Transaction #: Transactions listed in the results can be accessed by clicking on the Transaction number listed in this column to gain additional information.
- Date: Displays the date that is listed on the related Transaction.
- Customer/Vendor: The Customer/Vendor profile can be accessed by clicking on the name listed in this column.
- Memo: Displays the memo that is listed on the related Transaction in order to gain insight without having to open the Transaction.
- Qty On Transaction: Totals the quantity that is listed on the related Transaction. Depending on whether the Transaction is an Accounts Receivable or Accounts Payable type of Transaction will determine if the quantity is listed as a negative or positive to either bring additional quantity into the system or remove quantity.
- Qty On Hand: Lists a running total of the quantity that is on hand in the system based on how much the related Transaction is removing or adding additional quantity of the selected Item.
- Total As Of: Displays the overall total quantity of the specified Item as of the ending date range selected.
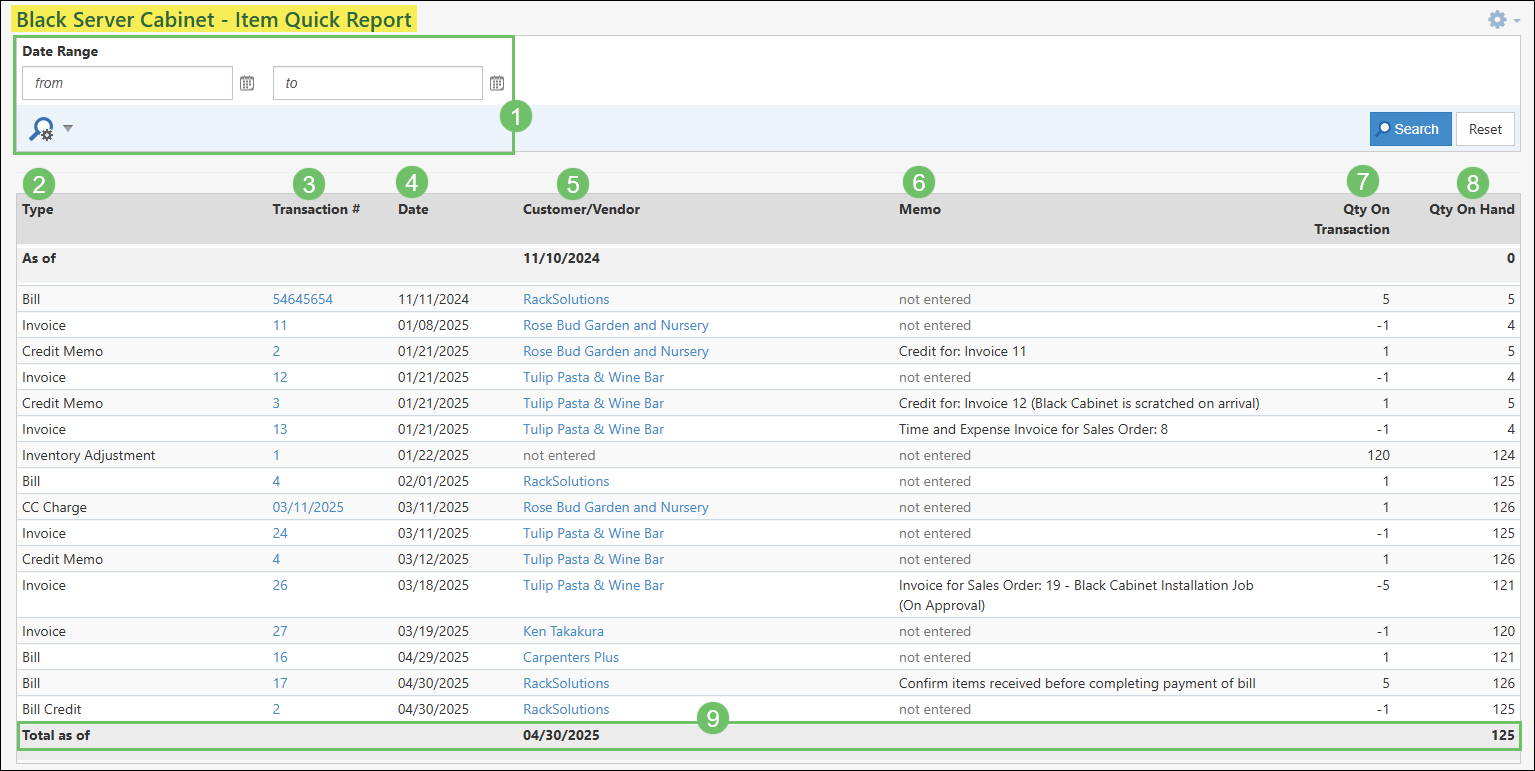
Example of the Information Available from the Item Quick Report
-
Recap
So with this guide, we’ve discovered how to create and manage all types of Items including Non-Inventory, Service, Fixed Assets, and more to enable you to buy and sell Items in Striven. We’ve also discovered ways to manage inventory by creating Inventory Items, Locations, and Adjustments to manage quantities on hand to ensure accurate counts in Striven. Finally, we’ve discussed creating and configuring Item Groups and creating and building Manufactured Items in Striven to help suit your Company’s Item Management needs.

Have a Question?
Ask the Striven Community
User-sourced how-to’s, feedback, and more!
FAQs
-
How do I start ordering Inventory Items from my Vendors?
Inventory Items can be ordered by using Purchase Orders in Striven which can be billed to Customers if desired. To learn more, please reference our Purchase Orders Guide.