
Portals
Customer Portal
Support Guide
-
Overview
The Striven Customer Portal is a valuable tool designed to significantly improve your Customers’ experience. It offers numerous features that empower your Company to communicate and collaborate more efficiently with your Customers. Customers can accomplish a great deal through the Customer Portal, with features such as approving Sales Orders, submitting Tasks, visibility into Projects, and much more.
Read this guide if you are trying to:
✔ Communicate and collaborate through the Customer Portal.
✔ Approve and review work such as Sales Orders, Projects, Tasks, etc.
✔ Understand how to increase visibility of ongoing work in the Customer Portal.
-
Customer/Vendor Portal Menu Bar
Both the Customer and Vendor Portal will have the same options from the Portal Menu Bar. Below is a screenshot illustrating how the Portal Menu Bar appears and a description of what can be accomplished there.

Example of the Portal Menu Bar Options in the Customer Vendor Portal

- Hide/Show Side Menu: Removes or displays the side menu in the Portal which houses additional navigation options for the user.
- Submit Ticket: Navigates to the New Task page. Learn more about the New Task page by reviewing the Add Task section located under the Tasks section of the Customer Portal Guide. This page will only be available if the Portal Role assigned to the logged-in user has the “Tasks: Add” permission enabled.
- Profile Icon: Gives the options to navigate to the My Info page or to Sign Out of the Customer/Vendor Portal.
- Discussions: Navigates to the Discussions list to view any Discussion Threads where the logged in user is a participant in.
- Happiness Rating: Gives the option to leave feedback in regards to happiness or unhappiness with the Company that is being worked with. This option will only be available if the Happiness Rating configurations have been enabled within the Core Settings page of your system. Learn more about these settings by reviewing the Company Settings section of our Company Setup Guide.
- Buzz: Accesses Buzz to view any announcements or posts that have been added through Buzz and made visible to the Customer or Vendor Contacts.
-
Profile Icon
The Profile Icon will have two options for the user currently logged into the Customer/Vendor Portal. The My Info page will hold information and configurations for the logged-in user while the Sign Out option will log the user out of the Customer/Vendor Portal and navigate to the Sign In page.

Example of the Options Under the Profile Icon
My Info
Below is a screenshot illustrating how the My Info page appears in the Customer/Vendor Portal and a description of what can be accomplished there.
- Profile Image: Allows the user to upload a profile image to be associated with their user profile.
- Name/Email: Displays the name that is associated with the logged-in user along with the email on file.
- Birthday/Birth Date: Records the birthday or birthdate for the logged-in user. To decide if only the day and month or the day, month, and year will be tracked, review the Contact Settings section from our Customer/Vendor Setup Guide.
- Timezone: Tracks the timezone that the logged-in user resides in.
- Reference Preference: Decides if the logged-in user would like to be used as a reference for the Company they are conducting business with. To indicate that being used as a reference is acceptable check the option It is OK to use me as a reference for (Company Name).
- Buzz Email Subscription: To turn off email notifications regarding Buzz Posts that have been made visible in the Customer/Vendor Portal, check the option Unsubscribe from Buzz Posts Emails.
- Sign In Attempts: Navigates to the Sign In Attempts list which will track the following information in regards to sign in attempts to the Portal with the logged-in user’s credentials:
- Site URL: Shows the URL from where the Portal was accessed from.
- IP Address: Displays the IP Address from where the user attempted to log in from.
- Status: Shows whether the log in attempt was successful or unsuccessful.
- Browser: Lists the browser type that was used to attempt the log in to the Portal.
- Date: Displays the date and time that the log in attempt took place.
- Sign Out: Will log out of the Portal and navigate back to the Log In page.

Example of the My Info Page in the Customer Vendor Portal
Sign Out
To log out of the Customer/Vendor Portal, click on the Profile Image and choose the option for Sign Out. This will navigate to the Log In page and successfully log you out of the Customer/Vendor Portal.

Example of the Sign Out Option Located Under the Profile Image
-
Discussions
The Discussions list holds all Discussion Threads that the logged-in user is a participant in with options to search through and start new Discussion Threads. To navigate to the Discussions list, click on the Discussions icon located within the Portal Menu Bar.

Example of the Location of the Discussions List Option in the Portal Menu Bar
Permissions
The following permissions will need to be configured for the Contact’s Portal Role if they will be managing or viewing Discussions in the Customer/Vendor Portal:
- “Discussions: View All”

Example of Discussions Related Permissions for the Customer Portal
Learn more about managing Portal Roles and Permissions for the Customer/Vendor Portal by reviewing the Customer/Vendor Portal Roles section in the Customer/Vendor Portal Setup Guide.
Discussions List
Below is a screenshot illustrating how the Discussions list appears in the Customer/Vendor Portal and a description of what can be accomplished there.
- Start Discussion: Begins a new Discussion Thread with options to choose which recipients should be added as participants.
- Archive/Unarchive: Moves any selected Discussion Threads into an Archived or Unarchived status based on which are being currently viewed.
- Refresh: Updates the Discussions list to view the most recent Discussions or replies to any open Discussions.
- Show/Hide Archived: Changes the list view to either view Discussion Threads that are currently Unarchived or have been moved into an Archived status.
- Discussions List: Lists the Discussion Threads that the logged-in user is set as a participant. Discussion Threads in bold font indicate there is an unread reply. Any related entities will be listed as a hyperlink underneath the Last Updated information for the Discussion Thread.
- View Discussion Thread: Displays the Discussion Thread which includes the initial message and any replies. Participants will be listed at the top of the Discussion Thread. Related entities will be hyperlinked underneath the participants for easy access. In the top right corner of the Discussion Thread will display when the Discussion was started and by whom sent the first message.
- Reply to Discussion Thread: Allows the logged-in user to send a reply to the Discussion Thread being viewed.

Example of the Information and Actions Available from the Discussions List
-
Happiness Rating
The Happiness Rating option allows the logged-in user to leave a comment review along with a rating of Happy, Satisfied, or Unhappy. This option will only be available if the Happiness Rating configurations have been enabled within the Core Settings page of your system. Learn more about these settings by reviewing the Company Settings section of our Company Setup Guide.
To leave a Happiness Rating in the Customer/Vendor Portal, click the Happy Face icon located within the Portal Menu Bar.

Example of the Happiness Rating Option in the Portal Menu Bar
Below is a screenshot illustrating how the Happiness Rating pop-up page appears in the Customer/Vendor Portal and a description of what can be accomplished there.
- Rating: There are three options when leaving a Happiness Rating in the Portal which includes Happy, Satisfied, and Unhappy.
- Comment: Allows the user to leave an additional comment to give context to the rating that they are submitting.

Example of the Happiness Rating Pop Up in the Portal
-
Buzz
Buzz is a Company-wide communication center that allows you to update Employees and Customers with news for your Company. To view Buzz in the Customer/Vendor Portal, click the Buzz icon. If there are Buzz posts that have not previously been viewed, a red dot will be added to the Buzz icon to indicate new posts.

Example of the Buzz Option in the Portal Menu Bar
Permissions
The following permissions will need to be configured for the Contact’s Portal Role if they will be managing or viewing Discussions in the Customer/Vendor Portal:
- “Buzz Posts: Access”
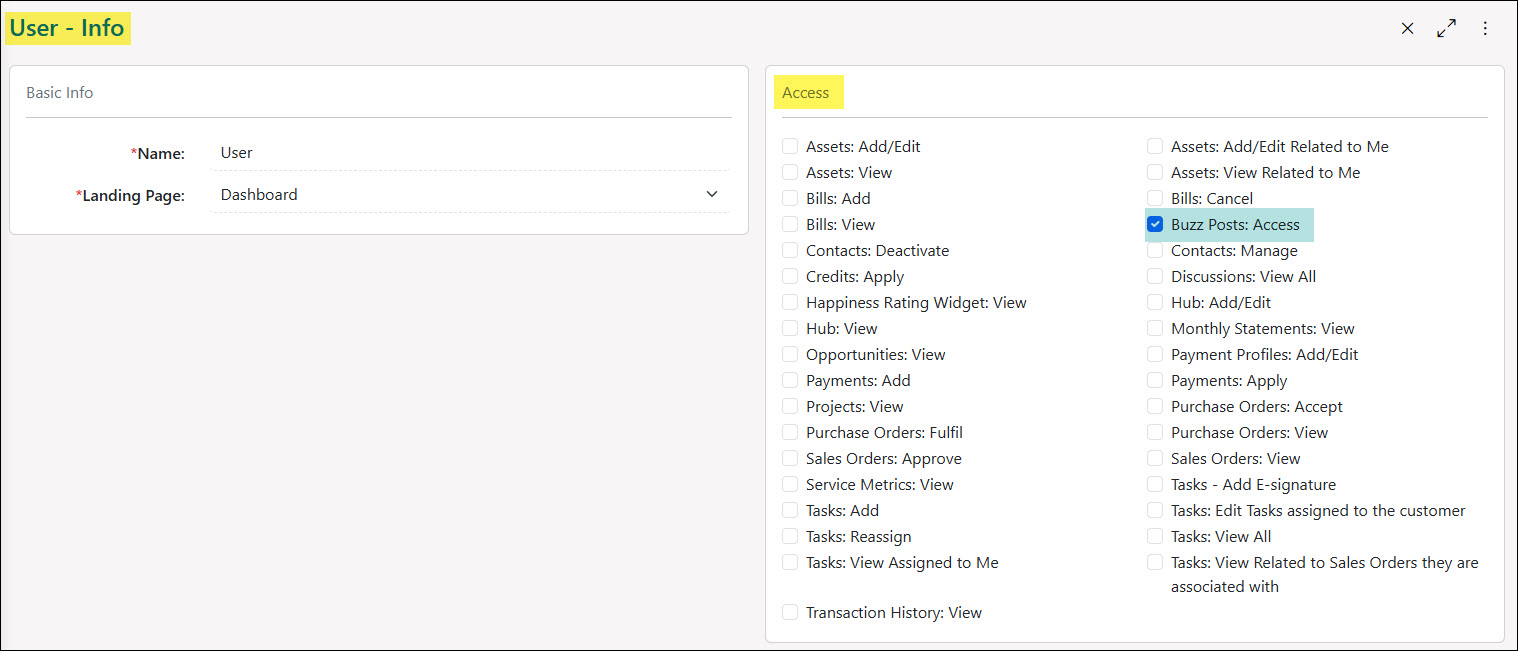
Example of Buzz Related Permissions for the Customer Portal
Learn more about managing Portal Roles and Permissions for the Customer/Vendor Portal by reviewing the Customer/Vendor Portal Roles section in the Customer/Vendor Portal Setup Guide.
Portal Visibility
If you would like to have Buzz posts visible to Customers or Vendors through the Customer/Vendor Portal, the option will need to be enabled for Share with specified Customers/Vendors when creating or editing the Buzz post.

Example of a Buzz Post that is Visible to Customers in the Portal
Buzz Posts
Below is a screenshot illustrating how Buzz appears in the Customer/Vendor Portal and a description of what can be accomplished there.
- Buzz Post Title: Displays the title that has been added to the Buzz post. A New! Tag will be added next to the Buzz post title if the Buzz post has not been previously viewed.
- Buzz Poster: Lists the person who made the Buzz post along with the date and time it was created.
- Buzz Post Content: Shows the text, images, and any other information that was added to the Buzz post.

Example of a Buzz Post that is Visible in the Portal
-
Customer Portal Dashboard
The Customer Portal Dashboard displays the widgets selected for the Customer Portal, which can include Customer’s financial information for past due balances, Sales Orders in need of approval, billing summary, Tasks summary, Assignments, and more. Below is a screenshot illustrating how the Customer Portal Dashboard appears and a description of what can be accomplished there.
- Past Due: Displays the Customer’s past due amount and provides a Pay Now link which will navigate to the Make a Payment page.
- Needs Approval: Displays the number of Sales Orders that are in a Pending Approval status with a link to navigate to the Sales Orders list prefiltered for Pending Approval Sales Orders.
- Recents: Displays a list of pages recently viewed by the logged-in user such as specific Transactions, Sales Orders, Tasks, Assets, etc.
- Customer Billing Summary: Displays a summary of the financial information for the Customer including the overall open balance amount along with how much is current and past due. A total for the unapplied Credit Memos will also be shown. A Pay Now button is also to navigate to the Open Balance page.
- Customer Display Widget: A customizable widget that can include any information you would like to display to your Customer, such as a welcome message, a hyperlink, images, etc.
- Assignments: Lists who is currently Assigned to the Customer. Only Assignments that have been marked as Visible on the Portal will be displayed within this widget.
- Work Summary: Displays a summary of Sales Orders that are In Progress or recurring, Projects that are In Progress, and Opportunities that are in a status that is visible on the Portal.
- Task Completion: Displays a bar graph showing Task completion progress by month.
- Asset Status: Lists Customer Assets with the status set to either In Service or Out of Service. An option is available to Add Assets to Monitor Status in order select which Assets being tracked should be included in this widget.
- Task Summary: Displays how many Tasks are currently in an Open or On Hold status.
- Efficiency: Displays a pie chart depicting the efficiency results of Tasks completed within the current month.
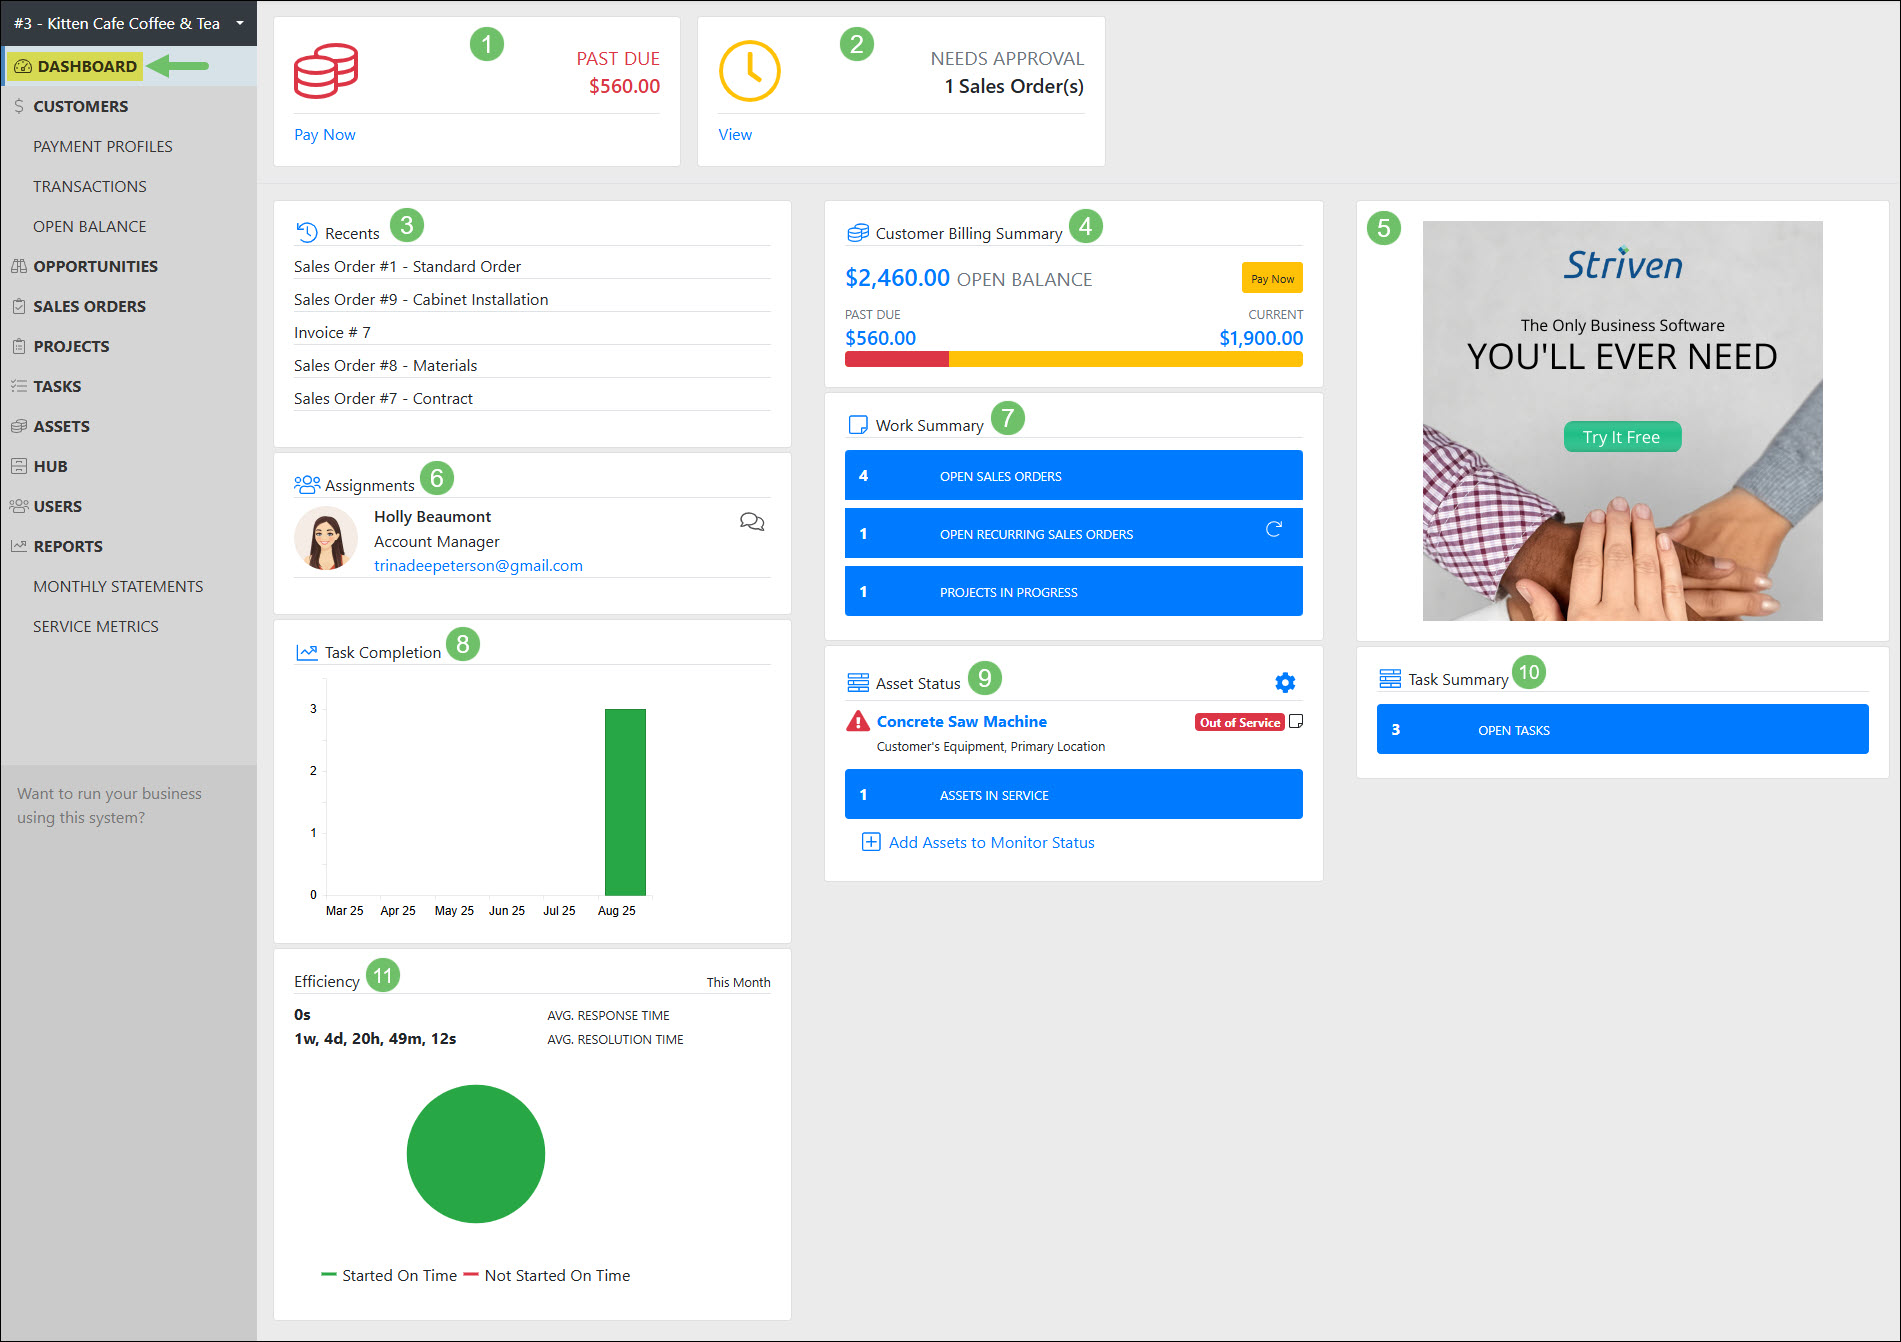
Example of Customer Portal Dashboard Widgets
Learn more about configuring and customization the Customer Portal Dashboard by reviewing the Managing Dashboard Widgets section from our Customer/Vendor Portal Setup Guide.
-
Customer Portal Menu
The Customer Portal Menu is located on the left side of the Portal screen and is a useful tool to navigate through the different areas of the Portal. The options available for your Customers to view here depend on which Portal content and permissions you have selected to make visible in your Customer Portal Roles. Below you will find an example of how a Customer Menu appears on the Portal, followed by an explanation of each menu option in the sections that follow.

Example of Customer Portal Menu
-
Payment Profiles
The Payment Profiles page is located in the side menu under Customers. The Payment Profiles page allows Customers to add, remove, or manage their payment profiles that they have on file through Striven. The option to enable or disable Autopay is also available on this page to manage.
Example of the Menu Location for Payment Profiles in the Portal
Permissions
The following permissions will need to be configured for the Contact’s Portal Role if they will be managing or viewing Payment Profiles in the Customer Portal:
- “Payment Profiles: Add/Edit”
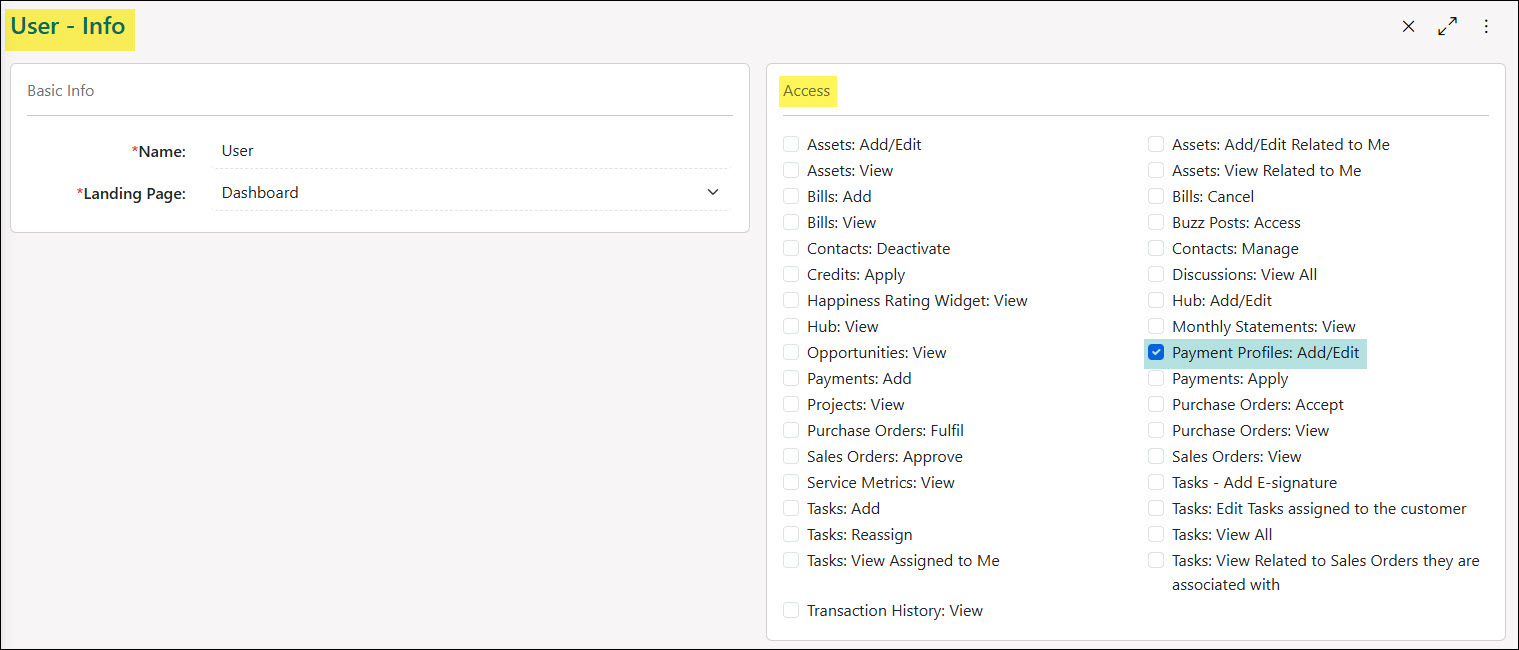
Example of Payment Profiles Related Permissions for the Customer Portal
Learn more about managing Portal Roles and Permissions for the Customer/Vendor Portal by reviewing the Customer/Vendor Portal Roles section in the Customer/Vendor Portal Setup Guide.
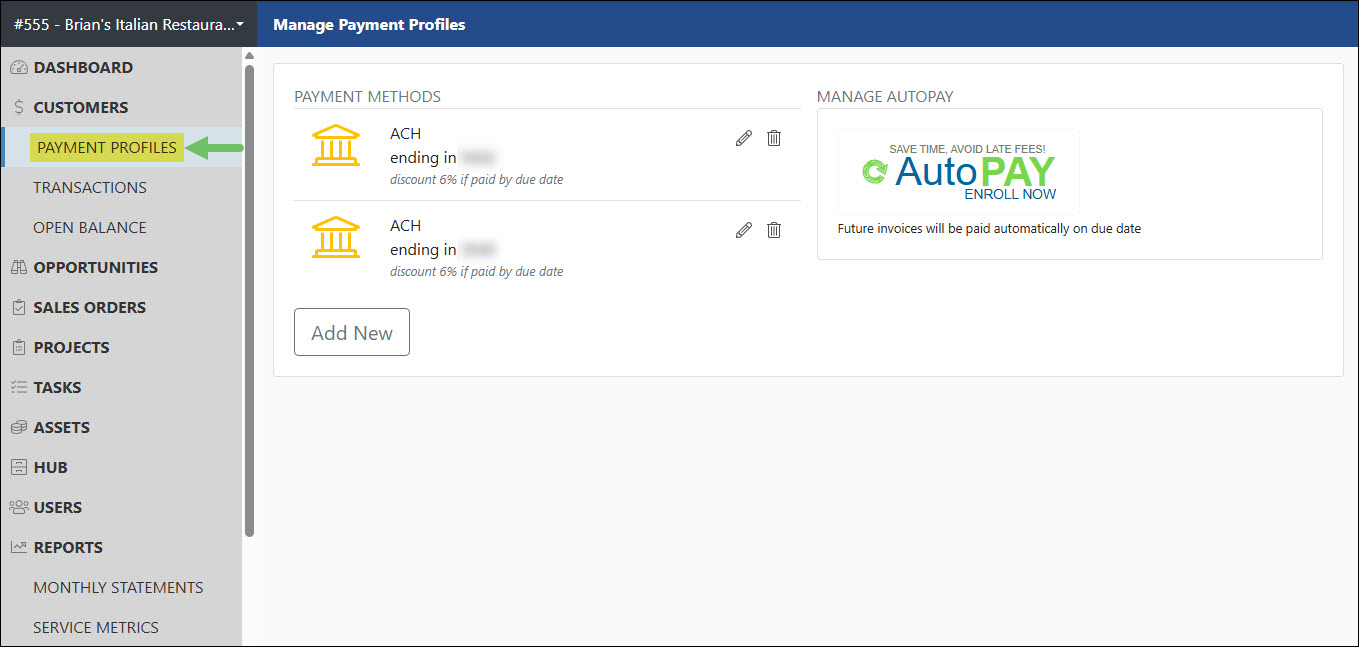
Payment Profiles Page
Below is a screenshot illustrating how the Payment Profiles page appears and a description of what can be accomplished there.
- Payment Methods: Lists current payment profiles that have been added through the Customer Portal. Clicking on the Edit icon will allow the user to make updates to the payment method information. Clicking on the Delete icon will remove the payment method from record. Any convenience fees or discounts that have been configured within the settings will display in print below each of the payment profiles based on the payment type.
- Add New: To add a new payment method click the Add New button to add either a Credit Card or E-Check on file. Any convenience fees or discounts that have been configured within the settings will display below each type of payment option available.
- Manage Autopay: Enables or disables the option for Autopay. Once selected, a dropdown menu will appear in order to choose which payment profile should be set up with Autopay. If Autopay has been enabled, the options will be available to change which profile is set up for the Autopay or to turn off the Autopay completely.
Example of Actions and Information Available on the Payment Profiles Page in the Portal
Note: To enable online Payments, you will need to have an Account with Authorize.net or Stripe and configure the Payment Settings accordingly in your Striven system. If you wish to use another Payment gateway, or for more information setting this up, please contact your Striven Consultant. The Payment Profile options are available by navigating to Company → Settings → Integrations → Payment Integration.
-
Transactions
The Transactions list displays a history of the Customer’s Transactions, including Invoices, Sales Receipts, Payments, Credit Memos, and Journal Entries that have been related to the Customer. By default, the list will show all Transactions but can be adjusted to show only open or past due. The Transactions list is located in the side menu of the Customer Portal located under the Customers option. Transactions that have been voided will not be accessible through the Customer Portal.

Example of the Location of the Transactions List in the Customer Portal
Permissions
The following permissions will need to be configured for the Contact’s Portal Role if they will be managing or viewing Transactions in the Customer Portal:
- “Credits: Apply”
- “Payments: Add”
- “Payments: Apply”
- “Transaction History: View”

Example of Transaction Related Permissions for the Customer Portal
Learn more about managing Portal Roles and Permissions for the Customer/Vendor Portal by reviewing the Customer/Vendor Portal Roles section in the Customer/Vendor Portal Setup Guide.
Transactions List
Below is a screenshot illustrating how the Transactions list appears and a description of what can be accomplished there.
- Quick Filters: Click on one of the options listed here to easily adjust the list to show only open or past due Transactions.
- Search Filters: There are an array of search filters available on the Transactions list to narrow results such as:
- Date Range: Filters the list based on the Transaction date that is listed on the Transaction.
- Type: Narrows results based on the type of Transaction such as Invoice, Sales Receipt, Credit Memo, Payment, or Journal Entry.
- Transaction #: Adjusts results listed based on the number listed on the Transaction.
- Memo: Searches through the memos that have been entered on the Transactions and will only show results that include what is being searched for.
- Sales Order #: Shows Transactions based on the related Sales Order number which will be listed in the Related To column on the list.
- PO #: This filter will work when using the search filters for Vendors in the Portal rather than Customers.
- Project #: Narrows results based on the Project that has been related to the Transaction through the Sales Order. The related Project will be listed in the Related To column in the list.
- Open/Past Due: Adjusts list to only show Transactions that are open or past the due date.
- Type: Displays the type of Transaction that is accessible to the Customer. Transaction Types include Invoices, Sales Receipts, Payments, Credit Memos, and Journal Entries. Clicking on the Transaction Type listed will open the Transaction in a new window to view additional details. A red highlight will appear on Transactions that are past due to indicate the lateness.
- Txn #: Lists the number that has been entered onto the Transaction. Clicking on the Transaction number will open the Transaction in a new window to view additional details.
- Date: Shows the date that has been entered onto the Transaction.
- Memo: Will display any memo that has been entered onto the Transaction.
- Due Date: Displays the date that the Transaction is due for payment.
- Related To: Lists out any related Sales Orders or Projects. Clicking on the hyperlinks listed here will open the Sales Order or Project in a new window to view additional details.
- Amount: Shows the total amount that has been entered into the Transaction.
- Open: Displays the amount that is still open on the Transaction. If $0 is shown, this indicates the Transaction has been closed.
- Actions: A Pay button will be listed for Invoices that still need payment added. For Credit Memos and Payments that are still open, an Apply button will be available.
Example of the Actions and Information Available on the Transactions List in the Customer Portal
-
Open Balance
The Open Balance page will only display Transactions that have not been closed. Invoices will be shown that need payment or Payments and Credit Memos will be listed that need to be applied to open Invoices. A summary of the total open balance will be displayed at the top of the page along with a breakdown of past due vs current. The Open Balance page is located in the side menu of the Customer Portal located under the Customers option.

Example of the Location of the Open Balance Page in the Customer Portal
Permissions
The following permissions will need to be configured for the Contact’s Portal Role if they will be managing or viewing Open Balances in the Customer Portal:
- “Credits: Apply”
- “Payments: Add”
- “Payments: Apply”
- “Transaction History: View”

Example of Open Balance Related Permissions for the Customer Portal
Learn more about managing Portal Roles and Permissions for the Customer/Vendor Portal by reviewing the Customer/Vendor Portal Roles section in the Customer/Vendor Portal Setup Guide.
Open Balance Page
Below is a screenshot illustrating how the Open Balance page appears and a description of what can be accomplished there.
- Summary: The summary area at the top of the Open Balance page will be the overall total dollar amount that is open. A bar graph will be displayed to indicate how much of the open balance is past due vs. current. To the right of the bar graph will have a total of open Credit Memos and open Payments.
- Type: Displays the type of Transaction that is accessible to the Customer. Clicking on the Transaction Type listed will open the Transaction in a new window to view additional details. A red highlight will appear on Transactions that are past due to indicate the lateness. Using the checkbox located next to each Invoice listed will allow you to use the option at the bottom of the list for Next: Select Payment Method.
- Txn #: Lists the number that has been entered onto the Transaction. Clicking on the Transaction number will open the Transaction in a new window to view additional details.
- Date: Shows the date that has been entered onto the Transaction.
- Memo: Will display any memo that has been entered onto the Transaction.
- Due Date: Displays the date that the Transaction is due for payment.
- PO #: Will only display information if viewing this list from the Vendor Portal.
- Amount: Shows the total amount that has been entered into the Transaction.
- Open: Displays the amount that is still open on the Transaction.
- Amount/Apply: Invoices listed will have a box where the amount you wish to pay on the specific Invoices can be entered. Open Credit Memos and Payments will have an Apply button in order to apply the open Credit or Payment amount to any of the open Invoices.
- Next: Once you have selected the Invoices you wish to pay and have entered the amount that should be paid per selected Invoice, click the option labeled Next: Select Payment Method.

Example of Actions and Information Available on the Open Balance Page in the Customer Portal
-
Opportunities
The Opportunities feature helps you manage potential sales of goods or services to your Customers. For each Opportunity, you can track key details such as the estimated value, expected close-ratio, priority, and type. Opportunities in the Customer Portal can be accessed through the side menu.

Example of the Location of Opportunities in the Customer Portal
Permissions
The following permissions will need to be configured for the Contact’s Portal Role if they will be managing or viewing Opportunities in the Customer Portal:
- “Opportunities: View”
Example of Opportunities Related Permissions for the Customer Portal
Learn more about managing Portal Roles and Permissions for the Customer/Vendor Portal by reviewing the Customer/Vendor Portal Roles section in the Customer/Vendor Portal Setup Guide.
Portal Visibility
In order for Opportunities to be visible within the Customer Portal, the option will need to be checked on the Opportunity for Visible to Contacts.

Example of the Location to Mark an Opportunity Visible on the Portal in Striven
-
Opportunities List
Below is a screenshot illustrating how the Opportunities list appears in the Customer Portal and a description of what can be accomplished there.
- Quick Filters: Allows the user to easily filter the list based on the status of the Opportunity or if they are set as the Contact within the Opportunity through the My Opportunities option.
- Search Filters: There are an array of search filters available to narrow down results listed in the Opportunities List such as:
- Opportunity #: Searches the list based on the number that has been assigned to the Opportunity.
- Opportunity: Narrows results based on the Opportunity name and description.
- Stage: Shows results based on the stage that the Opportunity resides in. Stages that are searchable and viewable on the Customer Portal will need to be marked as Visible on Customer/Vendor Dashboard within the settings.
- Contact: Narrows results based on the Contact that has been selected on the Opportunity.
- Date Range: Searches through the Opportunities list and updates results based on the created date.
- Opportunity: Lists the Opportunity number and name. Underneath the name will only display the current stage the Opportunity is in. The color bar next to the number and name will indicate the priority of the Opportunity.
- Contact: Lists the Contact that has been selected on the Opportunity.
- Date Created: Displays the date the Opportunity was initially created.
- Assignment: Lists who will be working on the Opportunity. If multiple people are assigned, their profile images will be stacked on top of each other. Hovering over the profile image will display the full list.
Example of the Actions and Information Available on the Opportunities List in the Customer Portal
-
Opportunity Info
Once you have clicked to access an Opportunity from the list, you will be able to view more details about the Opportunity. Below is a screenshot illustrating how an Opportunity Info page appears in the Customer Portal and a description of what can be accomplished there.
- View Discussions: Navigates to the bottom of the page to the Discussions area in order to view current Discussion threads or begin a new conversation.
- Opportunity Info: Displays an array of information regarding the Opportunity such as:
- Stage: The current stage the Opportunity resides in.
- Type: The Opportunity Type that was selected on the Opportunity.
- Priority: Indicates the importance or priority of the potential work.
- Location: Displays the Customer’s Location name if it was selected on the Opportunity.
- Created: Displays the date and time the Opportunity was initially created.
- Description: Any description that was entered into the Opportunity will display for additional context or information.
- Assignees: Lists the people who are assigned to the Opportunity and will be completing or overseeing the potential work or next steps.
- Contact: Lists the Contact that is associated with the Opportunity.
- Attachments: Any attachments that have been uploaded to the Opportunity will be available for download. The employee who completed the upload will be displayed along with the date and time the upload took place.
- Discussions: Houses any Discussion threads that have been added to the Opportunity. Clicking the New Thread icon will autopopulate the assignees to easily begin communication as needed.

Example of an Opportunity in the Customer Portal
-
Sales Orders
Striven’s Sales Orders offer extensive flexibility, accommodating a wide range of services and goods. Sales Order Types can be configured for various purposes, including acting as a Quote or Contract, managing time and materials billing, or handling subscriptions. The Customer Portal enhances collaboration, allowing customers to view current or completed Sales Orders and approve pending ones. Sales Orders can be accessed in the Customer Portal by selecting the Sales Orders option in the side menu.

Example of the Sales Order Location in the Customer Portal
Permissions
The following permissions will need to be configured for the Contact’s Portal Role if they will be managing or viewing Sales Orders in the Customer Portal:
- “Sales Orders: View”
- “Sales Orders: Approve”
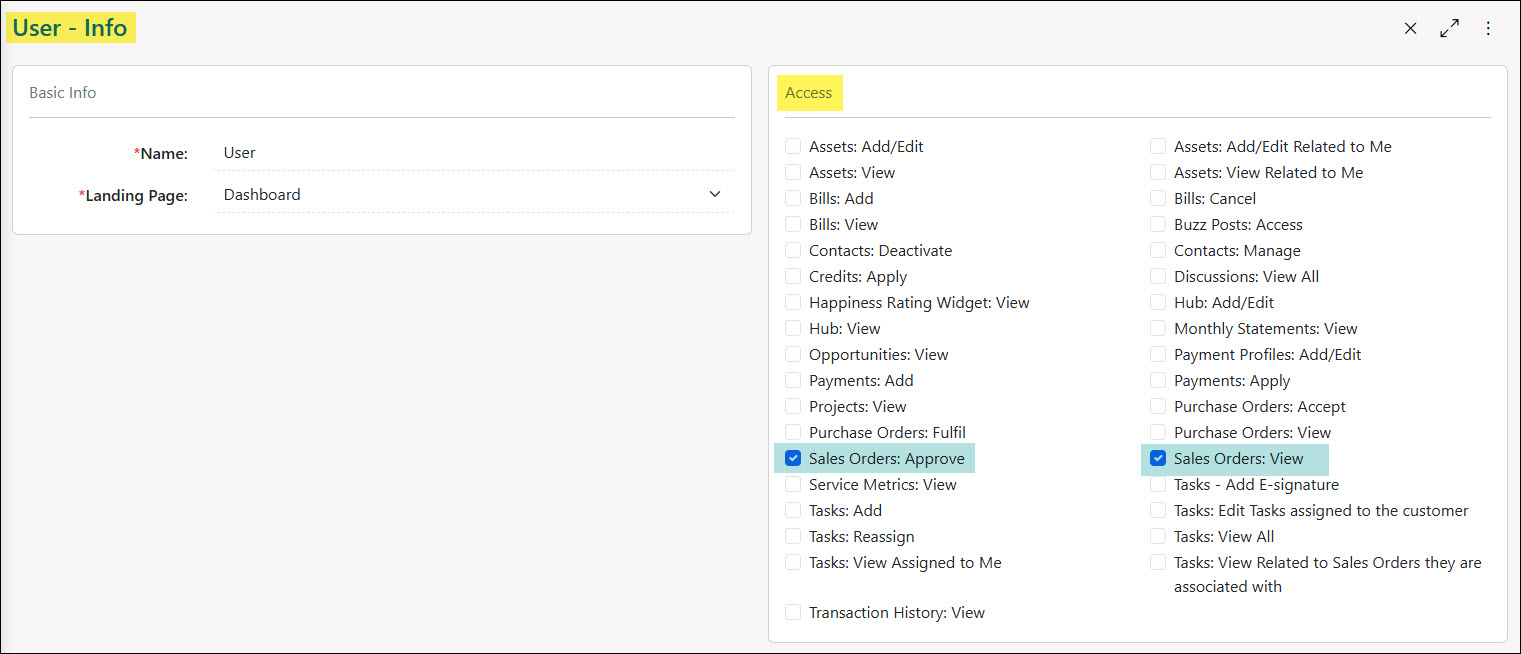
Example of Sales Order Related Permissions for the Customer Portal
Learn more about managing Portal Roles and Permissions for the Customer/Vendor Portal by reviewing the Customer/Vendor Portal Roles section in the Customer/Vendor Portal Setup Guide.
-
Sales Orders List
Below is a screenshot illustrating how the Sales Orders list appears in the Customer Portal and a description of what can be accomplished there.
- Quick Filters: Allows the user to narrow the list based on the status of the Sales Orders or Orders they are selected in the Contact field on the Sales Order.
- Search Filters: There are an array of search filters available to adjust the results listed such as:
- Sales Order #: Narrows results based on the number that was assigned to the Sales Order.
- Name: Searches the list based on the name that was assigned to the Sales Order. Depending on the Sales Order Type, this field may not be accessible on a Sales Order.
- PO #: Bases results based on the PO # that was assigned to a Sales Order. This field is only searchable for Sales Orders that are set up as Contract Managed within the Sales Order Type.
- Status: Allows the user to search through Sales Orders based on the status the Sales Order resides in. Statuses that are searchable on the Customer Portal include Pending Approval, Approved, In Progress, Quoted, and Completed. By default, this search field will have the Pending Approval, Approved, and In Progress statuses selected.
- Sales Order Date Range: Searches the listed Sales Orders based on the Sales Order date that was entered on the Sales Order.
- Completion Date Range: Searches the listed Sales Orders based on when the Sales Order was marked as Completed.
- Approval Date Range: Searches the listed Sales Orders based on when the Sales Order was marked as Approved.
- Assigned To: Narrows results based on the Customer Contact that is selected within the Contact field on a Sales Order. This field is only searchable if the Customer Contact option is turned on within the Sales Order Type as a display field.
- Frequency: Adjust results to show either Sales Orders that are set up as One Time or Recurring.
- Sales Order: Lists the Sales Order number and name. Underneath the assigned number and name will also be listed the current status of the Sales Order. Clicking on the hyperlink listed in this field will open the Sales Order Info page for additional information regarding the Sales Order.
- Sales Order Date: Displays the date that has been entered into the Sales Order Date field on the Sales Order.
- Target Date: Shows the date that has been entered into the Target Date field on the Sales Order. To enter a Target Date on a Sales Order the Target Date option will need to be enabled within the Sales Order Type’s display fields.
- Total: Depicts the overall total dollar amount that has been added to the Sales Order based on the Items and prices entered.
- PO #: Displays the PO # that has been entered for the Sales Order. This column will only display information for Sales Orders that have Contract Managed turned on in the Sales Order Type and have been moved into the Approved status.
- Assigned To: Displays the Customer Contact that has been added to the Contact field within the Sales Order. This column will only display information if the Customer Contact field has been enabled within the Sales Order Type’s display fields.
- Approved By: Will display who completed the approval for the Sales Order if the Sales Order Type is set up as Contract Managed. If the Sales Order is awaiting approval, an Approve button will be available to update the status from the list view.

Example of the Information and Actions Available for Sales Orders in the Customer Portal
-
Sales Order Info
The Sales Order Info page will house an array of information and actions that can be taken regarding a specific Sales Order. Some information and actions may or may not be listed based on the Sales Order Type configurations. Below is a screenshot illustrating how the Sales Order Info page appears in the Customer Portal and a description of what can be accomplished there.
- View Discussions or Related To: To navigate to the Discussions section in the Sales Order click the View Discussions button. To view related entities to the Sales Order such as Projects or Tasks, click the Related To button.
- Sales Order Info: This section will display an array of information related to the Sales Order such as:
- Sales Order Total: Displays the overall total dollar amount that has been added to the Sales Order based on the Items and prices listed within the Sales Order.
- Sales Order Date: Displays the date that has been entered into the Sales Order Date field on the Sales Order.
- Target Date: Displays the date that has been entered into the Target Date field on the Sales Order. For a date to appear here the Target Date option will need to be enabled within the Sales Order Type’s display fields.
- Bill To/Ship To: Shows the Customer Location’s address that was selected for the Bill To and Ship To for the specific Sales Order.
- Sales Rep: Lists the Sales Rep that is related to the Sales Order. Clicking on the Start Discussion button next to the Sales Rep’s name will open a New Discussion window with the Sales Rep pre-selected to begin a conversation related to the Sales Order.
- Assigned To: Lists the Customer Contact that has been selected on the Sales Order. Clicking on the Start Discussion button next to the person’s name will open a New Discussion window with the person pre-selected to begin a conversation related to the Sales Order.
- Attachments: Lists any attachments that have been uploaded for the Sales Order. Any attachments uploaded for a specific Sales Order will be visible on the Customer Portal through viewing the Sales Order.
- Item Information: Lists any Items that have been added to the Sales Order. Information related to the item will be displayed such as the quantity, description, rate, amount, and whether or not the Item has been marked as taxable.
- Payment Schedule: If the Sales Order Type has been set up as Contract Managed and has not been approved, a Payment Schedule section will be shown which will display how much payment is expected at certain durations during the Sales Order’s lifecycle.
- Total Info: Displays the total dollar amount that is due for the Sales Order which is calculated based on a subtotal, shipping & handling amount, and the total tax amount.
- Approval Info: If the Sales Order Type has been set up as a Contract Managed, this section will either show the action to mark the Sales Order as approved or list the information that was captured at the time of approval.
- Discussions: Displays any Discussion Threads that have been related to the Sales Order. Internal Discussion Threads will only display if they have been marked Visible on Portal. Clicking the New Thread icon will start a new Discussion Thread with the Sales Rep assigned to the Sales Order.
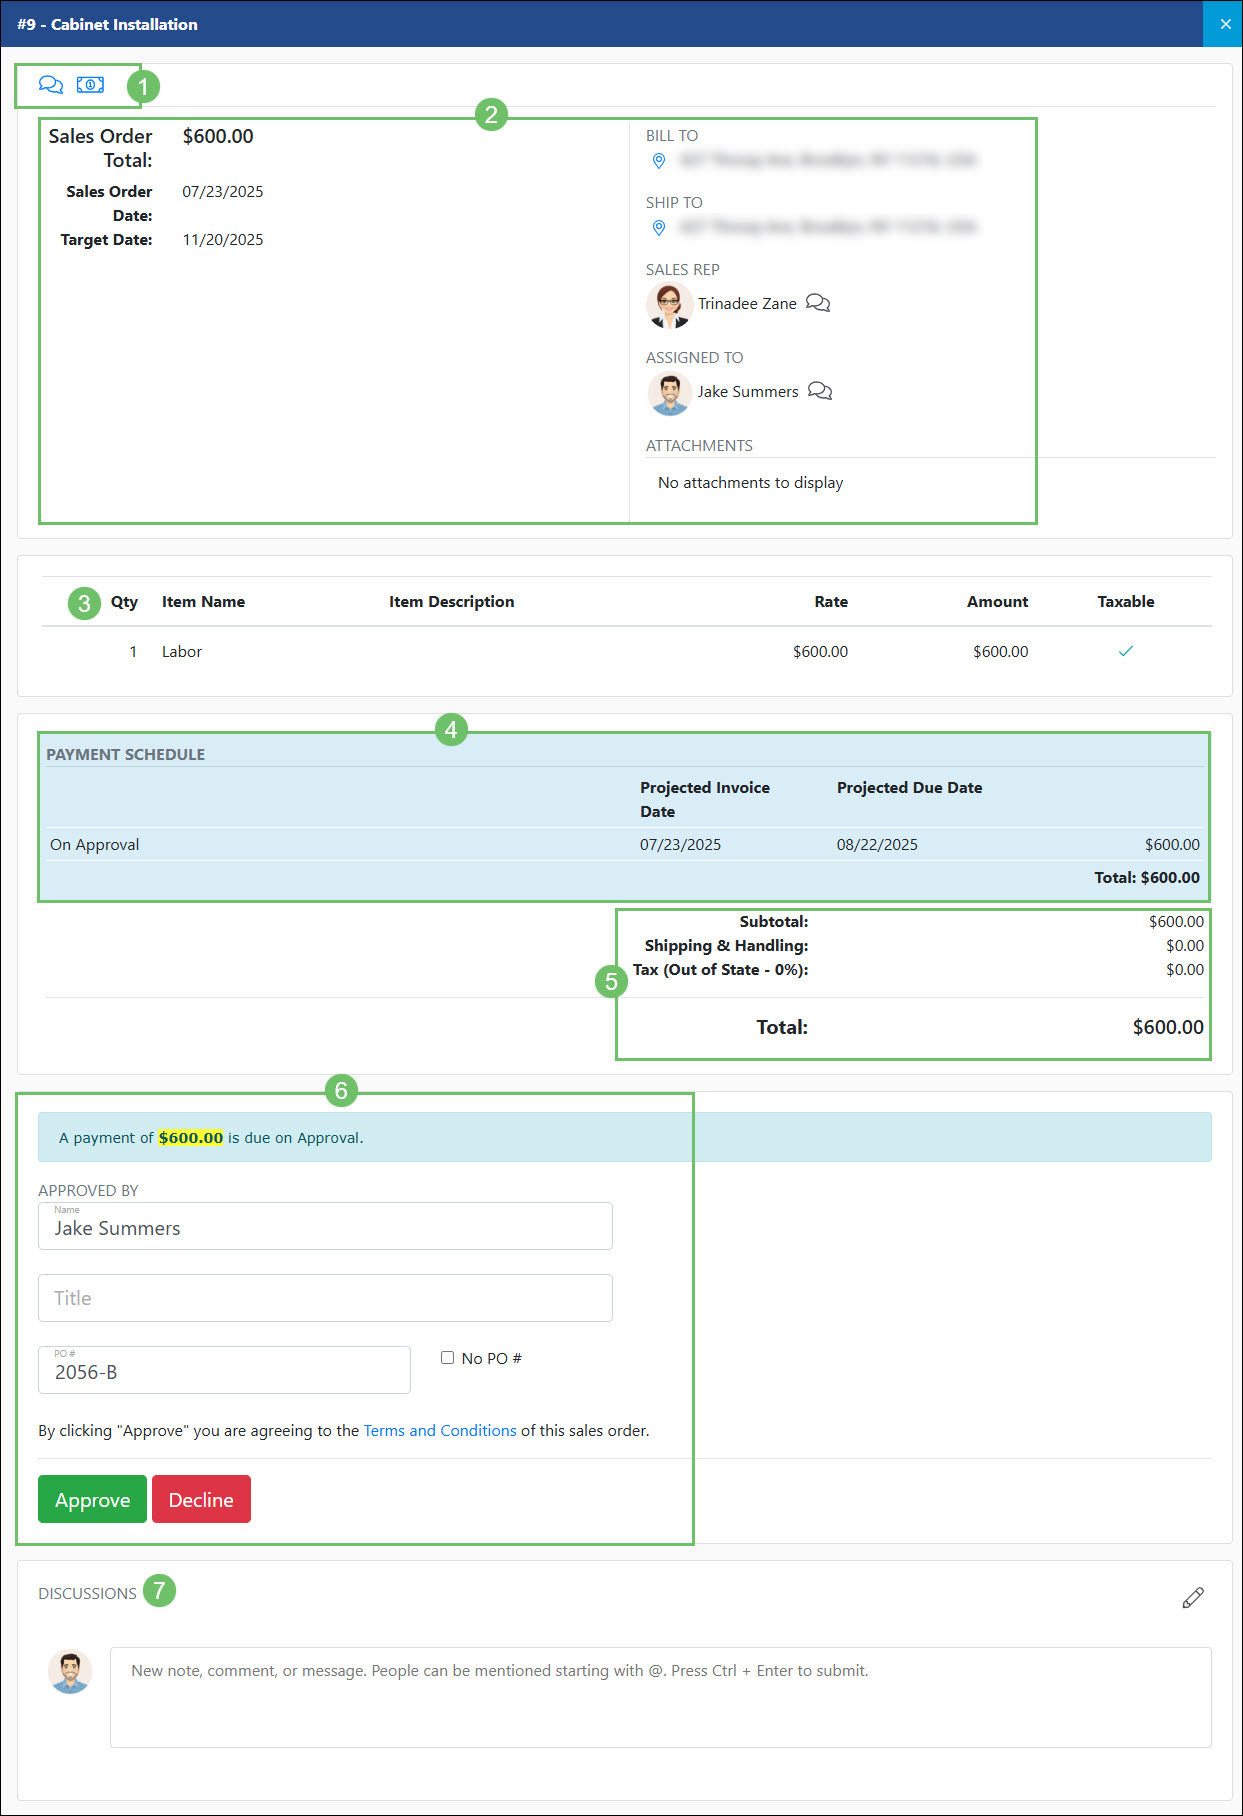
Example of Information and Actions Available on the Sales Order Info Page in the Customer Portal
-
Projects
Project Management offers an excellent framework for overseeing workflows, monitoring assignments, and delivering a progress summary. By making Projects accessible through the Customer Portal, you facilitate seamless collaboration with your Customers, providing them with immediate insight into the current status and specifics of ongoing Projects. To access Projects in the Customer Portal, navigate to the Projects option in the side menu.

Example of the Location of Projects in the Customer Portal
Permissions
The following permissions will need to be configured for the Contact’s Portal Role if they will be managing or viewing Projects in the Customer Portal:
- “Projects: View”
Note: Please review the Tasks section in the Customer Portal Guide to learn more about permissions that will affect visibility of Tasks.

Example of Project Related Permissions for the Customer Portal
Learn more about managing Portal Roles and Permissions for the Customer/Vendor Portal by reviewing the Customer/Vendor Portal Roles section in the Customer/Vendor Portal Setup Guide.
Portal Visibility
There are a few layers that you can decide on whether or not to make visible on the Customer Portal in regards to Projects. The first layer would be to make the Project itself visible on the Customer Portal through associating the Project with a Customer.

Example of the Customer Field on a Project
By default, the Milestones created in the Project will not be visible in the Customer Portal until the Visible on Portal option has been toggled on. This can be done when creating or editing the Milestone in the project.

Example of the Visible on Portal Option When Editing a Milestone
When viewing the Milestone View for a Project, the visibility on the Portal can also be toggled on or off by clicking the globe icon located on each Milestone. When the globe icon is set to a blue shade, this indicates that it will be visible to the Customer on the Portal. When the globe icon is shaded grey, this indicates that the Milestone is currently not visible on the Customer Portal.

Example of the Globe Icon on a Milestone to Indicate Visibility on the Customer Portal
Tasks within the Milestones will be visible on the Customer Portal when viewing a Project based on the Task Type configurations. To have the Project Tasks visible to the Customer through the Project, enable the Visible on Striven Customer/Vendor Portal option within the Task Type.
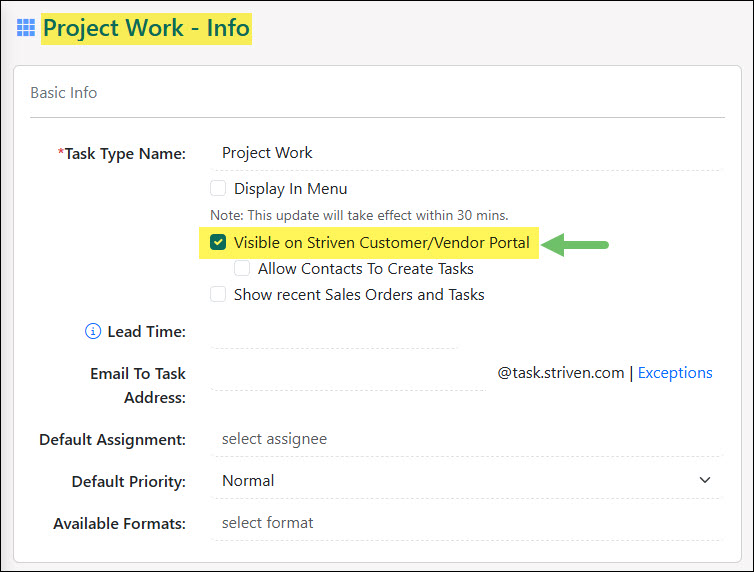
Example of the Visible on Customer Portal Option on Task Type
-
Projects List
Below is a screenshot illustrating how the Projects list appears in the Customer Portal and a description of what can be accomplished there.
- Quick Filters: To easily filter based on the status of the Project, click on one of the statuses listed here. Using the My Projects filter will only show Projects where the logged in user is set as the Contact listed on the Projected.
- Search Filters: There are an array of search filters available on the Projects list to narrow results such as:
- Project: Searches based on the name of the Project.
- Status: Narrows list based on the status of the Project. Statuses include Pending, In Progress, Done, Canceled, and On Hold. By default, the In Progress status will be selected.
- Promise Date Range: Searches through the Projects list based on the date that has been entered into the Promise Date field on a Project.
- Assigned To: Narrows results based on the Customer Contact that has been selected on the Project.
- Project: Lists the Project number and name. Underneath the Project number and name will include the current status the Project resides in.
- Assigned To: Lists the Customer Contact that has been selected in the Contact field on a Project.
- Person Responsible: Lists the Employee that has been selected as the primary assignment of the Project.
- Promise Date: Lists the date that was entered into the Promise Date field on the Project.
- Status Note: Displays the Status Note that was last entered into the Project.

Example of the Information and Actions Available on the Projects List in the Customer Portal
-
Project Info
After clicking on Project from the Projects list you will be navigated to the Project Info page for more information regarding the details of the Project. Below is a screenshot illustrating how the Project Info page appears in the Customer Portal and a description of what can be accomplished there.
- View Icons: There is a number of easily accessed information through the icons located at the top of the Project. These icons include the following:
- Hub: Accesses the Project Hub which will include any documentation or uploads that have been added to the Project. In order for the upload to be visible through the Customer Portal, the Visible on Customer/Vendor Portal option will need to be toggled on for the uploaded content.
- Assignments: Navigates to a list of Assignments that have been added to the Project. This page will include the Assignee’s name, Assignment category, email, and the option to start a Discussion with the Assignees.
- Tasks: Will navigate to the bottom of the page where the Milestones and Tasks are listed within the Project.
- Discussions: Navigates to the bottom of the page where the Discussions section is located within the Project.
- Related To: Opens a Transactions Related To window which will list any related Sales Orders and Transactions that have been associated with the Project. This window will list the Transactions or Orders date, number, and total dollar amount.
- Status Note: Lists the latest Status Note that was entered into the Project along with the Employee who entered the note and the date and time it was added.
- Promise Date: Displays the date that was entered into the Promise Date field on the Project.
- Project Manager/Assigned To: Lists the primary Assignment of the Project along with the Contact that was added to the Project. A Start Discussion icon will be located next to each name listed in order to easily begin a Discussion Thread with the selected person.
- Objective: Displays the text and information that was added into the Objective section of the Project.
- Related Sales Orders: Lists the Sales Orders that have been associated with the Project. Clicking on the Sales Orders listed here will open the Order for further information.
- Switch View: Switches between the Milestone View and the Gantt Chart. The Gantt Chart will display the Tasks in a timeline view based on the Start and Due Dates listed on the Tasks.
- Show Completed Work/Show Done Tasks: Has the option to include completed Milestones through the Show Completed Work option. The Show Done Tasks option will include Tasks that have been marked as Done within the open Milestones listed.
- Milestones: Displays Milestones that have been marked as visible in the Customer Portal with any visible Tasks listed within each Milestone. Milestones will show the promise date in a calendar icon with the icon of the person who is responsible for each Milestone.
- Discussions: Houses Discussion Threads that are related to the Project. Using the New Thread icon will open a New Discussion window with the primary Assignment selected as the recipient to begin a conversation.
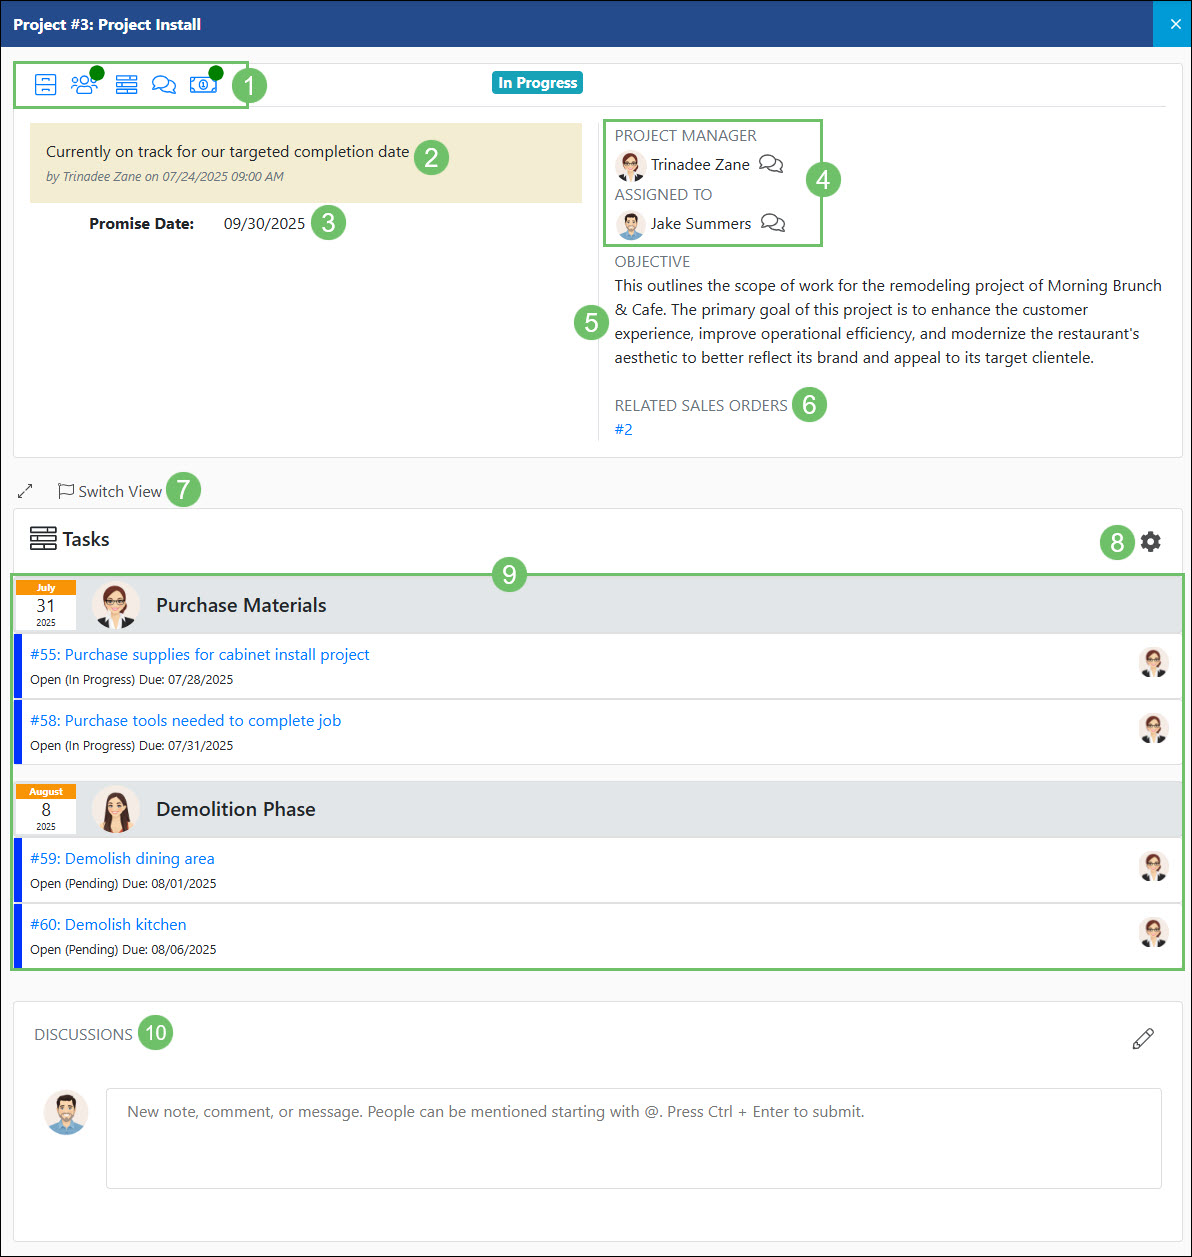
Example of Actions and Information Available on the Project Info Page in the Customer Portal
- View Icons: There is a number of easily accessed information through the icons located at the top of the Project. These icons include the following:
-
Tasks
The Tasks option of the Portal displays info for Customer related Tasks. The Tasks list offers a comprehensive overview of Tasks associated with a particular Customer that have been configured to be visible on the Portal. This feature streamlines collaboration and tracking of various work items, including services rendered and to-dos, ensuring efficient completion for the Customer. To access the Tasks list in the Customer/Vendor Portal, navigate to the Tasks option in the side menu.

Example of the Tasks List in the Customer Portal
Permissions
The following permissions will need to be configured for the Contact’s Portal Role if they will be managing or viewing Tasks in the Customer Portal:
- “Tasks – Add E-signature”
- “Tasks: Edit Tasks assigned to the customer”
- “Tasks: View All”
- “Tasks: View Related to Sales Orders they are associated with”
- “Tasks: Add”
- “Tasks: Reassign”
- “Tasks: View Assigned to Me”

Example of Tasks Related Permissions for the Customer Portal
Learn more about managing Portal Roles and Permissions for the Customer/Vendor Portal by reviewing the Customer/Vendor Portal Roles section in the Customer/Vendor Portal Setup Guide.
Portal Visibility
In order for Tasks to be visible within the Customer Portal, the option will need to be enabled on the Task Type for Visible on Striven Customer/Vendor Portal.

Example of a Task Type Configured to be Visible on the Portal
If you would like Contacts in the Portal to be able to select the Task Type when creating a Task, the option will need to be enabled for Allow Contacts To Create Tasks within the Task Type configurations.

Example of a Task Type Configured to Allow Contacts to Create Tasks in Portal
-
Tasks List
Below is a screenshot illustrating how the Tasks list in the Customer/Vendor Portal appears and a description of what can be accomplished there.
- Status Filters: By default, Tasks that are in an Open status will be displayed but you can easily switch to Tasks that Needs Approval, On Hold, Done, or My Tasks. Selecting My Tasks will only display Tasks where you are set as the Requested By.
- Search Filters: There are multiple search filters to help narrow down results in the Tasks list which include the following:
- Needs Approval: Narrows the list to only show Tasks that are waiting to be approved.
- Task #: Shows results based on the number assigned to the Task.
- Task: Will search through both the name and description that has been added to the Tasks.
- Task Type: Narrows search results based on the Task Type related to the Task. Only Task Types that have been marked as visible in the Portal will be available to select from this list.
- Status: Mult-select option to base results on the Task status including Open, On Hold, Done, and Canceled.
- Location: Lists the Tasks that have one of the Locations saved with the Customer.
- Assigned To: Allows the user to search for Tasks based on the Contact or Employee who is assigned to the Task.
- Requested By: Lists the Tasks based on the Contact who is set in the Requested By field on the Task.
- Due Date: Filters the list based on the To and From dates entered for the Due Date on the Task.
- Date Created: Filters the list based on the To and From dates entered for the date the Task was created.
- Date Completed: Filters the list based on the To and From dates entered for the date the Task was marked as Done.
- Add New: Will initiate the process to add a new Task that will automatically be related to the Customer.
- Task: Lists the number and name associated with the Task. Clicking on the hyperlink in this column will open up the Task for more details.
- Requested By: Lists the person who is set in the Requested By field on the Task.
- Created: Displays the date and time the Task was created.
- Modified: Displays the date and time that the Task was last updated or modified.
- Due Date: Shows the date that is set for the Due Date field on the Task. Both the date and time will display if the Task Type has time included with the due date.
- Related To: Hyperlinks any Sales Orders or Projects that are related to the Task.
- Assigned To: Shows the Employees, Pools, or Teams that the Task is assigned to.

Example of the Information and Actions Available on the Tasks List in the Customer Portal
-
Add Task
Clicking on the Add New button located on the Tasks list will open the New Task page where the user can enter information important to note within the Task. Below is a screenshot illustrating how the New Task page in the Customer/Vendor Portal appears and a description of what can be accomplished there.
- Task Name: The text entered here will become the Task name once it has been saved.
- Priority: Allows the user to select the priority of the Task. By default, the Normal priority will be set within this field.
- Type: The options listed here will only include Types that have been configured within the Task Type to Allow Contacts To Create Tasks. The Location field may appear after the Type is selected depending on the configuration of the Task Type.
- Attachments: Allows the user to upload any images or documents that will then be accessible as attachments when viewing the Task.
- Assignment: Options to select for the Task assignment will include the User’s fellow Contacts, the Employee who may be set as the default assignment at the Task Type, or Employees that have been assigned to the Customer and marked as visible on the Portal.
- Description: A rich editor which allows for text to be added to the Task for additional information or context.

Example of the New Task Page in the Customer Portal
-
Task Info
The Task Info page in the Portal will display additional information regarding the Task that may not be visible from the list view. Information included on this page may vary depending on how the Task Type has been configured. Below is a screenshot illustrating how the Task Info page in the Customer/Vendor Portal appears and a description of what can be accomplished there.
- Task # and Name: Displays the name and number that has been assigned to the Task.
- Task Info: Shows an array of information related to the task. Depending on how the Task Type is configured, not all fields may appear in this section.
- Task Info: Shows an array of information related to the task. Depending on how the Task Type is configured, not all fields may appear in this section.
- Type: Shows the Type that has been selected on the Task. This field will display regardless of the Task Type configurations.
- Budget: Displays the numerical value that has been set for the budget of the Task. This field may or may not appear depending on how the Task Type is configured.
- Start Date: Shows the start date of the Task. Depending on how the Task Type is configured, this field may not appear and the start time may or may not be displayed.
- Due Date: Displays the due date that has been set on the Task. Depending on how the Task Type was configured, the due time may also be shown.
- Created Date: Shows both the date and time that the Task was created. This field will display regardless of the Task Type configurations.
- Related To: This section will have other entities that are related to the Task such as:
- Sales Order: Shows the Sales Order that has been selected on the Task. This field will be hyperlinked to easily access the related Sales Order in the Customer Portal. This field may or may not appear depending on the Task Type configurations.
- Project: Displays the Project that has been selected on the Task. The Project will only display in this area if the Customer has been related not only to the Task, but the Project as well. This field may or may not appear depending on the Task Type configurations.
- Milestone: Shows the Milestone that the Task currently resides in. The Milestone will only appear if it is selected on the Task and has been marked visible on the Portal. This field may or may not appear depending on the Task Type configurations.
- Requested By: Displays the person who has been set in the Requested By field on the Task. A Discussions icon will appear next to the name in order to easily begin a Discussion Thread with the specific person.
- Location: Shows the Location that has been selected on the Task. Clicking on the View on map icon next to the Location name will open the address in Google Maps. This field may or may not appear depending on the Task Type configurations.
- Attachments: Lists any attachments that have been uploaded to the Task and are available for download. Only attachments that have been marked as visible on the Portal will appear within this area.
- Assignees: Will display any Employees, Pools, or Teams that have been added as assignees to the Task. A Discussions icon will appear next to each assignment in order to easily begin a Discussion Thread with the specific person.
- Assets: Lists any Customer Assets that have been added to the Task. Clicking on an Asset listed here will open the Asset Info page for additional information. The current status of the Asset will be shown in parentheses next to the Asset name. This field may or may not appear depending on the Task Type configurations.
- Description: Shows any description that has been added to the Task for additional information or context.
- Discussions: Allows the user to add any notes, comments, or start a conversation with the assignees of the Task. Clicking the New Thread icon will automatically associate the new Discussion Thread with the assignees of the Task.

Example of the Task Info Page in the Customer Portal
-
Assets
Customer Assets encompass a broad range of tangible and intangible items and information that an organization services or manages for a customer, all of which are crucial to their operations and well-being. Effective Customer Asset management is fundamental to providing high-quality service, ensuring customer satisfaction, and building long-term relationships, requiring robust tracking systems, skilled personnel, and a clear understanding of each Asset’s importance to the customer. Assets can be accessed by the Customer through the Customer Portal by navigating to Assets in the side menu.
Example of the Location of Assets in the Customer Portal
Permissions
The following permissions will need to be configured for the Contact’s Portal Role if they will be managing or viewing Assets in the Customer Portal:
- “Assets: Add/Edit”
- “Assets: View”
- “Assets: Add/Edit Related to Me”
- “Assets: View Related to Me”

Example of Asset Related Permissions for the Customer Portal
Learn more about managing Portal Roles and Permissions for the Customer/Vendor Portal by reviewing the Customer/Vendor Portal Roles section in the Customer/Vendor Portal Setup Guide.
Portal Visibility
Assets will only appear on the Customer Portal if the Asset Type has been configured with the option toggled on for Visible on Customer/Vendor Portal.

Example of an Asset Type Configured to be Visible on the Customer Vendor Portal
-
Assets List
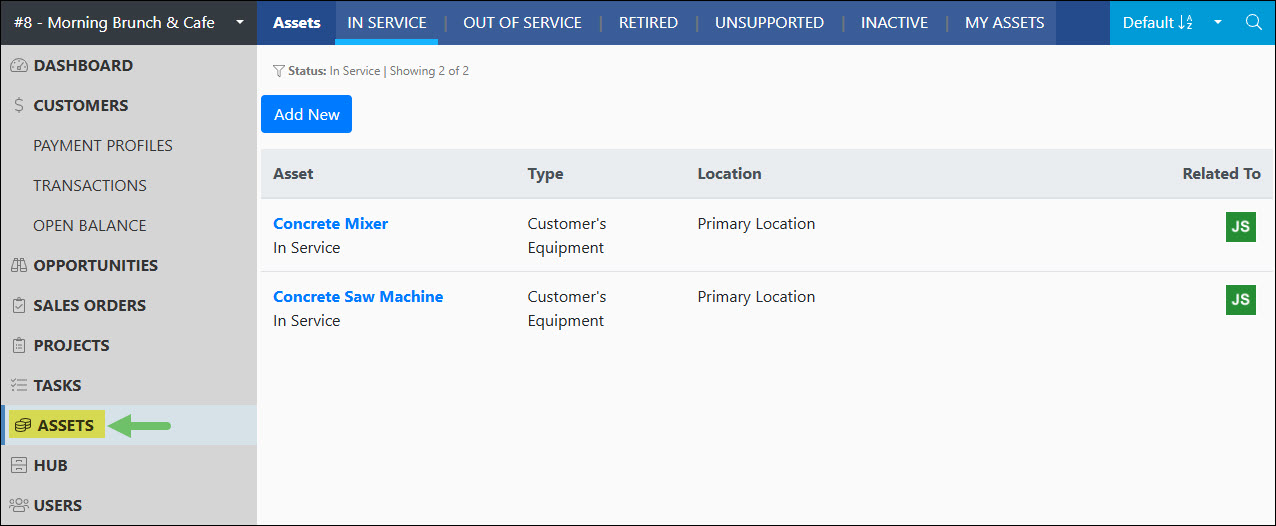
Below is a screenshot illustrating how the Assets list in the Customer Portal appears and a description of what can be accomplished there.
- Quick Filters: Allows the user to easily filter for Assets listed based on their current status. Statuses include In Service, Out of Service, Retired, Unsupported, and Inactive. An additional filter is available for My Assets which will filter the list based on Assets the Contact is related to.
- Search Filters: There are an array of search filters available to narrow results for the Assets listed such as:
- Asset: Narrows results based on the Assets name.
- Type: Filters results to only include certain Asset Types in the list.
- Status: Adjusts list to only include certain Asset statuses.
- Expiration Date: If the Expiration Date option is enabled within the Asset Type this search filter can be used to narrow results based on when the Asset is set to expire.
- Assigned To: Searches the Assets listed based on the Contact that is set to be related to the Asset.
- Maintenance Date: Although the maintenance dates entered are not visible on the Customer Portal, the Contact can still filter the list based on when maintenance for the Asset has occurred or been scheduled.
- Assets I Follow: Employees can configure additional Contacts to follow Assets when logged into Striven. Although this list is not visible on the Customer Portal, this search filter can still narrow down results based on who is set up to follow certain Assets.
- Add New: Will open the New Asset page where the Contact can create an Asset to be tracked.
- Asset: Lists the Asset name with the current status of the Asset listed underneath the name. Clicking on the Asset name will open the Asset Info page for additional information.
- Type: Displays the Asset Type that was configured for the Asset.
- Location: Shows the Customer’s Location name that was associated with the Asset.
- Related To: Displays the Contact’s profile image that was set as related to the Asset.
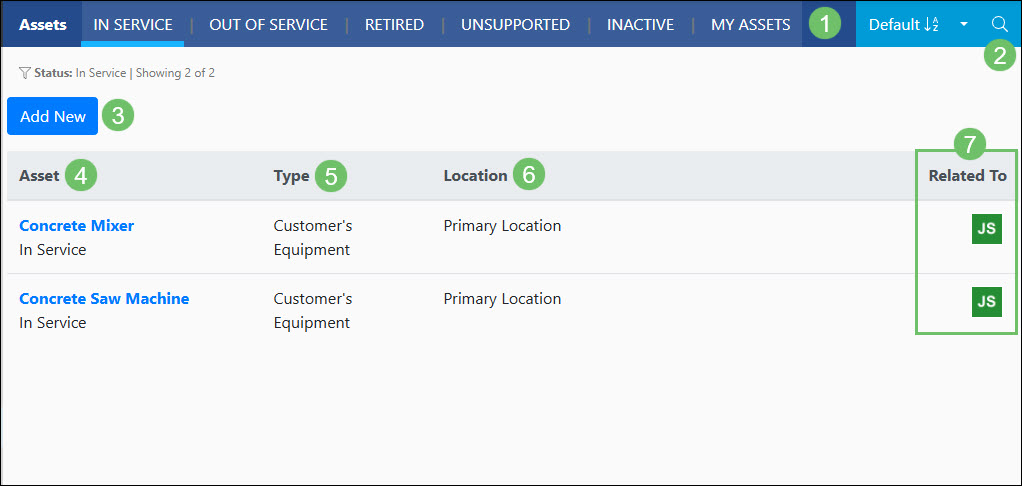
Example of the Actions and Information Available on the Assets List in the Customer Portal
-
Asset Info
Clicking on the Asset’s name from the Assets list will open the Assets Info page for additional information. Below is a screenshot illustrating how the Asset Info page in the Customer Portal appears and a description of what can be accomplished there.
- Hub: Navigates to the Asset’s Hub to manage any documents or uploads that have been added for the Asset.
- Asset Info: There is an array of information regarding the Asset that can be viewed by the Customer Contact such as:
- Type: Shows the type that is associated with the Asset.
- Name: Displays the Asset name that was added when the Asset was created.
- Location: Lists the Customer’s Location that was associated with the Asset.
- Status: Indicates the current status that the Asset resides in.
- Date Purchased: Shows the date that the Asset was initially purchased. This field will only be available if it was enabled in the Asset Type.
- Purchase Price: Lists the price that the Asset was purchased for.
- Present Value: Displays the amount that the Asset currently is valued at. This field will only be available if it was enabled in the Asset Type.
- Related To: Displays any Contacts that have been associated and related to the Asset. Next to the person’s name will be the option to Start Discussion or Remove them from the Related To list.
- Image: Gives the option to upload an image or the image that has already been uploaded for the Asset.
- Create Task: Navigates to the New Task page which will allow the Contact to create a Task that will automatically be related to the Asset.

Example of the Actions and Information Available on the Asset Info page in the Customer Portal
-
Hub
The Hub provides access to documents, posts, and links that are saved in the Customer’s or Company’s Hub and made visible on the Customer Portal. Depending on the Portal permissions set, one can add documents, posts and links to the Customer’s Hub here as well. Hub can be accessed by the Customer through the Customer Portal by navigating to the Hub option in the side menu.
Example of the Location of Hub in the Customer Portal
Permissions
The following permissions will need to be configured for the Contact’s Portal Role if they will be managing or viewing Hub in the Customer Portal:
- “Hub: View”
- “Hub: Add/Edit”

Example of Hub Related Permissions for the Customer Portal
Learn more about managing Portal Roles and Permissions for the Customer/Vendor Portal by reviewing the Customer/Vendor Portal Roles section in the Customer/Vendor Portal Setup Guide.
Portal Visibility
Uploads added through the Customer Hub or Company Hub can both be made visible to Customer in the Customer Portal as depicted below.
Company Hub
Users do have the ability to add documentation to the Company Hub and toggle on the option for Visible on Customer/Vendor Portal. Toggling this option on will make the upload visible to all Customer Contacts who have access to Hub when logged into the Customer Portal.
For more information about using the Company’s Hub in Striven, please review our Hub Guide.

Example of the a Document on the Company Hub Toggled for Visible on Customer Vendor Portal
Customer Hub
When uploading to the Customer’s Hub, the Visible on Customer/Vendor Portal will need to be toggled on in order for the content to appear to the Customer’s Contact when they are viewing Hub within the Customer Portal.
For more information about using Customer’s Hub in Striven, please review the Customer/Vendor Collaboration section of our Customer/Vendor Management Guide.

Example of the a Document on the Customer’s Hub Toggled for Visible on Customer Vendor Portal
-
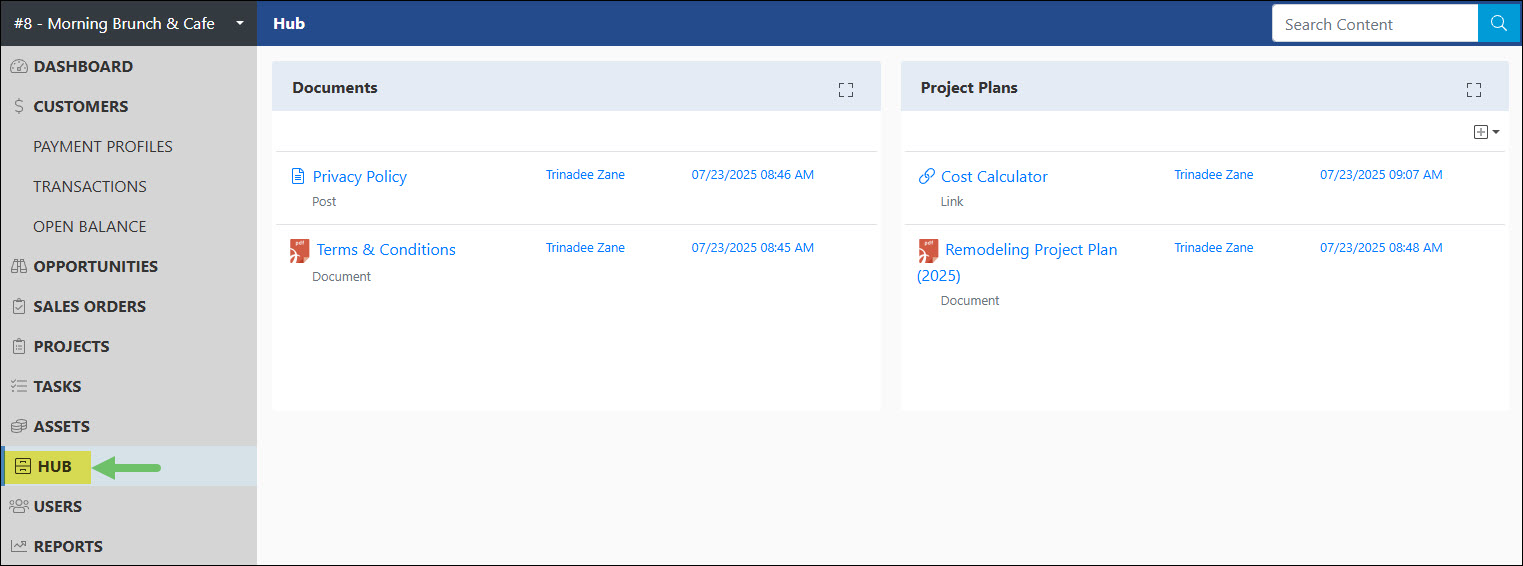
Hub Page
Below is a screenshot illustrating how Hub appears in the Customer Portal and a description of what can be accomplished there.
- Content Group: Lists the name of the content group which is used to organize and group the uploaded content in a more organized manner.
- Expand Content Group: Will expand and only show the uploads in the selected group in order to have an easier view.
- Uploads: Lists the content that was uploaded for each content group. Listed with each content uploaded will include the name with the content type underneath the name, who uploaded the content, and the date/time stamp on when the documentation was uploaded.
- Search Content: Allows the user to narrow down results of what is listed in Hub based on what is searched in this field.
- Upload Content: Allows the user to upload additional content to the Customer Portal Hub. This option will only be available for content groups that are located within the Customer’s Hub and not available for content groups listed within the Company’s Hub.

Example of the Information and Actions Available for Hub in the Customer Portal
-
Users
The Users list in the Customer Portal is a centralized location where the Contacts of the Customer can add, remove, and manage the Portal Users. Assigning Portal Roles, titles, locations and much more can be added or updated per Contact in order to make sure the most up to date information is tracked with the Contact Profile. The Users list can be accessed by selecting the Users option in the side menu of the Customer Portal.

Example of the Users Page Location in the Customer Portal
Permissions
The following permissions will need to be configured for the Contact’s Portal Role if they will be managing or viewing Users in the Customer Portal:
- “Contacts: Deactivate”
- “Contacts: Manage”

Example of User Related Permissions for the Customer Portal
Learn more about managing Portal Roles and Permissions for the Customer/Vendor Portal by reviewing the Customer/Vendor Portal Roles section in the Customer/Vendor Portal Setup Guide.
-
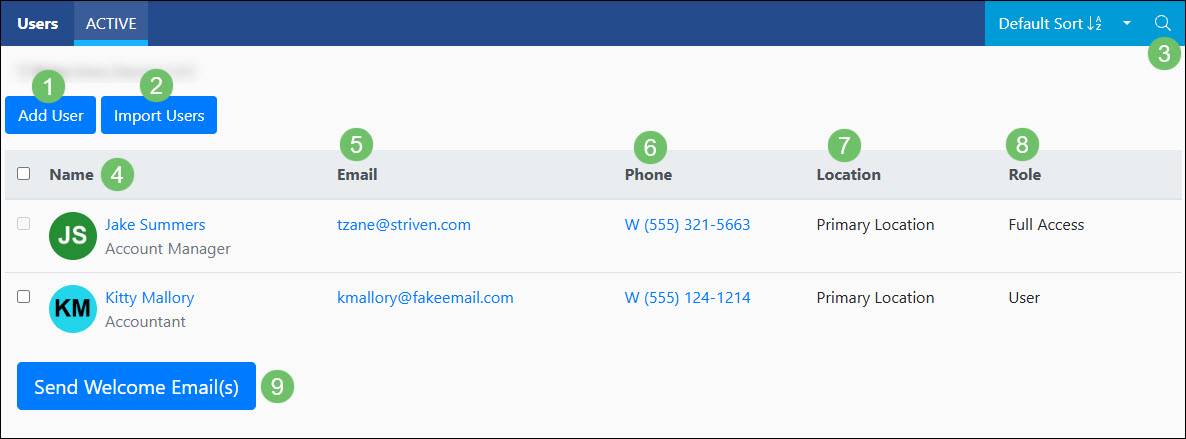
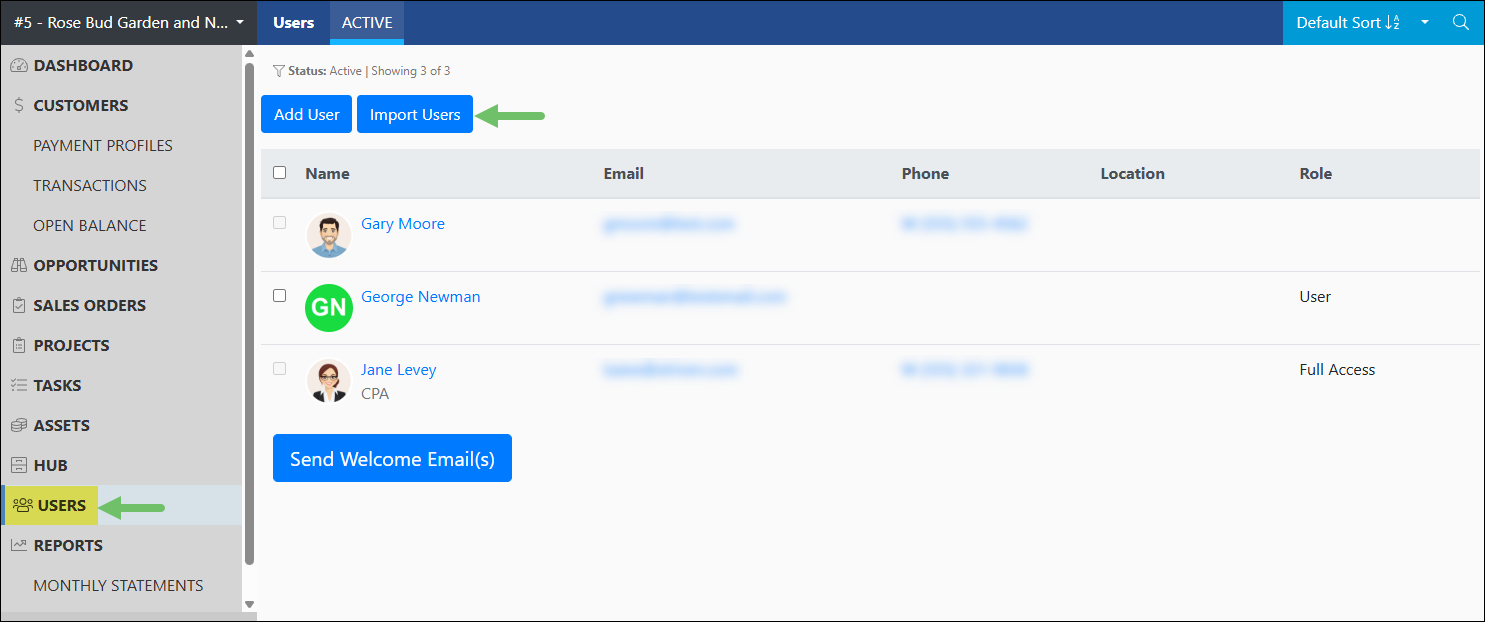
Users List
Below is a screenshot illustrating how the Users list in the Customer Portal appears and a description of what can be accomplished there.
- Add User: Will initiate the process to add a new user to the Customer Portal.
- Import Users: Allows multiple users to be imported into the Customer Portal through the use of an import tool.
- Search Filters: There are an array of search filters available to narrow results listed such as:
- Name: Narrows search results based on the Contact’s name.
- Locations: Adjusts results based on the Customer Location that is saved with the Contact.
- Roles: Searches through the list based on the Portal Role that has been assigned to the Contact.
- Status: By default, Contacts in an Active status will be displayed. Update this search filter to view Contacts that have been marked as Inactive.
- Name: Lists the name of the Contact with their title listed underneath the name. Clicking on the name of the Contact will open the User Info list for more additional information.
- Email: Displays the email that is associated with the Contact. Clicking on the email will initiate your computer’s designated email program to initiate an email to be sent.
- Phone: Lists the phone number that is set as the Contact’s primary phone. Clicking on the phone number will initiate your computer’s calling program to initiate a phone call with the Contact.
- Location: Displays the Customer’s Location name that has been associated with the Contact.
- Role: Shows the Portal Role that has been assigned to the Contact.
- Send Welcome Email(s): After the checkbox next to the Contact’s names have been checked, this option can be used to send a welcome email to the users in order for them to set up a log in password for the Customer Portal.
Example of the Actions and Information Available on the Users Page in the Customer Portal
-
User Profile
User Profile
The Users Profile page gives a more in depth view of information that is stored with the Contact. Below is a screenshot illustrating how a User Profile page in the Customer Portal appears and a description of what can be accomplished there.
- Profile Image: Allows the user to upload a profile image related to the Contact.
- Email: Lists the Contact’s log in email for the Customer Portal.
- Name: Shows the name that is saved with the Contact. Clicking on the vertical ellipse icon next to the Contact’s name will give additional options to add such as a prefix, middle name, and suffix.
- Title: Displays the title that has been added for the Contact.
- Location: Lists the Customer Location name that is assigned to the Contact. Viewing the Location in the dropdown menu will display the entire address.
- Portal Access: Grants the Contact access to the Portal. Once this option is checked the following will be available:
- Role: The Portal Role that is assigned to the Contact. This will determine the access they will have once logged into the Customer Portal.
- More About This Portal Role: Opens a dialog window which will list out the Portal Permissions that are assigned to the Portal Role.
- Phone Number: Displays any phone numbers that have been added to the Contact’s information. Clicking the Add new phone number link will allow the user to add additional phone numbers to the Contact Profile.

Example of the Actions and Information Available on a User Profile Page in the Customer Portal
-
Import Users
If multiple users are being added, the Import Users feature can be used to add multiple users into the Customer/Vendor Portal at once. On the Users page in the Customer/Vendor Portal, the Import Users button can be clicked to access the Import Users feature.
Example of the Import Users Button on the Users Page
Below is a screenshot illustrating how the Import Users page appears and a description of what can be accomplished there.
- Upload File: Once you have your import file ready, the file can be added to this area in order to continue with the importing process. The file should be in a .csv or .txt format and with a max file size of 100 MB.
- Download Sample File: Downloads a file with all of the available information that can be imported as header columns.
- View Column Mapping: Will lists the available information that can be imported for the users along with a description of what the type of information should be included.
- Upload: Once you have the file selected that is to be imported, the Upload button can be clicked to continue the importing process.
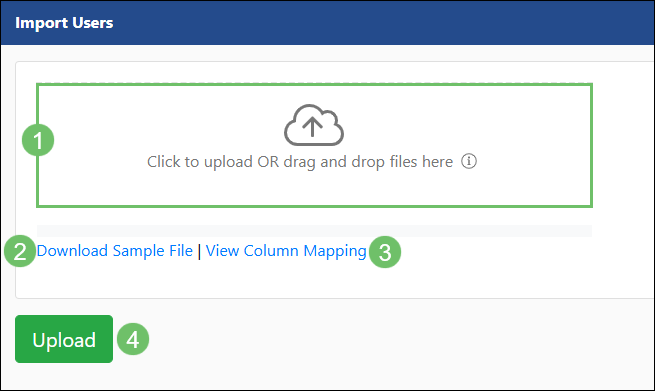
Example of the Import Users Page
-
Reports
Within the Reports section in the Customer Portal Monthly Statements and Service Metrics can be viewed by Customer Contacts with access to the Portal. Below is a description of how these reports can be accessed and what information is available within each.
-
Monthly Statements
Monthly Statements offer Customers a convenient way to stay informed and appreciate the value your business provides. Accessible through the Customer Portal, Customers can view or print statements at their leisure, without needing Employee assistance.
Monthly Statements can be configured to include an array of information not limited to financial. Learn more about setting up Monthly Statement Templates by reviewing our Monthly Statements Guide.
To access Monthly Statements in the Customer Portal, navigate to the Monthly Statements option located under Reports in the side menu.

Example of the Location of Monthly Statements in the Customer Portal
Permissions
The following permissions will need to be configured for the Contact’s Portal Role if they will be viewing Monthly Statements in the Customer Portal:
- “Monthly Statements: View”

Example of Monthly Statement Related Permissions for the Customer Portal
Learn more about managing Portal Roles and Permissions for the Customer/Vendor Portal by reviewing the Customer/Vendor Portal Roles section in the Customer/Vendor Portal Setup Guide.
Generating Monthly Statement
To generate a Monthly Statement, simply select a month and year in the Select Month field. Once selected, click the View button located under the selected month and year in order to view the month’s statement.

Example of the Monthly Statements Page in the Customer Portal
Viewing the Monthly Statement
Monthly Statements may vary on what is shown depending on how the Monthly Statement Template has been configured. Below is a screenshot illustrating how a Monthly Statement may appear in the Customer Portal and a description of what can be accomplished there.
- Pages: Displays the pages that are included with the Monthly Statement.
- Monthly Statement: An example of a Monthly Statement. Information included on the Monthly Statement may vary depending on the configuration of the Monthly Statement Template. Each section included in the Monthly Statement has the title hyperlinked in order to easily access the information regarding that topic in the Customer Portal.
- Actions: There are a couple actions available when viewing a Monthly Statement such as:
- Download: Saves the Monthly Statement on your computer or device as a PDF file.
- Print: Initiates your computer or device printing functionality in order to print the Monthly Statement.

Example of the Information and Actions Available on a Monthly Statement in the Customer Portal
-
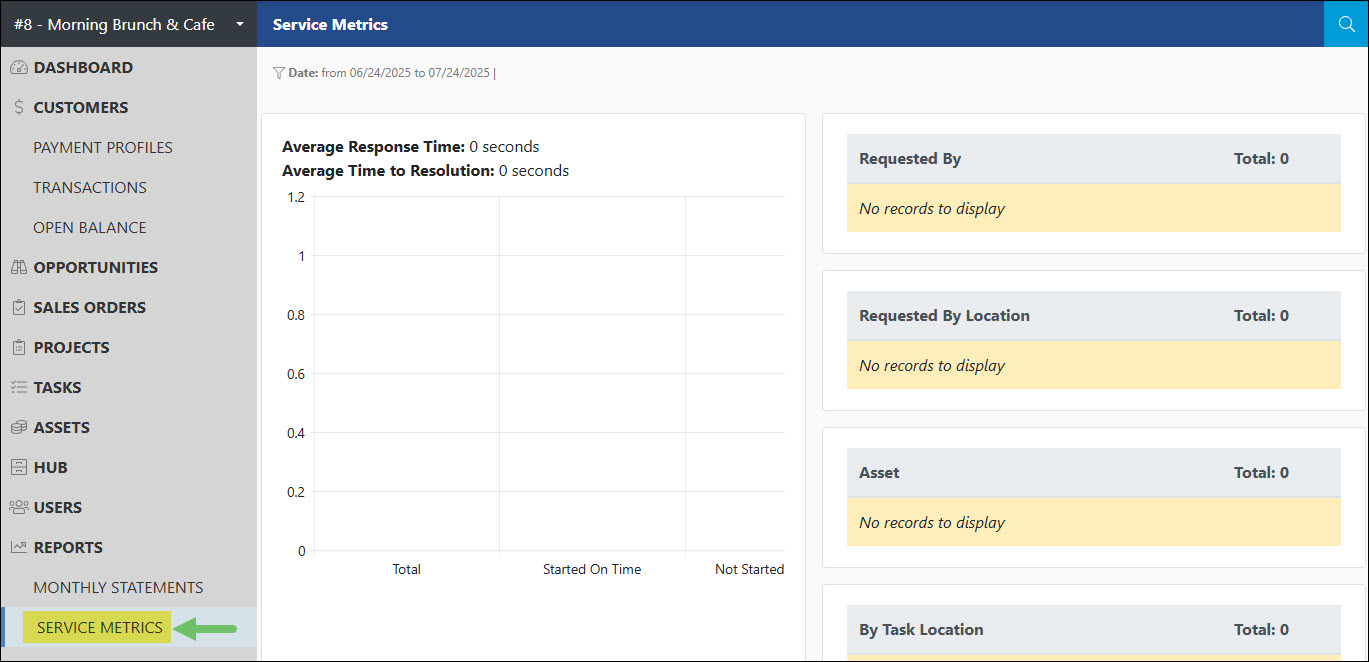
Service Metrics
The Service Metrics Report displays the Customer’s Service Metrics based on your settings configuration for the report. Task performance is broken down by important information such as Requested By, Location, and more. This information is useful in visualizing the progress of work being completed for your Customer.
Learn more about setting up the Service Metrics report in the Customer Portal by reviewing the Customer/Vendor Portal Service Metrics section from our Task Management Guide.
To access the Service Metrics report in the Customer Portal, navigate to the Service Metrics option located under Reports in the side menu.
Example of the Location of Service Metrics in the Customer Portal
Permissions
The following permissions will need to be configured for the Contact’s Portal Role if they will be viewing Service Metrics in the Customer Portal:
- “Service Metrics: View”

Example of Service Metrics Related Permissions for the Customer Portal
Learn more about managing Portal Roles and Permissions for the Customer/Vendor Portal by reviewing the Customer/Vendor Portal Roles section in the Customer/Vendor Portal Setup Guide.
Viewing Service Metrics
Below is a screenshot illustrating how the Service Metrics report appears in the Customer Portal and a description of what can be accomplished there.
- Average Response and Resolution: Displays the average amount of time it took for both the Task to be responded to and for the Task to be resolved and marked done.
- Chart View: Displays a chart view of completed Tasks grouped by the Total, Started On Time, Not Started On Time, Tasks per status, and the Average Per Day. Clicking on a bar listed in this chart will open a detailed list of which Tasks are included in the count.
- Search Filters: There are a few search filters available to narrow down what is being reported on such as:
- Task Type: Filters the Service Metrics report based on certain Task Types. Task Types that are searchable in this filter will only include Task Types that have been marked as visible on the Customer Portal.
- Date Range: Adjusts the report to only show Tasks completed within a certain date range.
- Details: Completed Tasks will be broken down by the following information in this section:
- Requested By: Displays the total number of Tasks completed per Requested By on the Tasks. Clicking on results listed here will open a detailed list of which Tasks are included in this count.
- Requested By Location: Based on the Location that is selected within the Contact’s information that is set as the Requested By on the Tasks. Clicking on results listed here will open a detailed list of which Tasks are included in this count.
- Asset: Includes Tasks that have a Customer’s Asset selected on the Tasks.Clicking on results listed here will open a detailed list of which Tasks are included in this count.
- By Task Location: Based on the Customer Location that is selected by on the Tasks. Clicking on results listed here will open a detailed list of which Tasks are included in this count.

Example of the Information and Actions Available on the Service Metrics Report in the Customer Portal
Clicking on results listed in the Service Metrics report will open a window in order to view a detailed list of Tasks making up the count that is being reported on. This window will include a hyperlink to the Task to view more details along with the Task Date, Completion Date, and the calculated Response Hours and Resolution Hours.

Example of the Tasks Details from the Service Metric Report
-
Recap
With this guide, we’ve discussed what features are available through the Portal Menu Bar. We have covered what information is available through the Customer Portal Dashboard for an easy view of all work being completed. Additionally, have reviewed what entities are visible in the Customer Portal and how to increase visibility through various configurations.

Have a Question?
Ask the Striven Community
User-sourced how-to’s, feedback, and more!
FAQs
-
Why are none of the Tasks inside my Project Milestones being shown to the Customer when they are logged in to the Customer Portal?
If you are seeing the Milestone in the Customer Portal but no Tasks are being listed you may want to check if the Task Type has the configuring enabled for Visible on Striven Customer/Vendor Portal. You may also want to confirm the logged in user has the appropriate Task permissions checked inside of their Portal Role.
-
Why are no Assets appearing in the Asset Status widget on the Customer Dashboard?
Make sure the Asset you wish to appear on the widget is set to an In Service or Out of Service status. Then, click on the Add Asset to Monitor Status button on the widget to select which Assets you wish to be tracked through the widget.
-
Why do I have a Credit Memo but the system is not giving me the option to apply it to my Invoice?
Make sure the logged in user has the permission selected in their Portal Role for “Credits: Apply”. They may need to have their Portal Role updated to include this permission. Also make sure the Credit Memo and the Invoice has a balance listed within the Open column when viewing the Transactions list. This would indicate that both the Invoice and Credit Memo both have an open balance.