
Recruiting
Recruiting
Support Guide
-
Overview
Striven’s Recruiting section has a lot of great functionality to help you process Candidate Applications more efficiently than ever before. Using tools like the Recruiting Dashboard and the Application Queue will help recruiters organize workflows, and the Career Portal will allow them to communicate efficiently with Candidates. This guide will help you set up your recruiting and illustrate how to perform recruiting functions within Striven. Before continuing, it is recommended that your Company’s hierarchy is set up appropriately. Reference our Company Setup Guide to better understand creating Divisions, Locations, Job Titles, and more.
Read this guide if you are trying to:
✔ Create advertising sources, Candidate Categories, and configure your Recruiting Settings.
✔ Compose Job Postings, recruiting steps, and manage Candidate document types.
✔ Set up and configure the Career Portal for Candidates to apply online.
-
Recruiting Setup
Before you begin accepting Candidate Applications, it is best to review your recruiting setup within the settings. Below are some key locations within the settings to review to make sure they meet your Company’s needs for hiring new talent.
-
Advertising Sources
Advertising sources are a great way to pinpoint which efforts are leading to the best recruiting Candidates. Examples of advertising sources are job boards, job sites (Indeed, Glassdoor, etc.), Employee referrals, and radio. During the Application process, the Candidate selects the advertising source that led them to apply for a position with your Company. This gives you the ability to track advertising sources and budget accordingly. To manage your Advertising Sources, follow these steps:
Company → Settings → Employees → Recruiting → Recruiting Setup → Advertising Sources
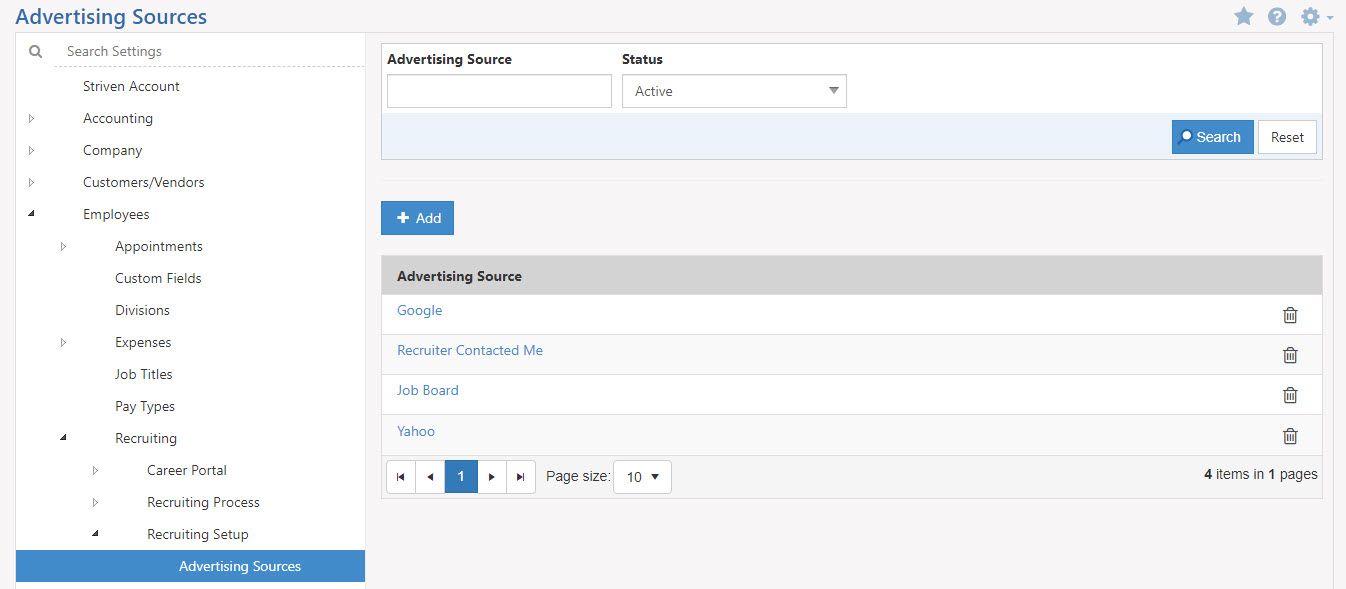
Example of the Advertising Sources Page

-
Candidate Categories
Candidate Categories help to organize applicants in whatever way you see fit. You may want to create Categories to indicate education level (Bachelor’s degree, Master’s degree, etc.) or work experience (strong managerial experience).
Learn more about creating Candidate Categories by reviewing the Category Management Guide.
You can use them to better match Candidates with open positions. To manage Candidate Categories, follow these steps: Company → Settings → Employees → Recruiting → Recruiting Setup → Categories
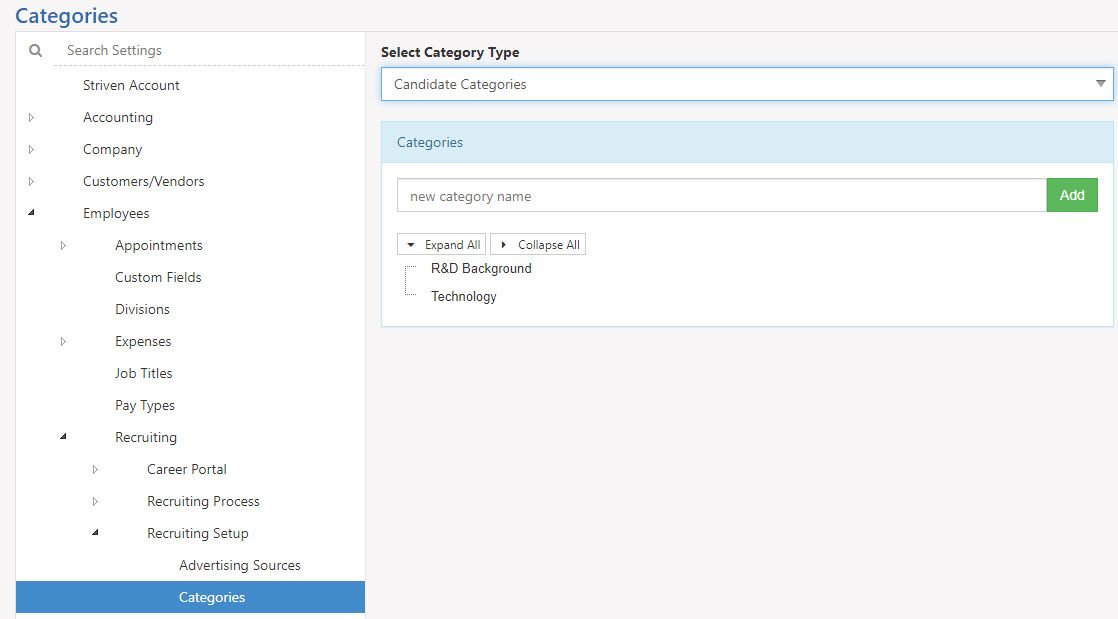
Example of the Candidate Categories Page
-
Recruiting Settings
When you are ready to start advertising Job Postings, it’s good to check the Recruiting Settings to configure things within the Career Portal. There are multiple sections within the recruiting settings that can help configure and customize your recruiting process in different ways. This page includes content in the Career Portal, Application Submission Message, and an iFrame code to embed on websites. Below we’ll discuss what can be configured here to satisfy your recruiting needs. To configure your Recruiting Settings, use the following steps:
Company → Settings → Employees → Recruiting → Recruiting Setup → Settings
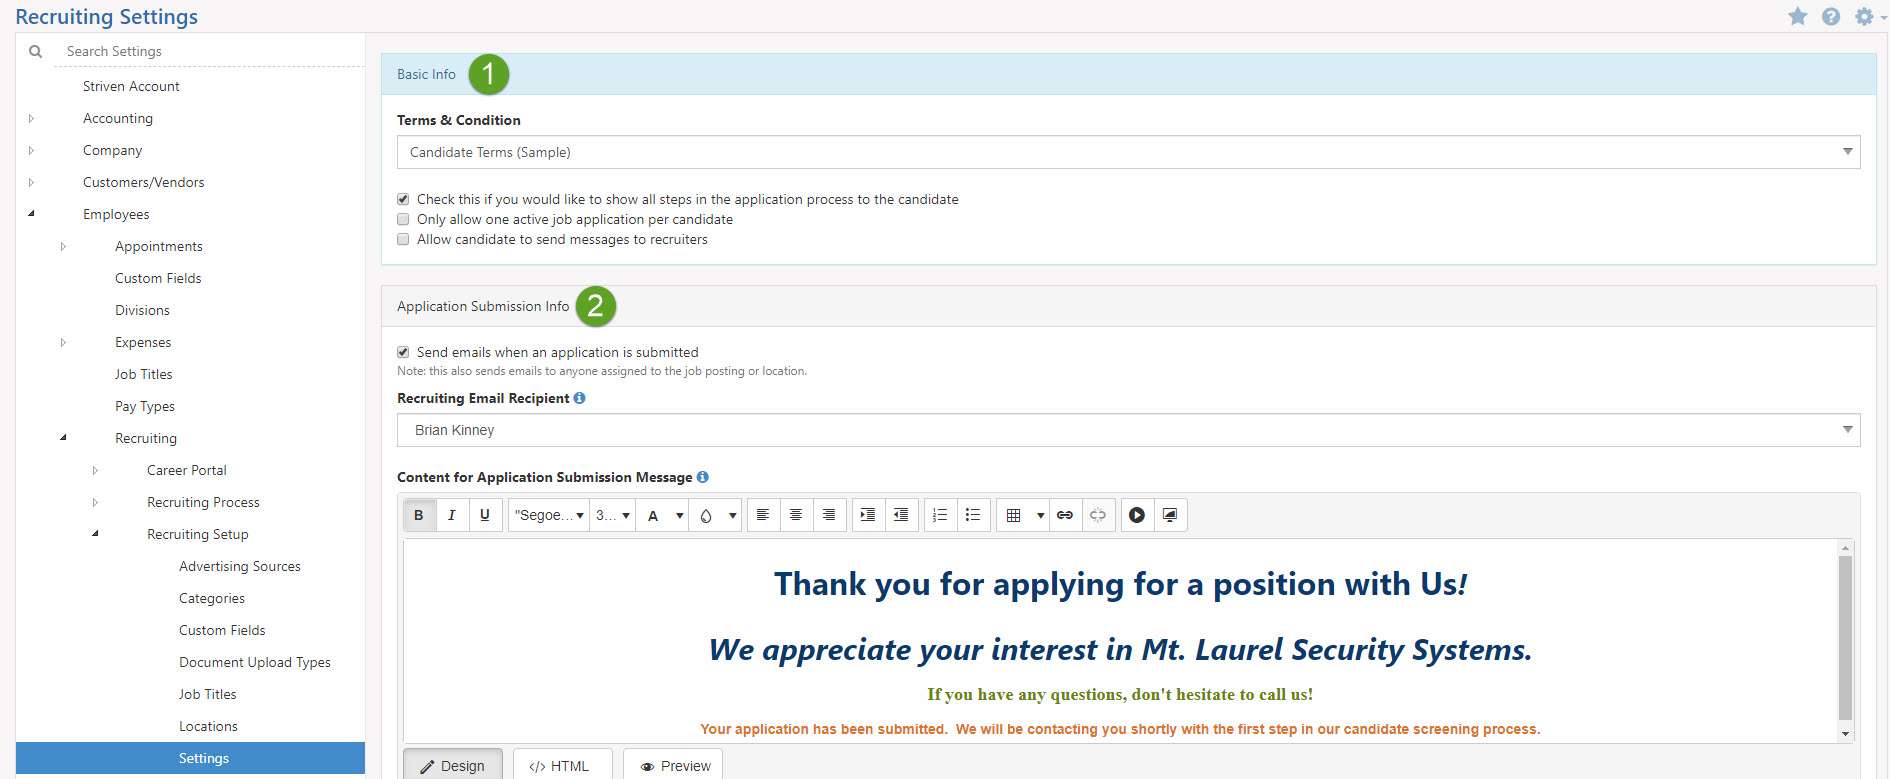
Example of the Recruiting Settings Page
- Basic Info: Allows you to configure the recruiting experience using three checkboxes to enable certain settings, which are described below:
- Check this if you would like to show all steps in the Application process to the Candidate: This will make all Steps visible to the Candidate in the Career Portal. If there are Steps that are taken internally that should not be visible to the potential hire, then this option should not be chosen.
- Note: Leaving this unchecked will hide Steps.
- Only allow one active Job Application per Candidate: If you would like for Candidates to only have one open Job Application at any given time, this option will prevent them from opening a new Application.
- Note: Leaving this unchecked will allow more than one Application per Candidate.
- Allow Candidate to send messages to recruiters: Allows the Candidates to reach out directly to the assigned recruiter in order to communicate via Discussions.
- Note: Leaving this unchecked will not allow Candidates to send messages to recruiters.
- Check this if you would like to show all steps in the Application process to the Candidate: This will make all Steps visible to the Candidate in the Career Portal. If there are Steps that are taken internally that should not be visible to the potential hire, then this option should not be chosen.
- Application Submission Info: Allows you to choose whether or not you want someone in your Striven system to receive emails when an Application is submitted.
Within the Recruiting Settings, you can configure a lot of information ranging from messages that appear in the Career Portal to an iFrame code for you to embed on a website for applicants to use. There are several default Career Portal messages that you can configure in the settings which are described below:
- Content for Application Submission Message: Once an Application is submitted by a Candidate, they will be greeted with the content configured here. The default that appears is for you to use or modify at your convenience.
- Content for Career Portal Landing Page: Upon logging in to the Career Portal, Candidates will be greeted with the content configured here. The default that appears is for you to use or modify at your convenience.
- Content for Career Portal Footer: When a Candidate is in the Career Portal, there is a footer with the content configured here. The default that appears is for you to use or modify at your convenience.
- Content for Career Portal Denied Access: Upon denying a Candidate access to the Career Portal, they will be greeted with the content configured here. The default that appears is for you to use or modify at your convenience.
- Basic Info: Allows you to configure the recruiting experience using three checkboxes to enable certain settings, which are described below:
-
Document Upload Types
Another option available when asking Candidates for information is requesting specific documents while in the recruiting process. If you require Candidates to upload documentation such as a valid driver’s license or an earned certification, then you can use Document Upload Types to achieve this. Below is an image showing how the document upload types appear in the settings. To view the Document Upload Types, use these following steps:
Company → Settings → Employees → Recruiting Setup → Document Types
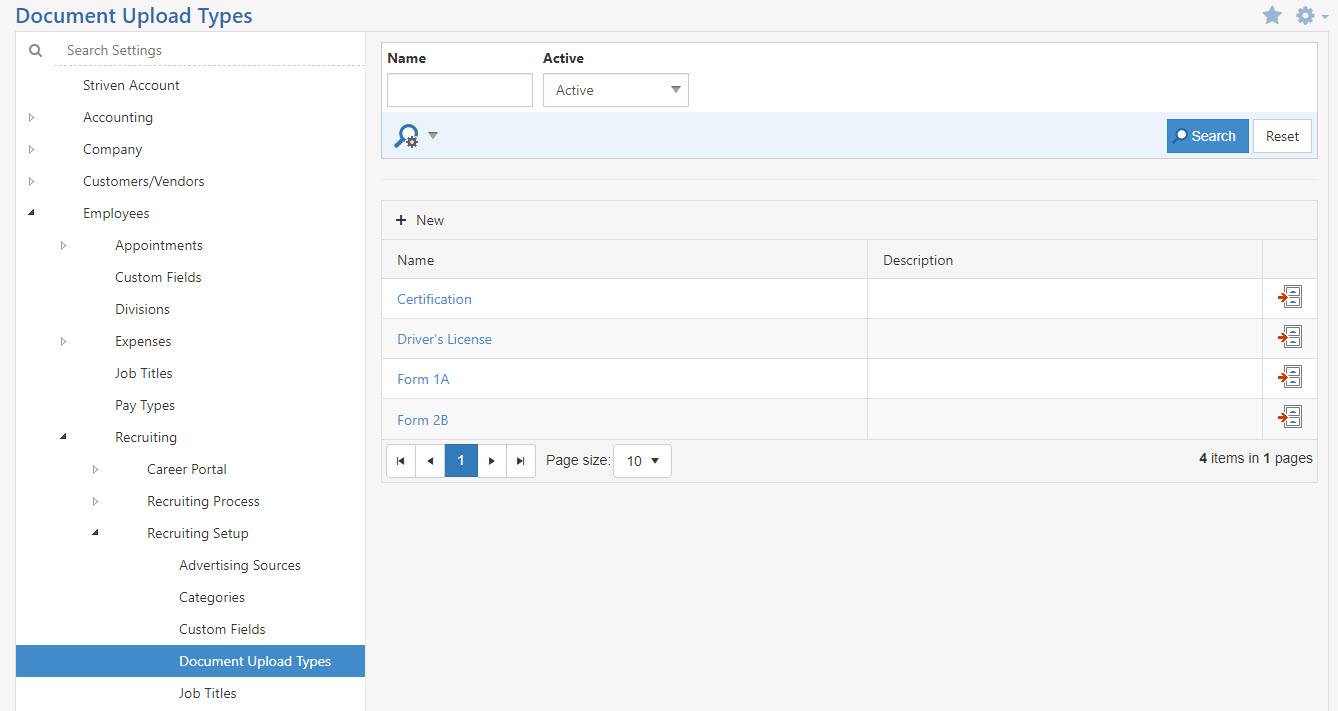
Example of Document Upload Types Page
-
Recruiting Process
Once you have set up your recruiting, then it is time to define a process. For the Recruiting Process Settings, you have the option to customize Application results and even set up a Recruiting Step Library in order to easily create Job Postings at any given time. Steps can be added on an individual Job Posting level and having steps saved in a library is an easy way to stay organized.
-
Application Results
Application results in Striven can be configured to meet your Company’s needs. As you close out Applications, having the correct results handy will allow you to keep your closed Applications clean and organized. Reporting on these results at a later date can also give you a view into your most common reasons as to why a Candidate may fail an Application with your Company.
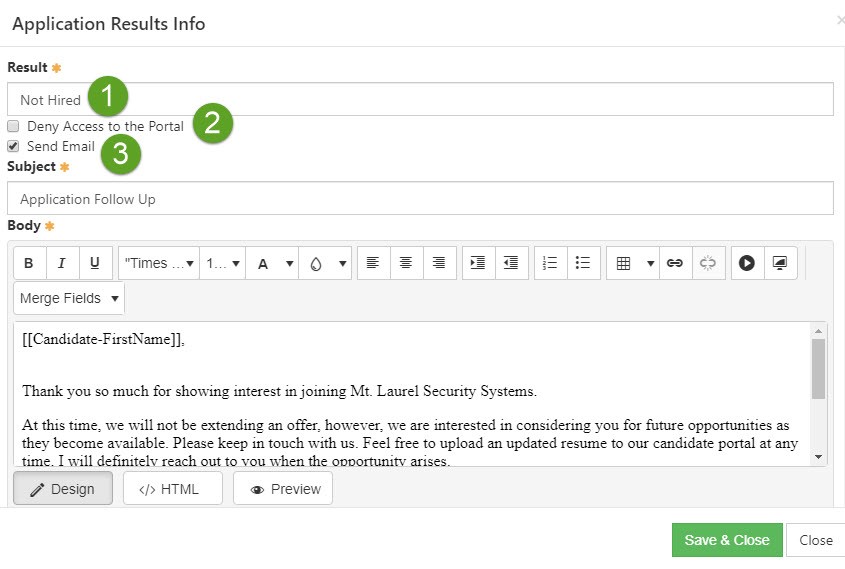
Example of an Application Results
- Result: The name of your Application result. This can be used as a merge-field if the Send Email option is enabled for the result.
- Deny Access to Portal: If you give a Candidate an Application result with this option enabled, then they will no longer have access to the Career Portal. This is ideal if you do not wish to receive any more Applications from a group of Candidates.
- Send Email: Allows you to create an email to be sent to the Candidate when an Application they have open receives this result while being closed out. Merge-fields about the Candidate, the user who will be sending the email, and the result are available when customizing the email to exactly as you need it.
-
Recruiting Steps Library
Adding steps to a Job Posting determines what the Candidate has to do to complete their Application. There are three main types of steps that you can configure, and they include Email, Manual, and Candidate to Upload Documents. Below we will go over each type of step with a screenshot and a guide for each to see what can be configured here. You can also View, Add, or Edit Job Posting steps in the settings by using the following steps below:
Company → Settings → Employees → Recruiting → Recruiting Process → Recruiting Steps Library
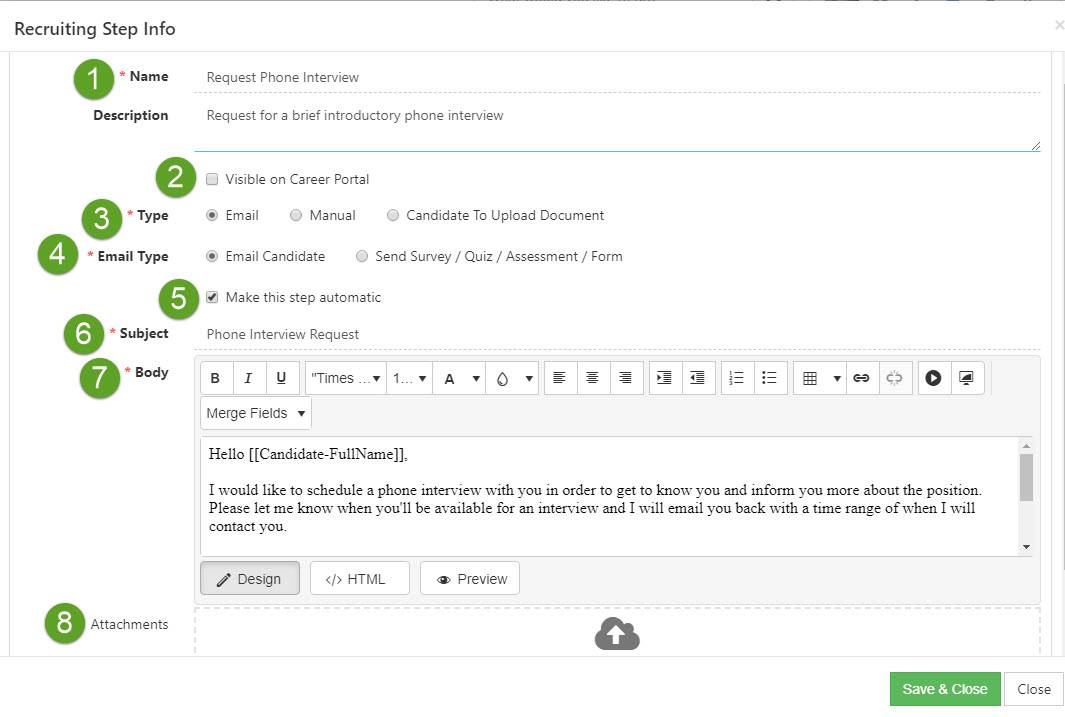
Example of the Recruiting Steps Library
- Name: The name of the recruiting step. This is also what will appear when adding steps using Add From Existing Steps on a new Job Posting.
- Visible?: When this checkbox is toggled on, this step is visible on the Career Portal. Determining what steps are visible to the Candidate varies depending on the action. There may be steps you take internally that you may not want visible to the Candidate.
- Type: Allows you to choose from three types of steps which are as follows:
- Email: Emails are sent to recipients and allow you to request feedback (using Surveys, Quizzes, etc.) and email using merge-fields for limited manual entry. Merge-fields regarding the Candidate can be added to the email for a personalized experience with your Candidates.
- Manual: These steps are completed by Employees or recruiters from Striven using tools such as the Application Queue.
- Candidate to Upload Document: Requires Candidates to upload a document that you choose from a drop-down menu. You can also choose what types of documents are uploaded in the settings with document upload types. This is ideal for documentation that may be needed during the recruiting process such as driver’s license, certifications or diplomas, etc.
- Email Type: Allows you to choose to Email Candidate or Send Feedback in the form of a Survey, Quiz, Assessment, or Form. By choosing to Send Feedback, you can then choose what is sent to the Candidate to complete. To learn more about setting up Surveying in Striven, review our Surveying & Feedback Guide.
- Automatic?: When this checkbox is toggled on, this step will be set to automatic. This action will be completed automatically after the previous step is completed. This is ideal if you wish to have emails sent without an action of a recruiter to ensure the recruiting process is still moving forward.
- Subject: The subject of the email that is sent to the Candidate.
- Body: Here you can enter the body of the email and also add merge fields to populate Candidate and Application data automatically.
- Attachments: Here you can add attachments that will be sent along with the email.
-
Terms & Conditions
This is where you can create Terms & Conditions that you want your Candidate to confirm they have read. This will be the last step as they are completing their Application in the Career Portal. When adding new Terms & Conditions into Striven for your Candidate, make sure to check off the recruiting options for the Terms & Conditions Category. To add Candidate Terms & Conditions, use the following steps below:
Company → Settings → Employees → Recruiting → Career Portal → Terms & Conditions
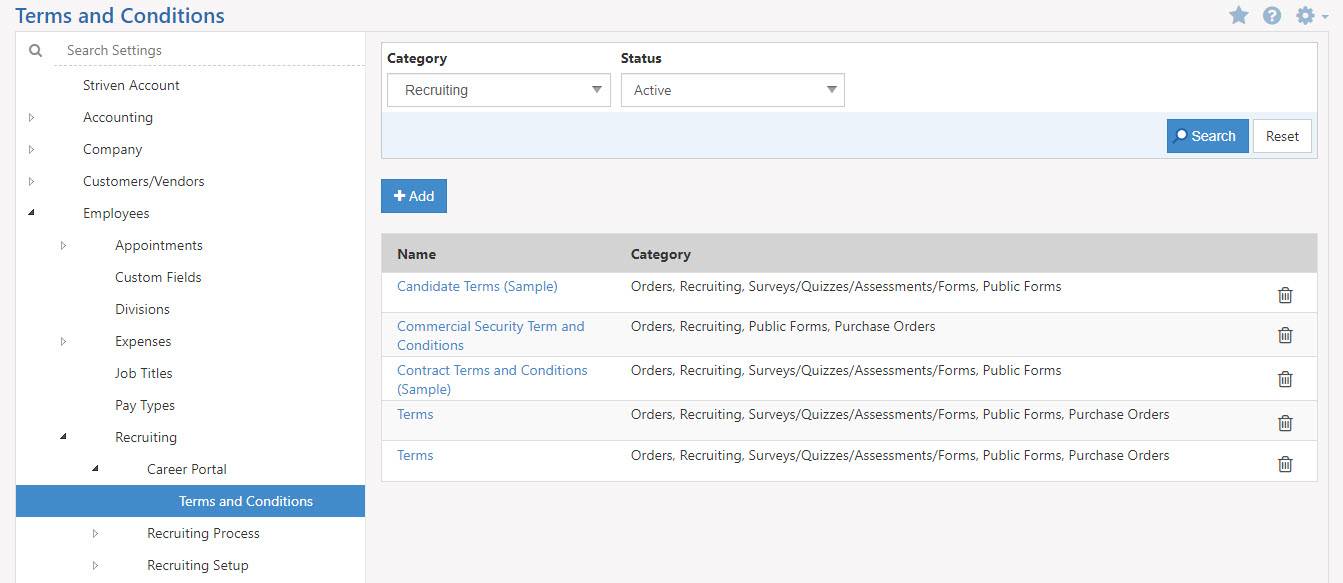
Example of the Recruiting Terms and Conditions
-
Candidates Custom Fields
Apart from capturing more information for specific Job Postings, you can also choose to capture more information for both Candidates and Candidate Applications. Candidate Custom Fields help capture information for all Candidates and Job Postings that aren’t already available when Candidates are applying for a position in the Career Portal. An example would be asking Candidates for their social security number. To learn more about Custom Fields in Striven, review the Custom Fields Guide. To add Candidate or Candidate Application Custom Fields, use the following steps below:
Company → Settings → Company → Customization → Fields
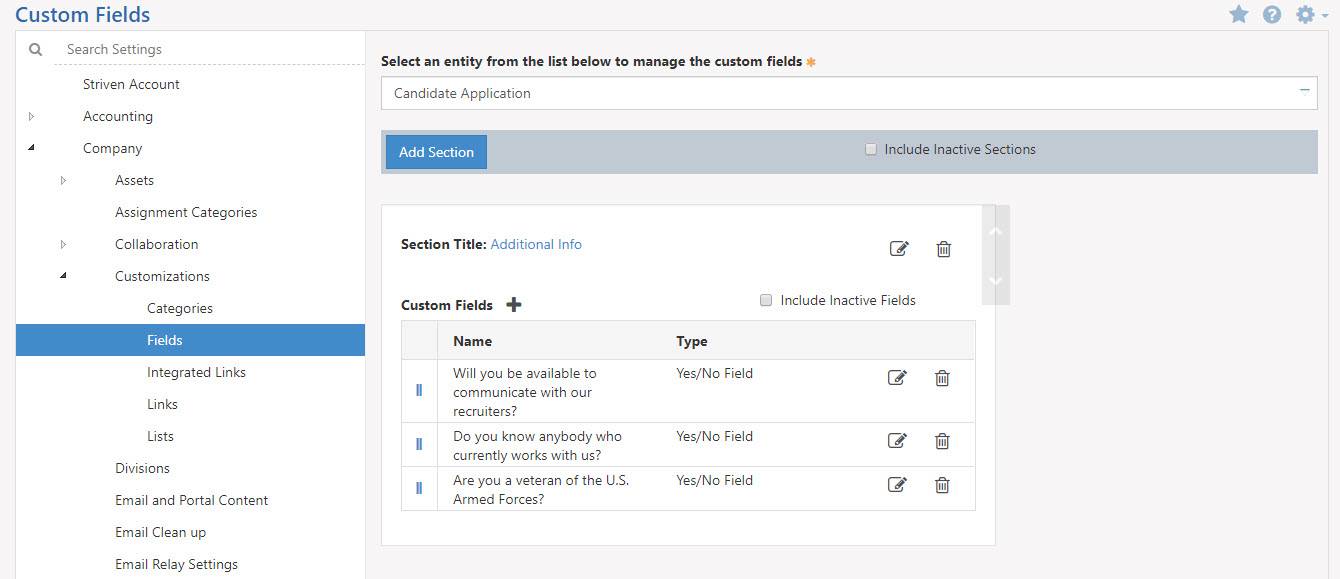
Example of Candidate Application in Custom Fields Page
-
Job Postings
Job Postings are advertisements to notify internal Employees or the public of an open position within your Company. Recruiters can communicate and work with Candidates to ultimately decide who will fill the open position. To begin unlocking this workflow within Striven, you must first create Job Postings. Below is a screenshot that will illustrate a Job Posting in Striven and what can be configured there. To create Job Postings, use the following steps below:
Employees → Job Postings
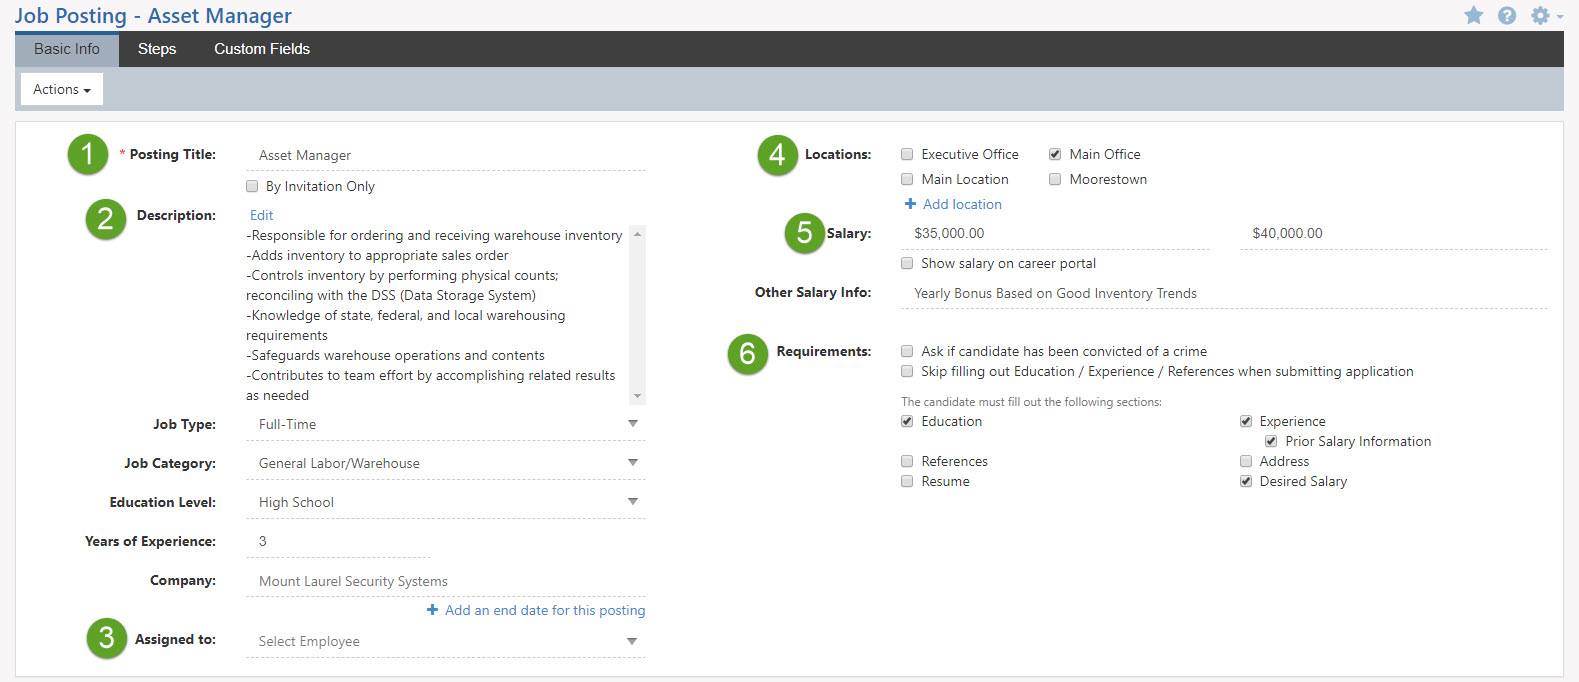
Example of Job Posting Page
- Posting Title: The title of the position you’re advertising to be filled. Under the posting title, you can also choose to make the posting available by invitation only. Once a post has been created, the Actions menu can be used to Share the Job Posting or Invite Candidates.
- Description: Here you can write a description of the Job Posting and let applicants know expectations and duties.
- Assigned to: Here you can associate an Employee to be assigned to the Job Posting. This Employee will be responsible for processing applicants.
- Locations: Company Locations where the posting will be located. This lets applicants know where they can expect to be working.
- Salary: Here you can enter a numeric value which is the expected position salary.
- Requirements: Here you can choose from many different options including the following:
- Ask if Candidate has been convicted of a crime: This is a Yes/No question that can be answered in the Portal.
- Skip filling out Education/Experience/References: Here you can choose whether to skip asking the applicant to fill out their education, experience, and references. This will hide those options in the boxes below.
- Individual Sections: By selecting individual boxes, you can note what sections the Candidate must fill out when applying.
-
Job Posting Custom Fields
With each Job Posting, you can choose to create Custom Fields in order to track more information that is not available within the Job Posting. There are many Custom Field types to track different types of information. Below is a screenshot illustrating how the Job Posting Custom Fields page appears and a guide that covers all the Custom Field types. Custom Field types are available to help you decide which Custom Field would best suit your needs to capture the right type of information. To learn more about Custom Fields in Striven, review the Custom Fields Guide.
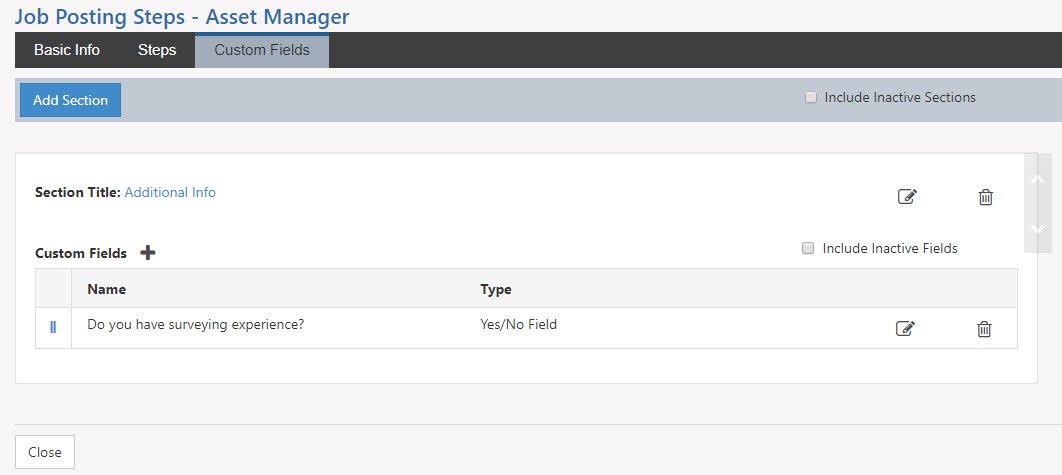
Example of Custom Fields on a Job Posting
-
Job Posting Steps
Once you create a Job Posting, you can add steps that Candidates will take while applying for the position. Using the Steps tab, you can add existing Steps to the Job Posting that are already in the global Recruiting Steps Library, or you can create a new Job Posting Step here. Review the available Job Step Types above.
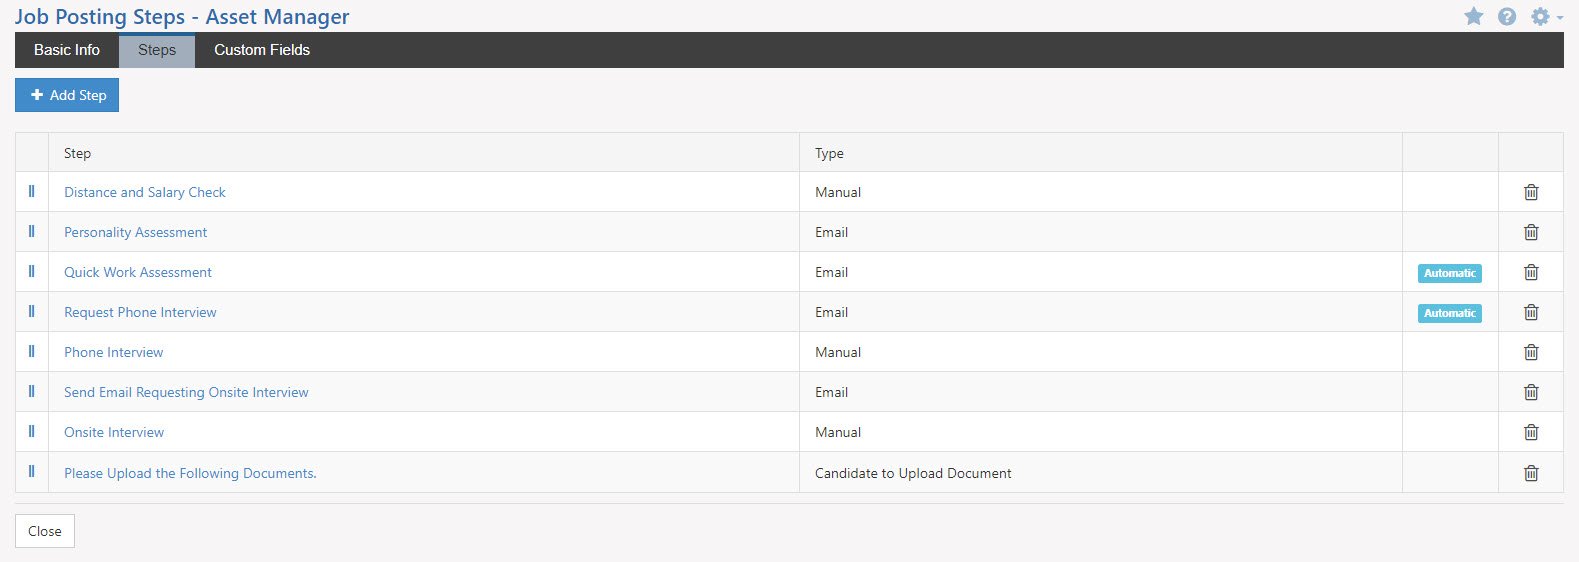
Example of Recruiting Steps in a Job Posting
-
The Career Portal
The Career Portal in Striven allows for your Candidates to sign in and apply to Job Applications. As they fill out information regarding their Candidate Profile, this information will be saved for the next time an Application is to be filled out. Collaboration between Candidates and recruiters can be enhanced by utilizing the Career Portal in Striven.
-
The Candidate Experience
The iFrame code found in the Recruiting Settings will allow you to not only allow embedding the iFrame into a website, but also test the Career Portal to ensure things are to your liking. To test the Career Portal and view it as a Candidate would, copy the iFrame code from the Recruiting Settings page and paste it into a new browser tab. Remove the iFrame code from the link so that only the URL is displayed before hitting enter. This will populate the Career Portal, and you can experience what your Candidates will experience. Once you have selected a Job Posting to apply for, you will be brought to a login page as illustrated in the image below. Here Candidates will enter their name and information to create a login and continue through the Application process.
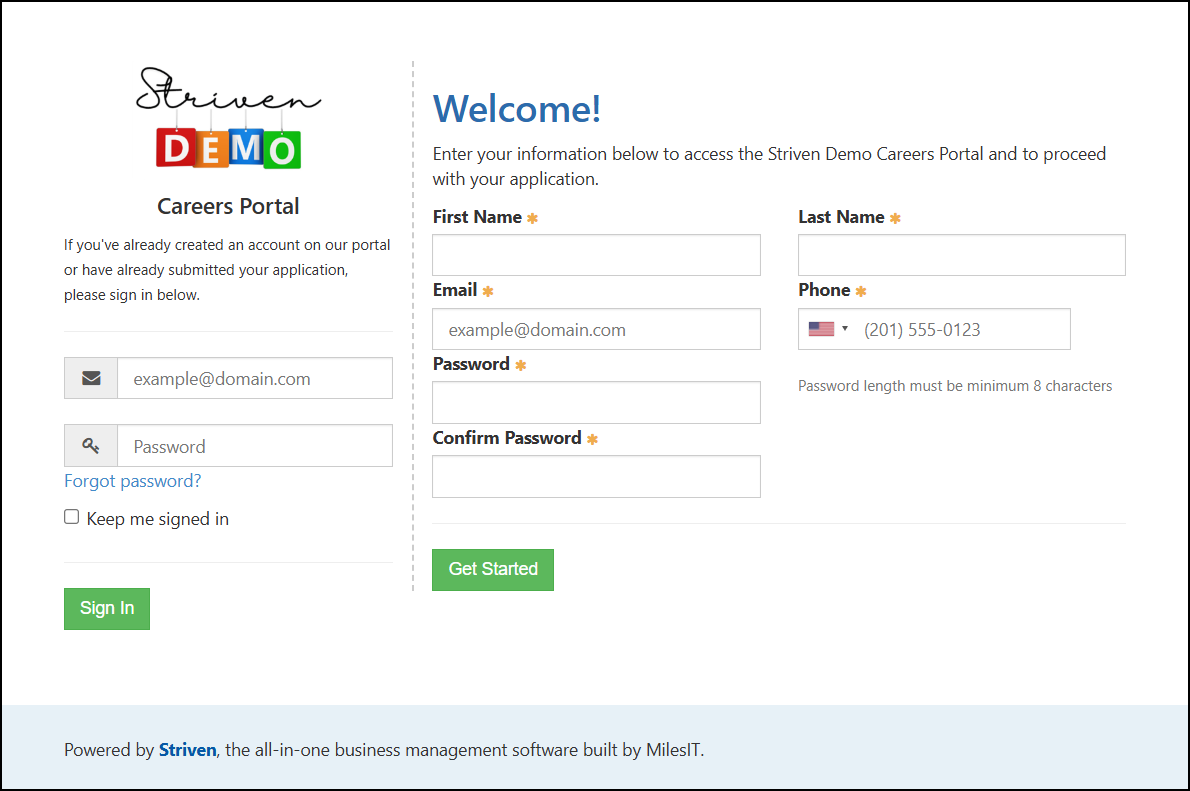
Example of Career Portal Signup Page
-
Candidate Profile
Upon creating a login, Candidates will be brought to their Candidate Profile page. Contact information submitted on the sign-up page will be prefilled in their respective fields on this page. There are a lot of fields on this page, each aiding to build a Profile of the Candidate for recruiters to see within Striven once the Application is submitted upon completion. Below is a screenshot demonstrating how the Candidate Profile page appears within the Career Portal.
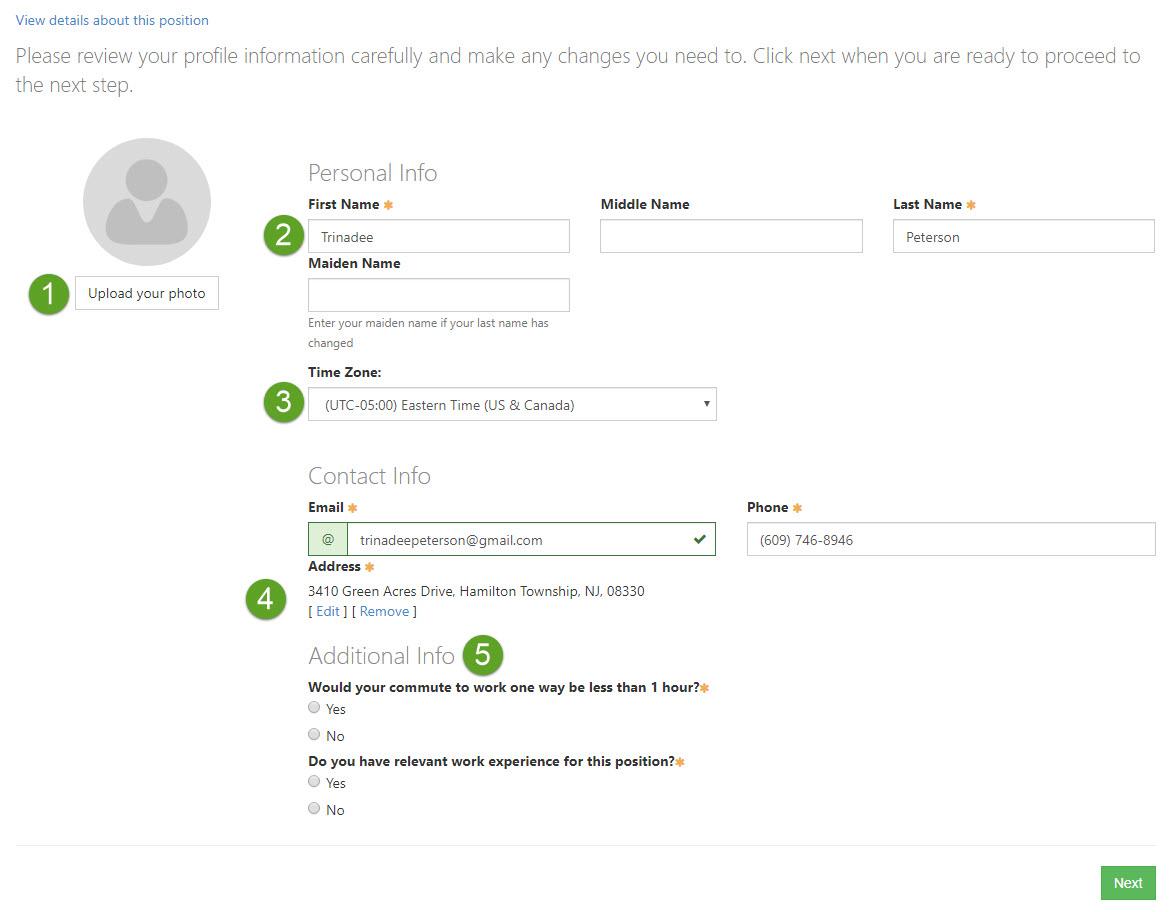
Example of Candidate Profile Page in the Career Portal
- Picture: The Candidate can choose to upload an image of themselves here. This will also appear on the Candidate’s Profile in Striven when the Candidate Application is submitted after completion.
- Personal Info: The information carried over from the sign-in page as discussed above.
- Time Zone: Allows Candidates to choose their respective time zone.
- Address: Allows the Candidate to search Google for their address or enter their address manually to save that information on their Profile.
- Custom Fields: Candidate Application Custom Fields as discussed above for the Candidate to fill out accordingly.
-
Education
Once the Candidate saves their Profile page, they will be brought to the Education List (unless you chose to skip education on the Job Posting they’re applying for). Here they can click the Add button to begin filling out the necessary information to enter one or more past educational institutes that they have attended or earned a degree from. Below is an image of how the Education page appears on the Career Portal. After the Career Portal saves one education instance, the applicant will be brought back to the Education List to add more education instances if needed.
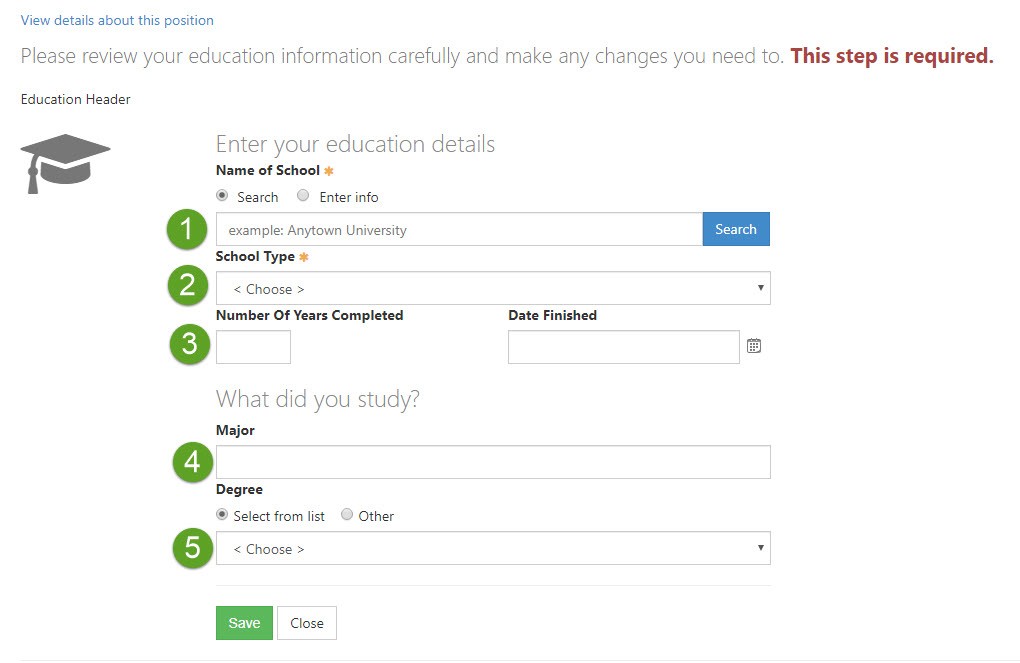
Example of Candidate Education Page in the Career Portal
- Name of School: Allows Candidates to search Google for schools they attended or enter the information manually.
- School Type: Allows the Candidate to choose from several types of schools including college, high school, professional school, and trade school.
- Completion Info: Allows the Candidate to enter how long it took to complete and when they finished/graduated.
- Major: An alphanumeric field in which the Candidate can type the degree they earned at the school.
- Degree: Allows the Candidate to choose their degree type from a drop-down list or choose Other to type in their earned degree.
-
Experience
After filling out their Education List, the Candidate will be brought to the Experience List (unless you chose to skip experience on the Job Posting they’re applying for). Here they can click the Add button to begin filling out the necessary information to enter one or more past positions and companies they worked for. Below is an image of how the Experience page appears on the Career Portal. After the Portal saves one experience instance, they’ll be brought back to the Experience List to add more experience instances if needed.

Example of Candidate Experience Page in the Career Portal
- Employer Name: Allows the Candidate to search Google for businesses they worked for or enter the information manually.
- Employer Info: Allows the Candidate to enter their previous employer’s phone number and website.
- Job Title: Allows the Candidate to enter their previous Job Title.
- Job Description: Allows the Candidate to enter a description of their previous Job Title duties and responsibilities.
- Started On/Ended On: Allows the Candidate to choose from the Calendar icons when they started and ended their previous position.
- Reason for Leaving: Allows the Candidate to note the reason they left their previous position.
-
References
After filling out their previous work experience, the Candidate will be brought to the References List (unless you chose to skip references on the Job Posting they’re applying for). Here they can click the Add button to begin filling out the reference information to enter one or more people who have chosen to speak to their character. Below is an image of how the References page appears on the Career Portal. After the Portal saves one reference, the Candidate will be brought back to the references list to add more references if needed.
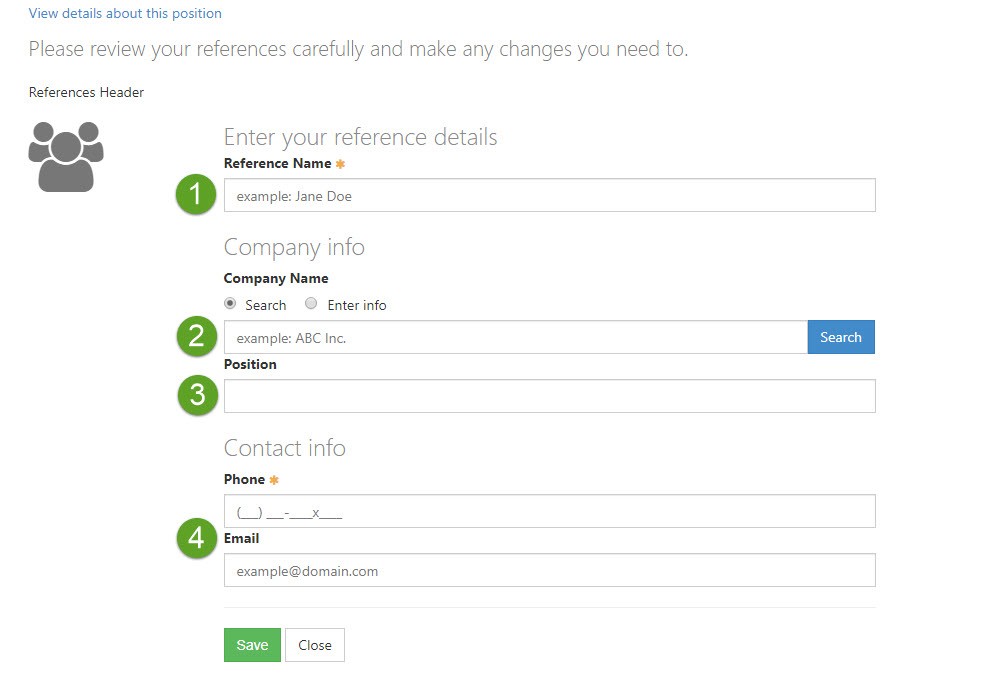
Example of Candidate References Page in the Career Portal
- Reference Name: Allows the Candidate to type in the name of the person who will be their reference.
- Company Name: Allows the Candidate to search Google for businesses their references work for or enter the information manually.
- Position: Allows the Candidate to enter the reference’s position with the selected Company.
- Contact Info: Allows the Candidate to enter the reference’s phone number and email address.
-
Applying
After filling out their education, previous work experience, and references (unless you chose to skip these on the Job Posting their applying for), Candidates will be brought to the Apply page. Here they can upload their resume, enter Application information, and more.
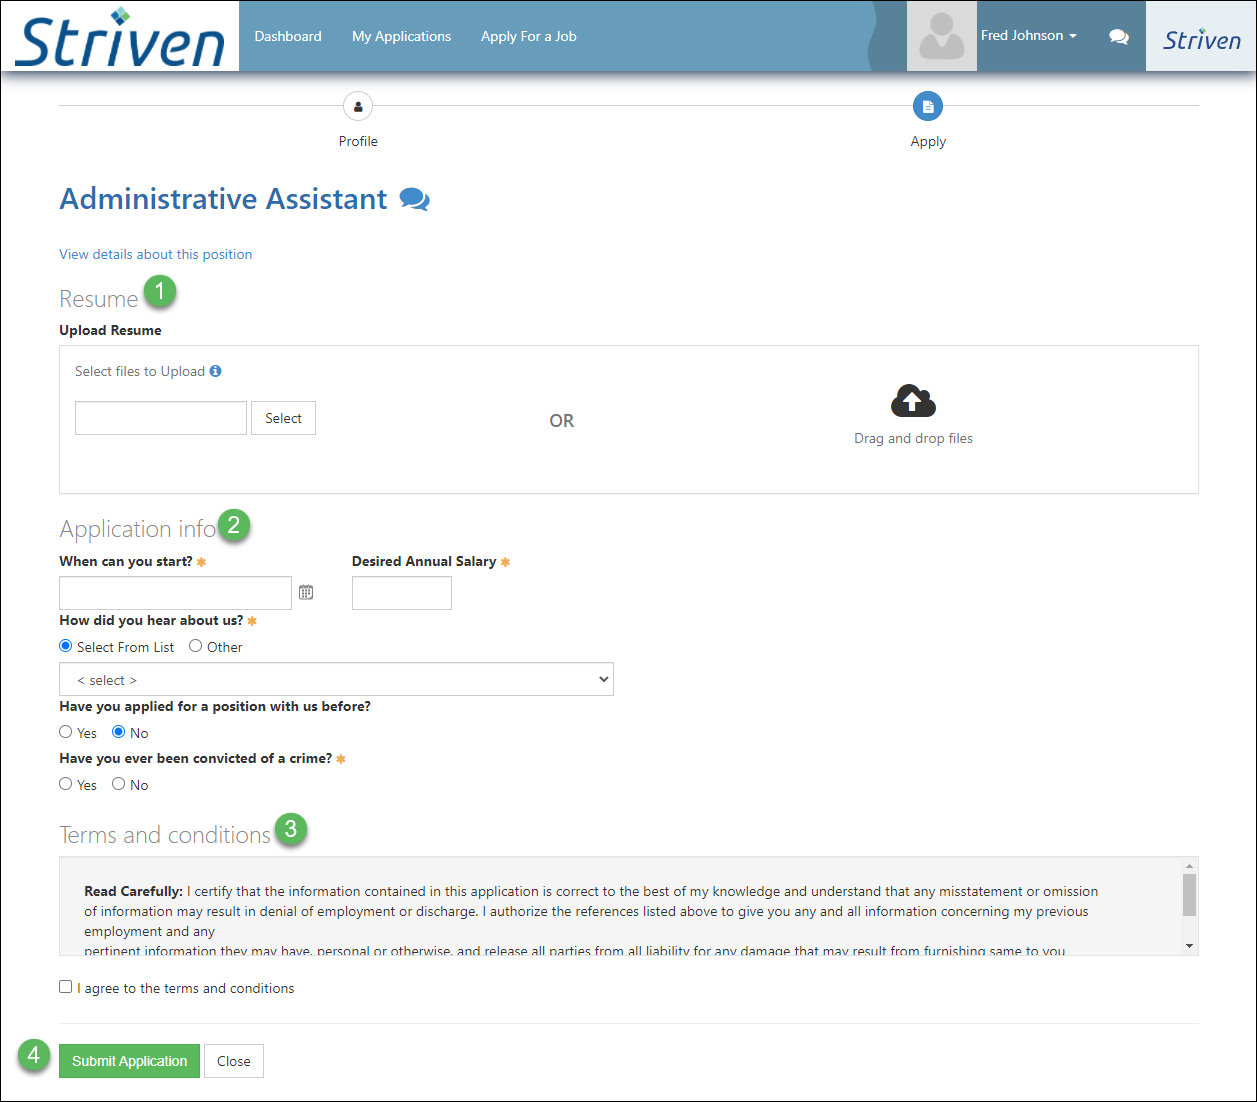
Example of Candidate Apply Page in the Career Portal
- Resume: Allows the Candidate to upload their resume from their computer.
- Compatible Extensions: .doc, .docx, .pdf,. jpeg, .jpg, .gif, .bmp, .txt
- Max File Size: 100 MB
- Application Info: There are several questions here to for the Candidate to respond to. Those marked with an * are required to submit the Application.
- Terms & Conditions: These are the Terms & Conditions that were selected in the recruiting settings (discussed above) for Candidates to agree to.
- Submit Application: Saves the Candidate’s responses and submits the Application for approval or next steps in the recruiting process.
- Resume: Allows the Candidate to upload their resume from their computer.
-
Submission
Now that the Candidate has submitted their Application, the thank you message will appear that was set up in the Recruiting Settings (discussed above). There are also buttons for them to apply for another positions, view their Applications, message recruiters, and edit their Candidate Profile. Below is a screenshot portraying how the Application Submission page appears in the Career Portal.
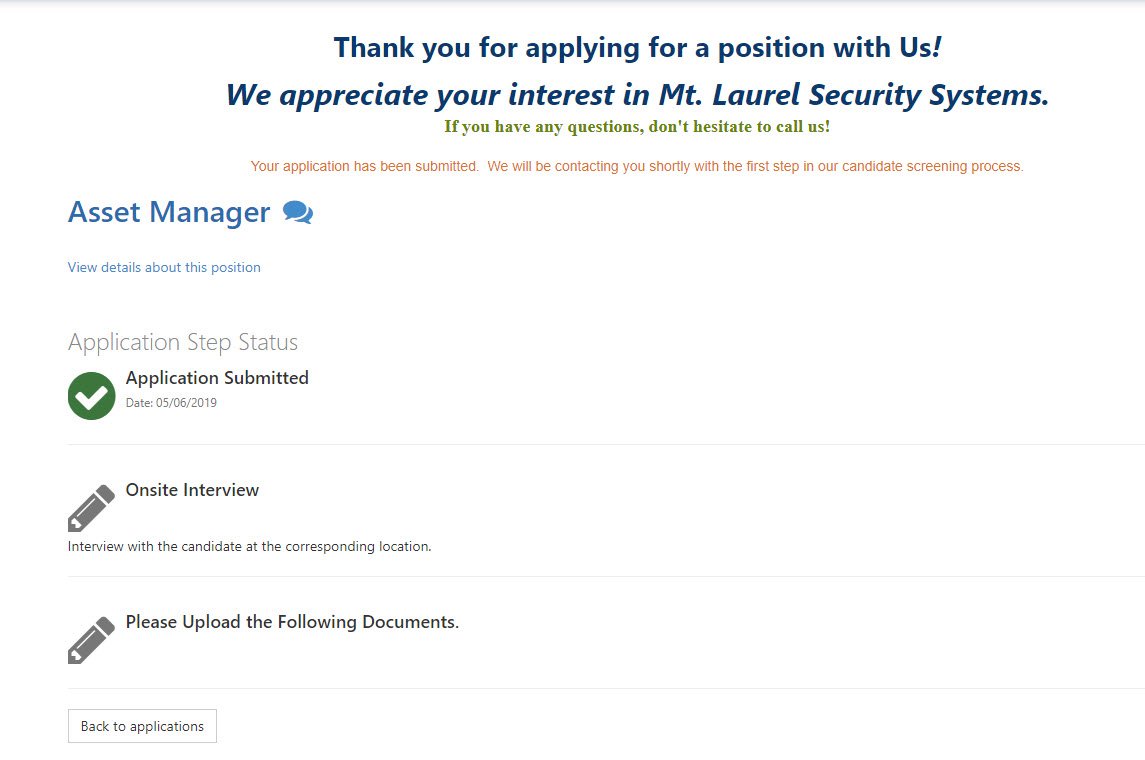
Example of Application Submission Page in the Career Portal
-
Recap
With this guide, we’ve discovered how to create and manage Job Postings, Custom Fields, job steps, and recruiting settings to enable your recruiting workflow to suit your Company’s needs. We’ve also discovered ways to test out the Career Portal to ensure the best user experience for the Candidate. To discover ways to manage submitted Applications, please reference our Applications & Onboarding Guide.
FAQs
-
Can I message Candidates using the Career Portal and see the Discussion thread in my Striven system?
Recruiters can message Candidates through Discussions in Striven with ease. The Discussion option can be found on pages such as the Application Queue and the Candidates List. Candidates can also send Discussion messages to recruiters through the Career Portal as long as the option is enabled in the Recruiting Settings. Both the Career Portal and Striven will track Discussion messages for each party’s convenience.
-
I want to send a Quiz to Candidates who apply for a Job Posting, but need to create it first. How can I add a Quiz into Striven?
Quizzes can be added to Striven under the Company tab. Quizzes function much like the other Surveying options in Striven such as Surveys, Assessments, and Forms. To learn more, please reference our Surveying & Feedback Guide.