


Employees
Employee Expenses
Support Guide
-
Overview
Configuring and managing Employee Expenses in Striven will enable you to track expenses that Employees have submitted to be either billed or reimbursed. There is a lot of functionality in Striven to help facilitate your Employee Expense management which will be discussed in further detail below. This User Doc will guide you through creating and managing Employee Expense Types, Expense Requests, and explain the Employee Expense Approval Queue.
Read this guide if you are trying to:
✔ Create Employee Expense Types.
✔ Submitting Expenses & using the Expense Approval Queue.
✔Process Employee Expense Reimbursements using Expense Checks.
-
Expense Types
Apart from Time Entries and Timesheets, another way to capture work Employees perform is to submit expenses. Expenses can be submitted, approved, and billed to Customers for Items that Employees purchase while performing work. Before Employees start submitting expenses, it’s important to configure your Expense Types in the settings. Expense Types will allow you to note if the expense is Billable by default, if the Customer/Vendor is required, and more. You can also restrict access to Job Titles or Employees, or choose to allow all Employees to submit expenses of that type.
To view Expense Types, navigate to: Company → Settings → Employees → Expenses → Types
Expense Types List
Below is a screenshot of how the Expense Types list appears and a list describing what can be accomplished there.
- Add: Navigates to the Add Expense Type page where a new kind of Employee Expense to be tracked and processed can be created.
- Type: Lists the existing Expense Types that have been created in the system.
- Amount / Qty: Expense Types can be set as either Amount or Qty which will be displayed in this column.
- Deactivate: Moves the Expense Type into an Inactive status. To view and reactivate Inactive Expense Types utilize the Status search filter from Active to Inactive on the Expense Types list.
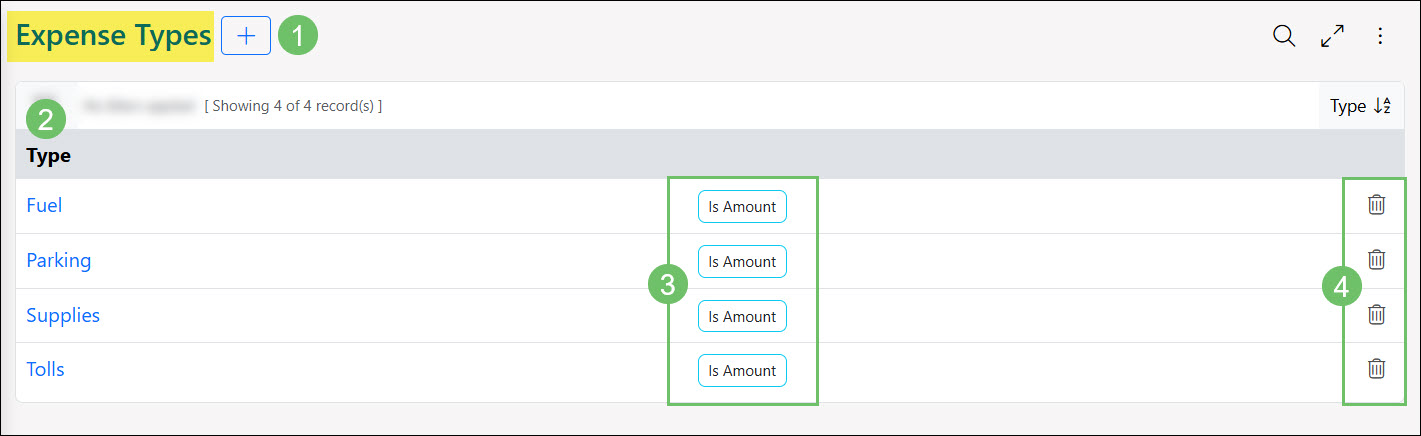
Example of the Expenses Types List

Add Expense Type
Below is a screenshot of how the Add Expense Type page appears and a list describing what can be accomplished there.
- Name: The name of the Expense Type that you can select when creating a new expense in Striven.
- Is Amount / Is Qty: Allows you to choose whether the expense is tracked by amount or quantity. Amount is used for currency values, while quantity is used for numeric values.
- Mark as Billable by Default: Enabling this option automatically checks the Billable box when creating expenses of this type, streamlining customer invoicing.
- Has a Multiplier: Determines the markup on expenses of this type, which is the difference between the cost and the selling price of the expense.
- Notify Manager: When enabled, expense submission requests are automatically routed to the user’s manager according to their organizational hierarchy.
- Expense Account: Determines the Expense Account which will be posted to when entering and reimbursing expenses.
- Billable Item: Establishes what Item from your Items List should be used as the Billable Item whenever a Billable expense of this type is submitted by users.
- Available To: Determines whether all Employees should have access to submit expenses of this type. By unchecking Available to All Employees, the availability can be specified to selected Employees or based on Job Titles.
- Recipient Notifications: Sets the internal user who should be notified of requests related to expenses of this type, which are described further below:
- Submission: The user associated here will be notified when an expense of this type has been submitted so that they can view the Expenses Approval Queue and manage the expense request.
- Approved: The user associated here will be notified when an expense of this type has been approved so that they can pay the user for the approved expense request.
- Paid: The user associated here will be notified when an expense of this type has been paid so that they can view the check created from this payment.
- Denied: The user associated here will be notified when an expense of this type has been denied so that they can notify the requester and can manage the expense request.
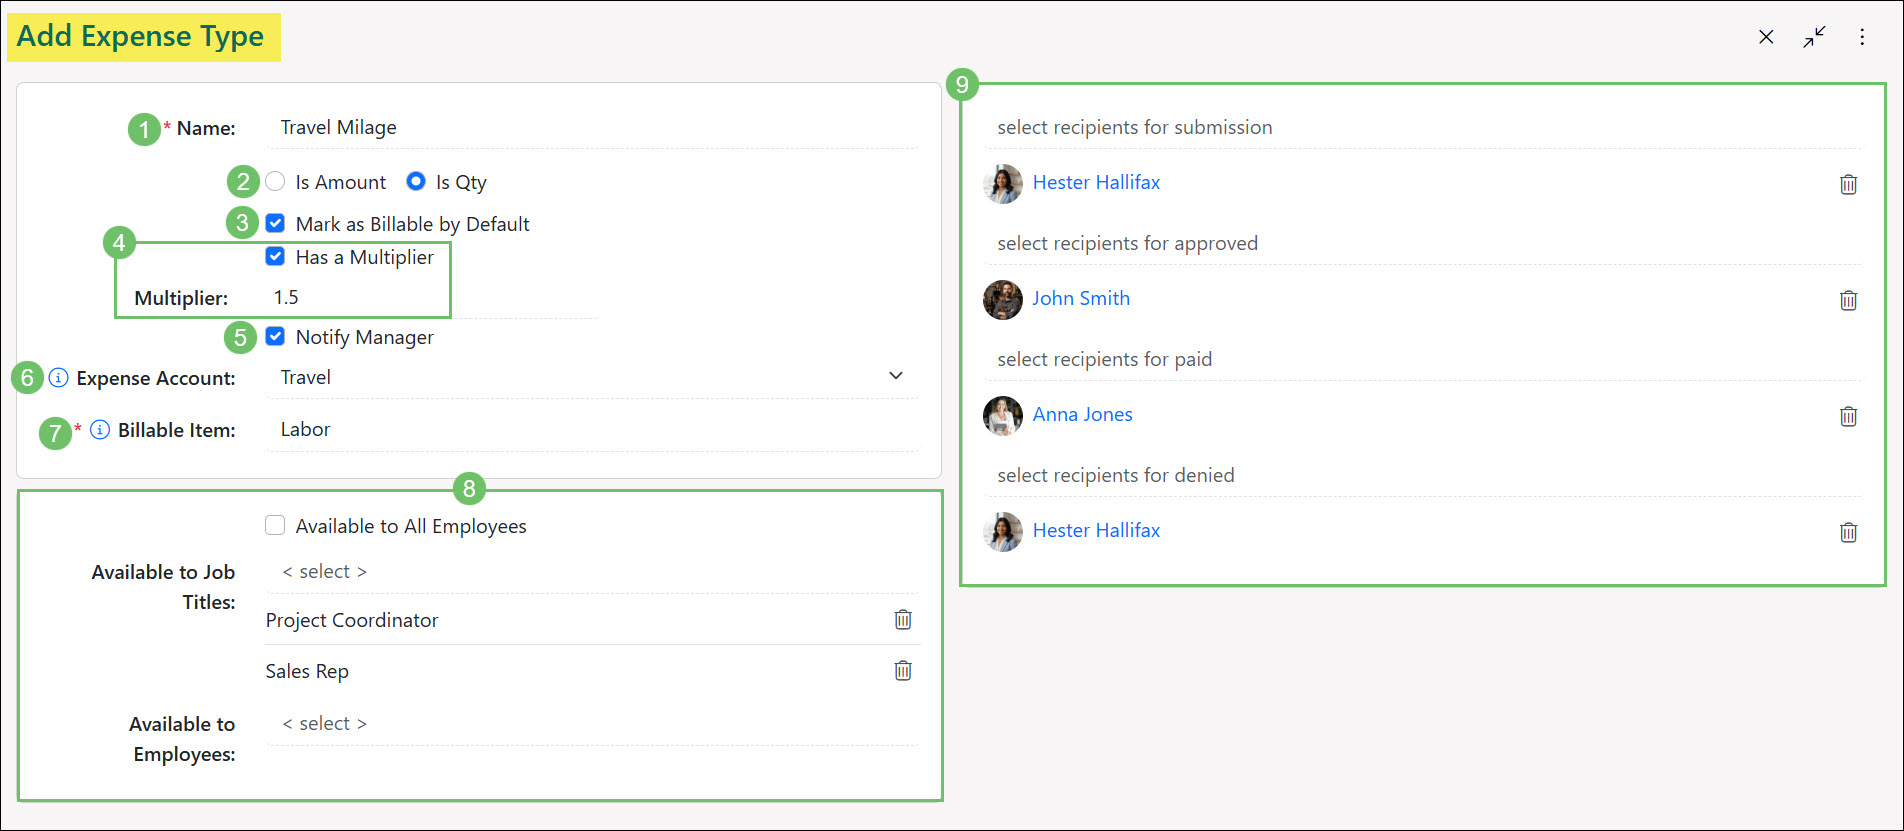
Example of the Add Expense Type Page
-
Expense Custom Fields at the Global Level
Striven has made it possible for you to configure Custom Fields for expenses at the global level. You can include Custom Fields specific to your Expense Reimbursement requests at a global level to be used to gather further details about your Employees’ expenses.
For example, you could include questions related to the expenses submitted to determine if a physical receipt is available or ask the Employee if they’d like the reimbursement included in their next payroll or if they need it before then.
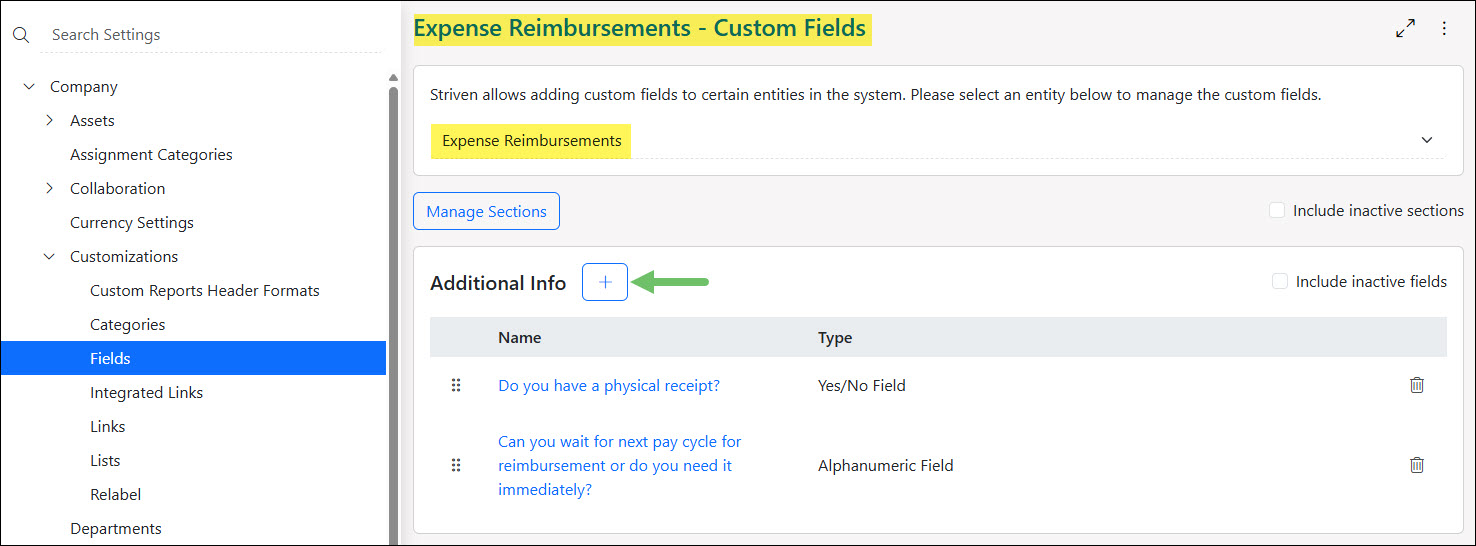
Example of Expense Reimbursement Custom Fields
Once created, you can enter the responses to the Custom Fields as needed when adding an expense.
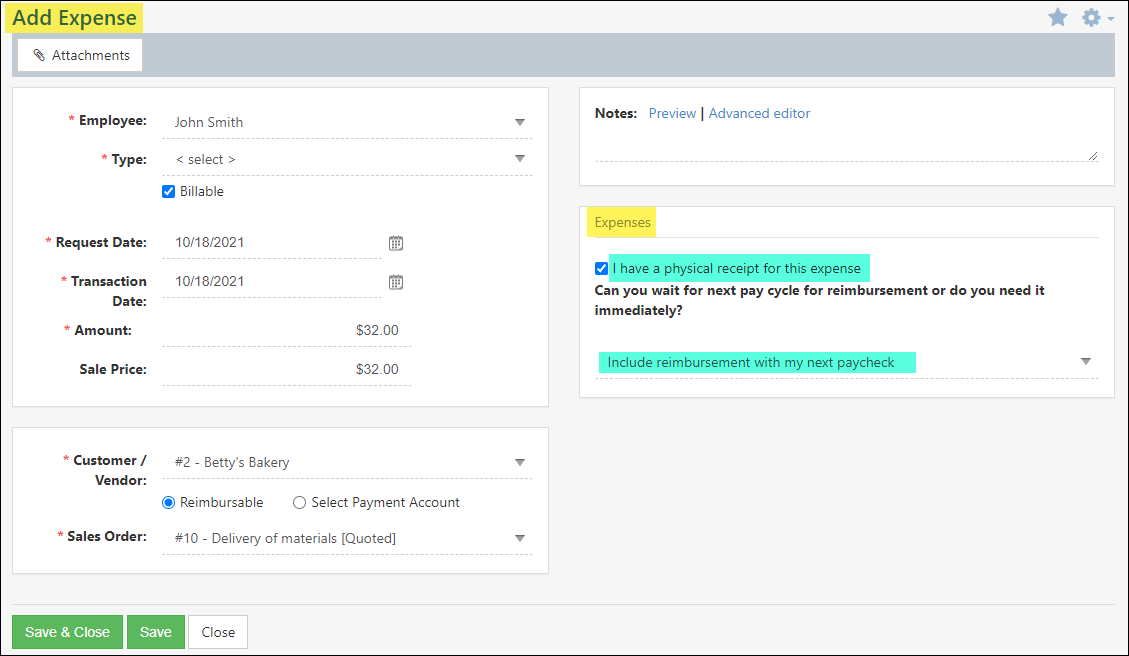
Example of Custom Fields on Add Expense Page
Custom Fields configured for Expense Types seamlessly feed into the Configure Columns for the Payroll File section within Striven’s Payroll Settings. Mapping these custom field data points ensures that specific expense data and attributes are accurately captured and transferred to your external payroll processor, such as ADP, Paylocity, or Paychex, during file generation. For comprehensive guidance on setting up file mappings, defining custom record columns, and processing exports, please refer to our Generate Payroll File Guide.
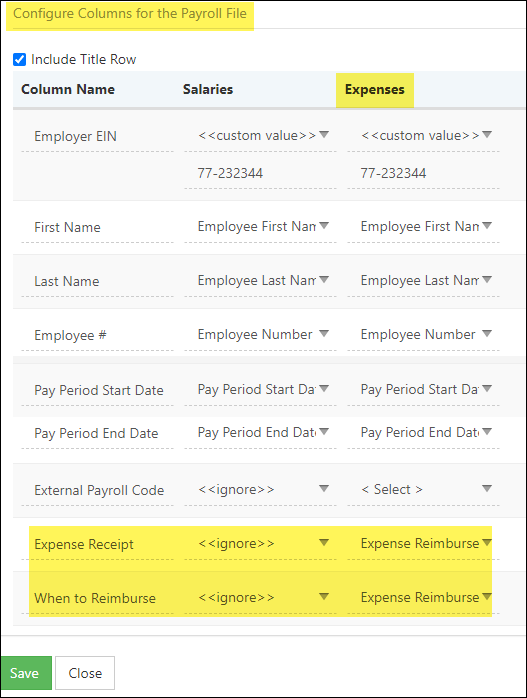
Example of Expense Custom Fields on Payroll File Configuration
-
Submitting Expenses
When Employees pay out-of-pocket for work-related expenses, they can submit those expenses for reimbursement through Striven.
To view the status of submitted expenses or to add a new expense, click on the Profile menu and select Expenses from the list.
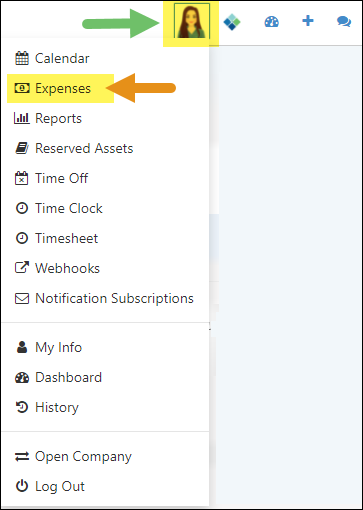
Example of Expenses Option in Profile Menu
This will navigate you to the My Expenses page, where you can use search filters to find particular expenses, or add new expenses by clicking the Add button or the Add Multiple button if you have multiple expenses to submit. You’ll also have the option to edit an existing expense if it is still in the Pending status.
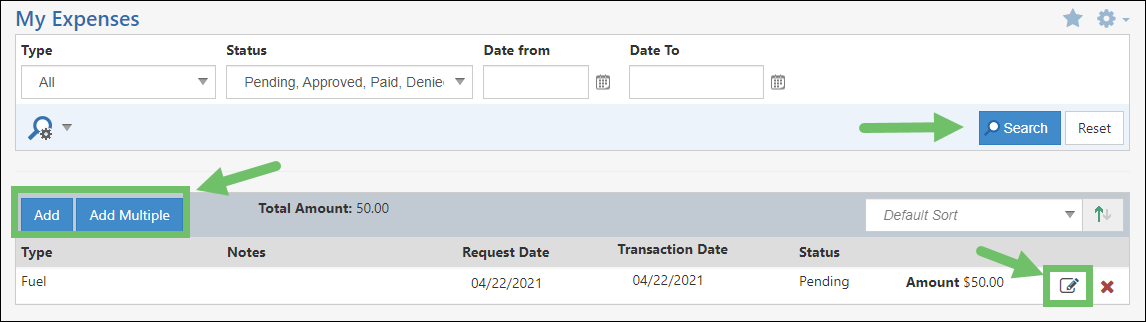
Example of My Expenses Page
Adding Expenses
If you only have one expense to submit, the Add button will navigate you to the Add Expense page where you can enter the relevant expense information, as seen in the example below.
- Employee: The name of the Employee that the expense relates to.
- Note: If an Employee has the permission “Expenses – Add for Other Employees” they will be able to enter the name of another Employee to submit the expense for them.
- Type: Provides a drop-down list of expense types saved in your Striven system to choose from. Below this field is the option to mark the expense as Billable.
- Request Date: The date the expense is being submitted.
- Transaction Date: The date the expense was incurred.
- Amount: The total amount of the expense. This would be the amount requested for reimbursement if applicable.
- Customer/Vendor: If the expense is related to a specific Customer or Vendor, you can select them here. For example, when you need to purchase a part in order to complete a Customer’s service, that expense would be related to the Customer.
- Sales Order: If the expense is directly related to a specific Sales Order, you can select it here.
- Notes: Provides the option to add a note regarding the expense, such as the reason the expense was necessary, where the expense was incurred, or any other details you wish to include with the expense.
- Custom Fields: If you have Custom Fields related to your Expenses, you will see those displayed for response when adding an expense.
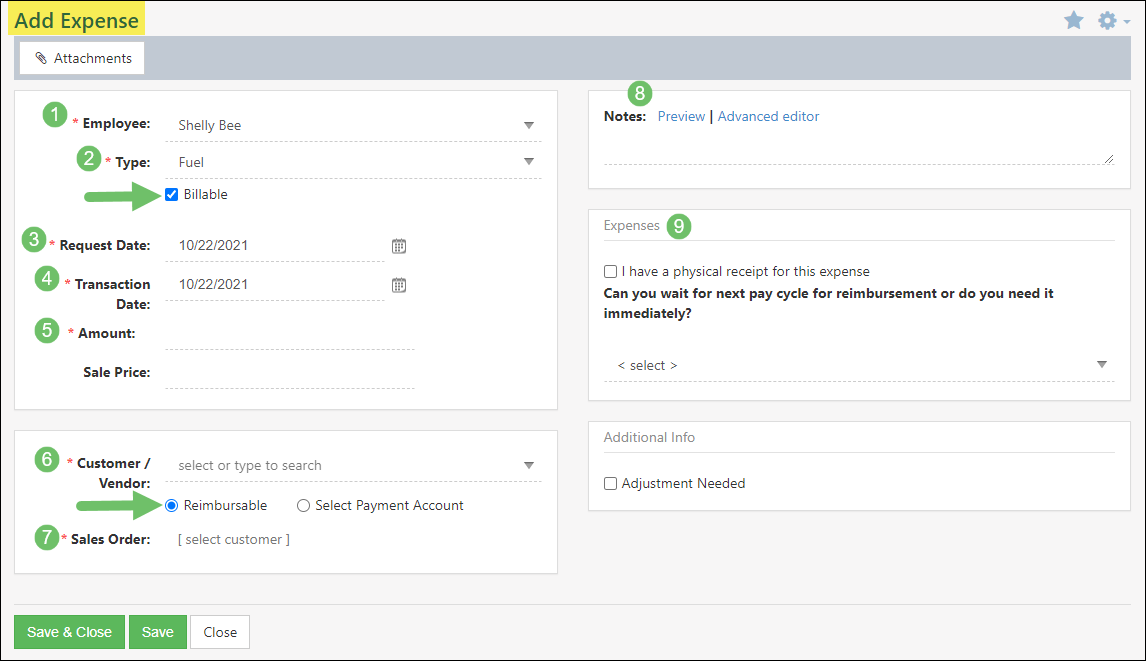
Example of Add Expense Page
Alternatively, if you need to submit multiple expenses, the Add Multiple button will provide a faster and easier way to submit them on one page. This option displays several submission fields in order to enter many expenses at one time. The fields on this page differ slightly from the single Add Expense page.
- Employee: The name of the Employee that the expense relates to.
- Note: If an Employee has the permission “Expenses – Add for Other Employees” they will be able to enter the name of another Employee to submit the expense for them.
- Type: Provides a drop-down list of expense types saved in your Striven system to choose from.
- Note: Based on Expense Type Settings, certain Request Types may require additional information which is not available for submission on the Expenses Multiple Request Entry page. Those will need to be submitted individually from the Add Expense page.
- Request Date: The date the expense is being submitted.
- Transaction Date: The date the expense was incurred.
- Amount: The total amount of the expense. This would be the amount requested for reimbursement if applicable.
- Notes: Provides the option to add a note regarding the expense, such as the reason the expense was necessary, where the expense was incurred, or any other details you wish to include with the expense.
- Attachments: Provides the ability to upload an attachment related to the expense, such as a receipt.
- Customer/Vendor: If the expense is related to a specific Customer or Vendor, you can select them here. For example, when you need to purchase a part in order to complete a Customer’s service, that expense would be related to the Customer.
- Delete: If you have extra fields on the page that you do not need for the expense submission, you can click the delete button to remove them from the list.
- Note: If you need more fields to enter additional expenses, you can add them by clicking on the Add New Line Item button as indicated by the green arrow in the example provided.
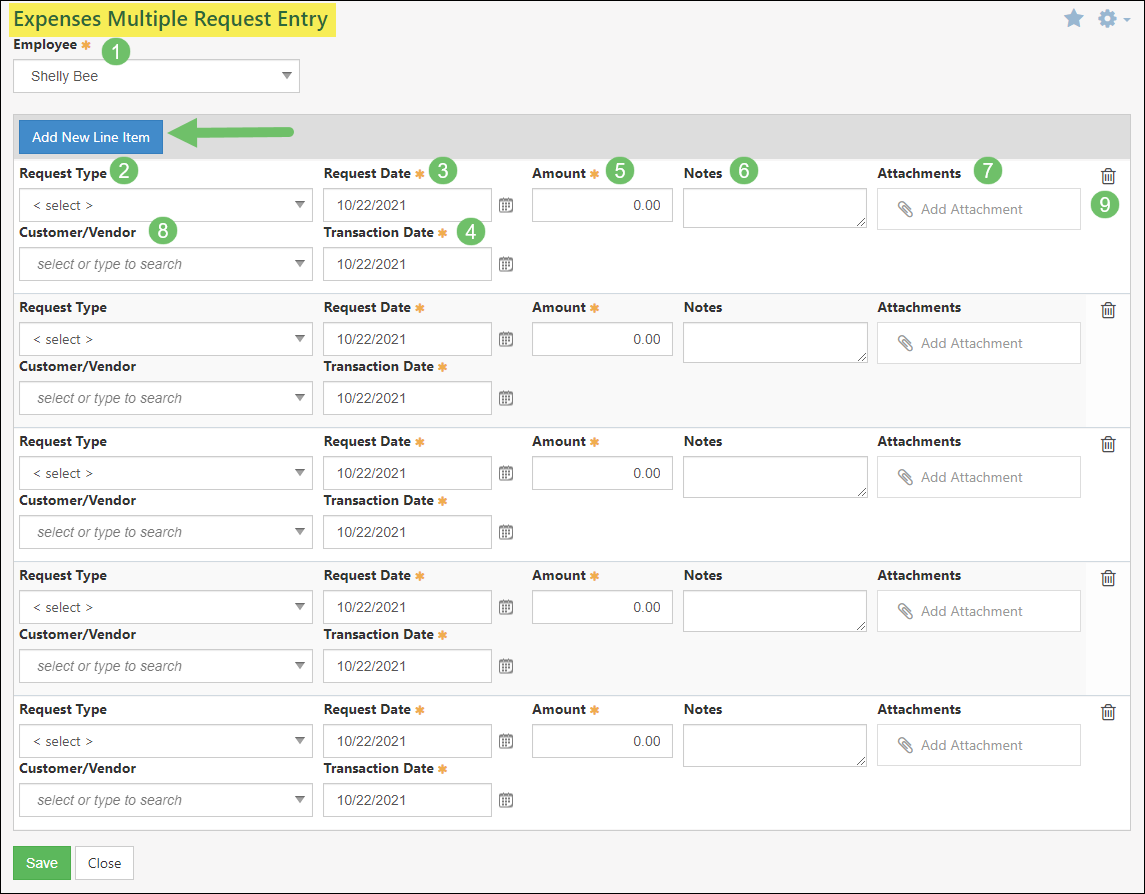
Example of Expenses Multiple Request Entry Page
After you’ve filled out the required fields on the page, you can save your expense(s) which will then display on your My Expenses page in a Pending status until reviewed and approved through the Expenses Queue.
- Employee: The name of the Employee that the expense relates to.
-
Expenses Queue
Once expenses are submitted, they can be managed using the Expense Queue. Once an expense request has been submitted, the notification recipient will be notified to review the request in the Expenses Queue. Using the Expenses Queue, you will be able to update statuses of selected expense requests using the Update Status button. You can also create expense checks by selecting expense requests and clicking the Create Checks button. To manage Employee Expenses through the Expenses Queue, navigate to Employees → Management → Approve Expenses
Below is a screenshot illustrating how the Expense Queue appears and a list describing what can be accomplished there.
- Search Filters: Allows you to narrow down the list of expenses by Employee, Expense Type, Expense Status, Date Range, and Amount.
- Add Expense: Navigates to the Add Expense page in order to begin the process of asking for an expense reimbursement.
- Employee Name: Displays the name of the Employee who submitted the expense, along with Billable or Reimbursable tags if applicable.
- Actions: Provides options to manage specific expense records:
- Edit: Allows you to modify the details of the expense.
- Attachments: Opens a window to view or add documents or receipts related to the expense.
- Cancel: Removes the expense record from the list.
- Audit Log: Shows the history of changes made to the expense record.
- Create Invoice: Generates an Invoice for the expense to bill a Customer.
- Associate with Sales Order: Links the expense to a specific Sales Order.
- Expense Type: Lists the type of the expense (e.g., Parking, Fuel).
- Customer/Vendor & Sales Order: Displays the associated Customer or Vendor and the related Sales Order.
- Note: Displays any notes or comments added to the expense record.
- Request Date / Transaction Date: Shows the date the expense was requested and the actual transaction date.
- Status: Indicates the current stage of the expense. Statuses include Pending, Approved, Paid, Denied, and Canceled.
- Amount: Shows the monetary value or quantity of the expense.
- Update Status: Allows you to bulk update the status of selected expenses.
- Create Checks: Initiates the process to generate payments for selected expenses.
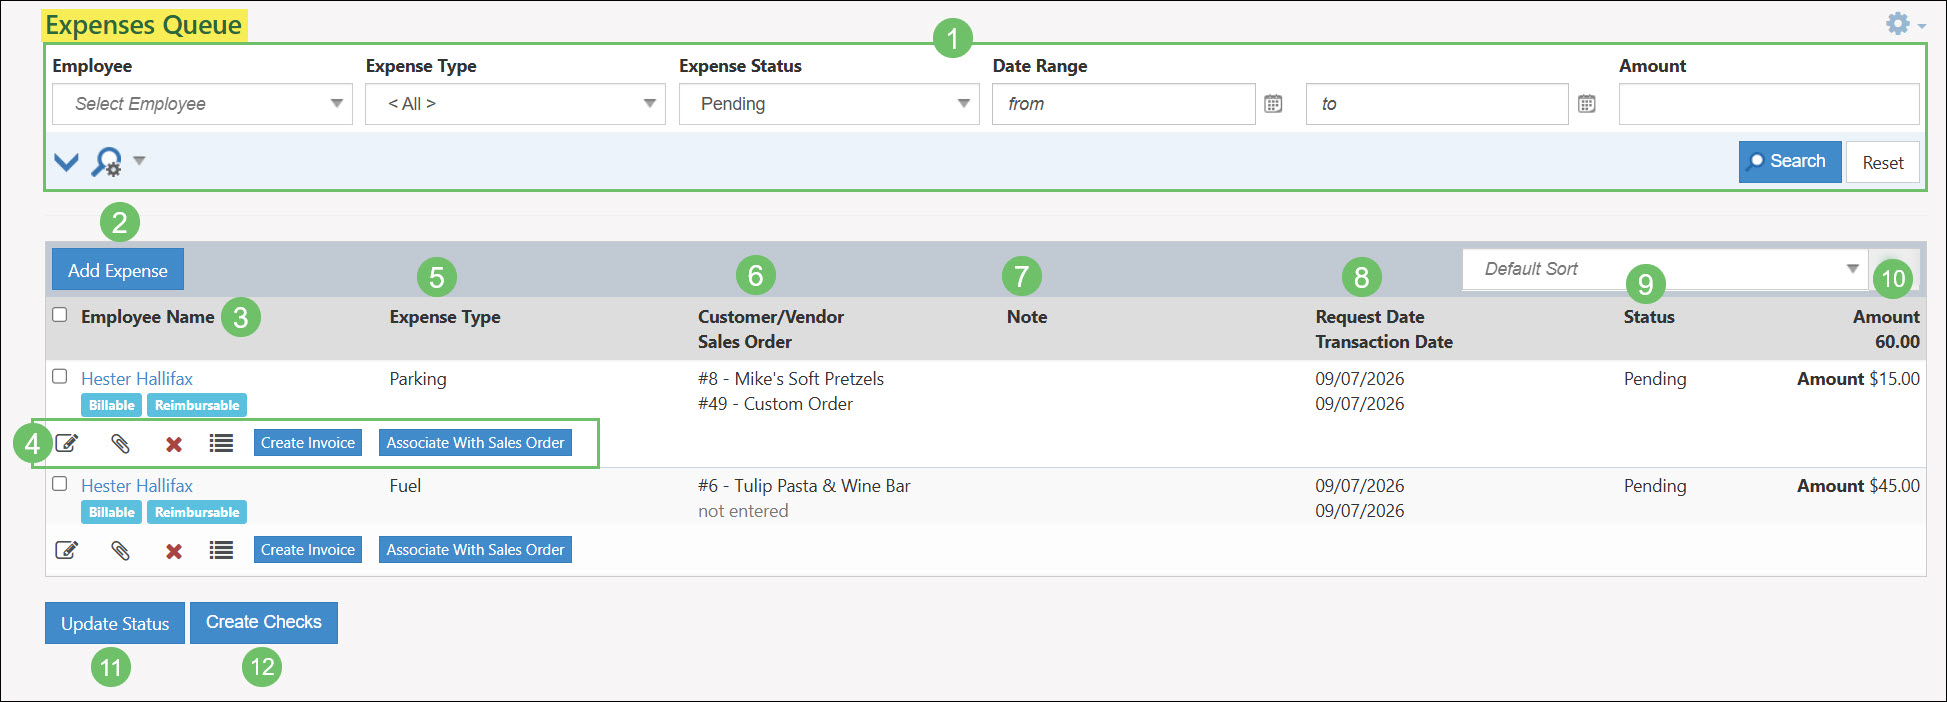
Example of the Expenses Queue
-
Expense Checks
Once an expense is approved, you can create an expense check using the Create Checks button at the bottom of the page. This will initiate a popup in which you can fill out information regarding the check, including the bank, payment date, and whether it is to be printed.
Below is a screenshot representing how the Create Checks popup appears.
- Date: Allows you to select the transaction date for the Check Reimbursement.
- Payment Account: Allows you to choose what payment account will be used to pay the Check. Once an account is chosen, the ending balance will be visible underneath the field so that you can ensure there are enough funds in the account to pay the check.
- To Be Printed: If this checkbox is toggled the check number will not appear and you can print the check using the Print Checks Queue.
- Vendor: Lists the Employee who will be receiving the Check Reimbursement.
- Pay Amount: The total amount that will be issued through the Check Reimbursement.
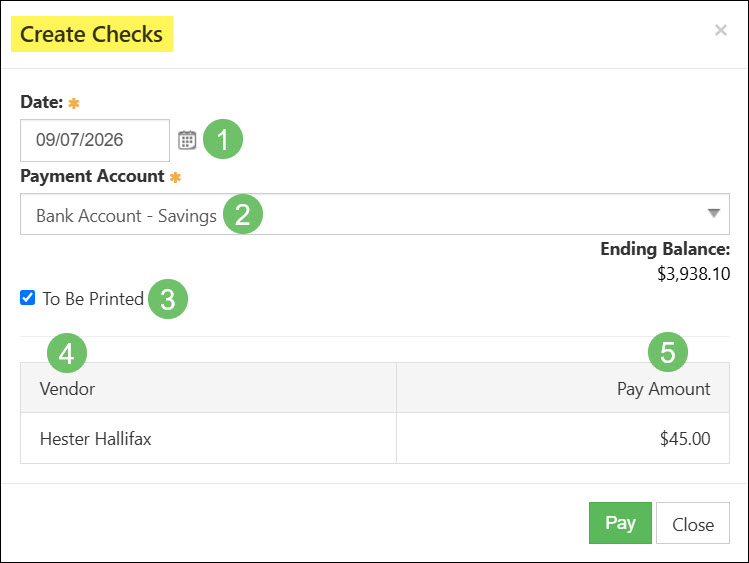
Example of Creating an Expense Check
-
Recap
With this Employee Expenses Guide we’ve explored the management of Employee expenses and their related Approval Queue process. We also explored the process for creating expense checks once Employee Expenses have been approved. The information provided in this guide should help you create and manage your Employee Expenses with ease using Striven.
Have a Question?
Ask the Striven Community
User-sourced how-to’s, feedback, and more!
FAQs
-
How can I restrict an Employee Expense Type to a specific individual or set of Employees?
When creating or editing your Expense Types, you can select to make the expense Available to All Employees, but you also have the option of selecting specific Employees individually or by Job Title for access to submit that particular Employee Expense Type.