


Tasks & Projects
Task Library & Groups
Support Guide
-
Overview
The Task Library and Task Groups are powerful tools designed to bring efficiency and consistency to your organization’s Task management process. The Task Library serves as a central repository for pre-defined, templated Tasks, incorporating essential details like the Task Type, Description, and Budget to minimize repetitive data entry and reduce errors. Building on this foundation, Task Groups allow you to bundle collections of these library Tasks, enabling them to be assigned simultaneously thereby streamlining workflow with just a few clicks. Additionally, the Task Import tool allows for the creation of multiple Tasks at once, further optimizing your workflow.
Read this guide if you are trying to:
✔ Utilize the Task Library to create Task templates.
✔ Assign Tasks to users in bulk with Task Groups.
✔ Create multiple Tasks at once with the Task Import tool.
-
Task Library
The Task Library is a central repository for pre-defined, templated Tasks, designed to streamline operations by incorporating vital information such as the Task Type, a detailed Task Description, an allocated Budget, and other relevant parameters. Its primary benefit lies in promoting efficiency and consistency, as users can significantly reduce the time and effort involved in creating new Tasks from scratch, especially when the same Task information is frequently used. By offering these functionalities, the Task Library effectively minimizes repetitive data entry, reduces the potential for errors, and ensures a uniform approach to Task management across an organization.
To view, add, or edit the Task Library, navigate to Tasks → Library.
Below is a screenshot illustrating how the Tasks Library list appears and a description of what can be accomplished there.
- Add: Navigates to the Add Task Library Item page in order to create a new Task in the Task Library.
- Task: Lists the Task Title that will appear on the Task when it is created from the Task Library. Clicking on the name listed here will allow you to make changes to the Task Library Item as needed.
- Task Type: Indicates the Task Type that will be set when the Task is created from the Task Library.
- Budget: Indicates the amount that will be automatically set on the Task for the Task Budget when it is created from the Task Library.
- Deactivate: Removes the Task from the Task Library and changes it to an Inactive status. The Status search filter can be used from the Tasks Library list in order to view and reactivate Task Library Items that have been previously deactivated.
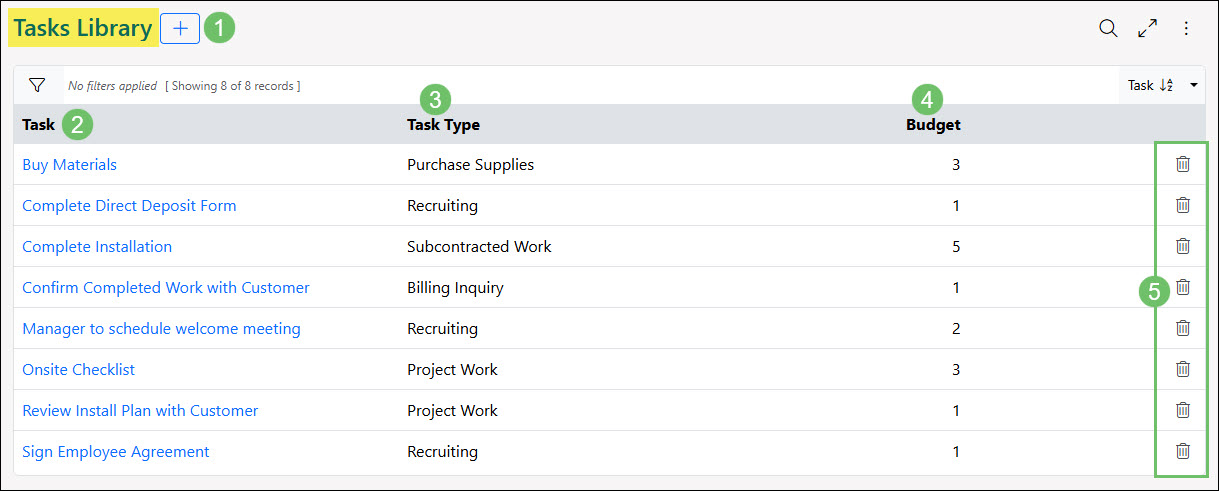
Example of the Task Library List

-
Add Task Library Item
From the Tasks Library list, you can select the Add button in order to create a new Task for the Task Library. When creating a new Task Library Item, important information can be set such as the Task Title, Task Description, and more.
Below is a screenshot illustrating how the Add Task Library Item page appears and a description of what can be accomplished there.
- Title: The text entered here will become the Task Title when a Task is created using the Task Library.
- Task Type: Determines what the Task Type will be set as when a Task is created using the Task Library.
- Budget: Determines what the Budget will be automatically set as when a Task is created from the Task Library.
- Attachments: Any attachments added here will automatically be copied over to the Task that is created using the Task Library.
- Description: Any text or details added into the Description will automatically populate in the Task when it is created from the Task Library.
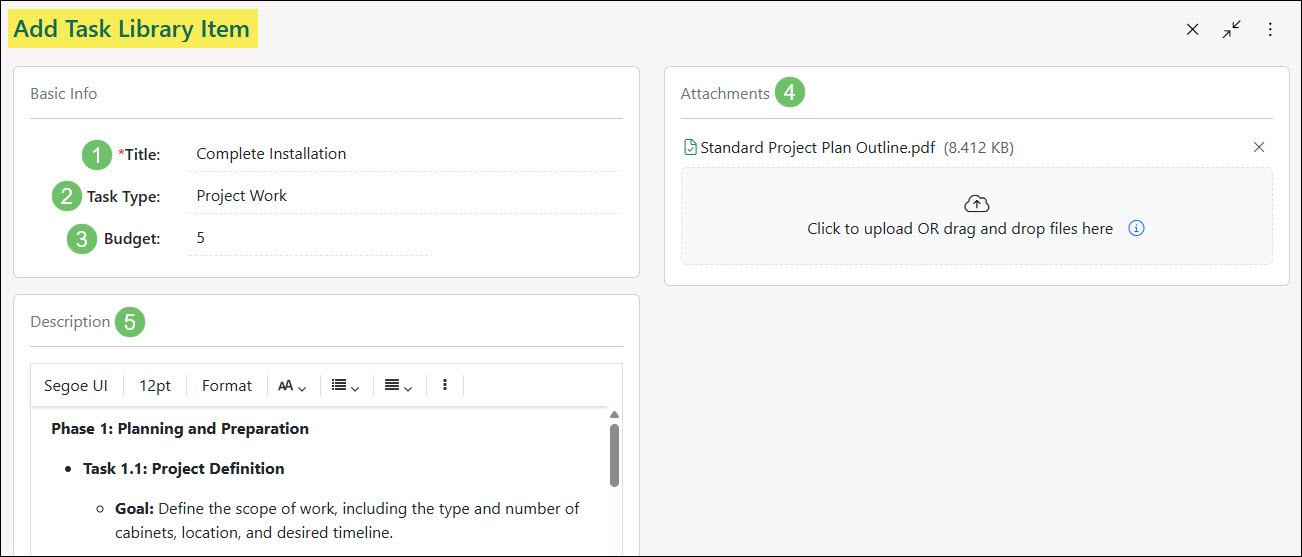
Example of the Add Task Library Item Page
-
Task Library Item Checklist Item
Once the Task Library Item has been saved, using the waffle menu will give the option to include Checklist Items that will automatically be created when a Task is created from the Task Library. Checklist Items that are available to select from this page can be configured by navigating to Company → Settings → Tasks → Tasks Setup → Checklist Items.
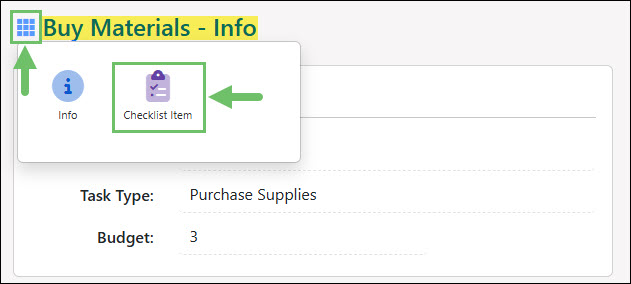
Example of the Checklist Item Option in a Task Library Item
-
Assigning Task Library Items
Tasks that are housed within the Tasks Library can be created and assigned to Employees through the Tasks list or through the use of Task Groups. To learn more about Task Groups, read the next section below.
To assign Tasks from the Task Library to Employees from the Tasks list navigate to Tasks → List. Once on the Tasks list click the down arrow located next to the Add Task icon at the top of the Tasks list and select the Create From Library option.
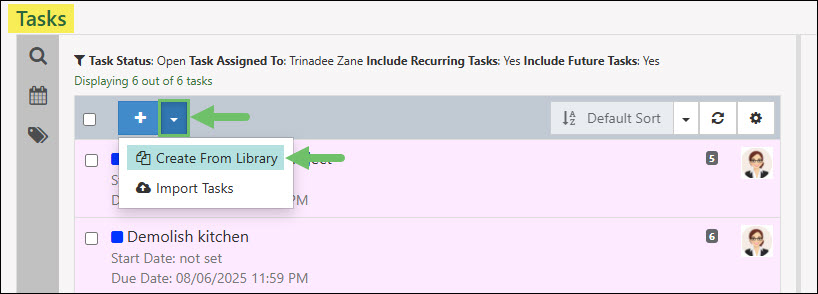
Example of the Create From Library Option on the Tasks List
Once you have selected the Create From Library option from the Tasks list, a Copy Task window will appear which will list the Tasks that are housed in the Tasks Library. You can search through the list of Tasks here by the Task Name or the Task Type. Once you have located the Task you would like to make a copy of, click the Select button located in the list.
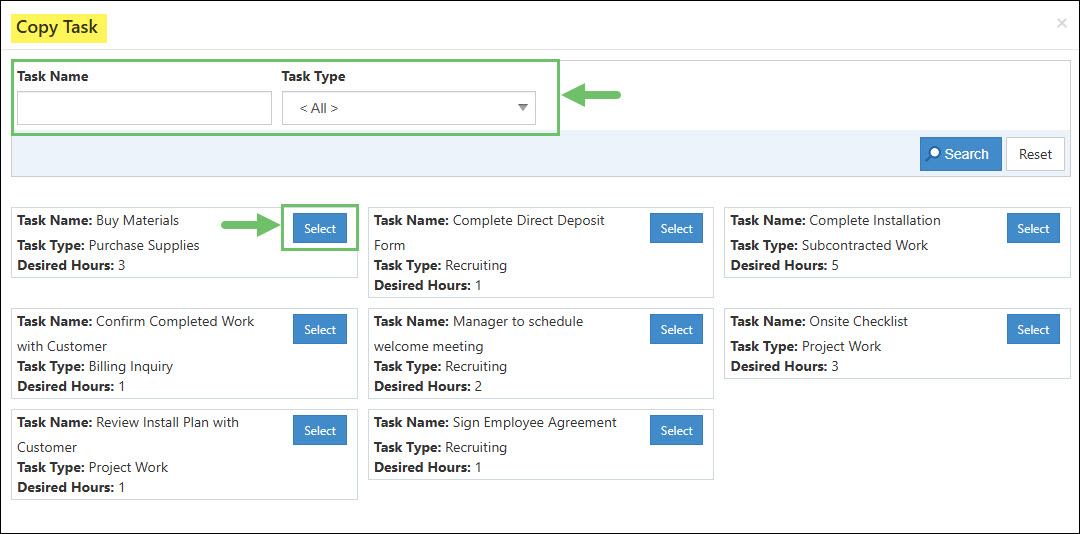
Example of the Copy Task Window
-
Task Groups
Task Groups are a collection of Tasks that can be assigned all at the same time and can be saved for later use. An example of using a Task Group is new Employee onboarding. It is common to have new Employees complete forms for taxes, direct deposit, Employment Agreements, etc. Tasks to complete these forms can be added to a Task Group so when a new Employee starts, it only takes a few clicks to assign them. Checklist Items, Budget Hours, links, and attachments can also be added to Tasks within a Task Group.
Tasks within Task Groups are housed within a Task Library. This makes it easy to add them to multiple Task Groups when needed.
To view, add, or edit Task Groups, navigate to Company → Settings → Tasks → Task Groups.
Below is a screenshot illustrating how the Task Groups list appears and a description of what can be accomplished there.
- Add: Navigates to the Add Task Group page which allows you to create a new Task Group.
- Name: Lists the name of the Task Group. The name typically will indicate the type of Tasks housed in the Task Group or the overall goal of the Task Group. Clicking on the Task Group name will open the Task Group Info page to make configuration changes as needed.
- # of Tasks: Indicates how many Tasks from the Task Library are included within the Task Group.
- Deactivate: Changes the status of the Task Group to Inactive. Using the Status search filter available from the Tasks Group list can be used to view previously deactivated Task Groups in order to reactivate as needed.
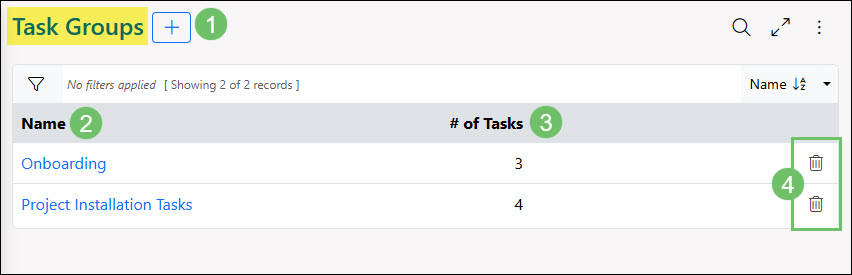
Example of the Task Groups List
-
Add Task Group
From the Task Groups list, you can select the Add button in order to create a new Task Group. When adding a new Task Group, you have the ability to name the Group, and configure what Task Library Items the Task Group includes.
Below is a screenshot illustrating how the Add Task Group page appears and a description of what can be accomplished there.
- Manage Task Library: Navigates to the Tasks Library list in order to configure Tasks within the Library without having to leave the Task Group being created or configured.
- Group Name: The name of the Task Group that will appear when assigning the Group to Employees. The name typically will indicate the type of Tasks housed in the Task Group or the overall goal of the Task Group.
- Select Task: A drop-down list of Tasks from the Task Library that can be selected and added to the Task Group.
- Name: Lists the name of the Task from the Task Library that has been added to the Task Group. Clicking on the Task Name will open the Task Library Info page to make changes as needed.
- Assigned To: Indicates who the Task will be assigned to when the Task Group is utilized. Options include the Selected Employee, the Employee’s Manager, or a Different Employee.
- Time Apart: Determines when the Start and Due Date on the Tasks will be set as once created. Only week days will be included in the calculations for the Start and Due Date.
- Rearrange: Changes the order in which the Tasks will be created and when the Start and Due Date will be set based on the Time Apart column.
- Actions: There are two actions available for Tasks Library items added to the Task Group including:
- Edit: Allows you to edit the Assigned To and the Days Apart for each Task included within the Group.
- Deactivate: Removes the Task from the Group.
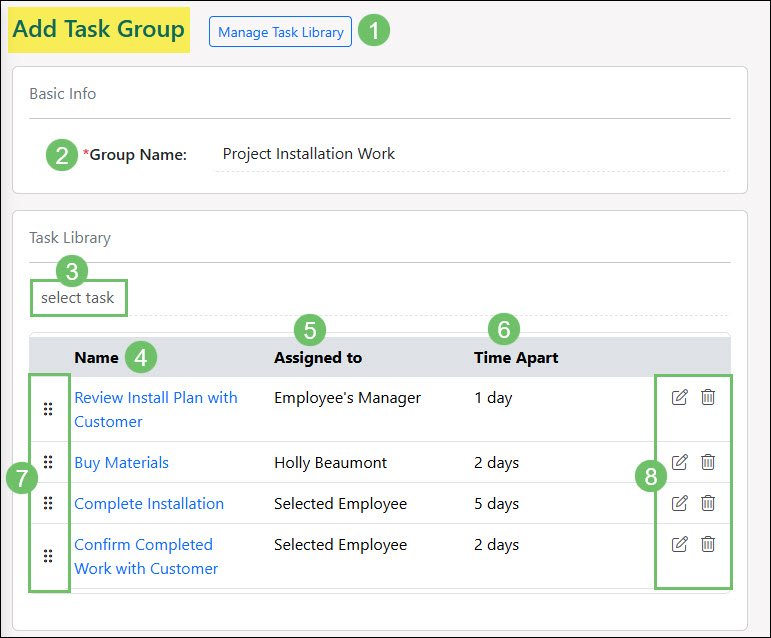
Example of Adding a Task Group
-
Assigning Task Groups
Task Groups can be assigned by navigating to Employees → List. Once on the Employees list the search filters can be used to narrow down which Employees you would like to assign the Task Group to. Once you have the selected Employees listed, the Create Tasks button can be used at the top of the page in order to select a Task Group you would like to create. For each Employee listed in the Employees list, a separate Task Group will be created.
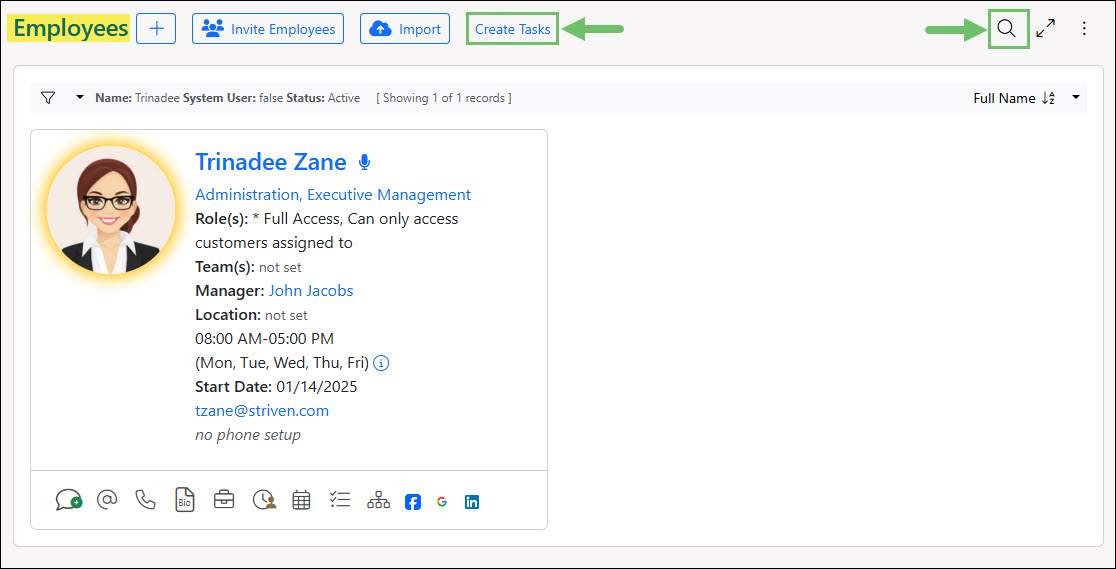
Example of the Create Tasks Button from the Employees List
Once you have selected the Create Tasks button, a Create Tasks window will appear which will allow you to select from the list of Task Groups. Once you have selected the Task Group that you would like to create, a field will appear to select a Customer/Vendor if the Tasks should be associated with an Account. Once ready to create the Tasks from the Task Group click the Save button.
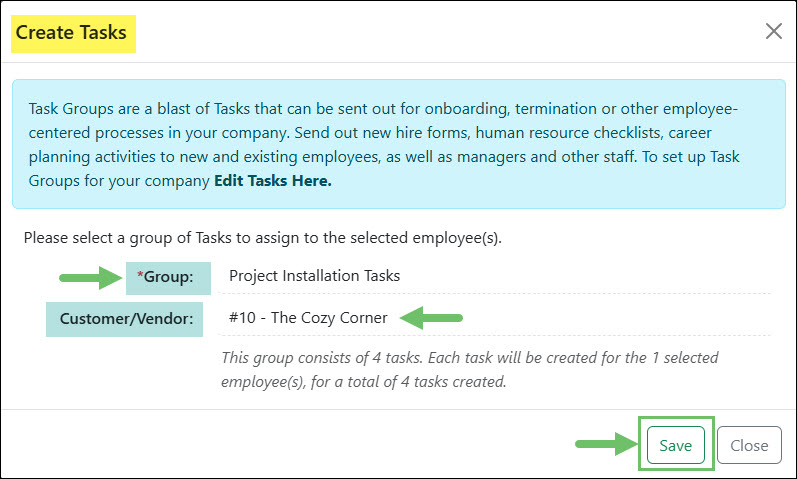
Example of the Create Tasks Window from the Employees List
The Tasks created from the Task Group will automatically set the information configured during the Task Group set up process. The Customer/Vendor selected when choosing the Task Group from the Employees list will also be selected for the Tasks that get created.
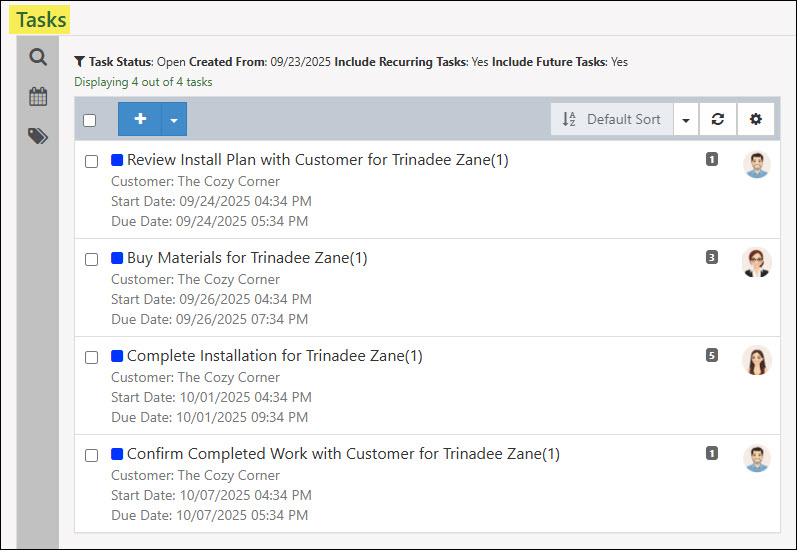
Example of Tasks Created from a Task Group
-
Importing Tasks
Tasks can be brought into Striven en masse by utilizing Striven’s Tasks Import. This can be done for large and small databases to bring in multiple Tasks at once.
- The Download Sample provides a spreadsheet with pre-filled column headers (listed on the mapping) to assist with entering data.
- The Mapping icon will initiate a popup detailing what goes into the import spreadsheet for successful importing.
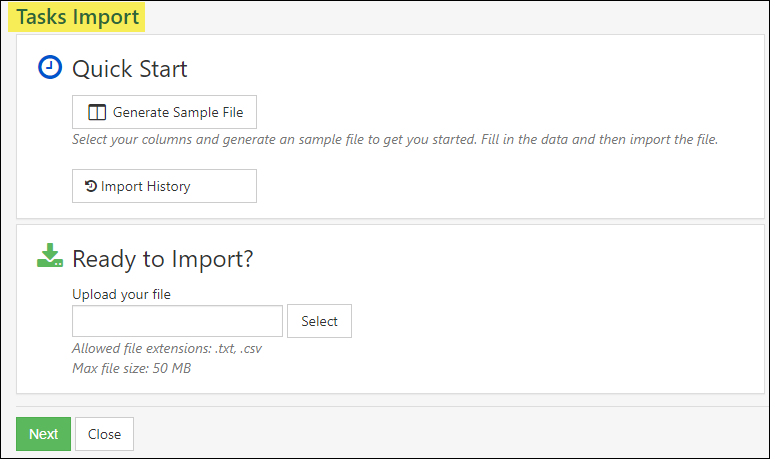
Example of Tasks Import Tool
-
Recap
With this guide, we’ve discussed how the Task Library and Task Groups can bring efficiency and consistency to your organization’s workflow. We have covered how the Task Library acts as a central repository for templated Tasks—saving essential details like Type, Description, and Budget—and how Task Groups allow you to bundle and assign these Tasks simultaneously with just a few clicks. Additionally, we’ve explored the Task Import tool, which enables you to create multiple Tasks at once to further optimize your process.
FAQs
-
I’d like to assign a Task Group to multiple Employees. What would the quickest way to accompplish this be?
Using the Employees List would be ideal for assigning a Task Group to more than one Employee at a time. Utilize the search filters on the Employees List to narrow results down to the Employees you wish to assign the Task Group to. Once you have completed this step, click the Create Tasks button and select the Task Group you wish to assign to the Employees in your search. This will simultaneously create Tasks for each Employee which will then notify them accordingly.