
Tasks & Projects
Task Navigation & Management
Support Guide
-
Overview
This guide explains how to navigate and manage daily Tasks. We cover the Task Dashboard, Task Lists, and the actions and fields available within the Task Info page. You will also learn how to streamline your work for internal and external clients using features like Email-To-Task, Task Approvals, and Task Signatures, as well as how to add attachments, checklists, and custom fields.
Read this guide if you are trying to:
✔ Learn how to navigate through the Task Dashboard, List, and Task Info page.
✔ Discover what actions and fields are available in the Task Info page.
✔ Understand how to use tools for Tasks such as Email-To-Task, Task Approvals, and Task Signatures.
-
Task Dashboard
The Task Dashboard is a fully-customizable page that allows you to add, track, manage, and report on Tasks within Striven. Widgets can be added, removed, and reconfigured using the Manage Widgets popup on the right-hand side of the Dashboard page. Below are some of the available widgets on the Task Dashboard page.
- Note: Any widgets available on the Task Dashboard page will also be available on the My Dashboard page. Also, all widgets can be renamed.
To access the Task Dashboard, the path is as follows:
Tasks → Dashboard
- Add Tasks: Use this widget for quick links to the Task queue, Tasks Dispatch, Workload Management, and Task Import.
- Efficiency: Shows a visual representation of Tasks started on time and/or Tasks not started on time along with average response time and resolution time. The Tasks can be filtered to show certain Task Types, Tasks for certain Customers, Tasks of a certain Priority, and Tasks assigned to particular Employees, Teams, and/or Pools. Date filters can also be used to narrow down which Tasks are used in the calculations. Response time is calculated based on the time between Task creation and when it was viewed by the first Employee or Team member it gets assigned to. Resolution time also takes business hours into account.
- Available Filters : Date periods, Task Types, Customers, Assigned to, Team, Priority, Pool
- My Tasks: Shows Tasks assigned to you and sorted by Due Date. Each Task listed is hyperlinked and will bring up that Task in another tab.
- Recent Tasks: Shows Tasks you’ve recently viewed. This includes Tasks not assigned to you.
- Tasks by Customer: Shows a filtered or unfiltered view of Open Tasks.
- Available Filters : Date periods, Task Types, Customers, Customer Assignment Category
- Tasks by Type: Displays a filtered or unfiltered view of Open Tasks.
- Available Filters : Date periods, Task Types, Customers, Customer Assignment Category
- Tasks – Custom Report: Shows results from Custom Reports created using the Report Builder and using the Tasks Dataset.
- Tasks – Happiness Rating: Allows you to review the Happiness Rating responses for a filtered or non-filtered set of Tasks.
- Available Filters : Date periods, Task Types, Customers, Assigned to, Team, Priority.
- Note: Happiness Rating will need to be turned on in your Company Settings in order to use this widget effectively.
- Available Filters : Date periods, Task Types, Customers, Assigned to, Team, Priority.
- Team Summary – Completed Tasks: Displays a filtered or unfiltered view of completed Tasks in Striven. Selecting the bars in the bar graph will take you to a filtered view of Tasks matching the selected filters.
- Available Filters : Date periods, Task Types, Customers, Assigned to, Team, Pool
- Team Summary – Open Tasks: Enables you to view a filtered or unfiltered view of Open Tasks in Striven. Selecting the bars in the bar graph will take you to a filtered view of Tasks matching the selected filters.
- Available Filters : Date periods, Task Types, Customers, Assigned to, Team, Pool
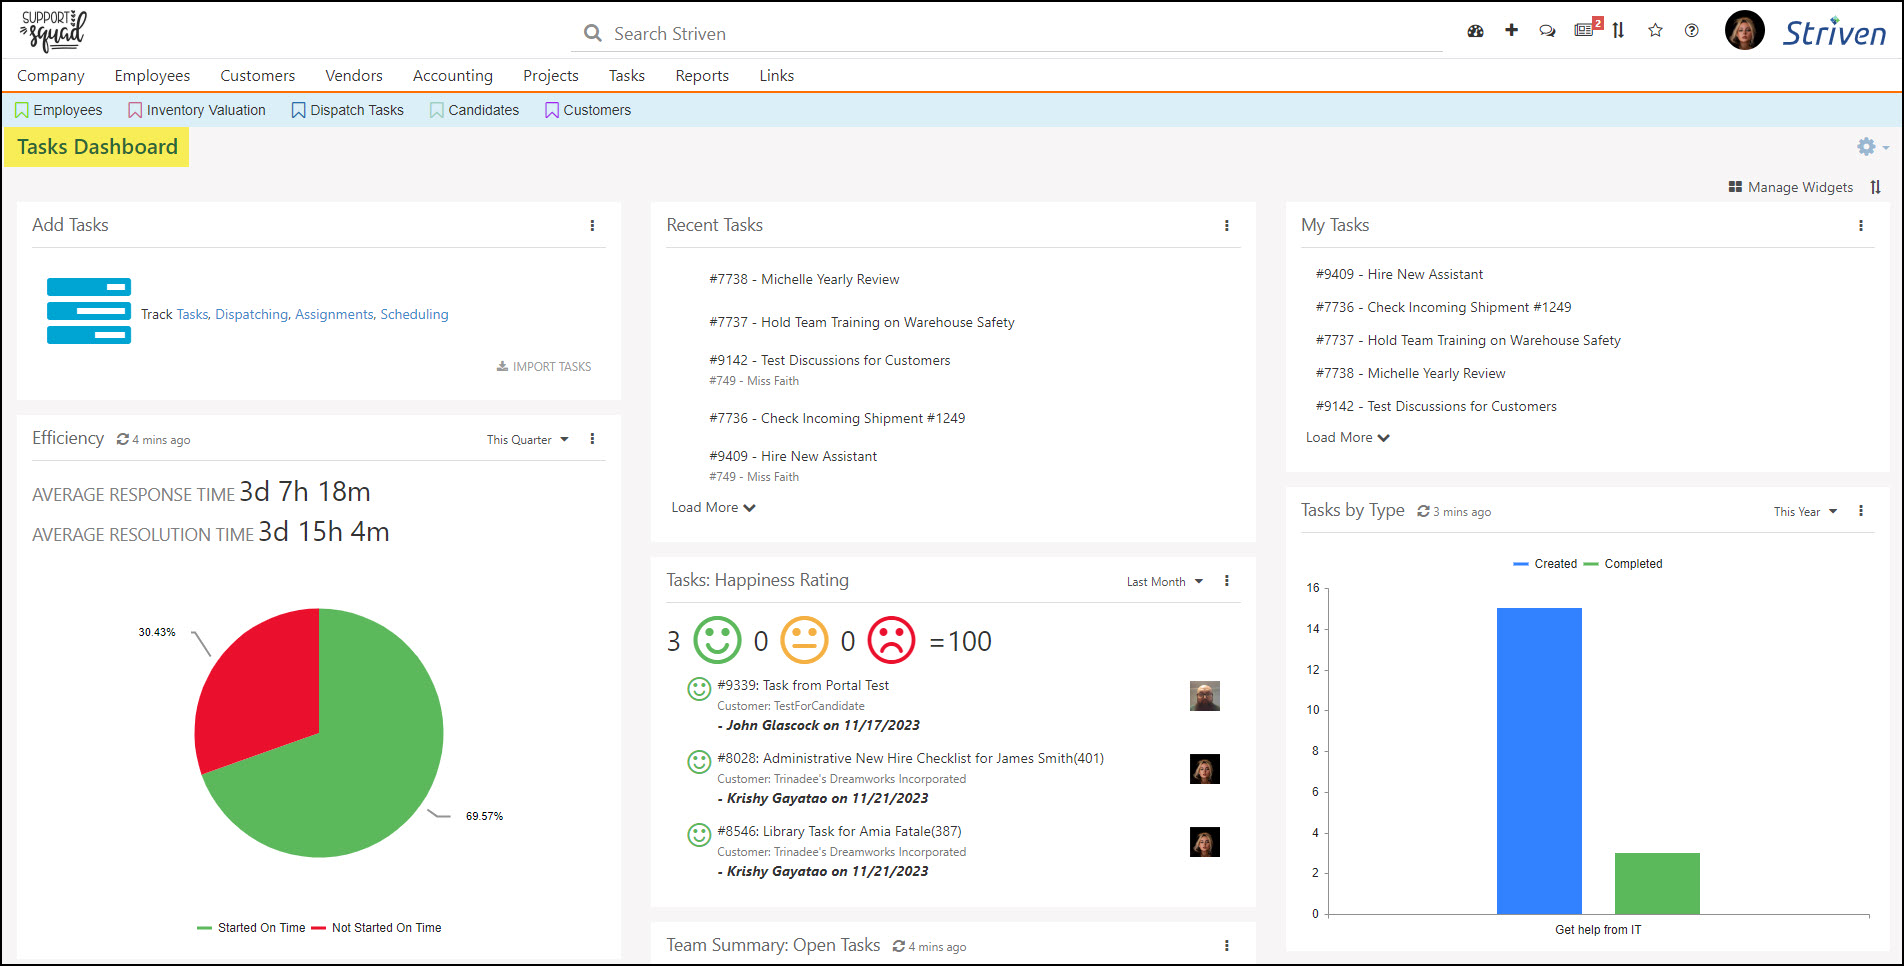
Example of a Configured Tasks Dashboard

-
Task List
When you are ready to start viewing or creating Tasks, you can utilize the Task List to begin organizing your work, assign Tasks to other Employees, and begin collaborating with your Customers as you complete requests for them. The Task List has a lot of functionality to allow users to search for Tasks, view Tasks due that day/week, create and assign Labels, and manage Tasks. You can also add new Tasks from the Task List. Below is a screenshot demonstrating how the Task List appears and a list describing what you can accomplish here. To view the Task List, use the following steps below:
Tasks → List
- Search: Allows you to search for specific Tasks. Search filters include: Due Date, Assignee, Customer, Task Type, Followed by Me, and many more to narrow down the search results.
- Due Date: Displays Due Date buckets to toggle on and off to show Tasks that are due within the selected date. There are two default ranges, including Due Today and Due Tomorrow. Custom buckets can be added by typing in a number in the due within ___ days and clicking enter. Selecting a day on the calendar will add that specific date to the list as well.
- Note: Clicking on a date or range from this list will act as a filter and will display results in the list to the right. If Tasks are grouped by the Due Date (based on your Task Display Settings – Group Tasks by Due Date), buckets are separated on the Task List, as well as shown by the number 2 in the example image.
- Labels: Allows you to view and add Labels to be assigned to Tasks. Labels will appear on Tasks once the Label has been applied, as shown by the number 3 in the example image. Task Labels are discussed in further detail in the Task Labels section below.
- Add Task: The blue plus ( + ) button will allow you to add new Tasks. Clicking this icon will open a Create section which will allow you to select the type, assignment, and privacy settings of the Task. Typing into the field labeled Enter Title For New Task and hitting the enter key on your keyboard will result in the creation of the Task. Clicking the down arrow will display additional options for creating Tasks from the library or using the Tasks Import tool.
- Default Sort: Enables you to set the sorting order for Tasks in the Task List. Options include Task Priority, Start Date, Due Date, Created Date, Last Modified, and Last Modified by Me.
- Refresh List: Refreshes the Task List to show the most current data based on the filters selected. This is useful after changes are made to Tasks displayed in the List so you’re looking at current results.
- Settings: There are 2 settings areas on this popup:
- Task Settings: Allows you to set a Default Task Type, set the default task assignment to yourself, or mark tasks you create as private by default.
- Task List Settings: Enables you to Group Tasks by Due Date, as well as determine the Display Field options to show on the Task List. Display Field options include:
- Task Number
- Customer
- Type
- Start Date
- Due Date
- Due In
- Created Date
- Last Modified Date
- Project
- Project Location
- Task Info: After clicking on the Task, the Task Info will appear on the right side of the screen for you to manage Tasks more efficiently.
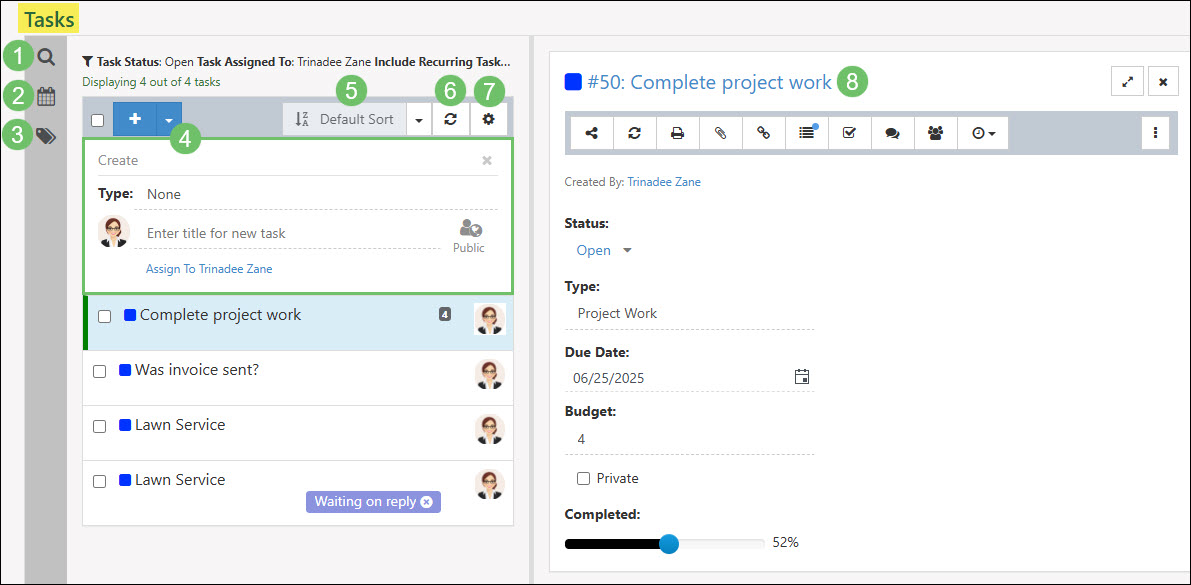
Example of the Tasks List
-
Task Labels
Striven provides the ability to create and apply Task Labels to Tasks to allow for better organization of your Tasks, easy display of actions needed for a Task, and clearer identification of the type of work related to the Task.
For example, you can create Task Labels that identify if you’re waiting for clarification or a response from a customer or colleague before continuing work on a Task. If you use a process for completing a Task, you can create and use Labels to signal which step the Task is currently on and then switch to another Label when the step changes. You can even create Labels to more obviously identify details about the Task, such as the Customer or Employee assigned, a timeframe or deadline for the Task, or in order to group similar Tasks together.
-
Task Label Visibility Settings
There are multiple options when it comes to Task Label visibility, as demonstrated in the example image provided.
- Blue Globe icon: Identifies that the Label is visible on the Portal.
- Note: Only Public Labels can be made visible in the Portal.
- Gray Globe icon: Identifies that the Label is not visible on the Portal. You may make the Label visible on the Portal by clicking on the globe, which will turn it from gray to blue.
- Lock icon: Identifies the Label as Private. If there is no Lock, the Label is Public and can be used and viewed by other Employees or made visible on the Portal.
- New Label field: Enter a new Label name and click Save to create a new Task Label. You can also click on the colored block to select the desired color for your new Label.
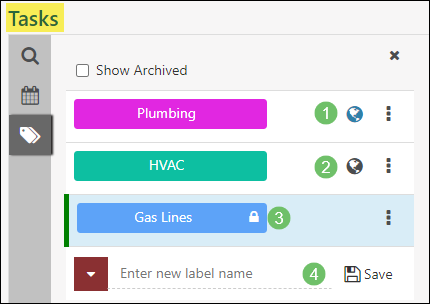
Example of Task Label Options
- Blue Globe icon: Identifies that the Label is visible on the Portal.
-
Public Labels vs. Private Labels
There are 2 kinds of Task Labels: Public Labels, which all Striven users in your system can see and utilize, and Private Labels, which only the Label creator can see, use, or edit and which cannot be set as visible in the Portal. Private Labels are identified with a Lock icon next to the Label name in the Task Label list on the Task List page.
When Task Labels are initially created they are Private and display with the Lock icon. To make a Task Label Public, you will need to have the “Public Task Labels – Add/Edit” permission included in your User Role. With that permission, you can click on the kebab menu on the Label from the Labels List and select the Make Public option.
- Note: Once a Label has been made Public, it cannot be switched back to Private.
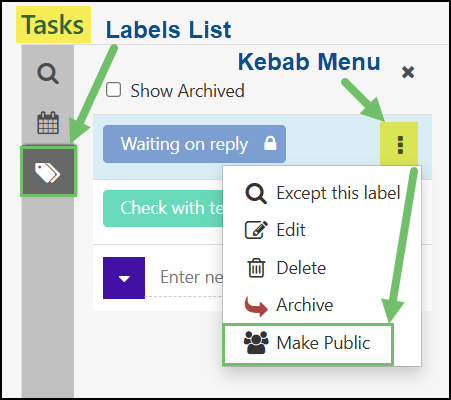
Example of Making a Task Label Public
-
Except This Label
The kebab menu, located next to each Label, provides an option called Except This Label. This functionality allows users to filter and display only the Tasks that do not have the selected Label. This can be particularly useful in scenarios where, for instance, a user wants to exclude Tasks that are labeled as Waiting on Reply, effectively filtering them out of the current view. By using this feature, users can refine their Task list and focus on those that require immediate attention or meet specific criteria, improving efficiency and organization.
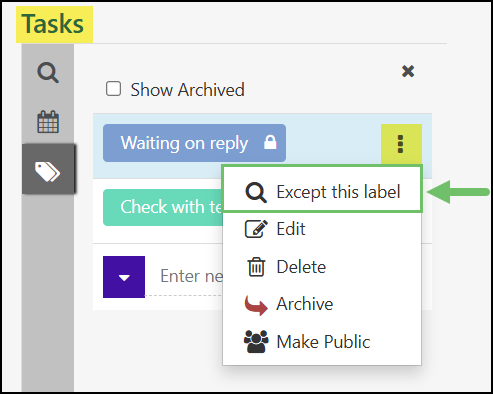
Example of the Except This Label Option on Task Labels
Other kebab menu options for Task Labels include the following:
- Edit: Provides the opportunity to edit the Label Name or display color.
- Delete: Deletes unwanted Labels permanently.
- Archive: Hides the Label from the Label List and puts it to an Archived status in the event you wish to use the Label in the future. Clicking the Show Archived button will display a list of your archived Labels so you can reactivate them as desired.
- Note: Archived Labels will continue to display on Tasks they were applied to before they were archived, whereas Deleted Labels will disappear completely.
-
Applying Task Labels
Now that you know how to create your Task Labels, this guide will explain how to apply them. There are currently 2 methods for applying Labels to Tasks, which will be reviewed in detail below.
Drag/Drop Method
Navigate to the Task List and you will see the Left-side Menu Bar which includes the Task Search, Task Due Dates, and Task Labels options. From the Task Labels list, you will be able to apply Labels to Tasks by clicking on the desired Task and dragging/dropping it onto the Label you wish to apply to it. You can tell when to drop the Task as the Label will turn green as you hover over it with the Task. To apply multiple Labels to a Task, drag/drop the Task to each Label you want to be displayed on the Task.

Example of Drag/Drop Method for Applying Task Labels
Kebab Menu Method
Alternatively, you can apply a Task Label from the Task kebab menu found on the right side of the Task window. Selecting the Add Label option will trigger a popup window supplying the available Task Labels. Click on the desired Label to apply it to the Task. Repeat this process to add multiple Labels as needed.
Example of Selecting Task Labels From Kebab Menu
- Note: To remove Labels from Tasks, simply click on the X on the Label.
-
Filtering Tasks by Labels
Aside from the visual identification assistance Task Labels provide, you can also utilize them to filter your Task List. From your Task List, click on a Task Label to filter your list and display only Tasks with that Label applied to it. You can select multiple Label filters to narrow down your results more specifically or remove Label filters by clicking on the X next to the Label Filter on the top of the Task List.
Example of Filtering Tasks Using Labels
-
Task Actions
After you create a Task, you can configure what information is entered and who is assigned to work on the Task. By utilizing Task Types, you can unlock different functionality and associate different entities to accomplish your goals. Tasks can be added from the Task List, importing, Email-to-Task, from a Project, from a Sales Order, from an Appointment, or from the Quick Add menu. Below is a screenshot showing how a Task appears and a list describing what you can accomplish here.
- Share: Allows you to share the Task with other users. The link provided is an internal link and will require the user to log in to view the Task.
- Refresh: Refreshes the Task to load the most current version of the Task for users to work off of. This can be very useful if more than one person is working on a Task as they can be sure to have the most up-to-date version as they complete their work.
- Print: Allows you to create a printable PDF format for your Task. If you have multiple Task Print formats, you can select the appropriate one from a drop-down list.
- Attachments: Initiates a popup that will display attachments and allow you to upload new attachments if desired. If your Task is visible in the Portal based on the type, these attachments will be available to the Customer as well.
- Linked To: Displays any entities that are linked to the Task you are viewing, such as recurring or duplicate Tasks.
- Audit Log: Initiates a popup that will display changes that have been made to the Task. Each change is audited to note who made the change and when.
- Check List: Initiates a popup (see the Adding Checklist Items to a Task section below) in which you can view, use, or add Checklist Items. If Checklist Items are present, they must be completed before marking the Task Done. Checklist Items may be printed as well.
- Discussions: Drops you down to the Discussions section of the Task towards the bottom of the page. Here you can take notes or start a Discussion to collaborate on the Task. There is also the option to tag someone not assigned to the Task to the Discussion for feedback or relevant information to the Task. This can be done by either adding them as a participant to a new Discussion thread, or by typing the “@” symbol before their name in the Discussion message window.
- Recent Orders and Tasks: If the Customer has had recent Orders and Tasks, these will be listed here. This will allow you to quickly view any recent work without having to navigate away from the Task Info page.
- View Log: Initiates a popup that displays the users who have viewed the Task. Both the most recently viewed and the most frequently viewed will both be available. Users will not see themselves represented in the View Log.
- Time Options: Allows you to clock in for the task or create a Time Entry from the Task for hours worked to complete the Task. Information such as the Task, Customer, Sales Order and more will populate automatically into the Time Entry for convenience. When in a Project, this setting may be located under the options menu in a Task.
- Assignee Availability: Opens the View Assignee Availability popup which allows you to assign or reassign the Task to the best available Employee based on their Calendar and Task Availability. To learn more about this feature, review the Task Availability section further below in this guide.
- Additional Options: By clicking on the kebab menu the following additional options are available from a Task:
- Duplicate Task: Copies the Task while carrying over the information into a new Task. Duplicate Tasks will be linked to each other to easily navigate to and from the copy and original.
- Set as Recurring Task: Sets a recurrence based on a daily, weekly, or monthly occurrence you set. Recurring Tasks will be linked to each other to easily navigate to and from the copy and original. Entering lead time will generate Tasks ahead of schedule to be created.
- Create Opportunity: Allows you to create an Opportunity from the Task. Opportunities created this way will link the Task and Opportunity to each other.
- Email Assignees: Allows you to send an email to the Assigned Employee(s).
- Follow/Unfollow Task: Displays whether or not you are currently following the Task. Toggle this option on (Follow) if you would like to receive Task Update emails, or off (Unfollow) to discontinue receiving Task Update emails. By default, Tasks assigned to you will send update emails.
- Add Label: Triggers a popup of the available Task Labels to choose from to associate to the Task.
- Copy Portal Link: Copies a Portal Task link to your clipboard to paste and share with users with Portal access to view the Task in the Customer/Vendor Portal.
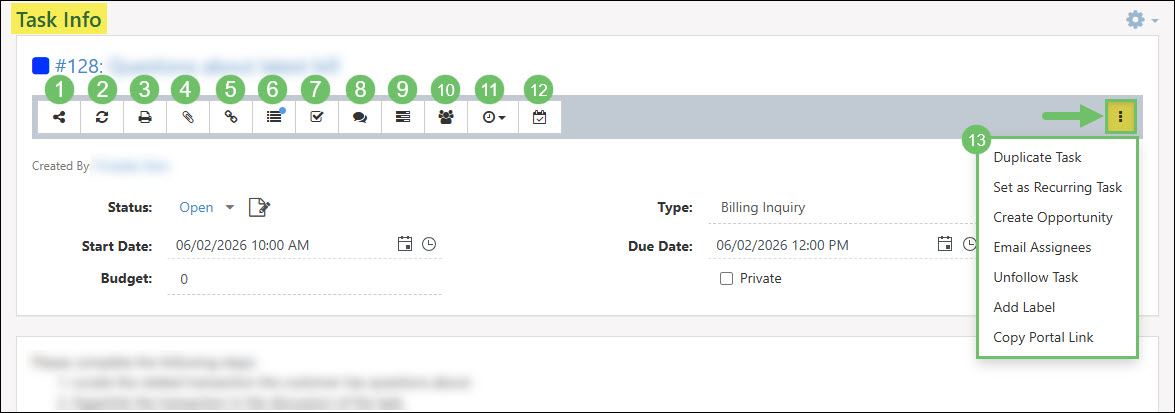
Example of the Task Actions Available
-
Task Linked To
Tasks in Striven can be linked to Opportunities, Purchase Orders, and other Tasks.
The first option to create this relationship is to create an Opportunity or duplicate a Task from the Actions Menu on a Task which will automatically create a relationship between the two. Entities linked to Tasks using this option will not be able to be deleted and will remain related to one another.
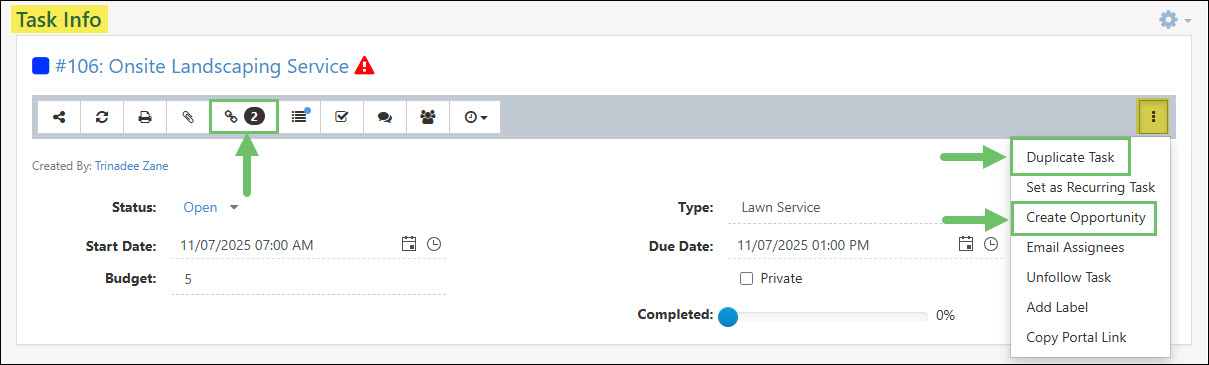
Example of Relating Entities to Tasks from the Actions Menu
The second option is to manually link an Opportunity, Purchase Order, or another Task to the Task by clicking on the Linked To button at the top of the Task and selecting the Add button to choose what entity you would like to manually link to the Task. Entities linked to the Task using this method will allow the user to remove the relationship by using the Delete icon.
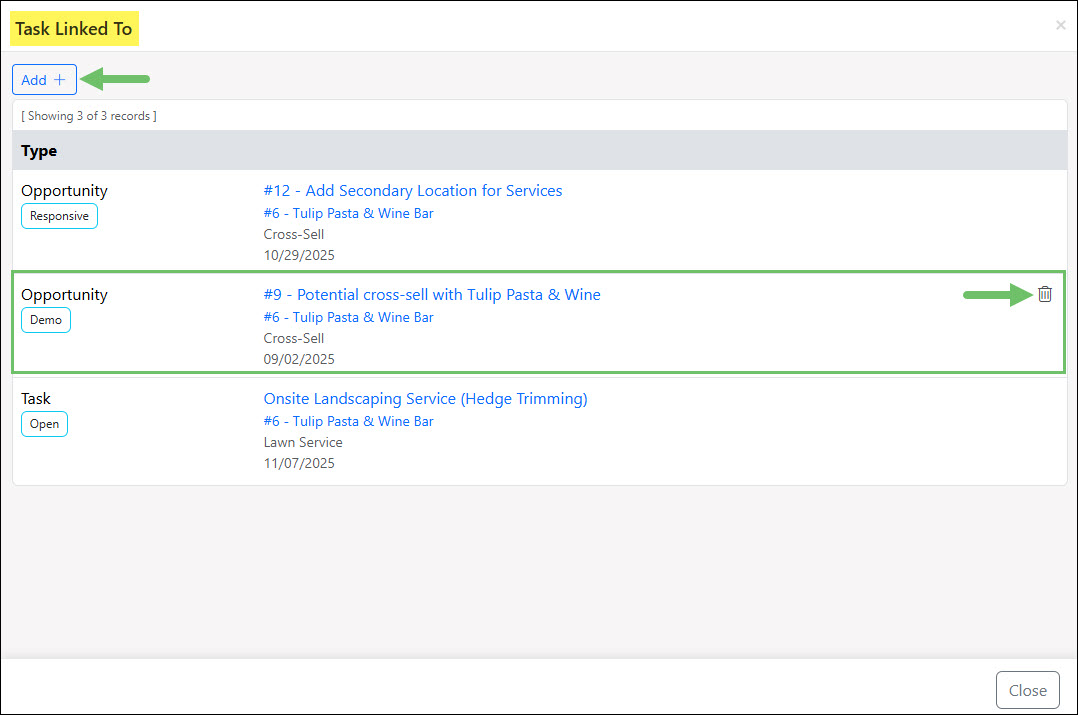
Example of a Manually Related Entity to a Task
Below is a screenshot illustrating how the Task Linked To window appears and a description of what can be accomplished there.
- Add: Allows you to manually add an entity to be linked to the Task. Entities that can be manually linked to a Task include an Opportunity, Purchase Order, or another Task.
- Type: Lists the entity that is related to the Task with the current status underneath. Entities that can be linked to a Task include an Opportunity, Purchase Order, or another Task.
- Linked Entity: Lists the name and number if applicable for the linked entity. Underneath the linked entity will include additional information regarding the entity. Clicking on the hyperlink listed here will open the related entity to view more information.
- Delete: Allows you to remove a relationship between the entity and the Task. The Delete icon will only be listed for entities that were manually related to the Task through the Add button.
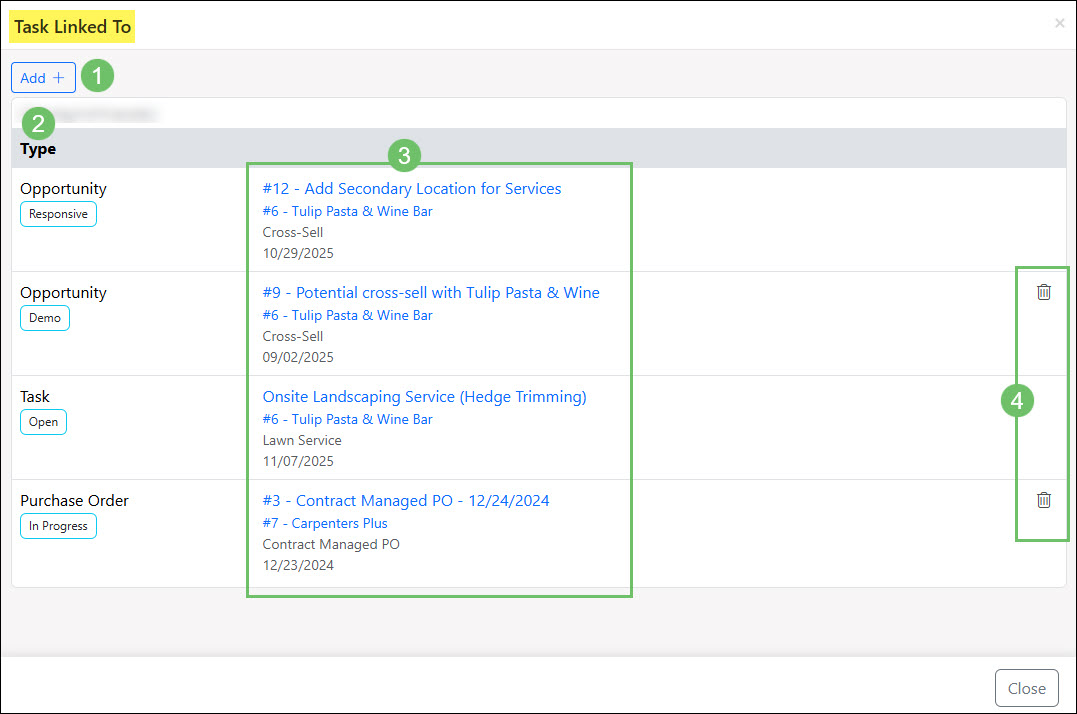
Example of the Information and Actions Available in the Task Linked To Window
Below is a screenshot illustrating how the Add option in the Task Linked To window appears and a description of what can be accomplished there.
- Relate To: A drop-down menu which lists the entities that can be related to the Task which includes an Opportunity, Purchase Order, or another Task.
- Entity: A search field that will search for the entity being related to the Task based on the name or number.
- Entity URL: An additional option to add a related entity is to add in the direct URL without having to use the search option.
- Show Inactive: Will adjust the results to include inactive results to be selectable. By default, only entities in an Active status will be listed.
- Results: Lists the search results based on either the Entity search or the Entity URL search options from above. Results listed can be multi-selected to include as linked to the Task before using the Save button.
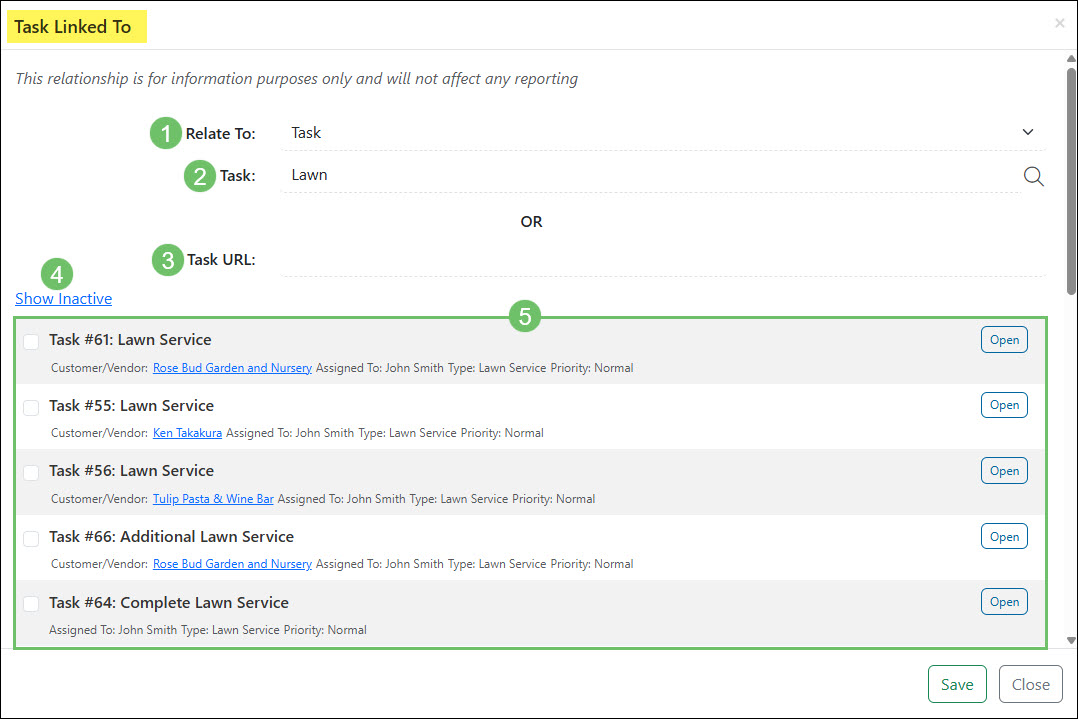
Example of the Actions and Information Available in the Add Option for the Task Linked To Window
-
Task Fields
Users can also manage Task information including adding Assignees, associating Customers, changing Due Dates, and more. Below is a screenshot illustrating how the top section of a Task appears and a list describing what you can configure here.
- Task Info: Displays information about the Task that has been enabled by the selected Task Type. Information here includes the following:
- Created By: Displays the Employee or Contact who created the Task. Clicking on the name of the Created By will open the Employee Information Card or the Contact Information Card for more information.
- Status: Displays where the Task stands. Statuses include Open, On Hold, Done, and Canceled. If Approval Signatures have been enabled at the Task Type level, the Task Signature icon will appear here as well.
- Start Date: Allows you to choose when the Task starts and can include time as well if enabled for the Task Type chosen.
- Budget: Allows you to enter how long the Task should take to complete.
- Due Date: Allows you to choose when the Task is due.
- Completed: Provides a visual estimation of how close to completion the Task is. This option is available after a Budget is entered.
- Task Type: The type of Task can be selected from the drop-down menu. Each Task Type will have its own functionality depending on what is configured, as discussed above in the Tasks Type section.
- Note: When changing a Task Type, a popup will appear if there have been default options set for the Task Type. You can choose to include those default values or disregard them when changing the Task Type.
- Related Info: Allows you to associated entities to the Task including:
- Customer: The Customer for which the work is being done.
- Location: The Customer Location where the work is being done. This field may or may not appear depending on the Task Type’s configuration.
- Order: The Sales Order which the Task is associated with. This field may or may not appear depending on how the Task Type has been configured.
- Project: The Project the Task is associated with. Choosing a Project here will add the Task to the selected Project. How the Task Type has been set up will determine if you can select a Project from this field.
- Milestone: The Milestone the Task is associated with in the Project that has been selected. This field may not appear if it is not enabled within the Task Type.
- Requested By: The Contact or Employee who requested the work to be completed. This field will only be available on the Task if the Task Type selected has the field enabled.
- Assignees: Added here using the drop-down menu to select Employees, Customer Contacts, or Pools to complete work on a Task. The Assignee will have a Contact label denoting that they are a Customer Contact. If Teams are available for Task Assignments, you can assign Teams here as well. You can reassign using the Reassign icon, which will unassign the original Assignee and assign a new Employee/Contact/Pool, or you can add an Assignee to work with other Assignee(s). If the Task Type is visible in the Portal, the Customer will be able to view the Task and participate in Discussions right from the Portal.
- Assets: Allows you to add a Customer’s Asset to be associated with the Task after associating a Customer to the Task. This is a very useful way to keep track of what equipment is being worked on if you track your Customer’s Assets. The drop-down list will display the Asset’s status by the Asset Name.
- Skillsets: Associates specific Employee Skillsets that are needed to complete the work required for the Task. If Skillsets have been selected on the Task Type, they will populate in this section. Once the Task is created, this list can be updated as needed based on Skillsets saved within the system. Learn more about Employee Skillsets by reviewing the My Profile – Skills section of the My Profile Guide.
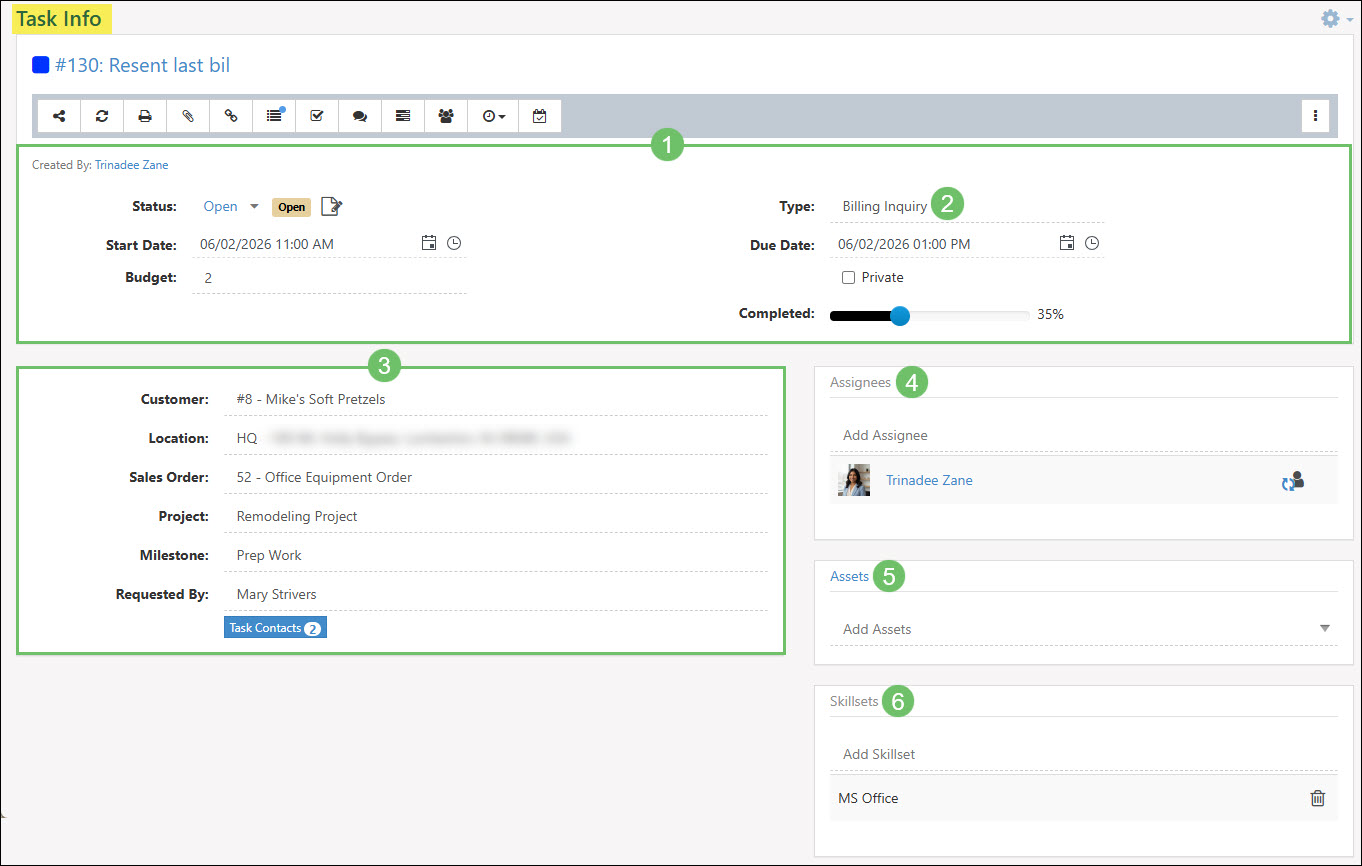
Example of the Task Info Fields
When hovering over certain fields in the Related Info section (#3 in the image above), you may see additional options within a popup. For example:
Customer Info
When you hover over the Customer Info, the following options popup:
- View Customer: Allows you to view the Customer’s Dashboard in a separate window.
- Assignments: Displays a popup with all Assignments related to that Customer.
- Quick-Add: Provides the option to swiftly add a Customer to your Striven system so you can designate it as the Customer the Task is related to.
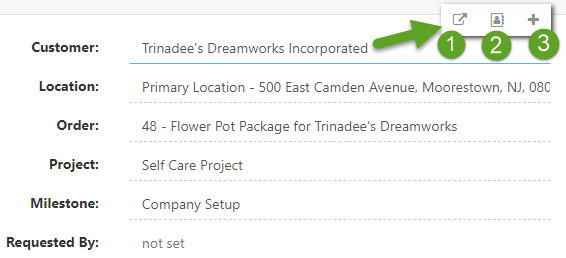
Example of Customer Hover Options
Location Info
When hovering over the Location Info, you see the following options:
- View Location: Opens the Location Info for the Task in a new window.
- View in Google Maps: Opens the Location in Google Maps in another window.
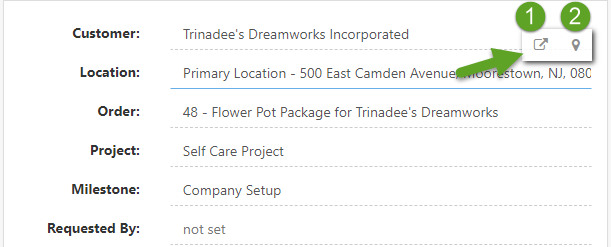
Example of Location Hover Options
Order Info
When hovering over the Order Info, the following options appear:
- View Order: Opens the Order associated with the Task in a new window.
- Assignments: Opens related Customer Assignments.
- Create Order: Opens the Add Sales Order page in a new window, which will relate the Order to the Task.
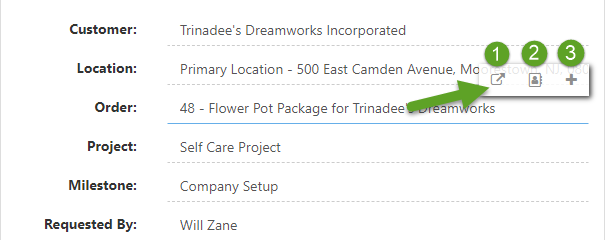
Example of Order Hover Options
Project Info
When hovering over the Project Info, the following options will appear:
- View Project: Opens the Project the Task is related to in a new window.
- Assignments: Opens a popup window displaying the participants assigned to work on the Task.
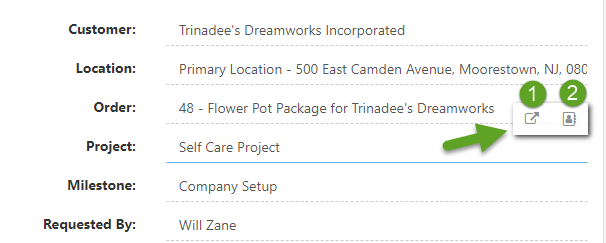
Example of Project Hover Options
Requested By Info
When you hover over the Requested By information, the following options will appear:
- View Requested By: Opens a new window displaying the Contact info for the person who requested the Task.
- Send Email: Opens an email message window to send to the Contact assigned as the Requested By Contact.
- Add Contact: Opens a Quick-Add window to add a Contact to the Task, or gives the option to associate to an existing Contact already in your Striven System.
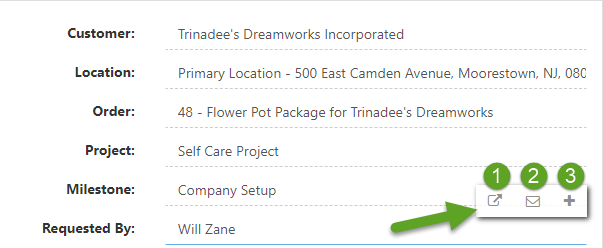
Example of Requested By Hover Options
- Task Info: Displays information about the Task that has been enabled by the selected Task Type. Information here includes the following:
-
Task Description
Task Descriptions can contain links, attachments, and text related to the Task you have created. The Description can continue to house information up to 1 MB.
If the Description size exceeds 1 MB for Tasks created within Striven, a red Error Message will appear, advising you that the Description size exceeds the 1 MB limit.
Your description will not be saved when the limit is exceeded. This size restriction can also be found when completing Imports, creating Tasks using Public API, and when creating Tasks through the Customer/Vendor Portal.
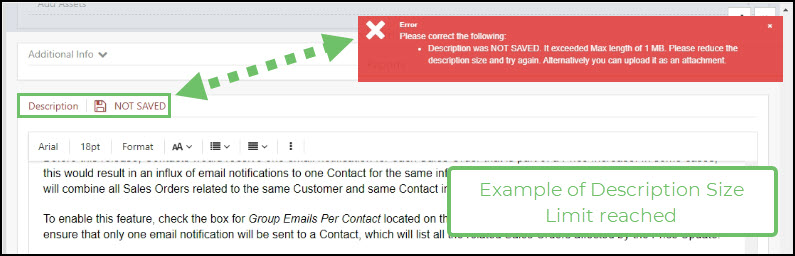
Example of the Task Description Size Limit Being Reached
-
Email to Task
If the Task is created using the Email to Task feature and the email content exceeds 1 MB, the body of the email which typically displays as the description, will be transcribed into a PDF document. This document is then automatically added to the Task attachments to be reviewed.
Tasks created in this manner will have an additional section added to the Task Info page which lists the Source and Email From along with a View Email button to view the original email that was used to create the Task.
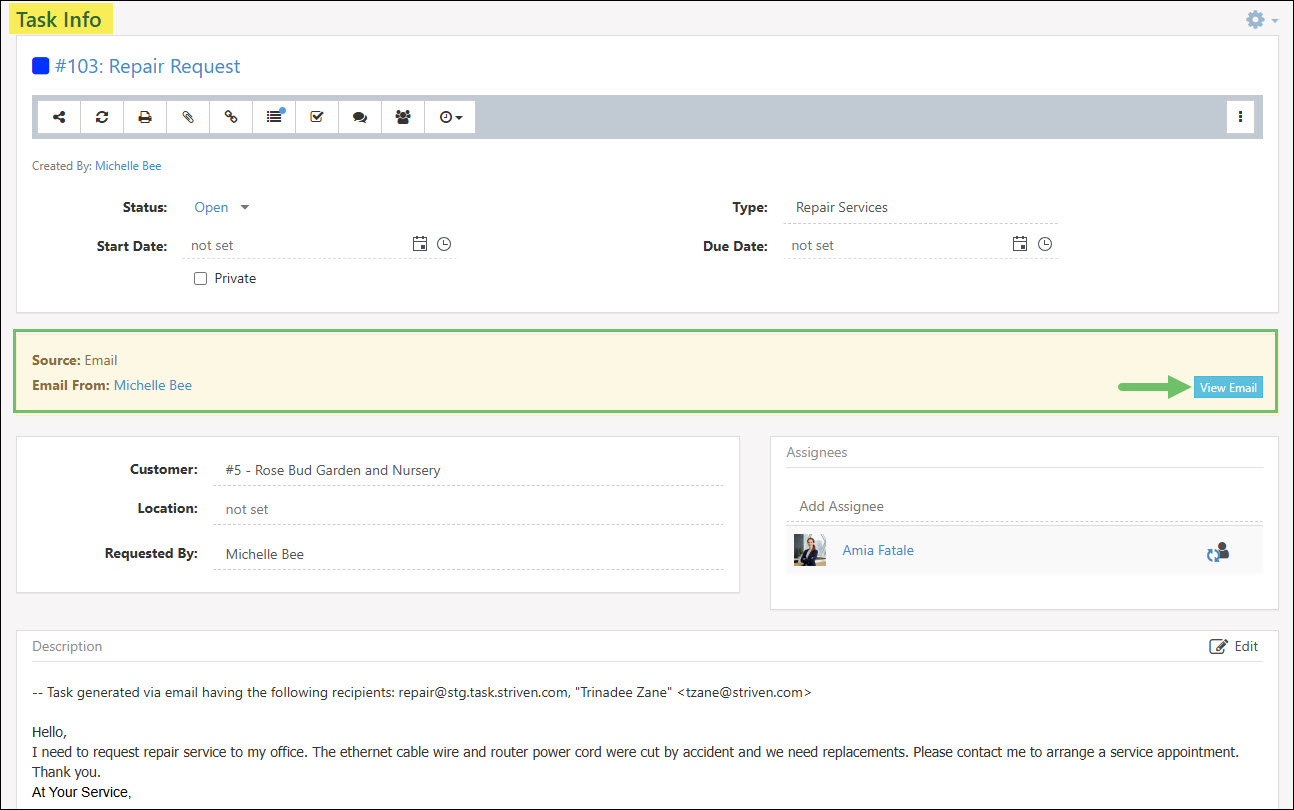
Example of the View Email Button for an Email to Task on the Task Info Page
At the top of the Task description, an additional notation will be added which states Task generated via email having the following recipients.
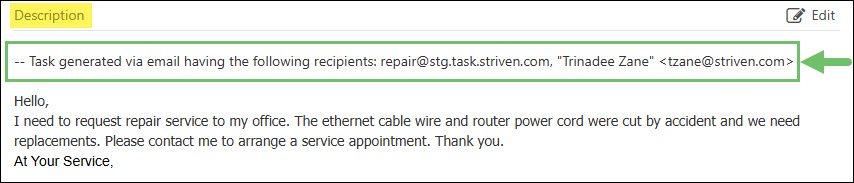
Example of the Task Description Stating Task was Created Via Email
If email addresses were included as a carbon copy (CC), the additional email addresses will be listed in both the View Email button as well as the Task description as shown in the image below.
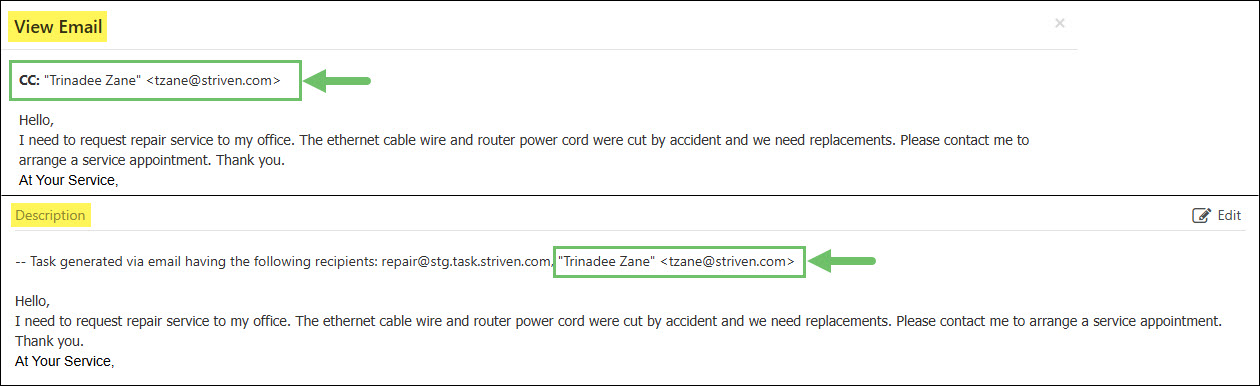
Example of the Carbon Copy Emails Included in Tasks Created from Email
Any attachments that were added to the email will be automatically uploaded as attachments in the Task in Striven.
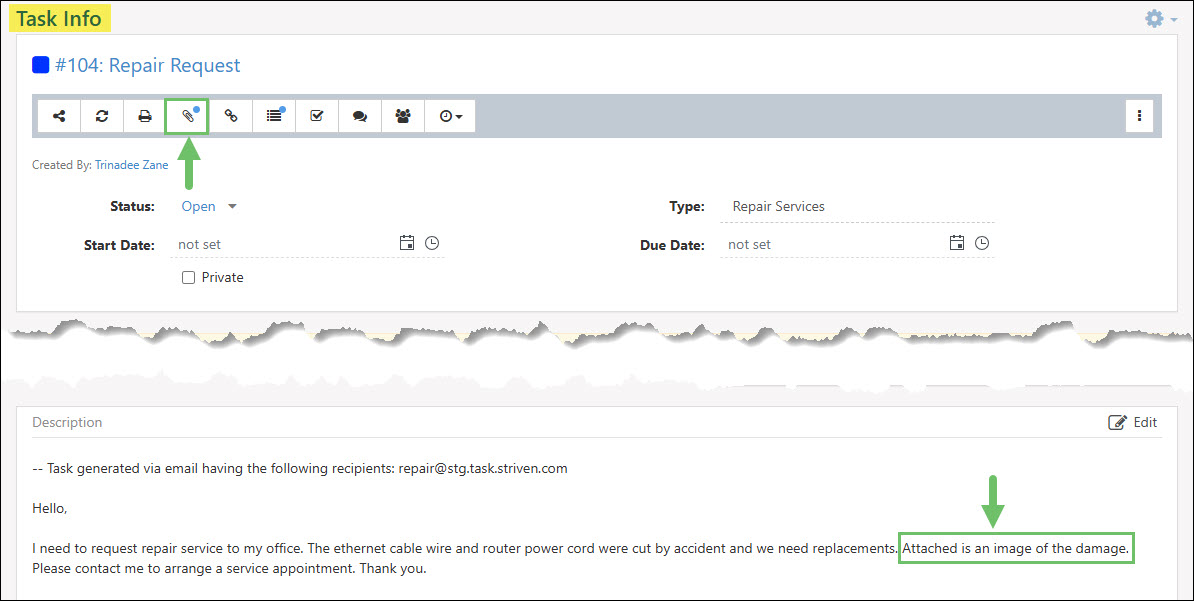
Example of an Email to Task with Attachments Included
-
Task Custom Fields
You can also manage Task information including completing Custom Fields, adding a description, and adding notes. Below is a screenshot displaying how this section of a Task may appear (based on the Task Type and requirements designated to the Task type) and a list describing what you can configure here.
- Custom Fields: If Custom Fields were added to the Task Type, they can be filled out here. If Custom Fields have been marked as required, they will be highlighted red if not filled out and will need to be completed before marking the Task as Done.
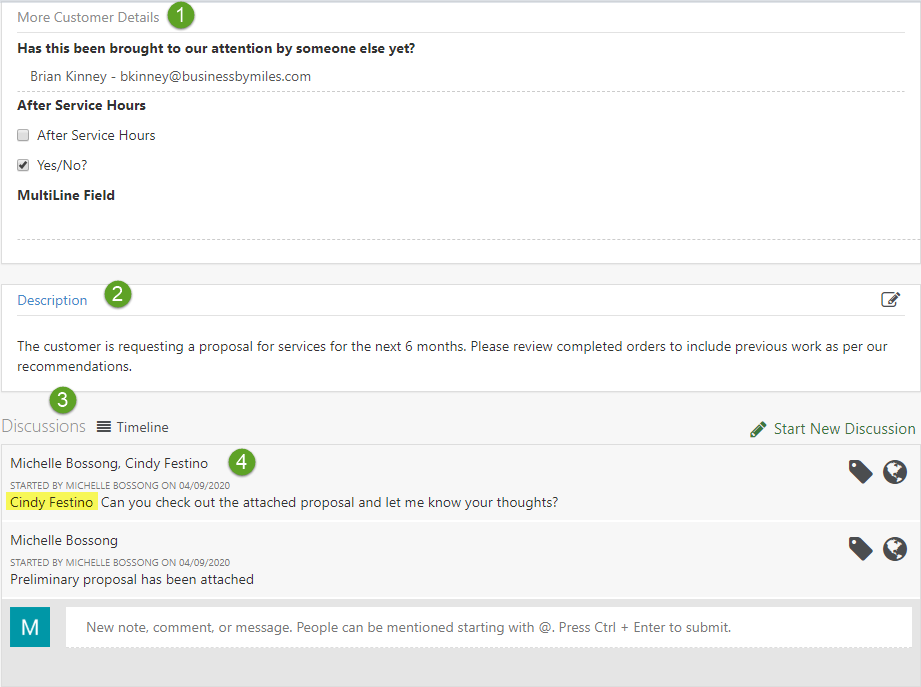
- Description: You can add a description for the Task in this section. Clicking this icon will populate an editor in which users can add images, content, videos, formatting, and much more. Contacts will be able to see information entered here in the Portal if you have the type visible to the Customer.
- Discussions: Allows you to add notes or collaborate with others within the Task.
- Tagging: Tagging occurs by typing either “@” or “+” followed by another user’s name or email address. This will initiate a drop-down menu to select a Employee or Contact to tag in a Discussion thread. Once the Discussion message is entered, the tagged user will receive an email with a hyperlink for them to view the Discussion in the Task.
- Note: Users can be tagged in both the description and the Discussions of a Task.
- Custom Fields: If Custom Fields were added to the Task Type, they can be filled out here. If Custom Fields have been marked as required, they will be highlighted red if not filled out and will need to be completed before marking the Task as Done.
- Description: You can add a description for the Task in this section. Clicking this icon will populate an editor in which users can add images, content, videos, formatting, and much more. Contacts will be able to see information entered here in the Portal if you have the type visible to the Customer.
- Discussions: Allows you to add notes or collaborate with others within the Task.
- Tagging: Tagging occurs by typing either “@” or “+” followed by another user’s name or email address. This will initiate a drop-down menu to select a Employee or Contact to tag in a Discussion thread. Once the Discussion message is entered, the tagged user will receive an email with a hyperlink for them to view the Discussion in the Task.
- Note: Users can be tagged in both the description and the Discussions of a Task.
Example of Task Info Custom Fields, Description, and Discussions
-
Task Attachments
Including file attachments with Tasks provides multiple benefits, such as:
- Enhanced clarity and context: Providing detailed information and supplementary material directly related to the Task clarifies requirements and expectations, thus reducing misunderstandings.
- Centralizing information: Keeping all Task-related material in one place, accessible to everyone involved, reduces the need to search through separate emails or drives for necessary files.
- Improved Productivity: Save time with immediate access to needed resources and prevent delays caused by waiting for files or information.
-
Uploading Attachments
As mentioned earlier in this guide, files can be attached to Tasks in Striven by clicking on the Attachments icon in the Task Actions toolbar located below the Task Name.
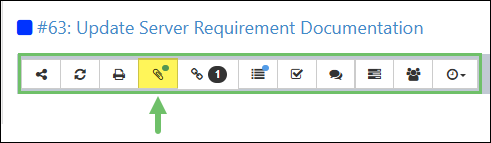
Example of the Task Actions Toolbar on a Task
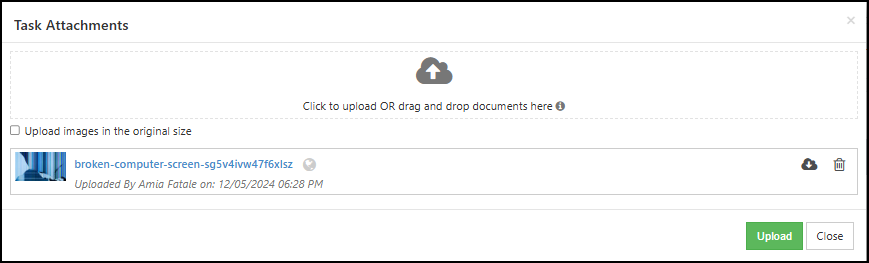
This will display the Task Attachments popup window wherein you will have the following options:
- Add Attachments: Offers the choices to either Click to select the file you wish to upload, or drag and drop files to the upload panel of the popup to upload the attachments.
- Note: There are a variety of file types accepted as attachments. A list of available file types is displayed when hovering over the Info icon in the upload panel. This also notes the 100 MB maximum file size restriction for attachments.
- Reorder Attachments: Allows you to change the order in which the attachments display in the list. This is explained in more detail below.
- View/Open Attachments: Clicking the file name will open the attachment for viewing. Depending on the file type, this may alternatively download the file to allow you to open and view the file on your device.
- View Attachment Details: Displays who uploaded the file as well as the date and time it was uploaded.
- Manage Portal Visibility of Attachments: Clicking on the globe icon toggles Customer/Vendor Portal visibility on/off for the attachment. A blue globe indicates the attachment IS visible on the Portal, whereas a gray globe indicates the attachment is NOT visible on the Portal.
- Edit Attachments: Enables you to edit the file name. This is explained in more detail below.
- Download Attachments: Saves the file to your device.
- Remove Attachments: Deletes the file from the Task.
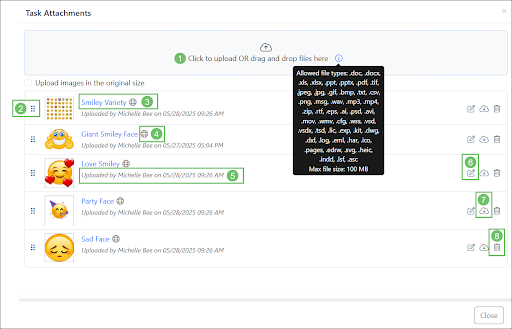
Example of the Task Attachments Popup
- Add Attachments: Offers the choices to either Click to select the file you wish to upload, or drag and drop files to the upload panel of the popup to upload the attachments.
-
Renaming Attachments
Striven provides the option to rename attachments after they have been uploaded with these easy-to-follow steps:
- Locate the attachment you wish to rename.
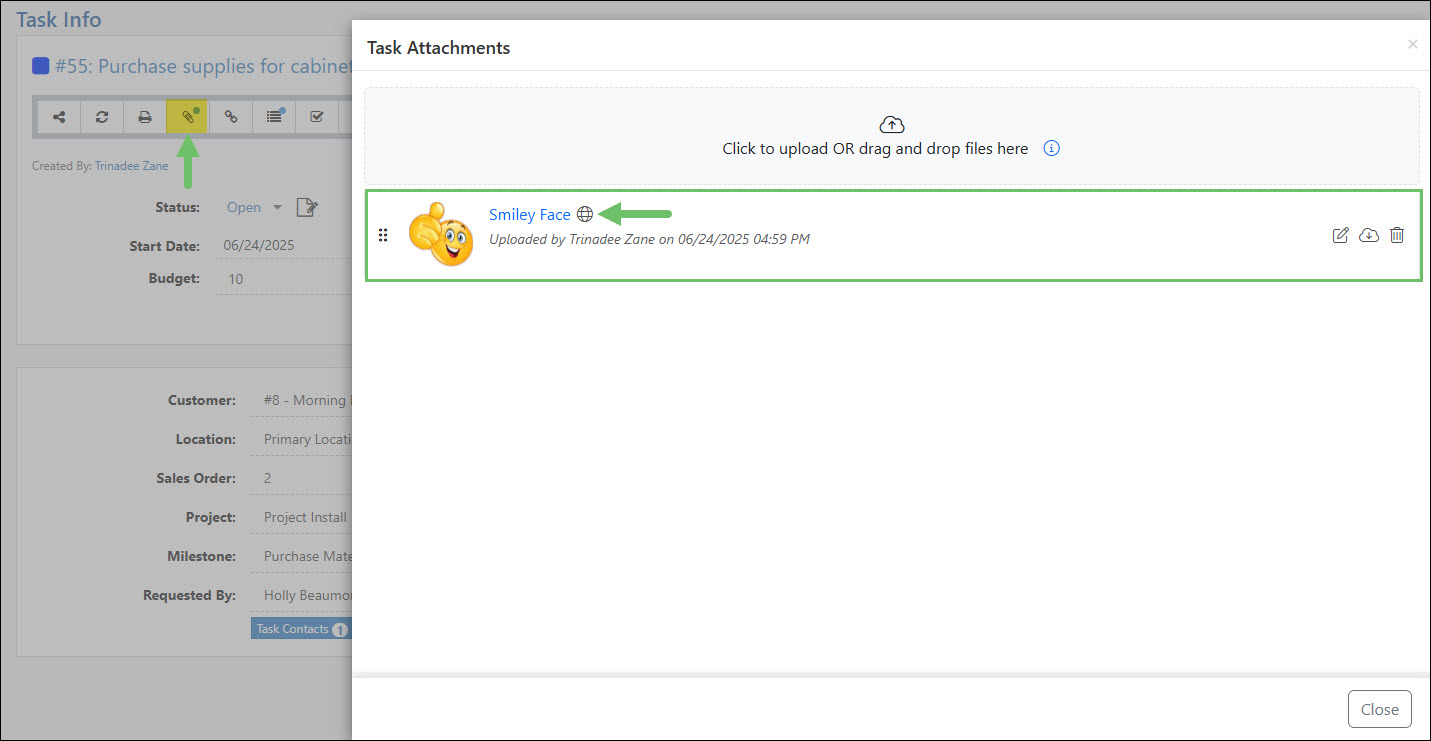
Example of Where to Find Task Attachments
- On the right side of the attachment, click the Edit icon.

Example of the Edit Button on a Task Attachment
- Modify the file name as needed and then click the Save button.
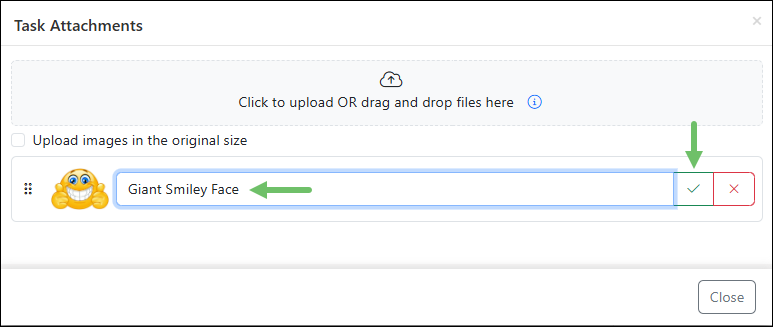
Example of Renaming a Task Attachment
- Note: If the attachment is downloaded, it will use the new file name.
-
Reordering Attachments
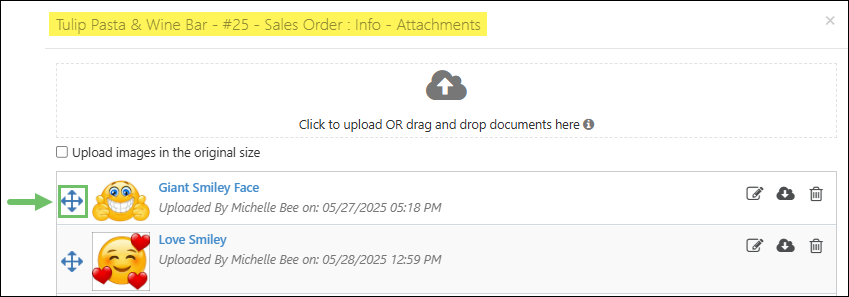
If you have multiple attachments, you may want to arrange them in a different order in the list. To do so, simply click and hold the drag/drop icon located on the left side of the attachment thumbnail and move the file to the desired position in the list.
Example of Using the Drag/Drop Icon to Reorder Attachments
- Note: Depending on where the attachment is in the system, you might see a move arrow icon on the left side of the attachment in place of the drag/drop icon, but it will function the same way as the drag/drop icon.
Example of the Move Arrow Icon Used to Reorder Sales Order Attachments
-
Resizing Attachments
Images uploaded to Striven within Task attachments, Hub files, and more, are compressed to enhance system efficiency and image rendering speed. Images are compressed to a maximum of 1200px, with thumbnails which are sized to a maximum of 256px.
Example of a Task Attachment with a Thumbnail
You may have the option to override this automatic resizing depending on your Striven subscription. Enterprise Subscription Customers have the option within your Core Settings to “Retain original image upload quality by default”. To enable this setting, navigate Company → Settings → Company → Settings.
Once the “Retain original image upload quality by default” checkbox is selected, images uploaded as entity attachments, and images within the Hub, will retain their original image size.
- Note: This checkbox does not apply to images directly uploaded to or pasted into a text editor.
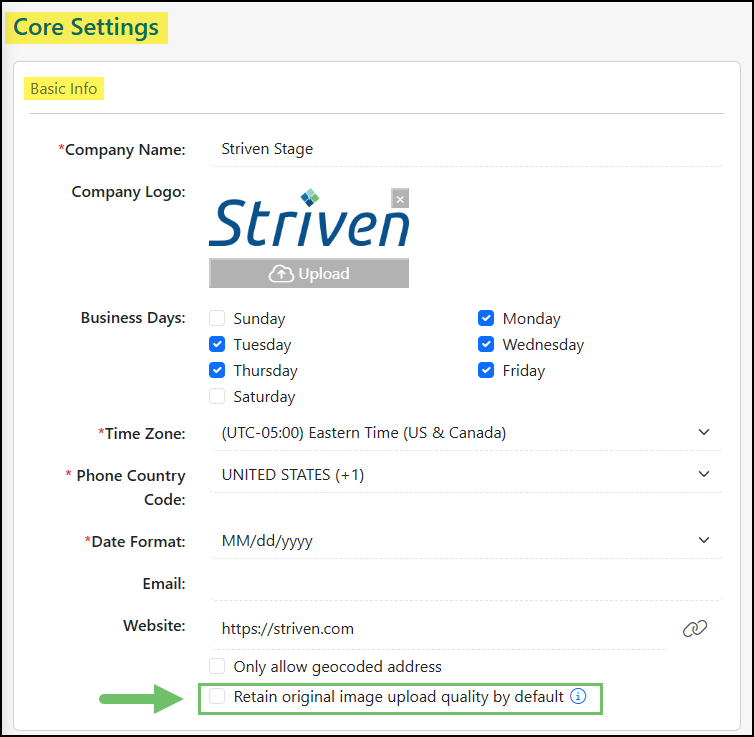
Example of the “Retain Original Image Upload Quality by Default” Option
You also have the option to override image resizing at the upload level by selecting the “Upload images in the original size” checkbox.
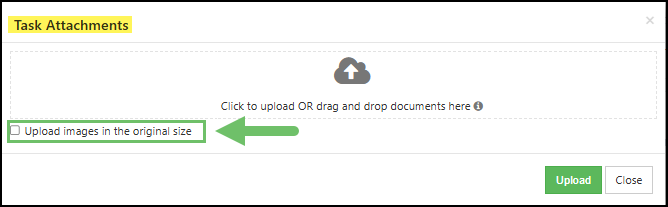
Example of the “Upload images in the original size” Checkbox
-
Task Approval
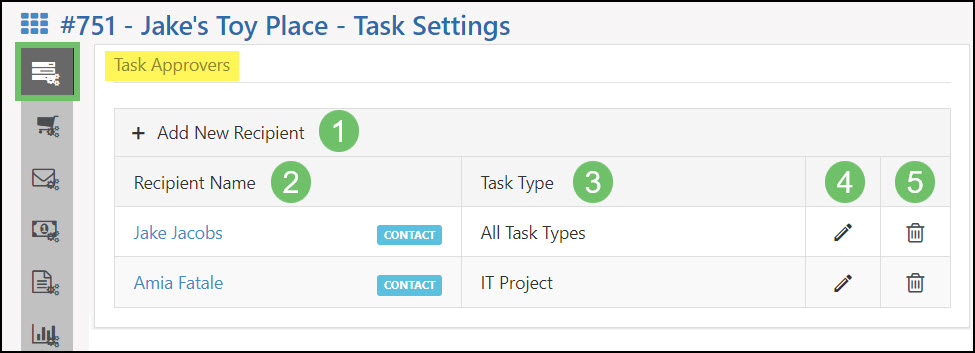
Tasks can be configured to require approval by a Customer or Employee before the Task can be worked on. The designated Task Approvers are assigned at the Customer level within Task Settings. The Customer Contact or Employee you would like to approve Tasks must be added to the Task Approvers section of the Task Settings page in order to receive the Approval Needed notification email.
- Note: If you would like to add an Employee to the Task Approvers list of a Customer, they must be added as a Contact of the Customer’s account.
- Add New Recipient: Allows you to add a contact to receive the approval email.
- Recipient Name: Displays the name of the Task Approver, and a tag displaying that this recipient is a Contact of the Customer.
- Task Type: Lists the Task Types selected for this Task Approver. When adding a Task Approver, you can choose for Tasks of only a specific type or Tasks of any type to require approval from the selected Approver.
- Edit: Allows you to change the Contact chosen as the Task Approver, or change the Task Type(s) they are required to Approve.
- Delete: Allows you to remove a Task Approver.
Example of the Task Approvers Settings
-
Approving a Task from Email
When a Contact is added to the Task Approvers list, they will receive an email containing a link to approve newly created Tasks. It is not required for the recipient of this email to access the Customer Portal to approve the Task. The content of these automated emails can be edited in the Notification & Portal Content for your company.
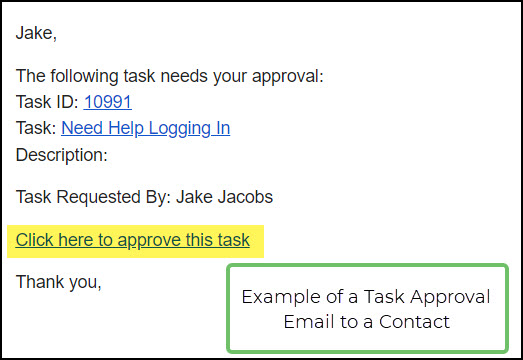
Example of the Task Approval Email
-
Approving a Task from within Striven
Tasks can also be approved by Employees directly from a Task. Attempting to view a Task that requires Customer approval prior to being approved will prompt a message box on the browser window which states that the Task cannot be worked on without approval. You can continue to view the Task by selecting “OK”.
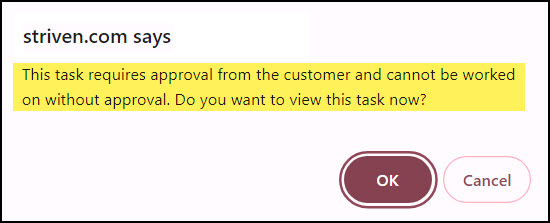
Example of the Notification Prompted by Viewing a Task Requiring Approval
When viewing a Task requiring approval, a message highlighted in red will appear on the Task stating that the Task needs approval from the Customer, with an option to approve the Task.
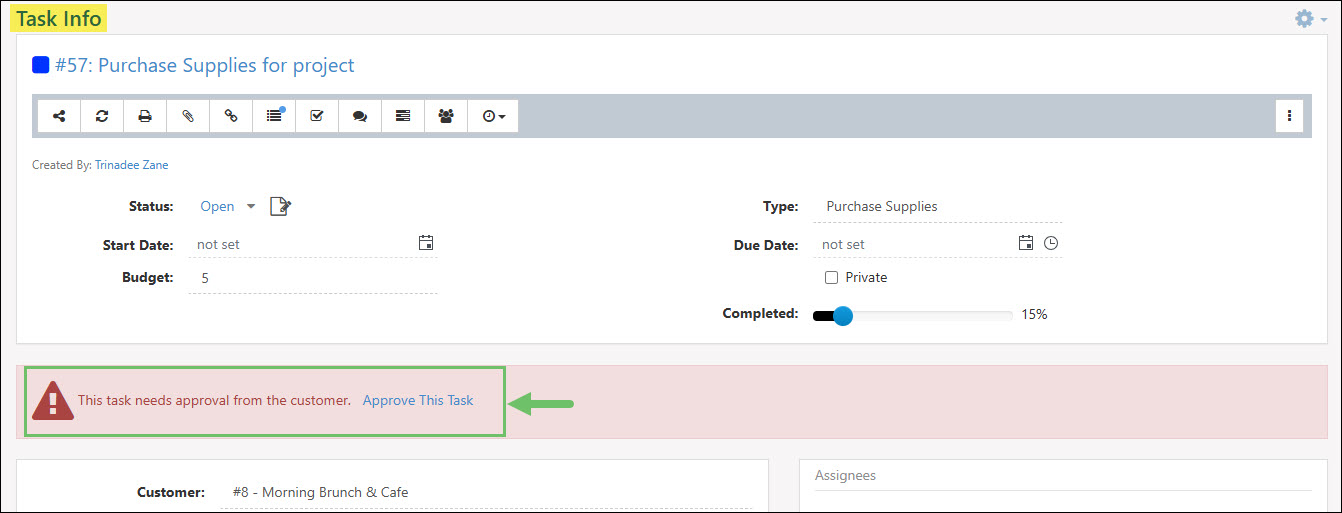
Example of the Approve This Task Option
Clicking “Approve This Task” will mark the Task as Approved, and record the name of the logged in user who approved the Task, the date and time of approval, as well as the user’s IP Address.
- Note: The user approving the Task must have the permission “Tasks – Approve Manually That Need Customer Approval” added to their User Role to manually approve a Task on behalf of a Customer.
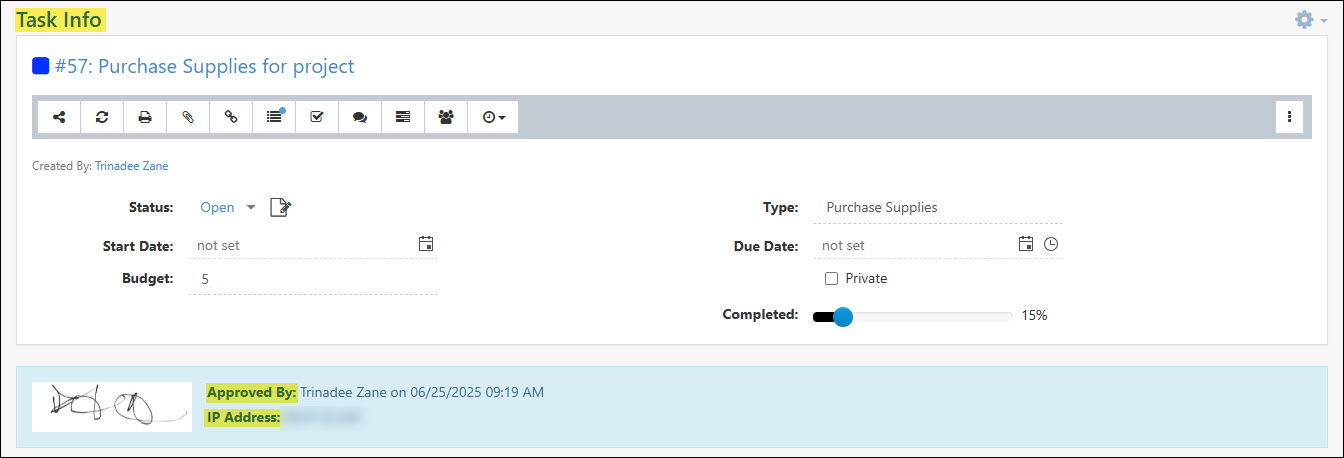
Example of the Task Approval Details
-
Approving a Task from within the Portal
Customers can approve Tasks through the Customer Portal within the Tasks List. Any Tasks requiring approval will display a green Approve button on the right side of the screen located under the Task Assignee’s icon.
Clicking the Approve button will display a popup message asking the Customer to confirm that they would like to approve the selected Task.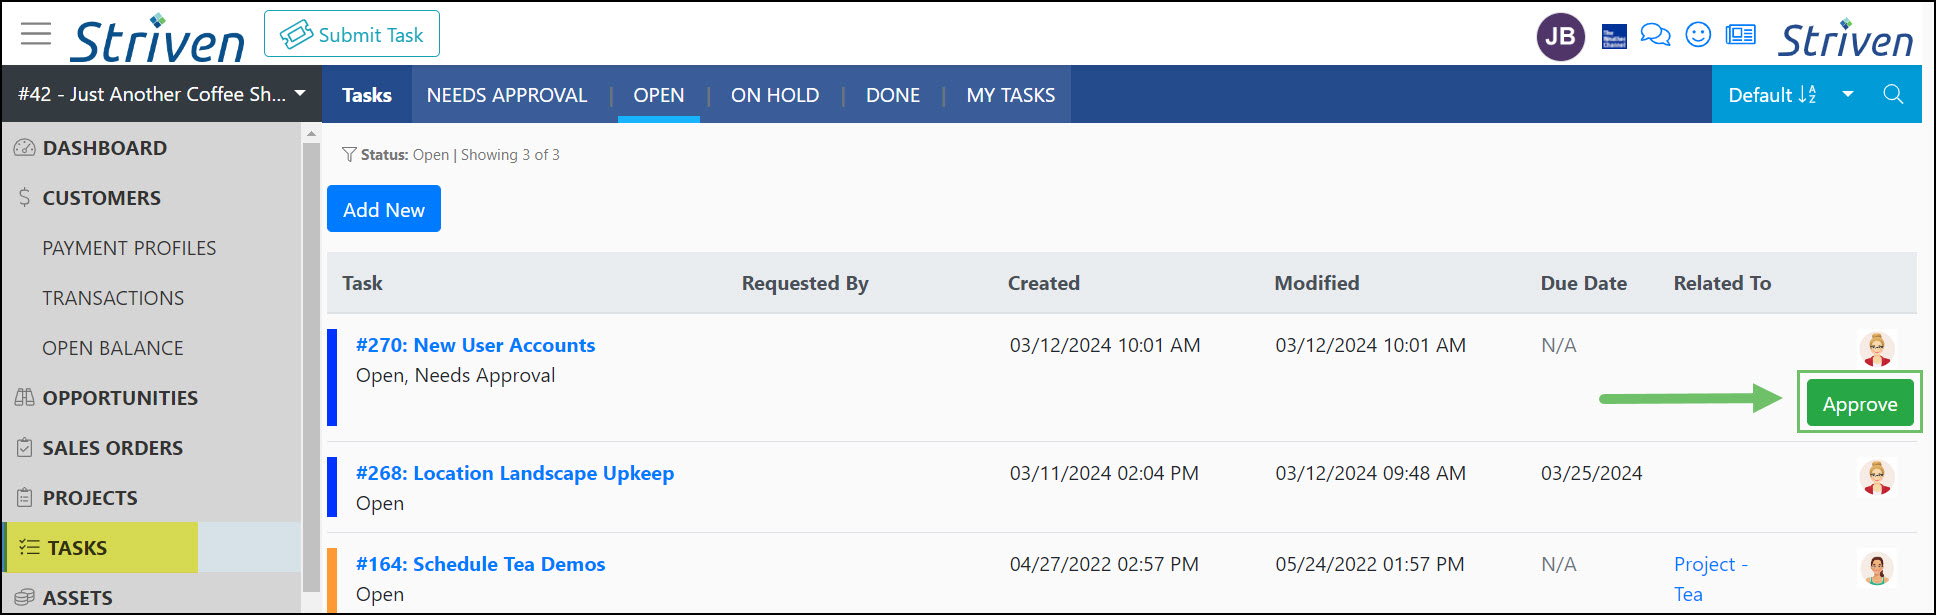
Example of the Approve Option on a Task in the Customer Portal
If “Yes” is selected, the Task will be marked as Approved and the Task Approver’s name, the date and time of approval, and the Approver’s IP Address will be captured and displayed on the Task.
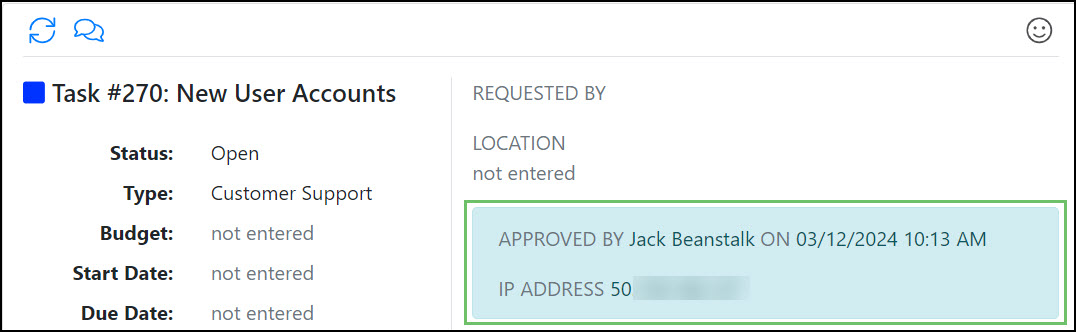
Example of Task Approval Details in the Portal
-
Task Signatures
E-Signatures for a Task can be captured at the time of marking a Task as Done, or when an assigned Approver is marking a Task as Approved.
-
Permissions
To enable your Employees to capture electronic signatures (E-Signatures) for Tasks, you need to activate these two (2) user role permissions.
- “Tasks – Add E-Signature” : Allows the User to capture an E-Signature upon Task completion.
- “Tasks – Delete E-Signature” : Allows the User to delete an E-Signature upon Task completion, provided the Task has not been marked as Done.

Example of the User Role Permissions for E-Signatures
If you would like to enable the usage of Task Signatures for approval and completion within the Customer Portal, there is a Portal Role Permission associated with this function:
- “Tasks – Add E-Signature” : Allows a Contact to capture an E-Signature.

Example of the Portal Role Permission Needed for E-Signatures
-
Settings
Task Signatures can be enabled at the Task Type level. To configure a Task Type to capture E-Signatures, navigate to Company > Settings > Tasks > Tasks Setup > Task Types, and select the Task Type you would like to configure from the list.
When viewing the Task Type – Info page, you can select the following options regarding Task Signatures using the E-Signature section:
- Turn On E-Signature: Allows you to enable Task Signatures for this Task Type, but at least one requirement, On Approval or On Completion, must be chosen to begin capturing E-Signatures.
- Require on Approval: Requires a Task Signature to be captured at the time of Approval by the designated Task Approver. This will only apply to Tasks of this Type that have been configured to require approval at the Customer level. Task Approvers are set within the Task Settings section of the Customer’s Information.
- Require on Completion: Requires a Task Signature to be captured before the Task can be marked as Done. If Tasks are marked as Done en masse or by an API, this requirement will not apply.

Example of the E-Signature Settings in the Task Type
-
Using Task Signatures
Once the permissions and Task Type have been configured to capture E-Signatures they can be utilized in the following methods.
Task Signature Upon Approval
When requiring a Task Signature upon Approval, there are 3 ways that an E-Signature can be captured.
Approval within Striven
- Clicking the Approve this Task option on a Task within Striven will prompt a Signature box to appear for the user to sign and approve the Task. This will capture the logged in user’s name, IP Address, and time and date of approval, in addition to the E-Signature.
Approval from Email
- When a designated Task Approver receives an email notification requesting Task Approval, clicking the link to approve the Task will prompt a window requiring an E-Signature to approve the Task. Once the Signature is completed, this will capture the Notification Recipient’s Name, Signature, Time and Date of Approval, and IP Address.
Approval from Customer Portal
- A Customer Contact will be able to sign to approve a Task by clicking the Approve option on a Task from the Tasks List within the Customer Portal. When clicking Approve, a popup window will appear to allow the Customer Contact to sign, and the E-Signature will be captured.
- Once the Task has been approved, the signature and the signer’s details will be displayed on the Task.
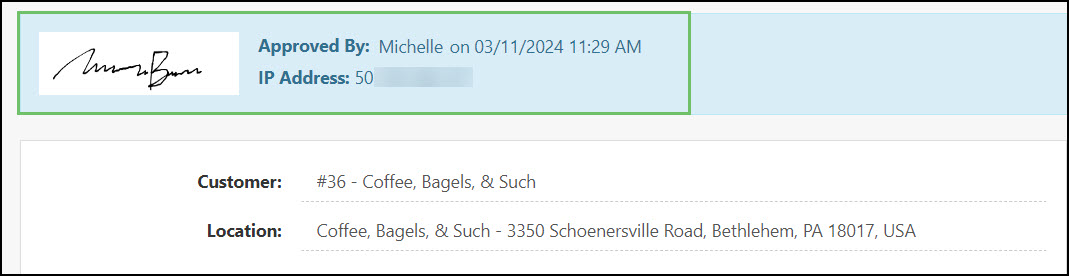
Example of the Approval Signature on a Task
Task Signature Upon Completion
Once Task Signatures are marked as Required on Completion, a Task cannot be marked as Done without a captured signature. Task Signatures can be captured through the Portal by a Contact or from within Striven by a user.
Signing on Completion within Striven
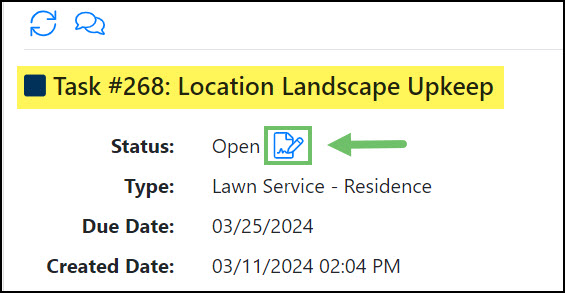
- For Tasks which require a signature on completion, a Completion Signature icon will be displayed besides the Task Status. To capture a signature, a user with the permission “Tasks – Add E-Signature” can click the Completion Signature icon, which will prompt the Task E-Signature window where the User can then sign themselves, or assist the Customer with signing acknowledging that the work is complete via the user’s device.
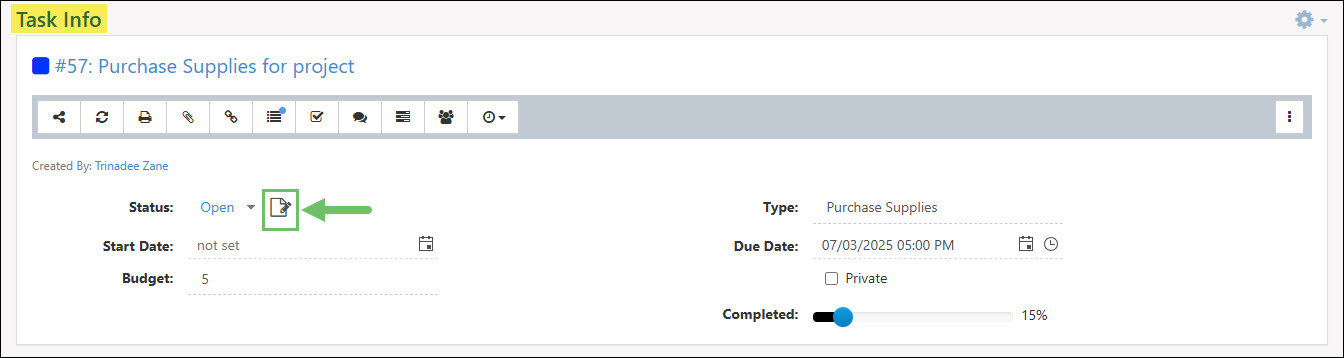
Example of the Completion Signature Icon on a Task
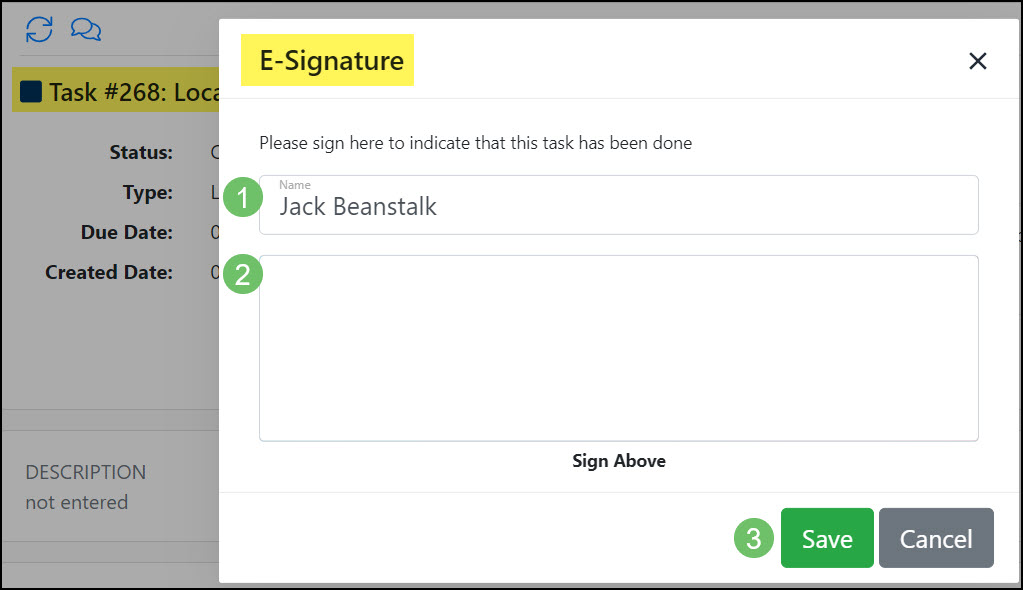
The Task E-Signature window contains the following options when capturing a Signature:
- Name: Allows you to enter the name of the person providing the Completion Signature. This can be a user, Customer, or any individual confirming that the work associated with the Task has been completed.
- Signature: Allows the individual signing to use their finger or a mouse to add an E-Signature.
- Save & Close: There are two buttons at the bottom of the window, Save & Close, and Close. Save & Close will capture the name and signature that had been entered into their respective fields. The Close button alone will not retain any information entered within this window.
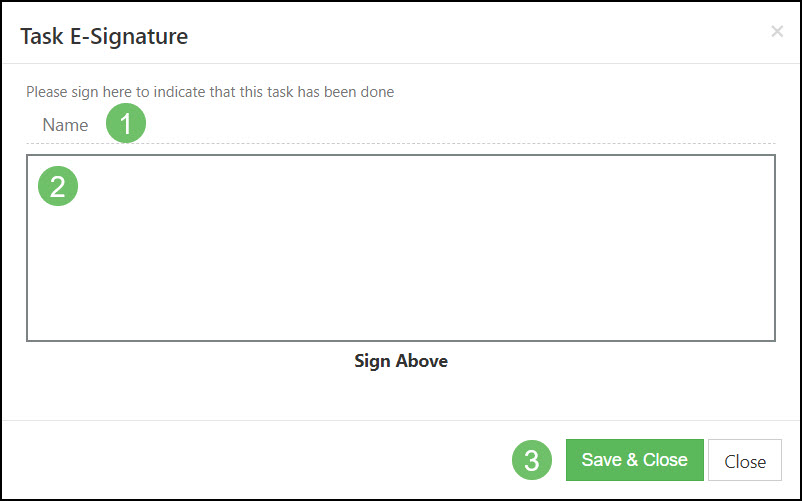
Example of the Task E-Signature Window
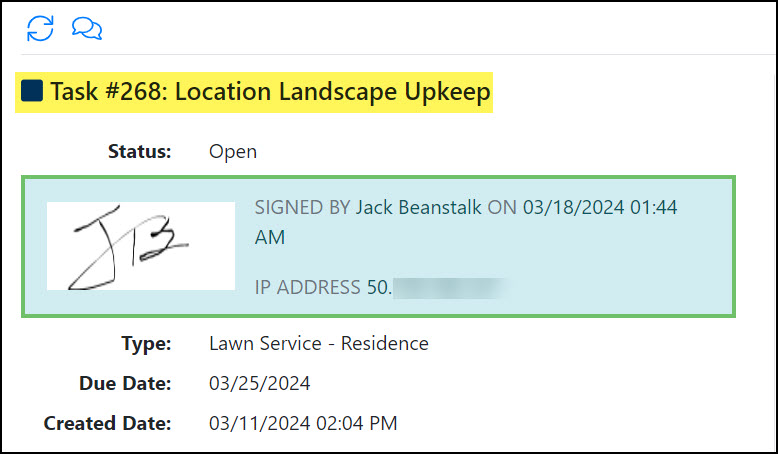
Once the changes made within the Task E-Signature window have been saved, the signature, the name of the signer, the date and time of the capture, and the IP Address of the device the signature was captured from will be recorded on the Task.
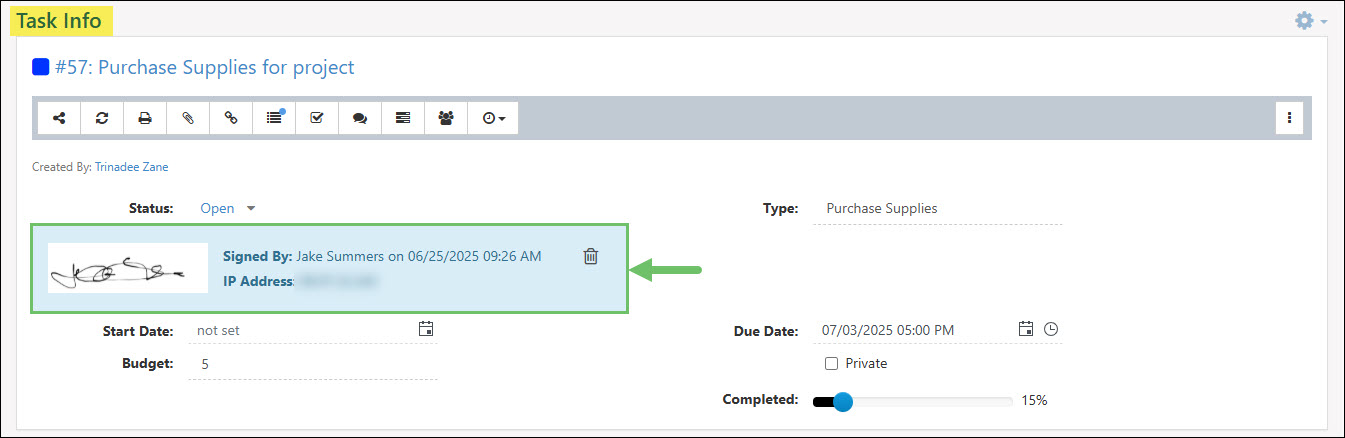
Example of a Completion Signature on a Task
Using the Trashcan icon located next to the Signed By information will allow users with the “Tasks – Delete E-Signature” permission to delete the captured Task Signature and add a new one.
If a user attempts to mark a Task as Done without adding a signature, a red error message will appear stating that a Completion Signature is required.

Example of the Completion Signature Required Error
Signing on Completion from the Portal
- To add a Completion Signature from within the Customer Portal, select the Completion Signature icon located next to the Task Status.
- Note: The Portal user adding the Completion Signature will need to have the “Tasks – Add E-Signature” permission added to their Portal Role in order to capture an E-Signature.
Example of the Completion Signature Icon in the Portal
Selecting the Completion Signature icon will open an E-Signature window with the following fields:
- Name: Allows you to enter the name of the person providing the Completion Signature.
- Signature: Allows the individual signing to use their finger or a mouse to add an E-Signature.
- Save & Close: There are two (2) buttons at the bottom of the window, Save and Close. Save will capture the name and signature that had been entered into their respective fields. The Close button alone will not retain any information entered within this window.
Example of the E-Signature Window in the Portal
Once the details recorded within the E-Signature window have been saved, the signature, the name of the signer, the date and time of the capture, and the IP Address of the device the E-Signature was captured from will be recorded on the Task.
Example of a Completion Signature in the Portal
-
Adding Checklist Items
While in a Task, you can use the button to Add Checklist Items to the Task. Checklist Items are useful to use when a Task is comprised of completing multiple things. As Checklist Items are completed, they can be marked off by checking the checkbox next to that Item. You have the ability to add notes to each Checklist Item in the list once they are marked off. Marking a Checklist Item as completed will stamp the name of the person that checked the Checklist Item below. In addition to name, there will also be a date and time stamp above the notes that were left, if any.
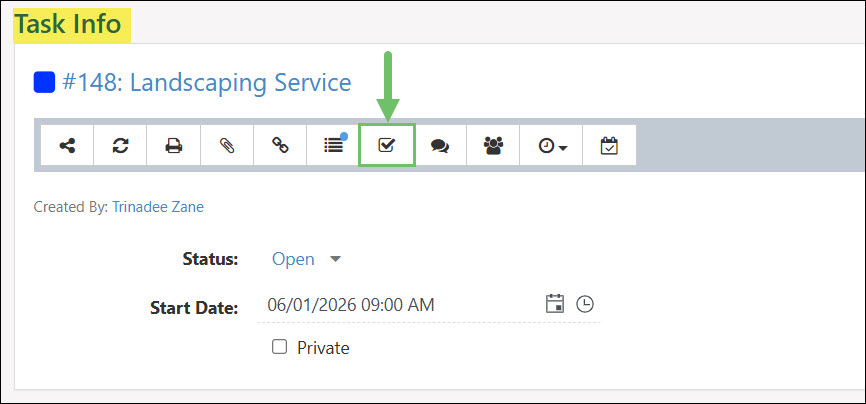
Example of the Location of the Checklist Button on a Task
-
Slide Task Due Dates in a Milestone
Striven has a time-saving feature to adjust Task Due Dates in Milestones in bulk. This feature is very useful and saves time and frustration when your deadlines change and the Milestone Task Due Dates need to be updated accordingly.
Instead of having to change the Due Date on each Task one-by-one, there are 2 options for changing the Task Due Dates using the Adjust Task Dates menu option on the Milestone kebab menu on the right side of a Milestone.
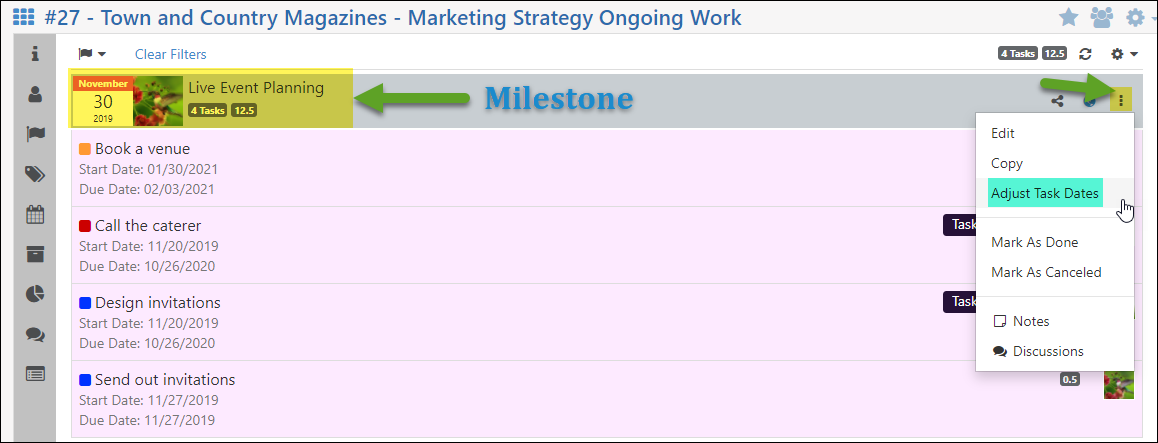
Example of Adjust Task Dates Option on Kebab Menu in Milestone
From this menu popup you will be presented with two options:
- Slide Due Dates of Open Tasks Under this Milestone: Provides the ability to enter the number of days, forwards or back, you wish to move the Task Due Dates. This is displayed by using positive numbers for a future date from the current Due Date, or negative numbers to move back the current Due Date to one that’s sooner.
- a. Checking the box for this option will also produce the choice to Adjust Start Date Also, which will include the same adjustment to the Start Dates as the Due Dates.
- Set Due Date of Open Tasks without Due Dates: Allows you to select either the Milestone End Date as the Due Date for Tasks within the Milestone that do not already have Due Dates set, or you can select a Custom Date to set as the Task Due Dates.
- Note: This will enter a Due Date for all Tasks without set Due Dates within the Milestone – you will not be able to select particular Tasks that have no Due Date to change in bulk this way. If you need to set a different Due Date for particular Tasks with no set Due Dates, those will need to be set individually.
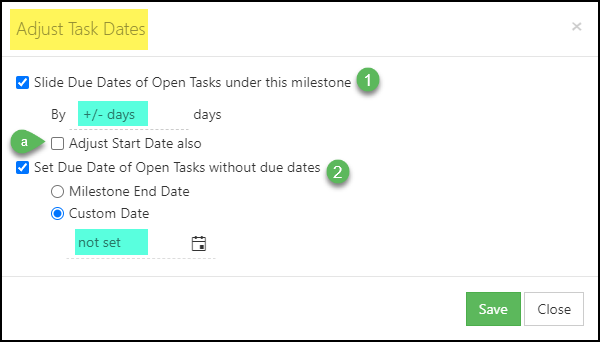
Example of Adjust Task Dates Options
Additionally, changing the End Date of a Milestone will provide these Slide Task Due Date options as well.
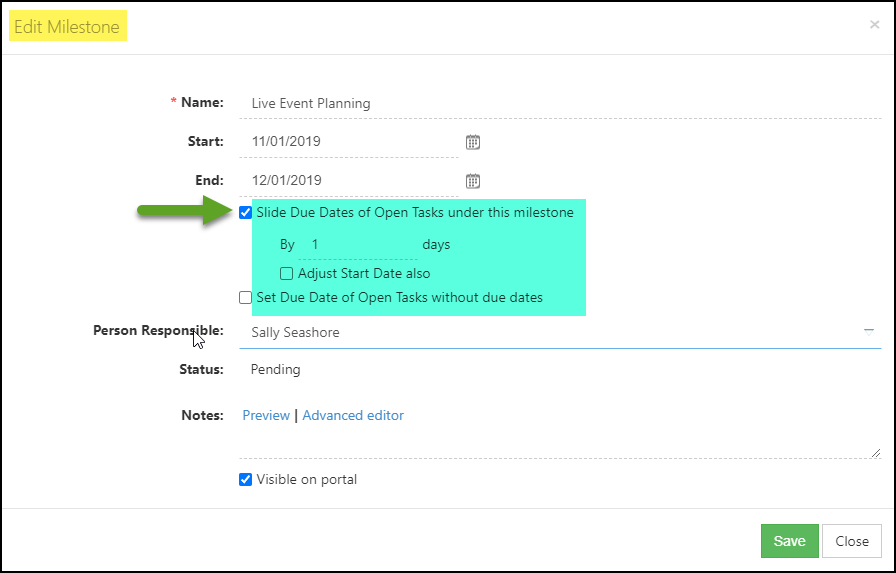
Example of Updating the Milestone End Date with Options to Slide Task Due Dates
- Slide Due Dates of Open Tasks Under this Milestone: Provides the ability to enter the number of days, forwards or back, you wish to move the Task Due Dates. This is displayed by using positive numbers for a future date from the current Due Date, or negative numbers to move back the current Due Date to one that’s sooner.
-
Recap
With this guide, we have explored the tools necessary for managing and navigating daily Tasks, specifically utilizing the Task List and Task Dashboard. We also detailed the various fields and actions accessible on the Task Info page. Furthermore, we examined methods to optimize work pipelines for both external and internal clients through the use of checklists, custom fields, and attachments, along with specialized features such as Task Signatures, Task Approvals, and Email-To-Task.
FAQs
-
I need to reach out to my customer about the next steps to take for a Task I am currently completing for them. I want to make sure they can see the details in the task so they have all the information they need to make the best decision on next steps. How can I do this through the Task?
Using Discussions in a Task is a great way to loop in your Customer on work being completed for them. You can begin a discussion with a Customer Contact as long as the Customer is selected on the Task in the Customer field. This will allow you to keep all the conversations about the specific Task saved within the Task itself.
-
I always end up adding the same checklist to my Tasks that I am working on. Is there any way to have a checklist already in the Task when I create the Task?
Default checklist items can be automatically added to a Task by adding them in the Task Type. Once viewing the Task Type, click on the waffle menu and navigate to the Checklist Items option. Checklist Items that can be added here are being pulled from the Checklist Item Library in your Settings.