


Tasks & Projects
Task Reporting
Support Guide
-
Overview
Managing a team’s capacity and measuring performance are critical to driving operational success. This guide explores three core tools within Striven designed to help you optimize your team’s output and track company-wide efficiency. You will learn how to use Workload Management to gain clear visibility into your employees’ overall committed work time, ensuring balanced assignments and preventing burnout. Additionally, we will cover how Task Service Metrics can help you calculate exact levels of productivity and efficiency during task execution. Finally, we will walk through the Service Metric Report, a powerful tool you can utilize to report on and analyze the monthly data of the services your company provides.
Read this guide if you are trying to:
✔ Have a visual into your Employees’ committed work.
✔ Report on the efficiency of your team’s completed Tasks.
✔ Learn more about the services your company is providing on a monthly basis.
-
Workload Management
Workload Management provides details on Employees’ overall committed work time. Here you can view Employees’ total hours of assigned Tasks, Appointments, and Approved Time Off. There are search filters available to view a date range, Teams, and Departments to track Workloads as desired. There are also helpful hyperlinks to allow you to view details about Tasks, Appointments, and Time Off to help manage Workloads as needed. This page can be extremely useful for dispatchers, Team leads, or anyone responsible for managing and distributing work among Employees. Below is a screenshot showing how the Workload Management appears and a list describing what you can accomplish here.
To view Workload Management, use the following steps:
Tasks → Workload
- Date Range: The From Date and To Date fields allow you to select a specific date range to filter workload results.
- Team: Allows you to manage the workloads of all or specific Teams by checking the associated checkboxes to include them in your search results.
- Department: Allows you to manage the workloads of all or specific Departments by checking the associated checkboxes to include them in your search results.
- Job Title: Allows you to select all or specific Job Titles to include in your workload search.
- Employee: Allows you to select all or specific Employees to include in your workload search.
- Employee Name: Lists all Employees displayed on the Workload Management page based on your search filters. Each Employee name is a hyperlink, which when clicked will initiate a popup displaying the Employee’s Info Card.
- Note: If the name is not hyperlinked, you do not have permission to view Employees’ info.
- Assigned Tasks: Displays the number of Tasks and the total amount of Budget Hours within the filtered date range. In the Employee rows, the number of Tasks is a hyperlink which triggers a popup displaying a list of the Tasks assigned to that Employee. This popup also provides a link to view the Task, a link to view the Employee’s Profile, as well as the option to send a new Discussion message related to the Task to the Employee.
- Note: This includes Tasks that are in Pending and In Progress statuses.
- Appointments: Lists the total number of Appointments scheduled and the total amount of hours for all Appointments. In the Employee row, the number of Appointments is a hyperlink which will trigger a popup displaying all the Appointments the Employee has scheduled within the filtered date range.
- Note: This includes Appointments that are in a Scheduled or Done status.
- Time Off: The total amount of Approved Time Off within the filtered date range.
- Total: There are three calculations listed in these columns.
- Committed: Lists the total of committed hours, which is the sum of the Task Budget Hours and the Appointment Hours listed within the filtered date range.
- Total Work: Lists the total work hours, which is the total scheduled hours to work from today to the selected due date, less the Approved Time Off.
- Allocated Percentage: Lists the total committed hours divided by the total work hours displayed as a percentage value.
- Calendar: Redirects the browser tab to the Employee’s Calendar.
The following details relate to the Workload search results in 2 ways. This guide will explain each column specifically, but note that the Gray Header Row displays this information for ALL of the Employees listed in the search results (like a grand total), while the individual Employee rows display information related to that particular Employee.
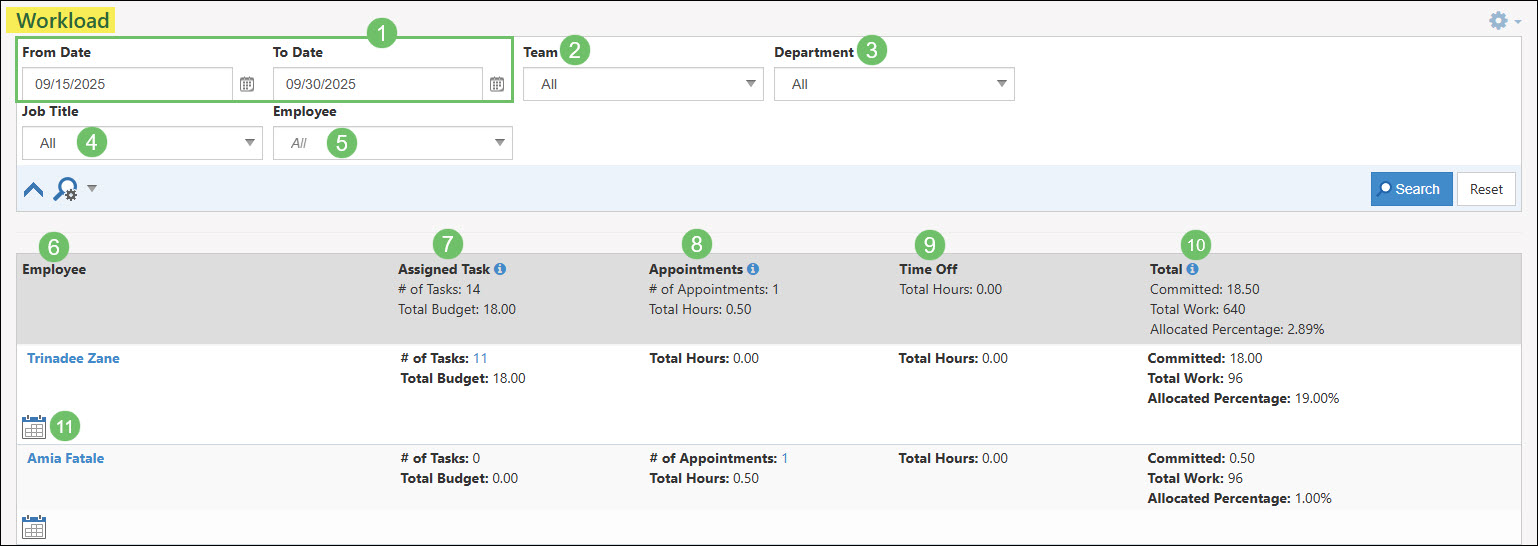
Example of the Workload Management Page

-
Task Service Metrics
Task Service Metrics are useful to calculate the level of productivity and efficiency with completing Tasks within Striven. These figures can be used to examine Employee performance and find strengths and weaknesses in your workflows.
This portion of the guide will explain how Task Service Metrics are calculated in Striven.
Task Service Metrics are calculated based on the following:
- Response Time: Calculated the first time the Task goes to In Progress status. The calculation is the length of time it takes for a Task to go to In Progress status relative to when it was created. The Task will be considered In Progress when the task is viewed by the assignee.
- The Business hours that are configured on the Service Metric Settings page will also play a factor into how the Response Time is calculated. For example, if the business hours are set to 7:00 AM – 6:00 PM and a Task has been created at 5:59 PM then viewed at 7:01 AM the next day, the Response Time would be considered 2 Minutes.
- Time taken to Start: Calculated the first time a Task goes to In Progress status. The calculation is the length of time taken for the task to go to In Progress status relative to when it was expected to be started (i.e. the Start Date Time).
- Resolution Time: Calculated the first time a Task is marked Done. The calculation is the length of time it takes for the Task to go to Done status relative to when it was created.
- Started on Time: A Task is determined to be Started on Time if the Time taken to Start is less than/equal to zero. In other words, if the Task has a Start Time set for 12:00 a.m. on a particular date and it is started at 11:59 p.m. of the date prior, or 12:00 a.m. exactly on the particular date, it is considered Started on Time.
- Not Started on Time: A Task is determined to be Not Started on Time if the Time taken to Start is greater than zero. For example, if a Task has a Start Time set for 12:00 a.m. on a particular date and it is started at 12:01 a.m. on that particular date, it is considered Not Started on Time. Anything later than 12:00 a.m. on that particular date is considered Not Started on Time.
- Total: The total number of Tasks matching the Metric’s search criteria.
- Average per Day: The total number of Tasks divided by the number of days within the search criteria. So if you have a Total of 50 Tasks and the date range is the month of July (which has 31 days), the calculation would be 50/31 = 1.61 (Avg. Tasks per Day).
- Response Time: Calculated the first time the Task goes to In Progress status. The calculation is the length of time it takes for a Task to go to In Progress status relative to when it was created. The Task will be considered In Progress when the task is viewed by the assignee.
-
Task Start Date/Time
There are certain details to keep in mind when considering Task Start Date/Time.
- If a Task Start Date/Time is set and it is not predated from the Task Created Date, then the Task Start Date/Time is used.
- For instance, if you have a Task with the Start Date/Time set for 11/15/2021 at 1:00 p.m. and the Task was actually created on 11/15/2021 at 8:00 a.m., the Effective Task Start Date/Time would be 11/15/2021 at 1:00 p.m. as set on the Task.

- If a Task Created Date is greater than the Task Start Date/Time, then add the response time (based on the Task’s Priority) to the Created Date and the result is the Effective Task Start Date/Time.
- In other words, if you have a Normal Priority Task (2-hour response time) created on 11/16/2021 at 8:00 a.m., but the Task Start Date/Time is set for a prior date/time, such as 11/15/2021 at 1:00 p.m., the Effective Task Start Date/Time would be equal to the addition of 2 hours to the Task Created Date, or 11/16/2021 at 10:00 a.m.

- If a Task has no set Start Date/Time, add the response time (based on the Task’s Priority) to the Created Date and the result is the Task Start Date/Time.
- For example, if you have a Normal Priority Task (2-hour response time) created on 11/16/2021 at 8:00 a.m. with no Task Start Date/Time set, the Effective Task Start Date/Time would be equal to the addition of 2 hours to the Task Created Date, or 11/16/2021 at 10:00 a.m.

- If a Task Start Date/Time is set and it is not predated from the Task Created Date, then the Task Start Date/Time is used.
-
In Progress Date Time
When considering In Progress Date Time, make note of the following:
- The first time a Task Assignee views the Task, it is put into a In Progress status. If the Task is assigned to the person who created it, it will immediately be put into an In Progress status upon creation.
- If a Task is marked Done before any of the Assignees view it, the date/time the Task is marked Done is used for the date/time the Task was set to In Progress status.
-
Service Metric Hours Calculations
Here are some other helpful facts to contemplate with regard to Service Metric Hours Calculations. Service Metric Hours:
- Exclude Holidays.
- Are based on the Striven Subscriber’s time zone.
- Are based on Service Metrics at a global level if not overridden at a Customer level.
-
Service Metric Report
The Service Metric Report is a tool you can utilize to report on information for services your Company provides on a monthly basis. Each month provides details about Tasks, including the number of completed Tasks, average response times, and average completion time.
This report also displays financial information related to Tasks, including the invoiced dollars each month and the average dollars per Task beginning from the start date of the service plan. Change Orders do not appear separately on this report, but they are included in the metrics for the original Order. Change Orders are, however, prorated based on the date they start in the month, up until a completion date is entered. Below is a screenshot representing how the Service Metrics Report appears.
To view the Service Metrics Report, use the following steps below:
Reports → Metrics
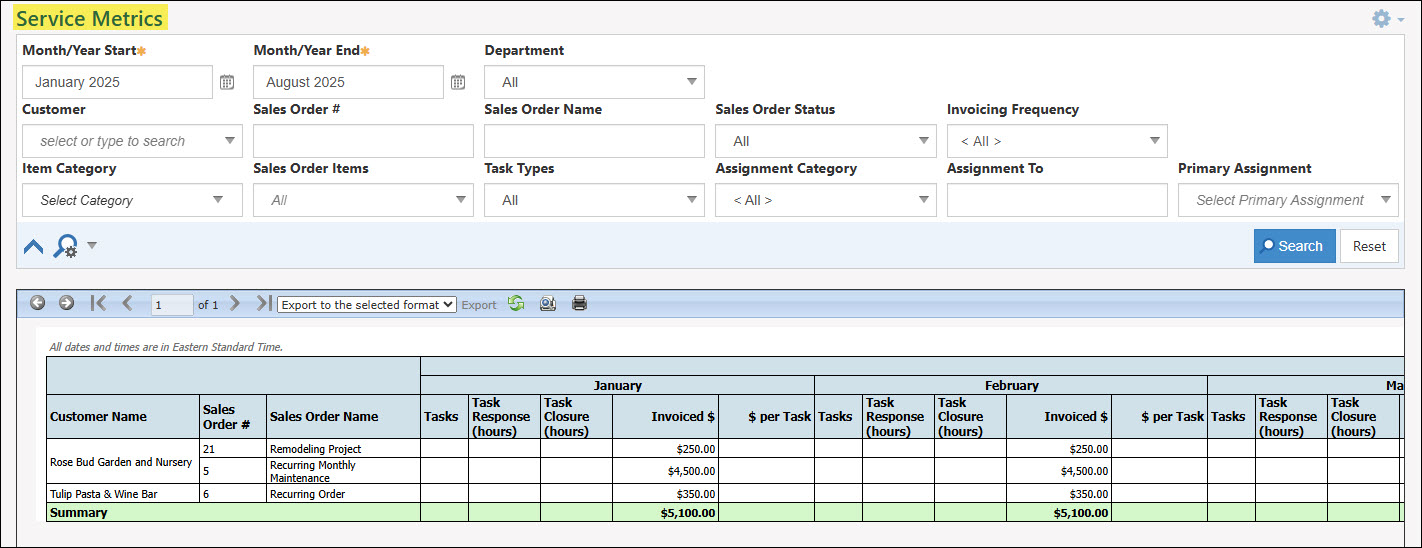
Example of Service Metrics Report
-
Customer/Vendor Portal Service Metrics
The settings related to the Service Metrics Report are established on a global level, but they can also be configured at each individual Customer’s settings section. The Service Metrics Report settings will allow you to do many things, including activate Service Metrics, including Task Types, and business hours to report on. This report will be available to Customers in the Customer/Vendor Portal, allowing them to see their Task history.
Although you can report on business hours, Holidays are not calculated in the Service Metrics Report. Below is a screenshot illustrating how the Service Metrics Report settings appear and a list describing what you can configure here. To view the Service Metrics Settings, use the following steps below:
Company → Settings → Tasks → Service Reports Setup → Service Metrics Settings
- Service Metrics Available: This checkbox will decide whether or not you make Service Metrics available for your Company to report on.
- Select Task Type: Enables you to choose which Task Types to include when calculating Service Metrics.
- Select Business Hours: In this section, you can choose business hours to report on.
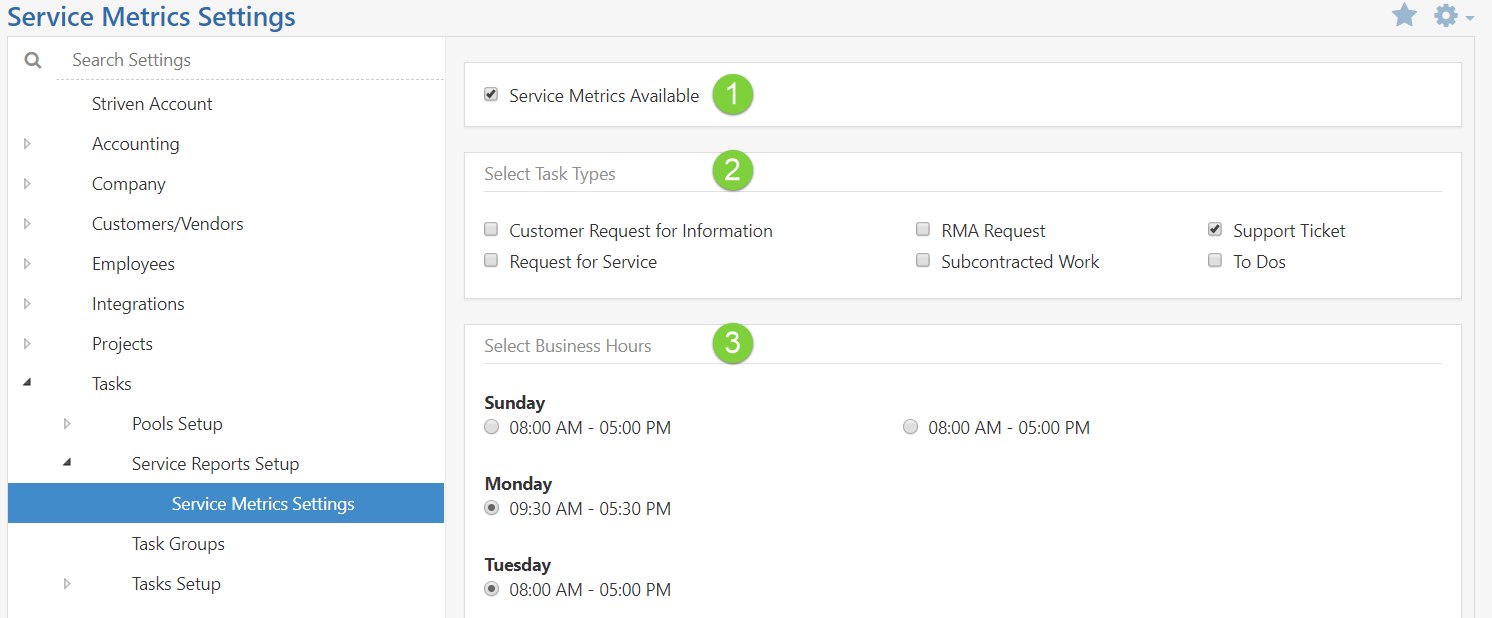
Example of Service Metrics Report Settings
-
Recap
With this guide, we’ve discussed Workload Management, which provides details on employees’ overall committed work time. We have covered Task Service Metrics and how they are useful for calculating the level of productivity and efficiency when completing tasks within Striven. Additionally, we’ve explored the Service Metric Report, a tool you can utilize to report on information for services your company provides on a monthly basis.
FAQs
-
My Customer is trying to view the Service Metrics Report in the Customer Portal but says they are unable to. What do I need to do to give access for this report to my Customer?
In order for your Customer to view the Service Metrics Report in the Customer Portal, make sure they have the permissions “Service Metrics: View” in their Portal Role. Having this permission will enable them to be able to view the report as needed through the Portal.