
Tasks & Projects
Task Settings
Support Guide
-
Overview
This guide provides a comprehensive overview on how to establish core operational structures, including creating distinct Task Types, defining Task Priorities for urgency tracking, and organizing employees into functional pools for efficient resource allocation. Furthermore, the guide covers advanced customization options, such as building a standardized Checklist Library to attach to specific Task Types, designing printable formats for physical record-keeping, and setting up Customer-level Task notifications to automate external updates.
Read this guide if you are trying to:
✔ Configure Task Types to require or include certain fields and information.
✔ Create pools for resource allocation and proper notifications.
✔ Set up Task Formats for a printable version of Tasks from the system.
-
Task Types
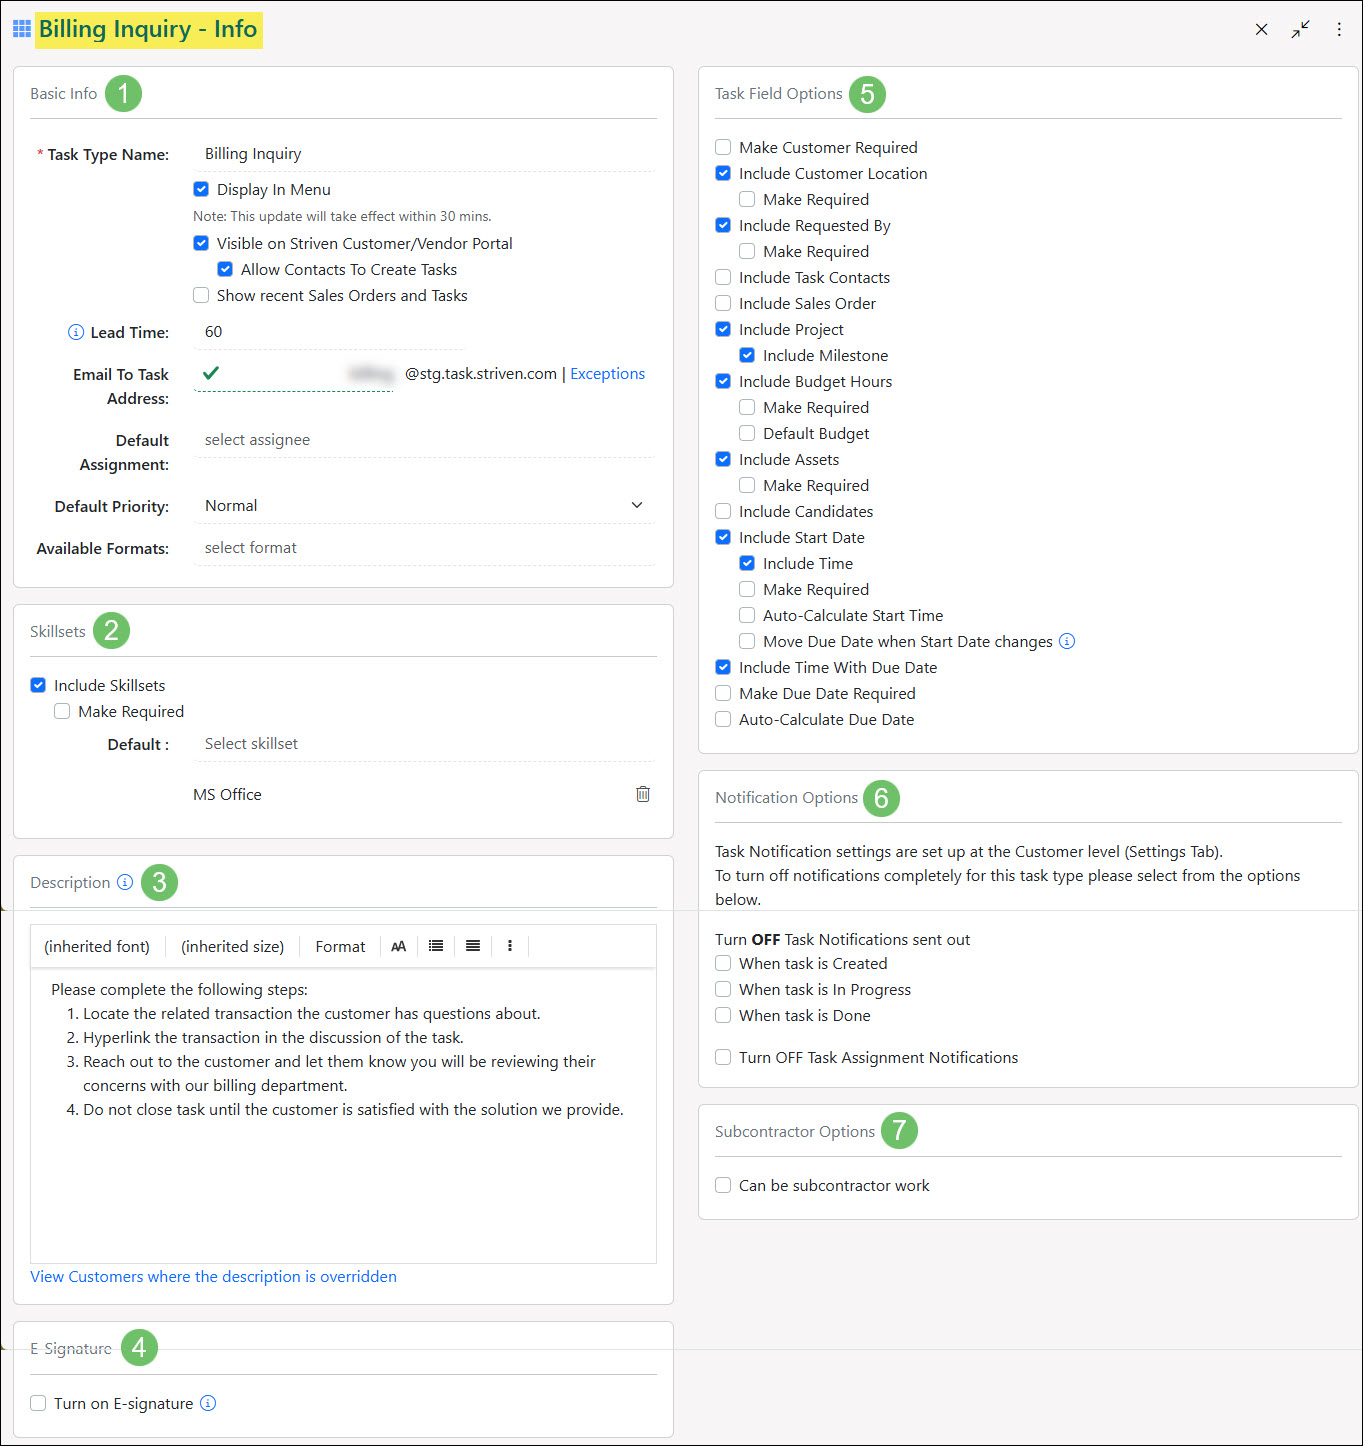
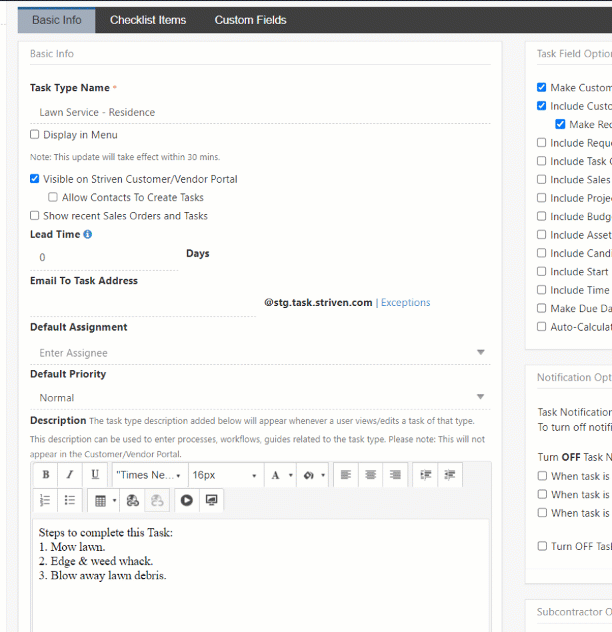
If you complete many different types of work, you will want to set up Task Types before utilizing Tasks in Striven. Creating Task Types will ensure that certain information is associated with different types of work. There are many options within Types, such as having your Tasks visible within the Striven Customer/Vendor Portal, allowing Contacts to create Tasks themselves, allowing for Subcontractor use, and much more. When on the Task Types List, you can add a new Task Type simply by clicking the Add button. Below is a screenshot displaying how adding a Task Type appears and a list describing what you can accomplish here. To view Task Types, use the following steps below:
Company → Settings → Tasks → Tasks Setup → Task Types
- Basic Info: The following configurations and can set within this section for the Task Type:
- Task Type Name: The name of the Task Type being added. This name will appear in drop-down menus when selecting a Task Type.
- Display in Menu: Adds the Task Type to the Tasks tab menu for users to choose to add. The Task Type will appear in the menu approximately 30 minutes after creation.
- Visible on Striven Customer/Vendor Portal: Notes whether the Task Type will be visible on the Customer/Vendor Portal. If this is selected, another option appears to either allow or deny Portal users to create Tasks of this type from the Portal using the Submit Request feature.
- Show Recent Sales Orders and Tasks: Adds an additional icon in the Task Actions menu to access the Recent Sales Orders and Tasks pop up which lists Orders and Tasks that are associated with the Customer listed on the Task.
- Lead Time: Notes how far in advance recurring Tasks are to be created.
- Email to Task Address: When a Customer sends an email to the selected handle, it will then generate a Task within Striven. The subject of the email will become the title of the Task and the body of the email will populate the Task Description. Attachments will remain attached as well.
- Default Assignment: The Default Assignment for this Task Type. If you have a Task Type that gets assigned to the same Employee/Pool/Team on a regular basis, you can set them as the Default Assignment.
- Default Priority: The default Priority for this Task Type. If you have a Task Type that is on average more urgent than others, you may want to note that here by having the default set to a higher Priority. Priorities in Striven are customizable and configurable to fit each Company’s needs.
- Available Formats: A configurable list of which printable formats will be available for Tasks created of the selected Task Type.
- Skillsets: Includes the options to associate the work that needs to be complete for a Task with specific Employee Skillsets. Once toggled on, additional options are available to require the Skillsets section to be filled in before the Task can be marked Done and also to select default Skillsets to be prefilled in on the Task when it is created. Learn more about Employee Skillsets by reviewing the My Profile – Skills section of the My Profile Guide.
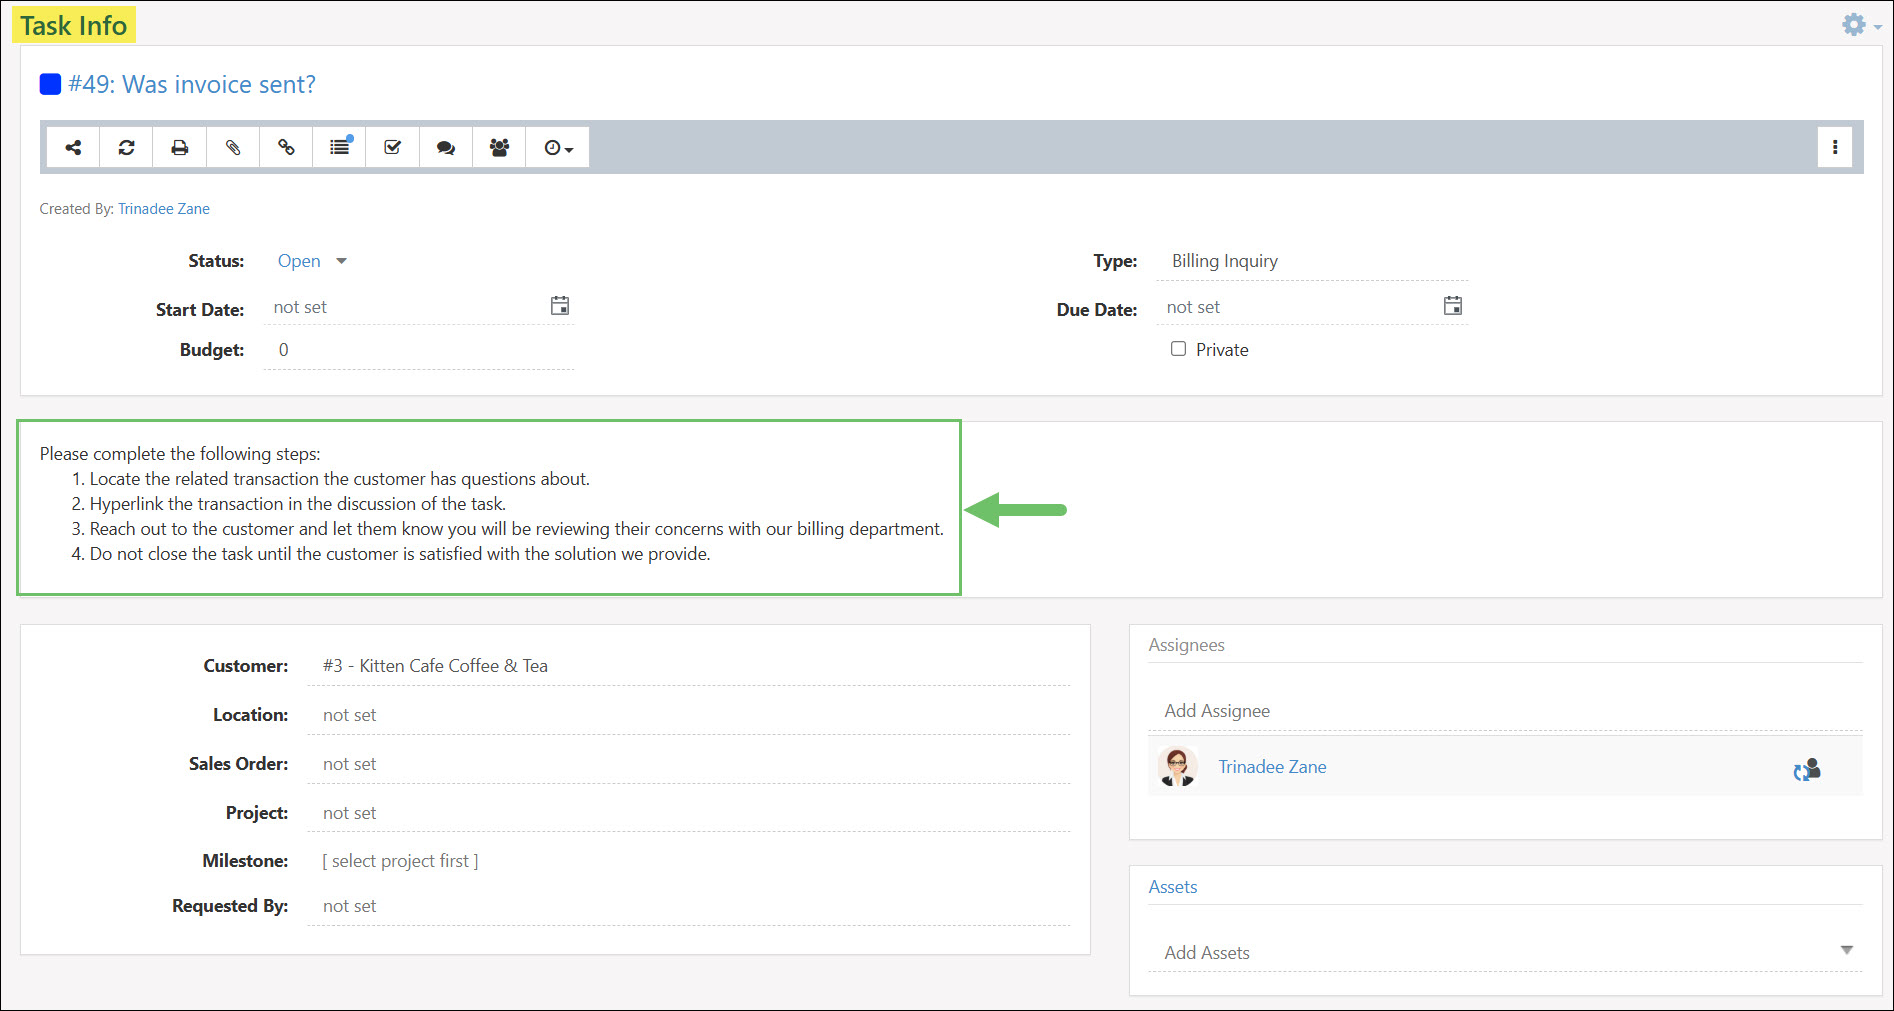
- Description: Displays on any Task that is created relating to the particular Task Type. This feature can be useful in describing anything you want to be included or to be known in a Task of this type, including information with specific details or formatting requirements. This option is explained in further detail in a separate section below.
- E-Signature: E-Signatures for a Task can be captured at the time of marking a Task as Done, or when an assigned Approver is marking a Task as Approved.
- Task Field Options: These settings are explained in further detail in a separate section below.
- Notification Options: Enables you to choose to turn off Task notifications sent to Assignees and Contacts when Tasks are created, set to In Progress, or set to Done. You can also turn off all notifications here if desired.
- Note: A Task is considered In Progress once the Assigned To person has viewed the Task.
- Subcontractor Options: By choosing Can Be Subcontracted Work, the section will expand with more available options, which are discussed further below:
- Default as Subcontracted: Provides the option to make this Task Type Subcontracted by default.
- Display Customer Information Before Acceptance: Enables the Vendor to review the Customer Information before deciding to accept the Task.
- Make Attachments Uploaded by Subcontractor Visible to Customer: Allows Customers on a Task to view any attachments the Vendor uploads to the Task.
- Default PO Template: Determines the default PO Template to be used for Tasks of this type.
- Default PO Type: Determines the default PO Type to be used for Tasks of this type.
Example of Setting Up a Task Type

- Basic Info: The following configurations and can set within this section for the Task Type:
-
Task Type Descriptions
Striven has the ability to display a Task Type Description within a Task. Different from the familiar Task Description which displays in the middle of a Task describing what the Task is about; the Task Type Description will display towards the top of the Task as an non-editable text box.
Example of Task Type Description Displayed in Task
The Task Type Description will automatically change based on what Task Type is selected when creating the Task. This will be helpful in making sure each description can be Task Type-specific.
- Note: The Task Type Description is visible when an Employee views or edits a Task of that type, but will not appear in the Customer/Vendor Portal.
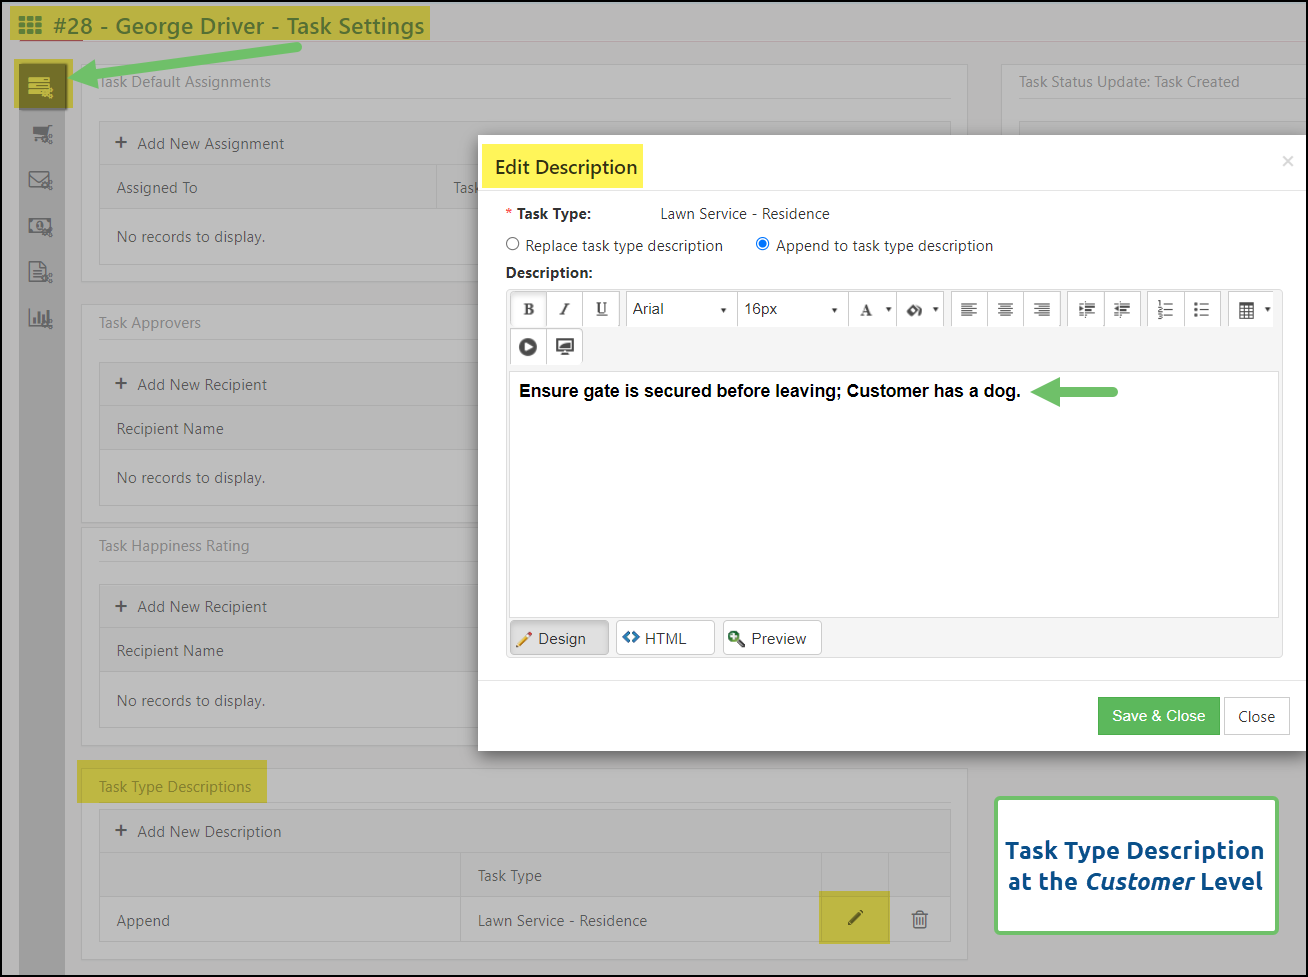
Customer Level Task Type Descriptions
In addition to the Task Type Description at the Task Type level, you can also customize your Task Type Descriptions at the Customer level. This is useful when you need to include additional or alternative details in the Task Type Description when working on a Task of this type for a Customer.
A good example of this would be if you have a Task Type that is used for a recurring service for your Customers, such as lawn care. The Task Type Description at the Task Type level can include the general details pertaining to how to complete a Task of this type, what the purpose of this Task Type is, or important steps that must be followed in order to complete the Task.

Example of a Task Type Description at the Task Type Level
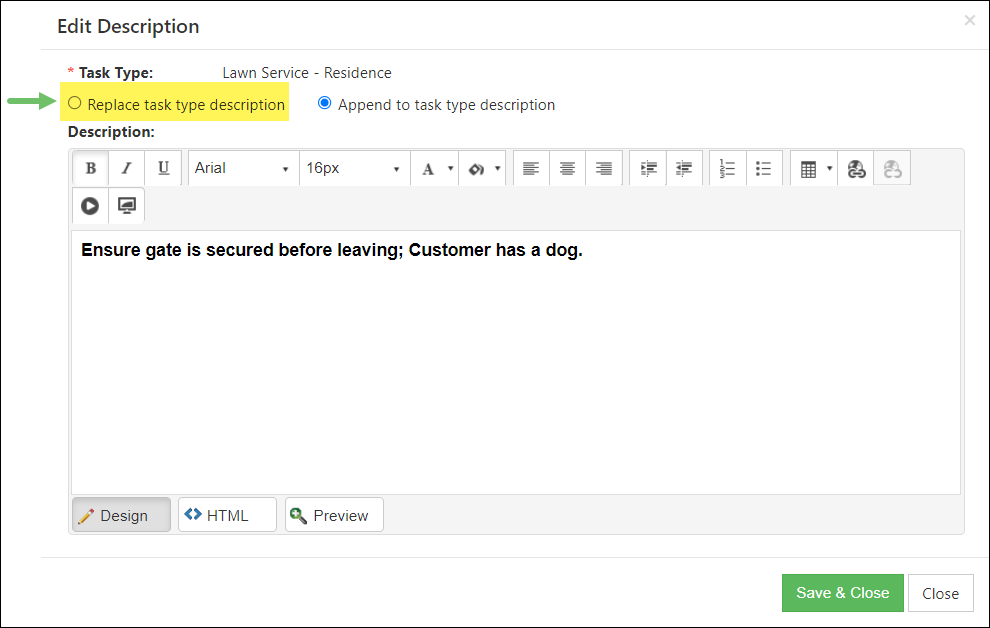
Now consider that you have a Customer whose service involves further instructions or details, such as “Ensure gate is secured before leaving; Customer has a dog.” This important information can be saved at the Customer level to append to the Task Type Description and display accordingly on the Task.
Example of a Task Type Description at the Customer Level
Below is an example of a Task Type Description that has been appended at the Customer level in comparison to the original Task Type Description.
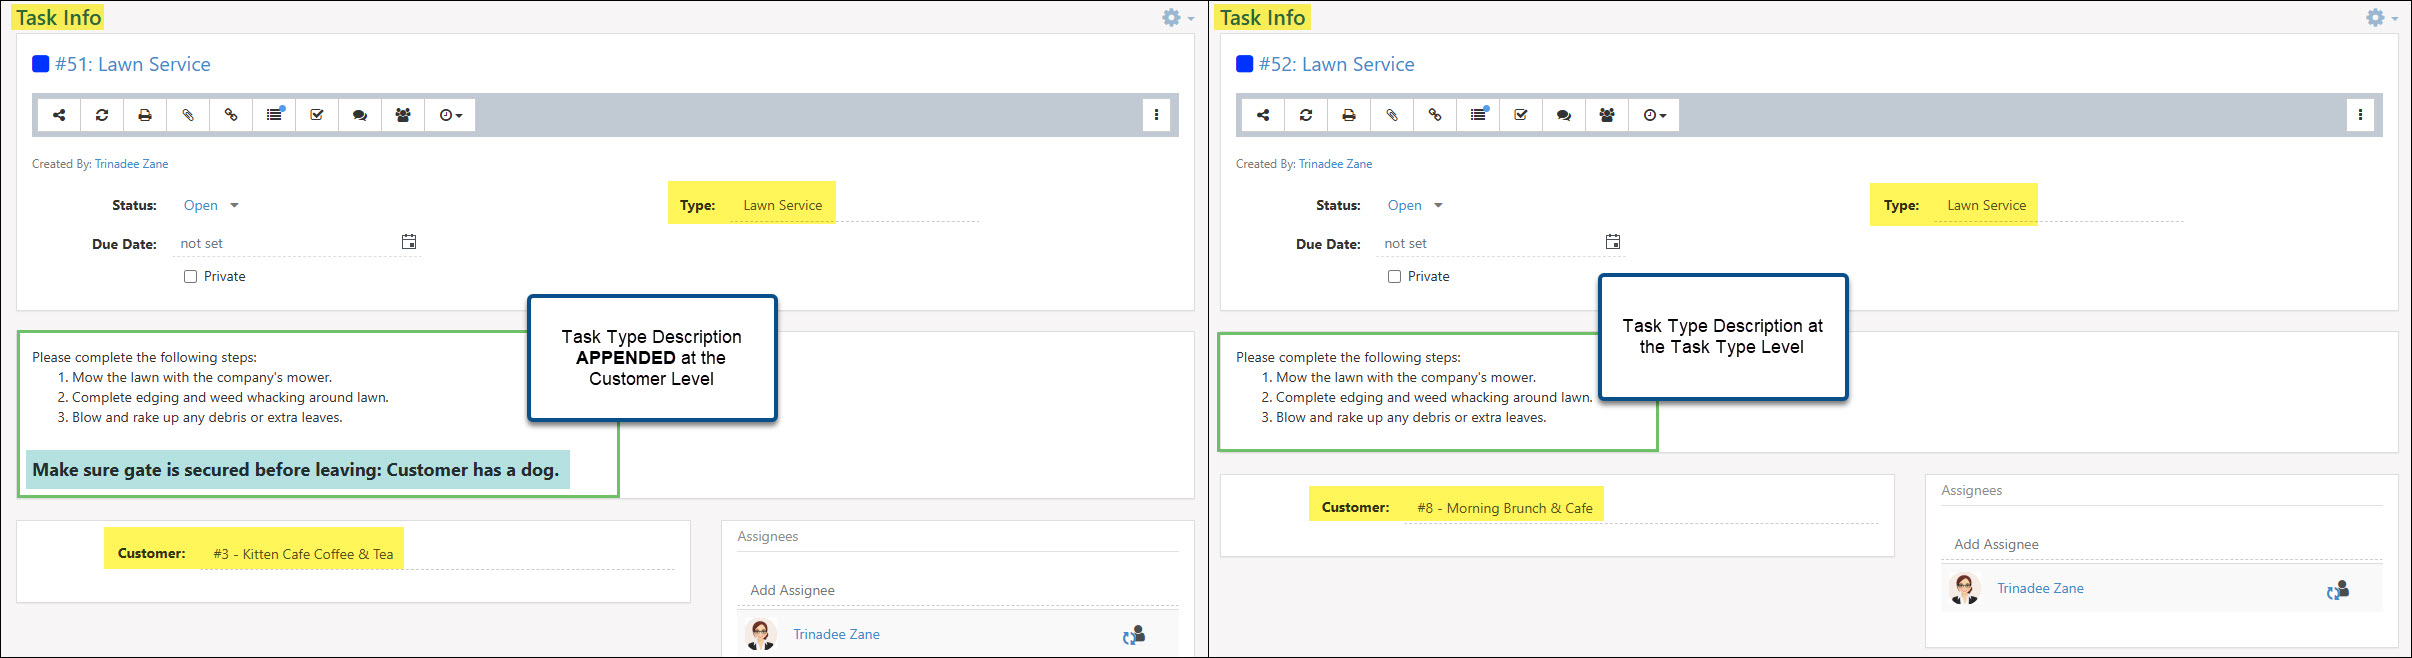
Examples of Tasks with Task Type Descriptions at the Task Type Level & the Customer Level
This Customer level Task Type Description can also be set to replace the Task Type Description at the Task Type level if necessary, based on the Customer.
Example of Customer Level Task Type Description Settings
View Customers where Description is Overridden
Another handy feature with the Task Type Description is the option to view all Customers who have a Task Type Description saved at the Customer Level. This feature provides a list of the Customers with Task Type Descriptions at the Customer Level with a link to view their Customer Dashboard, or button options to edit or delete their Customer level Task Type Description, all from one screen.
Example of View Customers
-
Task Type Field Options
There are also display fields that can be enabled using the checkboxes on the right-hand side of the Task Type page. Below is a screenshot showcasing how adding Task Types appears and a list describing what you can accomplish here.
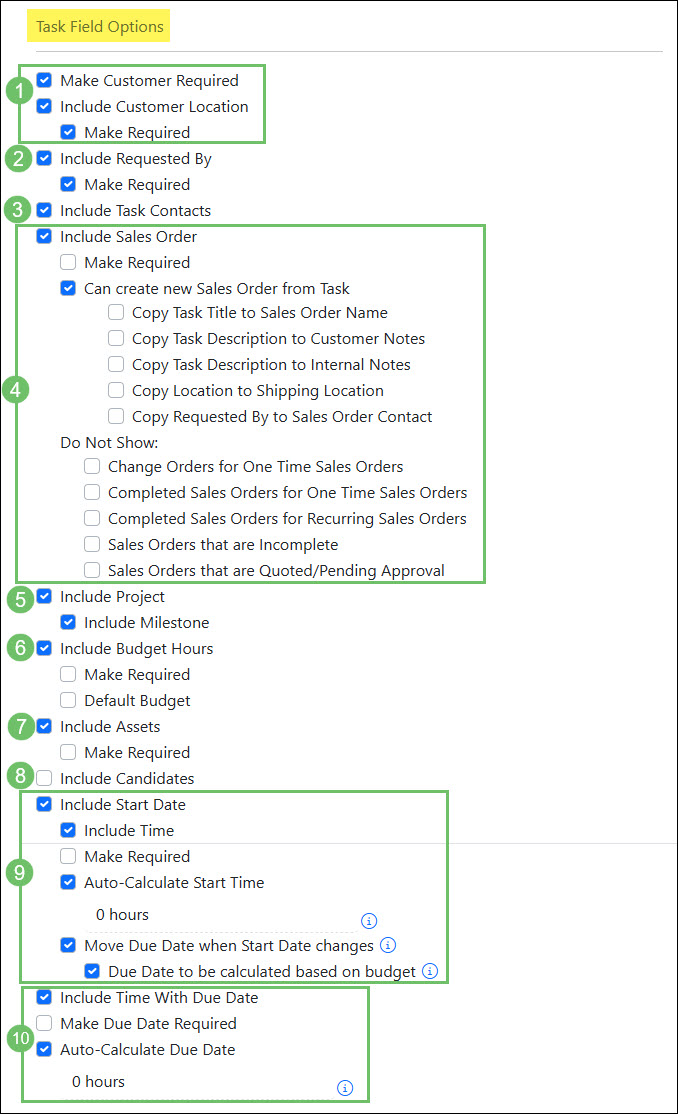
- Customer Info: There are checkboxes here related to the Customer information which are described further below:
- Make Customer Required: If this is required, users will have to associate a Customer, either before the Task is created or before it is marked Done (if the Type was altered after the Task was created).
- Include Customer Location: Allows users to choose the Customer Location from a drop-down menu on the Task.
- Make Required: If this is required, users will have to associate a Customer Location, either before the Task is created or before it is marked Done (if the Type was altered after the Task was created).
- Requested By: There are checkboxes here related to the Customer or Employee information which are described further below:
- Include Requested By: Allows you to associate the person (Customer Contact or Employee) who has requested the Task to be worked on. If selected, you can make this field required as described below.
- Make Required: If this is required, users will have to associate a Customer Contact or Employee, either before the Task is created or before it is marked Done (if the Type was altered after the Task was created).
- Include Task Contacts: Adds a Task Contacts button located under the Requested By field on a Task. This button will open the Task Contacts Info dialog window which allows you to select additional Customer Contacts that should be associated with the Task being worked on. This feature ensures an easy access to the Contact Information to the appropriate Contacts while completing work.
- Include Sales Order: Allows you to associate a Sales Order related to the Task. After choosing this option, the following options will appear:
- Make Required: Makes associating a Sales Order on this Task Type required before the Task can be marked Done.
- Can create new Order from Task: Allows you to create new Sales Orders from Tasks with this Task Type selected. If this is enabled, there will be a quick-add that pops up when hovering over the Sales Order field on the Task. Once this option is enabled, additional configuration options are available to choose which Task Fields should be copied to the Sales Order when completed.
- Do Not Show: Hides any Orders that meet the following parameters: Change Orders for one-time Orders, completed Orders for one-time Orders, completed Orders for recurring Orders, Orders that are incomplete, or Orders that are Quoted/Pending Approval. These will not appear in the Order drop-down menu to relate to the Task if selected.
- Include Project: Allows you to associate a Project related to the Task. The following options are available:
- Include Milestone: Allows you to select a Milestone for the Project selected on the Task. This is convenient to quickly associate your Tasks to the Project and Milestone without needing to leave the Task page.
- Include Budget Hours: Allows you to enter Budget Hours or the amount of time needed to complete the Task. If selected, the following options will appear which are described further below:
- Make Required: Makes entering a Default Budget required before marking the Task Done. You can enter a numeric value to note the Budget Hours on the Task.
- Default Budget: Allows for a number to populate in this field automatically upon creating a Task of this type. If Default Budget is selected, a space appears to enter the Default Budget amount.
- Include Assets: Allows you to select Assets from the related Customer’s Assets that are needed to complete the Task or are related to the Task. If selected, the option to make an Asset required before marking the Task Done will appear.
- Include Candidates: This checkbox allows you to dictate whether Candidates can be associated with created Tasks of this Type. When enabled, a separate field will be available on the Task to select Candidates related to the Task being worked on.
- Include Start Date: Allows you to select a Start Date for Tasks of this type. If selected, the following options will appear which include:
- Include Time: Allows you to select what time the Task should start.
- Make Required: Requires a Start Date/Time to be entered before a Task can be marked Done.
- Auto-Calculate Start Time: Auto-calculates the Start Time when a Task is created, based on the numeric value entered here. The Start Time will be calculated off of the Created Time.
- Note: If Auto-Calculate Start Time is toggled on, a blank space appears to enter the number of hours from the Task’s creation that will be the start time. In other words, if you enter a 4 in the space, you’re allowing 4 hours from the Task’s creation to start the Task in order for the Task to be considered started on time.
- Move Due Date when Start Date changes: Automatically adjusts a Task’s Due Date by the same amount of time whenever its start date is modified. This function ensures that the original duration or timeline allocated for a Task remains consistent without requiring manual updates to both dates.
- Due Date to be calculated based on budget: If this option is enabled, the amount entered in as a budget will be used to calculate the Due Date while using the Start Date as the beginning Date and Time.
- Due Date: The following configuration options are available in regards to the Tasks Due Dates:
- Include Time With Due Date: Includes a specific time to be entered along with the Due Date.
- Make Due Date Required: A Due Date will need to be entered on the Task before it can be marked Done.
- Auto-Calculate Due Date: Auto-calculates the Due Date and Time when a Task is created, based on the numeric value entered here. The Due Date will be calculated off of the Created Date and Time.
- Note: If Auto-Calculate Due Date is toggled on, a blank space appears to enter the number of hours from the Task’s creation that will be the Due Date time. In other words, if you enter an 8 in the space, you’re allowing 8 hours from the Task’s creation to mark the Task Done in order to be considered completed on time.
Example of Task Type Field Configuration Options
- Customer Info: There are checkboxes here related to the Customer information which are described further below:
-
Task Priorities
Task Priorities are used to determine the importance of a Task, which will allow you to see at-a-glance from your Task List which Task should be worked on first. When adding Task Priorities, you can note how long the response time should be for Assignees, whether the Priority is the default for Tasks, and a color icon to differentiate Task Priorities on the Task List. Establishing your Task Priorities with their response times will play a large role in calculating your Task Service Metrics, as well. Below is a screenshot displaying how adding Task Priorities appear.
Company → Settings → Tasks → Tasks Setup → Task Priorities
- Name: The name of the Priority, which will show up to be selected.
- Color: Enables users to select a color from the drop-down menu to differentiate Priorities. This will show on the Task List, Projects, and Reports.
- Response Time: Allows you to note how quickly Tasks of this Priority should be responded to in hours. This will determine if a Task has been started on time, which is displayed on the Team Efficiency Report.
- Is Default: Notes if the Priority is the default for Task creation.
- Description: Allows you to enter a description for the Priority.

Example of Configured Task Priorities
-
Task Pools
Tasks can be assigned to either a single Employee or a group of Employees called a Pool. Pools are one or more Employees in a group who can be assigned Tasks. When a Pool is assigned, each Pool member will receive a notification (unless notifications are turned off) from which they can add or re-assign themselves as the Task Assignee on a first-come-first-served basis. Once a Pool member assigns themselves the Task, it will be worked on by that Employee. There are default Pools in your settings that can be edited, and you can also create Pools from the Pool List. Below is a screenshot illustrating how adding Pools appears and a list of what you can configure here.
Company → Settings → Tasks → Pools Setup → Pools
- Name: The name of the Pool and will be visible in Task Assignee drop-down menus for you to choose from.
- Default Pool: Allows you to choose if this Pool will be the Default for created Tasks that are Unassigned.
- Description: You can add a brief Description of this Pool’s function or purpose.
- Custom Fields: If any Global Custom Fields have been saved for Pools, there will be additional fields to fill in when creating Pools in Striven.
- Pool Managers: Allows you to choose Employees who will be the Managers of the Pool being created.
- Note: Pool Managers can assign any Task from the Pool to anyone, as well as assign any Task to the Pool.
- Notification Recipients: Members of the Pool who will receive an email when a Pool is assigned to a Task. You can add emails, Employees, or Job Titles to receive notifications for the selected Pool.

Example of Configured Task Pools
-
Checklist Items Library
Checklist Items are steps or actions that will need to be completed before a Task can be marked Done. You can add Checklist Items to individual Tasks (see Task Actions below), but you can also add them in the global settings to Task Types in the Checklist Items subsection. By adding Checklist Items to Task Types, they will appear on Tasks created using those particular Task Types to be checked off by Assignees as they complete the work. You can also print the Checklists from the Task’s Checklist section if desired. Below is a screenshot representing how the Checklist Items appear in the settings. To view Checklist Items, use the following steps below:
Company → Settings → Tasks → Tasks Setup → Checklist Items
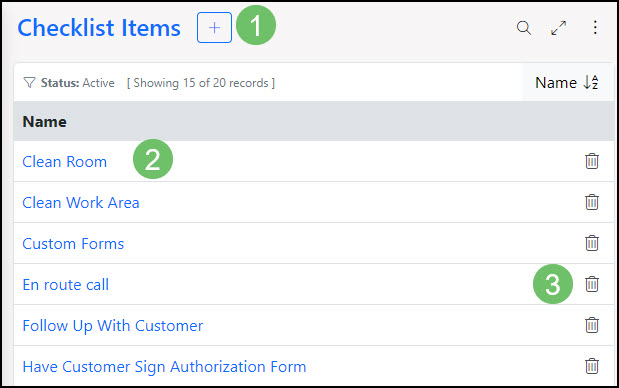
Example of Checklist Library List
- Add: Allows you to add new Checklist Items. Once added, these can be added to Task Types.
- Name: Lists Checklist Items that have been created within the library.
- Deactivate The Trashcan icon allows you to deactivate a Checklist Item.
-
Add Checklist Items to Task Type
Once the Checklist Library has been set up, you can now have them saved per Task Type. Adding Checklist Items into the Task Types will essentially allow the checklist to be populated each time a Task of that type is created.
To add a checklist to a Task Type, use the following steps:
Company → Settings → Tasks → Tasks Setup → Task Types → Select Task Type from List → Checklist Items located under the waffle menu → Add
- Checklist Item Name: Allows you to search your Checklist Items by name and select them from a drop-down list.
- Name: Displays the Names of the Checklist items added to the Task Type
- Move: You can click and drag the Checklist items to the order in which you would like them to display.
- Deactivate: Allows you to remove and deactivate a Checklist item directly from this list.
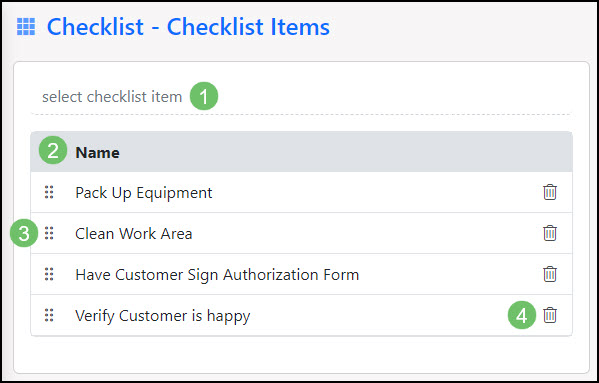
Example of Add Checklist Items to Task Type
-
Task Formats
Task Formats enable you to print Task-related information from within Striven or the Customer/Vendor Portal, utilizing merge fields to quickly populate Task data to the Printable Format.
-
Required Permission
Prior to configuring a Task Format, the “Task Formats – Add/Edit” permission will need to be added to the User Role of any Employees that will be creating or editing formats. User Roles can be adjusted by navigating Company > Settings > Employees > Roles.
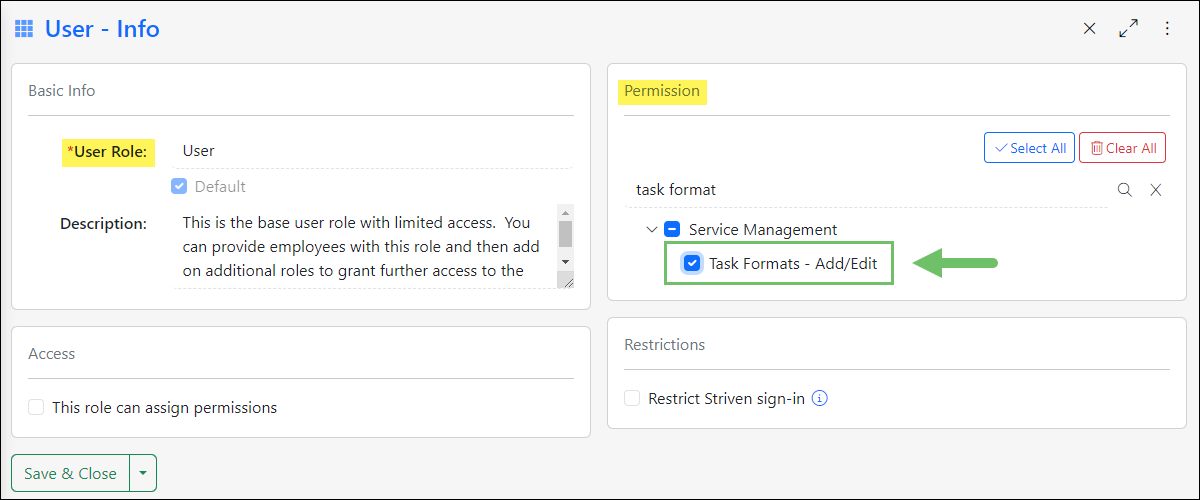
Example of the Permission Required to Add/Edit Task Formats
-
Creating Task Formats
You can view and configure your Task Formats from the Task Format List page by navigating to Company > Settings > Tasks > Tasks Setup > Task Formats.
When viewing the Task Format List, select the Plus (+) button from the top of the page to add a new Format.
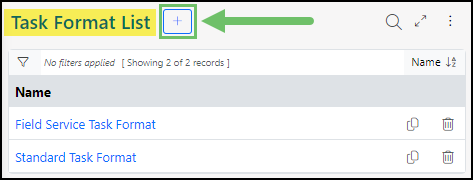
Example of the Add Button on the Task Format List Page
This will direct you to the Add Task Format page, where you can select a name for the format and designate whether it should be visible on the Portal. You can also choose to enable page numbers to display on the format.
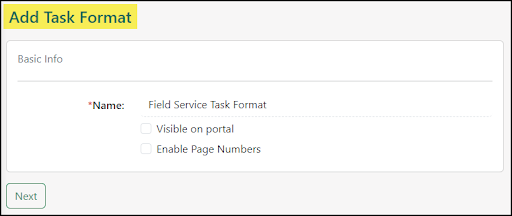
Example of Basic Info Section of the Task Format Info Page
After configuring the Basic Info settings, you can begin adding sections to the format using the Plus (+) button located in the Sections panel of the page.
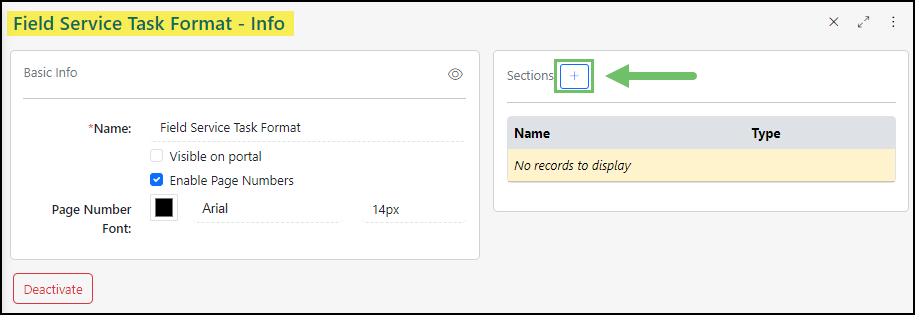
Example of the Add Button on the Sections Panel in a Task Format Info Page
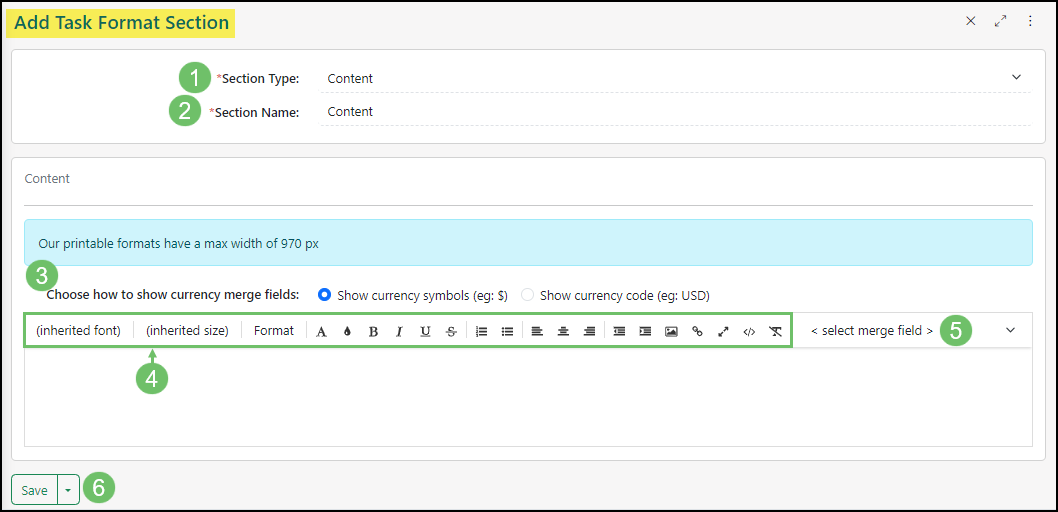
When adding a section, there are a number of customization options available which allow you to add content and styling to the format. These options are detailed below:
- Section Type: When adding a section to a Printable Format, you have the ability to select the Section Type. Currently, Task Formats only have one Section Type for Content.
- Section Name: Allows you to name the added section. This can be helpful if your Format contains different sections for headers, body, and footers.
- Choose How to Show Currency Merge Fields: These options allow you to choose whether the currency symbol or the currency code should display in reference to monetary amounts populated via merge fields.
- Editing Actions Menu: Each section allows you to add and stylize content using a Rich Text editor. From this menu you can edit the font, add numbering/bullets, change content alignment, insert images and links, and edit the HTML code for the section.
- Select Merge Field: You can use this drop-down menu to select merge fields that will populate Task related information such as Task Start and Due Dates, Task Descriptions, and Task Custom Fields into your format.
- Save: Allows you to Save, Save & Close, or Save & Add New the configurations you’ve made to this format section.
Example of the Add Task Format Section Settings
You can add multiple sections to the format, as needed. If you would like to preview how the Task Format will display when printed, select the Preview (eye) icon located in the top right of the Basic Info panel. You can then select a recent Task to preview from a drop-down list, and a PDF will generate for review.
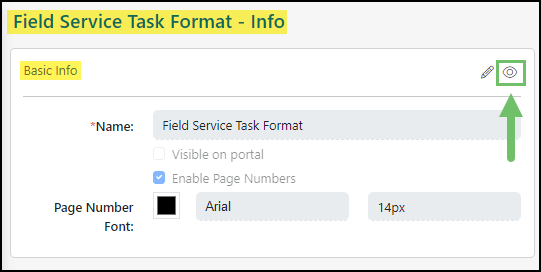
Example of the Preview (eye) Icon on a Task Format
Once configured, you can assign specific Task Formats to individual Task Types, allowing you to restrict Task Types to be printed with select formats.
To associate the Task Format to a Task Type, navigate Company > Settings > Tasks > Tasks Setup > Task Types, then select a Task Type from the list.
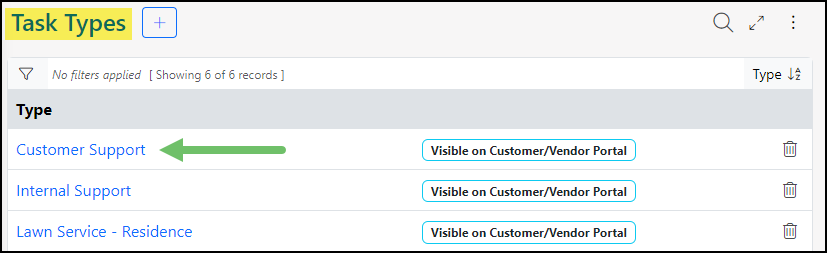
Example of the Task Types List
Once viewing the Task Type – Info page, use the Available Formats field to select which Task Formats can be used to print Tasks of this type.

Example of the Available Formats Option in Task Type Info Settings
-
Utilizing Task Formats
Tasks can be printed from within your Striven system and/or from the Customer/Vendor Portal.
To print a Task from within Striven, select the Print icon from the Task Actions menu. A drop-down menu will appear allowing you to select the Task Format you would like to use for printing.
- Note: If you do not have multiple formats configured or selected for the Task Type, clicking the print button will automatically download the Task in the only available format and there will be no drop-down list.
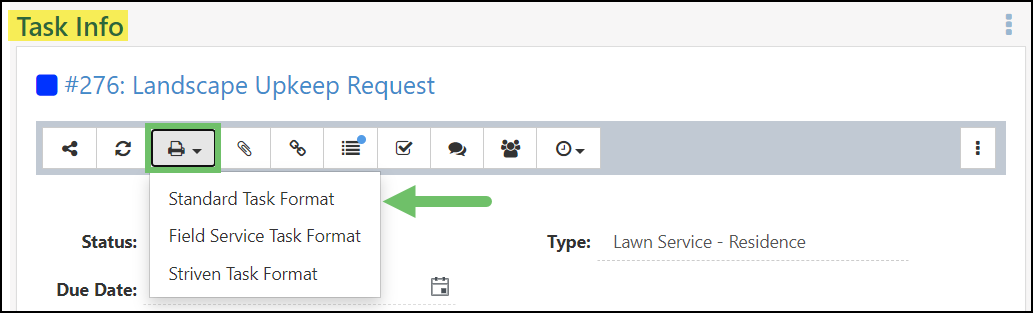
Example of the Available Print Format Options on a Task
Once the Task Format is selected, a viewer window will open allowing you to print the Task or save the PDF.
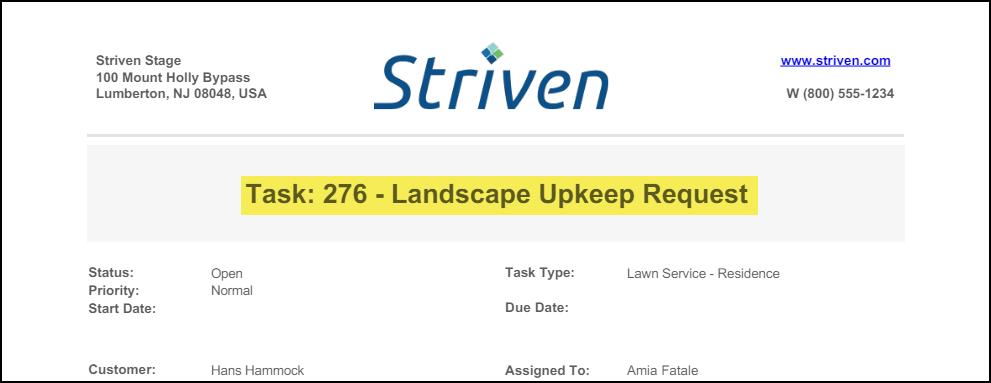
Example of a Printable Task Format
If you would like for a Customer/Vendor Contact to be able to print a Task from the Portal, they will only have access to the Task Formats which are marked Visible In the Portal when selecting the Print option from a Task. Similar to the function with your Striven system, clicking the Print icon on a Task in the Portal will allow the Contact to choose the Format they would like to utilize from those available for selection.
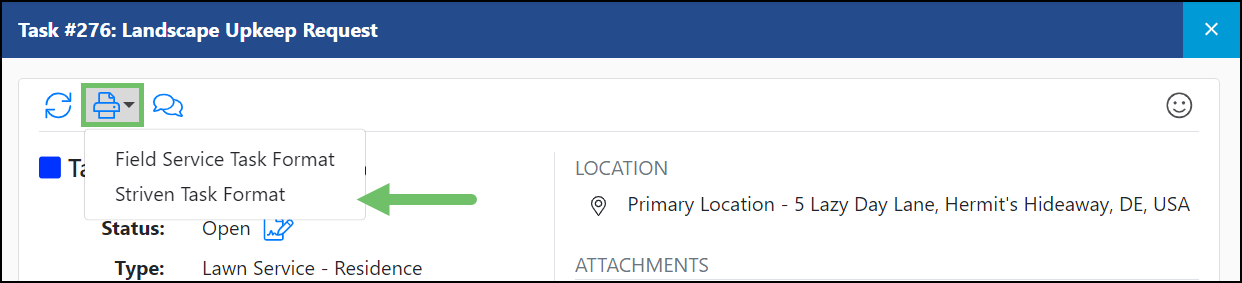
Example of the Print Options Available on a Task in the Customer/Vendor Portal
- Note: If there is only one format available for selection, the PDF will automatically generate using the available format when the Print button is selected, and no drop-down menu will appear.
-
Customer Settings Task Notifications
Notifications for Tasks can be set up at the Customer level. This is a very useful feature if Tasks for a particular Customer are generally handled by the same Employee or Team. This is also very useful if a particular Customer Contact would like to be notified of activity for Tasks associated with their Company. Notifications can be set for specific Task Types or all Task Types.
To access Customer-Level Task Notifications from the Customer’s Dashboard Page, click on the Customer Navigation Menu → Settings → Task Settings.
The Task Notifications that can be set up here are:
- Task Default Assignments: Determines who should be assigned to Tasks associated with this Customer. It can be different for different Task Types or the same across all Task Types.
- Note: If there is a Project or Order listed on the Task, the Assignments listed for them will supersede the Customer Task Assignments. If a Project is listed, Project Assignments are checked first. If no Assignment is selected, the Default Pool will be assigned. If no Project is listed but an Order is listed, Order Assignments will be checked first. If no Assignment is selected, the Default Pool will be assigned. If there is no Project or Order related to the Task, the Customer Assignments will be used.
- Task Status Update – Task Created: The recipients listed here will be notified by email when a Task gets created associated with their Company.
- Task Status Update – In Progress : The recipients listed here will be notified by email when a Task associated with their Company is viewed by the Assignee.
- Note: If a Task is assigned to a Team (turned off by default), any Team member viewing the Task will put the Task in an In Progress status. This is not the case for Pools. The Pool member would need to reassign the Task to an Employee/Team. The Task will go into an In Progress status after it is viewed by the Employee or Team member.
- Task Status Update – Done : The recipients listed here will be notified by email when a Task associated with this Company is marked Done.
- Task Approvers: The recipients listed here will have the ability to approve Tasks that require approval associated with this Customer.
- Task Happiness Rating: The recipients listed here will be notified of any Happiness Ratings and comments left for listed Tasks associated with the Customer.
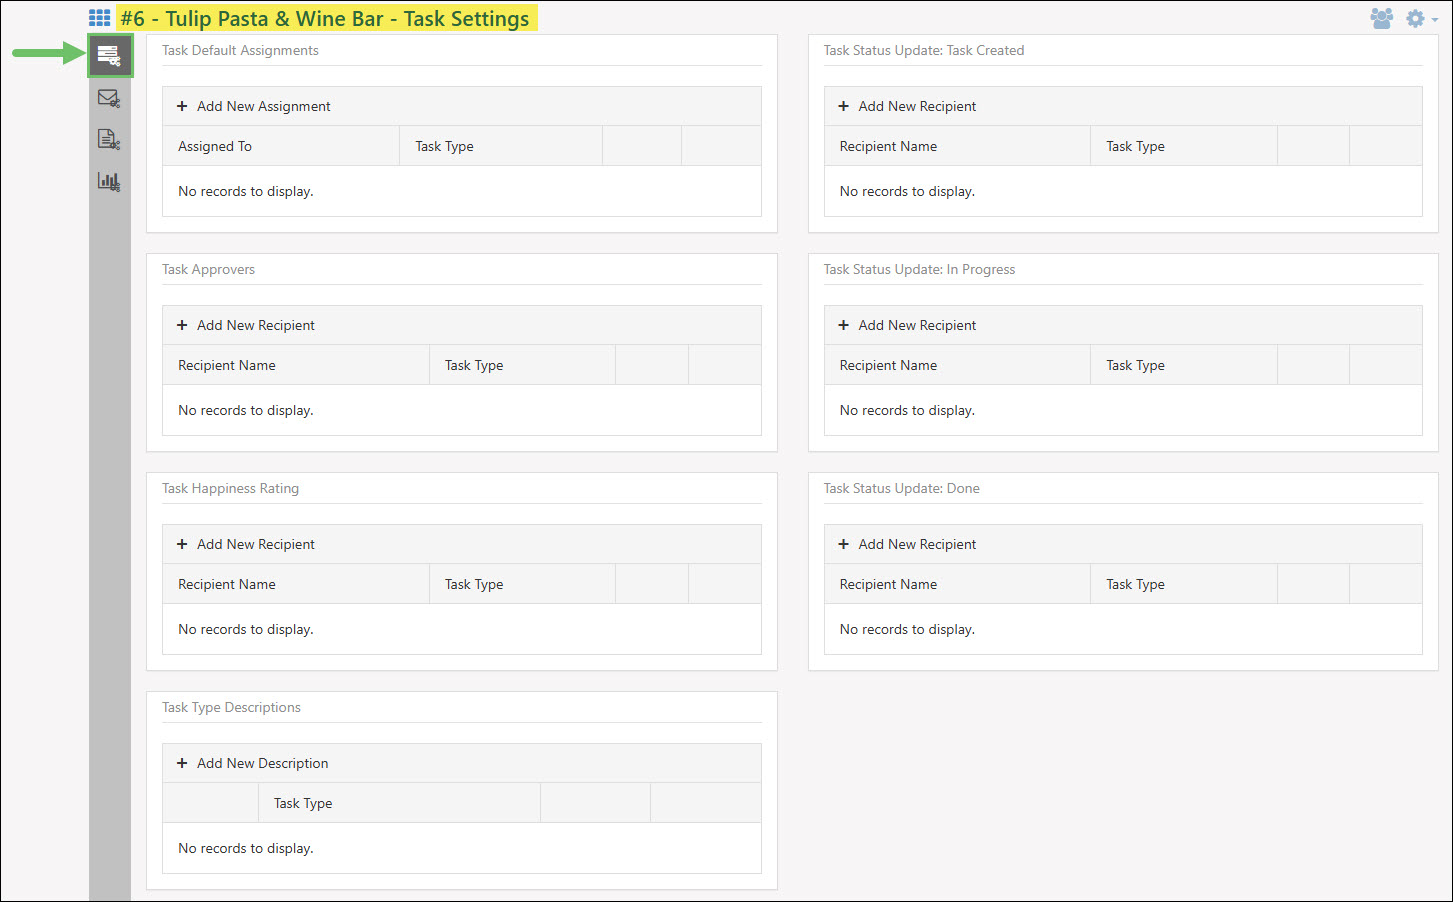
Example of Customer Settings Task Notifications
- Task Default Assignments: Determines who should be assigned to Tasks associated with this Customer. It can be different for different Task Types or the same across all Task Types.
-
Recap
With this guide, we’ve discussed how to establish core operational structures, including creating distinct Task Types, defining Task Priorities for urgency tracking, and organizing employees into functional pools for efficient resource allocation. We have covered advanced customization options, such as building a standardized Checklist Library to attach to specific Task Types and designing printable formats for physical record-keeping. Additionally, we’ve explored setting up Customer-level Task notifications to automate external updates.
FAQs
-
My Customer has said they are unable to print a Task that we are working on together from the Customer Portal. I have a format set up and am unsure why it is not available to them.
This may be due to visibility configuration set up within the Task Format. Confirm that you have the Visible on portal option enabled when editing the Task Format. Once this is enabled, your Customer should be able to access the Task Format through the Customer Portal.
-
I work with many Contacts for Tasks with my Customer. The owner would like to be kept informed for every time their employees enter a Task for me to review. How can I make sure they remain notified even though they is not set as the Requested By?
Using the Task Notifications within a Customer’s Settings is a great way to designate specific Contacts to receive Task Notifications even though they are not directly related to the Task. You can specify a Contact to receive a notification for Tasks when they are created, are in progress, or when they are marked done.