
Portals
Vendor Portal
Support Guide
-
Overview
The Striven Vendor Portal is designed to enhance your Vendors’ experience significantly. This powerful tool provides numerous features that enable your Company to communicate and collaborate more efficiently with your Vendors. Through the Vendor Portal, Vendors can access various functionalities, including accepting Purchase Orders and submitting Bills for review.
Read this guide if you are trying to:
✔ Learn how to accept and review Purchase Orders.
✔ Review the process for submitting Bills for work completed.
✔ Understand how to increase visibility of ongoing work in the Vendor Portal.
-
Customer/Vendor Portal Menu Bar
Both the Customer and Vendor Portal will have the same options from the Portal Menu Bar. Below is a screenshot illustrating how the Portal Menu Bar appears.

Example of the Portal Menu Bar in the Vendor Portal

To learn more about what can be accomplished with the Portal Menu Bar, review the Customer/Vendor Portal Menu Bar section from our
Customer Portal Guide.
-
Vendor Portal Dashboard
The Vendor Portal Dashboard displays the widgets selected for the Vendor Portal, which can include Vendor’s financial information for past due balances, Purchase Orders requiring Acceptance, Vendor billing summary, Task summary, and more. Below is a screenshot illustrating how the Vendor Portal Dashboard appears and a description of what can be accomplished there.
- Needs Acceptance: Displays the number of Purchase Orders that need acceptance from the Vendor with a link to navigate to the Purchase Orders list prefiltered for Pending Purchase Orders.
- Recents: Displays a list of pages recently viewed by the logged-in user such as specific Transactions, Purchase Orders, Tasks, Assets, etc.
- Vendor Billing Summary: Displays a summary of the financial information for the Vendor including the overall open balance amount along with how much is current and past due. A total for the unapplied Bill Credits will also be shown.
- Vendor Display Widget: A customizable widget that can include any information you would like to display to your Vendor, such as a welcome message, a hyperlink, images, etc.
- Work Summary: Displays a summary of Purchase Orders that are Open or recurring.
- Task Completion: Displays a bar graph showing Task completion progress by month.
- Asset Status: Lists Vendor Assets with the status set to either In Service or Out of Service. An option is available to Add Assets to Monitor Status in order select which Assets being tracked should be included in this widget.
- Task Summary: Displays how many Tasks are currently in an Open or On Hold status.
- Efficiency: Displays a pie chart depicting the efficiency results of Tasks completed within the current month.
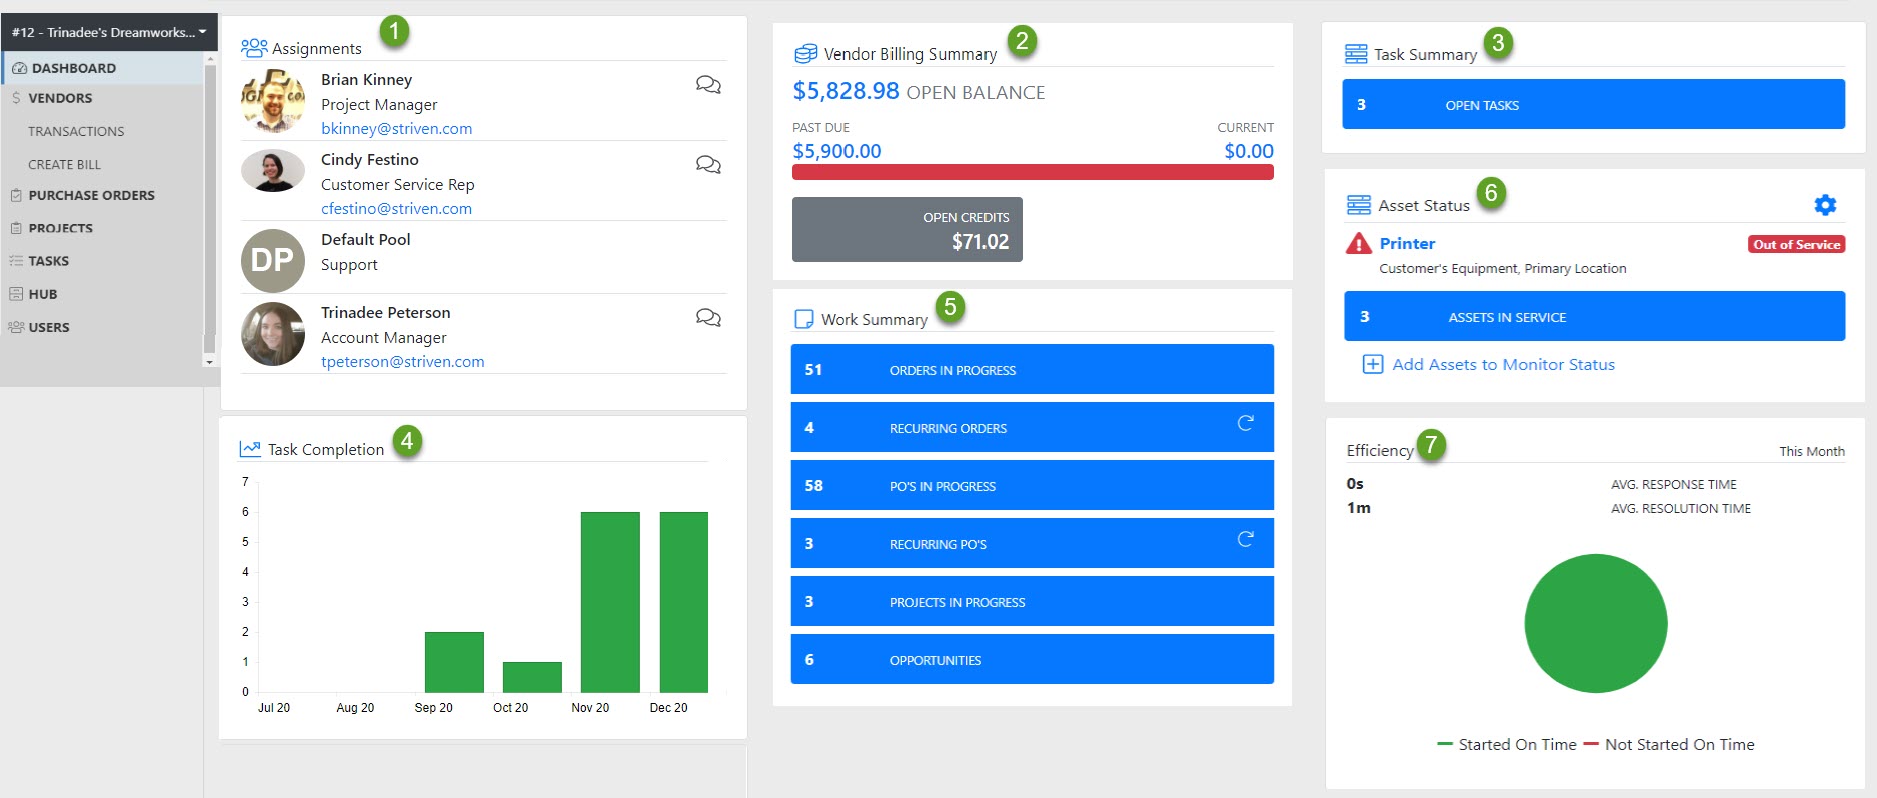
Example of Vendor Portal Dashboard Widgets
Learn more about configuring and customization the Vendor Dashboard by reviewing the Managing Dashboard Widgets section from our Customer/Vendor Portal Setup Guide.
-
Vendor Portal Menu
Like the Customer Portal Menu, the Vendor Portal Menu is very similar and also located on the left side of the Portal screen. It too is a useful tool to navigate through the different areas of the Vendor Portal. Many of the options are the same as with the Customer Portal, such as the Dashboard. Other similar Portal Menu options include Opportunities, Tasks, Hub, and Users. The difference in the Vendor Portal from the Customer Portal would be the Vendor financial Transactions and Vendor Billing information.
As with the Customer Portal, the options available for your Vendors to view here depend on which Portal content and permissions you have selected to make visible in your Vendor Portal Roles. Below you will find an example of how a Vendor Menu appears on the Portal, followed by an explanation of each menu option in the sections that follow.
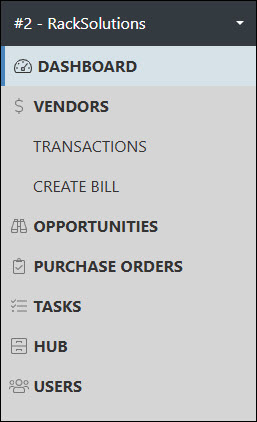
Example of the Vendor Portal Menu Options
-
Transactions
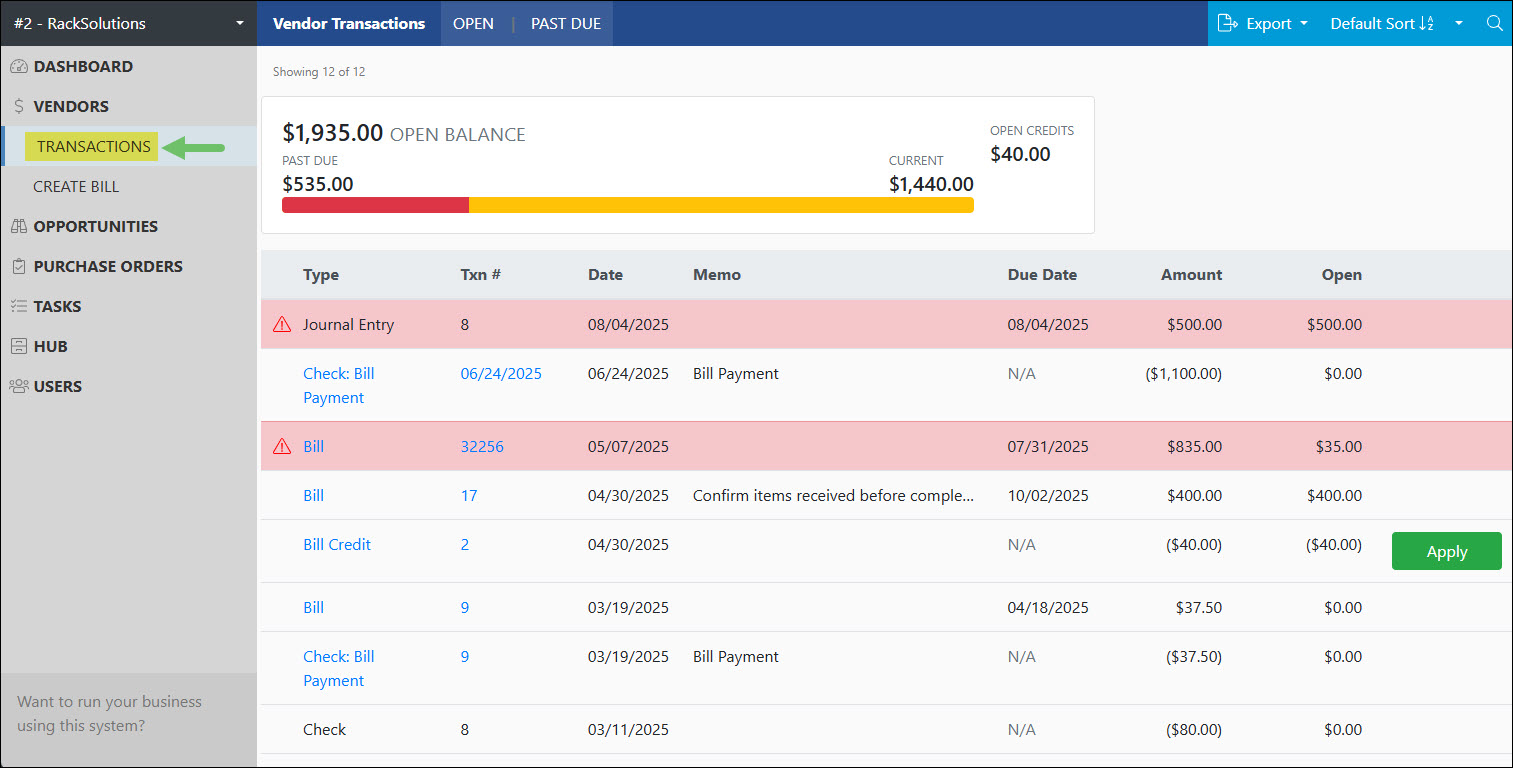
The Transactions list displays a history of the Vendor’s Transactions, including Bill Credits, Bills, CC Charges, CC Charges: Bill Payments, CC Refunds, Checks, Checks: Bill Payments, Checks: Refunds, Checks: Tax Payments, Checks: Service Charges, and Journal Entries that have been related to the Vendor. By default, the list will show all Transactions but can be adjusted to show only open or past due. The Transactions list is located in the side menu of the Vendor Portal located under the Vendors option. Transactions that have been voided will not be accessible through the Vendor Portal.
Example of the Transactions List in the Vendor Portal
Permissions
The following permissions will need to be configured for the Contact’s Portal Role if they will be managing or viewing Transactions in the Vendor Portal:
- “Bills: View”
- “Credits: Apply”
- “Transaction History: View”
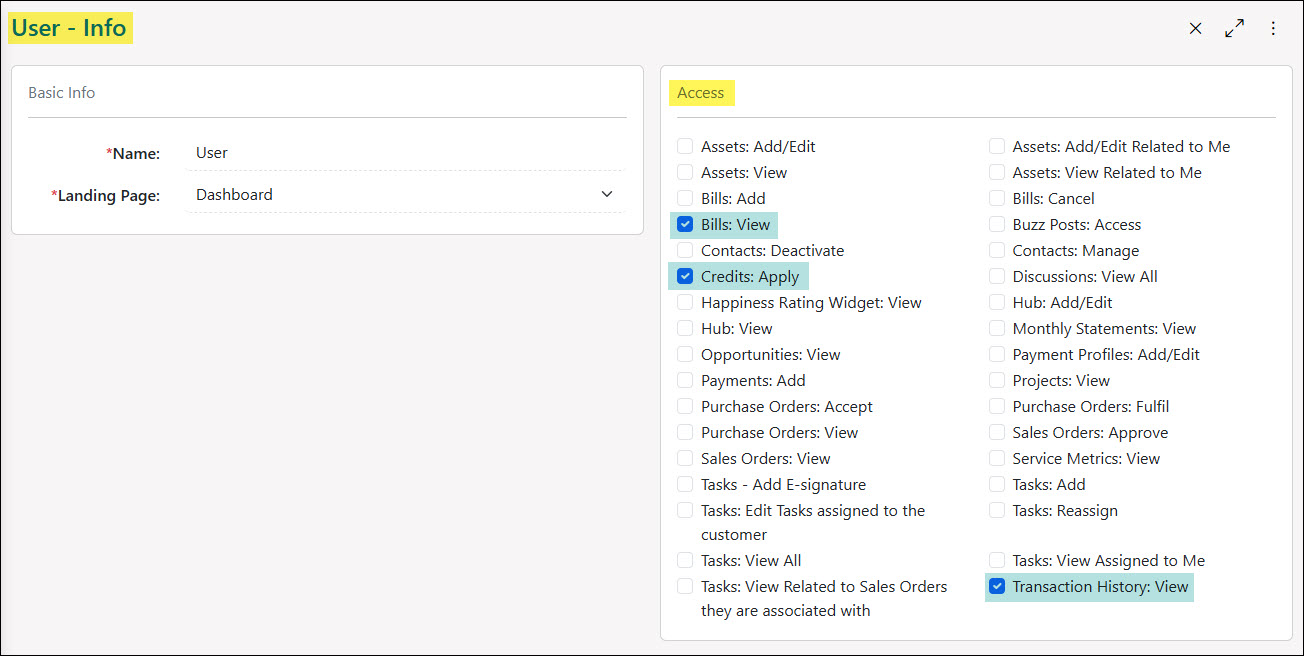
Example of Transaction Related Permissions in the Vendor Portal
Learn more about managing Portal Roles and Permissions for the Customer/Vendor Portal by reviewing the Customer/Vendor Portal Roles section in the Customer/Vendor Portal Setup Guide.
Transactions List
Below is a screenshot illustrating how the Transactions list in the Vendor Portal appears and a description of what can be accomplished there.
- Quick Filters: Click on one of the options listed here to easily adjust the list to show only open or past due Transactions.
- Export: Allows the user to export the list of Transactions into a .xlsx Excel file.
- Search Filters: There are an array of search filters available on the Transactions list to narrow results such as:
- Date Range: Filters the list based on the Transaction date that is listed on the Transaction.
- Type: Narrows results based on the type of Transaction such as Bill Credits, Bills, CC Charges, CC Charges: Bill Payments, CC Refunds, Checks, Checks: Bill Payments, Checks: Refunds, Checks: Tax Payments, Checks: Service Charges, and Journal Entries.
- Transaction #: Adjusts results listed based on the number listed on the Transaction.
- PO #: Narrows results based on the Purchase Order that was related to the Transaction.
- Memo: Searches through the memos that have been entered on the Transactions and will only show results that include what is being searched for.
- Open: Adjusts list to only show Transactions that still have an open balance remaining.
- Past Due: Adjusts list to only show Transactions that are past the due date.
- Include Denied Bills: Adjusts the list to only show Bills that have been submitted by the Vendor Contact through the Vendor Portal and was marked as denied.
- Summary: The summary area at the top of the Transactions list will be the overall total dollar amount that is open. A bar graph will be displayed to indicate how much of the open balance is past due vs. current. To the right of the bar graph will have a total of open Bill Credits.
- Type: Displays the type of Transaction that is accessible to the Vendor. Transaction Types include Bill Credits, Bills, CC Charges, CC Charges: Bill Payments, CC Refunds, Checks, Checks: Bill Payments, Checks: Refunds, Checks: Tax Payments, Checks: Service Charges, and Journal Entries that have been related to the Vendor. Clicking on the Transaction Type listed will open the Transaction in a new window to view additional details. A red highlight will appear on Transactions that are past due to indicate the lateness.
- Txn #: Lists the number that has been entered onto the Transaction. Clicking on the Transaction number will open the Transaction in a new window to view additional details.
- Date: Shows the date that has been entered onto the Transaction.
- Memo: Will display any memo that has been entered onto the Transaction.
- Due Date: Displays the date that the Transaction is due to be paid.
- Amount: Shows the total amount that has been entered into the Transaction.
- Open: Displays the amount that is still open on the Transaction. If $0 is shown, this indicates the Transaction has been closed.
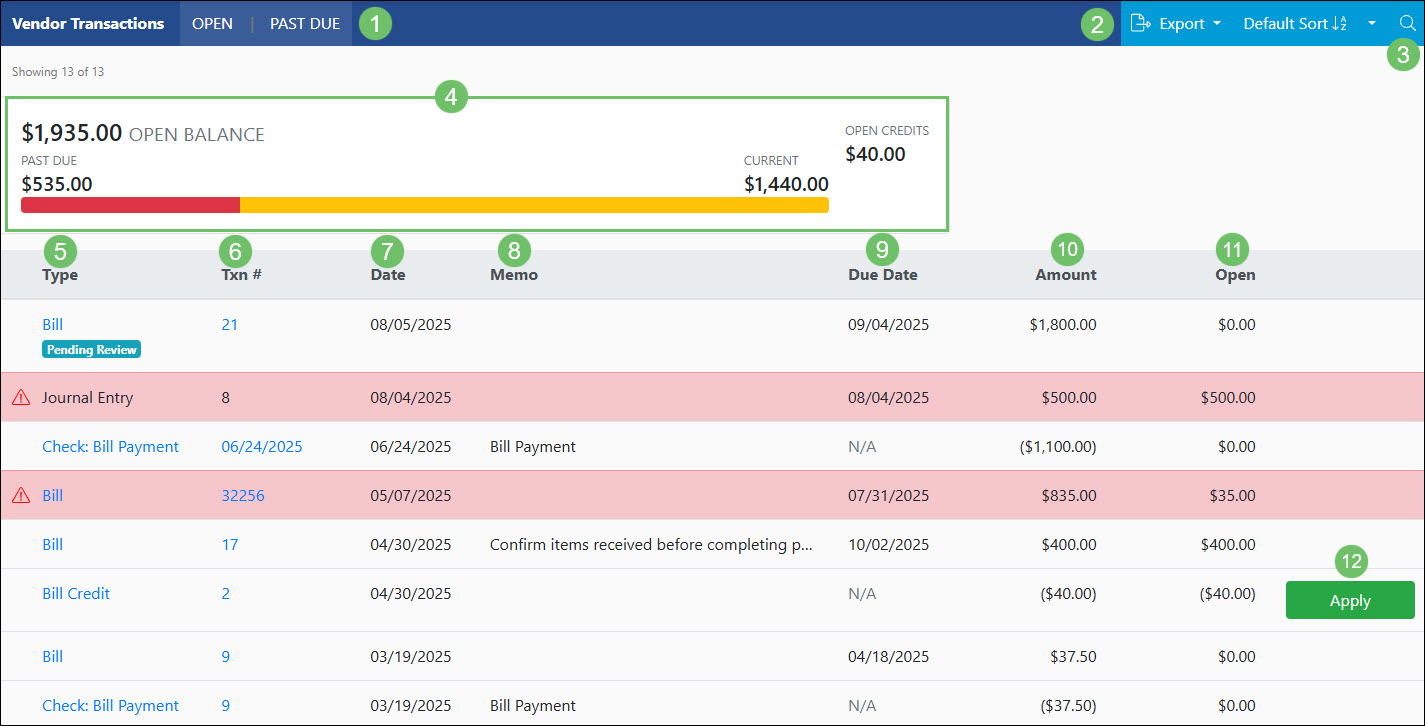
Example of the Actions and Information Available on the Transactions List in the Vendor Portal
-
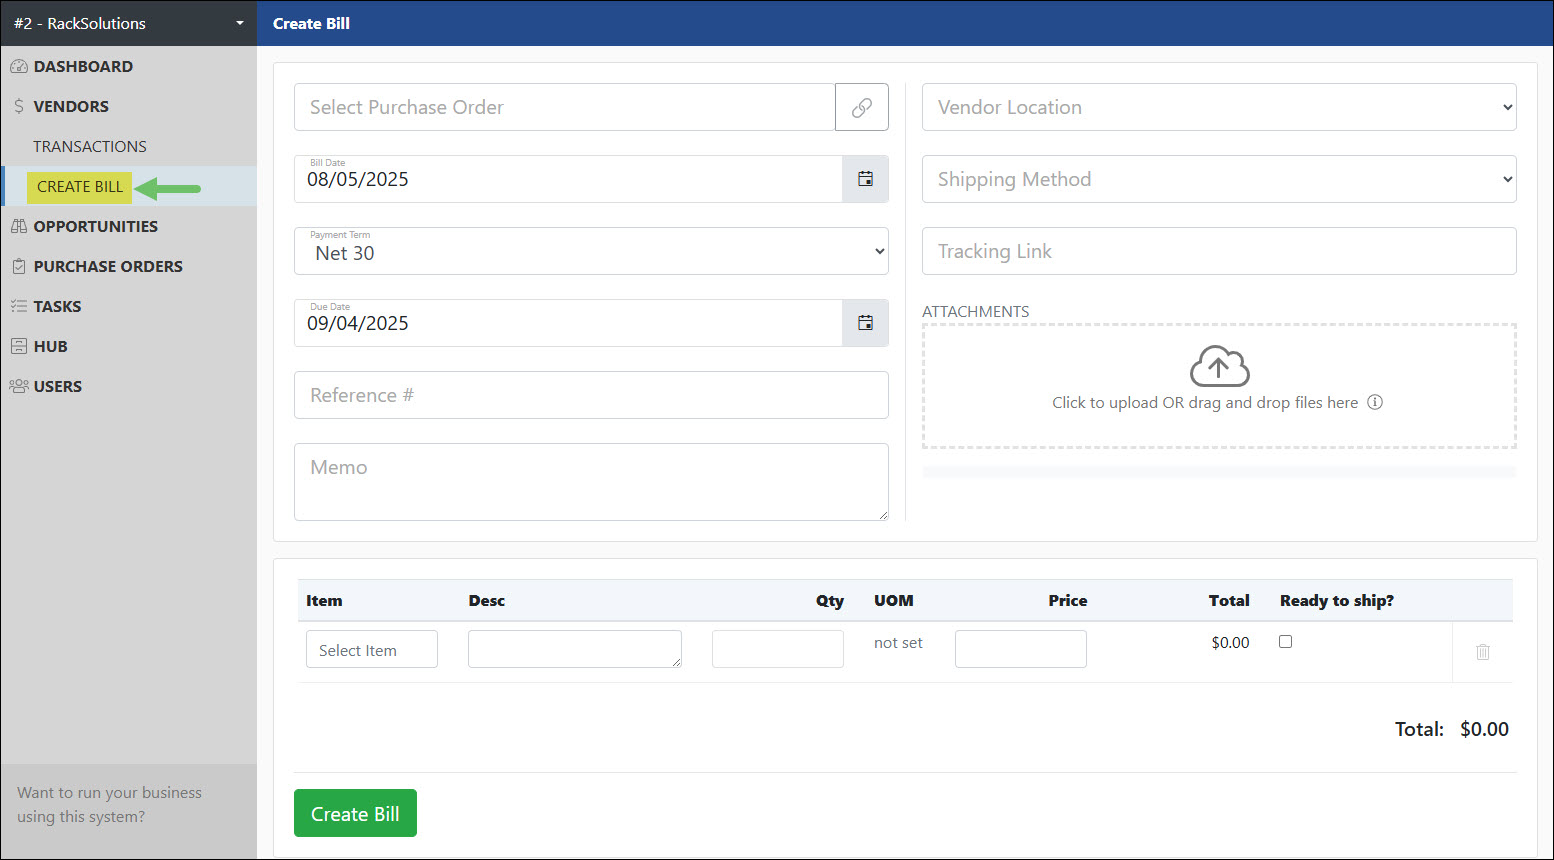
Create Bill
The Create Bill page allows the Vendor Contact to submit a Bill for work completed in order for someone within your company to review and approve the Bill to then be processed and paid.
Example of the Create Bill Page in the Vendor Portal
Permissions
The following permissions will need to be configured for the Contact’s Portal Role if they will be managing or viewing Bills in the Vendor Portal:
- “Bills: Add”
- “Bills: View”
- “Bills: Cancel”
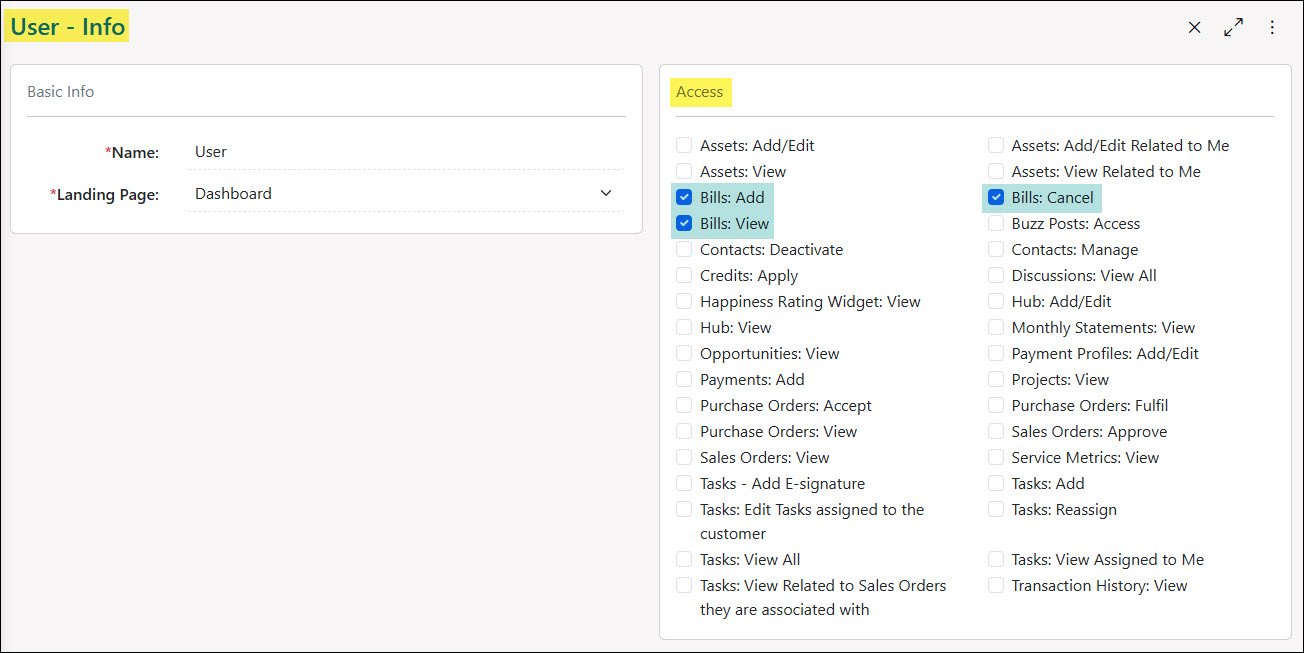
Example of Bills Related Permissions in the Vendor Portal
Learn more about managing Portal Roles and Permissions for the Customer/Vendor Portal by reviewing the Customer/Vendor Portal Roles section in the Customer/Vendor Portal Setup Guide.
Create Bill Page
Below is a screenshot illustrating how the Create Bill page appears and a description of what can be accomplished there.
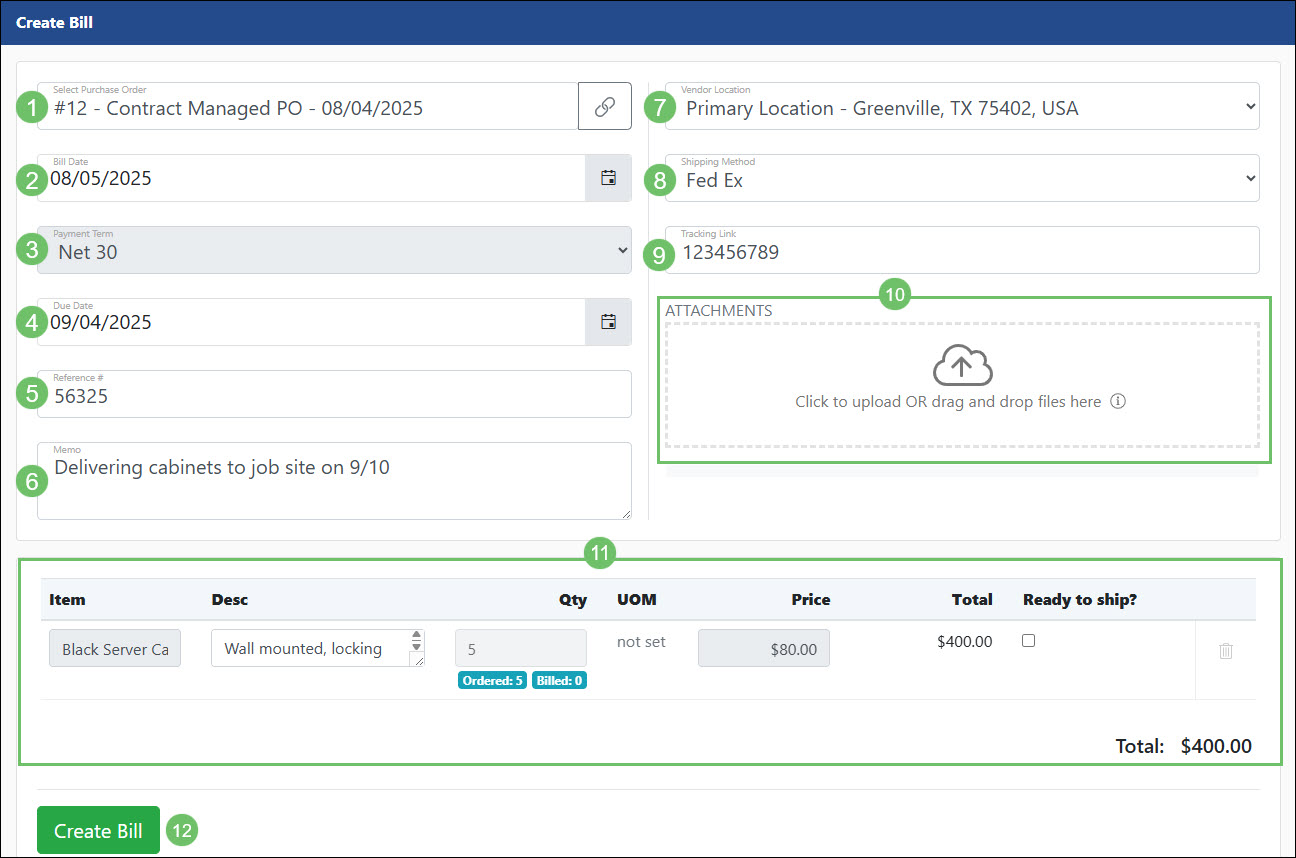
- Select Purchase Order: If Purchase Orders have been created for the Vendor, the Vendor Contact can select from the available open POs in order to prefill in information such as dates, item information, etc.
- Bill Date: The date that is associated with the Bill.
- Payment Term: Determines the date the Bill should be considered due. Based on the Bill Date and the Payment Term selected, the Due Date will prefill in with the appropriate date.
- Due Date: The date the Bill should be considered due for payment and be closed.
- Reference #: The number that should be referred to when referencing the Bill. The number entered here will become the Bill number within the system.
- Memo: Any notes that should be indicated on the Bill can be entered within the Memo field for later reference.
- Vendor Location: A dropdown list which houses the Vendor Locations that were added to the account and can be selected to be associated with the Bill.
- Shipping Method: A dropdown list of Shipping Methods that have been configured within the system and can be selected in order to associate to the Bill with physical type Items.
- Tracking Link: A number or link that can be added in order to have the tracking information easily accessible from the Bill.
- Attachments: Allows the user to upload any external files that should be housed with the Bill.
- Items: Items that should be added to the Bill. If a Purchase Order is selected, the Items from the PO will automatically be filled into this area. To have Vendor Contacts be able to select from a list of Items from the system, the Item will need to have the Allow Vendor to include this Item in Bill option toggled on within the Item Info page.
- Create Bill: Creates the Bill which will then be sent to the Review Bills Queue to be approved or denied. To learn more about the Review Bills Queue further, review the Review Bills Queue section from our Accounts Payable Guide.
Example of Creating a Bill in the Vendor Portal
Bill Info Page
A Bill can be viewed by clicking on the Bill number from the Transactions list. This will open the Bill Info page in the Vendor Portal to view more details. Below is a screenshot illustrating how the Bill Info page appears and a description of what can be accomplished there.
- View Applied Credits/Payments: Opens an Applied Credits/Payments pop-up window which houses any Bill Payments or Bill Credits that have been created and applied to the Bill. Any related Bill Payments and Bill Credits can be accessed by clicking on the Transaction listed here.
- Status Tag: A tag will be displayed at the top of the Bill including Pending Review, To Be Paid, Paid, or Denied to indicate the current status the Bill resides in.
- Edit/Cancel Bill: If the Bill was submitted by the Vendor Contact through the Vendor Portal, the user will have the ability to edit or cancel the Bill as needed.
- Bill Information: This section will house information regarding the Bill such as the Bill Total, Date, Payment Terms, Due Date, and Reference #.
- Shipping Method: Displays the method of shipping that was selected on the Bill. A hyperlink for Tracking will be available if a Tracking Link or Number was entered for the Bill.
- Requested By: Lists the internal Employee who was selected on the Bill or Purchase Order in the Requested By field. This field is not available for the Vendor Contact to select if the Bill is being created through the Vendor Portal.
- Attachments: Lists any attachments that were uploaded to be housed with the Bill.
- Memo: Displays any text that was added into the Memo field on the Bill.
- Item Information: Lists any Items that were added to the Bill along with the related Purchase Order where the Item was initially added. Clicking on the Purchase Order listed next to each Item will open the PO for further details. At the bottom of this section will list the total for the Bill along with the current balance that still remains open.
- Discussions: Contains any Discussion Threads that have been related to the Bill. Clicking on the New Thread icon will begin a new Discussion Thread with the Requested By automatically preselected to begin a conversation as needed.
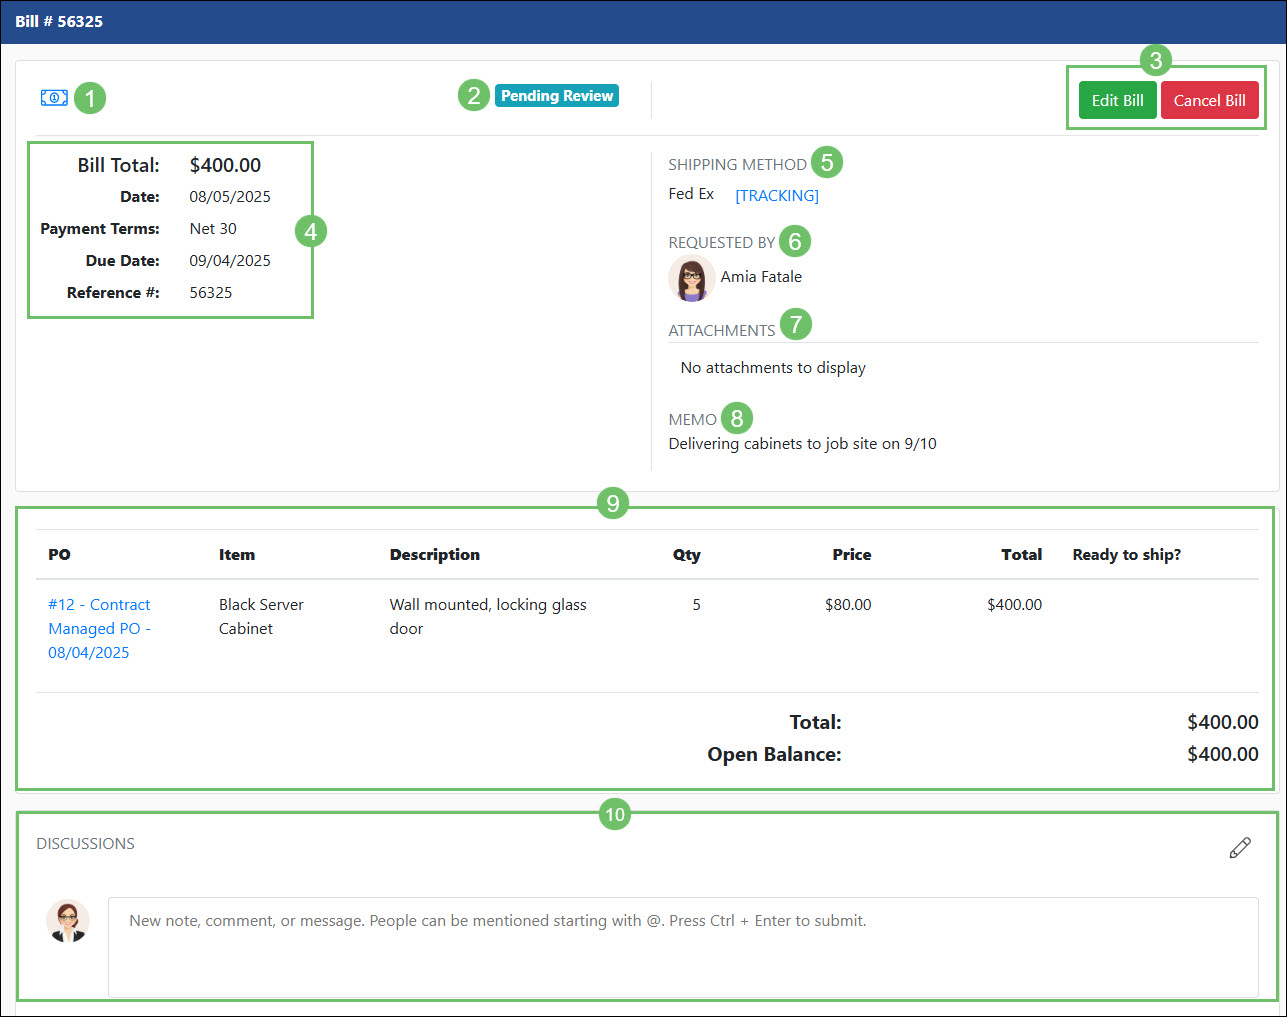
Example of the Bill Info Page in the Vendor Portal
-
Purchase Orders
Striven’s Purchase Orders offer comprehensive support for managing company orders. They facilitate ordering goods or services, receiving stock, and reporting on outstanding obligations. Additionally, the Vendor Portal improves collaboration by enabling Vendors to view both current and fulfilled Purchase Orders. Purchase Orders can be accessed in the Vendor Portal by selecting the Purchase Orders option in the side menu.
Example of the Purchase Orders List in the Vendor Portal
Permissions
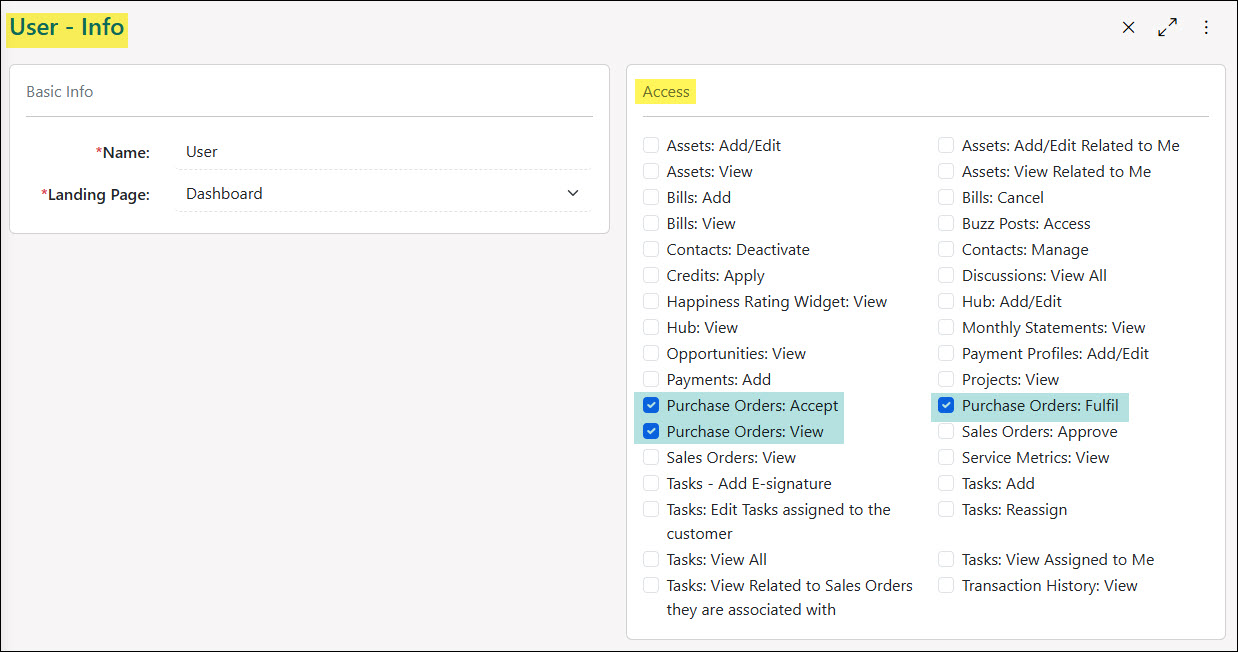
The following permissions will need to be configured for the Contact’s Portal Role if they will be managing or viewing Purchase Orders in the Vendor Portal:
- “Purchase Orders: Accept”
- “Purchase Orders: View”
- “Purchase Orders: Fulfil”
Example of Purchase Order Related Permissions for the Vendor Portal
Learn more about managing Portal Roles and Permissions for the Customer/Vendor Portal by reviewing the Customer/Vendor Portal Roles section in the Customer/Vendor Portal Setup Guide.
-
Purchase Orders List
Below is a screenshot illustrating how the Purchase Orders list in the Vendor Portal appears and a description of what can be accomplished there.
- Quick Filters: Allows the user to narrow the list based on the status of the Purchase Order or Orders they are selected in the Vendor Contact field on the Purchase Order.
- Search Filters: There are an array of search filters available to adjust the results listed such as:
- PO #: Narrows results based on the number that was assigned to the Purchase Order.
- Name: Searches the list based on the name that was assigned to the Purchase Order. Depending on the PO Type, this field may not be accessible on a Purchase Order.
- PO Date Range: Searches the listed Purchase Orders based on the PO date that was entered on the Purchase Order.
- Status: Allows the user to search through Purchase Orders based on the status the PO resides in. Statuses that are searchable on the Vendor Portal include Pending, Accepted, Partially Fulfilled, Fulfilled, and Declined.
- Assigned To: Narrows results based on the Contact that is selected within the Vendor Contact field on a Sales Order. This field is only searchable if the Vendor Contact option is turned on within the PO Type as a display field.
- Frequency: Adjust results to show either Purchase Orders that are set up as One Time or Recurring.
- PO: Lists the PO number, title or type, and date that is entered on the Purchase Order. Clicking on the hyperlink listed here will open the Purchase Order for additional details. Below the hyperlink will display the current status of the Purchase Order if the PO Type is configured as a contract managed.
- PO Date: Displays the date that was entered on the Purchase Order.
- Total: Lists the total dollar amount that has been added on to the PO.
- Assigned To: Displays the Vendor Contact that has been selected in the Vendor Contact field on the PO.
- Accepted By: Shows the Vendor Contact who took the action to accept the Purchase Order through the Vendor Portal. This field will be blank if the PO Type was not configured as contract managed.
- Actions: From the Purchase Orders list, you can take the action to either Accept any pending POs or Create Bill for Purchase Orders that have been moved into an Accepted, Partially Fulfilled, or Fulfilled status.
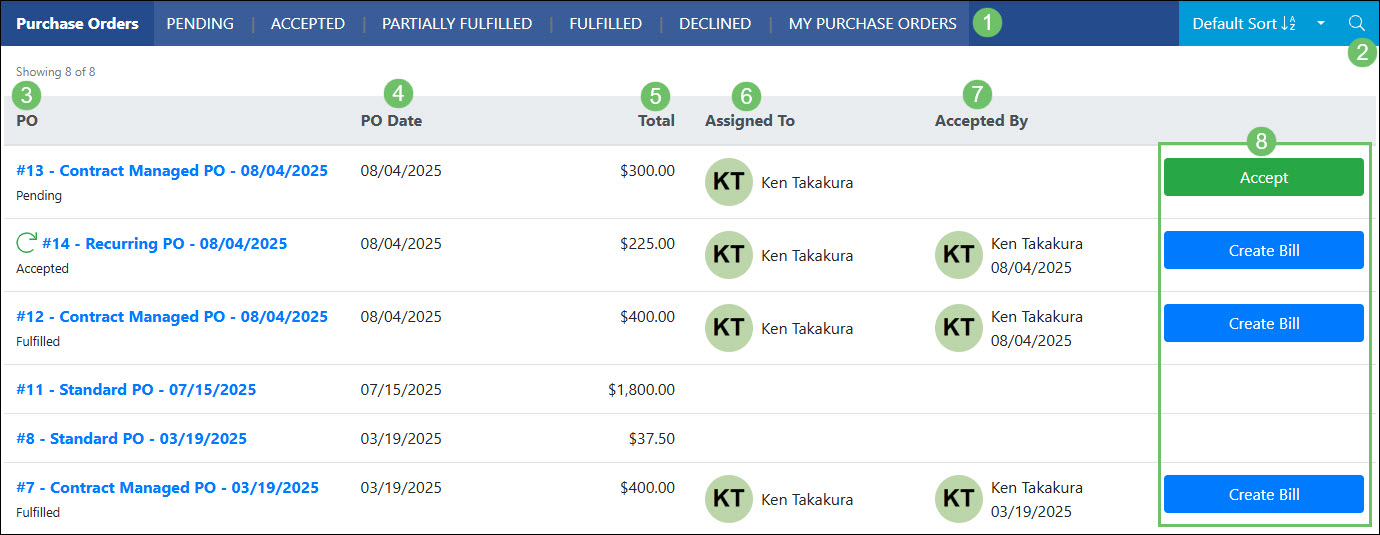
Example of the Actions and Information Available on the Purchase Orders List in the Vendor Portal
-
Purchase Order Info
Click on a PO listed on the Purchase Orders list to navigate to the Purchase Order Info page for further details. Below is a screenshot illustrating how the Purchase Order Info page in the Vendor Portal appears and a description of what can be accomplished there.
- Actions: From the Purchase Order Info page, the user can Create Bill which will be related to the Purchase Order, Mark as Fulfilled which will update the status of the PO, or View Discussions which will navigate to the Discussions section of the page.
- Status: Displays the current status the Purchase Order resides in.
- PO Information: Shows information pertaining to the PO such as the total, PO and promise date, and any description that was entered into the Vendor Notes section on the Order.
- Shipping Information: Displays shipping information regarding the purchase such as the shipping address and the shipping method. Clicking the View On Map icon next to the address listed in the Ship To field will open the address in Google Maps.
- Contact: Displays the Employee that was selected on the Purchase Order. Clicking on the Start Discussion icon next to the person’s name will initiate a new Discussion Thread to begin a conversation.
- Assigned To: Displays the Vendor Contact that was selected on the Purchase Order. Clicking on the Start Discussion icon next to the person’s name will initiate a new Discussion Thread to begin a conversation.
- Attachments: Gives the option to upload or view any external files that were uploaded to be related to the Purchase Order.
- View Item Reference Materials: Clicking on this button will open a list of Reference Materials that were added to any Items listed in the Item section. Learn more about Item Reference Materials by reviewing the Item Reference Materials section from our Item Management Guide.
- Item Information: Lists Items that were added to the Purchase Order along with any description, quantity, unit price, and total per Item. Underneath the Qty and Total columns will also display how much was already added to a related Bill.
- Total/Recurring Information: A total based on the Items will be added below the Item section of the Purchase Order. To the left of the total will also display any recurring information if the Purchase Order was set up as Recurring and not One Time.
- Acceptance Information: If the Purchase Order is waiting to be accepted, fields will be available to fill in the name and title of the person accepting the PO. If the Purchase Order has already been accepted, the information will be displayed including who accepted the PO along with the date of acceptance.
- Related Bills: A list of Bills that have been related to the Purchase Order will be listed in this area. The Transaction date, status, and total will also be listed. Clicking on the Bills listed here will open the Transaction for further information.
- Discussions: Displays any Discussion Threads that have been related to the Purchase Order. Internal Discussion Threads will only display if they have been marked Visible on Portal. Clicking the New Thread icon will start a new Discussion Thread with the Employee selected on the Purchase Order.
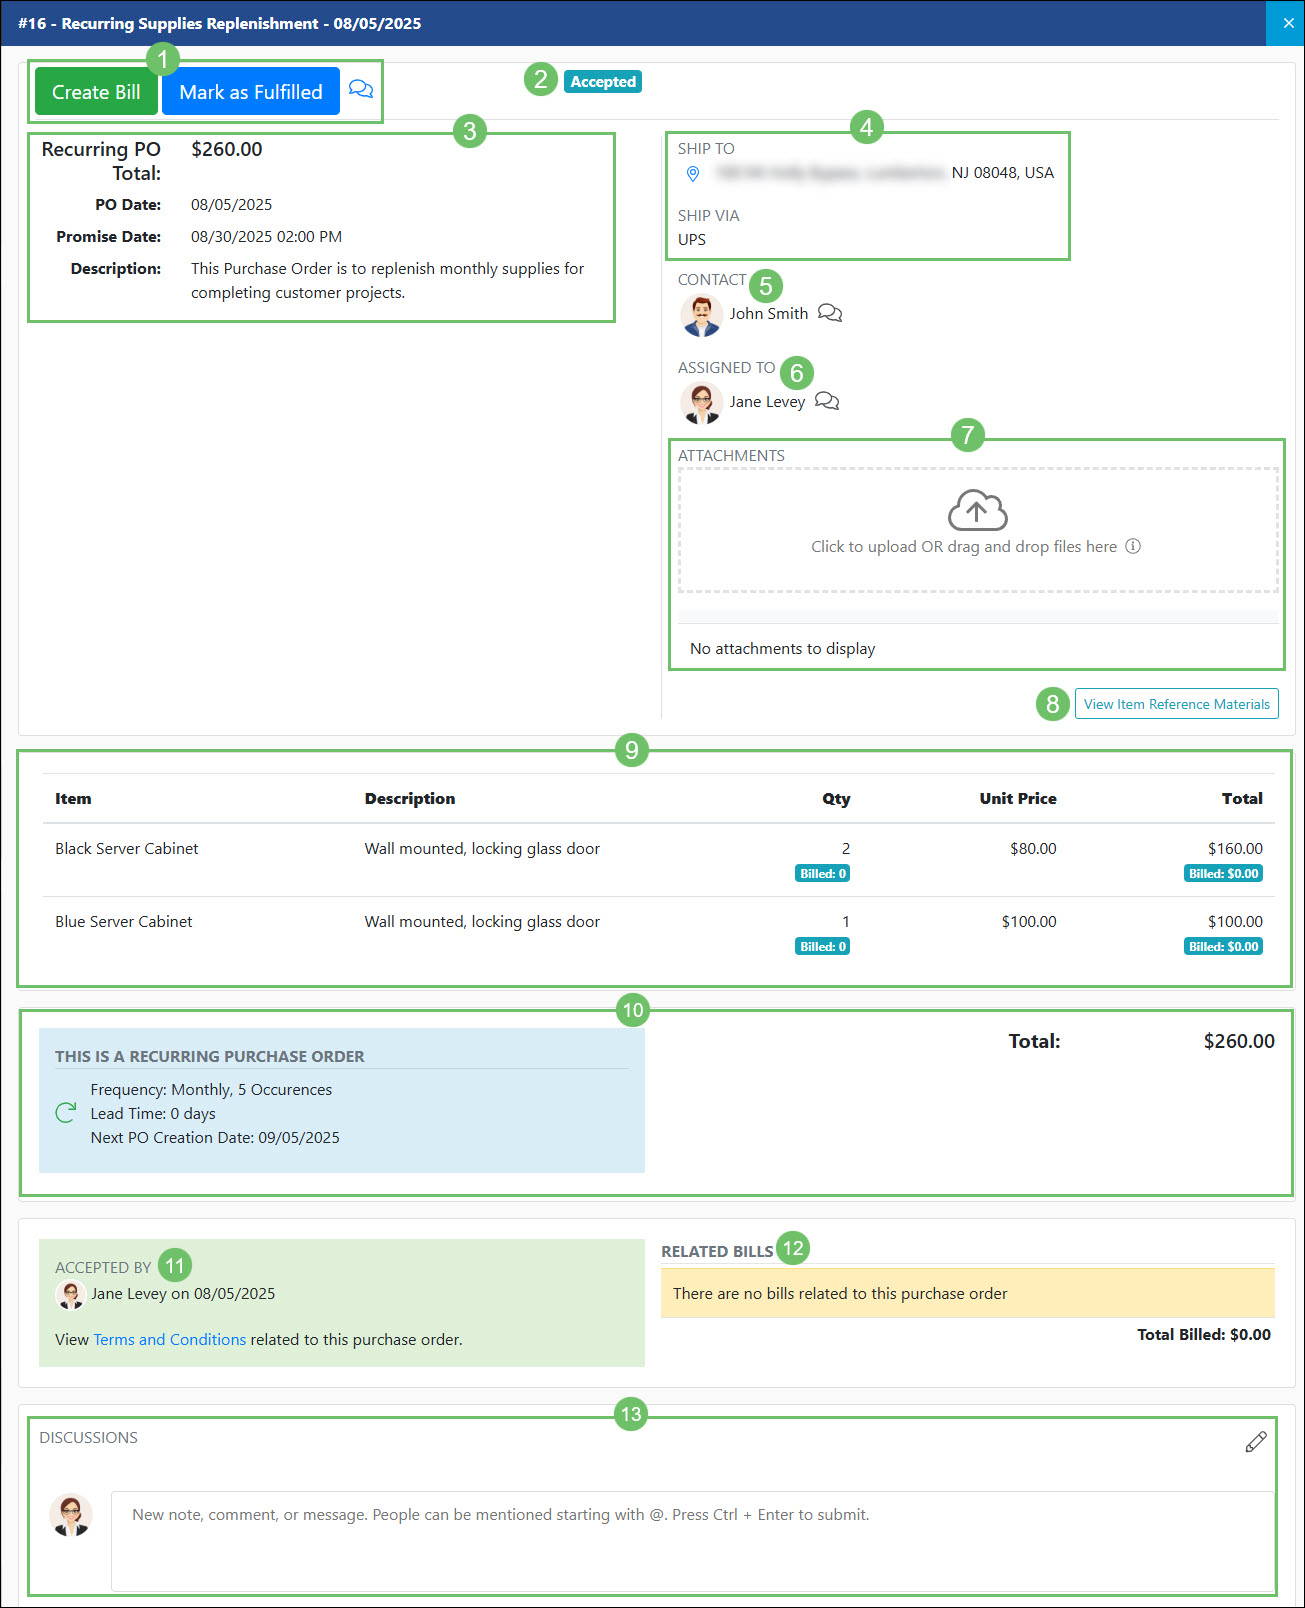
Example of the Actions and Information Available on the Purchase Order Info Page in the Vendor Portal
-
Opportunities
The Opportunities feature helps you manage potential work to be conducted with your Vendors. For each Opportunity, you can track key details such as the estimated value, expected close-ratio, priority, and type.
Opportunities are available in both the Customer and Vendor Portal as long as the logged in user has the appropriate permissions related to Opportunities.
To access the Opportunities list in the Vendor Portal, navigate to the Opportunities option in the side menu.
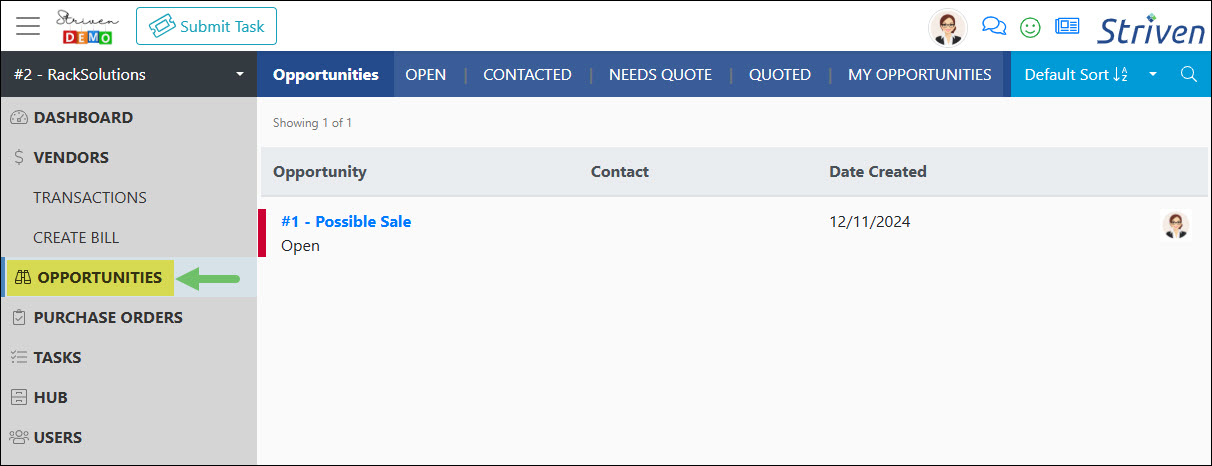
Example of the Location of Opportunities from the Side Menu in the Vendor Portal
To learn more about the information available with Opportunities in the Vendor Portal, review the Opportunities section from our Customer Portal Guide.
-
Tasks
The Tasks option of the Vendor Portal displays info for Vendor related Tasks. The Tasks list offers a comprehensive overview of Tasks associated with a particular Vendor that have been configured to be visible on the Portal.
Tasks are available in both the Customer and Vendor Portal as long as the logged in user has the appropriate permissions related to Tasks.
To access the Tasks list in the Vendor Portal, navigate to the Tasks option in the side menu.

Example of the Location of Tasks from the Side Menu in the Vendor Portal
To learn more about the information available with Tasks in the Vendor Portal, review the Tasks section from our
Customer Portal Guide.
-
Hub
The Hub provides access to documents, posts, and links that are saved in the Vendor’s or Company’s Hub and made visible on the Vendor Portal. Depending on the Portal permissions set, one can add documents, posts and links to the Vendor’s Hub here as well.
Hub is available in both the Customer and Vendor Portal as long as the logged in user has the appropriate permissions related to Hub.
Hub can be accessed by the Vendors through the Vendor Portal by navigating to the Hub option in the side menu.

Example of the Location of Hub from the Side Menu in the Vendor Portal
To learn more about the information available with Hub in the Vendor Portal, review the Hub section from our
Customer Portal Guide.
-
Users
The Users list in the Vendor Portal is a centralized location where the Contacts of the Vendor can add, remove, and manage the Portal Users. Assigning Portal Roles, titles, locations and much more can be added or updated per Contact in order to make sure the most up to date information is tracked with the Contact Profile.
Managing Users is available in both the Customer and Vendor Portal as long as the logged in user has the appropriate permissions related to User Management.
The Users list can be accessed by selecting the Users option in the side menu of the Vendor Portal.

Example of the Location of Users from the Side Menu in the Vendor Portal
To learn more about the information available with Users in the Vendor Portal, review the Users section from our
Customer Portal Guide.
-
Recap
With this guide, we’ve discussed how to view and process Transactions, such as Bills, in the Vendor Portal. We have covered how to review and accept work through the use of Purchase Orders. Additionally, we have reviewed what entities are available to utilize in the Vendor Portal for Vendor Contacts.

Have a Question?
Ask the Striven Community
User-sourced how-to’s, feedback, and more!
FAQs
-
Why can’t I accept my Purchase Order? It is listed in the Purchase Orders list without an option to accept or create a Bill.
This may be due to the Purchase Order Type being set as non-contract managed and therefore will not have the option to accept or create a Bill from the Purchase Order. You can use the Create Bill screen and select the Purchase Order there which will automatically fill in the Items from the PO on the Bill.
-
Why can I view documents that have been added to Hub but cannot upload any of my own documents?
This may be due to the permissions that are within your Portal Role. In order to be able to upload documents to Hub, you will need to have the permission “Hub: Add/Edit” added to your Portal Role.
-
How can I have changes made to a Purchase Order before accepting it?
If a Purchase Order is waiting to be accepted, you do have the option to use the Decline button which will notify the appropriate people that you have declined the PO. You can also use the Discussions feature inside the Purchase Order to begin a conversation about the changes you would like made to the PO before using the Accept option.