


Inventory & Items
Item Setup
Support Guide
-
Overview
This guide provides a comprehensive framework for managing your inventory and items within Striven. From configuring initial inventory settings to establishing detailed tracking methods like serial numbers, units of measure, and custom item labels, this guide walks you through the essential setup required to streamline your accounting and operations.
Read this guide if you are trying to:
✔ Set up global settings such as default GL accounts, unit of measure tracking, and barcoding to ensure consistency across all your items.
✔ Utilize custom labels, item categories, and distinct inventory locations to keep your stock organized and easily searchable for reporting.
✔ Enhance your sales and purchasing processes by defining shipping methods, associating reference materials, and automating tasks for items.
-
Inventory Settings
The Inventory Settings page houses settings to configure before you begin managing Items in Striven. Key components can be set such as default GL Accounts for Items entered into Striven as well as the ability to enable features such as serial numbers, lot tracking, and unit of measures.
To edit these settings navigate to Company → Settings → Accounting → Items → Settings.
Below is a screenshot illustrating how the Inventory Settings page appears and a description of what can be accomplished there.
- Default Item Creation Settings: You can save time during future Item creation by establishing default General Ledger accounts here. When utilizing the Add Item page, the fields for Income, Asset, COGS, and Expense GL Accounts will automatically pre-populate with the selections made in this section.
- Enable Serial Number/Lot Number Tracking: Turning this feature on allows you to track and manage Serial Numbers and Lot Numbers during item purchasing and sales transactions in Striven.
- Configure: Using the Configure option next to this setting will open the Serial Number/Lot Number Configuration pop up which will house the following configurations:
- Require Serial Numbers/Lot Numbers: This setting gives the option to require the use of serial numbers and lot numbers for any of the following: Bills, Sales Orders, Invoices/Sales Receipts, and Builds.
- Lot Numbers Sorting Rule: This setting gives the options for Builds, Invoices/Sales Receipts, and Sales Orders to determine if the sorting for lot numbers to be either oldest lot first, lot with the most quantity first, or lot with least quantity first.
- Configure: Using the Configure option next to this setting will open the Serial Number/Lot Number Configuration pop up which will house the following configurations:
- Enable Unit of Measure (UOM) Tracking: Activating this option allows you to configure and utilize measurement units when buying or selling items in Striven. For comprehensive details on setting up these preferences, refer to the Units of Measure (UOM) section located further down in this guide.
- Configure: Selecting the Configure button redirects you to the Units of Measure – Sets page, where you can begin building your sets.
- Enable Barcoding: Activating this preference enables the use of barcodes when adding items to transactions and orders.
- Configure: By choosing the Configure action for this choice, you will be able to designate the Default Barcode Type.
- Prevent Duplicate Item Numbers: Enable this setting to prevent multiple Items from being configured with the same Item number in Striven.
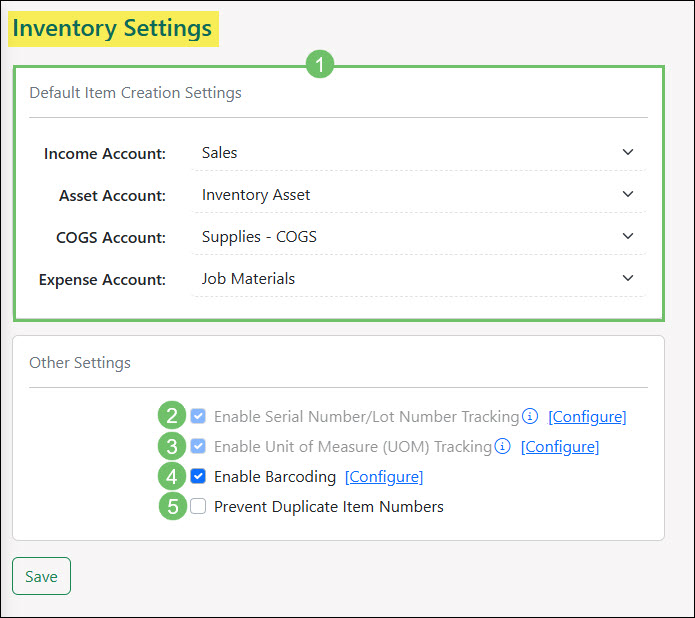
Example of the Inventory Settings Page

-
Item Labels
Item Labels provide a flexible way to categorize and organize your Items beyond standard classifications like category or department. By creating custom labels in the settings and applying them to specific records, you can streamline your inventory management. These labels are highly useful for filtering, as they allow you to quickly refine your Items List to display only relevant groups of Items via the search panel or the dedicated Filter by Label option. Once applied, labels are clearly displayed beneath the Item name and description, providing an effortless way to identify key item attributes at a glance.
-
Creating Item Labels
Labels can be created in various ways while managing Items in Striven. The Items – Labels page can be used in the settings to create public labels that can then be accessible to select while editing or adding an Item. The Items – Labels settings page only permits the creation of public labels. These public labels can be utilized by any Employee who manages Items.
To create or manage Item labels in the settings navigate to Company → Settings → Accounting → Items → Labels.
Below is a screenshot illustrating how the Items – Labels settings page appears and a description of what can be accomplished there.
- Show Archived: Displays labels that have been archived and are no longer active. When viewing archived labels, you can click the kebab menu next to a label to unarchive it as needed.
- Enter New Label Name: Input the desired name for the new label in this field. You can also choose an associated color. Once both the name and color are specified, select the Save button to finalize creating the label.
- Label: Lists the labels that have already been created. Using the kebab menu will give options to Edit, Delete, or Archive.
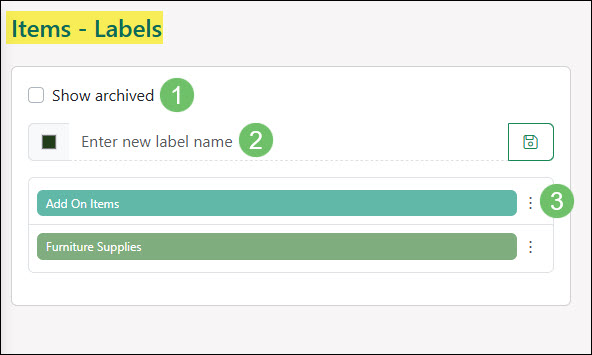
Example of the Items – Labels Settings Page
-
Applying Item Labels
While on the Add Item and Item Info page, the Manage Labels hyperlink can be used to create or edit labels without having to navigate to the settings. The Add Item and Item Info page are also where the label will also be applied to the Item. Labels created through the Manage Labels option from the Add Item and Item Info page by default are created as private labels.
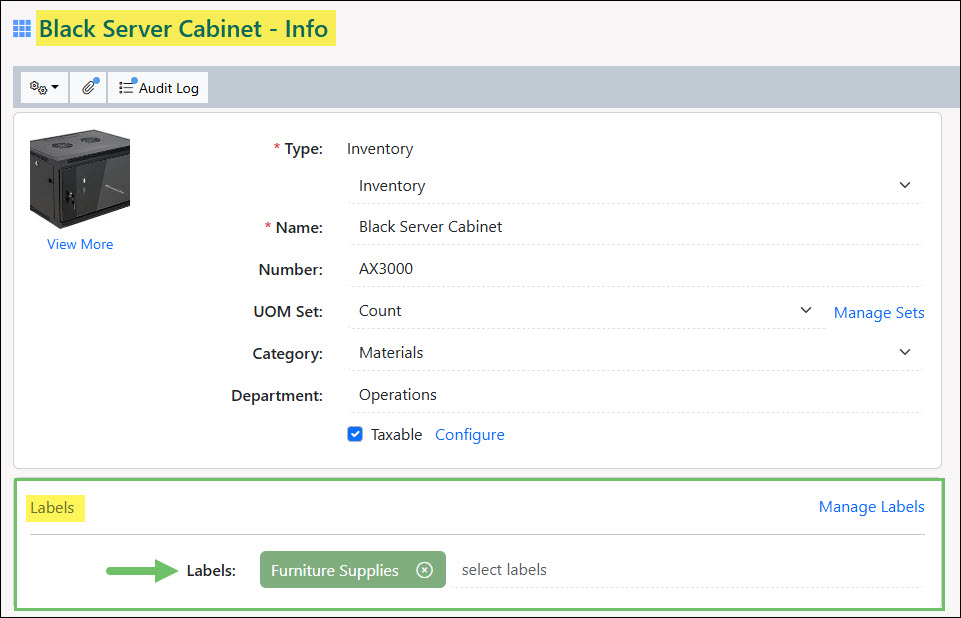
Example of the Labels Section on the Item Info Page
Private labels are only viewable and can be used as a filtering option by the Employee who created the label and not all Employees who manage Items. A lock icon will be listed next to the label name to indicate it is a private label. To turn a private label into a public label use the kebab menu when managing labels and use the Make Public option. Once a label has been made public, it can not be reverted back to a private label.
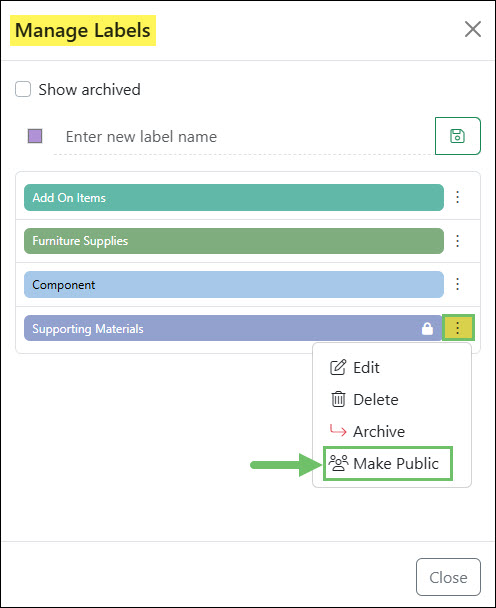
Example of the Make Public Option for an Item Label
-
Filtering by Item Labels
A quick and effortless way to filter the Items list by an applied label is by clicking the Filter by Label button at the top of the page. While label filtering is also available within the standard search filters, this dedicated option provides a more direct method to adjust your view, allowing you to focus purely on your assigned labels without needing to open the main search panel.
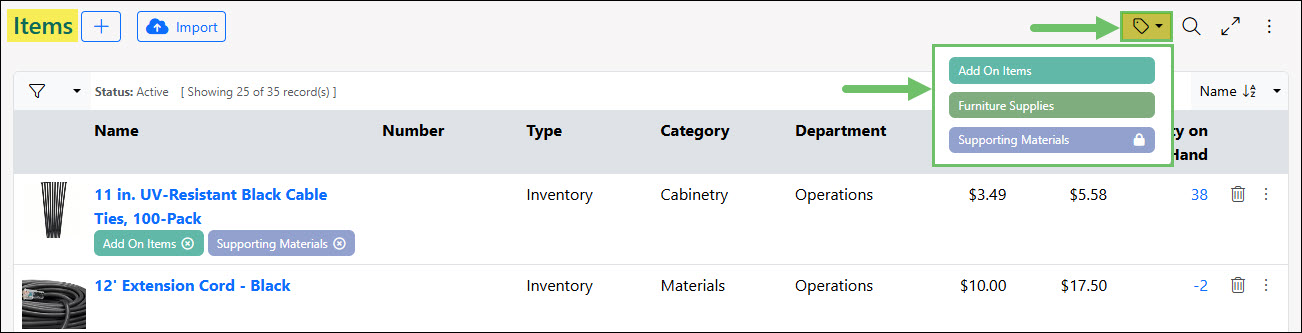
Example of the Filter by Label Option on the Items List
As mentioned above, Item Labels can also be used as a filtering option when using the Items List search filters. Within the main search filters panel, a dedicated Labels filter allows users to narrow down the directory by selecting specific assigned labels to focus purely on relevant groups of items.
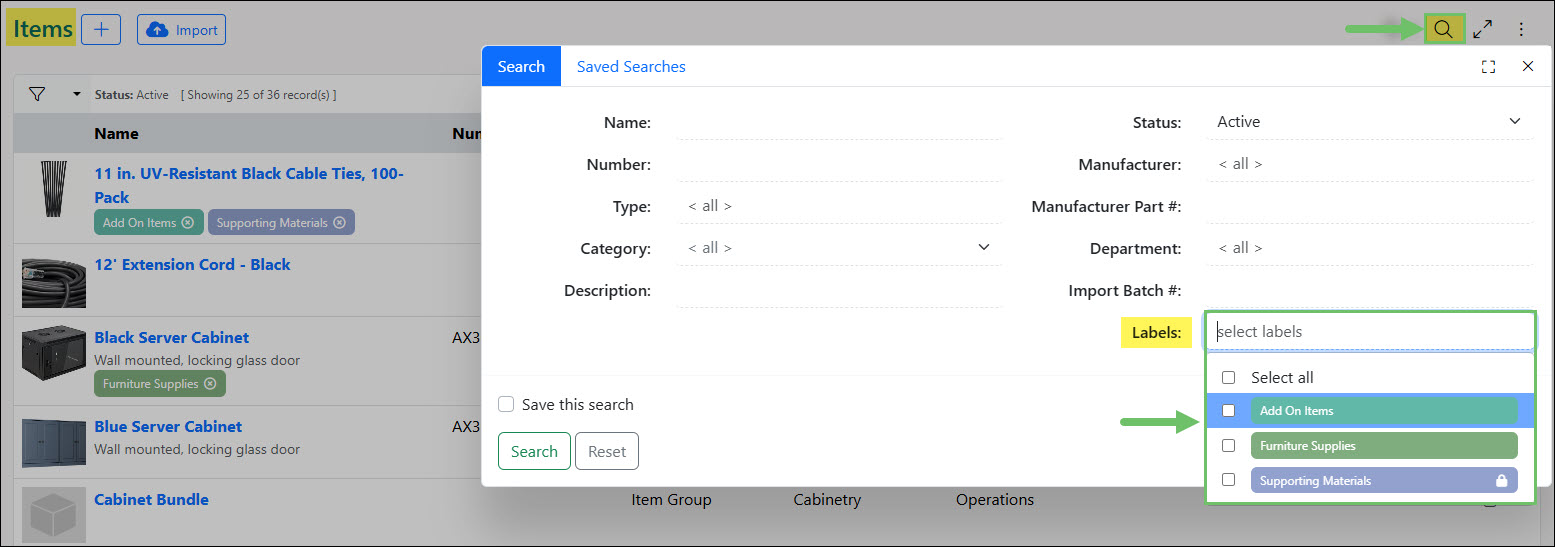
Example of the Labels Search Filter on the Items List
-
Item Categories
A helpful way to easily distinguish Items in Striven is to categorize them. Categories will help organize and separate Items for reporting and also when adding Items onto Orders and transactions. You can also designate a Parent and Child relationship if desired.
Learn more about Item Categories by reviewing the Category Management Guide.
To add Item Categories use the following steps: Company → Settings → Accounting → Inventory → Items → Categories.
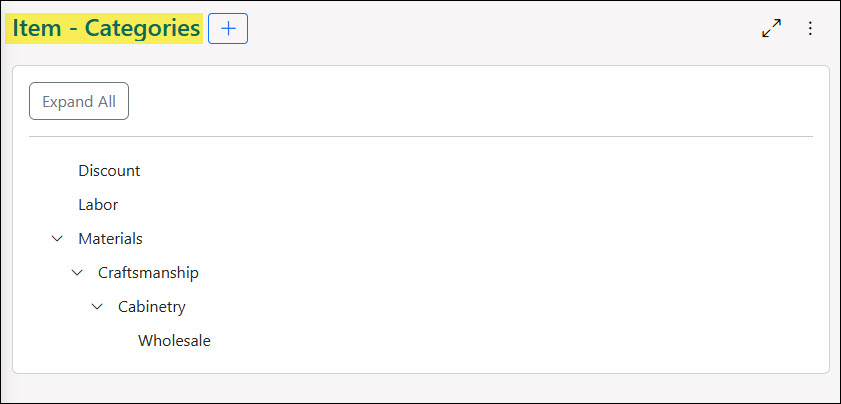
Example of the Item Categories Page
-
Inventory Locations
Inventory Items are stocked in physical locations, referred to in Striven as Inventory Locations. Inventory Locations will allow you to allocate Inventory when purchasing and relinquishing stock when selling them. This is not to be confused with Company Locations, which cannot hold Items in stock and are used for different functions in Striven. Inventory Locations will also come into play when creating Inventory Adjustments and Transferring Inventory between Locations.
To view and manage Inventory Locations navigate to Company → Settings → Accounting → Items → Inventory → Locations.
-
Managing Inventory Locations
Below is a screenshot illustrating how the Inventory Locations List appears and a description of what can be accomplished there.
- Add: Opens the Add Inventory Locations page which allows you to create a new location to store stock and physical goods in.
- Collapse/Expand All: By default, locations nestled underneath other locations will be shown when first accessing this page. The Collapse All button can be used to hide all child locations underneath their parent location. Once all locations have been collapsed, an Expand All button will be available to display all locations.
- Inventory Locations: Lists the Inventory Locations that have been created in the system. Child locations will be nestled underneath their parent location in order to display the configured hierarchy.
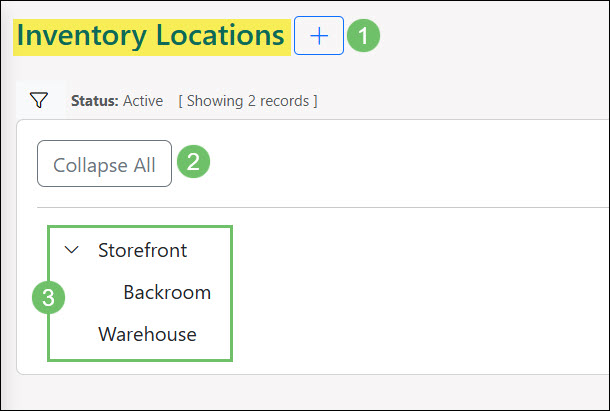
Example of the Inventory Locations List
Adding Inventory Locations
Once you have clicked the Add button from the Inventory Locations List, you will be navigated to the Add Inventory Location page. Below is a screenshot illustrating how the Add Inventory Location page appears and a description of what can be accomplished there.
- Location Name: The name of the location and how it will appear when selecting throughout the system when managing inventory.
- Parent Location: Sets up a hierarchy between the location being created and an existing location.
- Description: Any descriptions or notes regarding the location can be entered in this field.
- Barcode Value: Setting a barcode value for the location can save time later when selecting a location for inventory. Instead of scrolling through a list of locations, a barcode value can be scanned instead to easily select a specific location.
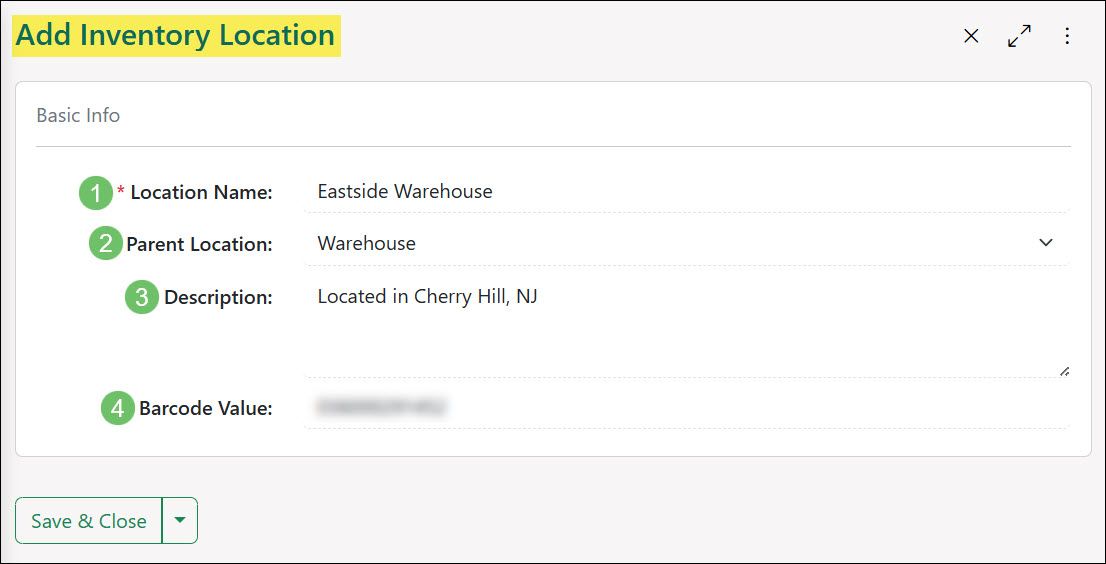
Example of the Add Inventory Location Page
-
Default Location on Items
When viewing an Item Info page for an Inventory or Manufactured type Item, a default Inventory Location can be selected from the Accounting section with the Default Location field. Setting a default location on an Item can save time when buying, selling, or managing the Item as the location will be preselected when the Item is selected on transactions, transfers, and adjustments. This default location helps streamline stock management, inventory tracking, and warehouse workflows by eliminating the need to manually choose a location each time the Item is referenced.
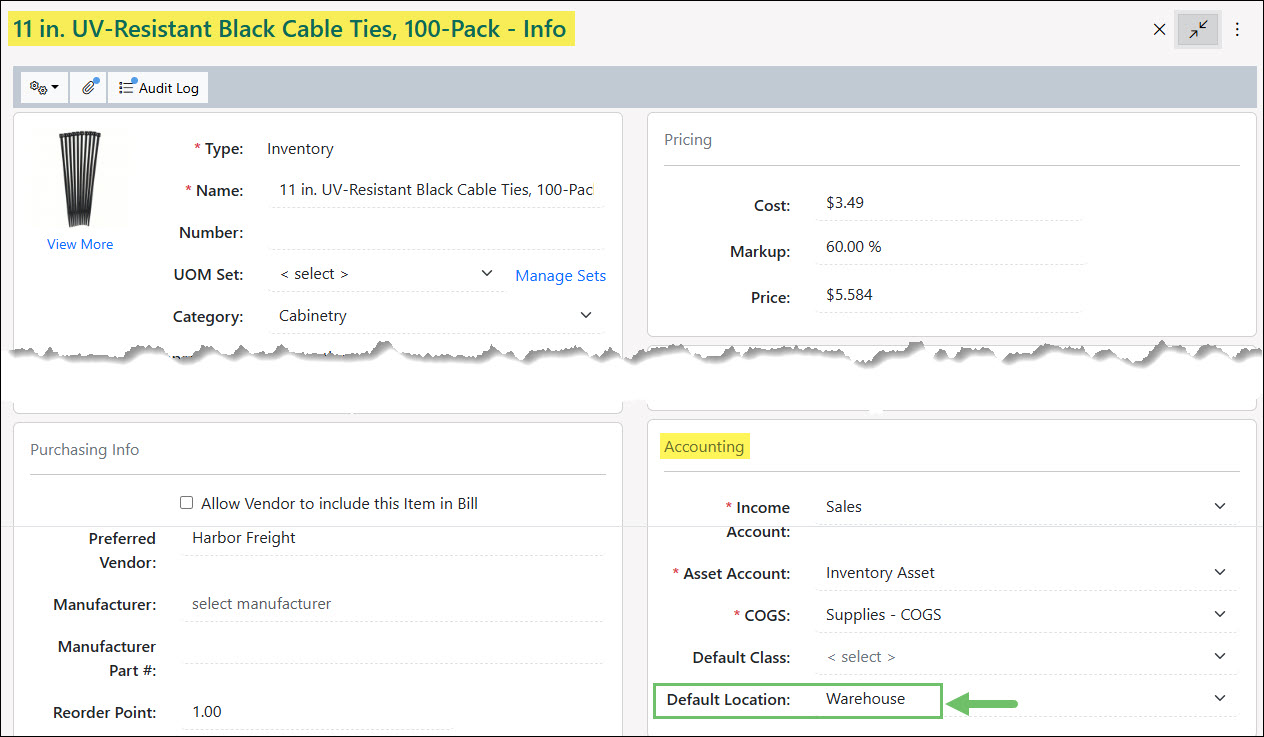
Example of the Default Location Field on an Item Info Page
-
Selecting Inventory Locations
There are a wide variety of areas where the Inventory Location can be utilized. The location can be selected on Transactions, Sales Orders, Purchase Orders, Inventory Adjustments, Inventory Transfers, and Item Builds. In each below section, an example will be shown for where the location can be selected on these entities.
Locations on Orders and Transactions
When creating or editing a Transaction, Sales Order, or Purchase Order in Striven, a Location field will be available underneath each Inventory and Manufactured type Item added to the transaction or order. This field may be filled in based on the Default Location field at the Item level. If it is not prefilled in, a location will need to be selected before the transaction or order can be saved and created.
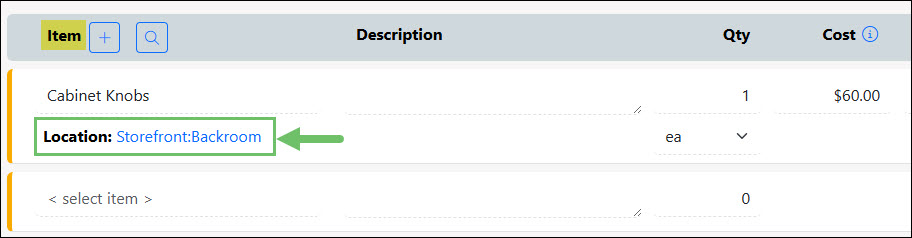
Example of the Location Field on a Transaction
Locations on Adjustments
When creating an Inventory Adjustment, the Inventory Location can be selected in the Location field that appears once an Item has been selected. Multiple locations can be selected for each Item on the Inventory Adjustment in order to change the quantity and/or value of Inventory in multiple areas at once.
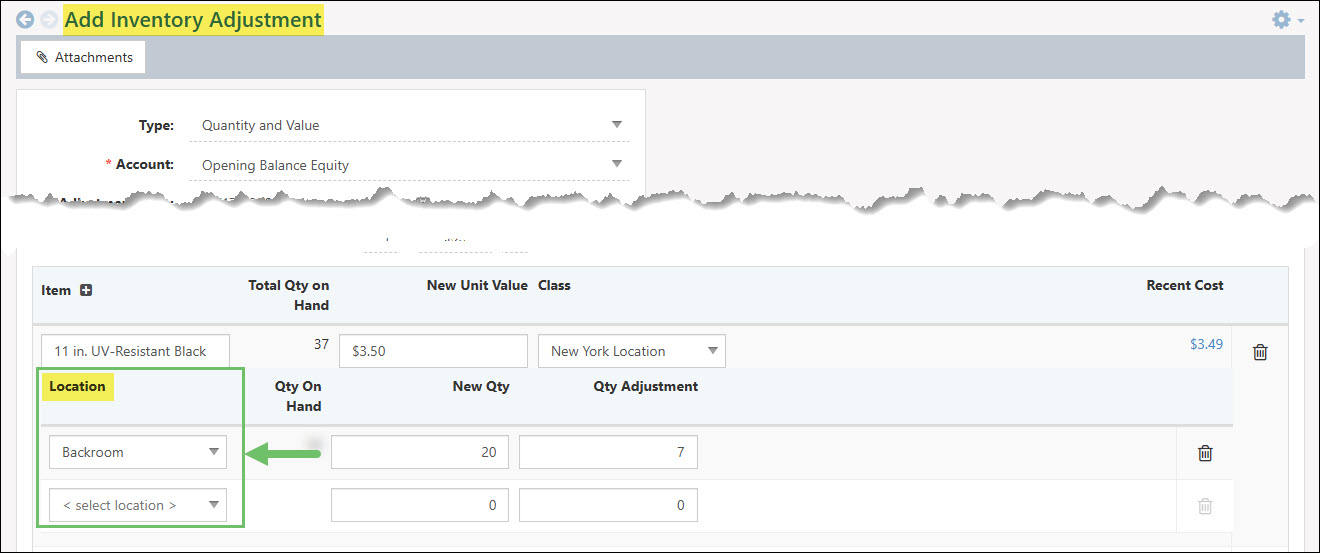
Example of the Location Column on an Inventory Adjustment
Locations on Transfers
With the Inventory Transfer tool, you can specify the stock’s source and destination by selecting inventory locations in the From Location and To Location fields when moving goods. The From Location and To Location can be chosen for the entire transfer, or can be specified per line Item selected.
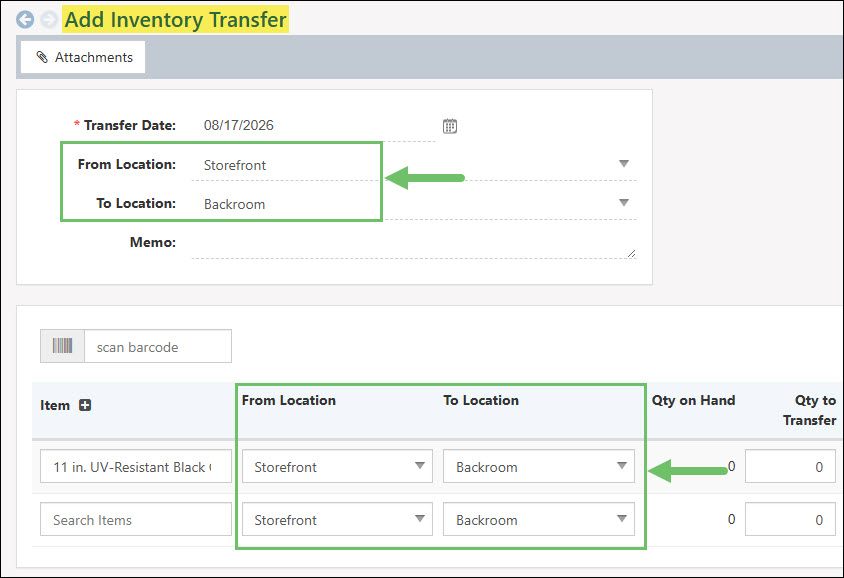
Example of the Location Fields on an Inventory Transfer
Locations on Items Builds
Item Builds have two areas where the Inventory Location can be used. The Location field in the header area of the Item Build will determine where the finished product of the Item Build will be housed. If the Item that is being built also uses Inventory or Manufactured type Items, you will also then need to specify where those individual parts are coming from through the Location field located with the line Item.
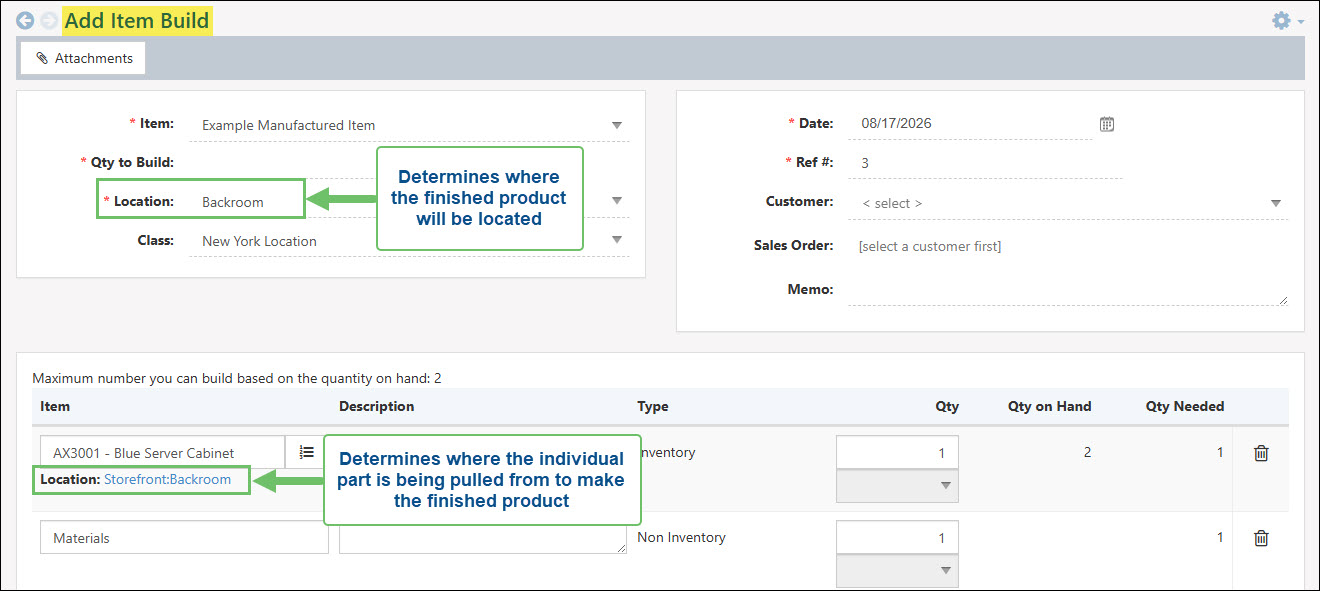
Example of the Location Fields on an Item Build
-
Shipping Methods
Shipping Methods in Striven are used to determine how orders and transactions are being transported to either your company or to the Customer’s locations. They allow users to select the preferred shipping method options from the Ship Via drop-down menu when configuring orders, such as Purchase Orders.
To configure Shipping Methods in Striven, navigate to Company → Settings → Accounting → Items → Inventory → Shipping Methods.
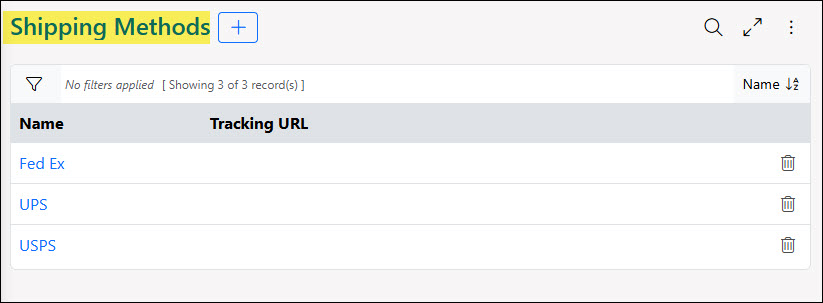
Example of the Shipping Methods Page
-
Units of Measure (UOM)
Once Units of Measure (UOM) have been turned on in the Accounting Settings, you can add Measurement Sets from the Units of Measure Sets area in the Settings. Measurement Sets are ways to note how the UOM is calculated. There are two options available when adding sets, including Count and Length. The following sections will explore how to set up measurement sets for both Count and Length measurement types. Once sets have been created, you can assign them to individual Items. Below is a screenshot representing how the Units of Measure Sets list looks and details on what can be accomplished here. To view Units of Measure Sets, use the following steps below:
Company → Settings → Accounting → Items → Inventory → Units of Measure
- Add: Allows you to add a new count or length Unit of Measure Set (which are each discussed further in the following sections below).
- Set Name: The name of the set that has been created. The set name is a hyperlink and the set can be viewed and edited by clicking it.
- Base UOM: The smallest UOM in the set. For Count, this will be each and for length, this will be millimeter.
- Sales UOM: The default UOM that will appear on Sales Orders when an Item using this set is added to the Order.
- Purchasing UOM: The default UOM that will appear on Purchase Orders when an Item using this set is added to the Purchase Order.
- Copy or Deactivate: Using the Copy button will copy the UoM set. Using the Trashcan icon will deactivate the set. If the set is in use, the delete option will be removed.
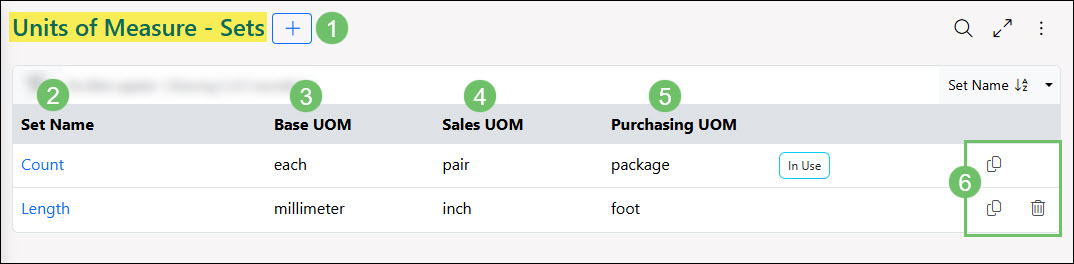
Example of the Units of Measure Sets List
-
Count Sets
As discussed above, there are two set types with which you can create a new Unit of Measure Set. One type that you can utilize to create a new set is Count. Count has a base unit (generally the smallest unit) of each, but the set can be configured to have multiple UOM to fit different Item measurements such as package, case, etc. After adding a new UOM, you can select Count from the drop-down menu. After count is selected, a few Related Units will populate below such as dozen (12), package (8), box (16), and case (80). Each of these can be edited to fit your needs, but you can also add more measurements if desired. The measurements selected for these Related Units can be less than one. Below is a screenshot demonstrating how the Set Info appears and details on what you can accomplish there.
- Set Name: The name of the set, which can be associated with an Item.
- Base Unit Name: The name of the base UOM, by default this is each.
- Base Unit Abbreviation: The abbreviation for the base UOM. Since the default base unit is each, the abbreviation is ea.
- Sales Default: The UOM that will be used to sell Items that can be chosen from the drop-down menu.
- Purchasing Default: The UOM that will be used to purchase Items that can be chosen from the drop-down menu.
- Related Units: Lists the related units of the Count Measurement Set.
- Name: Lists the name of the related UOM. Defaults here include: pair, package, box, and case.
- Abbreviation: Lists the abbreviations for each of the related units. Defaults here include: pr (pair), pkg (package), bx (box), and cs (case).
- # of Base Units: Lists the number of base units within each of the related UOM. Defaults here include: 2 (pair), 8 (package), 16 (box), and 80 (case).
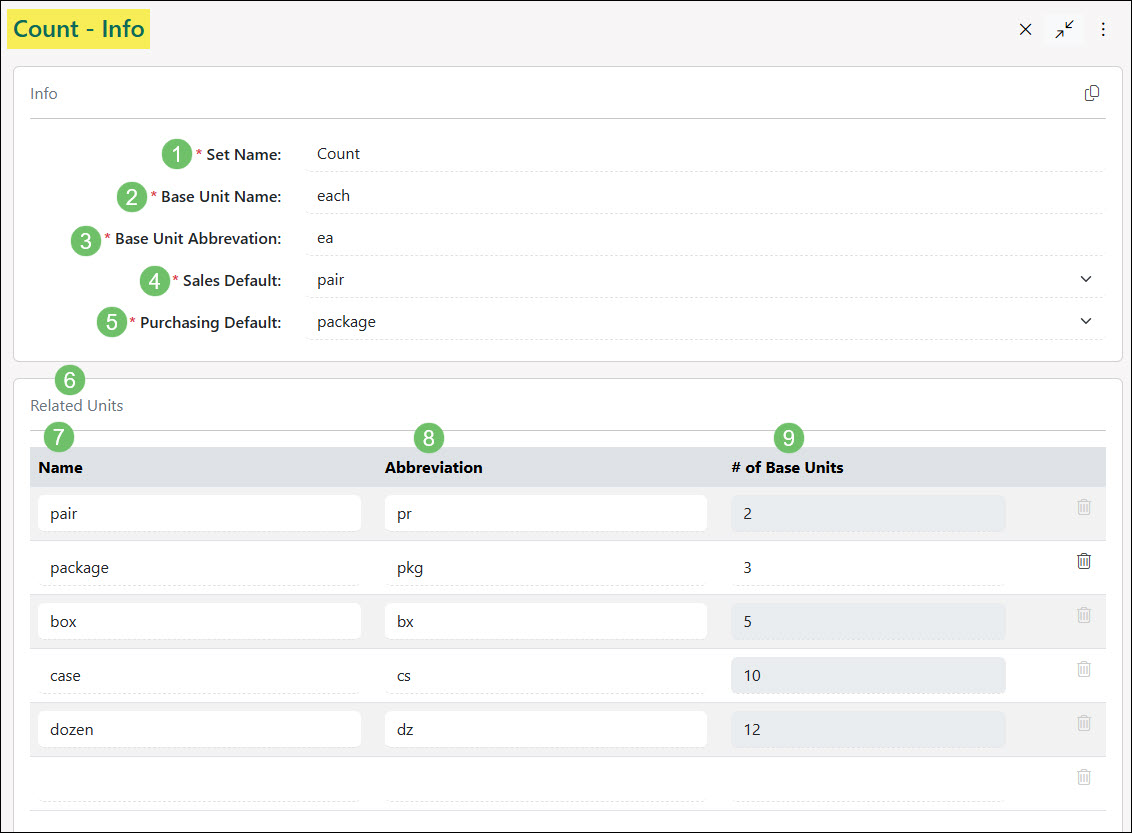
Example of a Count Units of Measure Sets
-
Length Sets
As discussed above there are two set types with which you can create a new Unit of Measure Set. One type you can utilize to create a new set is Length. Length has a base unit of a millimeter, but the set can be configured to have multiple UOM to fit different Item measurements such as centimeter, inch, decimeter, etc. As previously mentioned, the additional UoM may have values smaller than the base unit. After adding a new UOM, you can select Length from the drop-down menu. After length is selected, a few example measurements will populate below such as centimeter (10), inch (25.4), decimeter (100), foot (304.8), etc. Each of these can be edited to fit your needs, but you can also add more measurements if desired. Below is a screenshot exhibiting how the Set Info appears and details on what you can accomplish there.
- Set Name: The name of the set, which can be associated with an Item.
- Base Unit Name: The name of the base UOM, by default this is millimeter.
- Base Unit Abbreviation: The abbreviation for the base UOM. Since the default base unit is millimeter the abbreviation is mm.
- Sales Default: The UOM that will be used to sell Items and can be chosen from the drop-down menu.
- Purchasing Default: The UOM that will be used to purchase Items that can be chosen from the drop-down menu.
- Related Units: Lists the related units of the Length Measurement Set.
- Name: Lists the name of the related UOM. Defaults here include: centimeter, inch, decimeter, foot, yard, meter, kilometer, and mile.
- Abbreviation: Lists the abbreviation of the related UOM. Defaults here include: cm (centimeter), in (inch), dm (decimeter), ft (foot), yd (yard), m (meter), km (kilometer), and mi (mile).
- # of Base Units: Lists the number of base units within each of the related UOM. Defaults here include: 10 (centimeter), 25.4 (inch), 100 (decimeter), 304.8 (foot), 914.4 (yard), 1000 (meter), 1000000 (kilometer), and 1609344 (mile).
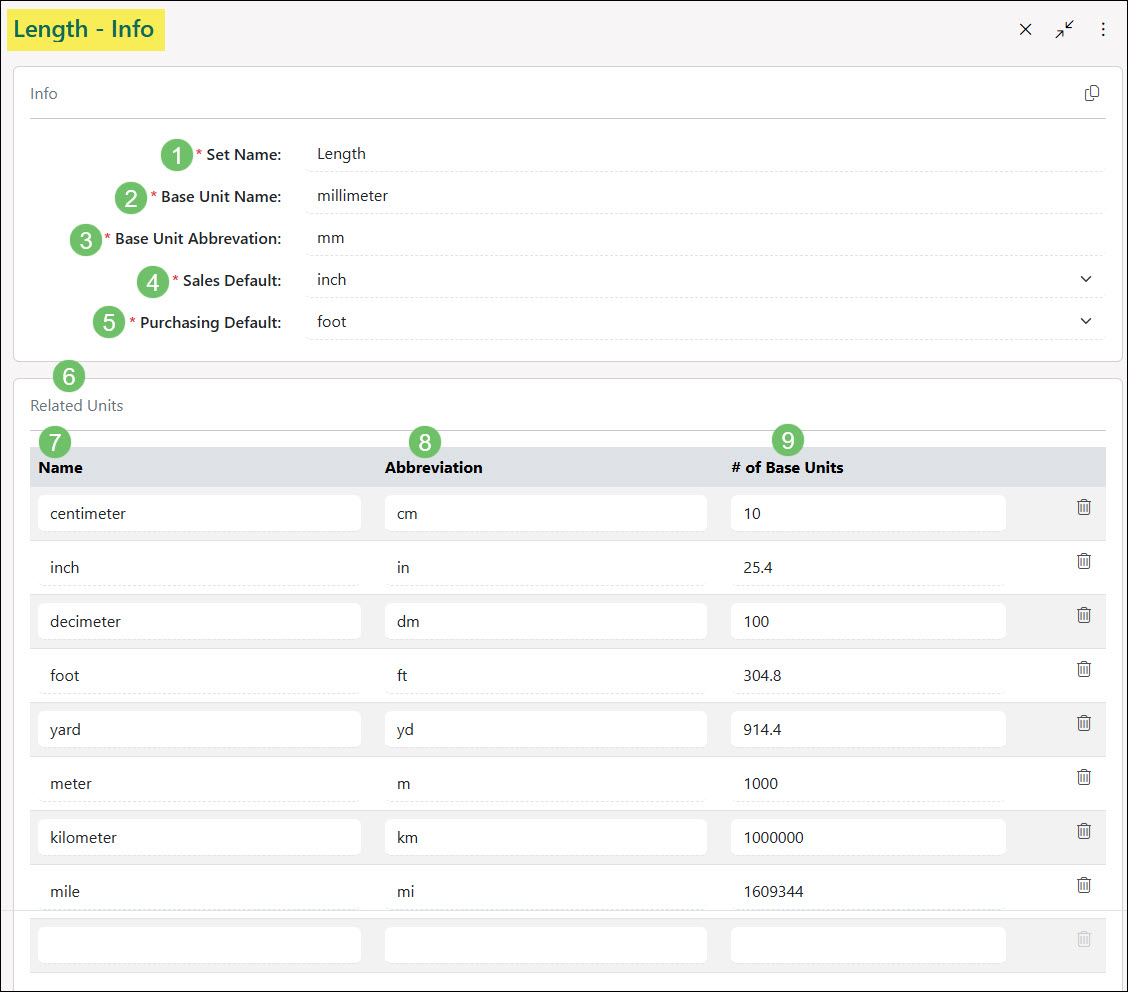
Example of a Length Units of Measure Sets
-
Using Unit of Measures
There are various places you can utilize Units of Measure in Striven when buying and selling goods in Striven. The Unit of Measure can be selected in areas such as the Item Info page as well as when creating Transactions, Sales Orders, and Purchase Orders. Below will show examples of where Unit of Measures can be selected in these various areas.
UOM on Item Info
The Unit of Measure Set can be configured when viewing an Inventory or Manufactured type of Item using the UOM Set field. Selecting the set here will determine what type of measurements the Item will be purchased or sold in when creating transactions and orders.
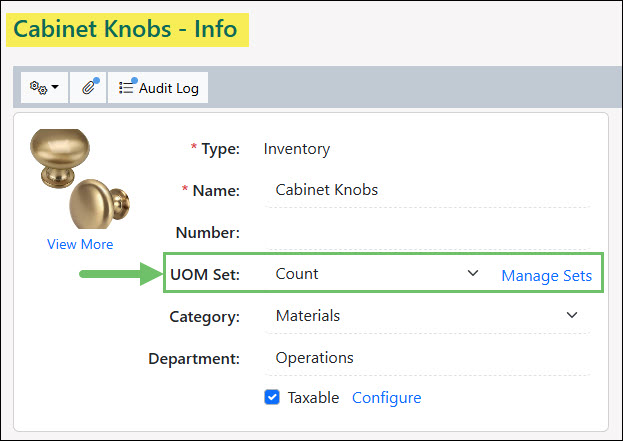
Example of the UOM Set Field on an Item Info Page
UOM on Transactions and Orders
When creating Transactions, Sales Orders, or Purchase Orders, the Unit of Measure’s Related Units can be selected to determine how much is being purchased or sold. The Related Units will be determined by what Unit of Measure Set has been configured at the Item Info page for the Item selected on the transaction or order.
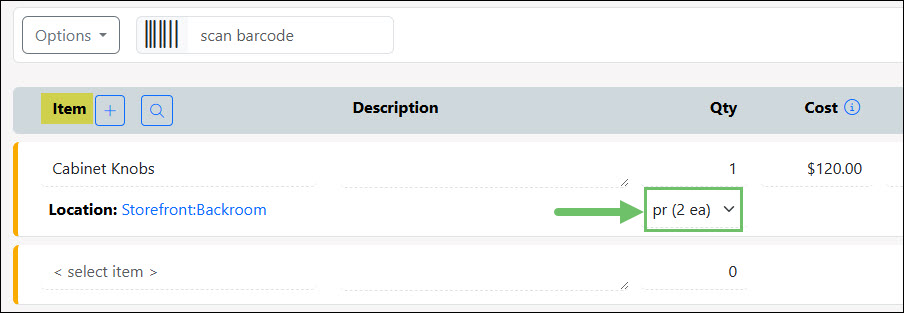
Example of the Related Units Field on a Transaction
-
Item Reference Materials
Item Reference Materials are resources that provide information regarding the Item being ordered. These materials can be instructions, schematics, warnings, and more. Once related to an Item, the Item Reference Materials may be viewed at the Item or Sales Order level.
Item Reference Materials can be created by navigating Company → Settings → Accounting → Items → Reference Materials.
The Reference Materials List page allows you to create and edit Reference Materials. The options available from this page are detailed in the section below.
- Add: Allows you to create a new Reference Material.
- Search: You may use the Search options to narrow the results listed on the Reference Materials List page.
- Reference Material Information: The Reference Materials List page will display the Reference Material Name, Type, and Category (if applicable). Selecting the hyperlinked Reference Material Name will allow you to view and edit the created resource.
- Reference Material Options: Selecting the View icon will allow you to download or open the selected Reference Material. If you would like to deactivate the selected Reference Material, select the Trashcan icon.

Example of the Reference Materials List
-
Creating Item Reference Materials
Select the Add button from the top of the Reference Material List page to begin creating a new Reference Material. The Add Reference Material page allows you to enter the following information:
- Name: Enables you to enter a name for the Reference Material.
- Type: You may choose to add Documents, Links, and Notes as Item Reference Materials.
- Category: The Category field uses a drop-down menu to allow you to organize your Reference Materials by designating a Category. Hovering over this field will prompt a plus button that can be used to create a new Category.
- Material Upload: This field will appear once a Reference Material Type has been chosen. Choosing the Document type will prompt an Upload field as seen in the example image. The Note type will prompt a rich text editor, and choosing a Link type will allow you to paste a link into the text field.
- Save Options: Allows you to Save, Save and Close, and Save and Add New.

Example of Adding a New Reference Material
-
Item Reference Materials Management
Item Reference Materials can be associated at the Item level, ensuring that the Reference Materials are easily accessible. Once an Item with associated Reference Materials has been added to a Sales Order, the Reference Materials may be viewed from within your system, or the Customer Portal. To associate Reference Materials, navigate to the Item – Info page of the selected Item. Select the Reference Materials option which is available from the Item Info waffle menu.
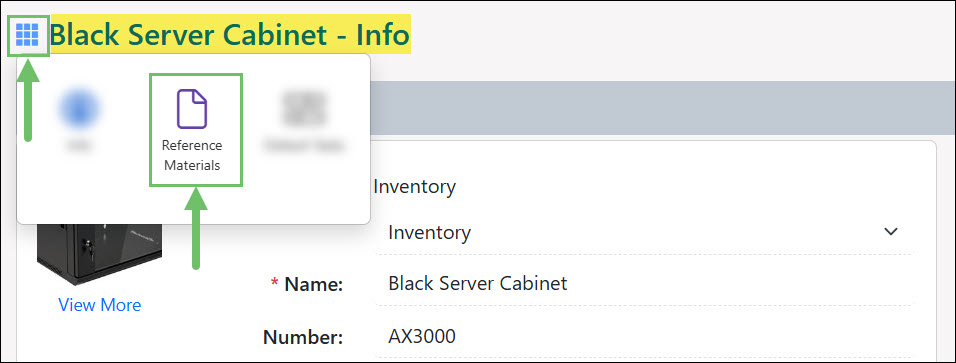
Example of the Reference Materials Option in the Waffle Menu
If no Reference Materials have been associated with the Item, the Item – Reference Materials page will display no results. Select the Associate or Add button to choose the Reference Materials relevant to the Item or create a new Reference Material.
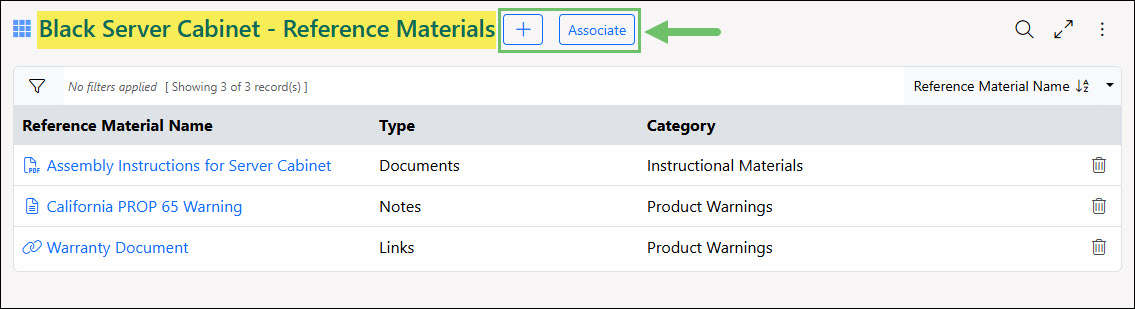
Example of the Associate or Add Options
When using the Associate option, you will be navigated to a Associate Reference Materials page where you can select pre-existing materials to then relate to the Item.

Example of the Associate Reference Materials Page
When using the Add option, you will be navigated to the Add Reference Material page where you can create a new record without having to leave the Item page. Once the new Reference Material has been created from the Item, it will automatically be listed in the Item’s Reference Materials page.
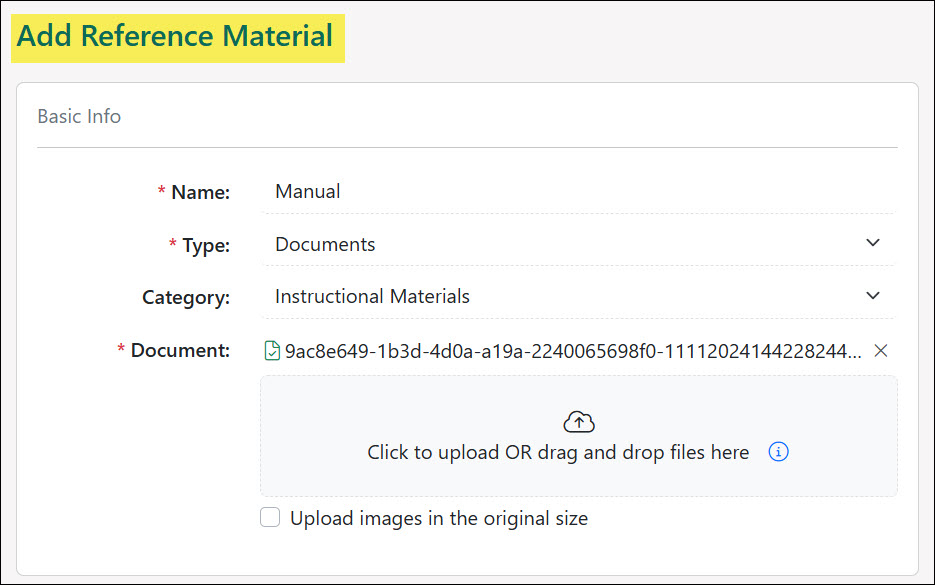
Example of the Add Reference Material Page
When viewing a Sales Order or Purchase Order containing an Item with associated Reference Materials, you may select the Reference Materials option from the Sales Order or Purchase Order Menu Bar. A blue dot will appear in the Reference Materials button to indicate Item Reference Materials are available for viewing.
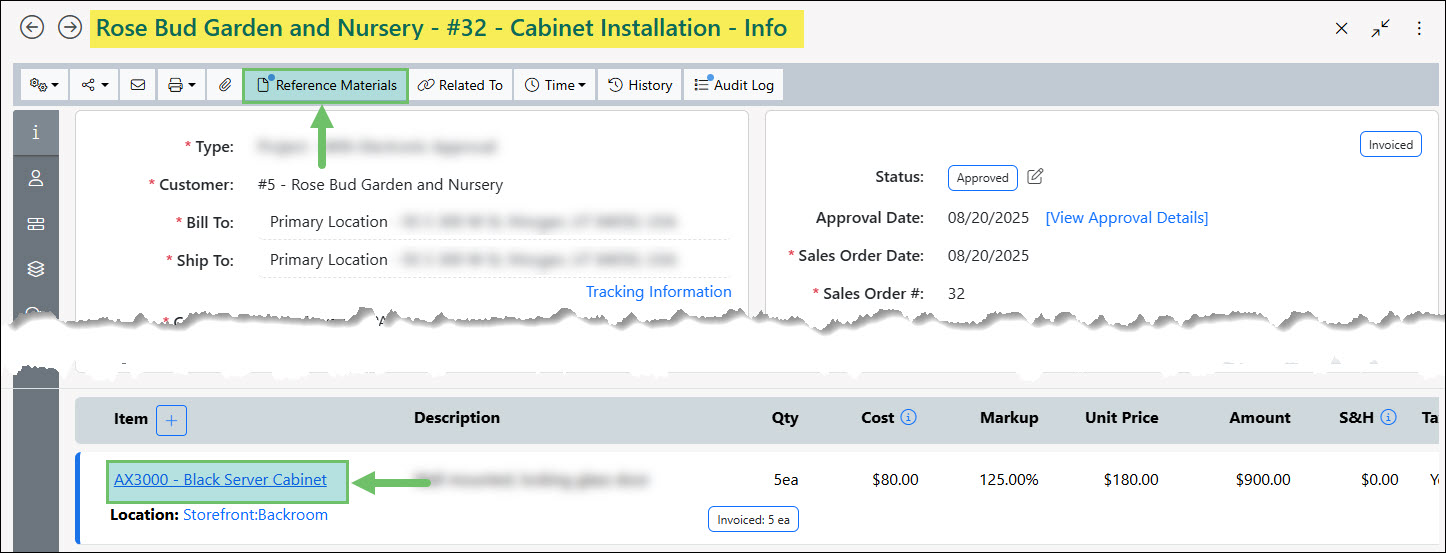
Example of Reference Materials Available on a Sales Order
Once you have selected the Reference Materials option, you are able to view the Reference Materials pop-up window. The name and Reference Material type will be listed. If you would like to view the Item Reference Materials, you may do so by selecting the hyperlinked Reference Material Name.
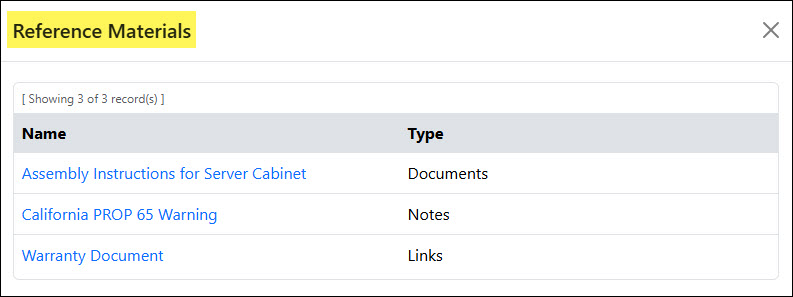
Example of the Reference Materials Popup Window
If a Sales Order contains Item Reference Materials, they may be viewed through the Customer Portal. To view the Reference Materials, select the View Item Reference Materials button located on the Sales Order Information page. Selecting this option will prompt a pop-up Item Reference Materials window, which allows you to view the Reference Material Name, and Type. The Reference Materials may be opened for viewing by clicking the hyperlinked Reference Material Name.

Example of Viewing Item Reference Materials from the Customer Portal
-
Default Tasks
Default Tasks on Items are pre-configured Task templates from your Task Library that are associated with specific products or services at the Item level, allowing you to instantly generate all the necessary fulfillment Tasks directly from a Sales Order’s Actions Menu. Learn more about adding Tasks to the Tasks Library by reviewing the Task Library & Groups Guide.
An Item’s Default Tasks can be accessed by clicking on the waffle menu and selecting the Default Tasks option.
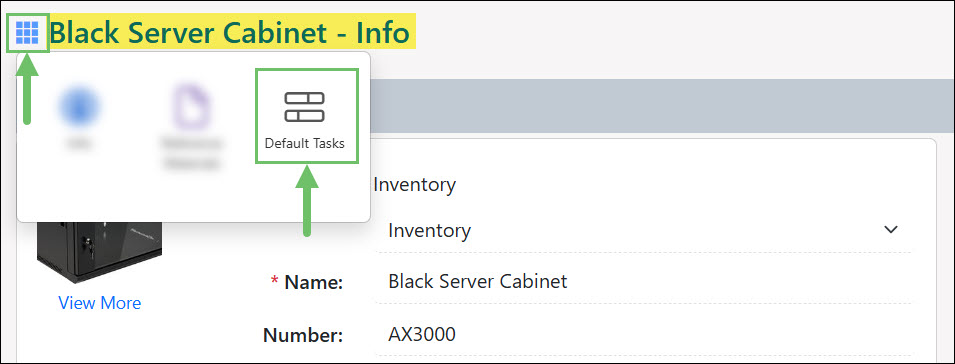
Example of the Default Tasks Option on an Item
When viewing an Item’s Default Tasks page, Tasks from the Task Library can be either associated or newly created by using the Add or Associate buttons available at the top of the page.
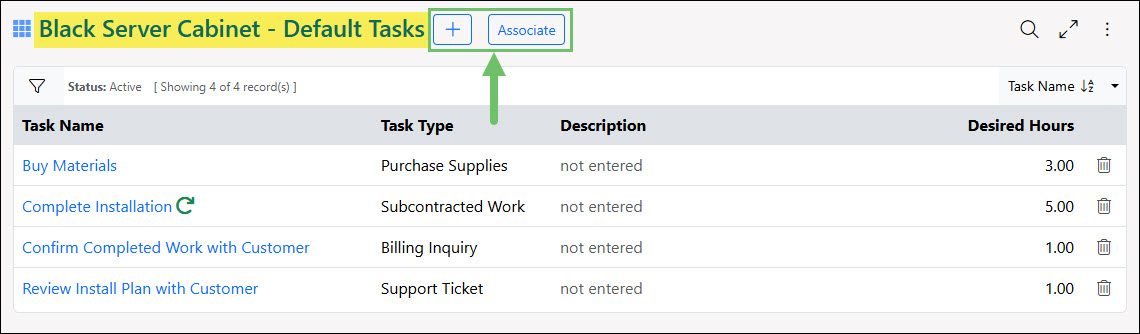
Example of the Add and Associate Options from an Item Default Tasks Page
When using the Add option, you will be navigated to an Add Task page where you can set up a new Task to be housed as a Task template for the Item. The Add Task page will have configurations for the Title, Task Type, Budget, Description, Attachments, and Recurring options. Below is a screenshot illustrating how the Add Tasks page for Default Tasks appears and a description of what can be accomplished there.
- Title: Will become the Task Title when a Task is created from this Task Template.
- Task Type: Will automatically set the Task Type when this Task is created for Default Tasks. The Task Type can ensure key fields are available or required on the Task.
- Budget: Enters a set number in the Budget field when the Task gets created.
- Description: The description will automatically populate with text entered in this field when the Task is created for an Item’s Default Tasks.
- Attachments: Carries over any attachments that were added to the Task.
- Is Recurring?: Determines if the Task should recur on any kind of basis which can be set up by using this option.
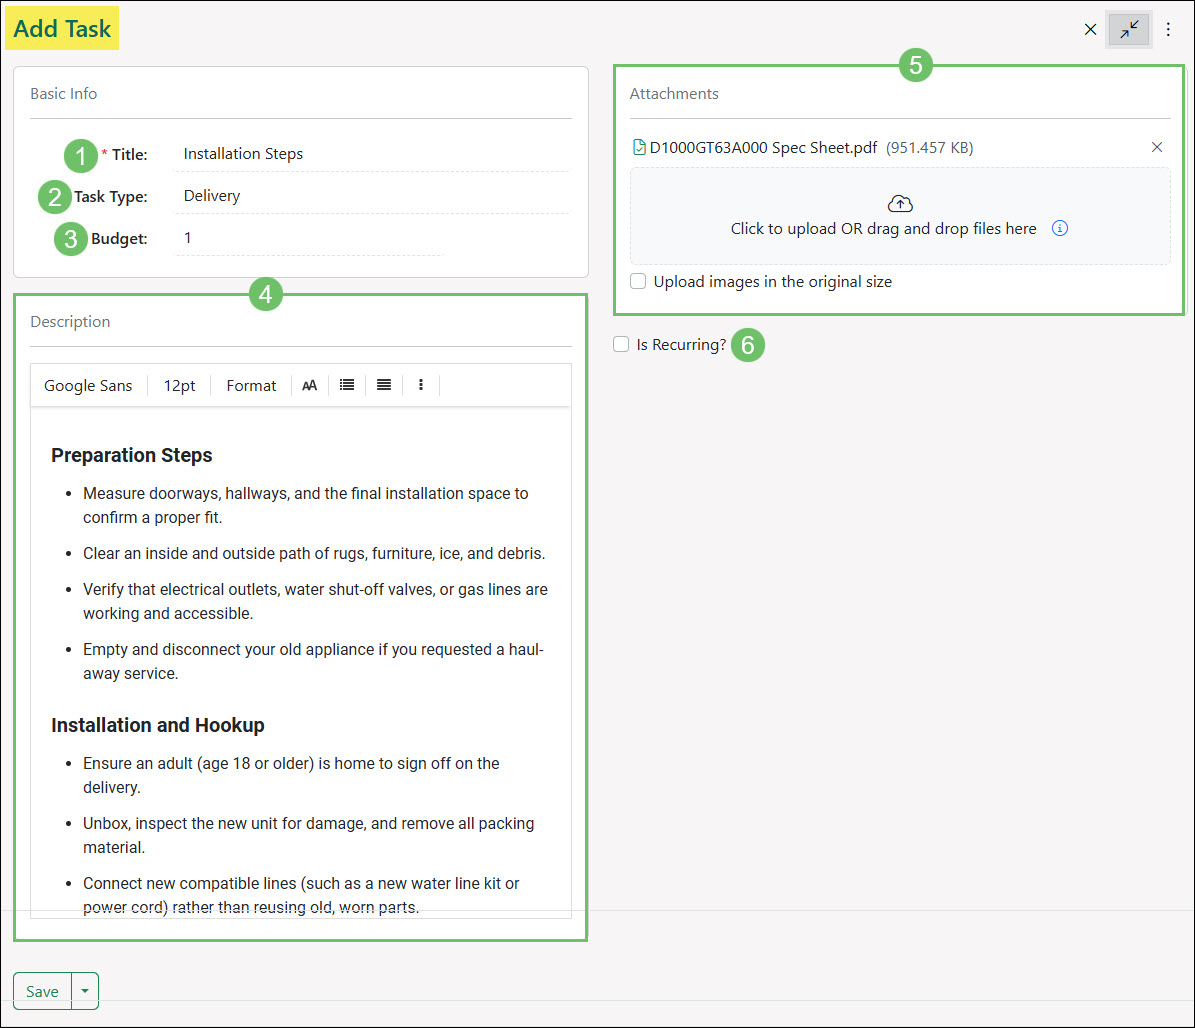
Example of the Add Task Page for Default Tasks on Items
When using the Associate option, you will be navigated to the Associate Tasks page where you can check off Tasks from the library and choose to associate as a Default Task for the Item. Information about the Task will be displayed such as the Task Name, Task Type, Description, and Desired Hours which is based on the budget entered on the Task.
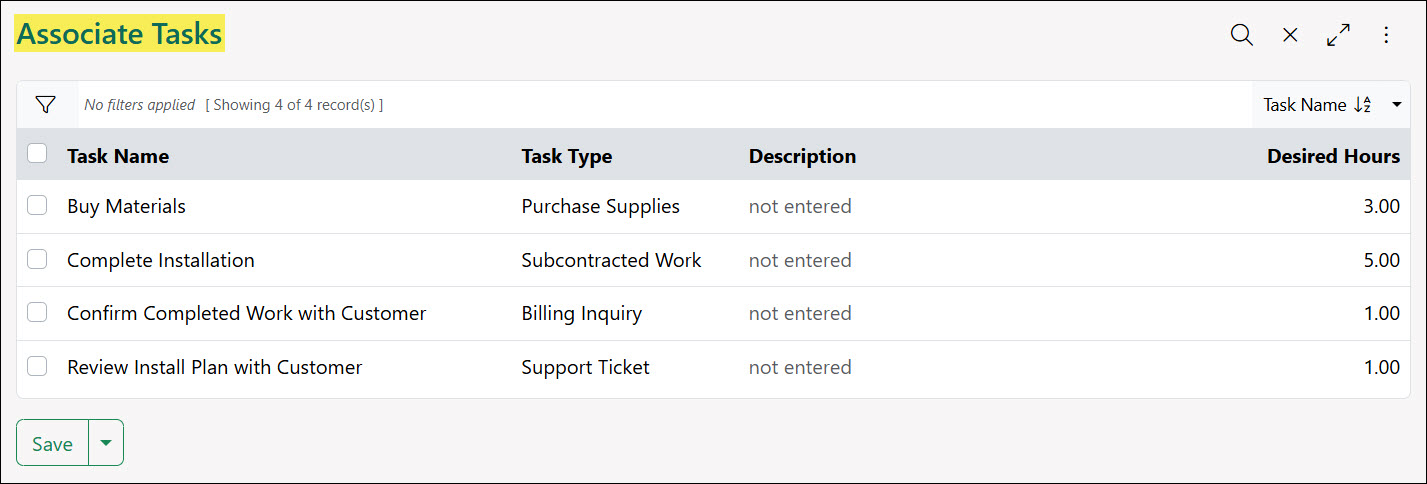
Example of the Associate Tasks Page from an Item
-
Assigning Default Tasks From Sales Orders
Once you have created or associated all the Default Tasks needed for an Item, these Tasks can then be created by using the Create Default Tasks option in the Actions Menu of a Sales Order.
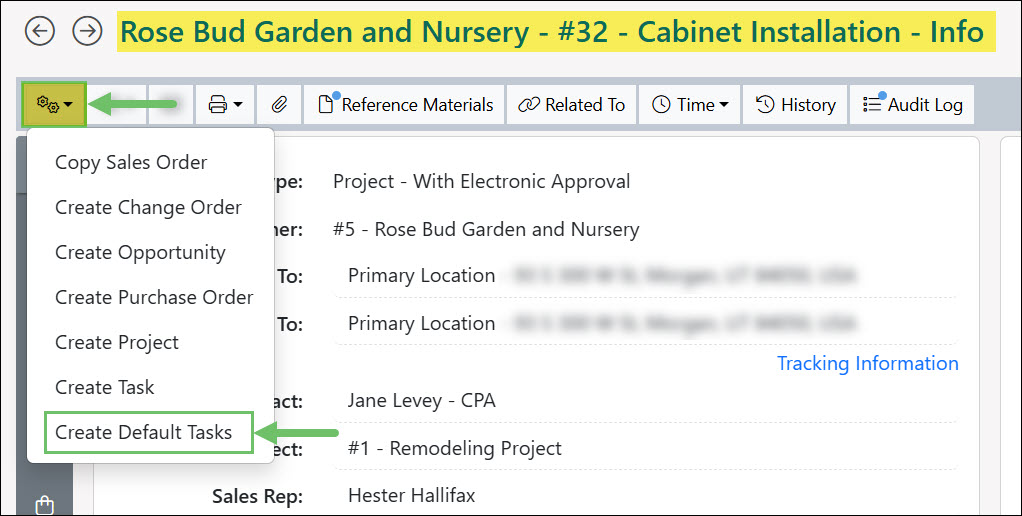
Example of the Create Default Tasks Option in the Actions Menu on a Sales Order
This will open the Create Default Tasks popup which will list the pre-associated Tasks from the Tasks Library that was configured for the Items listed on the Sales Order. A Start Date field will be available at the top to determine how the dates on the Tasks that are being created should be calculated. Click the checkbox next to each Task and click the Create button to have these Tasks get created in the system.
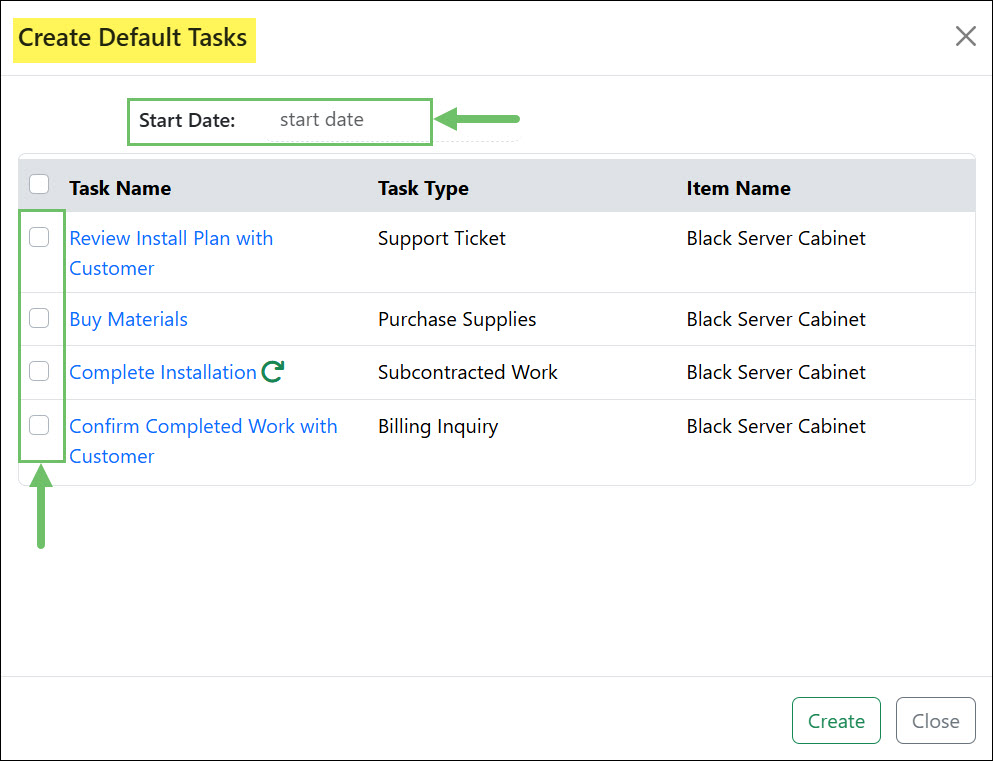
Example of the Create Default Tasks Popup
-
Recap
With this guide, we’ve discussed the essential inventory settings and configurations needed to streamline your accounting and operations, such as serial number tracking, barcoding, and units of measure. We have covered how to organize and categorize your inventory effectively using Item Labels, categories, and dedicated inventory locations. Additionally, we’ve explored how to manage operational workflows by setting up shipping methods, associating reference materials, and automating tasks for items.
FAQs
-
What is the difference between Public and Private Item Labels?
Public labels are visible and can be used for filtering by any employee who manages items. Private labels are only viewable and usable by the specific employee who created them; they are indicated by a lock icon. You can convert a private label to a public one, but please note that this change cannot be reversed.
-
Can I use my own barcode values for inventory locations?
Yes. When adding or editing an Inventory Location, you can use the Barcode Value field to assign a custom barcode value to that specific location, which helps streamline your inventory tracking processes.