
Recruiting
Candidate Information
Support Guide
-
Overview
Effectively managing Candidate information is crucial to a successful recruitment process. Striven automatically brings in applicant data when Candidates build their profiles and submit applications through the Career Portal. This guide will walk you through utilizing the Candidates list for high-level management and navigating the comprehensive Candidate Dashboard, which serves as the definitive, singular repository for all applicant data, documents, and archival information. You will learn how to use the dashboard’s customizable widgets to view everything from contact details and attachments to education and experience history , and how to perform critical management actions, such as converting a Candidate to an Employee and tracking detailed application step status.
Read this guide if you are trying to:
✔ Review to navigate the comprehensive Candidate Dashboard.
✔ Utilize customizable widgets to view everything needed regarding a Candidate.
✔ Understand the type of information stored within a Candidate’s Profile.
-
Permissions
The following permissions will need to be configured for the Employee’s User Role if they will be managing or viewing Candidate information in Striven:
- “Candidate Tracking”
- “Candidates – Delete”
- “Candidates – Email”
- “Candidates – View Salary”

Example of Permissions Related to Viewing Candidate Information

Learn more about managing User Roles and Permissions in Striven by reviewing the User Roles Guide.
-
Candidates List
After Candidates build their profiles and submit their application(s) through the Career Portal, the information will be brought into Striven automatically. To view Candidate information, you can utilize the Candidates list, which lists all names, phone numbers, email addresses, and more. This list will also allow you to enter follow-up dates, notes, and view each Candidate’s profile and application by clicking on the Candidate’s name. To access the Candidates list, navigate to Employees → Recruiting → Candidates.
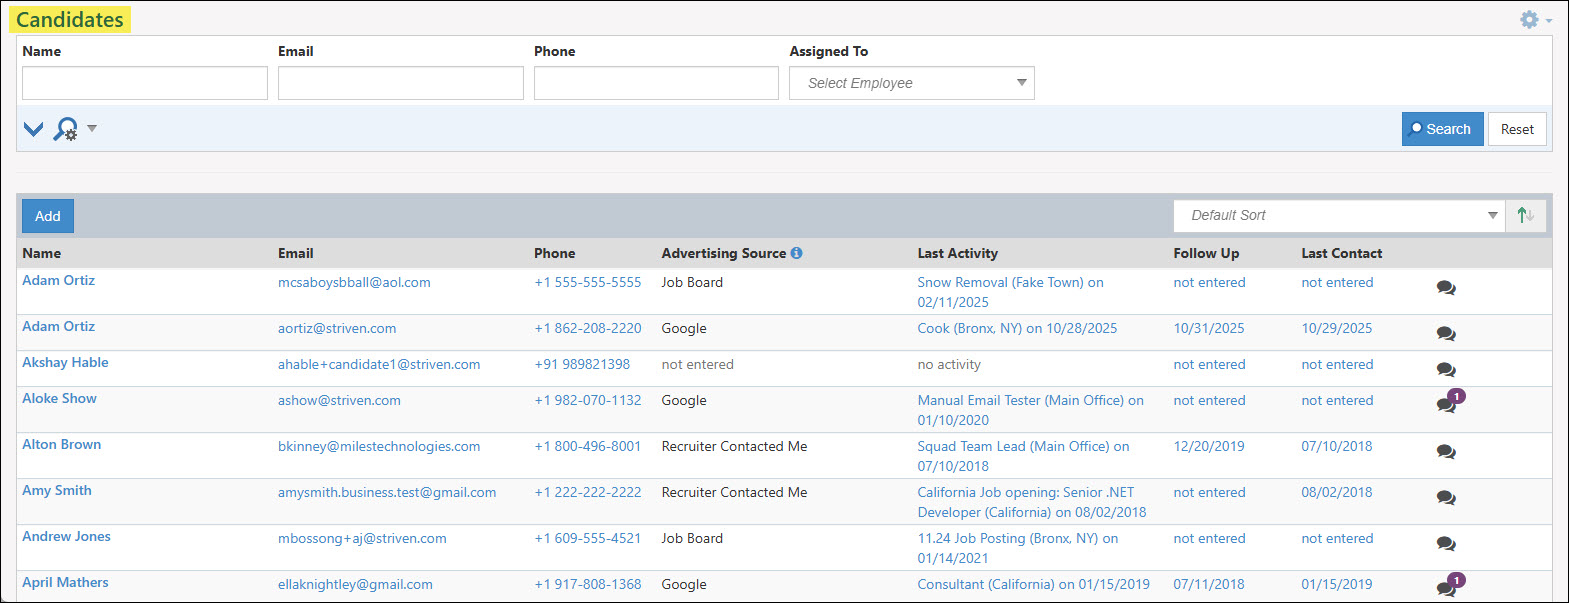
Example of the Candidates List
Below is a screenshot illustrating how the Candidates list appears and a description of what can be accomplished there.
- Add: Allows you to add a new Candidate to track information about. It is important to keep in mind that you will not be able to select a login email for the Candidate. It is recommended to only use the Add button from the Candidates list if you are only tracking information with no intention of having your Candidates sign in to the Career Portal.
- Name: Lists the name of the Candidate. Clicking on the name listed in this column will open their Candidate Dashboard to view more information.
- Email: Lists the log in email that was used when the Candidate logged into the Career Portal. This email will also be used to receive communication notifications when sent out from the system to the Candidate.
- Phone: Lists the contact phone number that the Candidate can be reached at by the recruiter.
- Advertising Source: Lists the advertising source that the Candidate selected when filling out their Candidate profile through the Career Portal.
- Last Activity: Lists the latest job application that the Candidate filled out. Clicking on the hyperlink listed in this column will navigate to the Applications tab within their profile to view the Application Step Status for the specified application.
- Follow Up: Entering a follow-up date into the Candidates List is a fantastic way for recruiters to stay on top of their work. As long as the follow-up date is being entered with accurate dates, then sorting can be done based on these dates to get a working list for recruiters within your Company.
- Last Contact: Allows a recruiter to add in a note regarding the last correspondence they had with their potential hire. Once a note has been entered, the last contact date will update accordingly within the Candidate List. The note will also include who entered the note, as well as the date and time it was added to the system.
- Send Message: Opens a Messages window which allows the recruiter to view previous messages sent or received by the Candidate as well as the option to create a New Message. A number indicator may be included with the Send Message icon indicating how many previous messages have been sent or received.
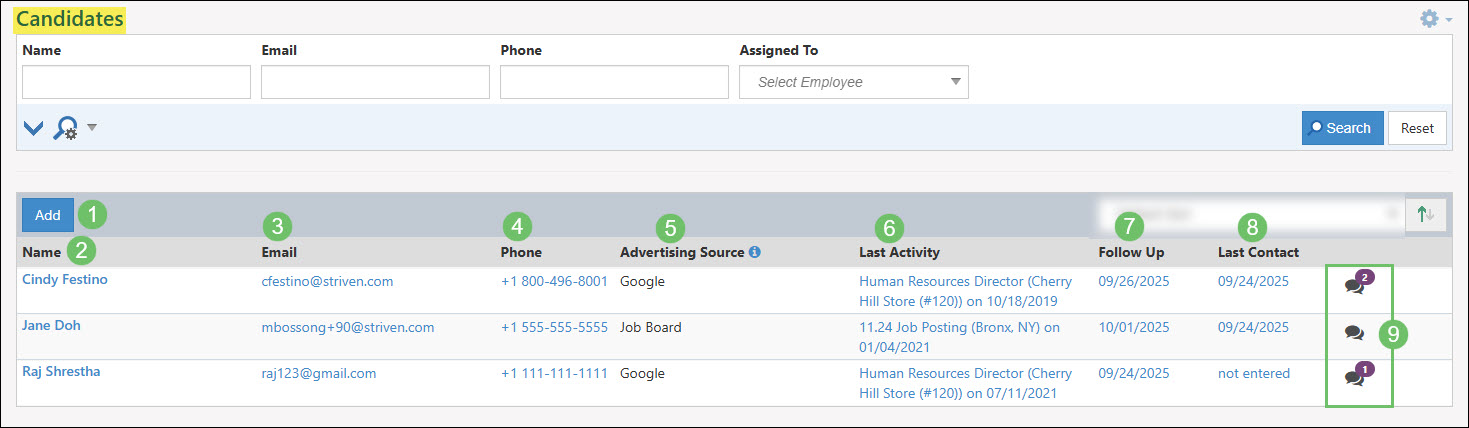
Example of the Information and Actions Available from the Candidates List
-
Candidate Dashboard
The Candidate Dashboard serves as a summary for the profile and application that the Candidate has submitted through the Career Portal. Here you can find sections that summarize contact info, custom field responses, experience, education, references, and more. Each section will allow you to view more detailed information on other tabs by clicking on the section name. There are also tools such as allowing recruiters to create an Employee, deny access to the Career Portal, set referral source, and the message icon to send messages to the Candidate.
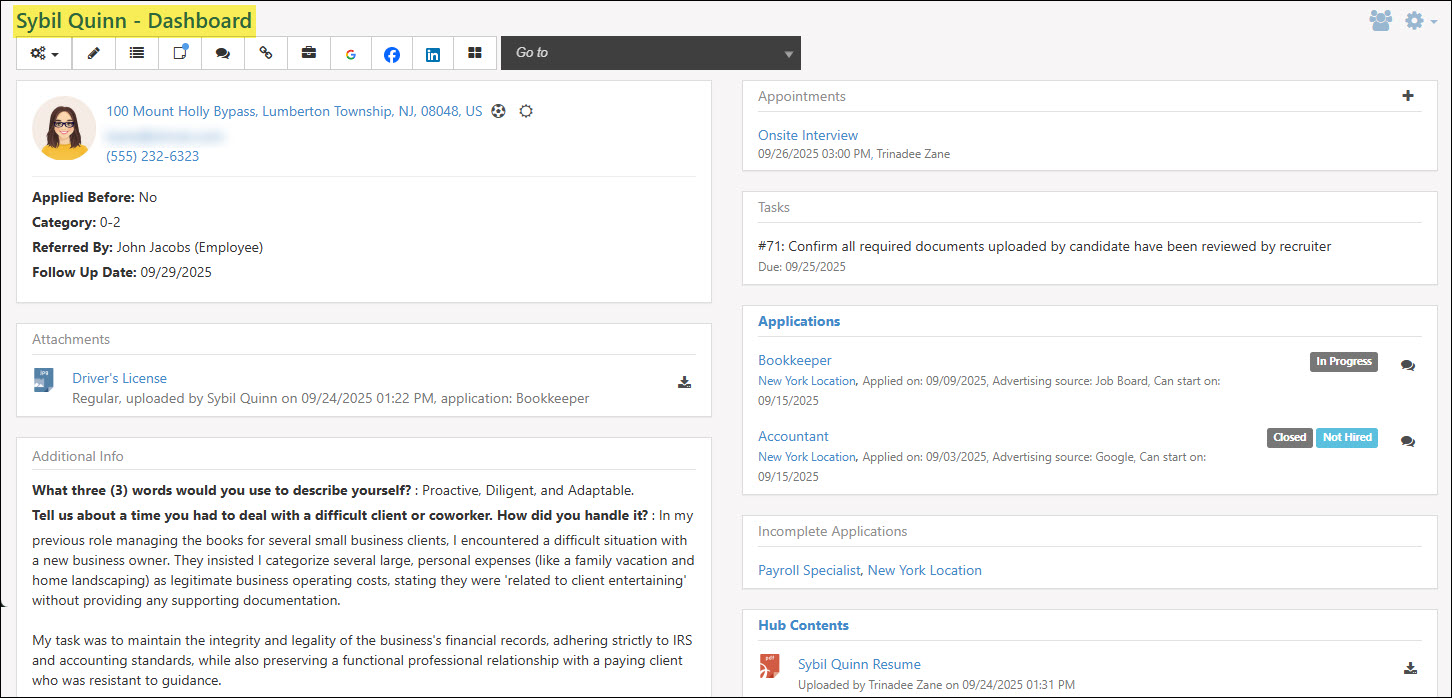
Example of a Candidate’s Dashboard
-
Candidate Dashboard Menu
From a Candidate’s Dashboard, an array of navigational options and actions are available to begin managing your Candidate. Below is a screenshot illustrating how the Candidate’s Dashboard Menu appears and a description of what can be accomplished there.
- Actions Menu: The following actions can be completed through the Candidate’s Action Menu from a Candidate’s Dashboard:
- Set Referral Source: The referral source for potential hires can be tracked as either an existing Employee, another Candidate, or a Contact from a Customer.
- Create Employee: When the time is right, a Candidate can be turned into an Employee directly from their Dashboard. Important information such as contact details will be carried over from the Candidate to the Employee for convenience. Both the Candidate and Employee entities will be linked together within Striven.
- Deny Access to Portal: Prevents a Candidate from signing in and applying for jobs on your Career Portal by restricting their access.
- Delete Candidate: When choosing to delete a Candidate from Striven, a list of information that is to be deleted will be displayed once the Delete Candidate button has been selected. After reviewing this list, click the Delete button for the removal to take effect.
- Edit: Navigates the user to the Candidate Info page where contact information for the potential hire can be adjusted.
- Audit Log: Tracks changes and updates that have been completed to the Candidate’s profile.
- Notes: Allows users to enter notes regarding the Candidate. The user, time and date of entry will be tracked along with the note entered.
- Send Message: Send or reply to messages between a potential Candidate and the user in Striven who is recruiting.
- Linked To: Easily access the related Employee’s profile that the Candidate is turned into. To create a link between a Candidate and an Employee, use the Create Employee option from the Actions Menu on the Candidate’s Dashboard.
- Potential Positions: Quickly access and manage potential positions that are being tracked for the potential hire. The options that are selectable here can be added or updated through the Job Titles through the Company Settings.
- Integrated Links: Access the integrated links that were added within the settings for Striven. To manage Integrated Links, navigate to Company → Settings → Company → Customizations → Integrated Links.
- Manage Widgets: Allows users to remove or add additional widgets to the Candidate’s Dashboard.
- Go To: Easily access additional information regarding the Candidate in Striven.

Example of a Candidate Dashboard Navigation Options
- Actions Menu: The following actions can be completed through the Candidate’s Action Menu from a Candidate’s Dashboard:
-
Candidate Dashboard Widgets
Widgets on the Candidate’s Dashboard are a summary view of the various information that is being stored for the Candidate at a quick glance and easy access. Below is a screenshot illustrating how a Candidate’s Dashboard appears and a description of what can be accomplished there.
- Basic Info: Displays contact information for the candidate along with whether or not the Candidate has applied before, any categories, referred by and follow up dates entered. This information can be edited by navigating to the Basic Info tab from the Go To menu for the Candidate.
- Attachments: Documents or other uploadable attachments entered by the Candidate during the application process through application steps will be displayed here. Next to each attachment added is a download icon in order to view the downloaded attachment.
- Custom Fields: Displays any custom field information that has been saved based on Candidate Custom Fields. Learn more about tracking additional information regarding Candidates through custom fields by reviewing the Candidate Custom Fields section from our Recruiting Setup Guide.
- Appointments: Upcoming appointments from the recruiter’s or user’s calendar in Striven that are related to the Candidate will be displayed here with the date and time listed. To add a Candidate to an appointment, the Appointment Type will need to have the Allow adding candidates as attendees option enabled. Clicking on appointments listed within this widget will open the Appointment Info page for additional information on the scheduled meeting.
- Tasks: Lists any Tasks related to the Candidate. In order to relate a Task to a Candidate, the Task Type will need to have the Include Candidates option enabled within the Task Field Options section. Clicking on Tasks listed within this widget will open the Task Info page for additional information.
- Applications: A widget is available for applications that have been completed by the Candidate and a widget for incomplete applications are both available to easily sort through the difference.
- Hub Contents: Any attachments or documents added to the Candidate’s Hub will be shown here to easily access external documents related to the Candidate. These documents can also be accessed by navigating to the Hub option from the Go To menu on the Candidate’s Dashboard.
- Education/Experience/References: Information regarding past education, previous experience, and any references entered by the Candidate during their application entry through the Career Portal will be listed within this widget. Clicking on any of the results listed in these widgets will open the Education, Experience, or References tab within the Candidate’s profile to view further information.
- Surveys/Quizzes/Assessments/Forms: Any feedback such as Surveys, Quizzes, Assessments, or Forms that have been completed by the Candidate or has been related to the Candidate.
- Potential Positions: Access and manage potential positions that are being tracked for the potential hire by clicking the plus sign icon in the top-right corner of the widget. The options that are selectable here can be added or updated through the Job Titles through the Company Settings.
- Add Widgets: Allows the user to add or remove widgets on a Candidate’s Dashboard.
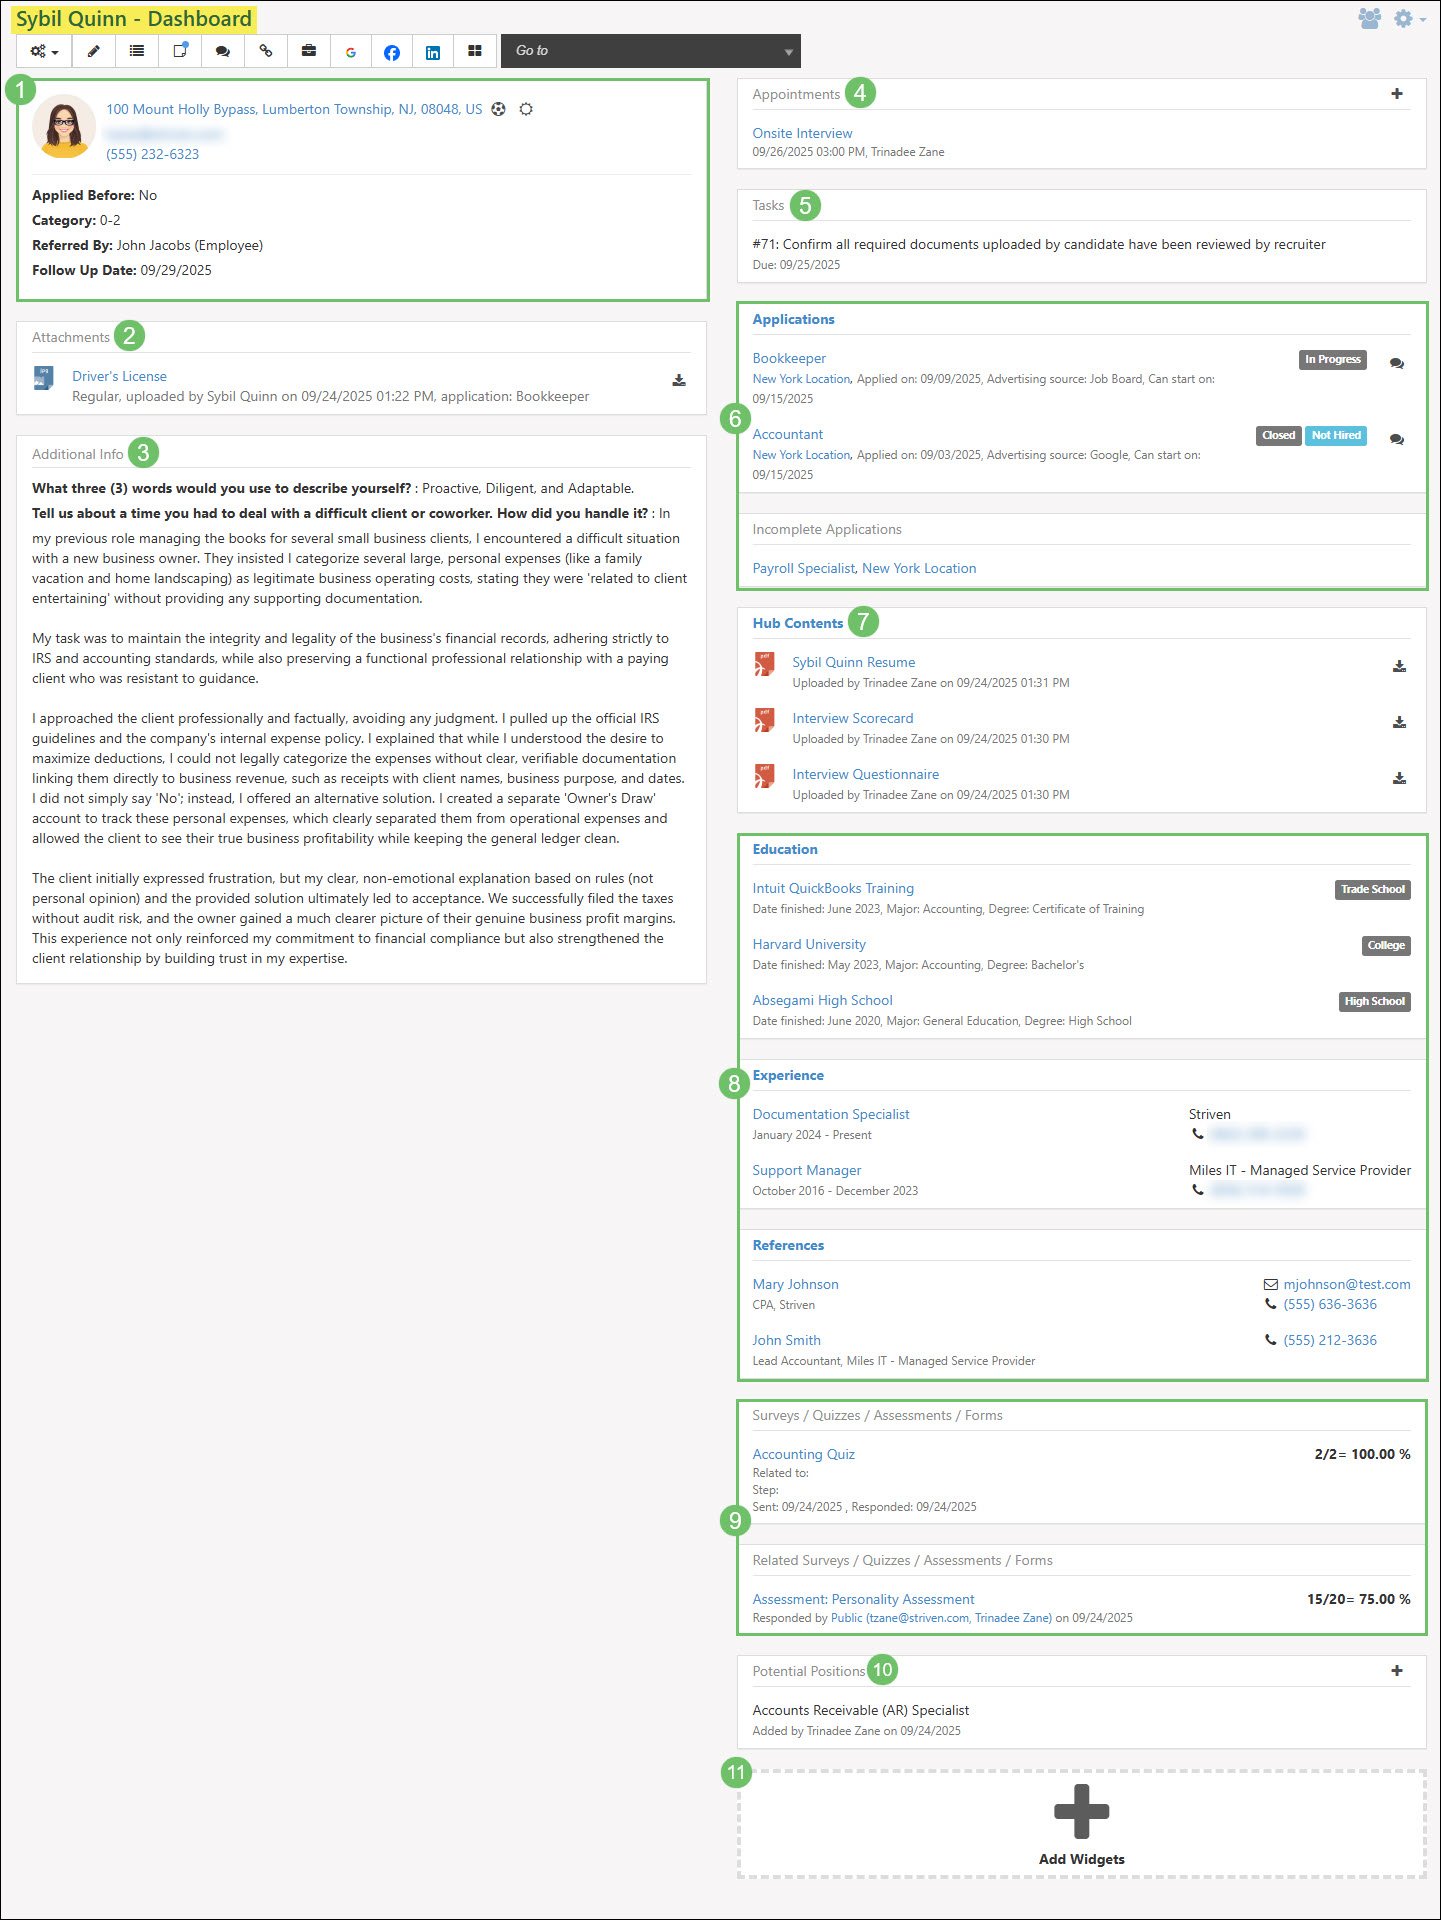
Example of the Widgets Available on a Candidate’s Dashboard
Add Widgets
Clicking the Add Widgets widget will allow you to add or remove widgets to be displayed on the Candidate’s Dashboard. Once you have clicked on the Add Widgets widget you can check or uncheck which widgets should be displayed or removed when viewing the Candidate’s Dashboard.

Example of the Add Widgets Widget from a Candidate’s Dashboard
-
Basic Info
The Basic Info widget and tab within a Candidate’s profile holds contact information such as their address, email, and contact phone number. This section will also include information such as if they have previously applied, any categories set for the Candidate, who the Candidate was referred to by (an Employee, another Candidate, or a Customer Contact), and a follow up date that was set.

Example of the Basic Info Widget from a Candidate’s Dashboard
This information can be edited by using the Edit icon within the Candidate Dashboard Menu or by selecting the Basic Info option from the Go To menu.

Example of the Edit and Basic Info Navigation Option in a Candidate’s Dashboard
Below is a screenshot illustrating how the Basic Info tab appears from a Candidate’s profile and a description of what can be accomplished there.
- Candidate Actions: The following actions can be completed through the Candidate Action button from a Candidate’s Basic Info tab:
- Set Referral Source: The referral source for potential hires can be tracked as either an existing Employee, another Candidate, or a Contact from a Customer.
- Create Employee: When the time is right, a Candidate can be turned into an Employee directly from their Dashboard. Important information such as contact details will be carried over from the Candidate to the Employee for convenience. Both the Candidate and Employee entities will be linked together within Striven.
- Deny Access to Portal: Prevents a Candidate from signing in and applying for jobs on your Career Portal by restricting their access.
- Attachments: Documents or other uploadable attachments entered by the Candidate during the application process through application steps can be accessed by clicking the Attachments button from the Basic Info tab. Clicking this option will open the Candidate Attachments window which will include information about the attachment such as the attachment type, uploaded by, which application the attachment is related to, and the uploaded date. Using the download button available next to each attachment in the Candidate Attachment window will allow you to download the attachment to view.
- Linked To: Easily access the related Employee’s profile that the Candidate is turned into. To create a link between a Candidate and an Employee, use the Create Employee option from the Actions Menu on the Candidate’s Dashboard or the Basic Info tab.
- Audit Log: Tracks changes and updates that have been completed to the Candidate’s profile.
- Messages: Send or reply to messages between a potential Candidate and the user in Striven who is recruiting.
- Basic Info: The Basic Info section from the Basic Info tab for a Candidate profile will include the Candidate’s name, contact information including their Sign In Email for the Career Portal, who referred the Candidate, and if the Candidate has applied previously.
- Contact Info: The Contact Info section from Basic Info tab for a Candidate profile will include a field to add a video link (such as an interview video), any categories set for the Candidate, additional phone numbers or email addresses to be stored with the Candidate, and what the next follow up date is currently set as.
- Custom Fields: Displays any custom field information that has been saved based on Candidate Custom Fields. From the Basic Info tab, the recruiter can override any text that has been entered into these fields by the Candidate if needed. Learn more about tracking additional information regarding Candidates through custom fields by reviewing the Candidate Custom Fields section from our Recruiting Setup Guide.

Example of the Basic Info Tab from a Candidate’s Profile
- Candidate Actions: The following actions can be completed through the Candidate Action button from a Candidate’s Basic Info tab:
-
Attachments
Any attachments that have been related to the Candidate will appear within a widget on the Dashboard. These attachments are added through the application process by the Candidate as they fill out a Job Posting. This section is not to be confused with Hub. Hub allows you to upload documents related to the Candidate versus the Candidate uploading documents related to the position they are applying for. Clicking on the attachment name from the widget will allow you to view a preview of the upload without downloading. Using the download icon to the right of the attachment name will allow you to download the attachment to save on your computer or device.

Example of the Attachments Widget from a Candidate’s Dashboard
Attachments can also be viewed by navigating to the Basic Info tab which can be accessed by clicking on the Edit icon within the Candidate Dashboard Menu or by selecting the Basic Info option from the Go To menu.

Example of the Basic Info Tab from a Candidate’s Profile to Access Attachments
Once you have navigated to the Basic Info tab for a Candidate’s profile, click the Attachments option at the top of the Basic Info page in order to open the Candidate Attachments window. The Candidate Attachments window will list attachments with information such as the attachment type, who completed the upload, which job application it is related to, and the upload date. Clicking on the attachment name will allow you to view a preview of the attachment without downloading while using the download icon will download the attachment to your computer or device.
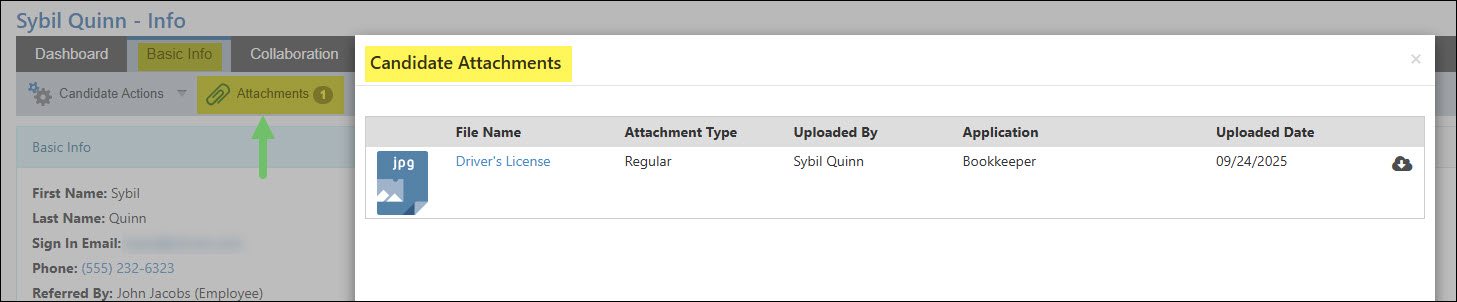
Example of the Candidate Attachments Window Accessed Through the Basic Info Tab
-
Candidate Custom Fields
Custom Fields saved with the Candidate can be viewed from the Dashboard located below the Attachments widget. When viewing the custom fields from the Dashboard, answers given cannot be edited. Learn more about tracking additional information regarding Candidates through custom fields by reviewing the Candidate Custom Fields section from our Recruiting Setup Guide.
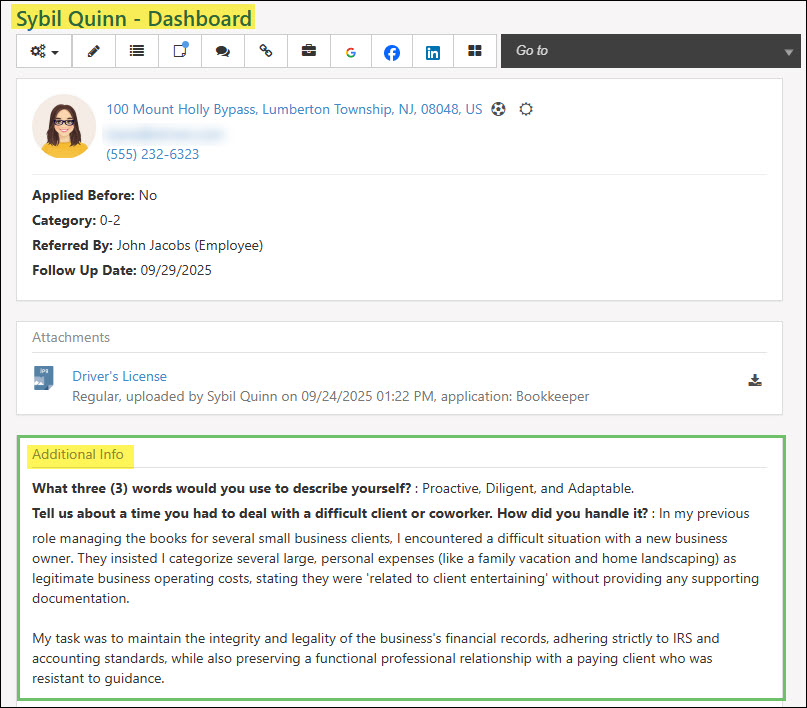
Example of Candidate Custom Fields Located on a Candidate’s Dashboard
To edit the information stored within the Candidate Custom fields, navigate to the Basic Info tab by using the Edit icon within the Candidate Dashboard Menu or by selecting the Basic Info option from the Go To menu.

Example of the Basic Info Tab from a Candidate’s Profile to Access Custom Fields
While on the Basic Info tab within a Candidate’s profile, Candidate custom fields can be edited and viewed underneath the Contact Info section.

Example of the Candidate Custom Fields Location from the Basic Info Tab
-
Appointments
The Appointments widget will display any upcoming appointments that the Candidate is included in as an attendee. This widget will display the Appointment name, the date and time, resources added to the Appointment, and other attendees set within the meeting. Clicking on the Appointment name will open the Appointment for further details. A plus sign icon is available in the top-right corner of the widget to create a new Appointment with the Candidate preselected.
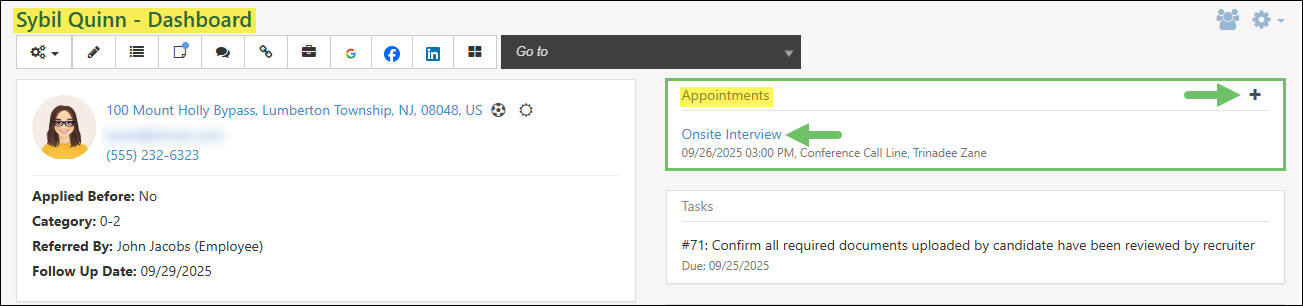
Example of the Appointments Widget on a Candidate’s Dashboard
-
Tasks
The Tasks widget will list any Tasks that have the Candidate added within the Candidates section on the Task. In order to select a Candidate on a Task, the Task Type will need to have the Include Candidates option enabled within the Task Field Options section when configuring a Task Type. The Tasks listed within the Tasks widget will include the Task number, name, and the due date set within the Task. Clicking on the Task listed within the widget will open the Task Info page for additional details.

Example of the Tasks Widget on a Candidate’s Dashboard
-
Applications
There are two widgets on the Candidate’s Dashboard that include Applications related to the Candidate. The Applications widget will include Applications that are currently open and being processed, or have been closed by the recruiter. The Incomplete Applications widget includes Applications that the Candidate has begun to apply for through the Career Portal but did not complete the submission.
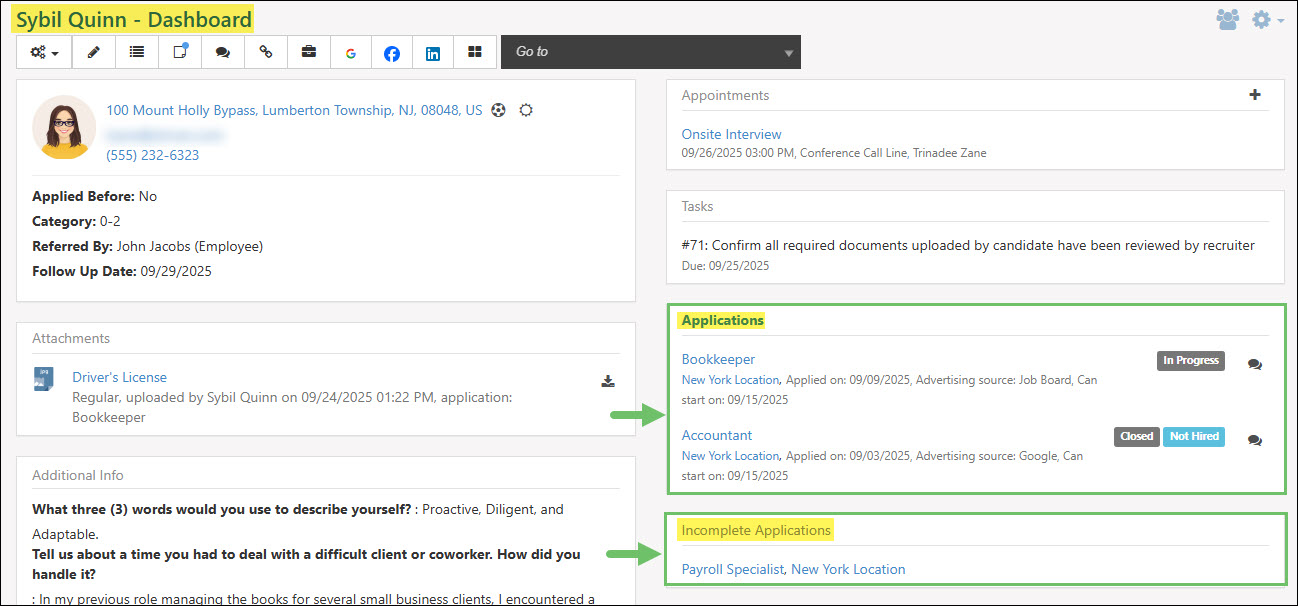
Example of the Applications and Incomplete Applications Widget on a Candidate’s Dashboard
-
Applications
The Applications widget will list Applications that were submitted by the Candidate and are currently being processed or have been closed by the recruiter. For each Job Posting listed in the Applications widget will include the Job Posting title, the location, the date the Application was submitted, the advertising source, and the potential start date selected by the Candidate. A tag will also be listed displaying the current status of the Application such as In Progress or Closed. If the Application has been closed, an additional tag will be listed which states the result of the Application, such as Hired or Not Hired. A Messages icon will also be listed next to each Application within the widget which opens the Messages window for the Application.
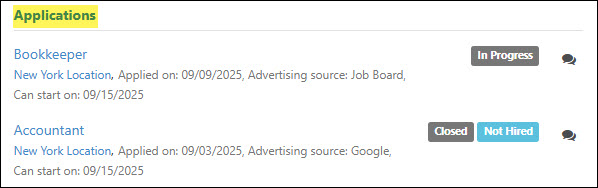
Example of the Applications Widget on a Candidate’s Dashboard
Clicking on the Applications header in the widget will navigate to the Applications tab within the Candidate’s profile. Below is a screenshot illustrating how the Applications tab from a Candidate’s profile appears and a description of what can be accomplished there.
- Application: Lists the Job Application that is currently being processed or has been closed by the recruiter. Clicking on the Application listed will open the Application Info subtab which includes more information about the Application.
- Location: Displays the location where the Candidate is applying to for the Job Application.
- Applied: Shows the date the Application was submitted by the Candidate through the Career Portal.
- Status: Includes the current status of the Job Application such as In Progress or Closed.
- Result: If the Application has been closed, the result of the Application will be listed in this column. If there is no result listed, this indicates the Application is still being processed and is an In Progress status.
- Message: Opens the Messages window for the Job Application to view any messages that have been sent or received by the Candidate with the option to begin a New Message.

Example of the Applications Tab within a Candidate’s Profile
Clicking on the Application’s name from the Applications widget or the Applications tab will open more information about the Job Application that is currently being processed or has been closed. Below is a screenshot illustrating how the Application Info subtab from a Candidate’s profile appears and a description of what can be accomplished there.
- Menu: The Application Info subtab will include the following menu items:
- Application Actions: Gives the options to change the status of the Application. If the Application is currently being processed, the status can be updated to On Hold or Closed. Once you choose to close an application, you will be given the option to select the result of the Application. On Hold Applications can be updated back to In Progress or Closed. Closed Applications can be changed to On Hold or In Progress. Closed Applications will have an additional option to update the result of the Application.
- Attachments: Opens the Application Attachments window which gives the option to view and download any uploads that were added by the Candidate or recruiter for the specific Job Application they applied for.
- Audit Log: Opens the Application Audit Log window which displays a list of each time the Application was updated based on various steps completed. The information included in this window will list the date and time of the update, who completed the update, what the change was, and the Application and related step.
- Messages: Opens the Messages window for the Job Application which includes any sent or received messages related to the specific Job Application from the Candidate or recruiter. An option is available within the window to create a New Message as well.
- General Info: This section includes general information regarding the Job Application that the Candidate applied to. The information included in this section details the location, Job Posting, desired annual salary if entered, the date the Candidate can begin work, the advertising source selected by the Candidate, and whether or not they have been convicted of a crime. If they have selected Yes for a conviction of a crime, there is an additional field for the explanation. The Convicted Crime question will be available to your Candidate based on the Requirements configurations within the Job Posting.
- Custom Fields: Displays any custom fields that were added to the specific Job Posting and the answer that was given by the Candidate. To learn more about custom fields for specific Job Postings, review the Job Posting Custom Fields section from our Recruiting Setup Guide.
- Application Step Status: This section will list the recruiting steps that were added to the Job Posting and the current status of each step. A green check mark will indicate the step has been completed, a blue hand will indicate the current step being worked on, and a grey circle indicates upcoming steps. Completed steps will include who completed the step, the date that the step was marked done, and any completion notes entered.

Example of the Applications Info Subtab in a Candidate’s Profile
-
Incomplete Applications
The Incomplete Applications widget will list any Job Applications that the Candidate has started to fill in but did not submit the Application through the Career Portal. Clicking on the Job Posting name listed in this widget will open the Job Posting Info page to review more information about the job listing. The location will be listed next to the Job Posting name which can also be clicked on to access the Location Info page for further details about the specific Location from the settings.

Example of the Incomplete Applications Widget from a Candidate’s Dashboard
-
Hub Content
The Hub Content widget houses any documents or uploads that have been added to the Candidate’s Hub for storage. Each upload listed can be clicked on to access a preview of the attachment or the download button can be clicked to download the attachment to your computer or device. Each upload listed in the Hub Content widget will include underneath the attachment name the person who completed the upload along with the date and time.

Example of the Hub Widget on a Candidate’s Dashboard
Clicking on the Hub Content widget header name will navigate to the Candidate’s Hub in order to view these uploads within the Content Groups or add additional documentation for storage. To learn more about Hub, review our Hub Guide.
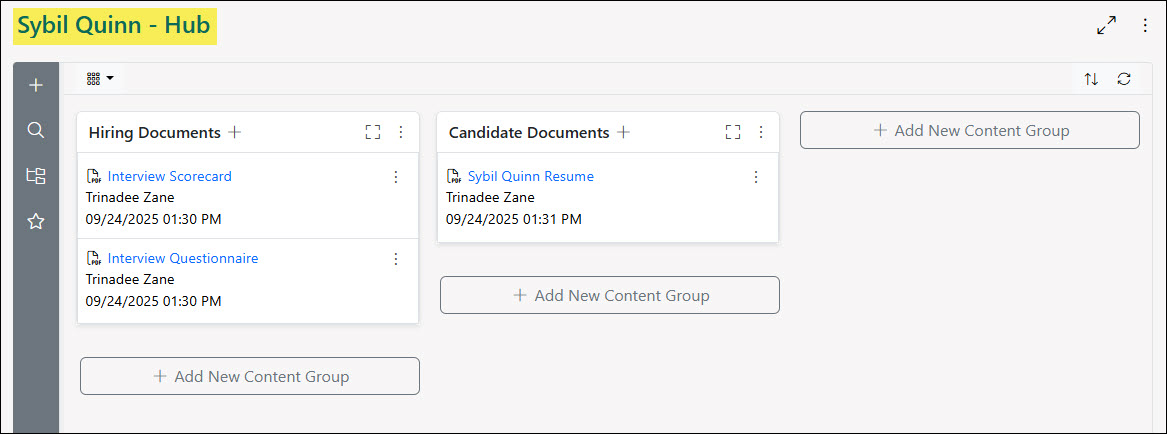
Example of a Candidate’s Hub
-
Education
The Education widget lists the past education history the Candidate entered when filling out their Candidate profile in the Career Portal. The widget will list the school name, the date finished, and what the major and degree was. A tag will be listed for each education entry indicating the type of schooling completed, such as College, High School, Trade School, etc. Clicking on each school listed in this widget will open more information about the specific education history.
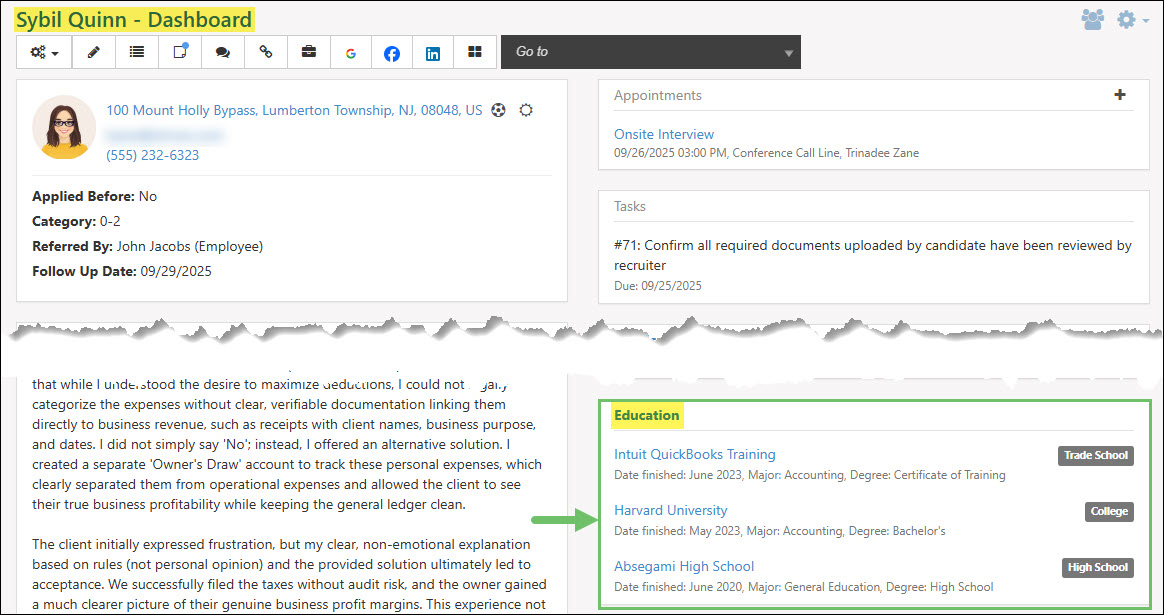
Example of the Education Widget on a Candidate’s Dashboard
Clicking on the Education header name in the Education widget will navigate to the Education tab within the Candidate’s profile. The Education tab will list the school type, school name, the date finished, and what the major and degree was.
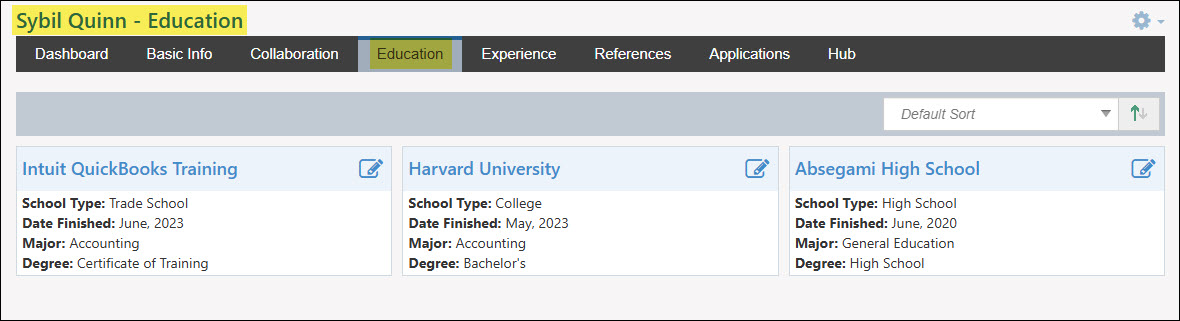
Example of the Education Tab from a Candidate’s Profile
Clicking on the Education entries listed from the Education widget or the Education tab will open more information about the previous education completed by the Candidate. Additional information will be included such as the address of the school and how many years were completed.

Example of the Education Basic Info Subtab from a Candidate’s Profile
-
Experience
The Experience widget lists the past job experience history the Candidate entered when filling out their Candidate profile in the Career Portal. The widget will list the previous job title, the date range they held this position, and the previous company name and contact phone number. Clicking on each experience listed in this widget will open more information about the specific job experience history.
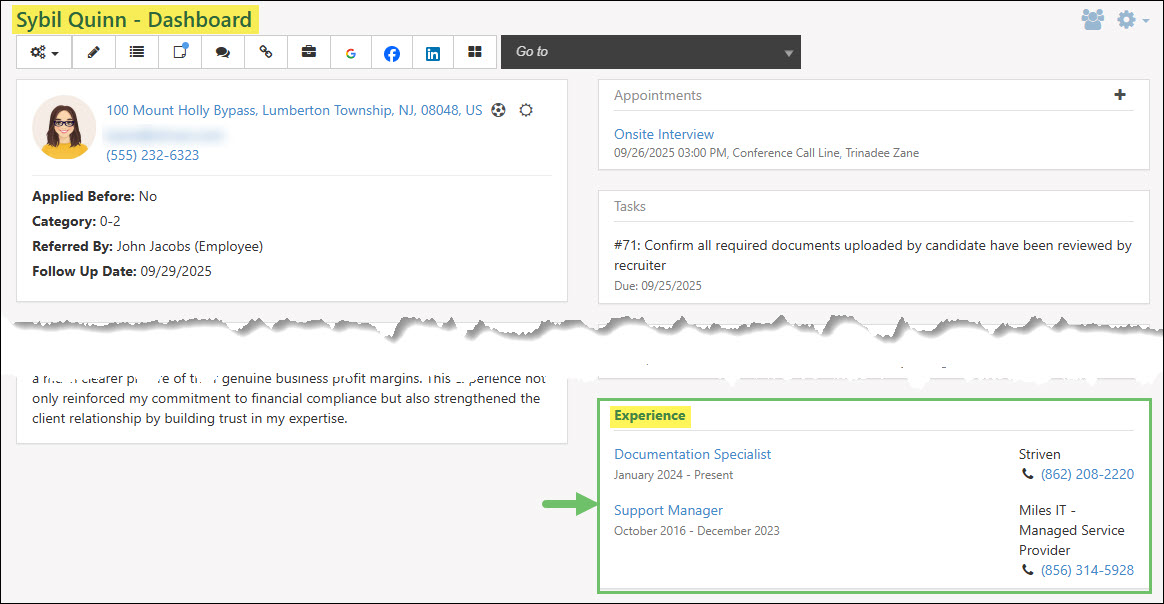
Example of the Experience Widget from a Candidate’s Dashboard
Clicking on the Experience header name in the Experience widget will navigate to the Experience tab within the Candidate’s profile. The Experience tab will list the previous job company and title, their contact phone number, and the date range the Candidate worked there.

Example of the Experience Tab from a Candidate’s Profile
Clicking on the Experience entries listed from the Experience widget or the Experience tab will open more information about the previous job experience entered by the Candidate. Additional information will be included such as the address, contact phone number, starting and ending salary, and a job description and reason for leaving.

Example of the Experience Basic Info Subtab from a Candidate’s Profile
-
References
The References widget lists the past colleagues that can be contacted by the recruiter that the Candidate entered when filling out their Candidate profile in the Career Portal. The widget will list the previous colleague’s name, job title, company, and contact information such as email and phone number. Clicking on each reference listed in this widget will open more information about the specific reference.

Example of the References Widget from a Candidate’s Dashboard
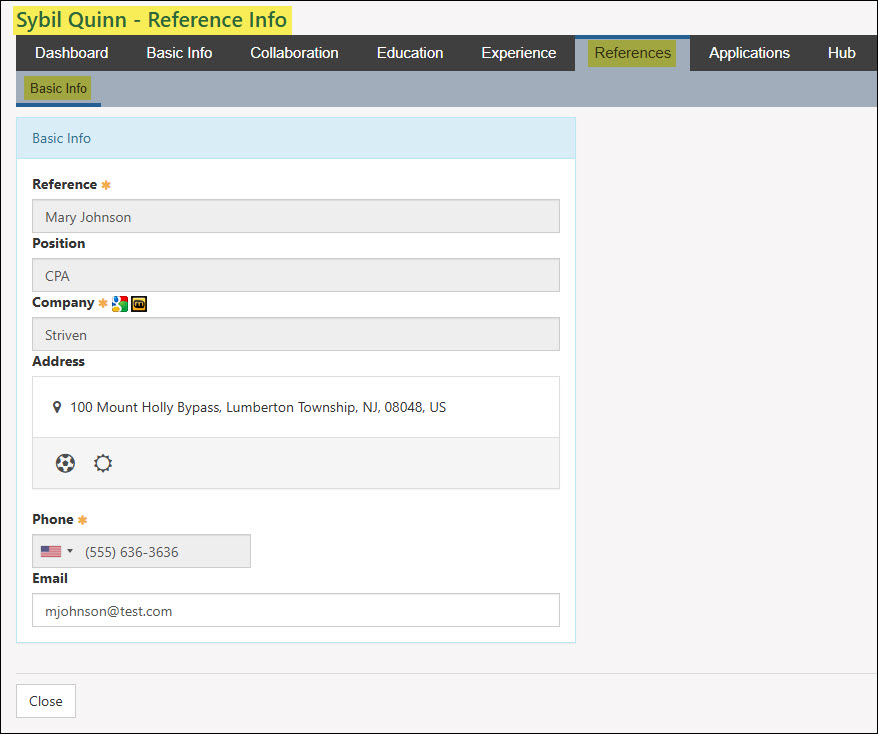
Clicking on the References header name in the References widget will navigate to the References tab within the Candidate’s profile. The References tab will list the reference name, their position and company, and contact information such as email address and phone number.

Example of the References Tab from a Candidate’s Profile
Clicking on a reference listed from the References widget or the References tab will open more information about the previous colleague worked with entered by the Candidate. Additional information will be included such as their address.
Example of a Reference Basic Info Subtab from a Candidate’s Profile
-
Surveys / Quizzes / Assessments / Forms
There are two widgets on the Candidate’s Dashboard that are related to Surveys, Quizzes, Assessments, and Forms. The Surveys / Quizzes / Assessments / Forms widget displays feedback that was completed by the Candidate through a recruiting step or through a feedback’s generated public link. The Related Surveys / Quizzes / Assessments / Forms widget includes feedback that was specifically related to the Candidate when the feedback was generated or by the email address the Candidate entered when completing a feedback’s generated public link.
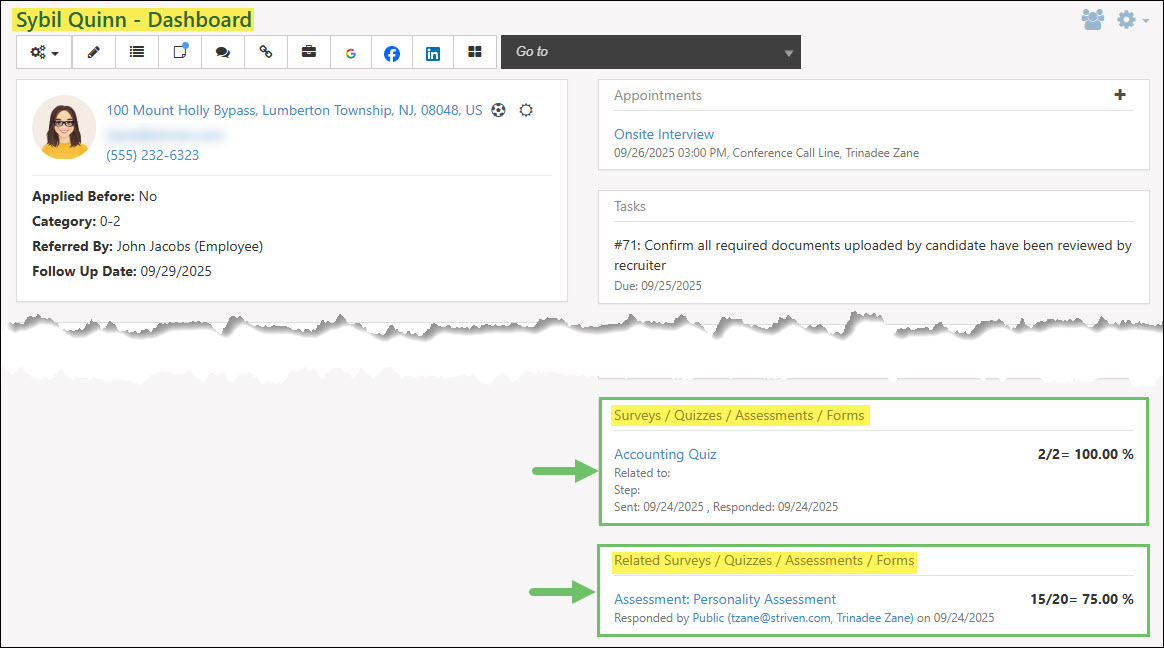
Example of the Surveys, Quizzes, Assessments, Forms Widgets from a Candidate’s Dashboard
-
Potential Positions
The Potential Positions widget gives the option to select possible Job Titles that would be a good fit for the potential Candidate. Each Job Title selected in this widget will list underneath the Job Title name the person and date who added the suggested position. To add a new Job Title to the Potential Positions widget or remove any existing Job Titles listed, click the plus sign icon in the corner of the widget.
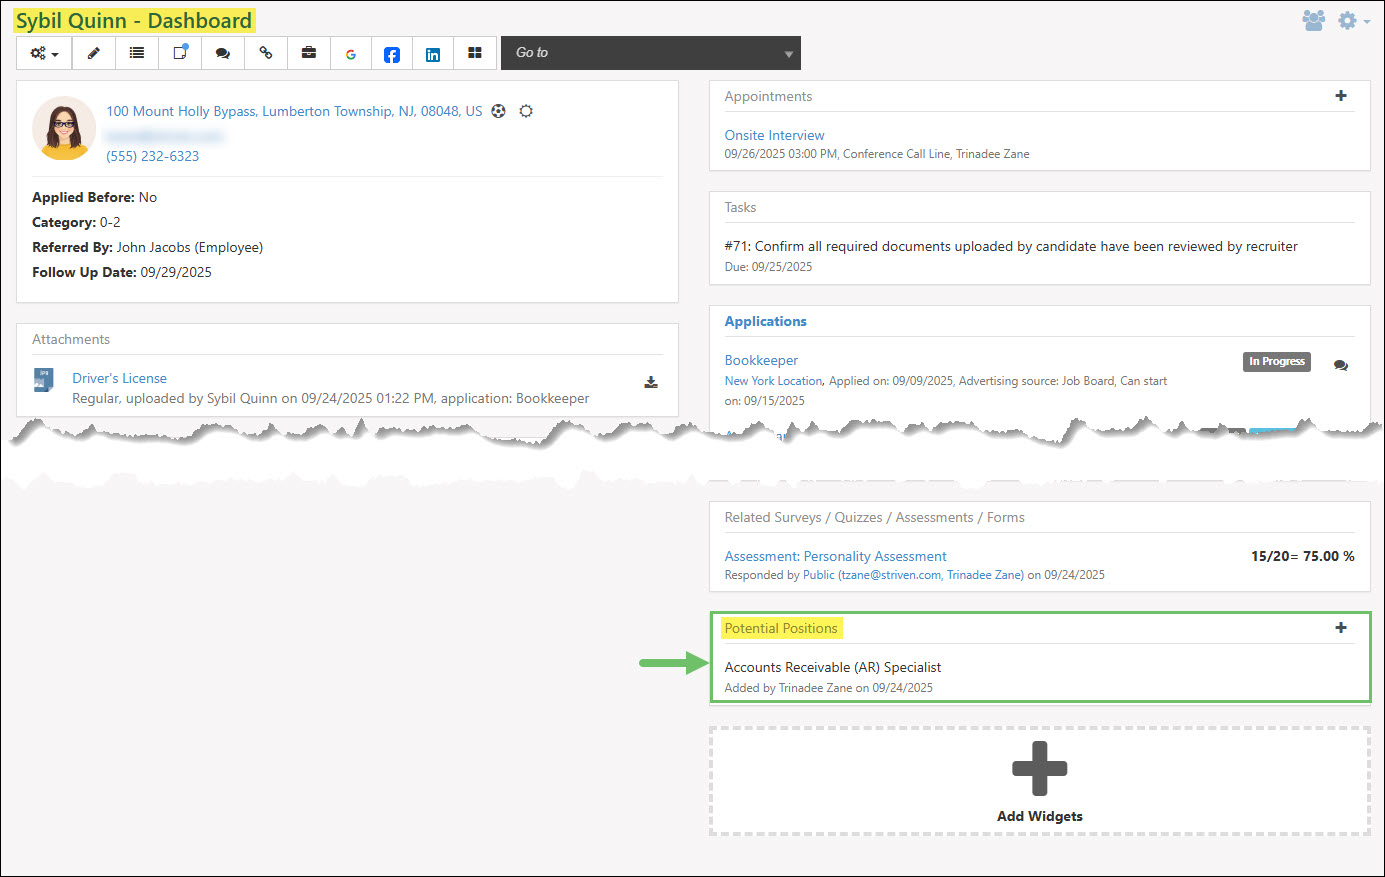
Example of the Potential Positions Widget from a Candidate’s Dashboard
-
Recap
So with this guide we’ve discovered how to use the Candidates list to manage applicants at a high level, including adding new Candidates, tracking follow-up dates, and sending direct messages. We’ve also learned how to navigate the comprehensive Candidate Dashboard, which serves as the central profile for each applicant, utilizing its customizable widgets to view everything from contact details and attachments to education and experience history. And finally, we reviewed critical management actions available on the dashboard, such as converting a Candidate to an Employee, restricting portal access, and tracking application progress via the Applications tab and its detailed steps.

Have a Question?
Ask the Striven Community
User-sourced how-to’s, feedback, and more!
FAQs
-
How can I best manage an Employee’s information?
Employee Management in Striven will allow you to assign skillsets, log salary or rate information, store Employee related documents, and much more. To learn more, please reference our Employee Setup & Info Guide.
-
How can I have my Candidates enter their own information for me to track while I am recruiting?
Directing your Candidates to the Career Portal is a great way to enable them to enter the information they deem important such as past experience, education, and any additional information you wish for them to add. Learn more about setting up the Career Portal with our Career Portal Guide.
-
If I update what widgets appear on a Candidate’s Dashboard, will this also update for other recruiters when they view a Candidate’s profile?
No, updating which widgets appear on a Candidate’s Dashboard will only update for the logged in user in order to allow each recruiter to focus on the information important to them when making hiring decisions.