
Recruiting
Recruiting Setup
Support Guide
-
Overview
Striven’s Recruiting section has a lot of great functionality to help you process Candidate Applications more efficiently than ever before. Using tools like the Recruiting Dashboard and the Application Queue will help recruiters organize workflows. This guide will help you set up your recruiting and illustrate how to perform recruiting functions within Striven. Before continuing, it is recommended that your Company’s hierarchy is set up appropriately. Reference our Company Setup Guide to better understand creating Departments, Locations, Job Titles, and more.
Read this guide if you are trying to:
✔ Create advertising sources, Candidate Categories, and configure your Recruiting Settings.
✔ Set up Application Results, terms and conditions, and customized fields to track information about Candidates.
✔ Compose Job Postings, recruiting steps, and manage Candidate Document Types.
-
Recruiting Setup
Before you begin accepting Candidate Applications, it is best to review your recruiting setup within the settings. Below are some key locations within the settings to review to make sure they meet your Company’s needs for hiring new talent.
-
Advertising Sources
Advertising sources are a great way to pinpoint which efforts are leading to the best recruiting Candidates. Examples of advertising sources are job boards, job sites (Indeed, Glassdoor, etc.), Employee referrals, and radio. During the Application process, the Candidate selects the advertising source that led them to apply for a position with your Company. This gives you the ability to track advertising sources and budget accordingly.
To set up your advertising sources, navigate to Company → Settings → Employees → Recruiting → Recruiting Setup → Advertising Sources.
Below is a screenshot illustrating how the Advertising Sources page appears and a description of what can be accomplished there.
- Add: Opens the Add Advertising Source page in order to add in a new source including the name and any notes that should be stored with the advertising source.
- Search Filters: Narrows the list results based on the advertising source name or the current status it resides in.
- Advertising Source: Lists the name of the advertising source. Clicking on the hyperlinked name in this list opens an existing Advertising Source – Info page to make any edits needed to the name or the notes stored with the advertising source.
- Deactivate: Changes the advertising source into a deactivated status. Use the Status filter in order to view deactivated advertising sources.
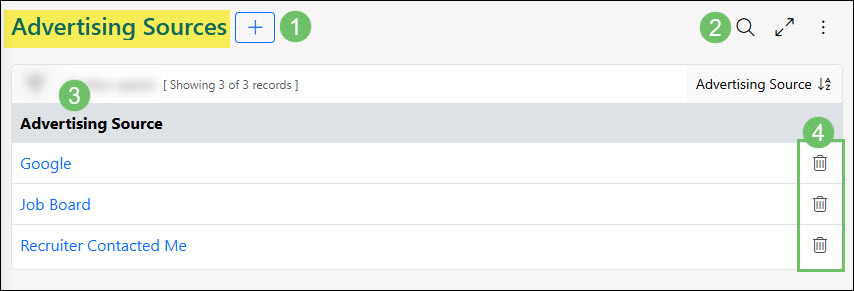
Example of the Advertising Sources for Job Postings

-
Candidate Categories
Candidate Categories help to organize applicants in whatever way you see fit. You may want to create Categories to indicate education level (Bachelor’s degree, Master’s degree, etc.) or work experience (strong managerial experience).
To manage and adjust the Candidate Categories, navigate to Company → Settings → Employees → Recruiting → Recruiting Setup → Categories.
Learn more about creating and managing Candidate Categories by reviewing the Category Management Guide.
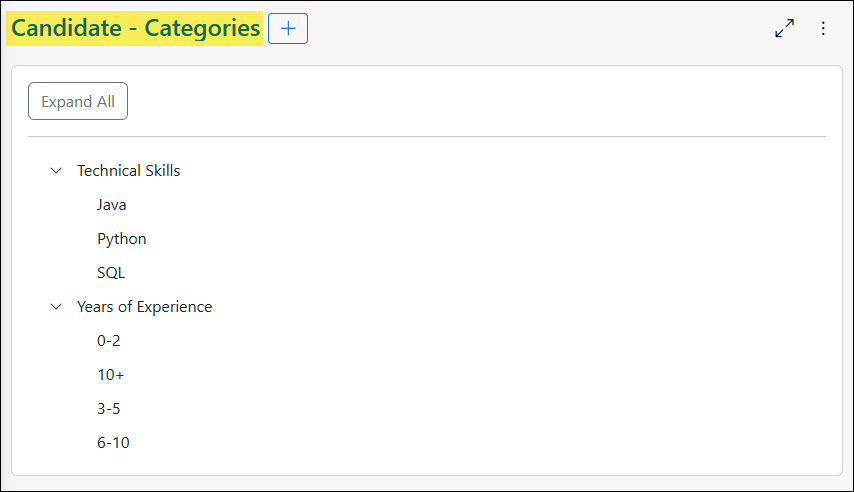
Example of Candidate Categories
-
Candidate Custom Fields
Apart from capturing more information for specific Job Postings through Candidate Application Custom Fields, you can also choose to capture more information about the Candidates. Candidate and Candidate Application Custom Fields help capture information for all Candidates and Job Postings that aren’t already available when Candidates are applying for a position in the Career Portal.
To configure and manage Custom Fields for both Candidates and Candidate Applications, navigate to Company → Settings → Company → Customization → Fields.
Learn more about creating and managing Candidate and Candidate Application Custom Fields by reviewing the Custom Fields Guide.

Example of Configuring Candidate Custom Fields
-
Recruiting Settings
When you are ready to start advertising Job Postings, it’s good to check the Recruiting Settings to configure things within the Career Portal. There are multiple sections within the recruiting settings that can help configure and customize your recruiting process in different ways. This page includes content in the Career Portal, Application Submission Message, and an iFrame code to embed on websites.
To configure your Recruiting Settings, navigate to Company → Settings → Employees → Recruiting → Recruiting Setup → Settings.
Below is a screenshot illustrating how the Recruiting Settings page appears and a description of what can be accomplished there.
- Basic Info: The settings within this section will include the following options:
- Terms & Conditions: The terms selected in this field will be displayed to the Candidate before they can submit a job application through the Career Portal. To add or update existing terms and conditions, navigate to Company → Settings → Employees → Career Portal → Terms and Conditions.
- Check this if you would like to show all steps in the application process to the candidate: With this option enabled, each step that is set up within Job Postings will be displayed to the Candidate through the Career Portal after they have submitted an application. If this setting is not enabled, individual steps can be set as visible to the Candidate when configuring the Recruiting Steps Library.
- Only allow one active job application per candidate: With this option enabled, a Candidate will only be able to have one active job application at a time. Before they can submit another job application through the Career Portal, their current open Job Posting will need to be closed by the recruiter in Striven.
- Allow candidates to send messages to recruiters: With this option enabled, Candidates logged into the Career Portal will be able to initiate a message thread with recruiters related to a specific Job Posting they have applied to. The recruiter assigned to the Job Posting will automatically be set as the To for the message, taking the need for the Candidate to know who to send the message to. If this option is not enabled, the Candidate will only be able to reply to message threads that were initiated by the recruiter.
- Application Submission Info: The settings within this section will include the following options:
- Send emails when an application is submitted: If this option is enabled, the recruiter selected in the Recruiting Email Recipient field will receive an email notification each time a Candidate applies to a Job Posting. Recruiters assigned to specific Job Postings will also receive an email notification when applications are submitted.
- Recruiting Email Recipient: The recruiter selected in this field will have their email address used for automated emails sent to Candidates during the recruiting process. If the Send emails when an application is submitted option is enabled, this Employee will also receive emails for each application submitted through the Career Portal.
- Content for Application Submission Message: The content entered here will be displayed to the Candidate once they have submitted a job application through the Career Portal. For example, the content entered here can be used to add additional context on next steps or a generalized Thank You page.
- IFrame Embed Code: The settings within this section will include the following options:
- Header Title: Once the IFrame Code has been entered on your website or other external source, this header title will be displayed as the hyperlink that allows the Candidates to access the Career Portal and apply to Job Postings by your company.
- IFrame Code: This IFrame Code can be used to add to your website or other external source to list the available Job Postings that your company currently has. Clicking on Job Postings listed within this IFrame Code will then allow the Candidate to access the Career Portal in order to submit their application.
- Content in Career Portal: The settings within this section will include the following options:
- Content for Career Portal Landing Page: The content entered here will be displayed to the Candidate when they access the Career Portal Dashboard.
- Content for Career Portal Footer: The content entered here will be displayed when logged into the Career Portal as the footer of each page.
- Content for Career Portal Denied Access: Upon denying a Candidate access to the Career Portal, they will be greeted with the content configured here.
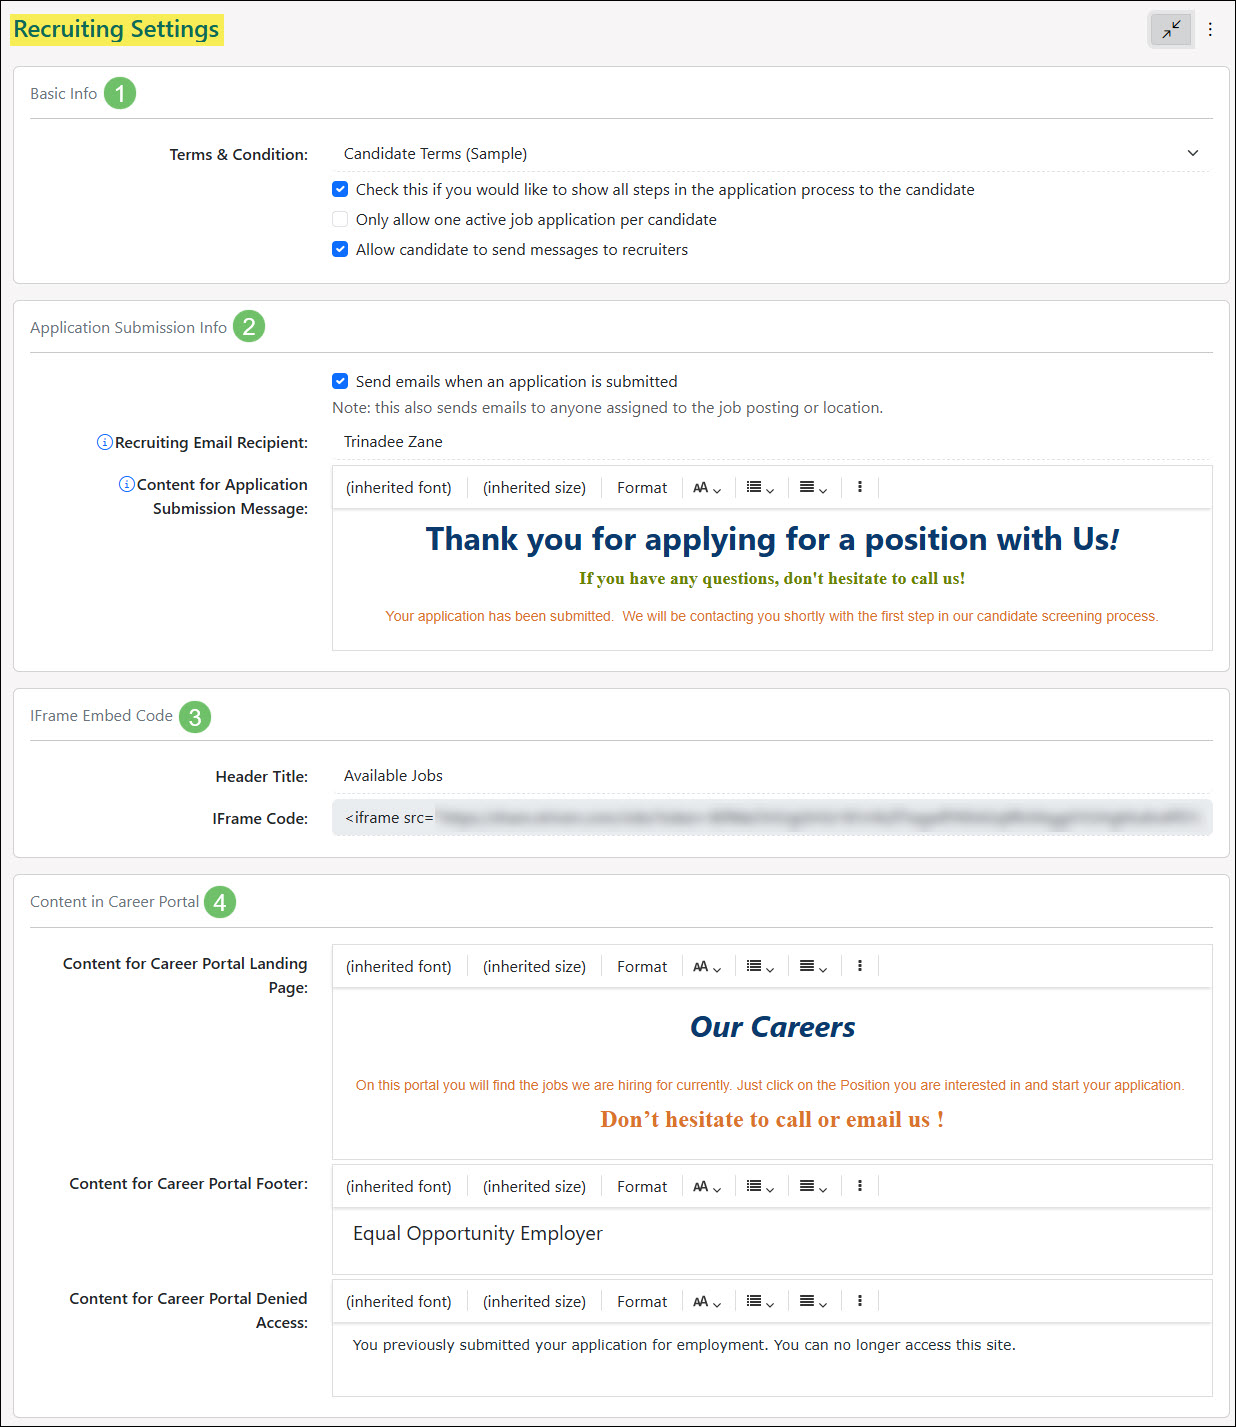
Example of the Recruiting Settings Page
- Basic Info: The settings within this section will include the following options:
-
Document Types
Document Types can be used to specify specific types of documentation that you would like your Candidate to upload during the recruiting process. Document Types can be selected when creating steps in the Recruiting Steps Library with the Candidate to Upload Document step type. For example, Document Types can include proof of certain types of certifications or identification such as a copy of a driver’s licence.
To manage and adjust the Document Types, navigate to Company → Settings → Employees → Recruiting → Recruiting Setup → Document Types.
Below is a screenshot illustrating how the Document Types page appears and a description of what can be accomplished there.
- Add: Opens the Add Document Type page in order to add in a new type including the name and any notes that should be stored with the Document Type.
- Search Filters: Narrows the list results based on the Document Type name or the current status it resides in.
- Name: Lists the name of the Document Type. Clicking on the hyperlinked name in this list opens an existing Document Type – Info page to make any edits needed to the name or the notes stored with the Document Type.
- Description: The description stored with the Document Type will be visible to the Candidate and recruiter when the recruiting step is being completed. This can be used to give more context into what is being requested such as examples or more information.
- Deactivate: Changes the Document Type into a deactivated status. Use the Status filter in order to view deactivated Document Types.

Example of Document Types for Job Postings
-
Application Printable Formats
Hiring managers and recruiters review Candidates through various steps. However, to provide an easy-to-read, external visual for interview panels, off-system review, or archiving, it is recommended you create Candidate Application Formats.
Using these formats generates a clean PDF printable version of the application. If review panels prefer physical portfolios or offline viewing, they can cleanly download or print a uniform copy. These formats can be tailored to your specific pipeline needs.
-
Adding an Application Printable Format
To view and manage these settings, navigate to Company → Settings → Employees → Recruiting → Recruiting Setup → Application Formats.
From the Candidate Application Format List, formats can be added, copied, or deactivated as needed. To add a new format, click the plus icon at the top of the list.
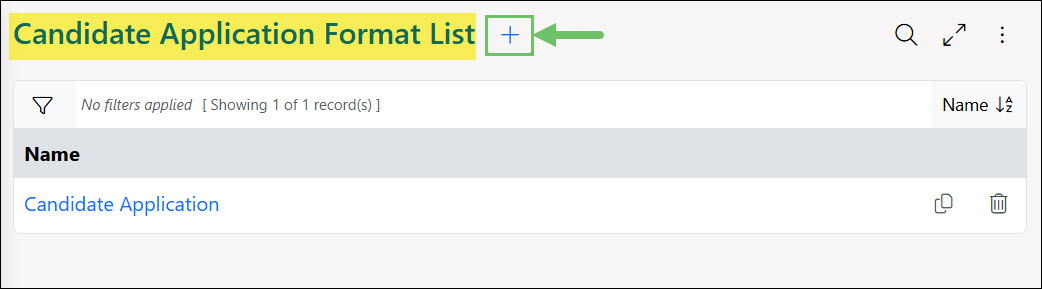
Example of the Candidate Application Format List
The first step to creating the printable format is to add a name and determine if page numbers should be enabled or not. Once these have been configured, clicking the Next button will continue to the next step in the process of creating an application printable format.

Example of the Add Candidate Application Format Page
After clicking the Next button, additional features are available to configure your printable format. The Sections section will have a plus icon in order to add a new Content section to your printable format. The Content section will allow you to add in merge fields to include important information regarding your Candidate and their Application.
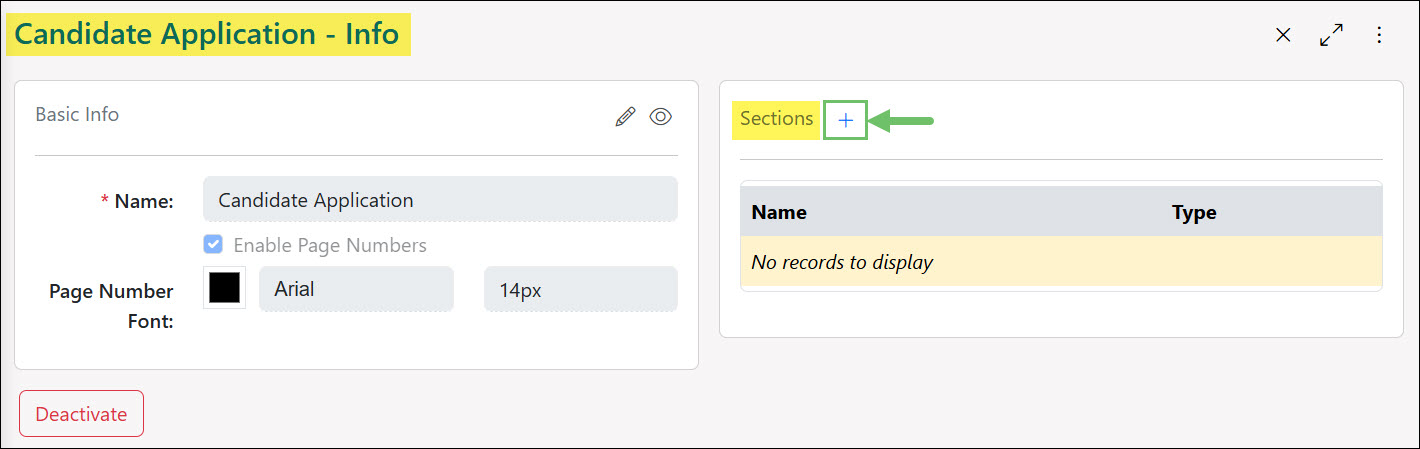
Example of the Candidate Application Info Page
The Content section has the option to add merge fields which will display information related to the Candidate and their application that is important to review to your team during the hiring process. Merge fields such as Candidate Experience, Candidate Education, and Candidate References will appear in a table format.

Example of Adding a Content Section to an Application Format
-
Printing an Application Printable Format
Once you have created your Application Printable Formats, you can then print this PDF in multiple areas of the system. When configuring the format, you can use the Preview button to generate a PDF of Candidate Applications.

Example of the Preview Button for an Application Format
You can also print the format when viewing a Candidate’s Dashboard. A print icon will be available in the Applications widget from the Dashboard. If multiple formats are available to choose from, the print button will appear with a drop-down list option.

Example of the Print Button from the Candidate Dashboard
Accessing the Applications tab from a Candidate’s Profile is another area where you can print an active application. After clicking into a specific application, the print button will be accessible in the Actions menu at the top of the page.

Example of the Print Button from a Candidate Application
-
Recruiting Process
Once you have set up your recruiting, then it is time to define a process. For the Recruiting Process settings, you have the option to customize Application Results and even set up a Recruiting Step Library in order to easily create Job Postings at any given time. Steps can be added on an individual Job Posting level and having steps saved in a library is an easy way to stay organized.
-
Application Results
Application Results in Striven can be configured to meet your Company’s needs. As you close out Applications, having the correct results handy will allow you to keep your closed Applications clean and organized. Reporting on these results at a later date can also give you a view into your most common reasons as to why a Candidate may fail an application with your Company. When Candidates are hired, this is also an easy way to send a correspondence to the Candidate to inform them of the good news and their next steps on starting their new position.
To manage and adjust the Application Results, navigate to Company → Settings → Employees → Recruiting → Recruiting Process → Application Results.
Below is a screenshot illustrating how the Application Results list appears and a description of what can be accomplished there.
- Add: Opens the Add Application Result page in order to add in a new result.
- Search Filters: Narrows the list results based on the current status the Application Result resides in.
- Result: Lists the name of the Application Result. Clicking on the hyperlinked name in this list opens an existing Application Result – Info page to make any edits needed to the Application Result.
- Deny Access to Portal: Indicates that the Application Result has been configured to deny the Candidate Access to the Career Portal after they have received this result for their application.
- Send Email: Indicates that the Application Result has been configured to send an email to the Candidate once they have received this result for their application.
- Deactivate: Changes the Application Result into a deactivated status. Use the Status filter in order to view deactivated Application Results.

Example of the Applications Results List for Job Postings
When adding or configuring an Application Result, there are a few different configuration options to consider. Below is a screenshot illustrating how the Application Result – Info page appears and a description of what can be accomplished there.
- Result: The name that will appear when selecting the result when closing a job application for a Candidate.
- Deny Access to the Portal: Automatically denies the Candidate access to the Portal once they receive this result when their application is closed.
- Send Email: Will send an email to the Candidate if they receive this result for their application when it is closed.
- Subject: The text that appears here will appear as the email subject line that the Candidate will receive.
- Body: The text that appears here will be the body content that will be in the email the Candidate receives.
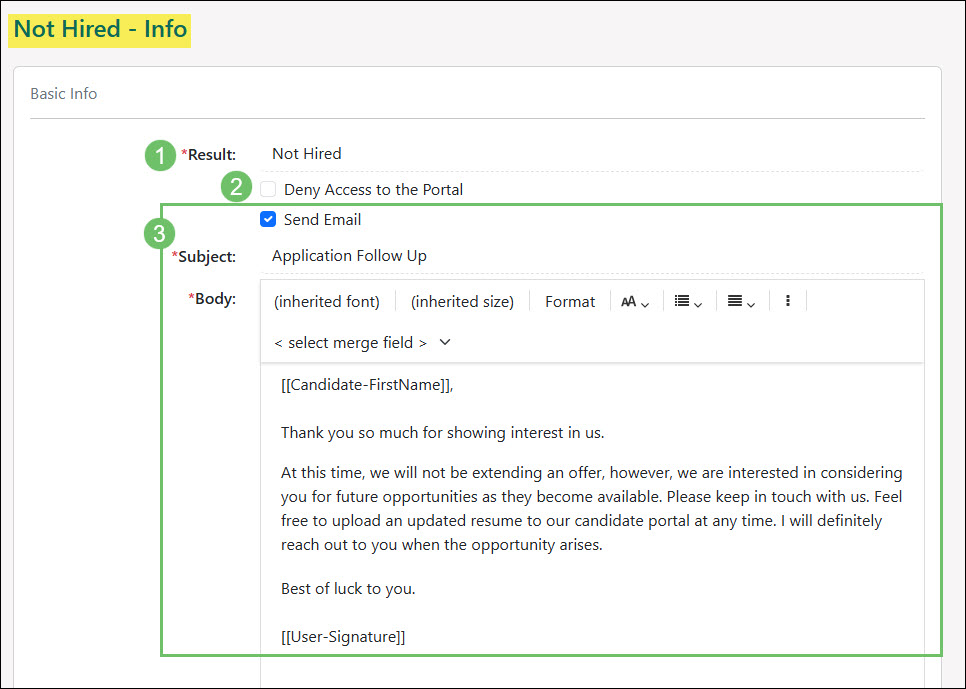
Example of Configuring an Application Result for a Job Posting
-
Recruiting Steps Library
Adding steps to a Job Posting determines what the Candidate or recruiter has to do to complete their application process. There are three types of steps that you can configure, and they include Email, Manual, and Candidate to Upload Document. Creating these steps within the Recruiting Steps Library saves time when later creating Job Postings. While you can create new steps during the Job Postings set up, pulling steps from the library is a convenient way to save time when configuring Job Postings.
To manage and adjust the Recruiting Step Library, navigate to Company → Settings → Employees → Recruiting → Recruiting Process → Recruiting Steps Library.
Below is a screenshot illustrating how the Recruiting Steps Library appears and a description of what can be accomplished there.
- Add: Opens the Add Recruiting Step page in order to add in a new step to the Recruiting Step Library.
- Search Filters: Narrows the list results based on the step name, the current status it resides in, or the type of step it is configured as.
- Rearrange: Moves the order in which the steps will appear when selecting them while configuring a Job Posting.
- Name: Lists the name of the Recruiting Step. Clicking on the hyperlinked name in this list opens an existing Recruiting Step – Info page to make any edits needed to the step.
- Type: Indicates whether the Recruiting Step has been configured to be a Manual, Email, or Candidate to Upload Document type of step.
- Deactivate: Changes the Recruiting Step into a deactivated status. Use the Status filter in order to view deactivated steps.
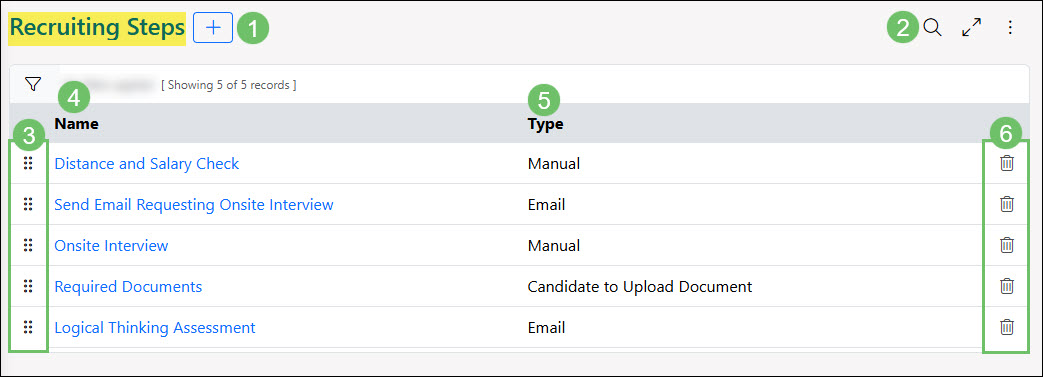
Example of the Recruiting Steps Library for Job Postings
Email Step
A Recruiting Step that is set as an Email Type will include an email that will be sent to the Candidate once this step is initiated. Email steps can include email content or a link to a Survey/Quiz/Assessment/Form for the Candidate to complete. Email steps can also be configured to send automatically once the step is initiated by the recruiter.
Below is a screenshot illustrating how adding an Email Type Recruiting Step appears and a description of what can be accomplished there.
- Name: The name added for the Recruiting Step will appear to the recruiter when processing applications in the Application Queue and to the Candidate if the step has been marked as Visible on Career Portal.
- Description: The description added for the Recruiting Step will be available for the recruiter to view when processing applications in the Application Queue. If the step has been marked as Visible on Career Portal they will also be able to view the description when viewing steps for their submitted application.
- Visible on Career Portal: Allows the Candidate to see this step when viewing the Application Step Status page for a submitted application in the Career Portal.
- Type: Recruiting Step Types include Email, Manual, and Candidate To Upload Document. This section is detailing how an Email Type step can be configured.
- Email Type: Options for an Email Type step can include either Email Candidate or Send Survey / Quiz / Assessment / Form. Each option gives the ability to write an email that will be sent to the Candidate with merge fields to customize the content. Choosing the Send Survey / Quiz / Assessment / Form option will allow feedback to be selected and included in the email as a merge field link.
- Make this step automatic: Making a step automatic will remove the need for the recruiter to go to the Application Queue and process the step. Instead, this step will automatically initiate once the previous step has been completed.
- Email Subject/Body/Attachment: With an Email Type step, the email can be configured which will be sent to the Candidate. A subject line, the body content of the email, and any attachments to include with the email can be customized for the specific step.
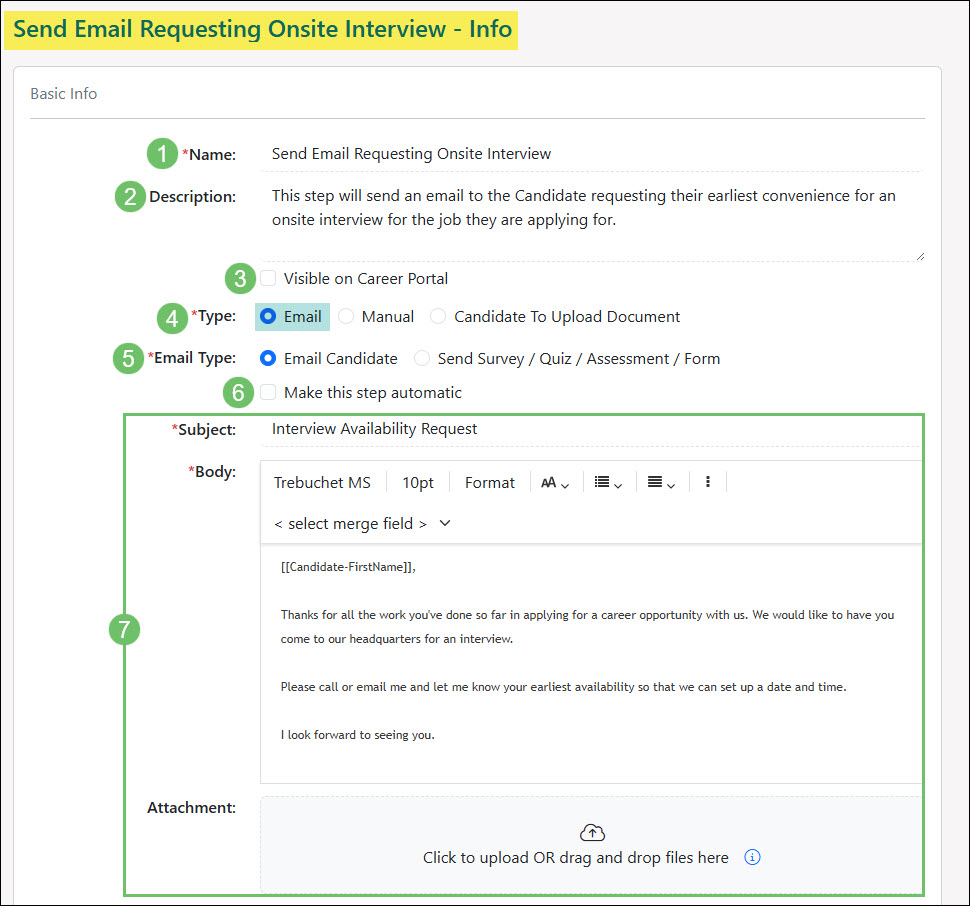
Example of an Email Type Recruiting Step for the Recruiting Step Library
Manual Step
A Recruiting Step that is set as a Manual Type will include the next step that the recruiter will need to take internally for the application process. These steps will not send anything externally to the Candidate and instead will be completed by the recruiter through the Application Queue. Even though this is a step the recruiter needs to complete, a Manual Type step can still be marked as Visible on Career Portal if you would like for the Candidate to see what is currently being worked on by the recruiter.
Below is a screenshot illustrating how adding a Manual Type Recruiting Step appears and a description of what can be accomplished there.
- Name: The name added for the Recruiting Step will appear to the recruiter when processing applications in the Application Queue and to the Candidate if the step has been marked as Visible on Career Portal.
- Description: The description added for the Recruiting Step will be available for the recruiter to view when processing applications in the Application Queue. If the step has been marked as Visible on Career Portal they will also be able to view the description when viewing steps for their submitted application.
- Visible on Career Portal: Allows the Candidate to see this step when viewing the Application Step Status page for a submitted application in the Career Portal.
- Type: Recruiting Step Types include Email, Manual, and Candidate To Upload Document. This section is detailing how a Manual Type step can be configured.

Example of a Manual Type Recruiting Step for the Recruiting Step Library
Candidate to Upload Document Step
A Recruiting Step that is set as a Candidate to Upload Document will include the Document Types that the recruiter or Candidate will need to upload in order to continue the recruiting process. These steps will not send anything externally to the Candidate and instead will be completed by the recruiter through the Application Queue or by the Candidate through the Application Step Status page in the Career Portal. A Candidate to Upload Document step can be marked as Visible on Career Portal if you would like for the Candidate to complete the uploads needed.
Below is a screenshot illustrating how adding a Candidate to Upload Document Recruiting Step appears and a description of what can be accomplished there.
- Name: The name added for the Recruiting Step will appear to the recruiter when processing applications in the Application Queue and to the Candidate if the step has been marked as Visible on Career Portal.
- Description: The description added for the Recruiting Step will be available for the recruiter to view when processing applications in the Application Queue. If the step has been marked as Visible on Career Portal they will also be able to view the description when viewing steps for their submitted application.
- Visible on Career Portal: Allows the Candidate to see this step when viewing the Application Step Status page for a submitted application in the Career Portal. If this type of step is visible to the Candidate, they will have the ability to upload the needed documents from the Application Step Status page in the Career Portal.
- Type: Recruiting Step Types include Email, Manual, and Candidate To Upload Document. This section is detailing how a Candidate to Upload Document step can be configured.
- Enter notes when manually completing this step: With this option enabled, when a recruiter completes this step through the Application Queue, they will have the ability to enter additional notes regarding the documents they uploaded on behalf of the Candidate.
- Manage document types: Allows for specific Document Types to be selected in order to be included in this step. Once Document Types are selected, they can be moved up or down in the listed order using the rearrange icon. Each Document Type selected also has the option to make it a Required document or not.

Example of a Candidate to Upload Document Recruiting Step for the Recruiting Step Library
-
Terms & Conditions
This is where you can create or manage Terms & Conditions that you want your Candidate to confirm they have read. This will be the last step as they are completing their application in the Career Portal.
To manage and adjust the Recruiting Step Library, navigate to Company → Settings → Employees → Recruiting → Career Portal → Terms and Conditions.
Below is a screenshot illustrating how adding the Terms and Conditions list appears and a description of what can be accomplished there.
- Add: Opens the Add Terms & Conditions page in order to add in new terms.
- Search Filters: Narrows the list results based on the categories selected on the Terms and Conditions and the current status it resides in.
- Name: Lists the name of the Terms and Conditions. Clicking on the hyperlinked name in this list opens an existing Terms and Conditions – Info page to make any edits needed to the terms.
- Category: Terms and Conditions can be set up for Sales Orders, Surveys/Quizzes/Assessments/Forms, Purchase Orders, Recruiting, or Public Forms. To be able to select the Terms and Conditions on the Recruiting Settings page, make sure the Recruiting option is selected in the Category section.
- Deactivate: Changes the Terms and Conditions into a deactivated status. Use the Status filter in order to view deactivated terms.
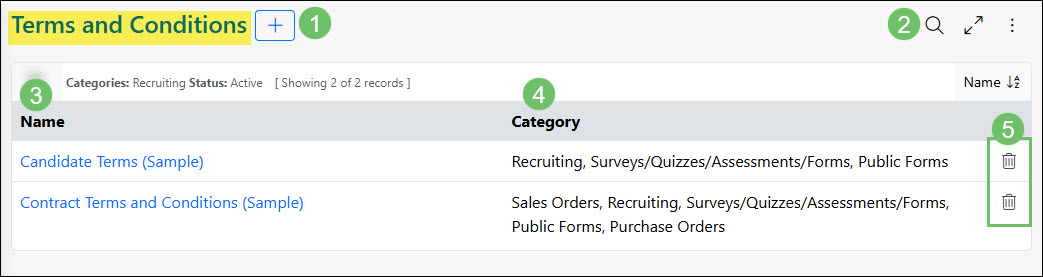
Example of the Terms and Conditions List for Job Applications
When adding new Terms & Conditions into Striven for your Candidate, make sure to check off the Recruiting options for the Terms & Conditions Category in order for them to be selectable within the Recruiting Settings page.

Example of Terms and Conditions with the Recruiting Category Selected
-
Job Postings
Job Postings are advertisements to notify internal Employees or the public of an open position within your Company. Recruiters can communicate and work with Candidates to ultimately decide who will fill the open position. To begin unlocking this workflow within Striven, you must first create Job Postings.
To access Job Postings, navigate to Employees → Recruiting → Job Postings.
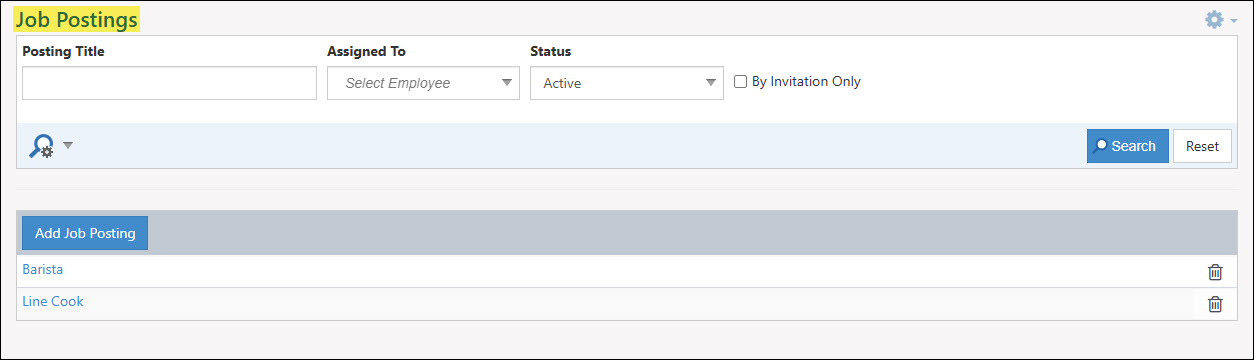
Example of the Job Postings List
-
Add Job Posting
To add a new Job Posting, click the Add Job Posting button from the Job Postings list. This page will house details regarding the job that is currently being hired for such as a job description, experience and education level needed for the position, and salary information.
Below is a screenshot illustrating how the Add Job Posting page appears and a description of what can be accomplished there.
- Posting Title: The title of the position you are advertising to be filled.
- By Invitation Only: This option makes the posting available by invitation only and will not be selectable when logged into the Career Portal. Once a post has been created, the Actions menu can be used to Share Posting which provides a direct link for Candidates to apply for the position.
- Description: Here you can write a description of the Job Posting and let applicants know expectations and duties. Using the Advanced Editor option allows for more formatting options when adding in the description content.
- Job Type/Category: The Job Type field will indicate whether the position is Full-Time, Part-Time, Temporary, Contract, Internship, or Commission. The Job Category field indicates the industry the position is included in.
- Education Level/Years of Experience: Indicates to the Candidate what type of education level is required to achieve the position and how many years of previous experience is recommended.
- Company: By default, the Company name listed on the Job Postings will be the Company name that is set with your Striven system. If you are advertising for a different company, this field can be overridden with a different Company name.
- Add an end date for this posting: Sets a specific date when the Job Posting will no longer be available for hire. If an end date is added to a Job Posting, it will be removed from the available jobs listed on the Career Portal for Candidates to apply to.
- Assigned to: Here you can associate one or multiple Employees to be assigned to the Job Posting. These Employees will be responsible for processing applicants through the Application Queue.
- Locations: Company Locations where the posting will be located. This lets applicants know where they can expect to be working.
- Salary Info: Indicates either a flat salary rate or gives the option to include a salary range that the position will be hired for. If the Candidate is allowed to view this salary information, checking the Show salary on Career Portal option will make it visible to the Candidate when applying for the position. Any additional salary details can be added to the Other Salary Info field.
- Requirements: This section will include the following Requirement options for the Candidate when filling out an application for the Job Posting:
- Ask if candidate has been convicted of a crime: Based on State laws, you can choose to ask this question before the Candidate submits their application for the Job Posting.
- Skip filling out Education / Experience / References when submitting application: Enabling this option will remove the option for the Candidate to fill out their Education, Experience, and References when completing their Candidate Profile though the Career Portal.
- The candidate must fill out the following sections: Enable the following options if the Candidate should be required to include this information in their Candidate Profile: Education, References, Resume, Experience, Address, or Desired Annual Salary.

Example of Adding a Job Posting
-
Job Posting Steps
Once a Job Posting has been saved, you can navigate to the Steps tab within the Job Posting to create or select Recruiting Steps that should be completed during the application process for the Job Posting. Recruiting Steps for a Job Posting can be selected from the Recruiting Steps Library, from another Job Posting, or by creating new Recruiting Steps.
Below is a screenshot illustrating how the Steps tab from a Job Posting appears and a description of what can be accomplished there.
- Add Step: Adds a Recruiting Step to the Job Posting to be processed during the application process.
- Rearrange: Moves the order in which the Recruiting Steps should be completed for the Job Posting.
- Step: Lists the name of the Recruiting Step. Clicking on the hyperlinked name in this list opens the existing Recruiting Step Info dialog window to make any edits needed. When making changes to the step through a Job Posting, the option will be given once saved to save the step as a copy or to save the step for all existing Job Postings where this step is included in.
- Type: Indicates what type of Recruiting Step is set such as Email, Manual, or Candidate to Upload Document.
- Deactivate: Removes the Recruiting Step and will no longer be part of the application process for the Job Posting.

Example of the Steps Tab in a Job Posting
Add Step
To add Recruiting Steps to a Job Posting, click on the Add Step button from the Steps tab within a Job Posting. Adding Steps to the Job Posting can be done in multiple ways.
Select Existing Steps: With this option selected, a list of Recruiting Steps that have been saved with the Recruiting Step Library will be displayed at the bottom of the dialog window. Once the steps that should be included in the Job Posting have been chosen, clicking the Select button will add them to the Job Posting.
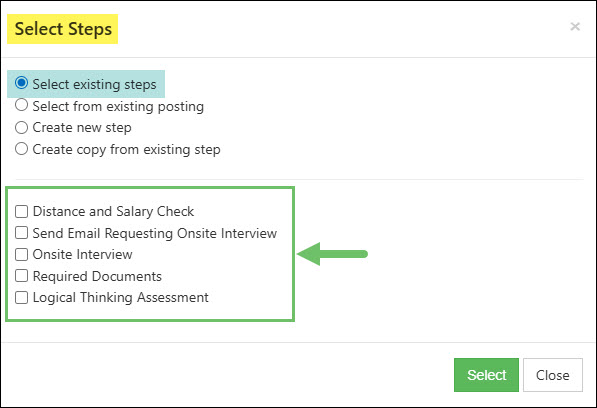
Example of the Select Steps Dialog Window for a Job Posting with the Select Existing Steps Option
Select From Existing Posting: With this option selected, you will be able to select a different Job Posting with their included Recruiting Steps. The Recruiting Steps for the existing posting can be selected or de-selected in order to include them in the Job Posting being configured. Once the steps that should be included in the Job Posting have been chosen, clicking the Select button will add them to the Job Posting.
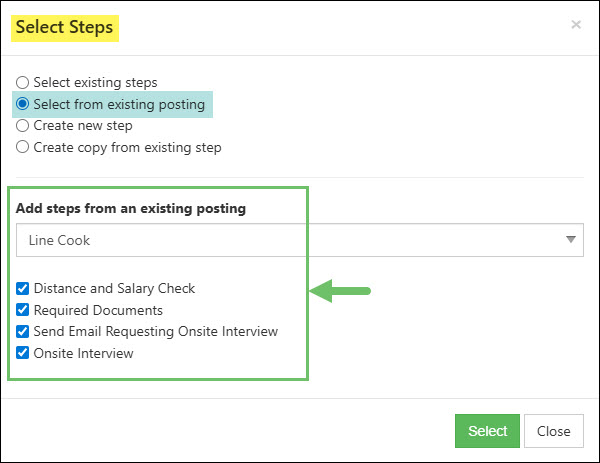
Example of the Select Steps Dialog Window for a Job Posting with the Select From Existing Posting Option
Create New Step: With this option selected, once you click the Select button, you will be able to configure a new Recruiting Step without leaving the Job Posting.

Example of the Select Steps Dialog Window for a Job Posting with the Create New Step Option
Create Copy From Existing Step: With this option selected, you will be able to choose an existing Recruiting Step and make a copy in order to make slight changes. Once you have the step that you would like to make a copy selected within the Select a step to copy and edit field, click the Select button in order to make the necessary changes.

Example of the Select Steps Dialog Window for a Job Posting with the Create Copy From Existing Step Option
-
Job Posting Custom Fields
Once a Job Posting has been saved, you can navigate to the Custom Fields tab within the Job Posting to create Custom Fields in order to track more information that is not available within the Job Posting. Custom Fields allows you to track additional information for the Candidate to fill out in the Career Portal that is specific to the job being applied for.
Learn more about creating and managing Custom Fields by reviewing the Custom Fields Guide.
Below is a screenshot illustrating how the Custom Fields tab in a Job Posting appears.
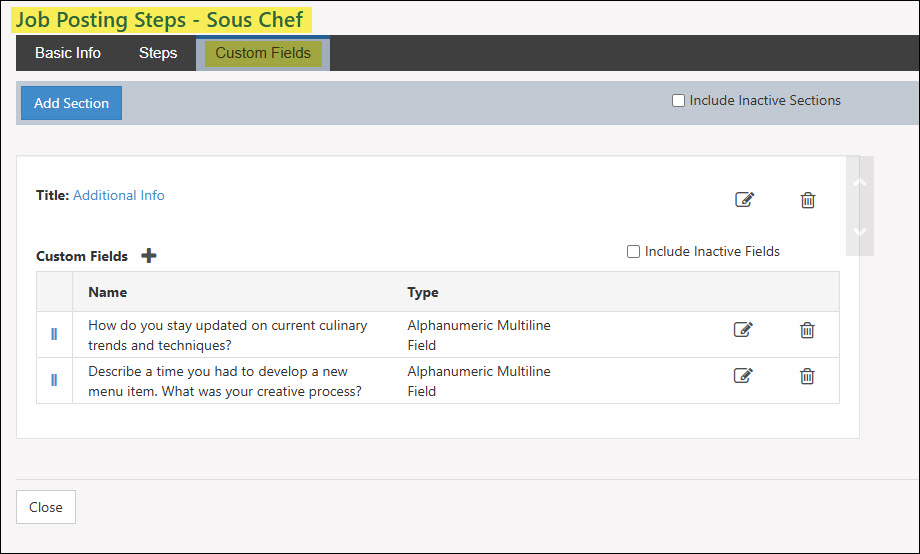
Example of the Custom Fields Tab in a Job Posting
-
Recap
With this guide, we’ve discovered how to configure recruiting settings such as Categories, Custom Fields, and Advertising Sources. We have covered how to set up the recruiting process including the Recruiting Steps Library and Application Results. We’ve also discussed how to create Job Postings and the different ways to include Recruiting Steps.

Have a Question?
Ask the Striven Community
User-sourced how-to’s, feedback, and more!
FAQs
-
I want to send a Quiz to Candidates who apply for a Job Posting, but need to create it first. How can I add a Quiz into Striven?
Quizzes can be added to Striven under the Company tab. Quizzes function much like the other Surveying options in Striven such as Surveys, Assessments, and Forms. To learn more, please reference our Surveying & Feedback Guide.
-
Now that I have set up my Recruiting Process and Settings, how can I see what things will look like from the Candidate’s point of view when applying for jobs?
To view what information is available for Candidates to fill out in the Career Portal and for Job Applications, review our Career Portal Guide.
-
I have Candidates that have submitted applications for the Job Postings I have created. What is the best way to process these applications to make sure nothing is falling through the cracks?
Now that you have Candidates applying for your Job Postings, you will want to make sure you are managing these in the best way possible. Review our Applications & Onboarding Guide for more information on best practices for processing Candidates and applications.