Portals
Customer/Vendor Portal
Support Guide
-
Overview
The Striven Customer/Vendor Portal is an extremely useful addition to enhance your Customer/Vendor’s experience with Striven. The Customer/Vendor Portal includes many features that will assist your Company in communicating and working effectively with your Customers/Vendors. Depending on your Portal settings, this Portal will allow you to share access to documents, Tasks, Projects, transaction information, Orders, Assets, Opportunities, reports, Discussions, and more. You will also have the option to accept Payments from Customers through the Portal.
Read this guide if you are trying to:
✔ Designate settings for your Customer/Vendor Portal.
✔ Give your Customers/Vendors access to view, manage, or pay Orders online.
✔ Assign and manage Projects and Tasks with your Customers/Vendors directly through your Striven system.
-
Customer/Vendor Portal Settings
Your default Customer/Vendor Portal Settings can be set within your Portal Settings page by navigating to:
Company → Settings → Customers/Vendors → Portal → Settings.
From this page you will have the ability to determine the configuration for the following settings:
- Access Settings: Allows you to designate whether or not Customer/Vendor Portal Access is enabled upon creation of the Contact. This is a very important setting, especially if you do not wish to utilize the Customer/Vendor Portal. To avoid unwanted Portal subscription fees, please ensure the box to Allow Striven Customer/Vendor Portal Access on Creation is not checked.
- Note: If you miss this step or find you need to remove Portal access for your Customers/Vendors in bulk, there are instructions listed below this section to easily accomplish this.
- Default Role for Contacts: Determines the default Portal role assigned to Customer/Vendor Contacts.
- Default Role for Employees: Determines the default Portal role assigned to your Employees when they access a Customer/Vendor’s Portal.
- Manage Dashboard Widgets: Displays available widgets for the Customer/Vendor Dashboard configuration. More details on these settings are provided below.
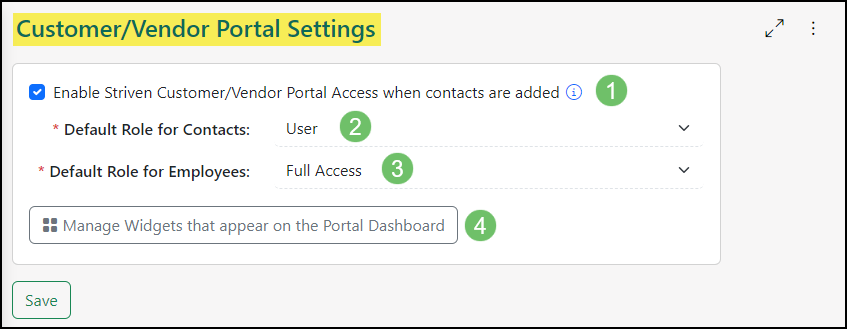
Example of Striven Customer/Vendor Portal Settings

After selecting “Manage Widgets that appear on the Portal Dashboard “, the following options are present:
- Available Widgets: Allows you choose which Widgets you would like to display on the Portal Dashboard. You may use the Search bar at the top of the list to search the Available Widgets by name.
- Dashboard Widgets: The Left Panel, Middle Panel, and Right Panel columns display the Widgets that are currently configured to appear on the Portal Dashboard. You may click and drag the Widgets to reorder them. To edit or remove a Widget from the Dashboard, select the kebab menu icon from the right side of the Widget.
- Configure Dashboard Display: This option is available for both the Customer Dashboard Display and the Vendor Dashboard Display. The Configure option allows you to view and edit the content of this widget and how it displays on the Portal.
- Save: Allows you to save the Dashboard configurations.
- Reset to Default: Resets all changes you have made to the Striven default configurations.
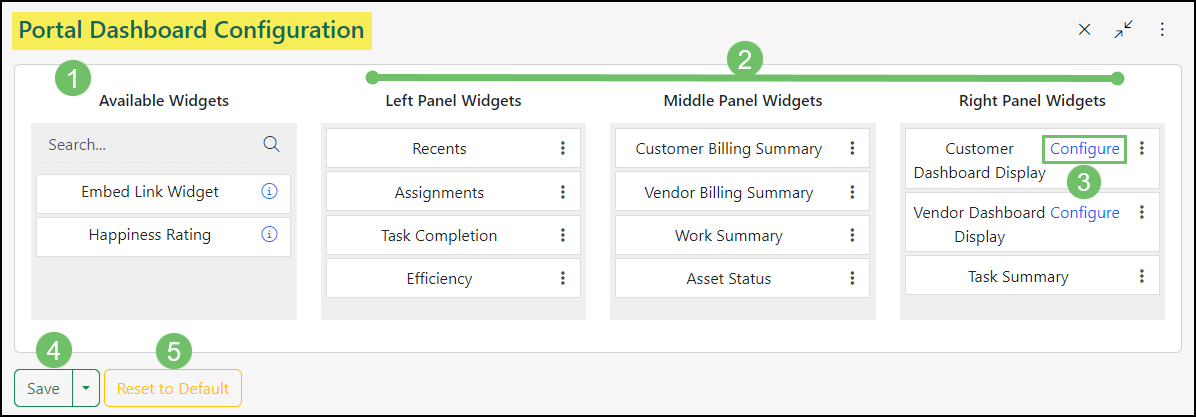
Example of the Portal Dashboard Configuration Page

Note: Widgets available for the Customer/Vendor Portal can be added once except for the Embed Link Widget which can be added to each panel multiple times in order to display a variety of information for Contacts accessing the Customer/Vendor Portal.
- Access Settings: Allows you to designate whether or not Customer/Vendor Portal Access is enabled upon creation of the Contact. This is a very important setting, especially if you do not wish to utilize the Customer/Vendor Portal. To avoid unwanted Portal subscription fees, please ensure the box to Allow Striven Customer/Vendor Portal Access on Creation is not checked.
-
Creating Portal Roles
Customer/Vendor Portal Roles will determine the permissions given to your Customers/Vendors when accessing your Customer/Vendor Portal. Your Striven system provides both a Full Access and User Role option to assign to your Customers/Vendors. Full Access would provide the User with access to all areas of the Customer/Vendor Portal, whereas the User Role has a limited set of default permissions related to the Portal. Below is an example of the Portal Roles page with a description of what you can configure there.
To access the Customer/Vendor Portal Roles settings, navigate to:
Company → Settings → Customers/Vendors → Portal → Roles.
- Add: Triggers the Portal Role Info page to pop up wherein you can create a new Portal Role. Here, you can name the Role, choose the Landing Page for the Portal, and select the desired permissions you wish to be designated for this Role. (An example of this page can be observed below).
- Search: Displays the Search options allowing you to narrow the results listed on the Portal Roles page. You can choose to search Roles by Status or Name.
- Role Name: Selecting the Name allows you to edit the Name, Landing Page, or permissions related to an existing Portal Role.
- Deactivate: Switches the Role to an Inactive status.

Example of Customer/Vendor Portal Roles Page

When viewing a Portal Role – Info page, you may configure the access available to the Role, as well as the Role’s Basic Info with the following options.
- Basic Info: Allows you to edit Role’s Name and the Landing Page users with this assigned Role will be directed to when accessing the Portal.
- Access: The Access section allows you to choose the entities and actions users assigned to this Role may view and perform within the Portal.
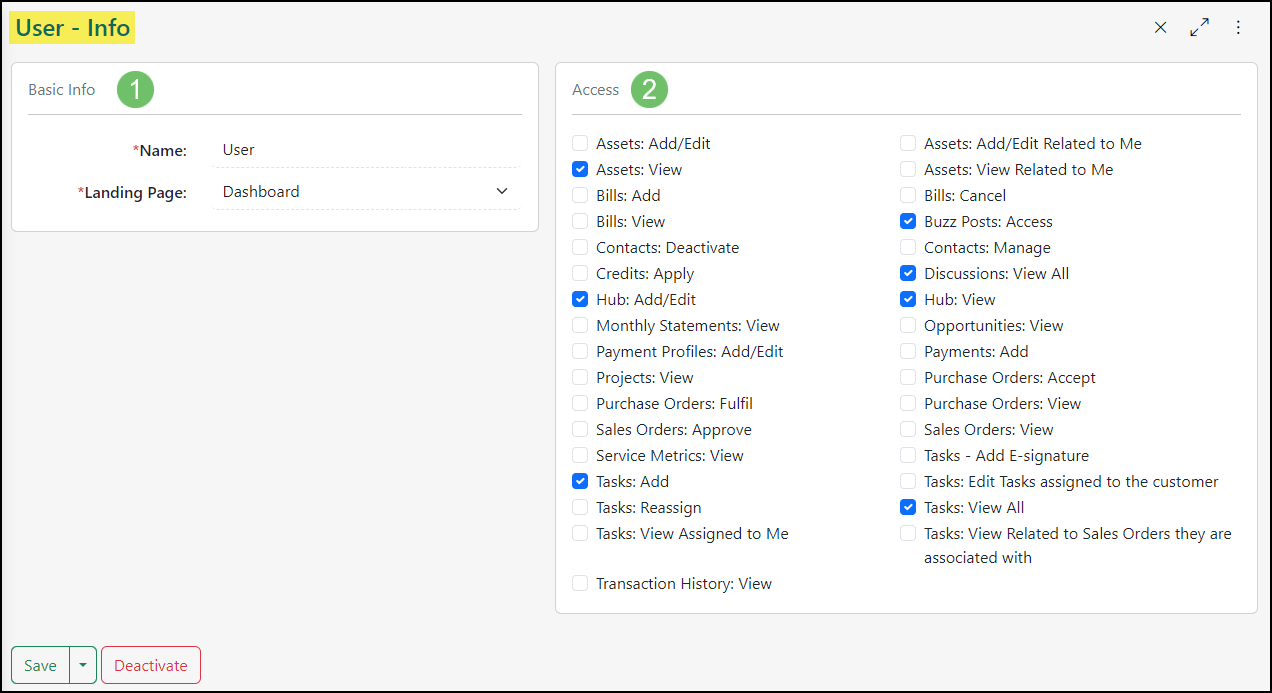
Example of Adding a Customer/Vendor Portal Role

-
Setting Portal Roles & Welcome Emails
During configuration of your Customer/Vendor Portal Settings, you will determine whether or not a new Contacts’ default role is set upon creation of the Contact in your Striven system.
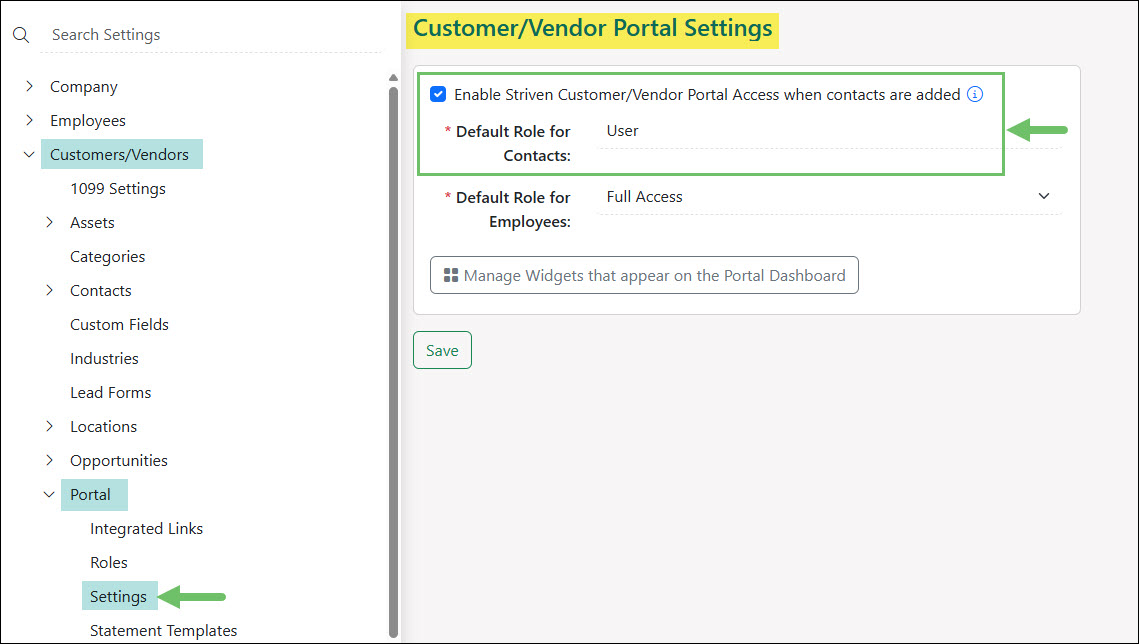
Example of the Default Portal Role for Contacts in the Portal Settings

If new Contacts are set to automatically receive Portal access, you will have the option to check the box to Send the Welcome Email during Contact creation in order for them to be able to sign in to the Portal. If you do not wish to have this designated as an automatic setting, you have the option to assign or change Customer/Vendor Portal roles at the Contact level with whatever permissions you select.
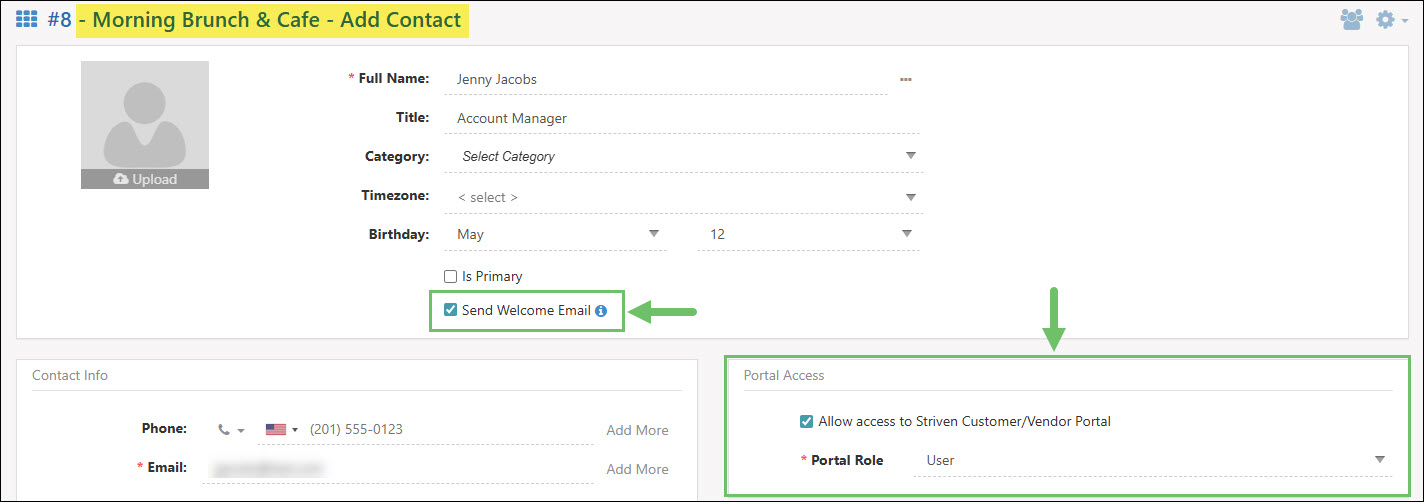
Example of Portal Options When Adding a Contact to a Customer

There is also a link on the Contact Info page to Send Welcome Email in the event they have never signed in but need the email sent to register for the Portal.

Example of the Send Welcome Email Option for a Customer Contact

-
Default Portal Roles at the Customer/Vendor Level
Default Portal Roles can be configured at the Customer/Vendor level, allowing Contacts associated with these accounts to have a Portal Role which overrides any Company level defaults.
When viewing a Customer/Vendor Dashboard, the Default Portal Role option will be located within the Other widget. You may select a configured Portal Role from the drop-down menu. Once a Contact with Portal access is created, this Portal Role will be automatically assigned to them.
If a Contact is created by an API, or an existing Contact is associated with a Customer/Vendor that has a Default Portal Role configured, the Contact will inherit this Portal Role.
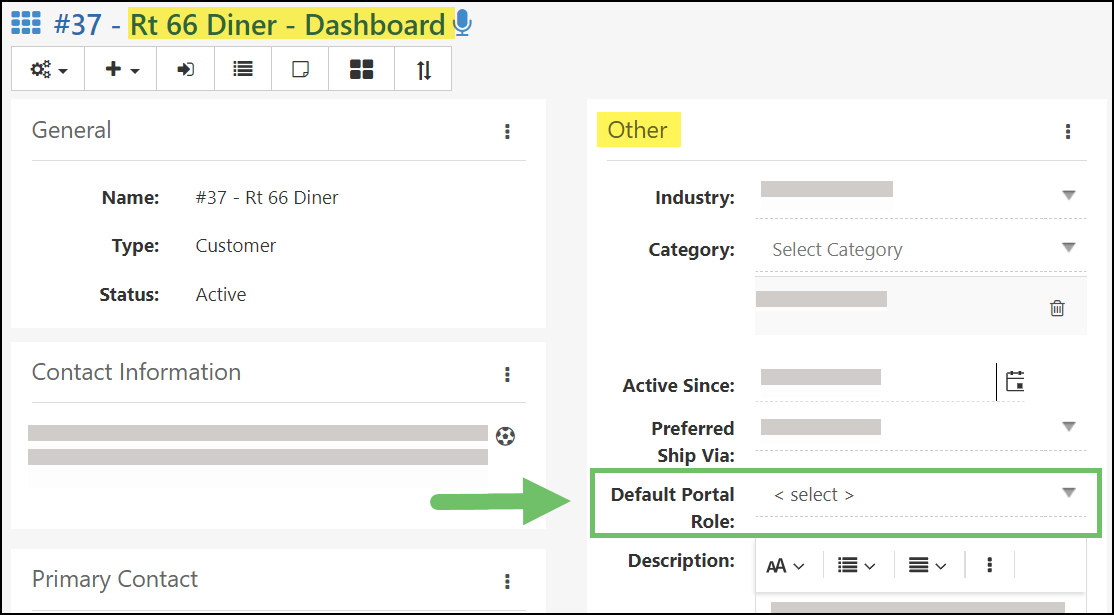
Example of the Default Portal Role Option at the Customer/Vendor Level

-
Removing Portal Access
There may be cases where a Contact has been given access to the Customer/Vendor Portal and you wish to remove that access. Whatever the reason, the solution is rather simple.
Removing Portal Access Individually
If you have an individual or small number of Contacts you wish to remove Portal access from, the easiest way would be to navigate to the Customer’s record in your system. From there, you can use the waffle menu to navigate to the Customer’s Contacts list.
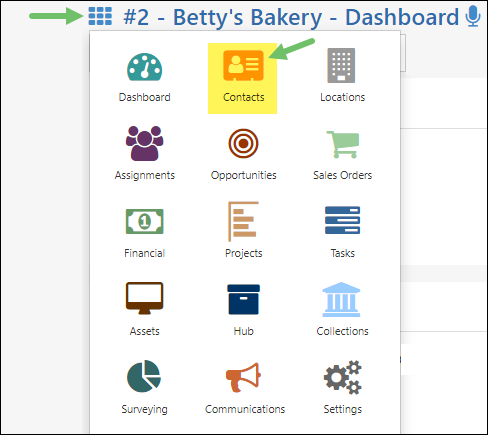
Example of the Contacts Option on a Customer’s Waffle Menu

Once the Customer’s Contact List displays, you can select the individual Contact whose Portal access you wish to update. On the Contact Info Page, you’ll see the Portal Access section on the right side of the page with the checkbox to enable or disable the setting to Allow Access to Striven Customer/Vendor Portal. Unchecking this box will remove the Contact’s Portal access and they will no longer be able to login to the Portal. Remember to click the Save button to save your changes.
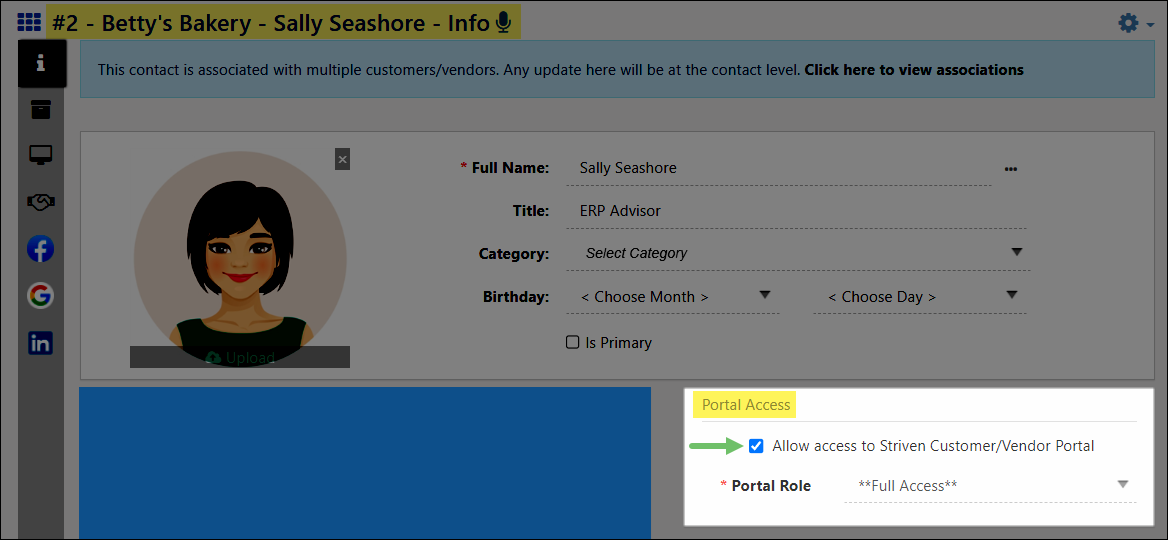
Example of the Portal Access Option on a Customer Contact Info Page

These simple steps can be repeated for each of the Contacts from which you wish to remove Portal access. If you determine you have a larger number of Contacts you wish to remove Portal access from, you can review the steps for that process below.
Removing Portal Access in Bulk
The process to remove Portal access from ALL of your Customer Contacts at once is a bit more involved, but the following steps should be straightforward and easy to follow.
The first step you will want to take is to create a custom report using Striven’s Report Builder. This feature can be located by navigating to
Reports → Report Builder. Then, click on the blue Plus (+) button to add a new report.

Example of the Add Report Button on the Reports Page

In order to gather the necessary details for this process, you will need to select the Customer/Vendor Contacts Dataset in the Based On field, enter a Name for your report, and then click Proceed.

Example of Creating a Custom Report Based On Customer and Vendor Contacts

Next, on the report Info page, locate the Filters panel and click on the Add Filters button to configure the parameters that will limit your report results to only the Contacts for which you wish to remove Portal access.
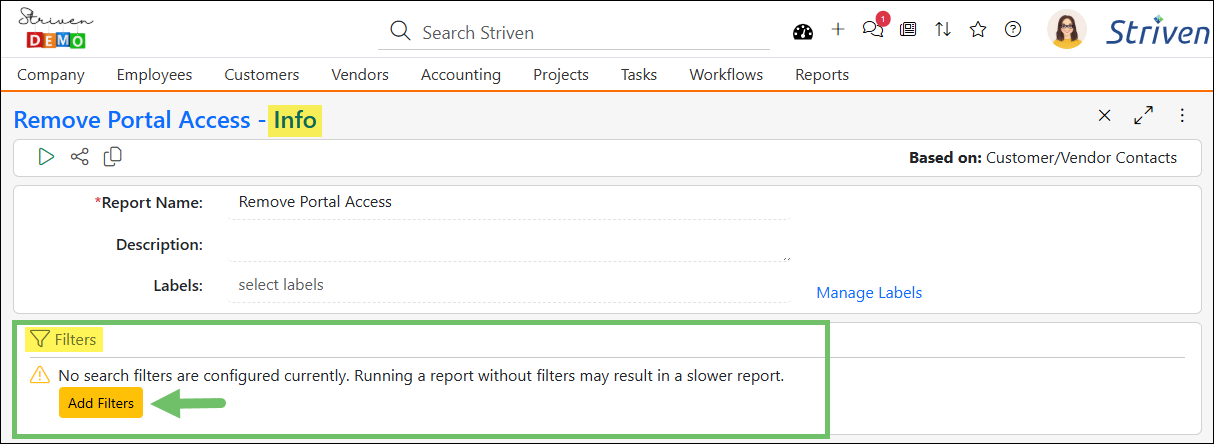
Example of the Add Filters Button

Select the following recommended filters and then click Save.
- Customer/Vendor Contact: Has Customer / Enter Value / Equal To / Yes
- Customer/Vendor Contact: Has Access To Portal / Enter Value / Equal To / Yes

Example of the Recommended Filters for Removing Portal Access to All Customer Contacts

Back on the report Info page, click on the Add button in the Columns panel to search for and add the following recommended columns:
- Customer/Vendor Contact: ContactId
- Customer/Vendor Contact: Customer: CustomerId
- Customer/Vendor Contact: First Name
- Customer/Vendor Contact: Last Name
- Customer/Vendor Contact: Customer: Name
- Customer/Vendor Contact: Has Access To Portal
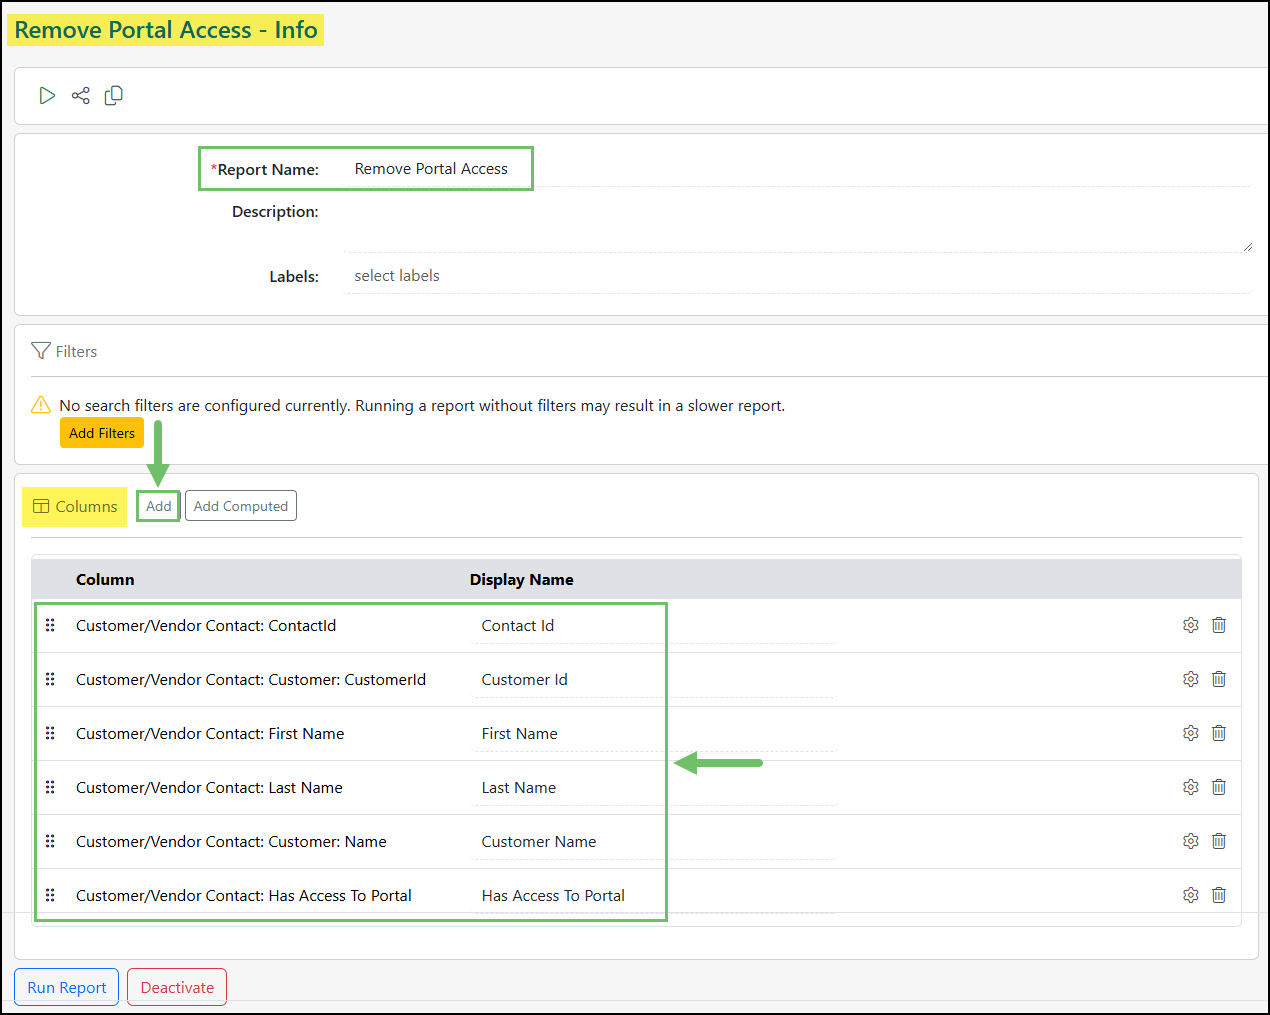
Example of the Recommended Columns for Removing Portal Access

Once you have your columns and filters set, you can click the Run Report button to see the results. Click on the Export button located on the left side of the page and choose the CSV option to download your report results in a file format that will be compatible with importing into Striven. You will then be able to edit the details in this document to use for importing and updating the data back into Striven.

Example of the CSV Export Option

Once you have exported the report as a .CSV file, you should open it and change the “Yes” responses in the Has Access To Portal column to “No” for each Contact listed.
Remember to save your edits to the file in a .CSV file format for importing.
After the import file is prepared, return to Striven and navigate to Customers → Contacts to view the Contacts List page.
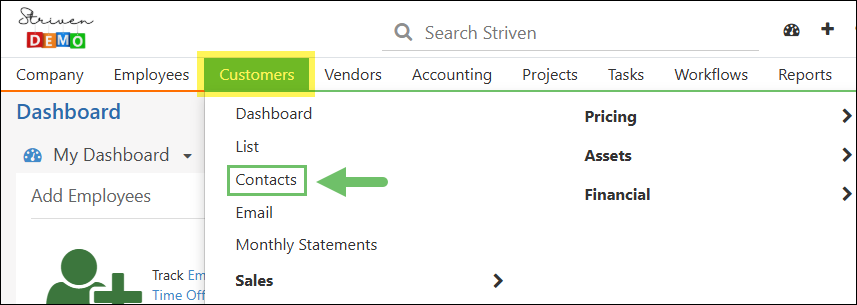
Example of the Contacts List Option on the Customers Menu

Click on the Import button and select Contacts.

Example of Contact Import Option on the Contacts List Page

On the Contacts Import page, select the .CSV import file you have prepared for the upload file. Before you click Next, make sure the box for Update Matching Data is checked. If this box is not checked, the Portal access will not be updated successfully. Click the Next button to continue with the import.
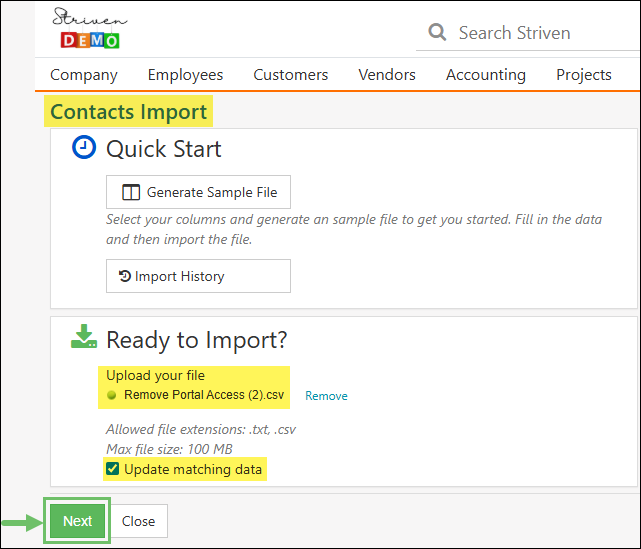
Example of the Contacts Import Page

Now, you will need to set the Import Mapping. Use the drop-down lists and make sure the Sources are mapped as follows:
- ContactId is mapped to “CONTACT ID”
- Customer: CustomerId is mapped to “CUSTOMER/VENDOR ID”
- First Name is mapped to “FIRST NAME”
- Last Name is mapped to “LAST NAME”
- Customer: Name is mapped to “CUSTOMER/VENDOR NAME”
- Has Access To Portal is mapped to “ALLOW ACCESS TO CUSTOMER/VENDOR PORTAL”

Example of the Contact Import Mapping for Removing Portal Access

Click Finish on the Contacts Import Confirmation page to complete the import.
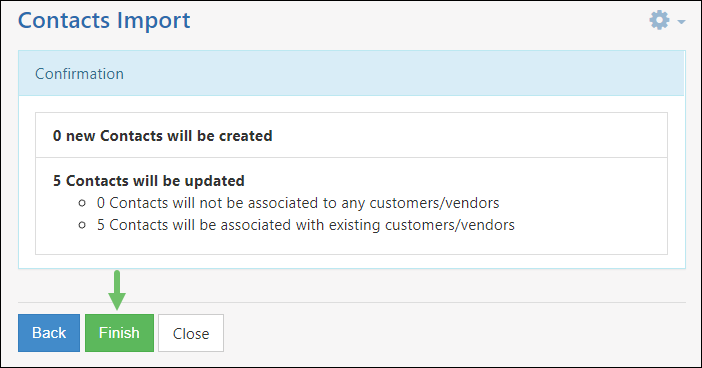
Example of Contacts Import Confirmation Page

The Import Progress page will display with a notification that your import is queued and that you will receive an email notification with the import summary once it is completed.

Example of the Import Progress Page

It is recommended that you return to the Report Builder page and run the custom report you created again in order to confirm the Portal access for Customer Contacts was properly updated.
- Note: If multiple Associations were created for a Contact, it is possible that only one Association may have been updated and others may need to have the Portal access updated manually.
The steps above were to guide you through removing Portal access from ALL of your Customers in Striven, but additional report filters may be used to narrow down your list more specifically. This way, you can easily remove access from a more particular group of Customers at one time. For more details related to the Report Builder feature in Striven, please review our Report Builder Guide.
Customer/Vendor Portal Dashboards
-
Customer Portal Dashboard
The Customer Portal Dashboard displays the widgets selected for the Customer Portal, which can include Customer’s financial information for past due balances, Sales Orders in need of approval, billing summary, Tasks summary, Assignments, and more. Below is a screenshot illustrating how the Customer Portal Dashboard appears and a description of what can be accomplished there.
- Past Due: Displays the Customer’s past due amount and provides a Pay Now link which will navigate to the Make a Payment page.
- Needs Approval: Displays the number of Sales Orders that are in a Pending Approval status with a link to navigate to the Sales Orders list prefiltered for Pending Approval Sales Orders.
- Recents: Displays a list of pages recently viewed by the logged-in user such as specific Transactions, Sales Orders, Tasks, Assets, etc.
- Customer Billing Summary: Displays a summary of the financial information for the Customer including the overall open balance amount along with how much is current and past due. A total for the unapplied Credit Memos will also be shown. A Pay Now button is also to navigate to the Open Balance page.
- Customer Display Widget: A customizable widget that can include any information you would like to display to your Customer, such as a welcome message, a hyperlink, images, etc.
- Assignments: Lists who is currently Assigned to the Customer. Only Assignments that have been marked as Visible on the Portal will be displayed within this widget.
- Work Summary: Displays a summary of Sales Orders that are In Progress or recurring, Projects that are In Progress, and Opportunities that are in a status that is visible on the Portal.
- Task Completion: Displays a bar graph showing Task completion progress by month.
- Asset Status: Lists Customer Assets with the status set to either In Service or Out of Service. An option is available to Add Assets to Monitor Status in order select which Assets being tracked should be included in this widget.
- Task Summary: Displays how many Tasks are currently in an Open or On Hold status.
- Efficiency: Displays a pie chart depicting the efficiency results of Tasks completed within the current month.
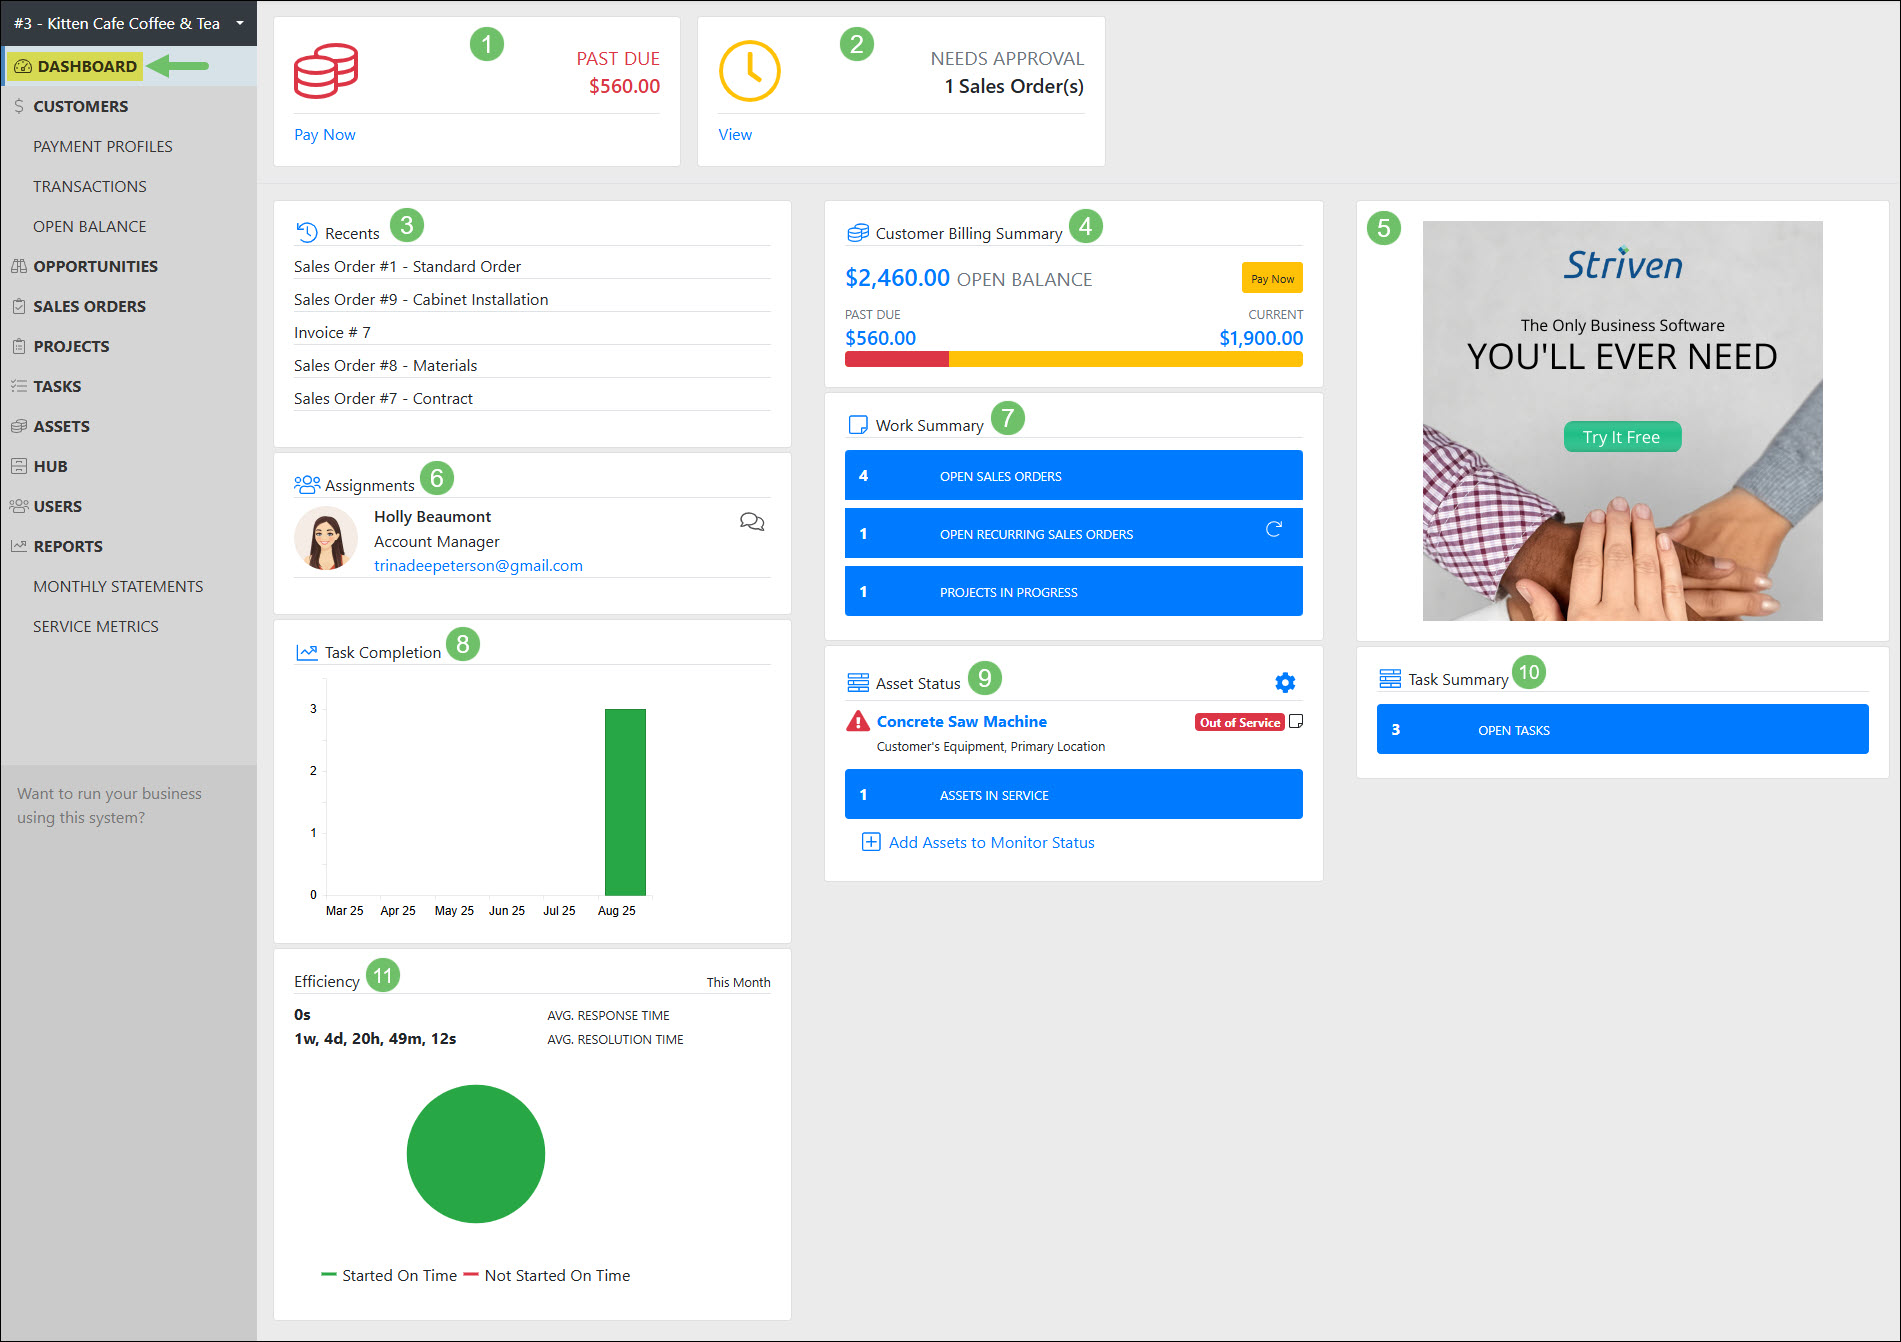
Example of Customer Portal Dashboard Widgets

-
Vendor Portal Dashboard
The Vendor Portal Dashboard displays the widgets selected for the Vendor Portal, which can include Vendor’s financial information for past due balances, Purchase Orders requiring Acceptance, Vendor billing summary, Task summary, and more. Below is a screenshot illustrating how the Vendor Portal Dashboard appears and a description of what can be accomplished there.
- Needs Acceptance: Displays the number of Purchase Orders that need acceptance from the Vendor with a link to navigate to the Purchase Orders list prefiltered for Pending Purchase Orders.
- Recents: Displays a list of pages recently viewed by the logged-in user such as specific Transactions, Purchase Orders, Tasks, Assets, etc.
- Vendor Billing Summary: Displays a summary of the financial information for the Vendor including the overall open balance amount along with how much is current and past due. A total for the unapplied Bill Credits will also be shown.
- Vendor Display Widget: A customizable widget that can include any information you would like to display to your Vendor, such as a welcome message, a hyperlink, images, etc.
- Work Summary: Displays a summary of Purchase Orders that are Open or recurring.
- Task Completion: Displays a bar graph showing Task completion progress by month.
- Asset Status: Lists Vendor Assets with the status set to either In Service or Out of Service. An option is available to Add Assets to Monitor Status in order select which Assets being tracked should be included in this widget.
- Task Summary: Displays how many Tasks are currently in an Open or On Hold status.
- Efficiency: Displays a pie chart depicting the efficiency results of Tasks completed within the current month.
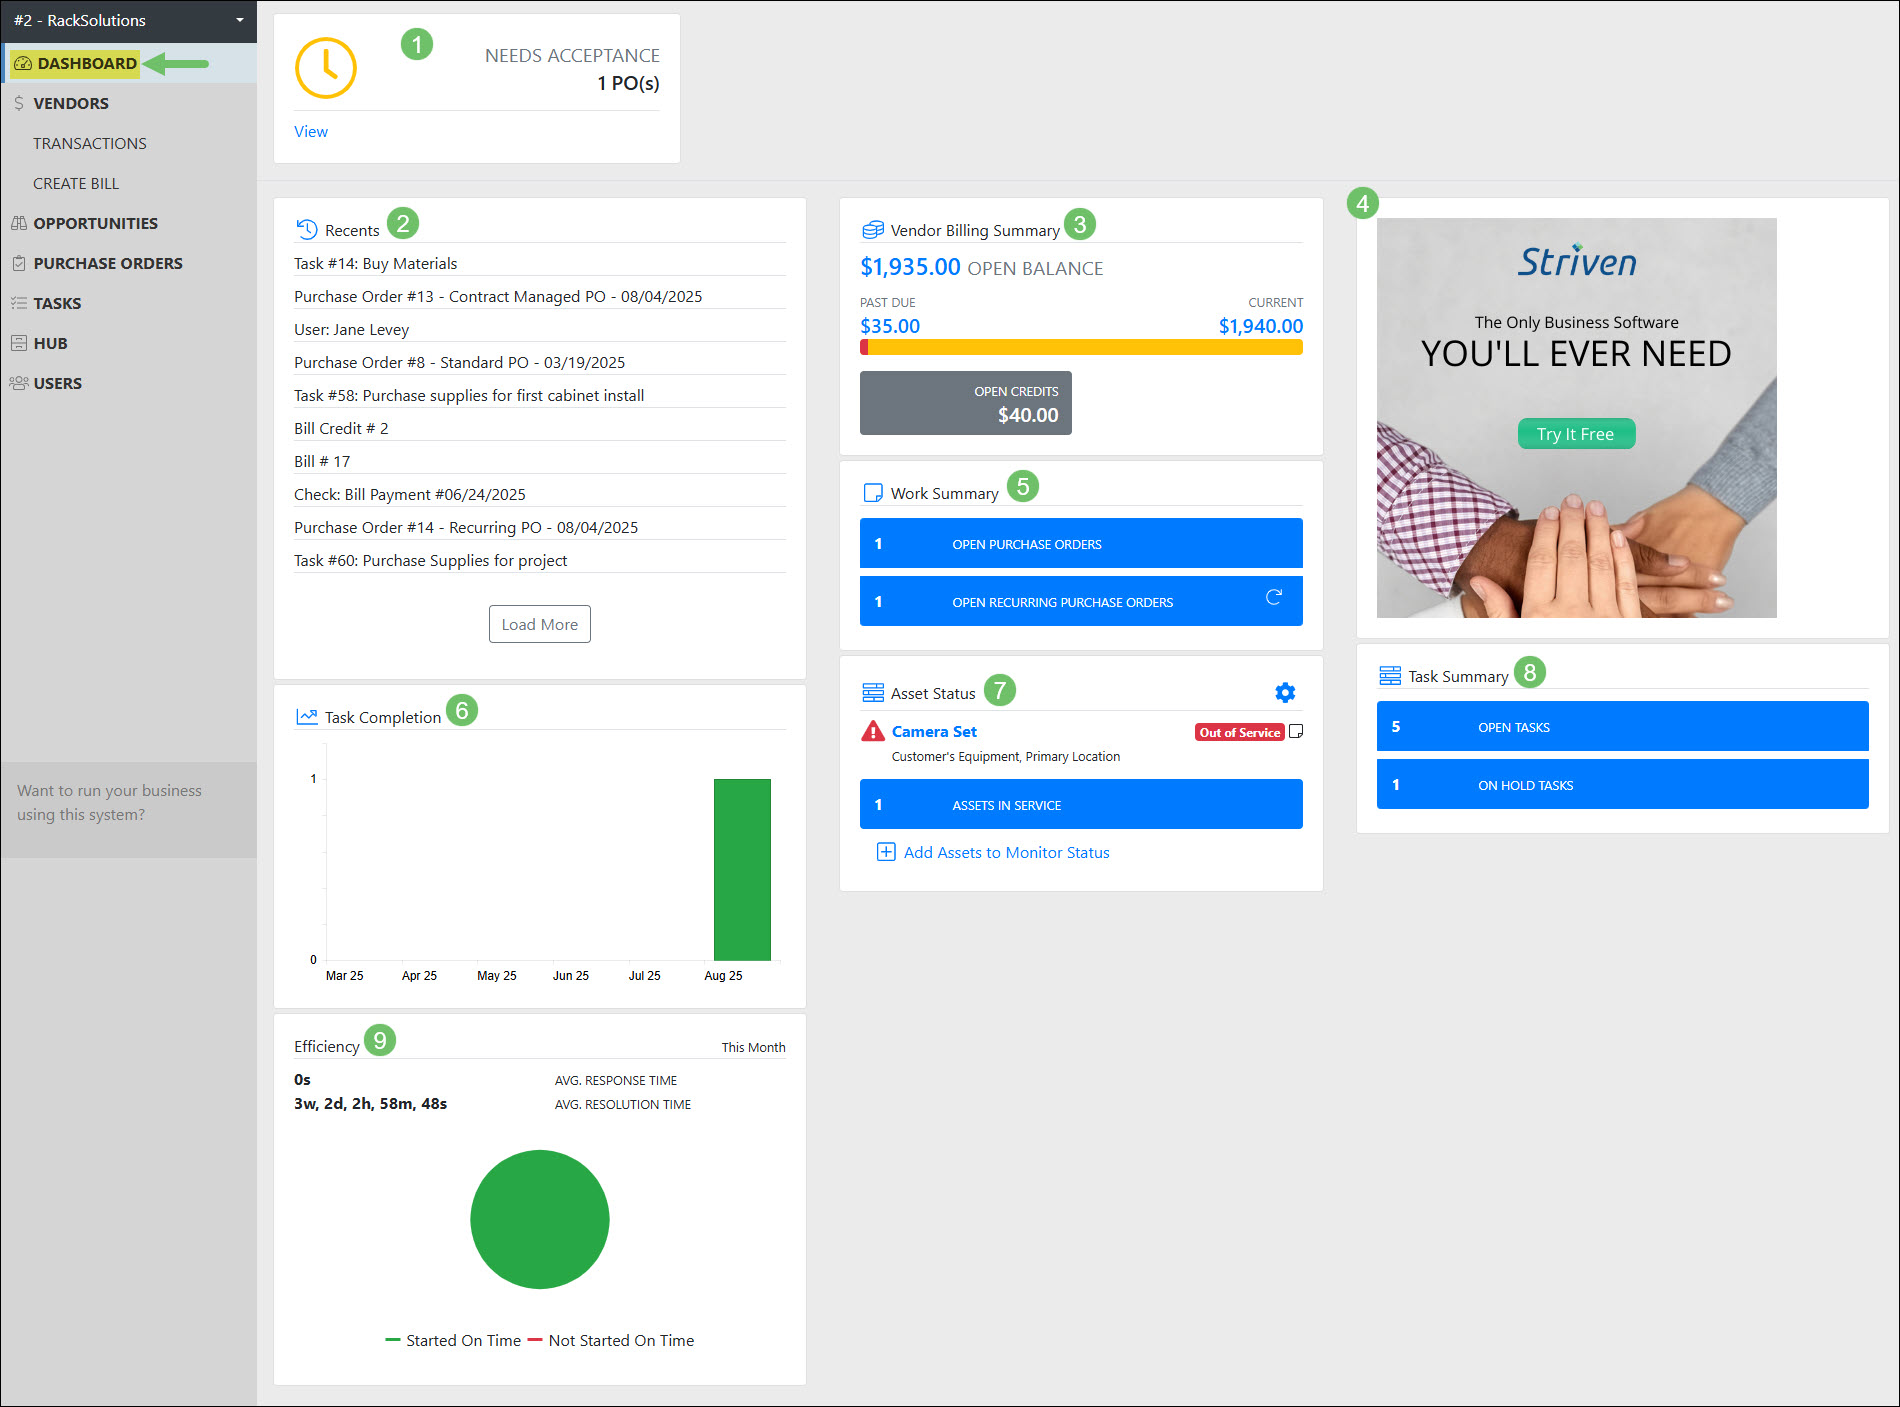
Example of Vendor Portal Dashboard Widgets

-
Managing Dashboard Widgets
To adjust which widgets will appear on the Customer or Vendor Portal Dashboards, navigate to Company → Settings → Customers/Vendors → Portal → Settings. Once on the Customer/Vendor Portal Settings page, click the Manage Widgets that appear on the Portal Dashboard button to decide which widgets should appear for your Customer or Vendor when they log into the Portal.
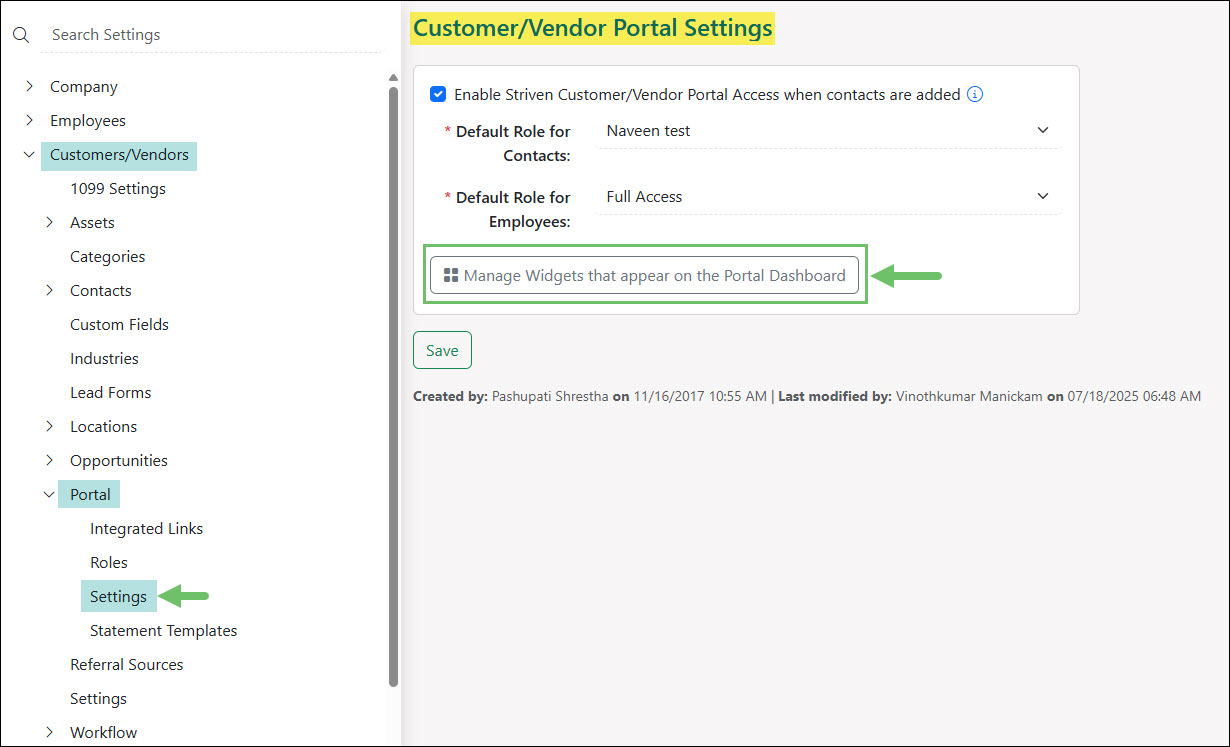
Example of the Customer Vendor Portal Manage Widgets Settings Location

The Portal Dashboard Configuration page will allow you to add, remove, or rearrange widgets for the Customer/Vendor Portal Dashboard. To change the location or which panel the widget resides in, simply click and drag the widget to the desired spot. Below is a screenshot illustrating how the Portal Dashboard Configuration page appears and a description of what can be accomplished there.
- Available Widgets: Lists widgets that have either not been added to a panel or can have multiples of the same widget within the panel. Click and drag the widget to the desired spot to add it to the Customer/Vendor Portal Dashboard.
- Vertical Ellipsis: Gives the options to either Edit the widget which allows the name of the widget to be changed or Delete the widget which removes the widget from the Portal Dashboard.
- Configure: The Vendor Dashboard Display and Customer Dashboard Display widgets give the option to include any information you would like to display to your Customer or Vendor, such as a welcome message, a hyperlink, images, etc. The Embed Link Widget option will allow you to select a URL or Integrated Link to display in a widget on the Customer/Vendor Dashboard.
- Reset to Default: Reverts the Customer/Vendor Portal Dashboard back to the original layout and configurations.

Example of the Portal Dashboard Configuration Page

-
Happiness Rating Widget
Happiness Ratings are a way for Contacts through the Portal leave feedback as to whether they are Happy, Satisfied, or Unhappy with services being completed. Ratings left by a Company can be viewed by other Contacts that are logged in to the Portal through the Happiness Rating Widget on the Dashboard in order to have a more collaborative and open view of the overall happiness of the logged-in users colleagues.
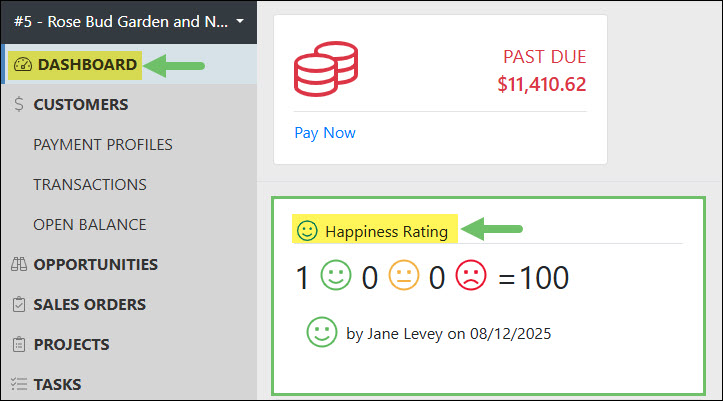
Example of the Happiness Rating Widget on the Dashboard

To have the Happiness Rating Widget be visible to Customer/Vendor Contacts logging into the Portal, a two-step process will need to be completed.
The widget will first need to be added to a panel when viewing the Portal Dashboard Configuration page.

Example of the Happiness Rating Widget added on the Portal Dashboard Configuration Page

Next, the user logging in will need to have the permission “Happiness Rating Widget: View” added to their Portal Role.

Example of the Happiness Rating Widget Permission

Learn more about managing Portal Roles and Permissions for the Customer/Vendor Portal by reviewing the Creating Portal Roles section in the Customer/Vendor Portal Guide.
-
Customer/Vendor Portal Embed Widget
Similar to other Embed Link Widgets within Striven, this feature will allow you to select a URL or Integrated Link to display in a widget on the Customer/Vendor Dashboard.
The settings for this option can be found by visiting Company → Settings → Customers/Vendors → Portal → Settings from within your Striven system.
From here, you’ll click on the Manage Widgets that appear on the Portal Dashboard option and add the Embed Link Widget onto one of the panels for the Customer/Vendor Portal Dashboard. Once the Embed Link Widget has been added to a panel, click the Configure button in order to set up the widget.
There are 2 available options for the Embed Widget link:
- URL: Allows you to enter the web address link used to direct your internet browser to a particular website.
- Integrated Link: Allows you to choose from the list of Integrated Links you have already set in your system. (This list can be edited by visiting Company → Settings → Customers/Vendors → Portal → Integrated Links).
Note: Both options will also have the ability to set your widget Height settings from this section.
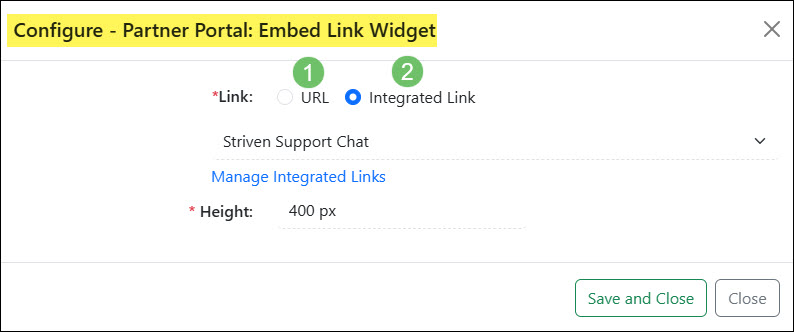
Example of the Configuring an Embed Link Widget for the Portal Dashboard

To add this Embed Link Widget to your Customer/Vendor Portal Dashboard, you can click into the Manage Dashboard Widgets settings and drag the Embed Link Widget option to whichever column position you wish to view the widget in.
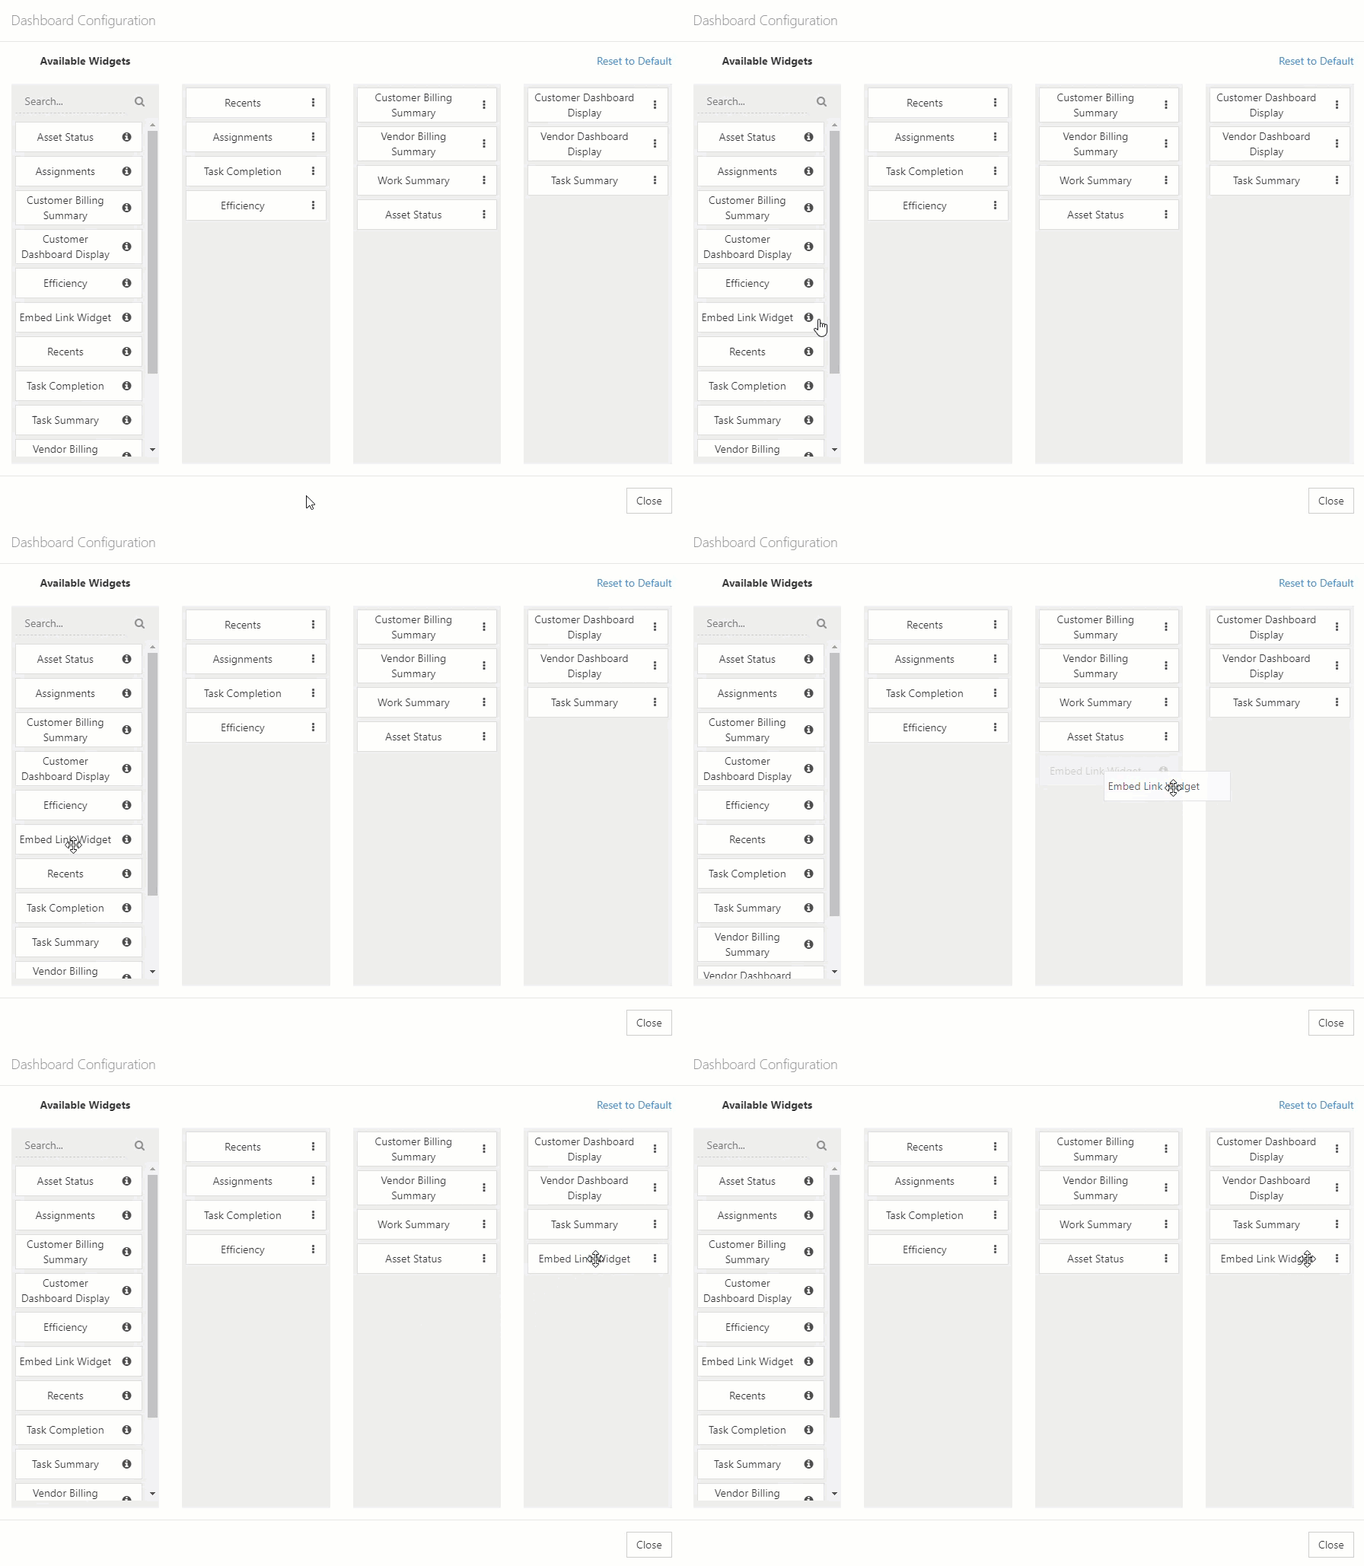
Example of Adding Embed Link Widget to Customer/Vendor Portal Dashboard

By clicking on the breadcrumb menu to the right of the widget, you’ll be able to click Edit to change the name of the widget, then click the green check mark to save.
Now when you view your Customer/Vendor Portal Dashboard, the Embed Link Widget should display on the page according to your settings.
- Note: Not all integrated links or URLs will work as embedded links on the Customer/Vendor Dashboard as some websites may block the ability to embed their content.

Example of Editing an Embed Link Widget Name

An Embedded Link Widget enables you to share videos or websites you want to bring to your Customer/Vendor’s attention. For example, perhaps you want to provide a helpful tool in your Portal, such as a calculator or chat option, or even something simple, like a recorded video announcement or holiday greeting you’d like to share with your Customer/Vendors. Using this new feature gives you the opportunity to share relevant content from within your Customer/Vendor Portal.
-
Signing In to the Customer/Vendor Portal
The URL to Sign In, Create New User, or Reset a Customer’s password is customers.striven.com.
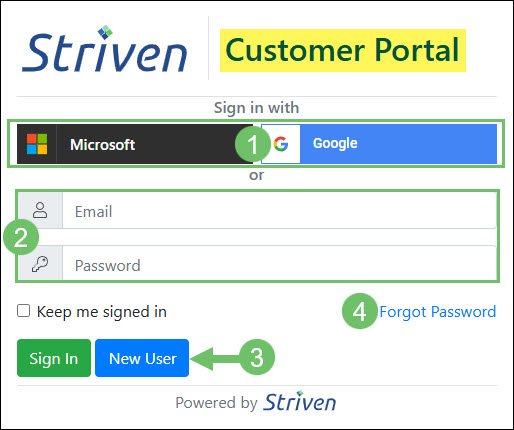
Example of the Customer Portal Sign In Page

The URL to Sign In, Create New User, or Reset a Vendor’s password is vendors.striven.com.
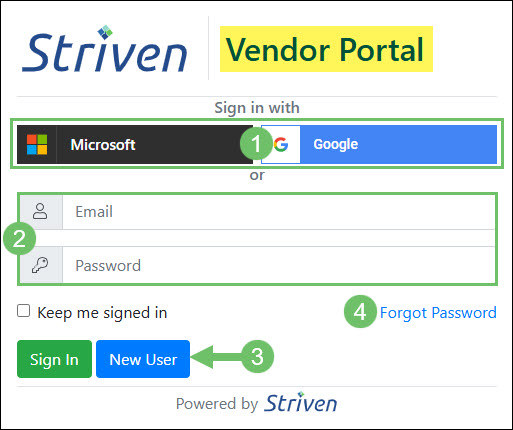
Example of the Vendor Portal Sign In Page

- Single Sign On: A convenient option is to use either the Google Single Sign On or the Microsoft Single Sign On so there is no need to create a password. Users would be able to use their current Google or Microsoft Account login information to quickly and easily sign in to the Portal.
- Note: The email address used for the single sign on needs to match the primary email address saved in the system for the Contact.
- Signing In: Your Customer/Vendor will need to navigate to the Customer/Vendor Portal Sign In page in order to sign in and view the Portal content.
- New User: To access the Customer/Vendor Portal, the Contact needs to be entered into your Striven system as a Customer Contact. The Contact would click on the New User button and enter their email address to request access. This will trigger a Welcome email to be sent with instructions for signing into the Portal.
- Forgot Password: If your Customer/Vendor forgets their password and is unable to sign in to the Portal, you can provide them with the URL to the Portal sign in page to reset their password. Once the Forgot Password link is clicked, the Customer/Vendor will receive an email with a link to reset their password.
- Single Sign On: A convenient option is to use either the Google Single Sign On or the Microsoft Single Sign On so there is no need to create a password. Users would be able to use their current Google or Microsoft Account login information to quickly and easily sign in to the Portal.
-
2-Factor Authentication for Customer/Vendor Portal
Striven has included a 2-Factor Authentication feature with the Customer/Vendor Portal to ensure your Customer/Vendor’s information is secure. The Customers/Vendors will be required to enter their Username and Password as usual, but will then be prompted to enter a 2FA code, which will be provided to them via email or text message.
- Code: Field where you can copy/paste or type in the 2FA code you receive from Striven.
- Remember this device for 30 days: Checkbox to set the system to remember the current device you’re signing in with for 30 days.
- I didn’t get my code, resend it: Link to have the 2FA code resent to you if you did not receive it when attempting to sign in.
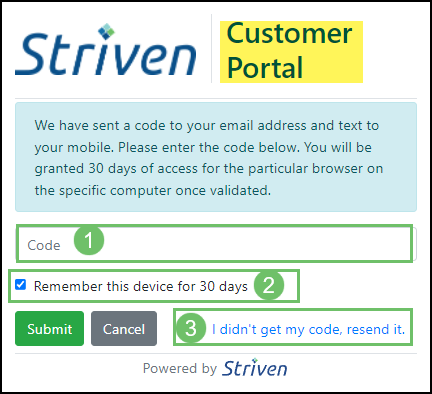
Example of the Customer Portal 2FA Screen

- Note: In order to send the 2FA Code via text message, the Twilio Integration with Striven must be activated, and the User must have a phone number designated as “Mobile” saved in their Contact Information.
-
Account Lockout
To enhance the security of the Customer/Vendor Portal, Striven has an Account Lockout feature. This feature will protect your Customer/Vendor data by automatically locking a Portal account if a user enters the wrong password five (5) times in a row.
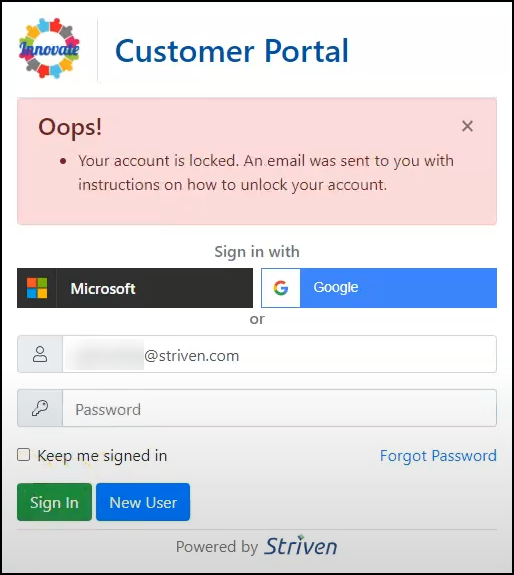
Example of the Account Lockout Alert for the Customer/Vendor Portal

If a Portal account gets locked, an email notification will be sent to the email address on record for that particular account. This email will provide a link to unlock the account.
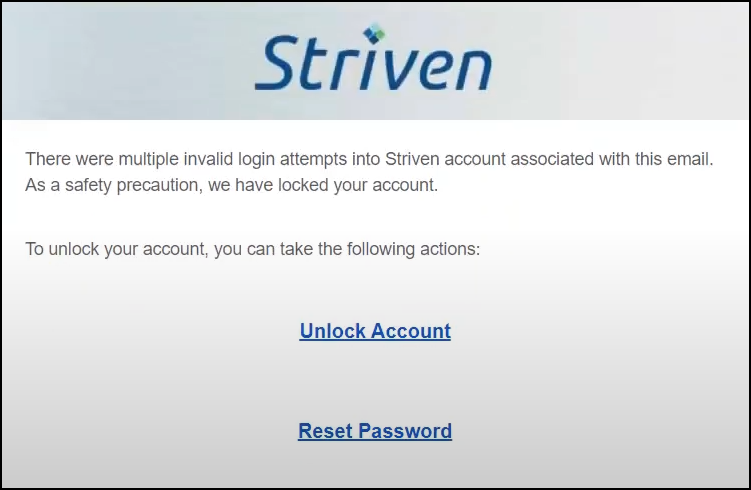
Example of the Email Notification for a Portal Account Lockout

Clicking on the link will unlock the Portal account and display a page that details the latest failed login attempts, including the Site URL, IP Address, Reason for the failed attempt, what Browser was used in the attempt, and the Date (UTC) the attempt was made. Additionally, at the bottom of this page, there is a Back to Sign-In button.
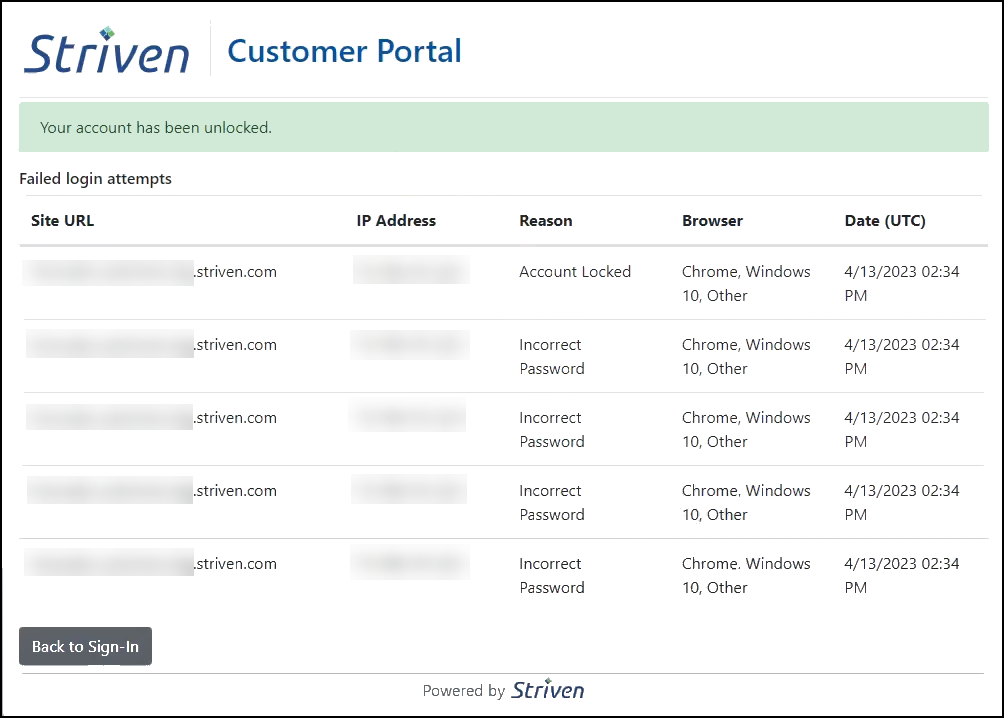
Example of the Failed Login Attempts Page for Portal Account Lockout

The email will also provide a Reset Password link that the user can use to change their password. This will help to prevent unauthorized access to the Portal account.
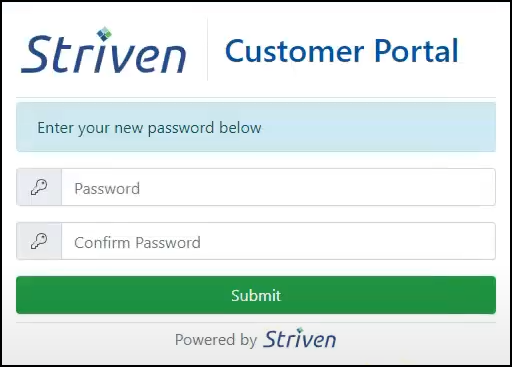
Example of the Reset Password Page for the Customer Portal

Customer Portal Options
-
Customer Portal Menu Options
The Customer Portal Menu is located on the left side of the Portal screen and is a useful tool to navigate through the different areas of the Portal. The options available for your Customers to view here depend on which Portal content and permissions you have selected to make visible in your Customer Portal Roles. Below you will find an example of how a Customer Dashboard Menu appears on the Portal, followed by an explanation of each menu option in the sections that follow.

Example of Customer Portal Menu

-
Customers
There are 3 options available in this menu section: Payment Profiles, Transactions, and Open Balance. Each section is described below.
Payment Profiles
The Payment Profiles page is located in the side menu under Customers. The Payment Profiles page allows Customers to add, remove, or manage their payment profiles that they have on file through Striven. The option to enable or disable Autopay is also available on this page to manage.
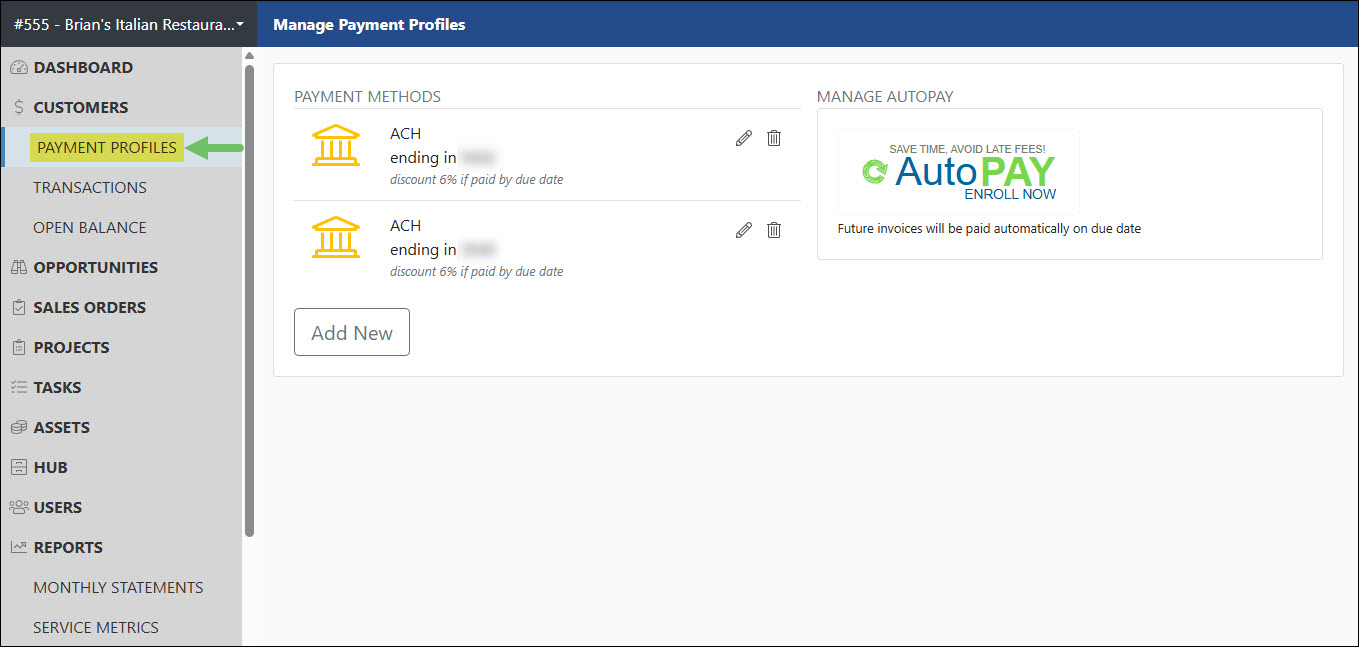
Example of the Menu Location for Payment Profiles in the Portal

Permissions
The following permissions will need to be configured for the Contact’s Portal Role if they will be managing or viewing Payment Profiles in the Customer Portal:
- “Payment Profiles: Add/Edit”

Example of Payment Profiles Related Permissions for the Customer Portal

Learn more about managing Portal Roles and Permissions for the Customer/Vendor Portal by reviewing the Creating Portal Roles section in the Customer/Vendor Portal Guide.
Payment Profiles Page
Below is a screenshot illustrating how the Payment Profiles page appears and a description of what can be accomplished there.
- Payment Methods: Lists current payment profiles that have been added through the Customer Portal. Clicking on the Edit icon will allow the user to make updates to the payment method information. Clicking on the Delete icon will remove the payment method from record. Any convenience fees or discounts that have been configured within the settings will display in print below each of the payment profiles based on the payment type.
- Add New: To add a new payment method click the Add New button to add either a Credit Card or E-Check on file. Any convenience fees or discounts that have been configured within the settings will display below each type of payment option available.
- Manage Autopay: Enables or disables the option for Autopay. Once selected, a dropdown menu will appear in order to choose which payment profile should be set up with Autopay. If Autopay has been enabled, the options will be available to change which profile is set up for the Autopay or to turn off the Autopay completely.
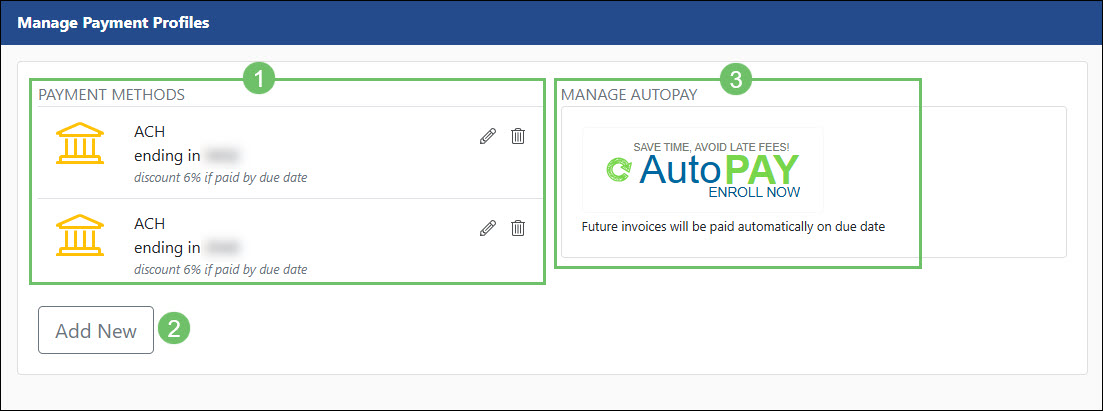
Example of Actions and Information Available on the Payment Profiles Page in the Portal

Note: To enable online Payments, you will need to have an Account with Authorize.net or Stripe and configure the Payment Settings accordingly in your Striven system. If you wish to use another Payment gateway, or for more information setting this up, please contact your Striven Consultant. The Payment Profile options are available by navigating to Company → Settings → Integrations →
Payment Integration.Transactions
The Transactions list displays a history of the Customer’s Transactions, including Invoices, Sales Receipts, Payments, Credit Memos, and Journal Entries that have been related to the Customer. By default, the list will show all Transactions but can be adjusted to show only open or past due. The Transactions list is located in the side menu of the Customer Portal located under the Customers option. Transactions that have been voided will not be accessible through the Customer Portal.
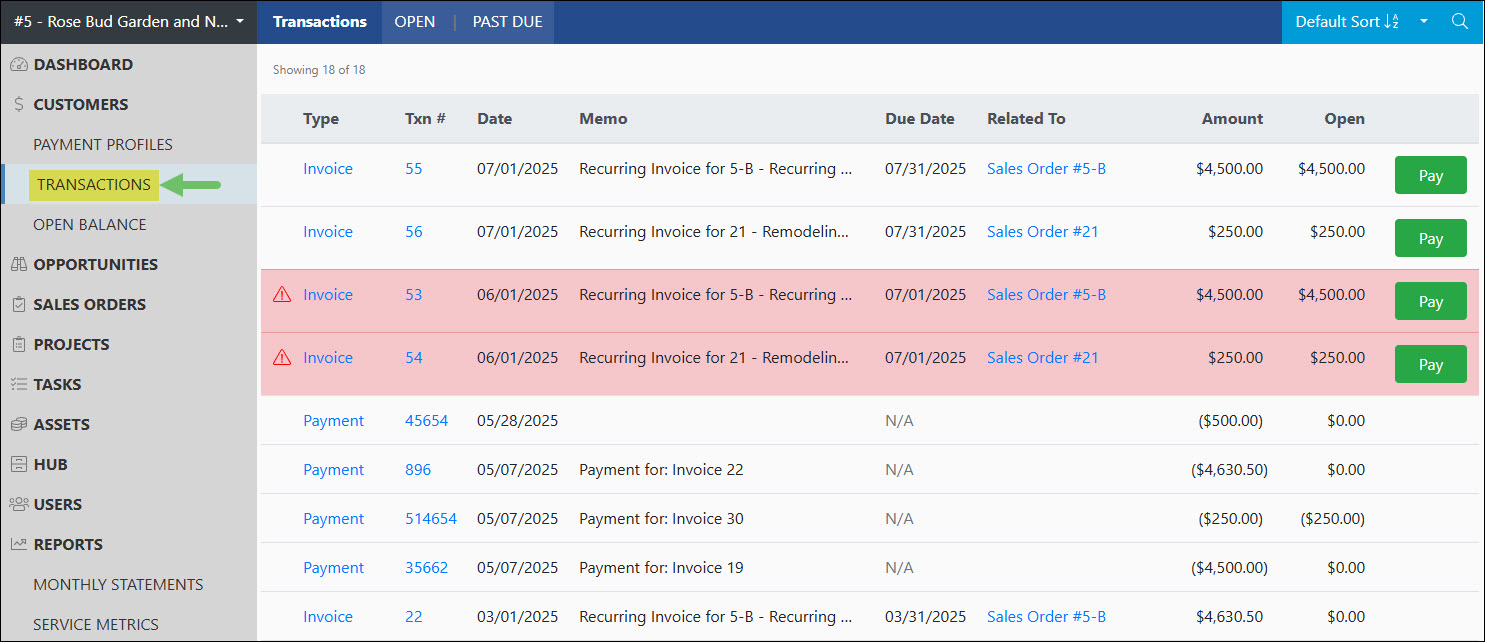
Example of the Location of the Transactions List in the Customer Portal

Permissions
The following permissions will need to be configured for the Contact’s Portal Role if they will be managing or viewing Transactions in the Customer Portal:
- “Credits: Apply”
- “Payments: Add”
- “Transaction History: View”

Example of Transaction Related Permissions for the Customer Portal

Learn more about managing Portal Roles and Permissions for the Customer/Vendor Portal by reviewing the Creating Portal Roles section in the Customer/Vendor Portal Guide.
Transactions List
Below is a screenshot illustrating how the Transactions list appears and a description of what can be accomplished there.
- Quick Filters: Click on one of the options listed here to easily adjust the list to show only open or past due Transactions.
- Search Filters: There are an array of search filters available on the Transactions list to narrow results such as:
- Date Range: Filters the list based on the Transaction date that is listed on the Transaction.
- Type: Narrows results based on the type of Transaction such as Invoice, Sales Receipt, Credit Memo, Payment, or Journal Entry.
- Transaction #: Adjusts results listed based on the number listed on the Transaction.
- Memo: Searches through the memos that have been entered on the Transactions and will only show results that include what is being searched for.
- Sales Order #: Shows Transactions based on the related Sales Order number which will be listed in the Related To column on the list.
- PO #: This filter will work when using the search filters for Vendors in the Portal rather than Customers.
- Project #: Narrows results based on the Project that has been related to the Transaction through the Sales Order. The related Project will be listed in the Related To column in the list.
- Open/Past Due: Adjusts list to only show Transactions that are open or past the due date.
- Type: Displays the type of Transaction that is accessible to the Customer. Transaction Types include Invoices, Sales Receipts, Payments, Credit Memos, and Journal Entries. Clicking on the Transaction Type listed will open the Transaction in a new window to view additional details. A red highlight will appear on Transactions that are past due to indicate the lateness.
- Txn #: Lists the number that has been entered onto the Transaction. Clicking on the Transaction number will open the Transaction in a new window to view additional details.
- Date: Shows the date that has been entered onto the Transaction.
- Memo: Will display any memo that has been entered onto the Transaction.
- Due Date: Displays the date that the Transaction is due for payment.
- Related To: Lists out any related Sales Orders or Projects. Clicking on the hyperlinks listed here will open the Sales Order or Project in a new window to view additional details.
- Amount: Shows the total amount that has been entered into the Transaction.
- Open: Displays the amount that is still open on the Transaction. If $0 is shown, this indicates the Transaction has been closed.
- Actions: A Pay button will be listed for Invoices that still need payment added. For Credit Memos that are still open, an Apply button will be available.

Example of the Actions and Information Available on the Transactions List in the Customer Portal

Open Balance
The Open Balance page will only display Transactions that have not been closed. Invoices will be shown that need payment or Payments and Credit Memos will be listed that need to be applied to open Invoices. A summary of the total open balance will be displayed at the top of the page along with a breakdown of past due vs current. The Open Balance page is located in the side menu of the Customer Portal located under the Customers option.
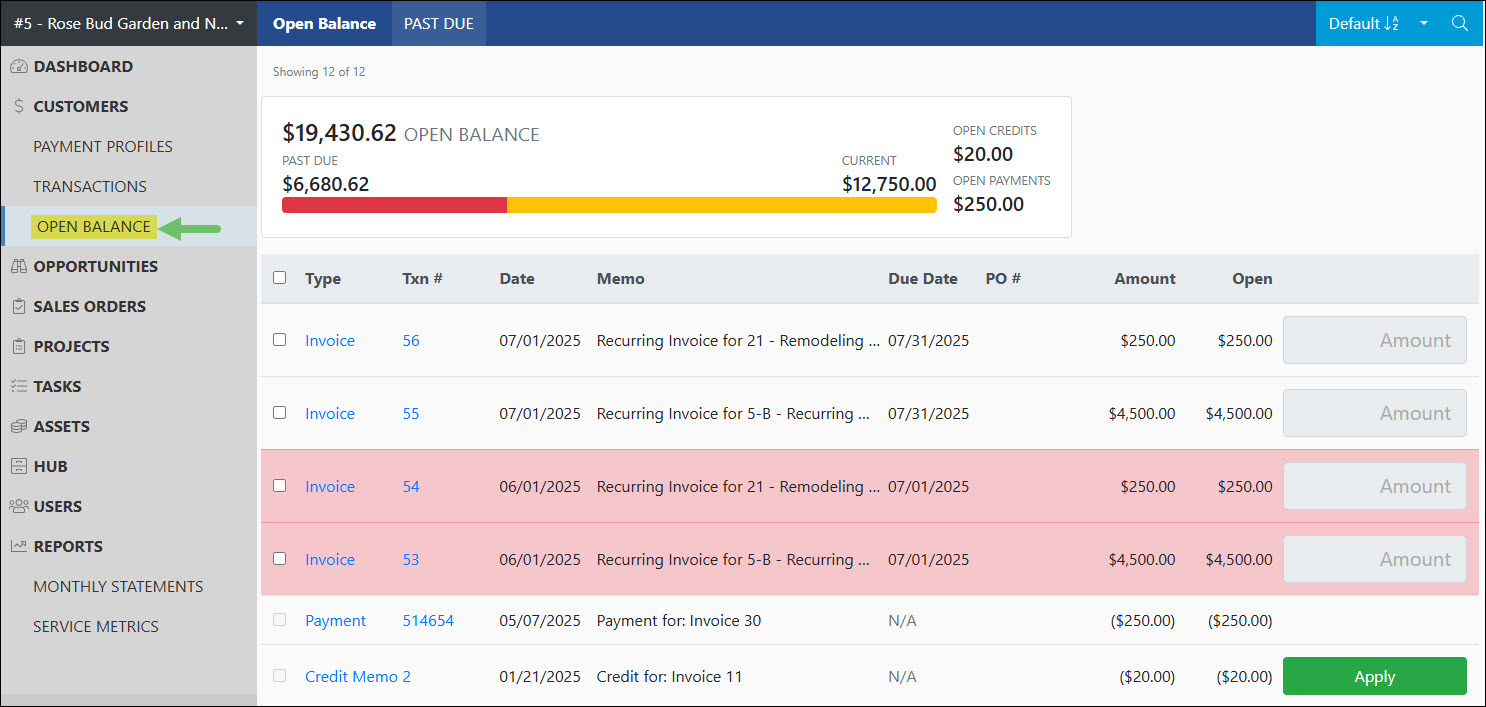
Example of the Location of the Open Balance Page in the Customer Portal

Permissions
The following permissions will need to be configured for the Contact’s Portal Role if they will be managing or viewing Open Balances in the Customer Portal:
- “Credits: Apply”
- “Payments: Add”
- “Transaction History: View”

Example of Open Balance Related Permissions for the Customer Portal

Learn more about managing Portal Roles and Permissions for the Customer/Vendor Portal by reviewing the Creating Portal Roles section in the Customer/Vendor Portal Guide.
Open Balance Page
Below is a screenshot illustrating how the Open Balance page appears and a description of what can be accomplished there.
- Summary: The summary area at the top of the Open Balance page will be the overall total dollar amount that is open. A bar graph will be displayed to indicate how much of the open balance is past due vs. current. To the right of the bar graph will have a total of open Credit Memos and open Payments.
- Type: Displays the type of Transaction that is accessible to the Customer. Clicking on the Transaction Type listed will open the Transaction in a new window to view additional details. A red highlight will appear on Transactions that are past due to indicate the lateness. Using the checkbox located next to each Invoice listed will allow you to use the option at the bottom of the list for Next: Select Payment Method.
- Txn #: Lists the number that has been entered onto the Transaction. Clicking on the Transaction number will open the Transaction in a new window to view additional details.
- Date: Shows the date that has been entered onto the Transaction.
- Memo: Will display any memo that has been entered onto the Transaction.
- Due Date: Displays the date that the Transaction is due for payment.
- PO #: Will only display information if viewing this list from the Vendor Portal.
- Amount: Shows the total amount that has been entered into the Transaction.
- Open: Displays the amount that is still open on the Transaction.
- Amount/Apply: Invoices listed will have a box where the amount you wish to pay on the specific Invoices can be entered. Open Credit Memos will have an Apply button in order to apply the open Credit amount to any of the open Invoices.
- Next: Once you have selected the Invoices you wish to pay and have entered the amount that should be paid per selected Invoice, click the option labeled Next: Select Payment Method.

Example of Actions and Information Available on the Open Balance Page in the Customer Portal

-
Opportunities
The Opportunities feature helps you manage potential sales of goods or services to your customers. For each Opportunity, you can track key details such as the estimated value, expected close-ratio, priority, and type. Opportunities in the Customer Portal can be accessed through the side menu.

Example of the Location of Opportunities in the Customer Portal

Permissions
The following permissions will need to be configured for the Contact’s Portal Role if they will be managing or viewing Opportunities in the Customer Portal:
- “Opportunities: View”

Example of Opportunities Related Permissions for the Customer Portal

Learn more about managing Portal Roles and Permissions for the Customer/Vendor Portal by reviewing the Creating Portal Roles section in the Customer/Vendor Portal Guide.
Note: In order for Opportunities to be visible within the Customer Portal, the option will need to be checked on the Opportunity for Visible to Contacts.

Example of the Location to Mark an Opportunity Visible on the Portal in Striven

Opportunities List
Below is a screenshot illustrating how the Opportunities list appears in the Customer Portal and a description of what can be accomplished there.
- Quick Filters: Allows the user to easily filter the list based on the status of the Opportunity or if they are set as the Contact within the Opportunity through the My Opportunities option.
- Search Filters: There are an array of search filters available to narrow down results listed in the Opportunities List such as:
- Opportunity #: Searches the list based on the number that has been assigned to the Opportunity.
- Opportunity: Narrows results based on the Opportunity name and description.
- Stage: Shows results based on the stage that the Opportunity resides in. Stages that are searchable and viewable on the Customer Portal will need to be marked as Visible on Customer/Vendor Dashboard within the settings.
- Contact: Narrows results based on the Contact that has been selected on the Opportunity.
- Date Range: Searches through the Opportunities list and updates results based on the created date.
- Opportunity: Lists the Opportunity number and name. Underneath the name will only display the current stage the Opportunity is in. The color bar next to the number and name will indicate the priority of the Opportunity.
- Contact: Lists the Contact that has been selected on the Opportunity.
- Date Created: Displays the date the Opportunity was initially created.
- Assignment: Lists who will be working on the Opportunity. If multiple people are assigned, their profile images will be stacked on top of each other. Hovering over the profile image will display the full list.
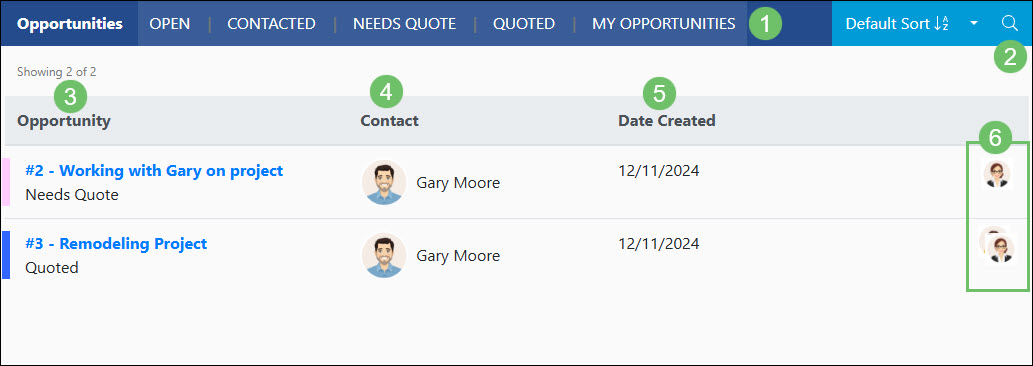
Example of the Actions and Information Available on the Opportunities List in the Customer Portal

Once you have clicked to access an Opportunity from the list, you will be able to view more details about the Opportunity. Below is a screenshot illustrating how an Opportunity appears in the Customer Portal and a description of what can be accomplished there.
- View Discussions: Navigates to the bottom of the page to the Discussions area in order to view current Discussion threads or begin a new conversation.
- Opportunity Info: Displays an array of information regarding the Opportunity such as:
- Stage: The current stage the Opportunity resides in.
- Type: The Opportunity Type that was selected on the Opportunity.
- Priority: Indicates the importance or priority of the potential work.
- Location: Displays the Customer’s Location name if it was selected on the Opportunity.
- Created: Displays the date and time the Opportunity was initially created.
- Description: Any description that was entered into the Opportunity will display for additional context or information.
- Assignees: Lists the people who are assigned to the Opportunity and will be completing or overseeing the potential work or next steps.
- Contact: Lists the Contact that is associated with the Opportunity.
- Attachments: Any attachments that have been uploaded to the Opportunity will be available for download. The employee who completed the upload will be displayed along with the date and time the upload took place.
- Discussions: Houses any Discussion threads that have been added to the Opportunity. Clicking the New Thread icon will autopopulate the assignees to easily begin communication as needed.

Example of an Opportunity in the Customer Portal

-
Sales Orders
Striven’s Sales Orders offer extensive flexibility, accommodating a wide range of services and goods. Sales Order Types can be configured for various purposes, including acting as a Quote or Contract, managing time and materials billing, or handling subscriptions. The Customer Portal enhances collaboration, allowing customers to view current or completed Sales Orders and approve pending ones. Sales Orders can be accessed in the Customer Portal by selecting the Sales Orders option in the side menu.

Example of the Sales Order Location in the Customer Portal

Permissions
The following permissions will need to be configured for the Contact’s Portal Role if they will be managing or viewing Sales Orders in the Customer Portal:
- “Sales Orders: View”
- “Sales Orders: Approve”

Example of Sales Order Related Permissions for the Customer Portal

Learn more about managing Portal Roles and Permissions for the Customer/Vendor Portal by reviewing the Creating Portal Roles section in the Customer/Vendor Portal Guide.
Sales Orders Page
Below is a screenshot illustrating how the Sales Orders page appears in the Customer Portal and a description of what can be accomplished there.
- Quick Filters: Allows the user to narrow the list based on the status of the Sales Orders or Orders they are selected in the Contact field on the Sales Order.
- Search Filters: There are an array of search filters available to adjust the results listed such as:
- Sales Order #: Narrows results based on the number that was assigned to the Sales Order.
- Name: Searches the list based on the name that was assigned to the Sales Order. Depending on the Sales Order Type, this field may not be accessible on a Sales Order.
- PO #: Bases results based on the PO # that was assigned to a Sales Order. This field is only searchable for Sales Orders that are set up as Contract Managed within the Sales Order Type.
- Status: Allows the user to search through Sales Orders based on the status the Sales Order resides in. Statuses that are searchable on the Customer Portal include Pending Approval, Approved, In Progress, Quoted, and Completed. By default, this search field will have the Pending Approval, Approved, and In Progress statuses selected.
- Sales Order Date Range: Searches the listed Sales Orders based on the Sales Order date that was entered on the Sales Order.
- Completion Date Range: Searches the listed Sales Orders based on when the Sales Order was marked as Completed.
- Approval Date Range: Searches the listed Sales Orders based on when the Sales Order was marked as Approved.
- Assigned To: Narrows results based on the Customer Contact that is selected within the Contact field on a Sales Order. This field is only searchable if the Customer Contact option is turned on within the Sales Order Type as a display field.
- Frequency: Adjust results to show either Sales Orders that are set up as One Time or Recurring.
- Sales Order: Lists the Sales Order number and name. Underneath the assigned number and name will also be listed the current status of the Sales Order. Clicking on the hyperlink listed in this field will open the Sales Order Info page for additional information regarding the Sales Order.
- Sales Order Date: Displays the date that has been entered into the Sales Order Date field on the Sales Order.
- Target Date: Shows the date that has been entered into the Target Date field on the Sales Order. To enter a Target Date on a Sales Order the Target Date option will need to be enabled within the Sales Order Type’s display fields.
- Total: Depicts the overall total dollar amount that has been added to the Sales Order based on the Items and prices entered.
- PO #: Displays the PO # that has been entered for the Sales Order. This column will only display information for Sales Orders that have Contract Managed turned on in the Sales Order Type and have been moved into the Approved status.
- Assigned To: Displays the Customer Contact that has been added to the Contact field within the Sales Order. This column will only display information if the Customer Contact field has been enabled within the Sales Order Type’s display fields.
- Approved By: Will display who completed the approval for the Sales Order if the Sales Order Type is set up as Contract Managed. If the Sales Order is awaiting approval, an Approve button will be available to update the status from the list view.

Example of the Information and Actions Available for Sales Orders in the Customer Portal

Sales Order Info
The Sales Order Info page will house an array of information and actions that can be taken regarding a specific Sales Order. Some information and actions may or may not be listed based on the Sales Order Type configurations. Below is a screenshot illustrating how the Sales Order Info page appears in the Customer Portal and a description of what can be accomplished there.
- View Discussions or Related To: To navigate to the Discussions section in the Sales Order click the View Discussions button. To view related entities to the Sales Order such as Projects or Tasks, click the Related To button.
- Sales Order Info: This section will display an array of information related to the Sales Order such as:
- Sales Order Total: Displays the overall total dollar amount that has been added to the Sales Order based on the Items and prices listed within the Sales Order.
- Sales Order Date: Displays the date that has been entered into the Sales Order Date field on the Sales Order.
- Target Date: Displays the date that has been entered into the Target Date field on the Sales Order. For a date to appear here the Target Date option will need to be enabled within the Sales Order Type’s display fields.
- Bill To/Ship To: Shows the Customer Location’s address that was selected for the Bill To and Ship To for the specific Sales Order.
- Sales Rep: Lists the Sales Rep that is related to the Sales Order. Clicking on the Start Discussion button next to the Sales Rep’s name will open a New Discussion window with the Sales Rep pre-selected to begin a conversation related to the Sales Order.
- Assigned To: Lists the Customer Contact that has been selected on the Sales Order. Clicking on the Start Discussion button next to the person’s name will open a New Discussion window with the person pre-selected to begin a conversation related to the Sales Order.
- Attachments: Lists any attachments that have been uploaded for the Sales Order. Any attachments uploaded for a specific Sales Order will be visible on the Customer Portal through viewing the Sales Order.
- Item Information: Lists any Items that have been added to the Sales Order. Information related to the item will be displayed such as the quantity, description, rate, amount, and whether or not the Item has been marked as taxable.
- Payment Schedule: If the Sales Order Type has been set up as Contract Managed and has not been approved, a Payment Schedule section will be shown which will display how much payment is expected at certain durations during the Sales Order’s lifecycle.
- Total Info: Displays the total dollar amount that is due for the Sales Order which is calculated based on a subtotal, shipping & handling amount, and the total tax amount.
- Approval Info: If the Sales Order Type has been set up as a Contract Managed, this section will either show the action to mark the Sales Order as approved or list the information that was captured at the time of approval.
- Discussions: Displays any Discussion Threads that have been related to the Sales Order. Internal Discussion Threads will only display if they have been marked Visible on Portal. Clicking the New Thread icon will start a new Discussion Thread with the Sales Rep assigned to the Sales Order.
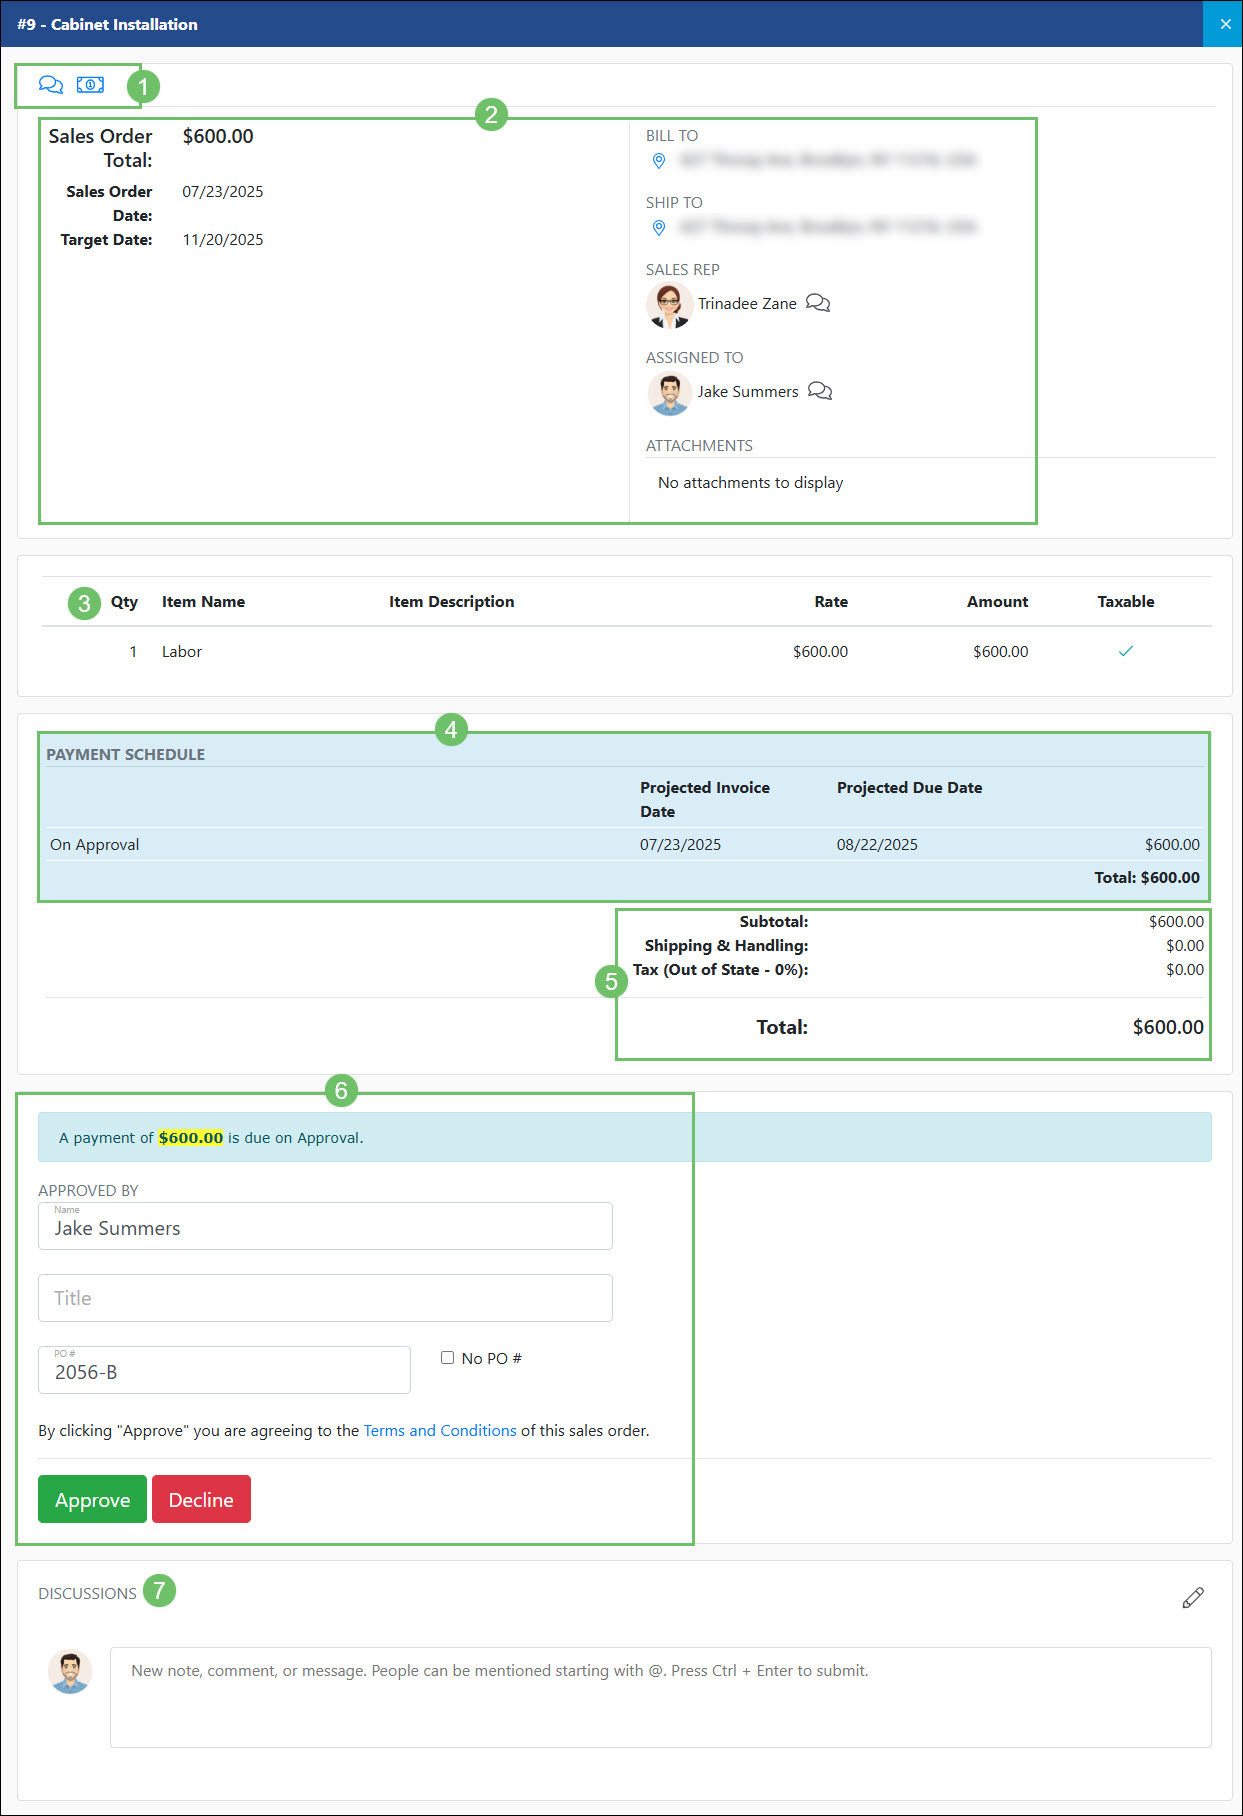
Example of Information and Actions Available on the Sales Order Info Page in the Customer Portal

-
Projects
Project Management offers an excellent framework for overseeing workflows, monitoring assignments, and delivering a progress summary. By making Projects accessible through the Customer Portal, you facilitate seamless collaboration with your Customers, providing them with immediate insight into the current status and specifics of ongoing Projects. To access Projects in the Customer Portal, navigate to the Projects option in the side menu.

Example of the Location of Projects in the Customer Portal

Portal Visibility
There are a few layers that you can decide on whether or not to make visible on the Customer Portal in regards to Projects. The first layer would be to make the Project itself visible on the Customer Portal through associating the Project with a Customer.

Example of the Customer Field on a Project

By default, the Milestones created in the Project will not be visible in the Customer Portal until the Visible on Portal option has been toggled on. This can be done when creating or editing the Milestone in the project.

Example of the Visible on Portal Option When Editing a Milestone

When viewing the Milestone View for a Project, the visibility on the Portal can also be toggled on or off by clicking the globe icon located on each Milestone. When the globe icon is set to a blue shade, this indicates that it will be visible to the Customer on the Portal. When the globe icon is shaded grey, this indicates that the Milestone is currently not visible on the Customer Portal.

Example of the Globe Icon on a Milestone to Indicate Visibility on the Customer Portal

Tasks within the Milestones will be visible on the Customer Portal when viewing a Project based on the Task Type configurations. To have the Project Tasks visible to the Customer through the Project, enable the Visible on Striven Customer/Vendor Portal option within the Task Type.
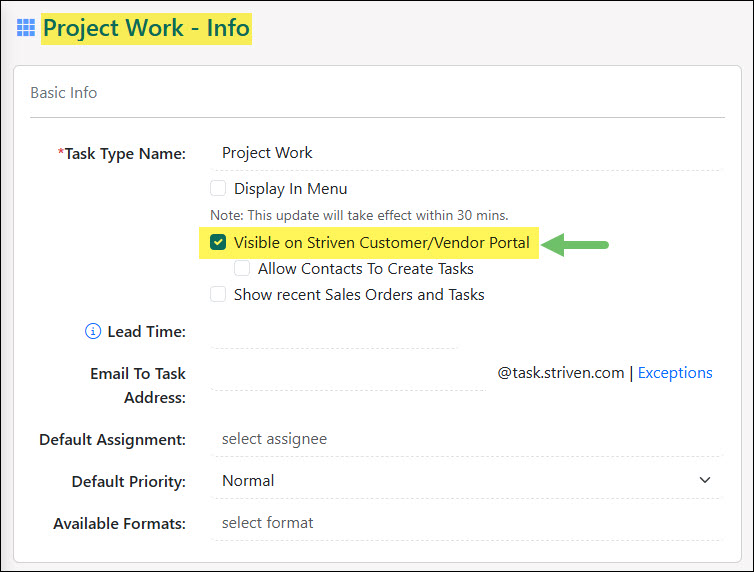
Example of the Visible on Customer Portal Option on Task Type

Permissions
The following permissions will need to be configured for the Contact’s Portal Role if they will be managing or viewing Projects in the Customer Portal:
- “Projects: View”
Note: Please review the Tasks section in this guide to learn more about permissions that will affect visibility of Tasks.
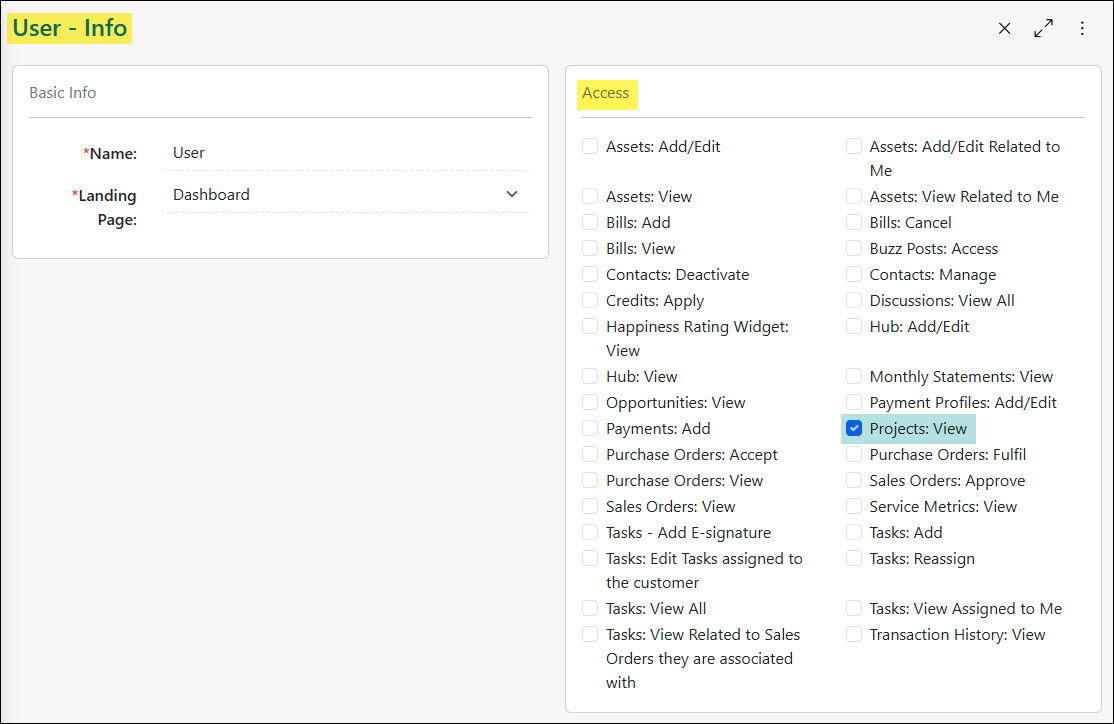
Example of Project Related Permissions for the Customer Portal

Learn more about managing Portal Roles and Permissions for the Customer/Vendor Portal by reviewing the Creating Portal Roles section in the Customer/Vendor Portal Guide.
Projects List
Below is a screenshot illustrating how the Projects list appears in the Customer Portal and a description of what can be accomplished there.
- Quick Filters: To easily filter based on the status of the Project, click on one of the statuses listed here. Using the My Projects filter will only show Projects where the logged in user is set as the Contact listed on the Projected.
- Search Filters: There are an array of search filters available on the Projects list to narrow results such as:
- Project: Searches based on the name of the Project.
- Status: Narrows list based on the status of the Project. Statuses include Pending, In Progress, Done, Canceled, and On Hold. By default, the In Progress status will be selected.
- Promise Date Range: Searches through the Projects list based on the date that has been entered into the Promise Date field on a Project.
- Assigned To: Narrows results based on the Customer Contact that has been selected on the Project.
- Project: Lists the Project number and name. Underneath the Project number and name will include the current status the Project resides in.
- Assigned To: Lists the Customer Contact that has been selected in the Contact field on a Project.
- Person Responsible: Lists the Employee that has been selected as the primary assignment of the Project.
- Promise Date: Lists the date that was entered into the Promise Date field on the Project.
- Status Note: Displays the Status Note that was last entered into the Project.

Example of the Information and Actions Available on the Projects List in the Customer Portal

Project Info
After clicking on Project from the Projects list you will be navigated to the Project Info page for more information regarding the details of the Project. Below is a screenshot illustrating how the Project Info page appears in the Customer Portal and a description of what can be accomplished there.
- View Icons: There is a number of easily accessed information through the icons located at the top of the Project. These icons include the following:
- Hub: Accesses the Project Hub which will include any documentation or uploads that have been added to the Project. In order for the upload to be visible through the Customer Portal, the Visible on Customer/Vendor Portal option will need to be toggled on for the uploaded content.
- Assignments: Navigates to a list of Assignments that have been added to the Project. This page will include the Assignee’s name, Assignment category, email, and the option to start a Discussion with the Assignees.
- Tasks: Will navigate to the bottom of the page where the Milestones and Tasks are listed within the Project.
- Discussions: Navigates to the bottom of the page where the Discussions section is located within the Project.
- Related To: Opens a Transactions Related To window which will list any related Sales Orders and Transactions that have been associated with the Project. This window will list the Transactions or Orders date, number, and total dollar amount.
- Status Note: Lists the latest Status Note that was entered into the Project along with the Employee who entered the note and the date and time it was added.
- Promise Date: Displays the date that was entered into the Promise Date field on the Project.
- Project Manager/Assigned To: Lists the primary Assignment of the Project along with the Contact that was added to the Project. A Start Discussion icon will be located next to each name listed in order to easily begin a Discussion Thread with the selected person.
- Objective: Displays the text and information that was added into the Objective section of the Project.
- Related Sales Orders: Lists the Sales Orders that have been associated with the Project. Clicking on the Sales Orders listed here will open the Order for further information.
- Switch View: Switches between the Milestone View and the Gantt Chart. The Gantt Chart will display the Tasks in a timeline view based on the Start and Due Dates listed on the Tasks.
- Show Completed Work/Show Done Tasks: Has the option to include completed Milestones through the Show Completed Work option. The Show Done Tasks option will include Tasks that have been marked as Done within the open Milestones listed.
- Milestones: Displays Milestones that have been marked as visible in the Customer Portal with any visible Tasks listed within each Milestone. Milestones will show the promise date in a calendar icon with the icon of the person who is responsible for each Milestone.
- Discussions: Houses Discussion Threads that are related to the Project. Using the New Thread icon will open a New Discussion window with the primary Assignment selected as the recipient to begin a conversation.
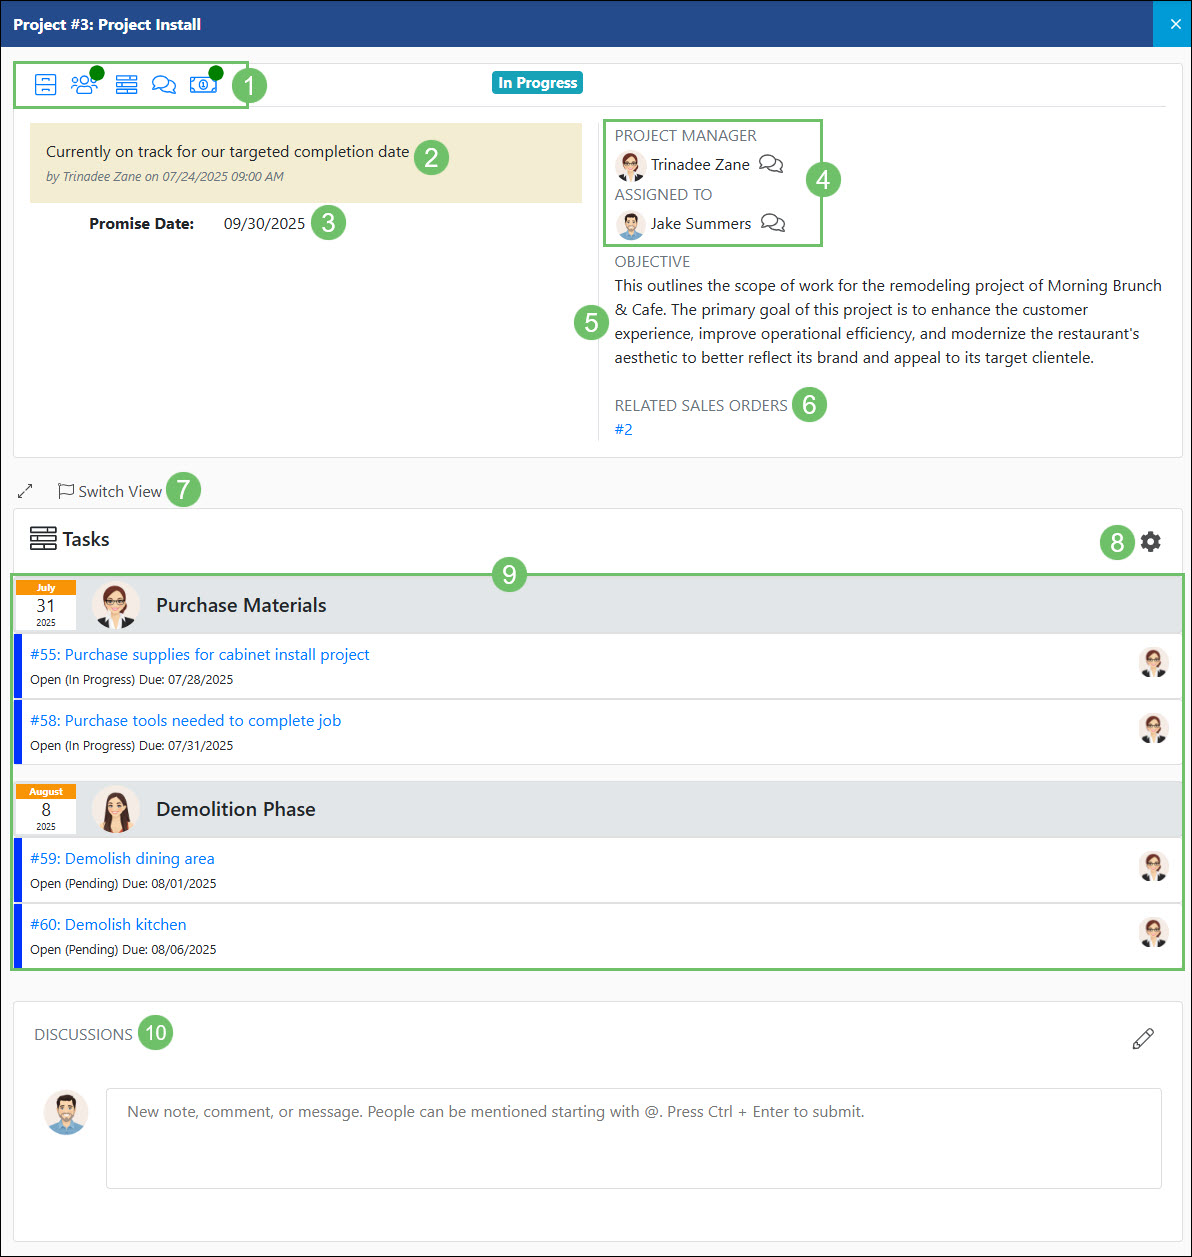
Example of Actions and Information Available on the Project Info Page in the Customer Portal

-
Tasks
The Tasks option of the Portal displays info for Customer related Tasks, including the Task The Tasks list offers a comprehensive overview of Tasks associated with a particular Customer that have been configured to be visible on the Portal. This feature streamlines collaboration and tracking of various work items, including services rendered and to-dos, ensuring efficient completion for the Customer. To access the Tasks list in the Customer/Vendor Portal, navigate to the Tasks option in the side menu.

Example of the Tasks List in the Customer Portal

Permissions
The following permissions will need to be configured for the Contact’s Portal Role if they will be managing or viewing Tasks in the Customer Portal:
- “Tasks – Add E-signature”
- “Tasks: Edit Tasks assigned to the customer”
- “Tasks: View All”
- “Tasks: View Related to Sales Orders they are associated with”
- “Tasks: Add”
- “Tasks: Reassign”
- “Tasks: View Assigned to Me”

Example of Tasks Related Permissions for the Customer Portal

Learn more about managing Portal Roles and Permissions for the Customer/Vendor Portal by reviewing the Creating Portal Roles section in the Customer/Vendor Portal Guide.
Tasks List
Below is a screenshot illustrating how the Tasks list in the Customer/Vendor Portal appears and a description of what can be accomplished there.
- Status Filters: By default, Tasks that are in an Open status will be displayed but you can easily switch to Tasks that Needs Approval, On Hold, Done, or My Tasks. Selecting My Tasks will only display Tasks where you are set as the Requested By.
- Search Filters: There are multiple search filters to help narrow down results in the Tasks list which include the following:
- Needs Approval: Narrows the list to only show Tasks that are waiting to be approved.
- Task #: Shows results based on the number assigned to the Task.
- Task: Will search through both the name and description that has been added to the Tasks.
- Task Type: Narrows search results based on the Task Type related to the Task. Only Task Types that have been marked as visible in the Portal will be available to select from this list.
- Status: Mult-select option to base results on the Task status including Open, On Hold, Done, and Canceled.
- Location: Lists the Tasks that have one of the Locations saved with the Customer.
- Assigned To: Allows the user to search for Tasks based on the Contact or Employee who is assigned to the Task.
- Requested By: Lists the Tasks based on the Contact who is set in the Requested By field on the Task.
- Due Date: Filters the list based on the To and From dates entered for the Due Date on the Task.
- Date Created: Filters the list based on the To and From dates entered for the date the Task was created.
- Date Completed: Filters the list based on the To and From dates entered for the date the Task was marked as Done.
- Add New: Will initiate the process to add a new Task that will automatically be related to the Customer.
- Task: Lists the number and name associated with the Task. Clicking on the hyperlink in this column will open up the Task for more details.
- Requested By: Lists the person who is set in the Requested By field on the Task.
- Created: Displays the date and time the Task was created.
- Modified: Displays the date and time that the Task was last updated or modified.
- Due Date: Shows the date that is set for the Due Date field on the Task. Both the date and time will display if the Task Type has time included with the due date.
- Related To: Hyperlinks any Sales Orders or Projects that are related to the Task.
- Assigned To: Shows the Employees, Pools, or Teams that the Task is assigned to.

Example of the Information and Actions Available on the Tasks List in the Customer Portal

Add Task
Clicking on the Add New button located on the Tasks list will open the New Task page where the user can enter information important to note within the Task. Below is a screenshot illustrating how the New Task page in the Customer/Vendor Portal appears and a description of what can be accomplished there.
- Task Name: The text entered here will become the Task name once it has been saved.
- Priority: Allows the user to select the priority of the Task. By default, the Normal priority will be set within this field.
- Type: The options listed here will only include Types that have been configured within the Task Type to Allow Contacts To Create Tasks. The Location field may appear after the Type is selected depending on the configuration of the Task Type.
- Attachments: Allows the user to upload any images or documents that will then be accessible as attachments when viewing the Task.
- Assignment: Options to select for the Task assignment will include the User’s fellow Contacts, the Employee who may be set as the default assignment at the Task Type, or Employees that have been assigned to the Customer and marked as visible on the Portal.
- Description: A rich editor which allows for text to be added to the Task for additional information or context.

Example of the New Task Page in the Customer Portal

Task Info
The Task Info page in the Portal will display additional information regarding the Task that may not be visible from the list view. Information included on this page may vary depending on how the Task Type has been configured. Below is a screenshot illustrating how the Task Info page in the Customer/Vendor Portal appears and a description of what can be accomplished there.
- Task # and Name: Displays the name and number that has been assigned to the Task.
- Task Info: Shows an array of information related to the task. Depending on how the Task Type is configured, not all fields may appear in this section.
- Task Info: Shows an array of information related to the task. Depending on how the Task Type is configured, not all fields may appear in this section.
- Type: Shows the Type that has been selected on the Task. This field will display regardless of the Task Type configurations.
- Budget: Displays the numerical value that has been set for the budget of the Task. This field may or may not appear depending on how the Task Type is configured.
- Start Date: Shows the start date of the Task. Depending on how the Task Type is configured, this field may not appear and the start time may or may not be displayed.
- Due Date: Displays the due date that has been set on the Task. Depending on how the Task Type was configured, the due time may also be shown.
- Created Date: Shows both the date and time that the Task was created. This field will display regardless of the Task Type configurations.
- Related To: This section will have other entities that are related to the Task such as:
- Sales Order: Shows the Sales Order that has been selected on the Task. This field will be hyperlinked to easily access the related Sales Order in the Customer Portal. This field may or may not appear depending on the Task Type configurations.
- Project: Displays the Project that has been selected on the Task. The Project will only display in this area if the Customer has been related not only to the Task, but the Project as well. This field may or may not appear depending on the Task Type configurations.
- Milestone: Shows the Milestone that the Task currently resides in. The Milestone will only appear if it is selected on the Task and has been marked visible on the Portal. This field may or may not appear depending on the Task Type configurations.
- Requested By: Displays the person who has been set in the Requested By field on the Task. A Discussions icon will appear next to the name in order to easily begin a Discussion Thread with the specific person.
- Location: Shows the Location that has been selected on the Task. Clicking on the View on map icon next to the Location name will open the address in Google Maps. This field may or may not appear depending on the Task Type configurations.
- Attachments: Lists any attachments that have been uploaded to the Task and are available for download. Only attachments that have been marked as visible on the Portal will appear within this area.
- Assignees: Will display any Employees, Pools, or Teams that have been added as assignees to the Task. A Discussions icon will appear next to each assignment in order to easily begin a Discussion Thread with the specific person.
- Assets: Lists any Customer Assets that have been added to the Task. Clicking on an Asset listed here will open the Asset Info page for additional information. The current status of the Asset will be shown in parentheses next to the Asset name. This field may or may not appear depending on the Task Type configurations.
- Description: Shows any description that has been added to the Task for additional information or context.
- Discussions: Allows the user to add any notes, comments, or start a conversation with the assignees of the Task. Clicking the New Thread icon will automatically associate the new Discussion Thread with the assignees of the Task.

Example of the Task Info Page in the Customer Portal

-
Assets
Customer Assets encompass a broad range of tangible and intangible items and information that an organization services or manages for a customer, all of which are crucial to their operations and well-being. Effective Customer Asset management is fundamental to providing high-quality service, ensuring customer satisfaction, and building long-term relationships, requiring robust tracking systems, skilled personnel, and a clear understanding of each Asset’s importance to the customer. Assets can be accessed by the Customer through the Customer Portal by navigating to Assets in the side menu.
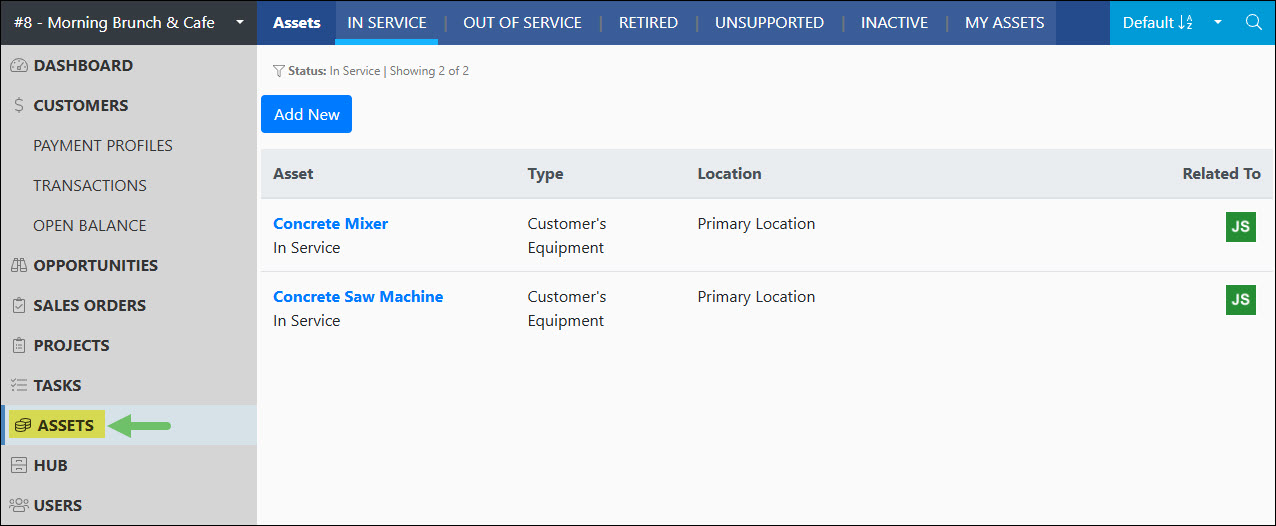
Example of the Location of Assets in the Customer Portal

Permissions
The following permissions will need to be configured for the Contact’s Portal Role if they will be managing or viewing Assets in the Customer Portal:
- “Assets: Add/Edit”
- “Assets: View”
- “Assets: Add/Edit Related to Me”
- “Assets: View Related to Me”

Example of Asset Related Permissions for the Customer Portal

Learn more about managing Portal Roles and Permissions for the Customer/Vendor Portal by reviewing the Creating Portal Roles section in the Customer/Vendor Portal Guide.
Note: Assets will only appear on the Customer Portal if the Asset Type has been configured with the option toggled on for Visible on Customer/Vendor Portal.

Example of an Asset Type Configured to be Visible on the Customer Vendor Portal

Assets List
Below is a screenshot illustrating how the Assets list in the Customer Portal appears and a description of what can be accomplished there.
- Quick Filters: Allows the user to easily filter for Assets listed based on their current status. Statuses include In Service, Out of Service, Retired, Unsupported, and Inactive. An additional filter is available for My Assets which will filter the list based on Assets the Contact is related to.
- Search Filters: There are an array of search filters available to narrow results for the Assets listed such as:
- Asset: Narrows results based on the Assets name.
- Type: Filters results to only include certain Asset Types in the list.
- Status: Adjusts list to only include certain Asset statuses.
- Expiration Date: If the Expiration Date option is enabled within the Asset Type this search filter can be used to narrow results based on when the Asset is set to expire.
- Assigned To: Searches the Assets listed based on the Contact that is set to be related to the Asset.
- Maintenance Date: Although the maintenance dates entered are not visible on the Customer Portal, the Contact can still filter the list based on when maintenance for the Asset has occurred or been scheduled.
- Assets I Follow: Employees can configure additional Contacts to follow Assets when logged into Striven. Although this list is not visible on the Customer Portal, this search filter can still narrow down results based on who is set up to follow certain Assets.
- Add New: Will open the New Asset page where the Contact can create an Asset to be tracked.
- Asset: Lists the Asset name with the current status of the Asset listed underneath the name. Clicking on the Asset name will open the Asset Info page for additional information.
- Type: Displays the Asset Type that was configured for the Asset.
- Location: Shows the Customer’s Location name that was associated with the Asset.
- Related To: Displays the Contact’s profile image that was set as related to the Asset.
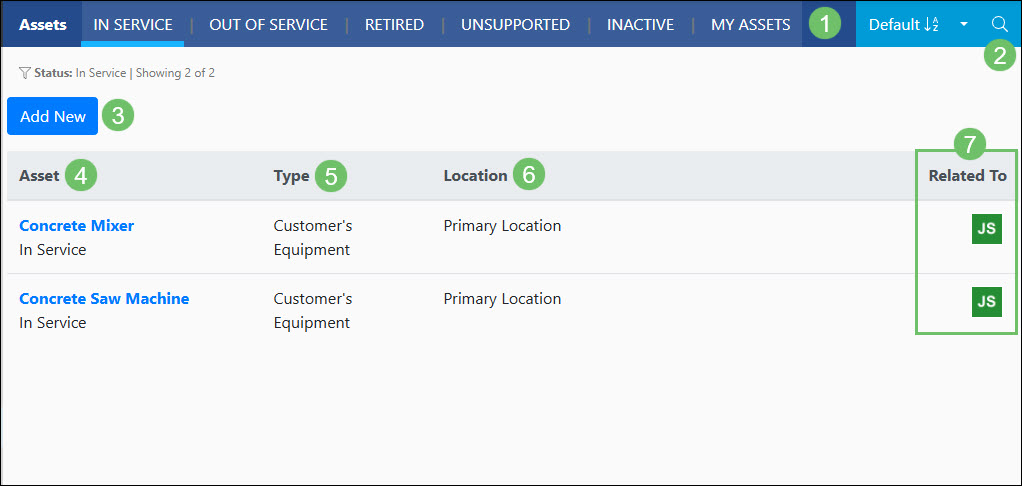
Example of the Actions and Information Available on the Assets List in the Customer Portal

Clicking on the Asset’s name from the Assets list will open the Assets Info page for additional information. Below is a screenshot illustrating how the Asset Info page in the Customer Portal appears and a description of what can be accomplished there.
- Hub: Navigates to the Asset’s Hub to manage any documents or uploads that have been added for the Asset.
- Asset Info: There is an array of information regarding the Asset that can be viewed by the Customer Contact such as:
- Type: Shows the type that is associated with the Asset.
- Name: Displays the Asset name that was added when the Asset was created.
- Location: Lists the Customer’s Location that was associated with the Asset.
- Status: Indicates the current status that the Asset resides in.
- Date Purchased: Shows the date that the Asset was initially purchased. This field will only be available if it was enabled in the Asset Type.
- Purchase Price: Lists the price that the Asset was purchased for.
- Present Value: Displays the amount that the Asset currently is valued at. This field will only be available if it was enabled in the Asset Type.
- Related To: Displays any Contacts that have been associated and related to the Asset. Next to the person’s name will be the option to Start Discussion or Remove them from the Related To list.
- Image: Gives the option to upload an image or the image that has already been uploaded for the Asset.
- Create Task: Navigates to the New Task page which will allow the Contact to create a Task that will automatically be related to the Asset.

Example of the Actions and Information Available on the Asset Info page in the Customer Portal

-
Hub
The Hub provides access to documents, posts, and links that are saved in the Customer’s or Company’s Hub and made visible on the Customer Portal. Depending on the Portal permissions set, one can add documents, posts and links to the Customer’s Hub here as well. Hub can be accessed by the Customer through the Customer Portal by navigating to the Hub option in the side menu.
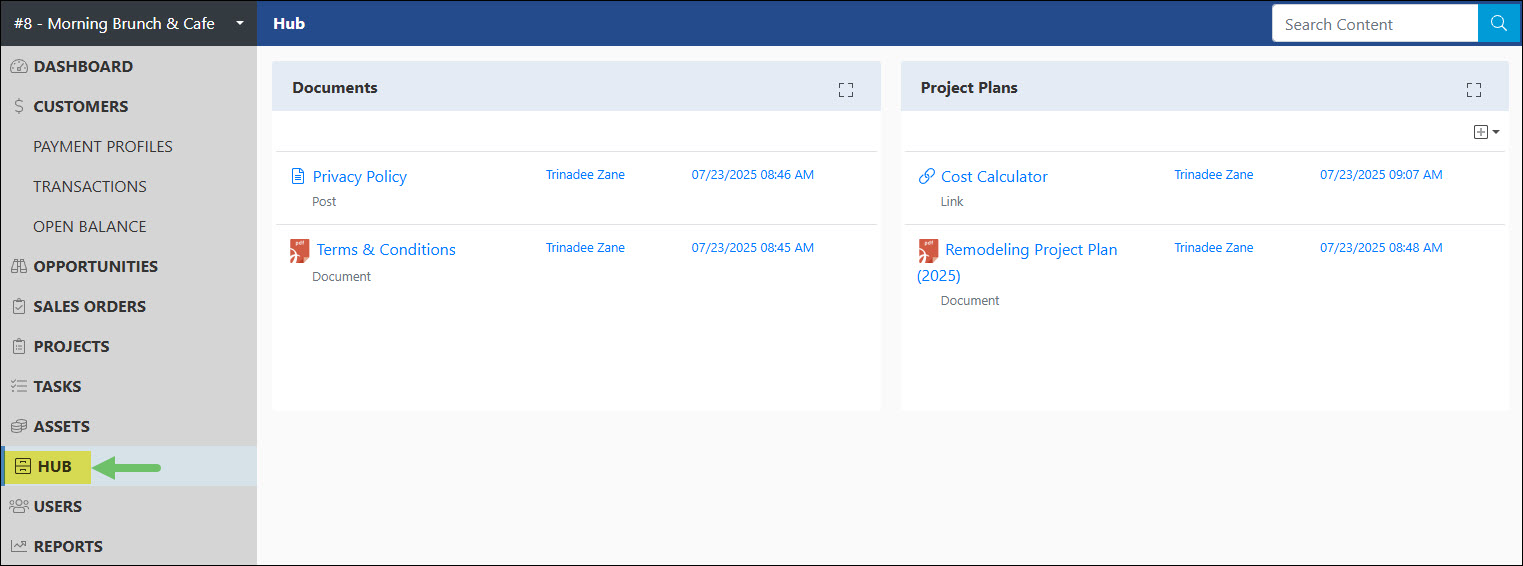
Example of the Location of Hub in the Customer Portal

Permissions
The following permissions will need to be configured for the Contact’s Portal Role if they will be managing or viewing Hub in the Customer Portal:
- “Hub: View”
- “Hub: Add/Edit”

Example of Hub Related Permissions for the Customer Portal

Learn more about managing Portal Roles and Permissions for the Customer/Vendor Portal by reviewing the Creating Portal Roles section in the Customer/Vendor Portal Guide.
Hub Page
Below is a screenshot illustrating how Hub appears in the Customer Portal and a description of what can be accomplished there.
- Content Group: Lists the name of the content group which is used to organize and group the uploaded content in a more organized manner.
- Expand Content Group: Will expand and only show the uploads in the selected group in order to have an easier view.
- Uploads: Lists the content that was uploaded for each content group. Listed with each content uploaded will include the name with the content type underneath the name, who uploaded the content, and the date/time stamp on when the documentation was uploaded.
- Search Content: Allows the user to narrow down results of what is listed in Hub based on what is searched in this field.
- Upload Content: Allows the user to upload additional content to the Customer Portal Hub. This option will only be available for content groups that are located within the Customer’s Hub and not available for content groups listed within the Company’s Hub.

Example of the Information and Actions Available for Hub in the Customer Portal

Company Hub
Users do have the ability to add documentation to the Company Hub and toggle on the option for Visible on Customer/Vendor Portal. Toggling this option on will make the upload visible to all Customer Contacts who have access to Hub when logged into the Customer Portal.
For more information about using the Company’s Hub in Striven, please review our Hub Guide.

Example of the a Document on the Company Hub Toggled for Visible on Customer Vendor Portal

Customer Hub
When uploading to the Customer’s Hub, the Visible on Customer/Vendor Portal will need to be toggled on in order for the content to appear to the Customer’s Contact when they are viewing Hub within the Customer Portal.
For more information about using Customer’s Hub in Striven, please review the Customer/Vendor Collaboration section of our Customer/Vendor Management Guide.

Example of the a Document on the Customer’s Hub Toggled for Visible on Customer Vendor Portal

-
Users
The Users list in the Customer Portal is a centralized location where the Contacts of the Customer can add, remove, and manage the Portal Users. Assigning Portal Roles, titles, locations and much more can be added or updated per Contact in order to make sure the most up to date information is tracked with the Contact Profile. The Users list can be accessed by selecting the Users option in the side menu of the Customer Portal.

Example of the Users Page Location in the Customer Portal

Permissions
The following permissions will need to be configured for the Contact’s Portal Role if they will be managing or viewing Users in the Customer Portal:
- “Contacts: Deactivate”
- “Contacts: Manage”

Example of User Related Permissions for the Customer Portal

Learn more about managing Portal Roles and Permissions for the Customer/Vendor Portal by reviewing the Creating Portal Roles section in the Customer/Vendor Portal Guide.
Users List
Below is a screenshot illustrating how the Users list in the Customer Portal appears and a description of what can be accomplished there.
- Add User: Will initiate the process to add a new user to the Customer Portal.
- Import Users: Allows multiple users to be imported into the Customer Portal through the use of an import tool.
- Search Filters: There are an array of search filters available to narrow results listed such as:
- Name: Narrows search results based on the Contact’s name.
- Locations: Adjusts results based on the Customer Location that is saved with the Contact.
- Roles: Searches through the list based on the Portal Role that has been assigned to the Contact.
- Status: By default, Contacts in an Active status will be displayed. Update this search filter to view Contacts that have been marked as Inactive.
- Name: Lists the name of the Contact with their title listed underneath the name. Clicking on the name of the Contact will open the User Info list for more additional information.
- Email: Displays the email that is associated with the Contact. Clicking on the email will initiate your computer’s designated email program to initiate an email to be sent.
- Phone: Lists the phone number that is set as the Contact’s primary phone. Clicking on the phone number will initiate your computer’s calling program to initiate a phone call with the Contact.
- Location: Displays the Customer’s Location name that has been associated with the Contact.
- Role: Shows the Portal Role that has been assigned to the Contact.
- Send Welcome Email(s): After the checkbox next to the Contact’s names have been checked, this option can be used to send a welcome email to the users in order for them to set up a log in password for the Customer Portal.
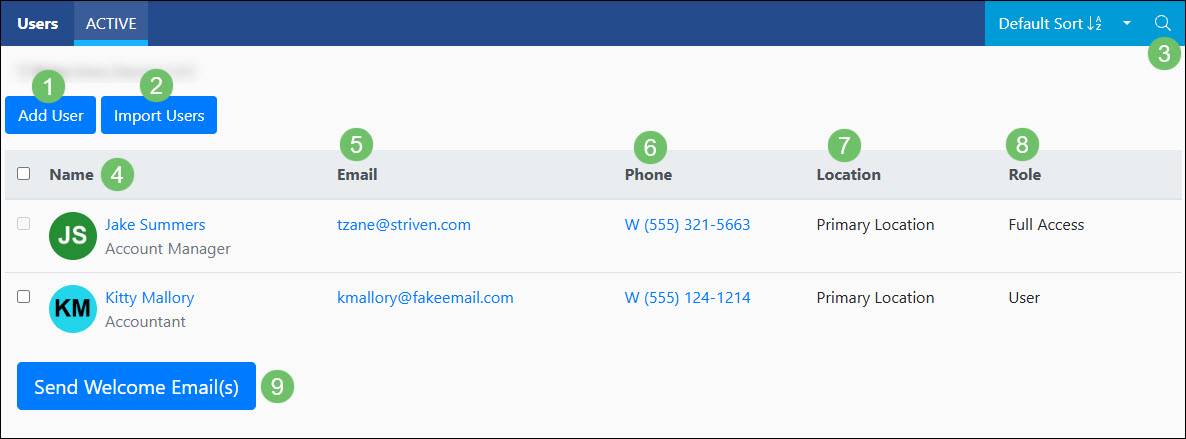
Example of the Actions and Information Available on the Users Page in the Customer Portal

User Profile
The Users Profile page gives a more in depth view of information that is stored with the Contact. Below is a screenshot illustrating how a User Profile page in the Customer Portal appears and a description of what can be accomplished there.
- Profile Image: Allows the user to upload a profile image related to the Contact.
- Email: Lists the Contact’s log in email for the Customer Portal.
- Name: Shows the name that is saved with the Contact. Clicking on the vertical ellipse icon next to the Contact’s name will give additional options to add such as a prefix, middle name, and suffix.
- Title: Displays the title that has been added for the Contact.
- Location: Lists the Customer Location name that is assigned to the Contact. Viewing the Location in the dropdown menu will display the entire address.
- Portal Access: Grants the Contact access to the Portal. Once this option is checked the following will be available:
- Role: The Portal Role that is assigned to the Contact. This will determine the access they will have once logged into the Customer Portal.
- More About This Portal Role: Opens a dialog window which will list out the Portal Permissions that are assigned to the Portal Role.
- Phone Number: Displays any phone numbers that have been added to the Contact’s information. Clicking the Add new phone number link will allow the user to add additional phone numbers to the Contact Profile.

Example of the Actions and Information Available on a User Profile Page in the Customer Portal

Import Users
If multiple users are being added, the Import Users feature can be used to add multiple users into the Customer/Vendor Portal at once. On the Users page in the Customer/Vendor Portal, the Import Users button can be clicked to access the Import Users feature.
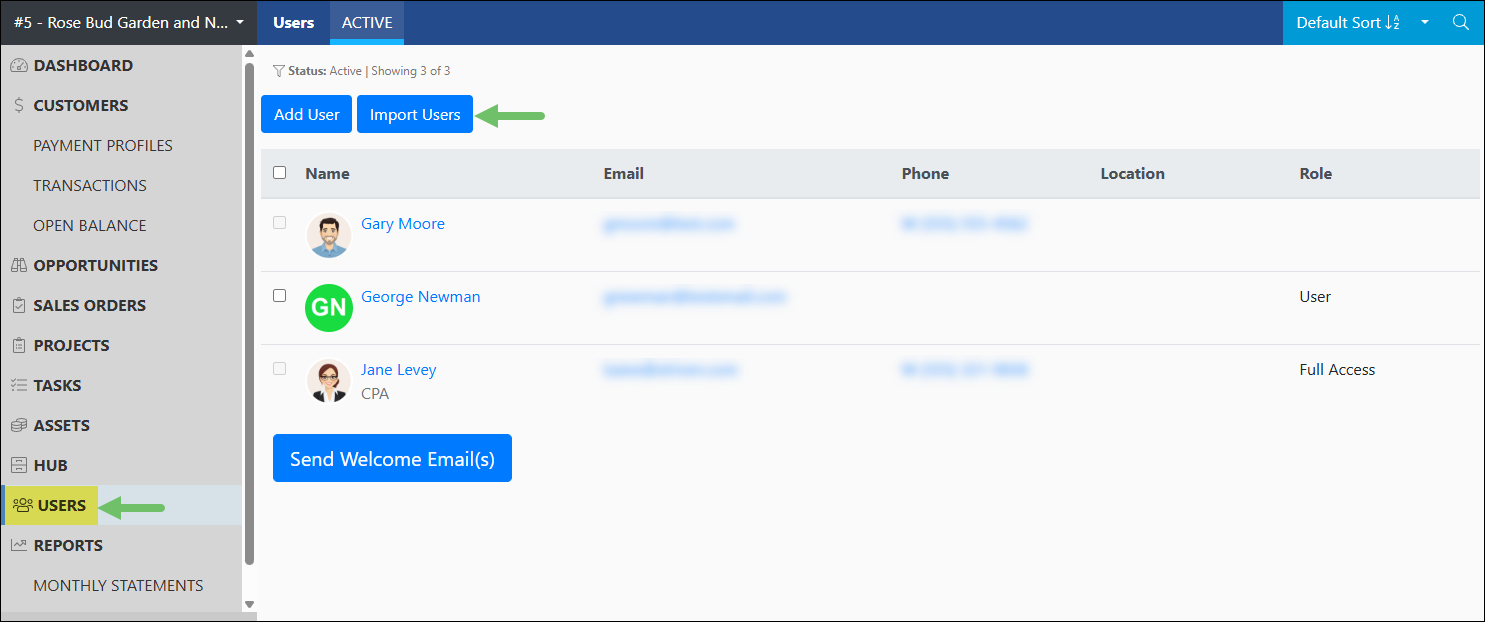
Example of the Import Users Button on the Users Page

Below is a screenshot illustrating how the Import Users page appears and a description of what can be accomplished there.
- Upload File: Once you have your import file ready, the file can be added to this area in order to continue with the importing process. The file should be in a .csv or .txt format and with a max file size of 100 MB.
- Download Sample File: Downloads a file with all of the available information that can be imported as header columns.
- View Column Mapping: Will lists the available information that can be imported for the users along with a description of what the type of information should be included.
- Upload: Once you have the file selected that is to be imported, the Upload button can be clicked to continue the importing process.
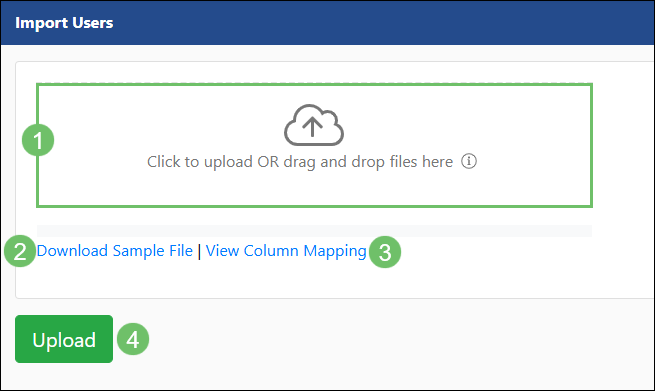
Example of the Import Users Page

-
Reports
Within the Reports section in the Customer Portal Monthly Statements and Service Metrics can be viewed by Customer Contacts with access to the Portal. Below is a description of how these reports can be accessed and what information is available within each.
Monthly Statements
Monthly Statements offer Customers a convenient way to stay informed and appreciate the value your business provides. Accessible through the Customer Portal, Customers can view or print statements at their leisure, without needing Employee assistance.
Monthly Statements can be configured to include an array of information not limited to financial. Learn more about setting up Monthly Statement Templates by reviewing our Monthly Statements Guide.
To access Monthly Statements in the Customer Portal, navigate to the Monthly Statements option located under Reports in the side menu.

Example of the Location of Monthly Statements in the Customer Portal

Permissions
The following permissions will need to be configured for the Contact’s Portal Role if they will be viewing Monthly Statements in the Customer Portal:
- “Monthly Statements: View”
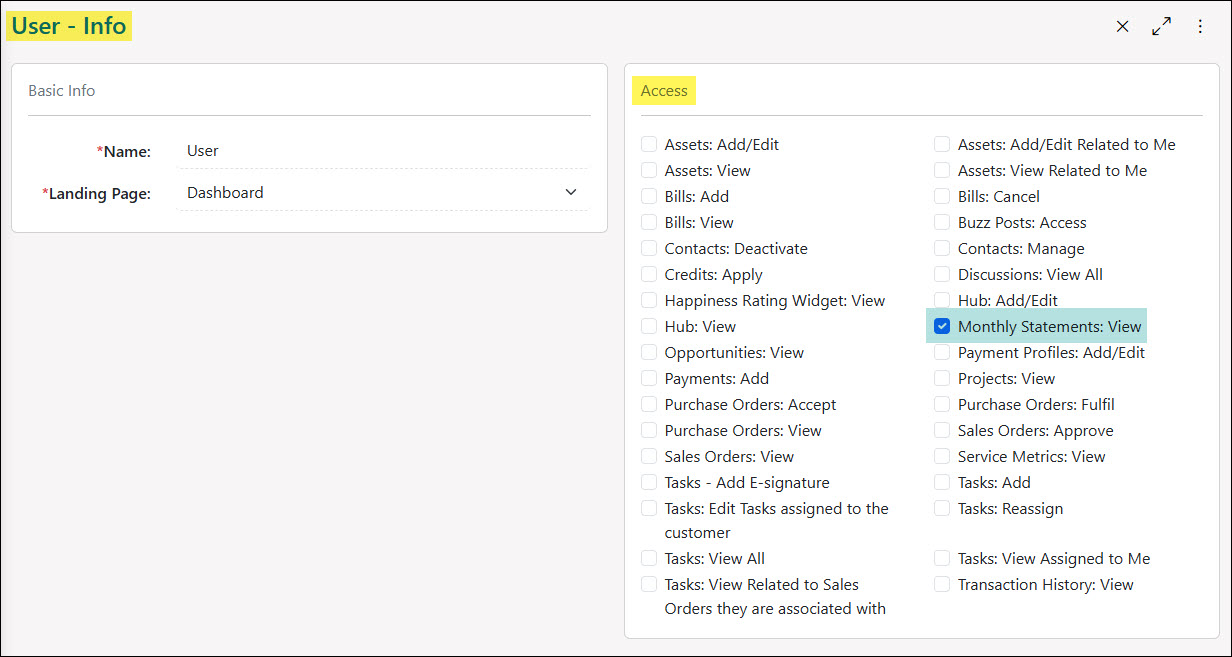
Example of Monthly Statement Related Permissions for the Customer Portal

Learn more about managing Portal Roles and Permissions for the Customer/Vendor Portal by reviewing the Creating Portal Roles section in the Customer/Vendor Portal Guide.
Generating Monthly Statement
To generate a Monthly Statement, simply select a month and year in the Select Month field. Once selected, click the View button located under the selected month and year in order to view the month’s statement.

Example of the Monthly Statements Page in the Customer Portal

Viewing the Monthly Statement
Monthly Statements may vary on what is shown depending on how the Monthly Statement Template has been configured. Below is a screenshot illustrating how a Monthly Statement may appear in the Customer Portal and a description of what can be accomplished there.
- Pages: Displays the pages that are included with the Monthly Statement.
- Monthly Statement: An example of a Monthly Statement. Information included on the Monthly Statement may vary depending on the configuration of the Monthly Statement Template. Each section included in the Monthly Statement has the title hyperlinked in order to easily access the information regarding that topic in the Customer Portal.
- Actions: There are a couple actions available when viewing a Monthly Statement such as:
- Download: Saves the Monthly Statement on your computer or device as a PDF file.
- Print: Initiates your computer or device printing functionality in order to print the Monthly Statement.

Example of the Information and Actions Available on a Monthly Statement in the Customer Portal

Service Metrics
The Service Metrics Report displays the Customer’s Service Metrics based on your settings configuration for the report. Task performance is broken down by important information such as Requested By, Location, and more. This information is useful in visualizing the progress of work being completed for your Customer.
Learn more about setting up the Service Metrics report in the Customer Portal by reviewing the Customer/Vendor Portal Service Metrics section from our Task Management Guide.
To access the Service Metrics report in the Customer Portal, navigate to the Service Metrics option located under Reports in the side menu.
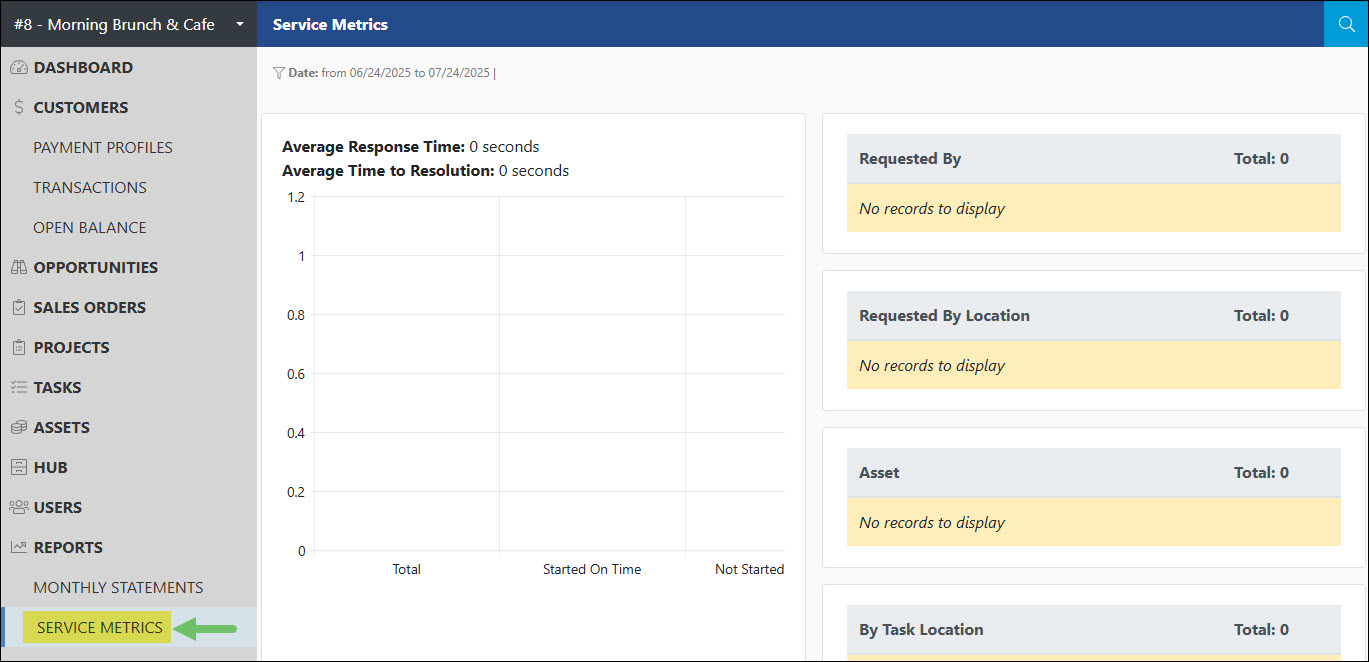
Example of the Location of Service Metrics in the Customer Portal

Permissions
The following permissions will need to be configured for the Contact’s Portal Role if they will be viewing Service Metrics in the Customer Portal:
- “Service Metrics: View”

Example of Service Metrics Related Permissions for the Customer Portal

Learn more about managing Portal Roles and Permissions for the Customer/Vendor Portal by reviewing the Creating Portal Roles section in the Customer/Vendor Portal Guide.
Viewing Service Metrics
Below is a screenshot illustrating how the Service Metrics report appears in the Customer Portal and a description of what can be accomplished there.
- Average Response and Resolution: Displays the average amount of time it took for both the Task to be responded to and for the Task to be resolved and marked done.
- Chart View: Displays a chart view of completed Tasks grouped by the Total, Started On Time, Not Started On Time, Tasks per status, and the Average Per Day. Clicking on a bar listed in this chart will open a detailed list of which Tasks are included in the count.
- Search Filters: There are a few search filters available to narrow down what is being reported on such as:
- Task Type: Filters the Service Metrics report based on certain Task Types. Task Types that are searchable in this filter will only include Task Types that have been marked as visible on the Customer Portal.
- Date Range: Adjusts the report to only show Tasks completed within a certain date range.
- Details: Completed Tasks will be broken down by the following information in this section:
- Requested By: Displays the total number of Tasks completed per Requested By on the Tasks. Clicking on results listed here will open a detailed list of which Tasks are included in this count.
- Requested By Location: Based on the Location that is selected within the Contact’s information that is set as the Requested By on the Tasks. Clicking on results listed here will open a detailed list of which Tasks are included in this count.
- Asset: Includes Tasks that have a Customer’s Asset selected on the Tasks.Clicking on results listed here will open a detailed list of which Tasks are included in this count.
- By Task Location: Based on the Customer Location that is selected by on the Tasks. Clicking on results listed here will open a detailed list of which Tasks are included in this count.

Example of the Information and Actions Available on the Service Metrics Report in the Customer Portal

Clicking on results listed in the Service Metrics report will open a window in order to view a detailed list of Tasks making up the count that is being reported on. This window will include a hyperlink to the Task to view more details along with the Task Date, Completion Date, and the calculated Response Hours and Resolution Hours.

Example of the Tasks Details from the Service Metric Report

Vendor Portal Options
-
Vendor Portal Menu Options
Like the Customer Portal Menu explained above, the Vendor Portal Menu is very similar and also located on the left side of the Portal screen. It too is a useful tool to navigate through the different areas of the Vendor Portal. Many of the options are the same as with the Customer Portal we reviewed above, such as the Dashboard, with the exception of some of the available widgets. Other similar Portal Menu options include Tasks, Hub, and Users. The difference in the Vendor Portal from the Customer Portal would be the Vendor financial Transactions and Vendor Billing information.
As with the Customer Portal, the options available for your Vendors to view here depend on which Portal content and permissions you have selected to make visible in your Vendor Portal Roles. Below you will find an example of how a Vendor Dashboard Menu appears on the Portal, followed by an explanation of each menu option in the sections that follow.
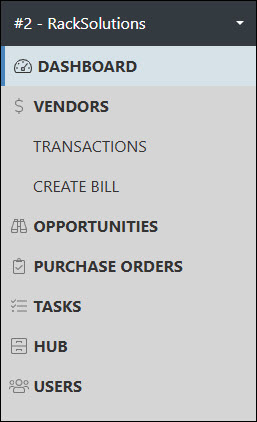
Example of the Vendor Portal Menu Options

-
Vendors
There are 2 options available in this menu section: Transactions and Create Bill. Each section is described below.
Transactions
The Transactions list displays a history of the Vendor’s Transactions, including Bill Credits, Bills, CC Charges, CC Charges: Bill Payments, CC Refunds, Checks, Checks: Bill Payments, Checks: Refunds, Checks: Tax Payments, Checks: Service Charges, and Journal Entries that have been related to the Vendor. By default, the list will show all Transactions but can be adjusted to show only open or past due. The Transactions list is located in the side menu of the Vendor Portal located under the Vendors option. Transactions that have been voided will not be accessible through the Vendor Portal.
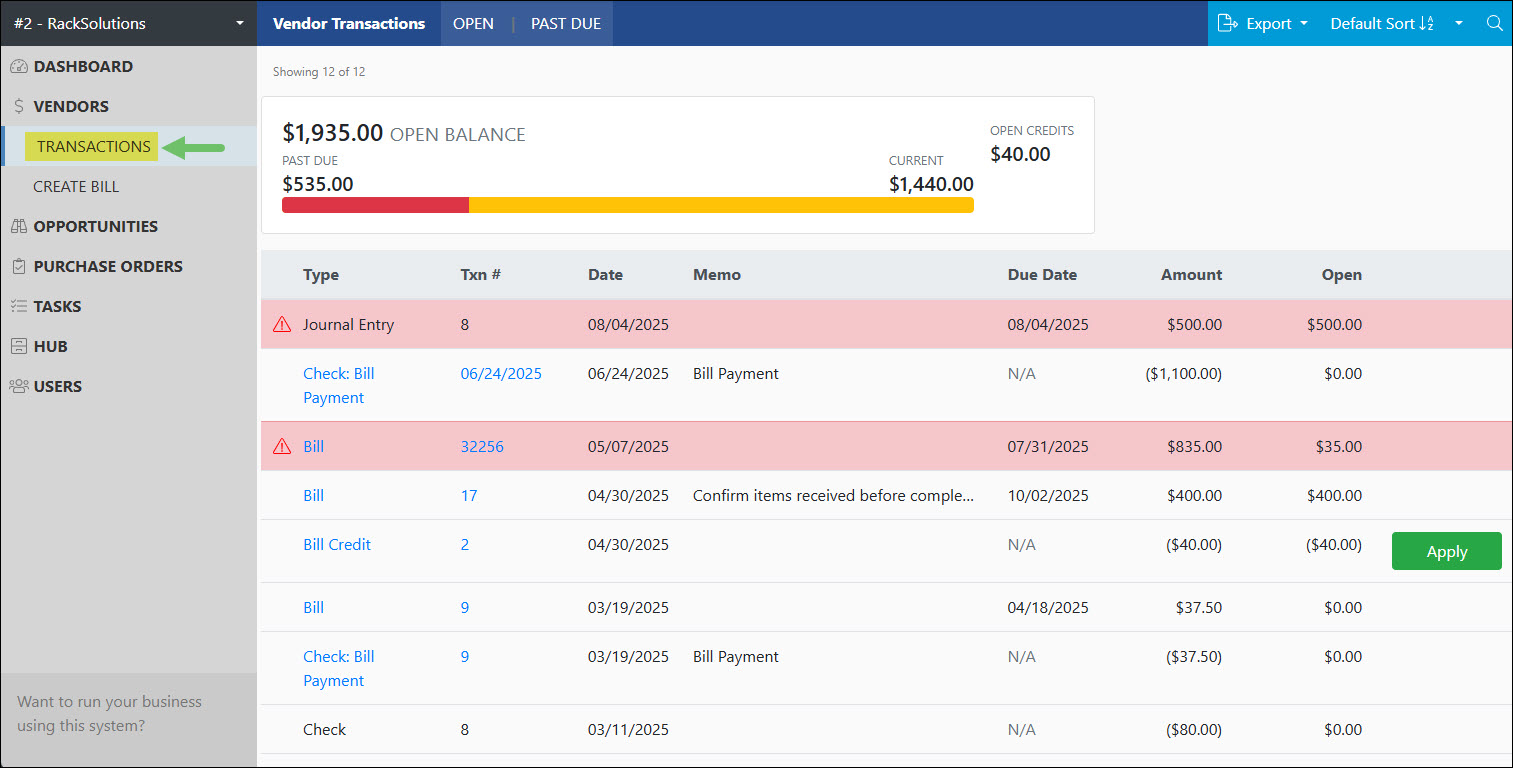
Example of the Transactions List in the Vendor Portal

Permissions
The following permissions will need to be configured for the Contact’s Portal Role if they will be managing or viewing Transactions in the Vendor Portal:
- “Bills: View”
- “Credits: Apply”
- “Transaction History: View”
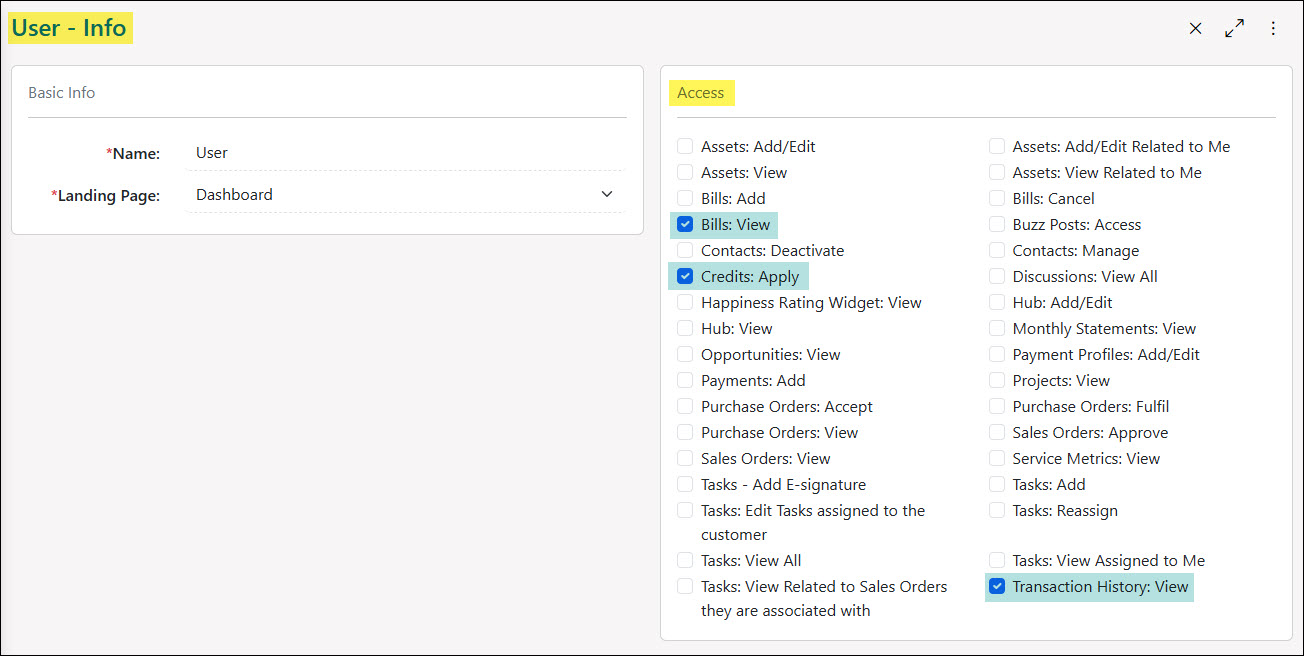
Example of Transaction Related Permissions in the Vendor Portal

Learn more about managing Portal Roles and Permissions for the Customer/Vendor Portal by reviewing the Creating Portal Roles section in the Customer/Vendor Portal Guide.
Transactions List
Below is a screenshot illustrating how the Transactions list in the Vendor Portal appears and a description of what can be accomplished there.
- Quick Filters: Click on one of the options listed here to easily adjust the list to show only open or past due Transactions.
- Export: Allows the user to export the list of Transactions into a .xlsx Excel file.
- Search Filters: There are an array of search filters available on the Transactions list to narrow results such as:
- Date Range: Filters the list based on the Transaction date that is listed on the Transaction.
- Type: Narrows results based on the type of Transaction such as Bill Credits, Bills, CC Charges, CC Charges: Bill Payments, CC Refunds, Checks, Checks: Bill Payments, Checks: Refunds, Checks: Tax Payments, Checks: Service Charges, and Journal Entries.
- Transaction #: Adjusts results listed based on the number listed on the Transaction.
- PO #: Narrows results based on the Purchase Order that was related to the Transaction.
- Memo: Searches through the memos that have been entered on the Transactions and will only show results that include what is being searched for.
- Open: Adjusts list to only show Transactions that still have an open balance remaining.
- Past Due: Adjusts list to only show Transactions that are past the due date.
- Include Denied Bills: Adjusts the list to only show Bills that have been submitted by the Vendor Contact through the Vendor Portal and was marked as denied.
- Summary: The summary area at the top of the Transactions list will be the overall total dollar amount that is open. A bar graph will be displayed to indicate how much of the open balance is past due vs. current. To the right of the bar graph will have a total of open Bill Credits.
- Type: Displays the type of Transaction that is accessible to the Vendor. Transaction Types include Bill Credits, Bills, CC Charges, CC Charges: Bill Payments, CC Refunds, Checks, Checks: Bill Payments, Checks: Refunds, Checks: Tax Payments, Checks: Service Charges, and Journal Entries that have been related to the Vendor. Clicking on the Transaction Type listed will open the Transaction in a new window to view additional details. A red highlight will appear on Transactions that are past due to indicate the lateness.
- Txn #: Lists the number that has been entered onto the Transaction. Clicking on the Transaction number will open the Transaction in a new window to view additional details.
- Date: Shows the date that has been entered onto the Transaction.
- Memo: Will display any memo that has been entered onto the Transaction.
- Due Date: Displays the date that the Transaction is due to be paid.
- Amount: Shows the total amount that has been entered into the Transaction.
- Open: Displays the amount that is still open on the Transaction. If $0 is shown, this indicates the Transaction has been closed.
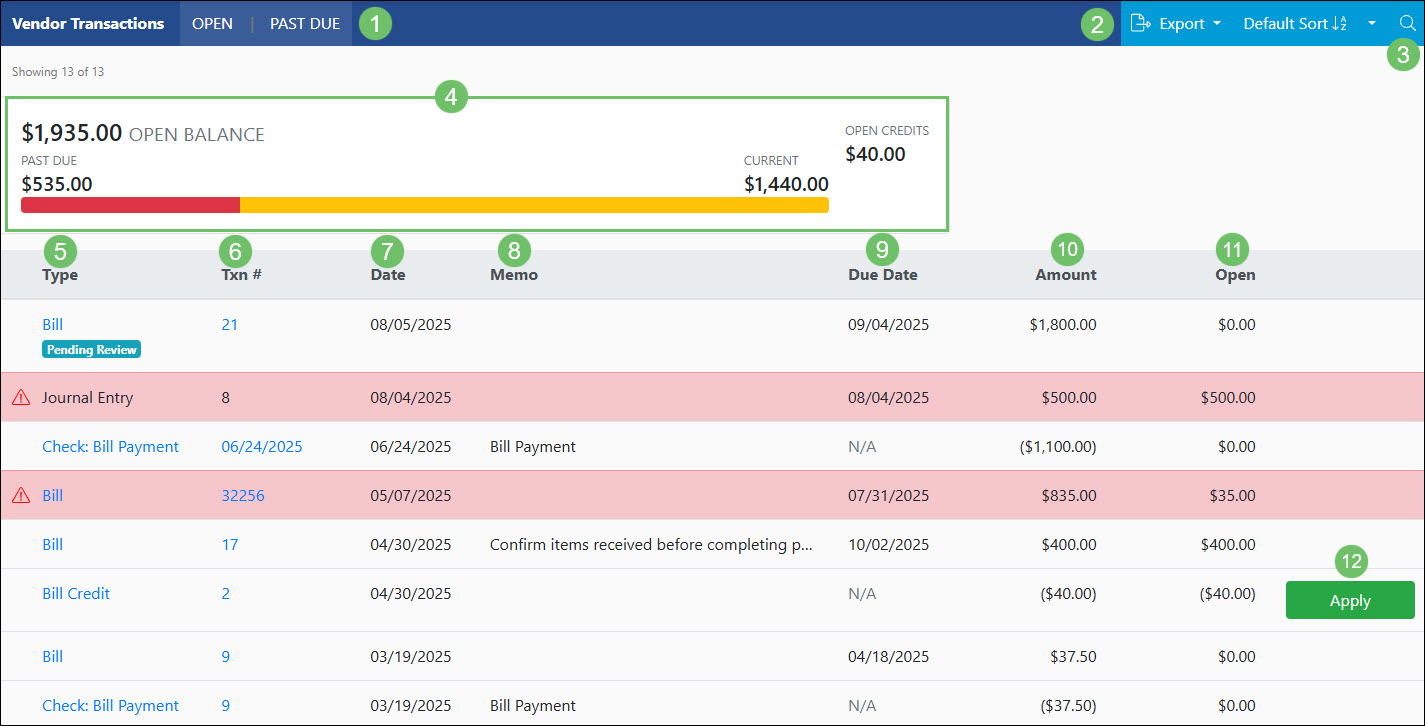
Example of the Actions and Information Available on the Transactions List in the Vendor Portal

Create Bill
The Create Bill page allows the Vendor Contact to submit a Bill for work completed in order for someone within your company to review and approve the Bill to then be processed and paid.
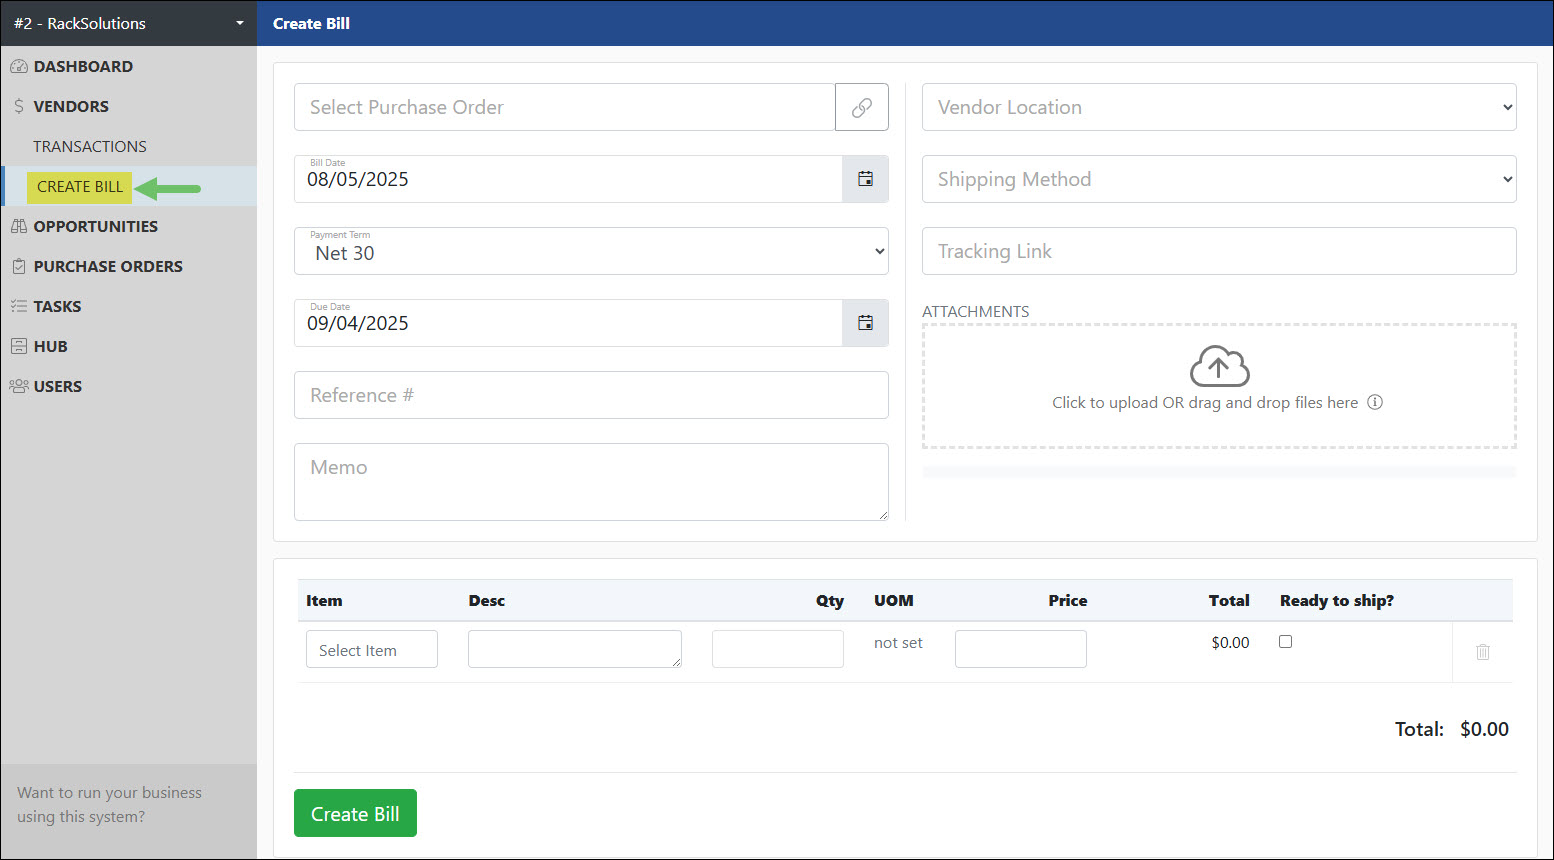
Example of the Create Bill Page in the Vendor Portal

Permissions
The following permissions will need to be configured for the Contact’s Portal Role if they will be managing or viewing Bills in the Vendor Portal:
- “Bills: Add”
- “Bills: View”
- “Bills: Cancel”
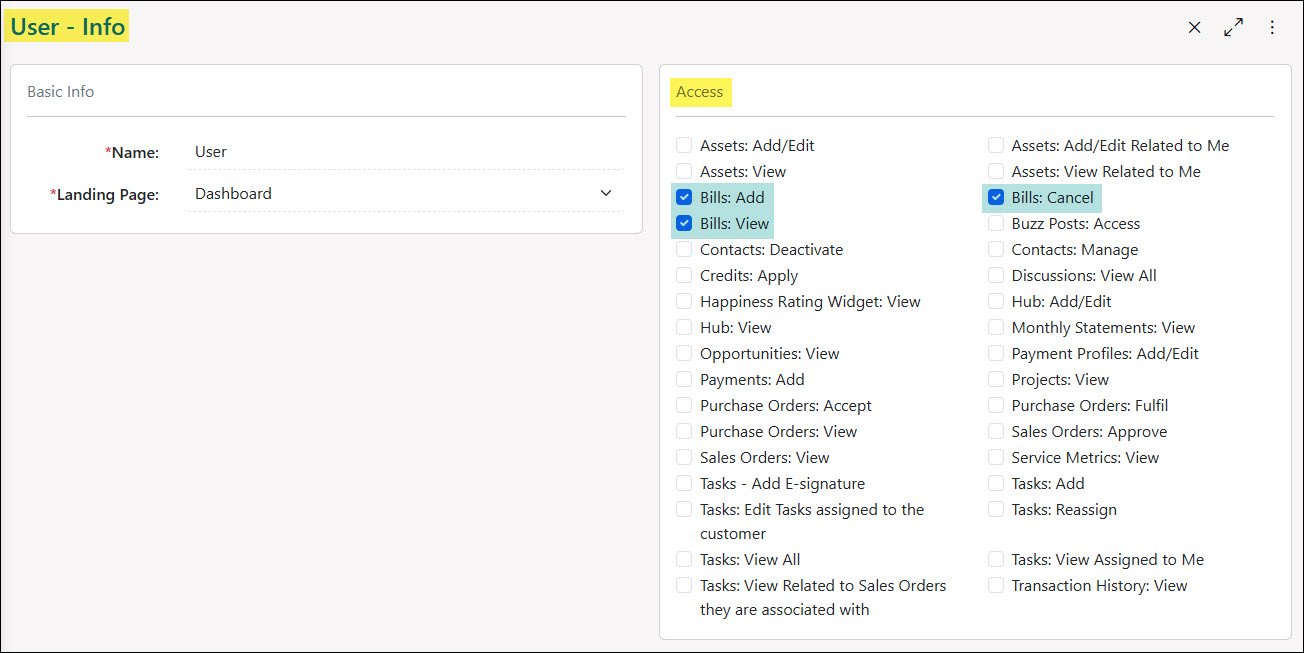
Example of Bills Related Permissions in the Vendor Portal

Learn more about managing Portal Roles and Permissions for the Customer/Vendor Portal by reviewing the Creating Portal Roles section in the Customer/Vendor Portal Guide.
Create Bill Page
Below is a screenshot illustrating how the Create Bill page appears and a description of what can be accomplished there.
- Select Purchase Order: If Purchase Orders have been created for the Vendor, the Vendor Contact can select from the available open POs in order to prefill in information such as dates, item information, etc.
- Bill Date: The date that is associated with the Bill.
- Payment Term: Determines the date the Bill should be considered due. Based on the Bill Date and the Payment Term selected, the Due Date will prefill in with the appropriate date.
- Due Date: The date the Bill should be considered due for payment and be closed.
- Reference #: The number that should be referred to when referencing the Bill. The number entered here will become the Bill number within the system.
- Memo: Any notes that should be indicated on the Bill can be entered within the Memo field for later reference.
- Vendor Location: A dropdown list which houses the Vendor Locations that were added to the account and can be selected to be associated with the Bill.
- Shipping Method: A dropdown list of Shipping Methods that have been configured within the system and can be selected in order to associate to the Bill with physical type Items.
- Tracking Link: A number or link that can be added in order to have the tracking information easily accessible from the Bill.
- Attachments: Allows the user to upload any external files that should be housed with the Bill.
- Items: Items that should be added to the Bill. If a Purchase Order is selected, the Items from the PO will automatically be filled into this area. To have Vendor Contacts be able to select from a list of Items from the system, the Item will need to have the Allow Vendor to include this Item in Bill option toggled on within the Item Info page.
- Create Bill: Creates the Bill which will then be sent to the Review Bills Queue to be approved or denied. To learn more about the Review Bills Queue further, review the Review Bills Queue section from our Accounts Payable Guide.
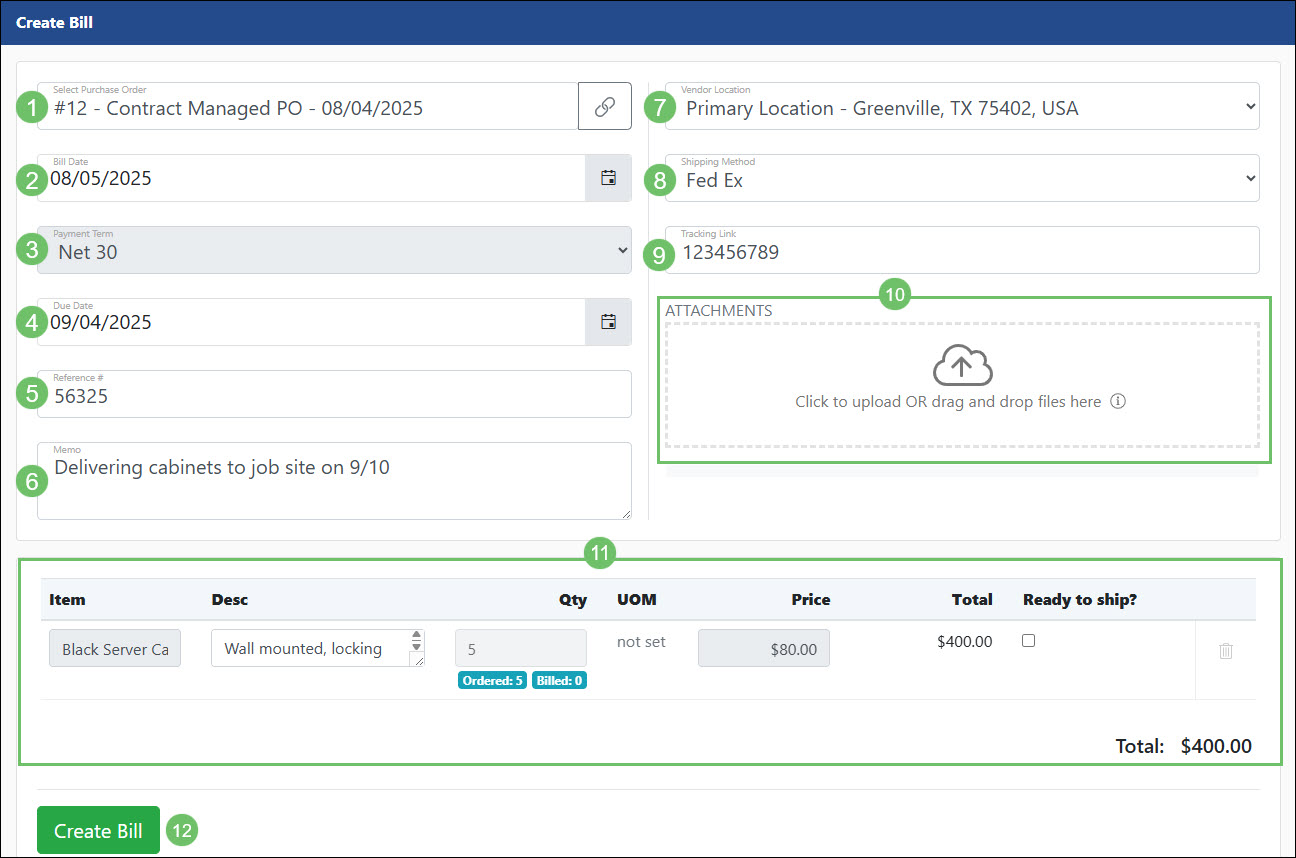
Example of Creating a Bill in the Vendor Portal

Bill Info Page
A Bill can be viewed by clicking on the Bill number from the Transactions list. This will open the Bill Info page in the Vendor Portal to view more details. Below is a screenshot illustrating how the Bill Info page appears and a description of what can be accomplished there.
- View Applied Credits/Payments: Opens an Applied Credits/Payments pop-up window which houses any Bill Payments or Bill Credits that have been created and applied to the Bill. Any related Bill Payments and Bill Credits can be accessed by clicking on the Transaction listed here.
- Status Tag: A tag will be displayed at the top of the Bill including Pending Review, To Be Paid, Paid, or Denied to indicate the current status the Bill resides in.
- Edit/Cancel Bill: If the Bill was submitted by the Vendor Contact through the Vendor Portal, the user will have the ability to edit or cancel the Bill as needed.
- Bill Information: This section will house information regarding the Bill such as the Bill Total, Date, Payment Terms, Due Date, and Reference #.
- Shipping Method: Displays the method of shipping that was selected on the Bill. A hyperlink for Tracking will be available if a Tracking Link or Number was entered for the Bill.
- Requested By: Lists the internal Employee who was selected on the Bill or Purchase Order in the Requested By field. This field is not available for the Vendor Contact to select if the Bill is being created through the Vendor Portal.
- Attachments: Lists any attachments that were uploaded to be housed with the Bill.
- Memo: Displays any text that was added into the Memo field on the Bill.
- Item Information: Lists any Items that were added to the Bill along with the related Purchase Order where the Item was initially added. Clicking on the Purchase Order listed next to each Item will open the PO for further details. At the bottom of this section will list the total for the Bill along with the current balance that still remains open.
- Discussions: Contains any Discussion Threads that have been related to the Bill. Clicking on the New Thread icon will begin a new Discussion Thread with the Requested By automatically preselected to begin a conversation as needed.
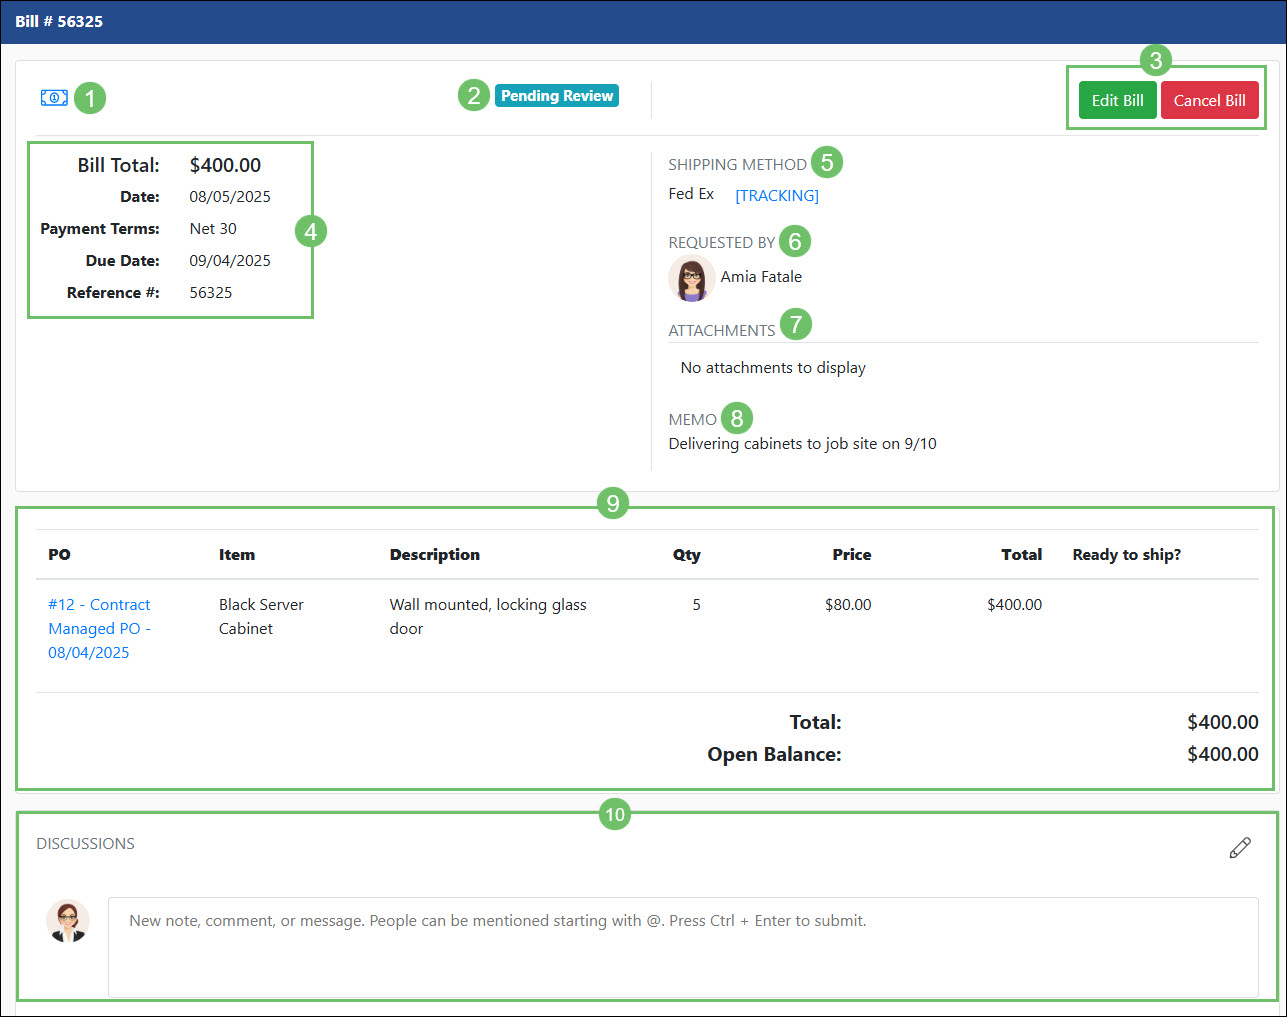
Example of the Bill Info Page in the Vendor Portal

-
Purchase Orders
Striven’s Purchase Orders offer comprehensive support for managing company orders. They facilitate ordering goods or services, receiving stock, and reporting on outstanding obligations. Additionally, the Vendor Portal improves collaboration by enabling Vendors to view both current and fulfilled Purchase Orders. Purchase Orders can be accessed in the Vendor Portal by selecting the Purchase Orders option in the side menu.
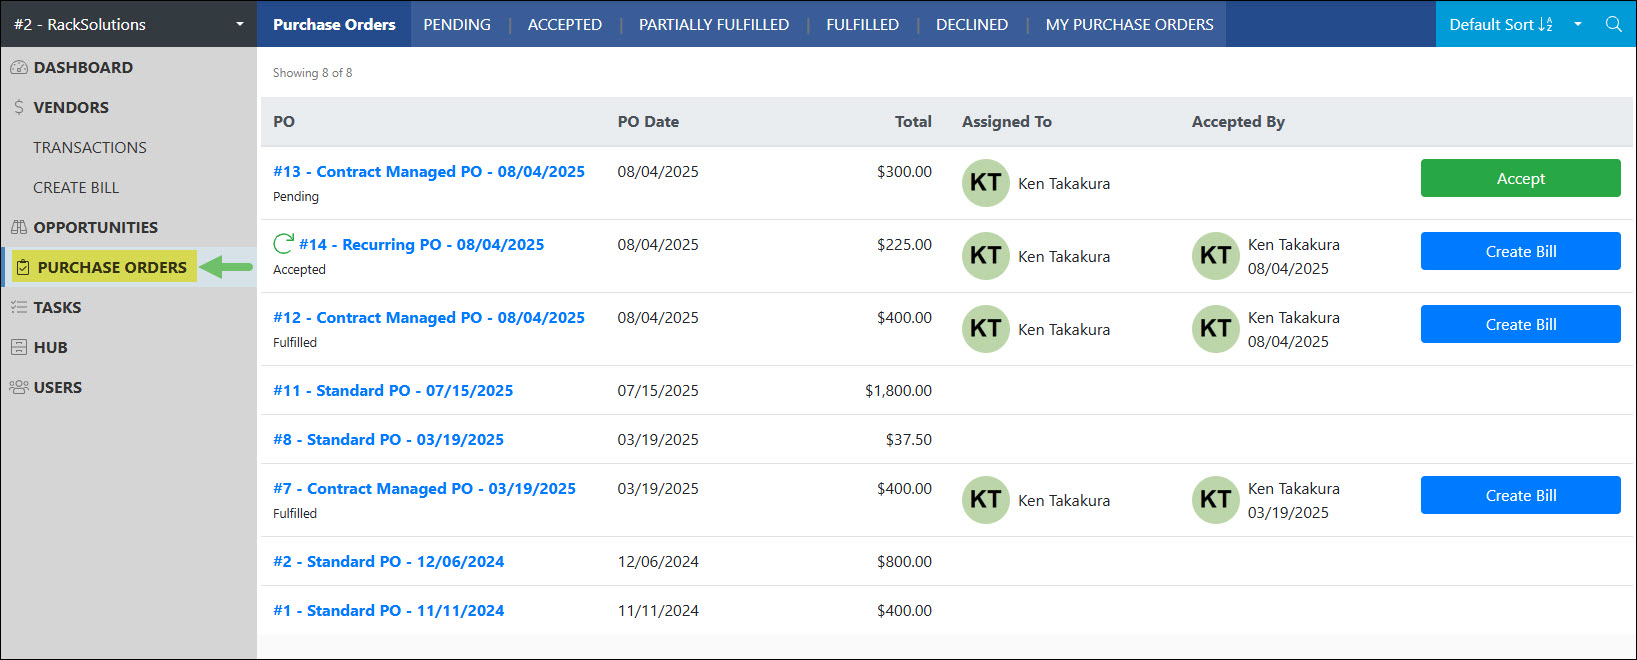
Example of the Purchase Orders List in the Vendor Portal

Permissions
The following permissions will need to be configured for the Contact’s Portal Role if they will be managing or viewing Purchase Orders in the Vendor Portal:
- “Purchase Orders: Accept”
- “Purchase Orders: View”
- “Purchase Orders: Fulfil”
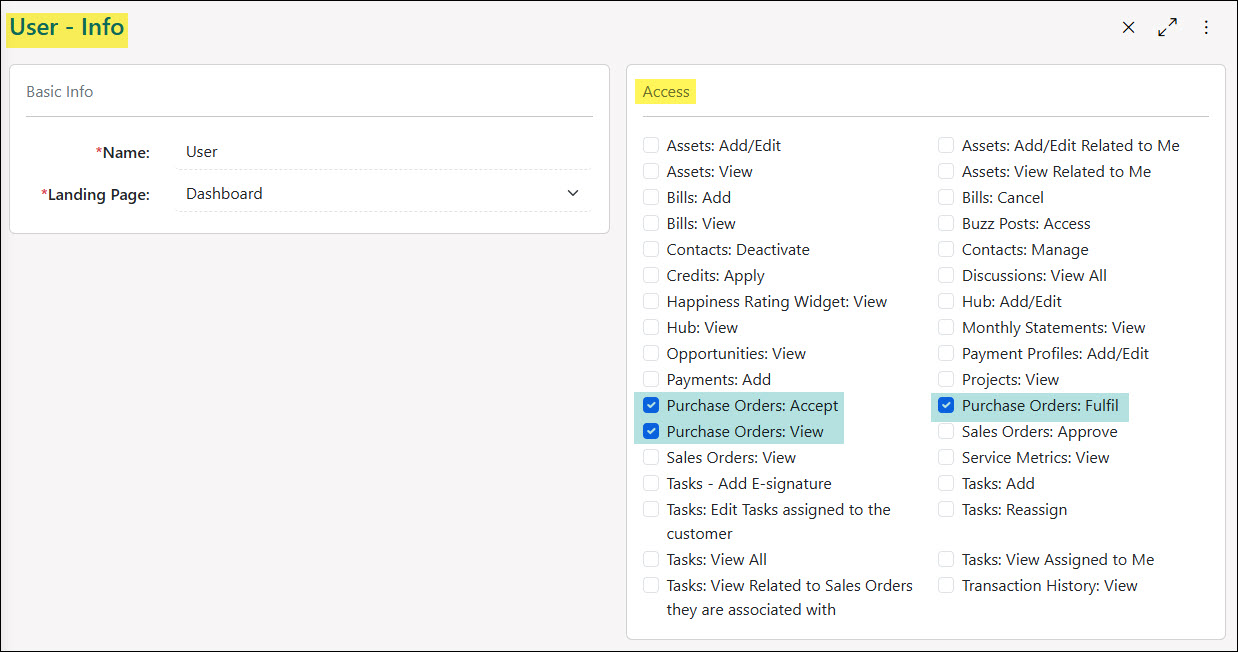
Example of Purchase Order Related Permissions for the Vendor Portal

Learn more about managing Portal Roles and Permissions for the Customer/Vendor Portal by reviewing the Creating Portal Roles section in the Customer/Vendor Portal Guide.
Purchase Orders List
Below is a screenshot illustrating how the Purchase Orders list in the Vendor Portal appears and a description of what can be accomplished there.
- Quick Filters: Allows the user to narrow the list based on the status of the Purchase Order or Orders they are selected in the Vendor Contact field on the Purchase Order.
- Search Filters: There are an array of search filters available to adjust the results listed such as:
- PO #: Narrows results based on the number that was assigned to the Purchase Order.
- Name: Searches the list based on the name that was assigned to the Purchase Order. Depending on the PO Type, this field may not be accessible on a Purchase Order.
- PO Date Range: Searches the listed Purchase Orders based on the PO date that was entered on the Purchase Order.
- Status: Allows the user to search through Purchase Orders based on the status the PO resides in. Statuses that are searchable on the Vendor Portal include Pending, Accepted, Partially Fulfilled, Fulfilled, and Declined.
- Assigned To: Narrows results based on the Contact that is selected within the Vendor Contact field on a Sales Order. This field is only searchable if the Vendor Contact option is turned on within the PO Type as a display field.
- Frequency: Adjust results to show either Purchase Orders that are set up as One Time or Recurring.
- PO: Lists the PO number, title or type, and date that is entered on the Purchase Order. Clicking on the hyperlink listed here will open the Purchase Order for additional details. Below the hyperlink will display the current status of the Purchase Order if the PO Type is configured as a contract managed.
- PO Date: Displays the date that was entered on the Purchase Order.
- Total: Lists the total dollar amount that has been added on to the PO.
- Assigned To: Displays the Vendor Contact that has been selected in the Vendor Contact field on the PO.
- Accepted By: Shows the Vendor Contact who took the action to accept the Purchase Order through the Vendor Portal. This field will be blank if the PO Type was not configured as contract managed.
- Actions: From the Purchase Orders list, you can take the action to either Accept any pending POs or Create Bill for Purchase Orders that have been moved into an Accepted, Partially Fulfilled, or Fulfilled status.
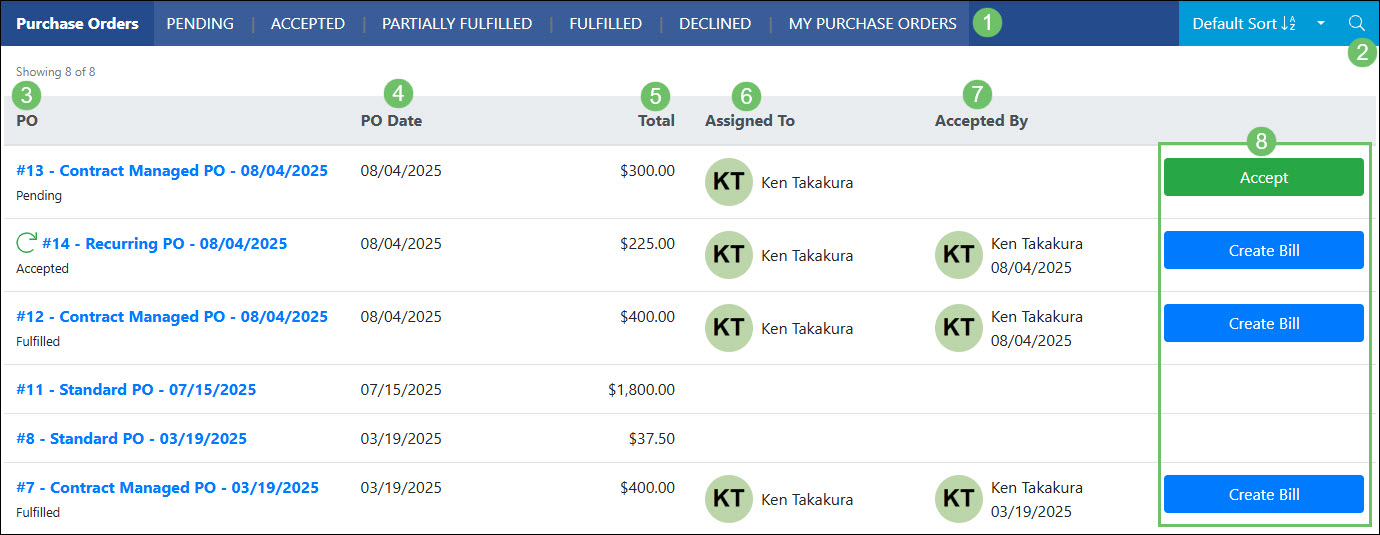
Example of the Actions and Information Available on the Purchase Orders List in the Vendor Portal

Purchase Order Info
Click on a PO listed on the Purchase Orders list to navigate to the Purchase Order Info page for further details. Below is a screenshot illustrating how the Purchase Order Info page in the Vendor Portal appears and a description of what can be accomplished there.
- Actions: From the Purchase Order Info page, the user can Create Bill which will be related to the Purchase Order, Mark as Fulfilled which will update the status of the PO, or View Discussions which will navigate to the Discussions section of the page.
- Status: Displays the current status the Purchase Order resides in.
- PO Information: Shows information pertaining to the PO such as the total, PO and promise date, and any description that was entered into the Vendor Notes section on the Order.
- Shipping Information: Displays shipping information regarding the purchase such as the shipping address and the shipping method. Clicking the View On Map icon next to the address listed in the Ship To field will open the address in Google Maps.
- Contact: Displays the Employee that was selected on the Purchase Order. Clicking on the Start Discussion icon next to the person’s name will initiate a new Discussion Thread to begin a conversation.
- Assigned To: Displays the Vendor Contact that was selected on the Purchase Order. Clicking on the Start Discussion icon next to the person’s name will initiate a new Discussion Thread to begin a conversation.
- Attachments: Gives the option to upload or view any external files that were uploaded to be related to the Purchase Order.
- View Item Reference Materials: Clicking on this button will open a list of Reference Materials that were added to any Items listed in the Item section. Learn more about Item Reference Materials by reviewing the Item Reference Materials section from our Item Management Guide.
- Item Information: Lists Items that were added to the Purchase Order along with any description, quantity, unit price, and total per Item. Underneath the Qty and Total columns will also display how much was already added to a related Bill.
- Total/Recurring Information: A total based on the Items will be added below the Item section of the Purchase Order. To the left of the total will also display any recurring information if the Purchase Order was set up as Recurring and not One Time.
- Acceptance Information: If the Purchase Order is waiting to be accepted, fields will be available to fill in the name and title of the person accepting the PO. If the Purchase Order has already been accepted, the information will be displayed including who accepted the PO along with the date of acceptance.
- Related Bills: A list of Bills that have been related to the Purchase Order will be listed in this area. The Transaction date, status, and total will also be listed. Clicking on the Bills listed here will open the Transaction for further information.
- Discussions: Displays any Discussion Threads that have been related to the Purchase Order. Internal Discussion Threads will only display if they have been marked Visible on Portal. Clicking the New Thread icon will start a new Discussion Thread with the Employee selected on the Purchase Order.
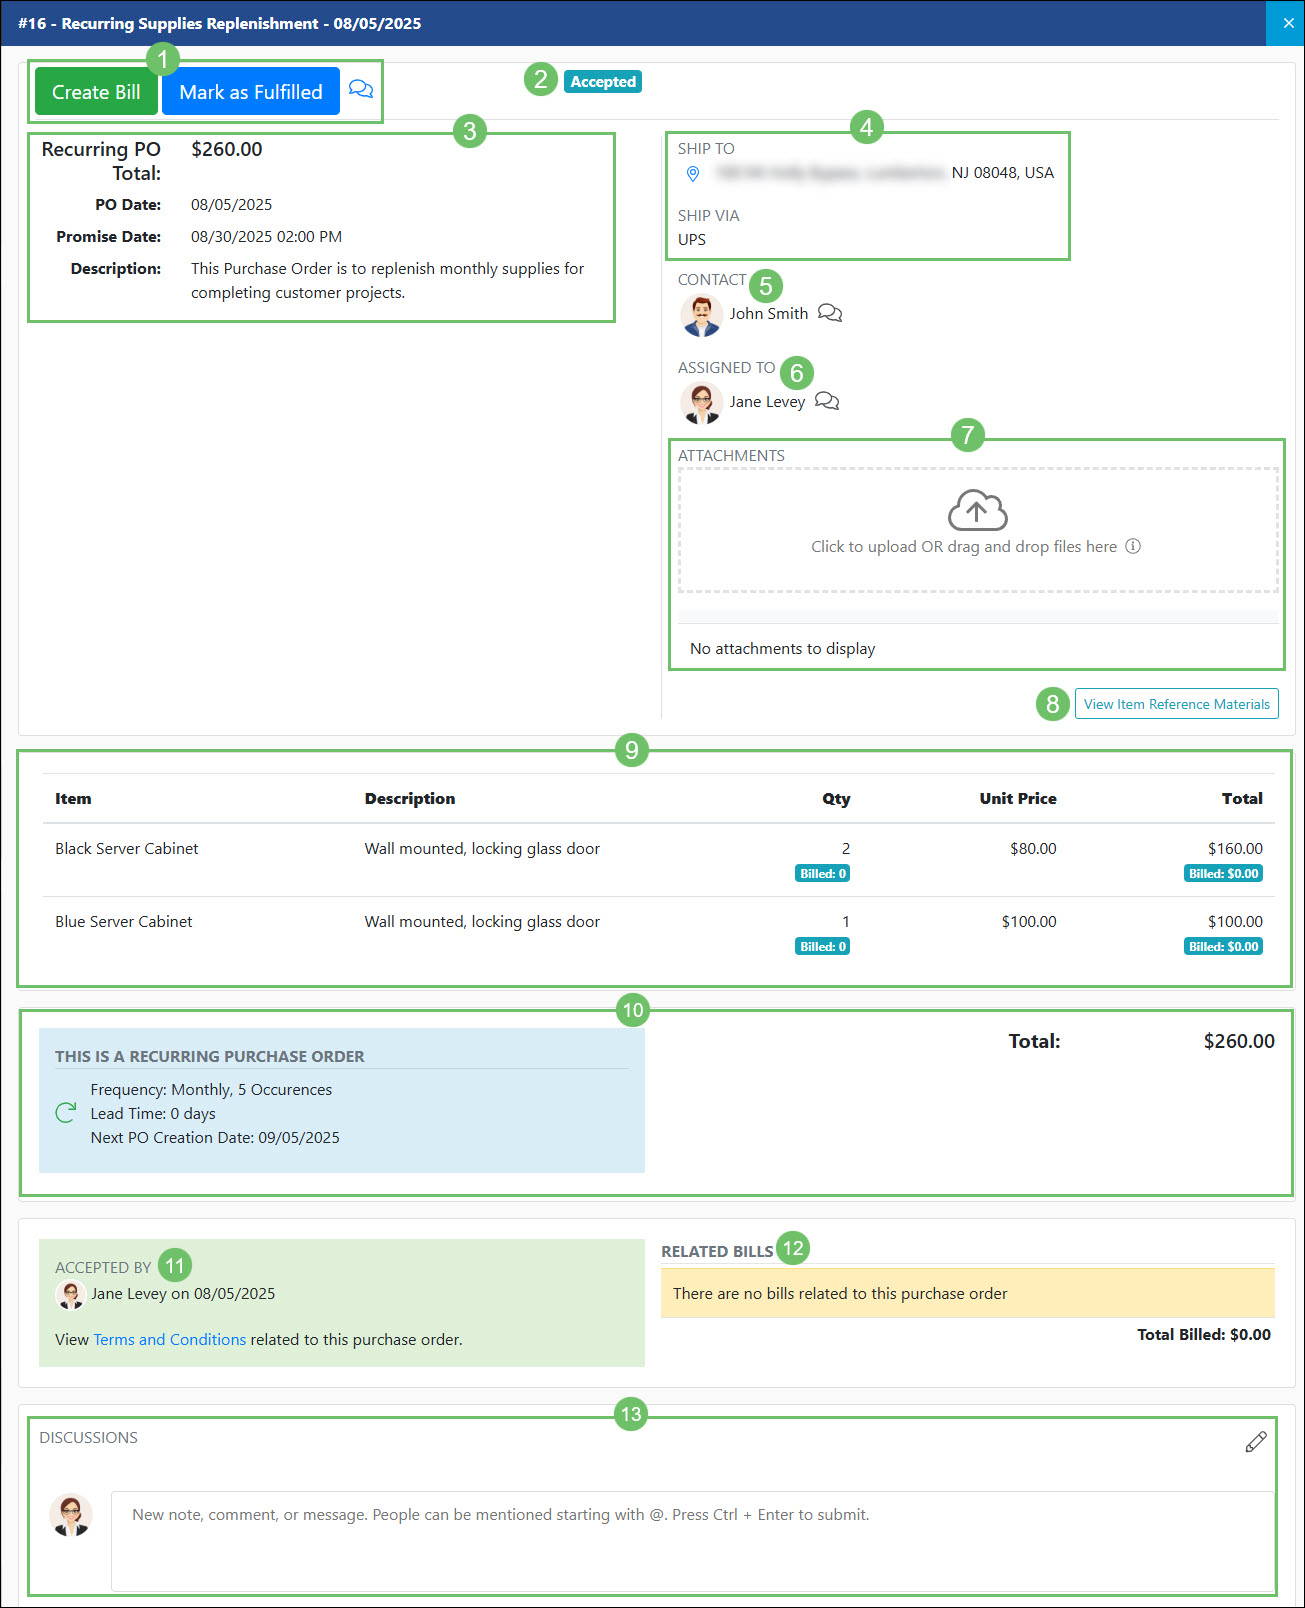
Example of the Actions and Information Available on the Purchase Order Info Page in the Vendor Portal

-
Opportunities, Tasks, Hub, & Users
The Opportunities, Tasks, Hub, and Users pages for the Vendor Portal will have the same information and actions available on the Customer Portal.
Please review these sections listed in the Customer Portal Options section of this guide for further information.

Example of Opportunities, Tasks, Hub, and Users Options in the Vendor Portal

-
Recap
With this guide, we’ve discovered how to configure your Customer/Vendor Portal settings. We have reviewed the options available for both the Customer Portal and Vendor Portal, including the Dashboard and permission settings. This information will be valuable to Users wishing to add the Customer/Vendor Portal features to their Striven system.
Have a Question?
Ask the Striven Community
User-sourced how-to’s, feedback, and more!
FAQs
-
Are there additional fees associated with using the Customer/Vendor Portal with my Striven system?
For more information regarding the Customer/Vendor Portal, please visit our Pricing page or contact your Striven Consultant.


