


Purchasing & A/P
Purchase Order Settings
Support Guide
-
Overview
This comprehensive guide details the configuration settings for Purchase Orders in Striven, providing instructions for both basic procurement and complex, contract-driven Vendor management. By utilizing these settings, you gain precise control over system terminology, custom mapping, and label libraries. Additionally, this documentation covers user permissions and Vendor approval workflows, ensuring your procurement processes remain highly efficient and fully integrated with your broader business operations.
Read this guide if you are trying to:
✔ Configure settings for Purchase Order Types in Striven.
✔ Map Custom Fields to PO Custom Columns.
✔ Manage vendor approval processes, cost update prompts, and specific user permissions.
-
Permissions
Access to Purchase Order information in Striven is managed by a variety of user permissions. To verify your current access, consult your system administrator or the individual responsible for assigning and managing User Roles within your organization.
You can also check the permissions specifically related to the page you are viewing in Striven by clicking on the kebab menu in the top right corner of the page and selecting Settings. This will display the Settings Info page, where the relevant permissions are listed, along with an indication of your current access status.
If there is a permission listed to which you do not have access, the system may offer the option to Request Access (depending on your organization’s system settings). Choosing this option will notify a designated individual, allowing them to grant you that specific permission.
-
Purchasing Settings
The Purchasing Settings page serves as the foundation for managing your company’s buying processes and expenses. This is where you can tailor the purchasing experience to fit your organization’s needs, from how orders look to how they interact with your books. By setting these defaults, you ensure that every Purchase Order starts on the right foot and follows a consistent process.
- Note: The configuration details provided in this guide section are typically reserved for system administrators or users with specific permissions or User Roles. If you do not have this access, you will be unable to make changes to these settings.
This guide section will walk through the settings available on the Purchasing Settings page, explaining its function and impact on your Purchase Order workflow. You can access this page by navigating to Company → Settings → Accounting → Purchasing → Settings.
- General Purchasing Settings:
- Prompt to update the Item cost if it is changed while creating a Purchase Order, Checks, Bills or Bill Credits: Enables a warning pop-up when an Item’s cost is modified during the creation of a PO, Check, Bill, or Bill Credit, offering the user the option to apply the cost change to the Item’s record for future transactions or Purchase Order, rather than limiting the change to the current transaction or order only.
- Purchase Order Settings:
- Payment Terms: Allows you to set the default Payment Terms for Purchase Orders.
- Checks: Provides the following options:
- Warn about duplicate Check Numbers: Triggers a warning to alert the user that they are attempting to use a duplicate Check number for the selected bank account. The warning will not be triggered if a different bank account has been selected for the Check.
- Note: If this warning is activated, you can either choose to keep the duplicate number or change it when creating a Check.
- Recurring Checks use the same Check Number: This setting is mainly used to identify the method used for Check processing when an actual numbered Check is not utilized. Examples include: Online, PayPal, Venmo, EFT, ACH, or Wire.
- Cannot Print Checks Unless Reviewed: Requires that Checks go through the Transaction Review Queue before they can be printed.
- Warn about duplicate Check Numbers: Triggers a warning to alert the user that they are attempting to use a duplicate Check number for the selected bank account. The warning will not be triggered if a different bank account has been selected for the Check.
- Bills: Provides the following options:
- Next Number: Shows the next number that will be used for the next Bill.This number can be set to a new number, as long as that new number is greater than the current one.
- Warn about duplicate Bill Numbers: Triggers a warning to alert the user that they are attempting to use a duplicate Bill number for the selected Vendor. The warning will not be triggered if the same Bill number is used for a different Vendor.
- Note: If this warning is activated, you can either choose to keep the duplicate number or change it when creating a Bill.
- Recipients for Review: Allows you to set the Employee(s) that will be notified when a Bill is ready for internal review.
- Default Format: Designates the default Bill format to be used when creating a Bill.
- Send an approved Bill as attachment to the following email addresses: Provides the ability to set recipients to receive notifications when Bills are created or approved.
- Bill Credits: Gives you the following options:
- Next Number: Shows the next number that will be used for the next Bill Credit.This number can be set to a new number, as long as that new number is greater than the current one.
- Warn about duplicate Bill Credit Numbers: Triggers a warning to alert the user that they are attempting to use a duplicate Bill Credit number for the selected Vendor. The warning will not be triggered if the same Bill Credit number is used for a different Vendor.
- Note: If this warning is activated, you can either choose to keep the duplicate number or change it when creating a Bill Credit.
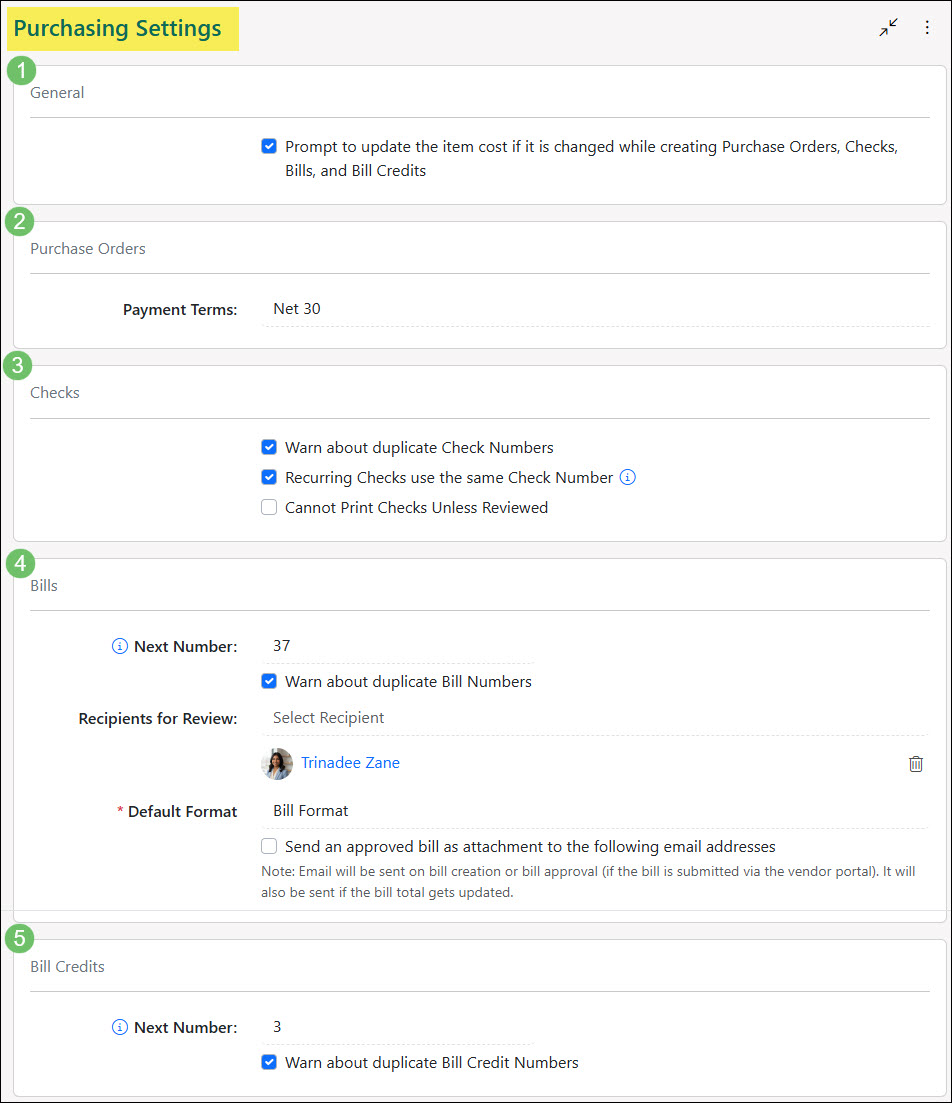
Example of the Purchasing Settings Page

-
Labels Library
Located within the POs Settings menu, the Labels Library allows users to compile a comprehensive bank of Purchase Order Labels that can be assigned to specific Purchase Order Types. This library gives you the ability to Create new Labels and assign a unique color to each, saving them for immediate use on your Purchase Order Types.
To view the Purchase Order Labels Library, navigate to Company → Settings → Accounting → Purchasing → POs → Labels Library.
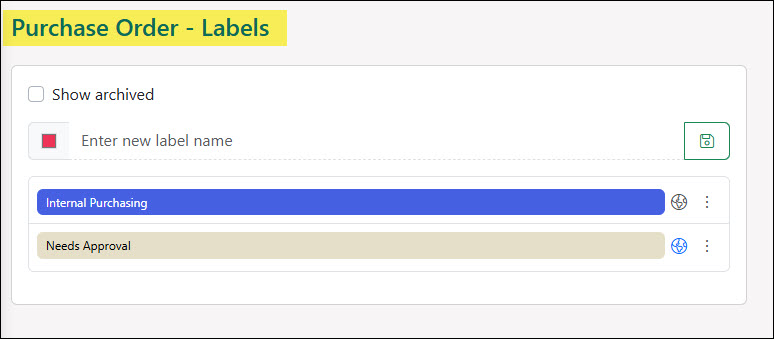
Example of the Labels Library Page
Once your Labels are created, you will have the following options listed in the Label kebab menu on the right side of the Label:
- Edit: Allows you to modify the Label’s name and color.
- Delete: Permanently removes the Label from the system.
- Note: Exercise caution when deleting a Label, as this action can un-mark Purchase Orders currently tagged with it. This loss of tagging may subsequently impact your reporting or filtering capabilities.
- Archive: Removes the Label from the active list while retaining it in a separate archive. Archiving is the recommended action for Labels that are no longer in active use but need to be retained for historical context on existing Purchase Orders. Archiving preserves the classification on existing Purchase Orders without cluttering the current selection menus.
- Purchase Order Types: Opens a popup showing a list of the Purchase Order Types associated with that particular Label, along with a trash icon to remove the association.
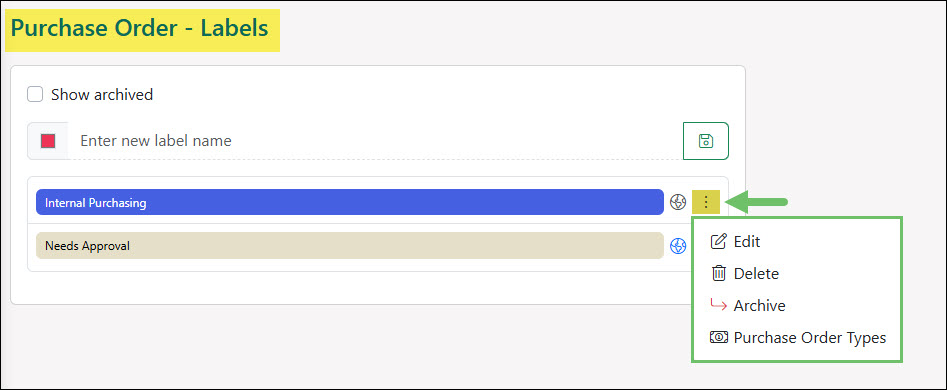
Example of the Kebab Menu on a Purchase Order Label in the Labels Library
Furthermore, Labels in the Labels Library can be made visible in the Vendor Portal by simply clicking the globe icon. Toggling this globe icon to blue will seamlessly turn a Label’s Vendor Portal visibility on, and toggling it to gray indicates the Label is not visible in the Portal.
If you need to view any Labels that have previously been marked as Archived, you can simply click the Show Archived checkbox to display them.
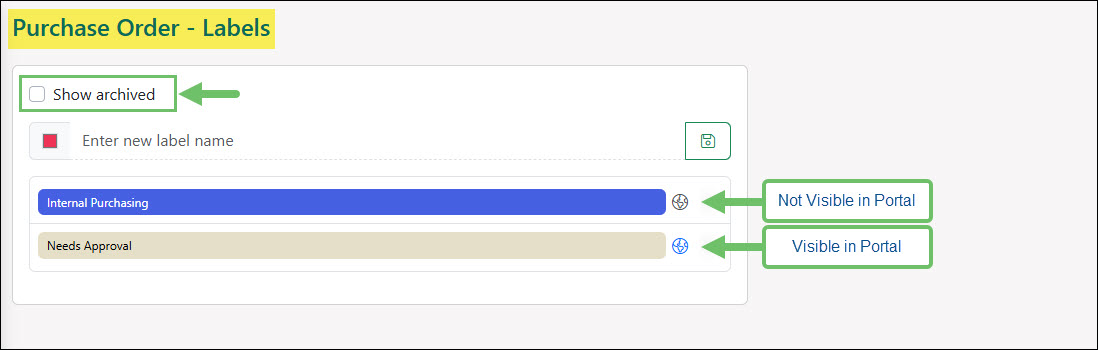
Example of Vendor Portal Visibility for Purchase Order Labels in the Labels Library
-
Purchase Order Types
Before you begin creating Purchase Orders, you must first configure your Purchase Order Types within Striven. These Types can be customized to align with the specific requirements of your organization’s procurement department.
The system provides two (2) versions of Purchase Order Types:
- Standard Orders: These are flexible, and do not require Vendor approval. Edits or additions can be made easily throughout the Purchase Order’s lifecycle.
- Contract Managed Orders: These are more stringent, requiring either Vendor approval or internal review before procurement can commence. Changes to these Purchase Orders after approval require specific system permissions.
To manage or create Purchase Order Types, view the Purchase Order Types List by navigating to Company → Settings → Accounting → Purchasing → POs → PO Types.
Use the Add button to start a new Purchase Order Type, or click any existing Type to make changes.
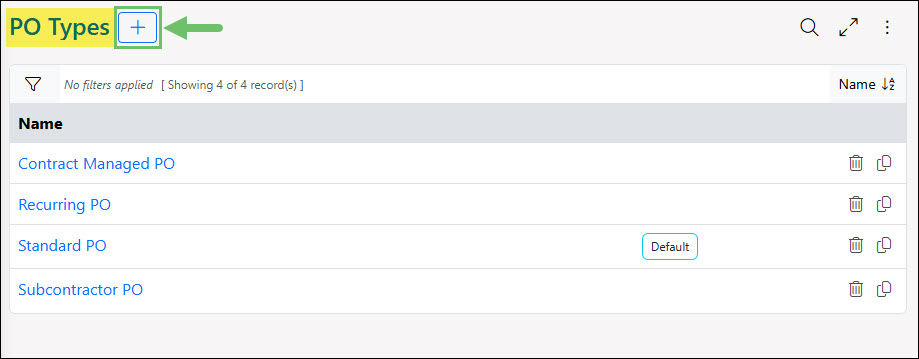
Example of the Add Button on the Purchase Order Types Page
An example of the configuration settings for a Purchase Order Type is demonstrated below.
- Purchase Order Type Name: The name of the Purchase Order Type you are configuring. This will appear on Purchase Orders to select a Type from a drop-down list.
- PO Type Options:
- Default: Sets the current Purchase Order Type as the default selection when creating a new Purchase Order.
- Requires Internal Review: Requires Purchase Orders of this Type to be subject for an Internal Review.
- Allow Recurring: Allows the Purchase Order Type to be set as Recurring.
- Allow Multiple Vendor Selection: Provides the option to have one or more Vendors selected for this Purchase Order Type.
- Payment Term: Assigns the default Payment Term for the Purchase Order Type, but can be changed on a Purchase Order later. If a Vendor has default Payment Terms saved, their Terms will be used.
- Display Fields: Determines which PO details will be displayed on Purchase Orders of this Type. Simply check the box next to the Display Fields you wish to be shown on Purchase Orders of this type.
- Note: Some options will display further option settings once selected.
- Defaults: Allows you to mark Dropship as a default setting. A Customer’s location can be selected on a PO for shipping information when the Dropship option is enabled.
- Turn on Contract Management: Enabling this option reveals additional configuration settings, which will be detailed in the Contract Management section of this guide.
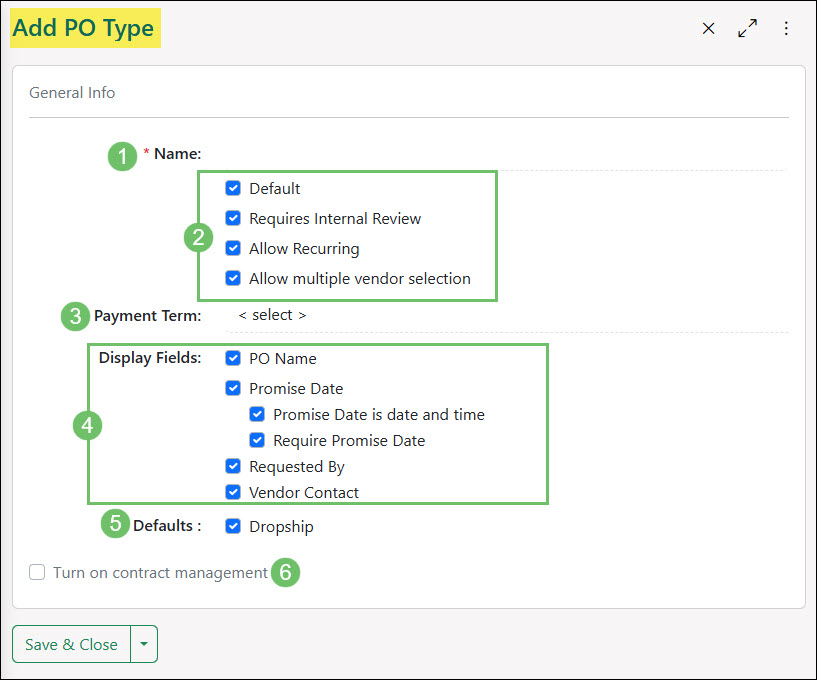
Example of the General Info Settings Panel on the Add Purchase Order Type Page
-
Contract Management
Activating Contract Management for a specific Purchase Order Type converts that order into a Contract. This functionality allows you to define Terms & Conditions, establish expectations for automatic billing or crediting, and tailor the approval process for your Vendors.
- Terms & Conditions: Allows you to set the default Terms & Conditions for this Purchase Order Type. The Terms must be agreed upon by the Vendor Contact before the Purchase Order can be approved. This setting will be detailed further in our Billing & Contract Management Guide.
- Requirements: These checkboxes will enable you to require the following:
- Vendor must enter tracking information: Select this option to enforce a workflow where Vendors must enter tracking information for Purchase Orders.
- Requires Vendor Approval: Mandates Vendor approval for all requested Purchase Orders. Activating this option will reveal an additional setting:
- Assign first Vendor who approves the Purchase Order: Applicable for Purchase Orders where multiple Vendors are assigned and they are sent approval requests. The first Vendor who approves the Order will be assigned to the Purchase Order. This option will only be available if the Purchase Order Type has Allow multiple vendor selection enabled.
- Approval Methods: There are three (3) Approval Methods, including the following:
- Electronic: Enables Vendor Contacts to sign their screen electronically to approve the Purchase Order.
- Written: Allows Vendor Contacts to approve Purchase Orders with written approval. You can also choose to require an attachment of a written agreement.
- Verbal: Allows Vendor Contacts to approve Purchase Orders with verbal approval. You can also choose to require an attachment related to a verbal agreement.
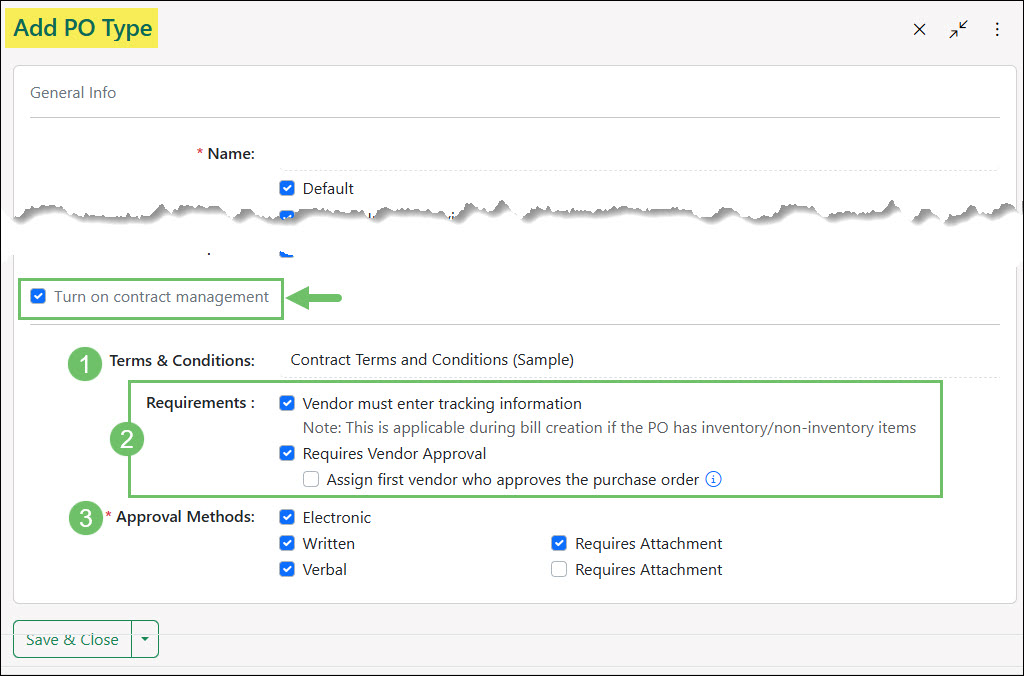
Example of the Turn On Contract Management Settings on the Purchase Order Type Page
Contract Management Purchase Orders will be covered in more detail in our Billing & Contract Management Guide.
-
Purchase Order Approval Notifications
If you have created a Contract Managed Purchase Order Type with Vendor Approval enabled, you may configure Approval Notifications. These notifications will inform an assigned recipient when Purchase Orders greater than a specific amount, or containing certain items have been approved by a Vendor.
To begin setting up your Approval Notifications, select the waffle menu located on the Purchase Order Type – Info page, then choose the Approval Notifications option.
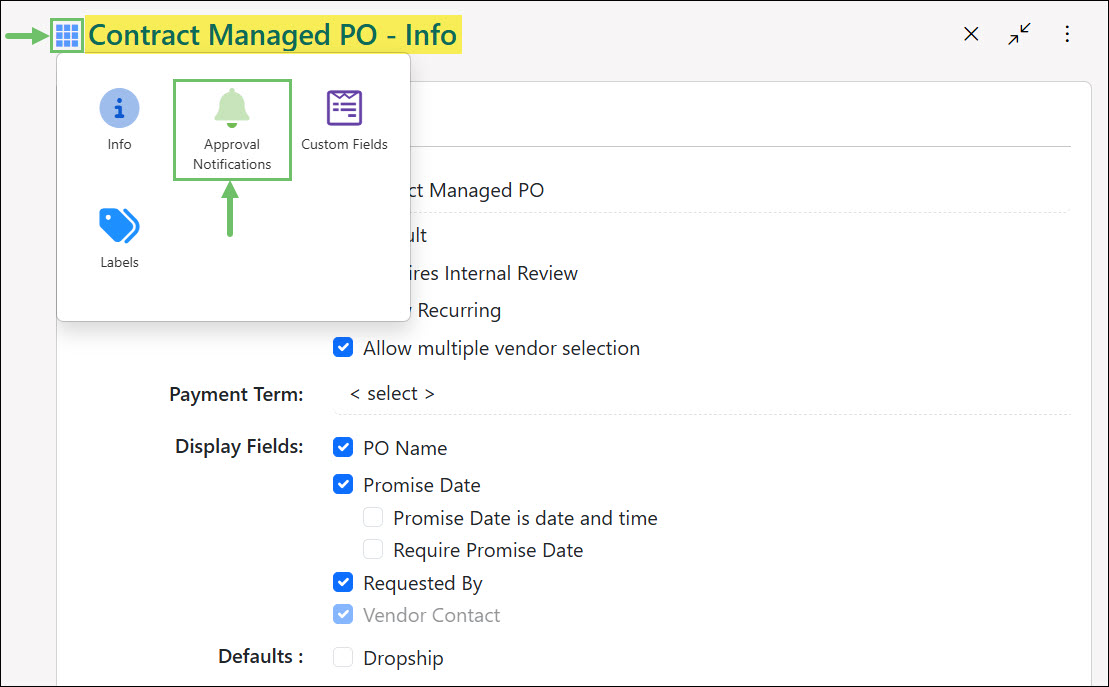
Example of the Approval Notifications Option within the Waffle Menu of a Purchase Order Type – Info Page
When adding a new Approval Notification, you have the option to configure the following criteria that the Purchase Order must contain to trigger the notification. It is possible to configure multiple Approval Notifications on one Purchase Order Type with various thresholds. Below is an example of the options available when configuring an Approval Notification.
- Recipient: The Recipient field features a type-ahead drop-down menu, where you may search for the Employee you would like to receive the Approval Notification by name or email address. Only email addresses that are currently assigned to an Employee may be entered and selected.
- Department: If you wish for the recipient to only be notified when Items from a specific Department are ordered, select the Department here. Departments can be assigned at the Item level. To learn more about Item Management, review our Item Management Guide.
- Order Total Greater Than: If you wish for the recipient to only be notified when Purchase Orders over a certain amount are approved, you may enter the amount threshold here.
- Items: Selecting an Item in this field will make sure the recipient is always notified when a Purchase Order with that Item has been approved by the Vendor.
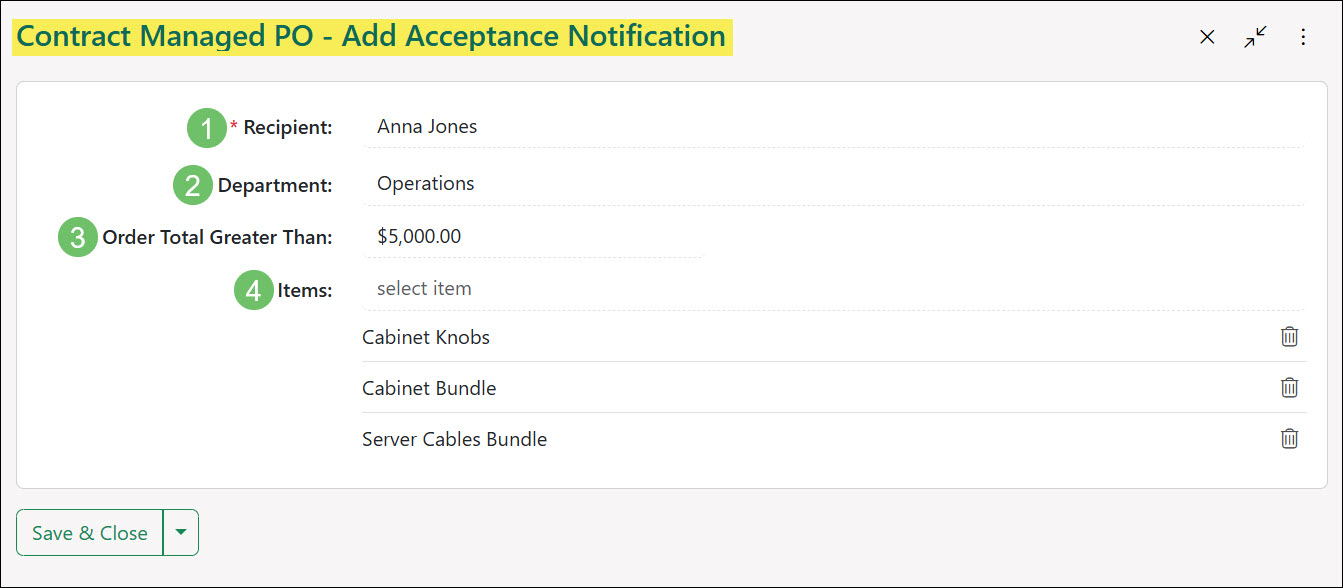
Example of the Approval Notifications Page in a Purchase Order Type
-
Type Level Custom Fields
To collect additional information on a Purchase Order, you can create Custom Fields. These fields can be set up in two ways:
- Globally: Appear on all Purchase Orders, regardless of their Type.
- Purchase Order Type Level: Created for specific Purchase Order Types, allowing you to gather information relevant only to that particular Purchase Order Type.
To configure Custom Fields at the Purchase Order Type level, use the waffle menu located next to the Purchase Order Type – Info title in the top left corner of the page to navigate to the desired option. You will be presented with the following Custom Fields option:
- Custom Fields – Purchase Order Info: Custom Fields intended to be filled in on the Purchase Order Info page when using this Purchase Order Type.
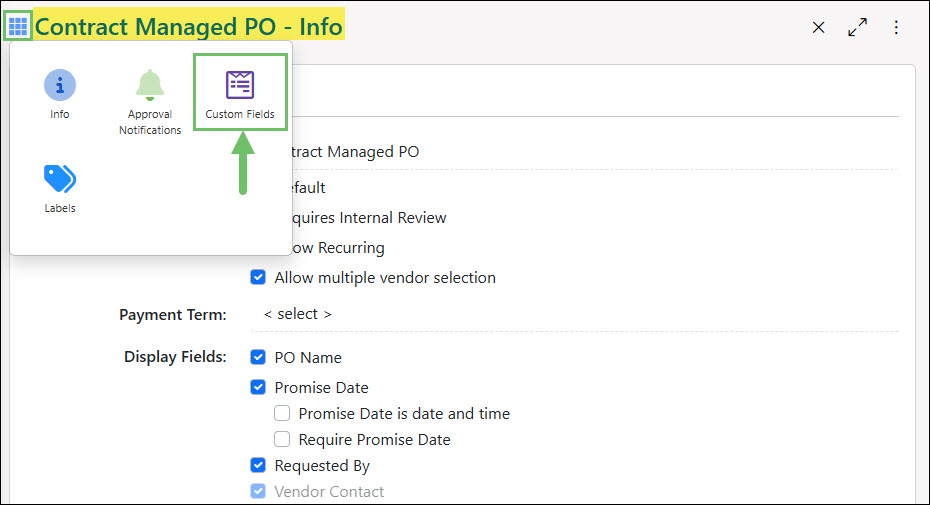
Example of Purchase Order Type Custom Fields
Please visit our Custom Fields Guide for more information about using or configuring Custom Fields in Striven.
-
Custom Columns
Custom Columns can be configured to capture specific information per Line Item within a Purchase Order. These fields can be useful for tracking information with regard to expected delivery dates, shipping information, backorder status, or product-specific detail such as product variations. To add Custom Columns to your Purchase Orders, use the following steps:
Company → Settings → Accounting → Purchasing → POs → Custom Columns.
- Add: Creates a new Custom Column to display on Purchase Orders. A total of three (3) additional columns can be added to Purchase Orders and the Custom Column Name is limited to 15 characters.
- Manage Field Mappings: Option available if you plan to map Item Custom Fields directly to Purchase Order Line Item Custom Columns, or if you want Custom Columns to carry over to the related Bills. This will be explained in more detail in the Purchase Order and Bill Custom Field Mapping sub-section below.
- Include Inactive: Toggle the checkbox to include deactivated Custom Columns to the list.
- Custom Columns List: Lists all of the Custom Columns and indicates whether each is set as required (noted by the red asterisk * symbol by the Column Name) or visible on the Vendor Portal (indicated by the globe icon). You may also deactivate a Custom Column by clicking on the trash icon, or click on the Column Name to open the Column Info page to make edits. The order in which the Custom Columns appear on Purchase Orders can be rearranged by clicking and dragging the drag/drop icon next to each column name.
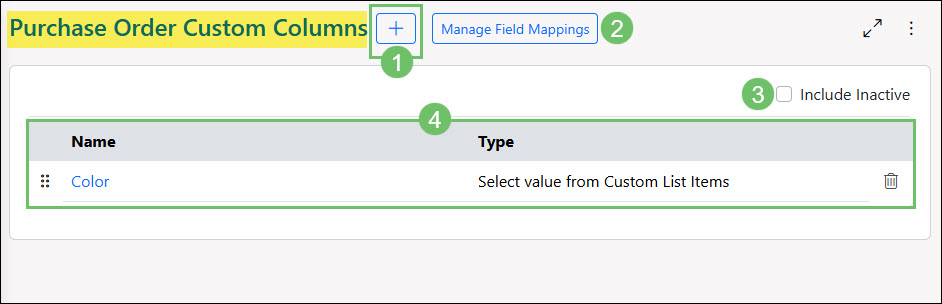
Example of Purchase Order Custom Columns
-
Purchase Order and Bill Custom Field Mapping
Custom Field Mapping is an automation tool in Striven that acts as a bridge. It enables Striven to pull information from one part of the system to be carried over to another part in an effort to eliminate the need for manual data entry. This also ensures that specific, custom information stays consistent throughout the process.
To link custom Purchase Order fields to the corresponding Bill, or to map Item Custom Fields directly to Purchase Order Line Item Custom Columns, navigate to the Purchase Order Custom Columns page and click Manage Field Mappings. This action opens the Custom Field Mappings page. The following steps will walk you through the process of mapping your Custom Fields to the Custom Columns on Purchase Orders:
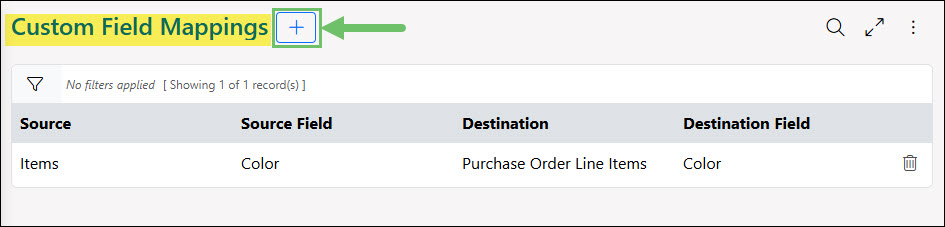
Example of the Custom Field Mappings Page
To start the mapping process, click the Add [ + ] button. This will open the Add Custom Field Mapping popup with the following fields:
- The Source is the origin of the data; the system entity that currently holds the data. For example, if the Source is set to Items, the system will look to the Items records for the data.
- The Destination is the record where the data needs to be added, such as a Custom Column on the Purchase Order Line Item level.
- The Field resource designates the specific Custom Field or Custom Column where the data is stored and where it should land, such as the “Color” Custom Field on the Items records (i.e. the Source) and the “Color” Custom Column on the Purchase Order Line Items (i.e. the Destination), as in the example.
- Note: For Custom Field Mapping to work smoothly, the Field on both the Source and Destination should ideally share the same data type (i.e. text to text, or number to number).
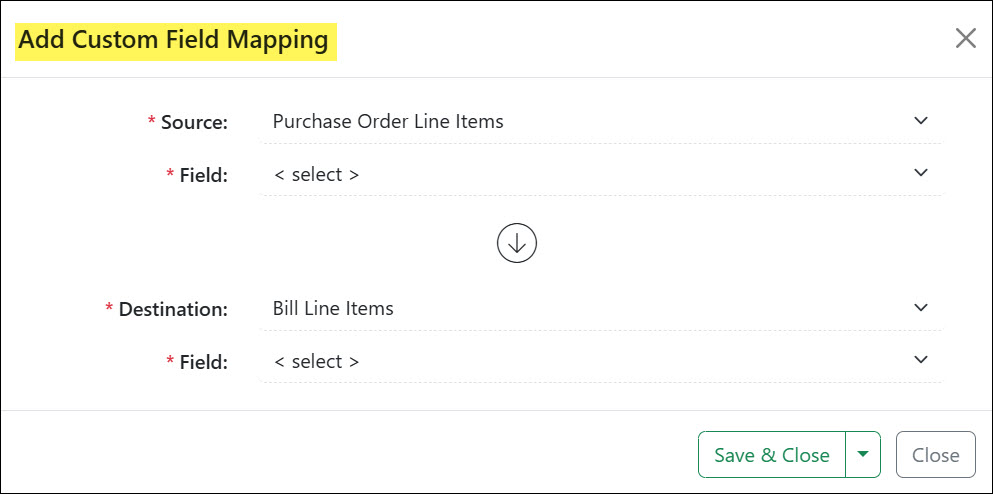
Example of the Add Custom Field Mapping Popup
Below is an example of a Purchase Order that includes a Custom Column based on an Item’s Custom Field which autopopulated once the Item was selected on the PO.
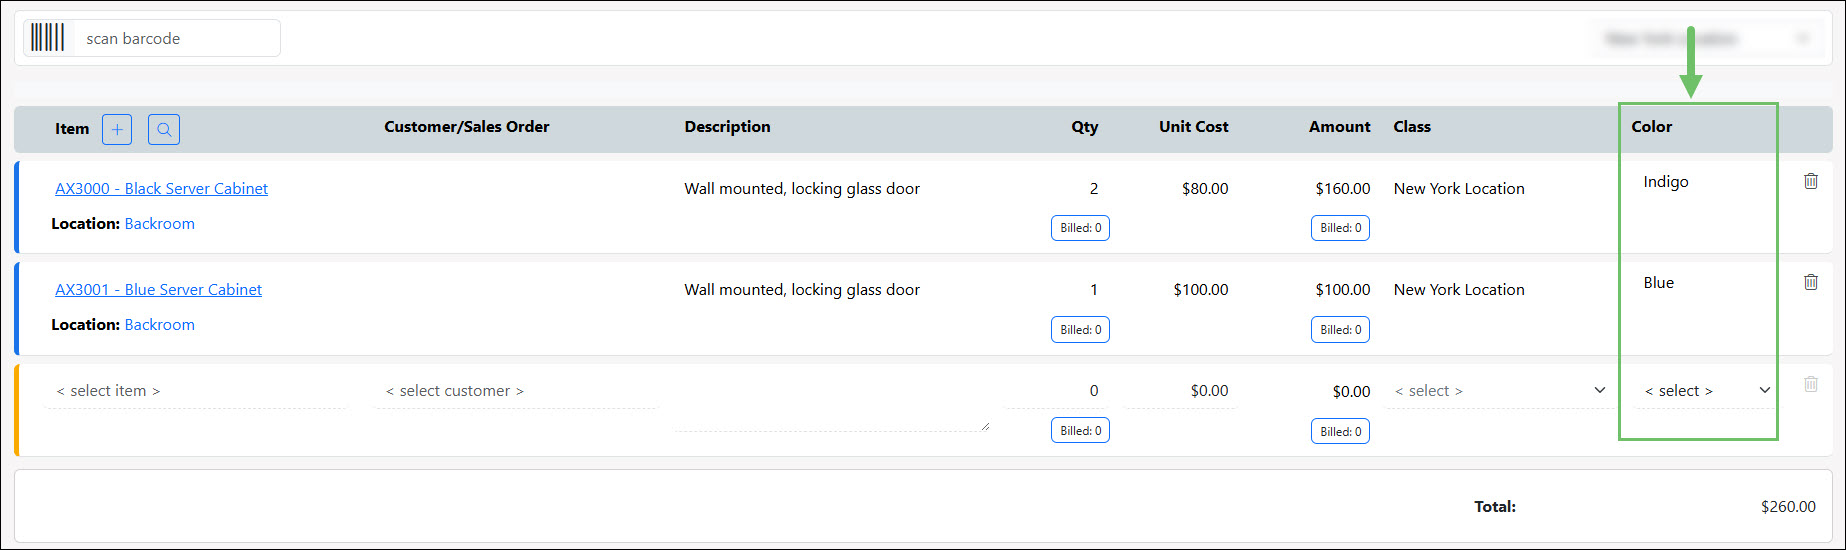
Example of a Custom Column on a Purchase Order
-
Editable Costs
Line Item costs can be edited on Purchase Orders, Bills, Checks, and Bill Credits in Striven. When an Item cost is edited on a Purchase Order, the new cost is stored at the Purchase Order level. This stored cost will then be used as the default cost when creating a Bill or Bill Credit directly from that Purchase Order.
Note: When an Item cost is edited, a prompt allows you to choose to update only the system’s master Item cost, or dynamically update both the cost and the price.
Before your Employees can use this feature, you will need to ensure they have the proper permission included in their User Role. The permission is called “Update item cost from AP Transactions and Purchase Orders”. Employees who lack this permission will not be able to update an Item cost at the Item or Cost List level.
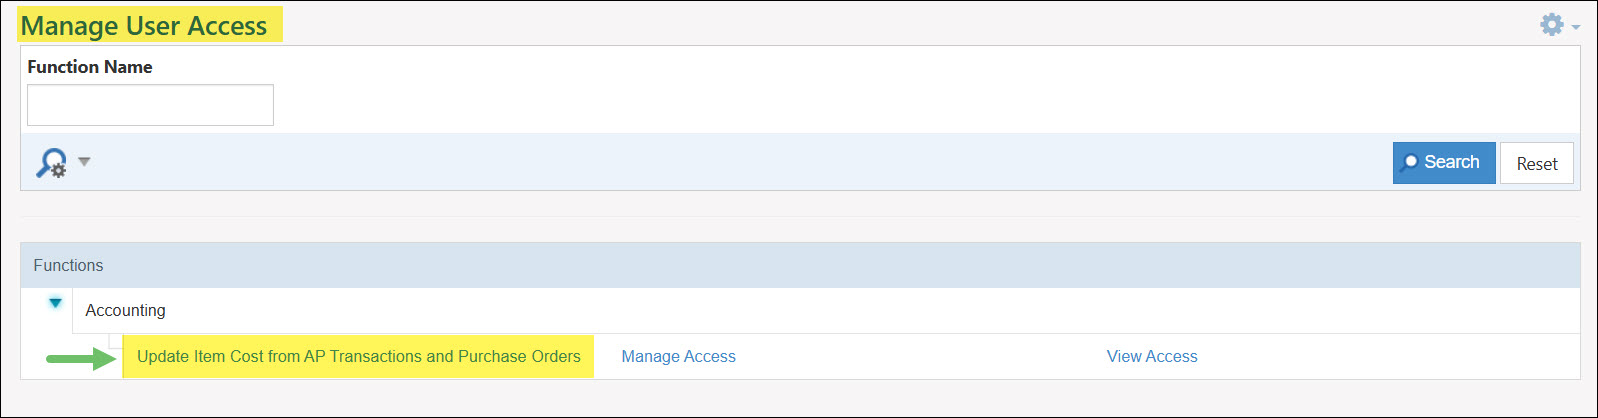
Example of the Permission Required to Update an Item Cost at the Item or Cost List Level
To enable this feature, navigate to the Purchasing Settings page. You must select the checkbox for Prompt to update the item cost if it is changed while creating Purchase Orders, Checks, Bills and Bills Credit.
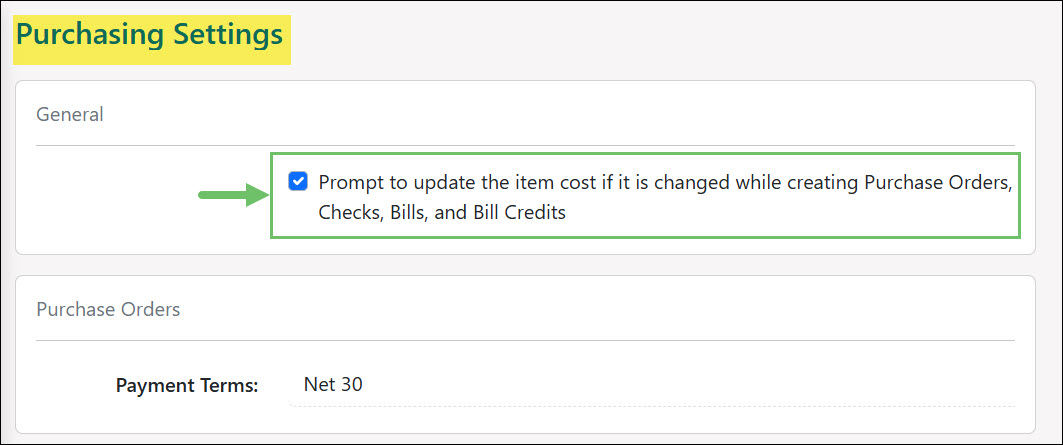
Example of the Setting to Enable Item Cost Editing on Purchase Orders & Bills
Item cost can be edited or updated for Items that are Inventory, Non-Inventory, and Service type Items as those are the primary Item Types being loaded on the Bill that is being created from the Purchase Order.
- Note: Item Groups, Manufactured, Fixed Assets, and Discount Items cannot be selected on a Purchase Order or Bill.
When creating the Bill or Bill Credit from the Purchase Order, you’ll see the costs that have been changed will carry over from the Purchase Order to display accordingly on the subsequent transaction.
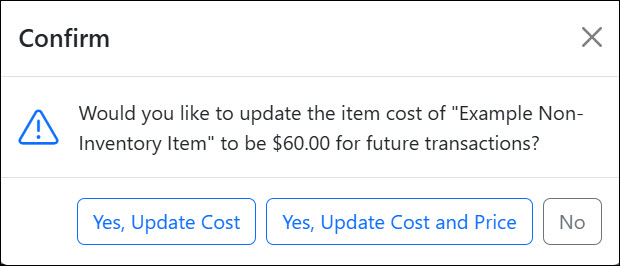
Example of the Different Cost Displays Depending on the Item Type
-
Purchase Order Internal Approval
Striven allows you to set up an internal review process for both Contract Managed and Non-Contract Managed Purchase Orders. This process requires certain orders to be reviewed by an internal user before they are officially approved internally or sent to a vendor for their final approval.
This feature is useful for improving Employee training by ensuring new Employees are properly supervised by requiring their Purchase Orders to be internally reviewed. It is also helpful for risk management by flagging sensitive Orders, such as those over a specific monetary amount, to enforce internal review and approval before funds are committed.
To configure this Purchase Order Internal Approval Process, you need to begin by navigating to the profile of the Employee who should not have the direct authority to approve or send Purchase Orders to Vendors. This can be done by navigating to Employees → List.
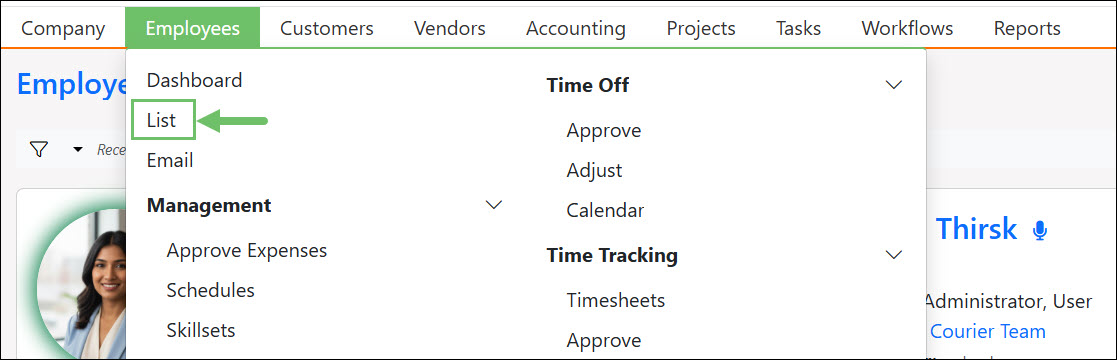
Example of the Employees List Option on the Employees Menu
Next, click on the Search icon and then enter the Employee’s name in the Name search field.
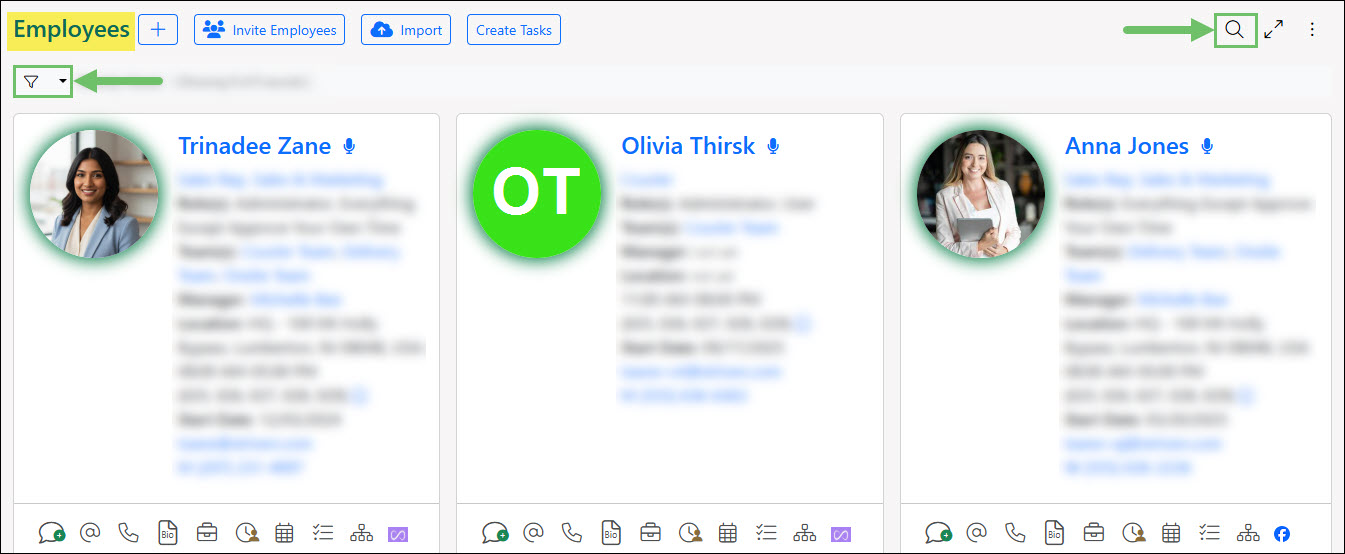
Example of the Two (2) Search Options Available on the Employees List Page
Once you have navigated to the Employee record you wish to configure for the Purchase Order Internal Approval Process, you will then click on the Settings tab. There you will see the following options in the Purchase Order Approval panel of the page:
- Approve up to: Provides a maximum dollar amount for the Employee’s authorization to Approve Purchase Orders.
- Cannot Add Blank Line Items On PO: Marking this check box will not allow the user to add blank line items on the Purchase Order.
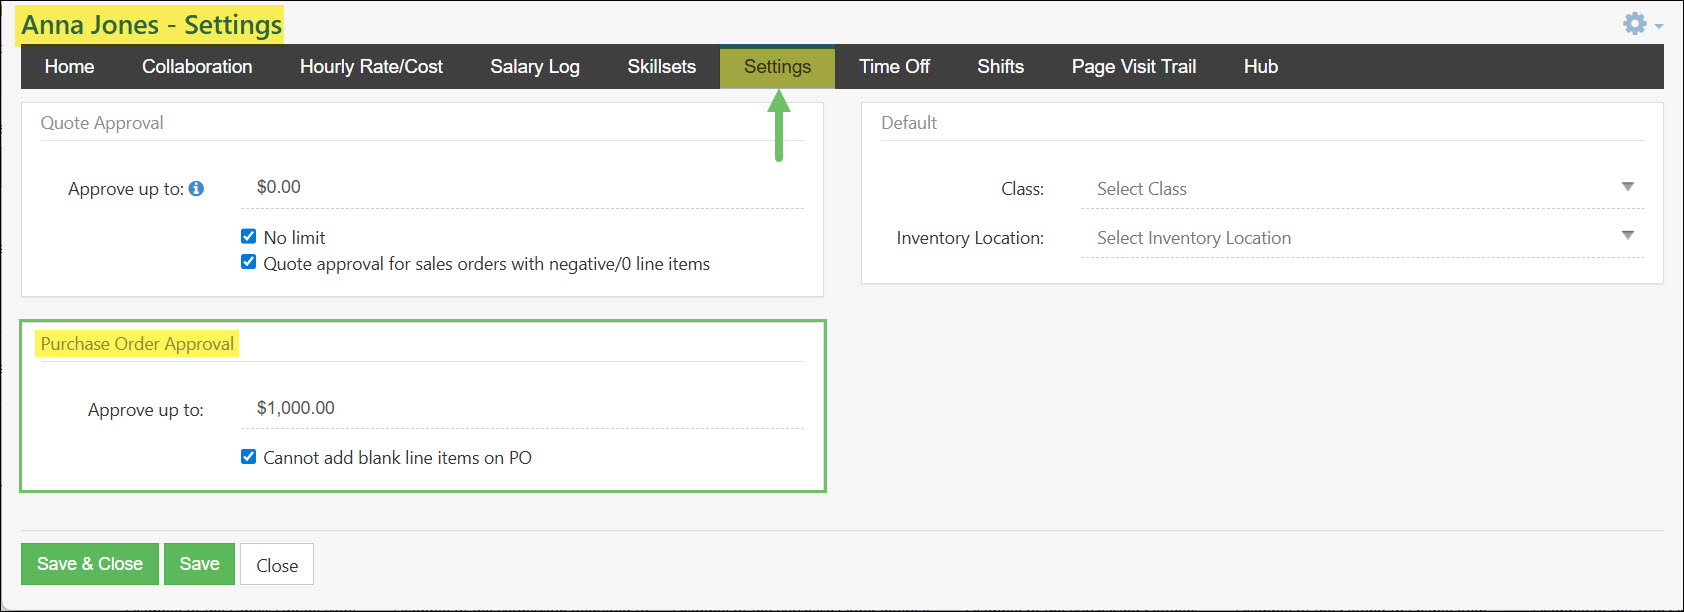
Example of Employee Order Approval Settings
If an Employee needs a Purchase Order reviewed internally, they can initiate the process when creating the Purchase Order. If they lack the necessary authority, they will be asked to choose an approving Employee to send a request to. The chosen Employee will get an email notification to review the Purchase Order. The delegated reviewer can then review and approve the PO, decline it, send it to another Employee for review, or forward the Purchase Order to the Vendor Contact for their final approval.
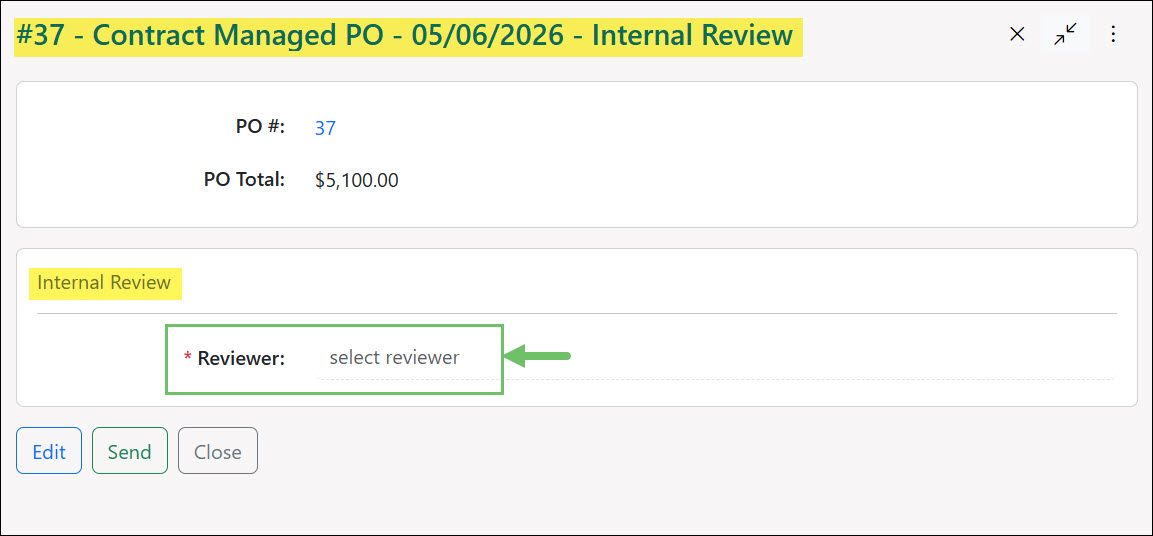
Example of the Purchase Order Internal Review Page
- Note: Restrictions have been implemented within the Purchase Order import process to ensure these limits are securely maintained. If a user imports a Purchase Order that exceeds their established approval limit, the system will automatically set the status to Pending for internal review, regardless of the status provided in the import file.
-
Recap
This guide covers the essential settings and configuration options for managing Purchase Orders in Striven. We reviewed how to manage user Permissions and configure system-wide Purchase Settings to establish defaults and automations across your procurement workflows. We also explored how to categorize orders using the Labels Library and how to define specific rules, payment terms, and Vendor approval requirements through Purchase Order Types. Additionally, we detailed how to capture specialized data and automate data entry using Custom Fields, Custom Columns, and Custom Field Mapping. Finally, we discussed the settings required for dynamically updating Editable Costs and configuring Internal Approvals with Employee-specific limits to ensure proper oversight and risk management.
FAQs
-
Who receives a notification when a new Purchase Order is created?
By default, the creator of the PO and the assigned Approver receive an email notification. You can add additional recipients in the Approval Notifications tab when configuring Purchase Order Types by entering their email addresses or selecting an Employee in the Recipient field.
-
Why am I being asked to choose an approver when I try to create a Purchase Order?
This happens if your user profile has an Approve up to limit that is lower than the total amount of the Purchase Order you are creating. In these cases, Striven requires you to select an authorized Employee to review and approve the order before it can be finalized or sent to the vendor.
-
How can I ensure specific data (like a “Color” choice) carries over from a Purchase Order to a Bill?
You can use Custom Field Mapping to automate this. By navigating to Custom Columns and selecting Manage Field Mappings, you can set a Source (the PO Line Item) and a Destination (the Bill Line Item). This ensures that your custom data stays consistent without manual re-entry.