


Purchasing & A/P
Standard Purchase Orders & Layout
Support Guide
-
Overview
Purchase Orders (POs) act as the backbone of your procurement and inventory management processes. They represent a formal, binding request to a Vendor to provide materials, inventory, or services at specified prices and terms. Understanding how to properly build, format, and utilize Standard Purchase Orders in Striven ensures accurate financial tracking, prevents unauthorized expenditures, and maintains clear communication with your supplier network.
Read this guide if you are trying to:
✔ Understand the navigation and layout of the Purchase Order screen.
✔ Learn how to manage Purchase Order and apply categorizing labels.
✔ Discover how to search, sort, and organize Items using drag-and-drop.
-
Permissions
Access to Purchase Order information in Striven is managed by a variety of user permissions. To verify your current access, consult your system administrator or the individual responsible for assigning and managing User Roles within your organization.
You can also check the permissions specifically related to the page you are viewing in Striven by clicking on the kebab menu in the top right corner of the page and selecting Settings. This will display the Settings Info page, where the relevant permissions are listed, along with an indication of your current access status.
If there is a permission listed to which you do not have access, the system may offer the option to Request Access (depending on your organization’s system settings). Choosing this option will notify a designated individual, allowing them to grant you that specific permission.
-
Creating a Standard Purchase Order
Creating a Standard Purchase Order is an important step in the purchasing/procurement process, officially documenting your intent to purchase specific goods or services from a Vendor/Supplier. This versatile internal document is used for several purposes: it facilitates communication with the Vendor/Supplier, establishes the foundation for inventory management and receiving operations, and serves as the basis for vendor billing/accounts payable. The process for creating a Standard Purchase Order typically involves several key steps.
There are a number of different ways to create a Standard Purchase Order in Striven:
Purchase Orders List: Click the Add button on this page to open the Add Purchase Order page. Alternatively, you can use the Purchase Orders Import button on this page to add Purchase Orders to Striven in bulk.
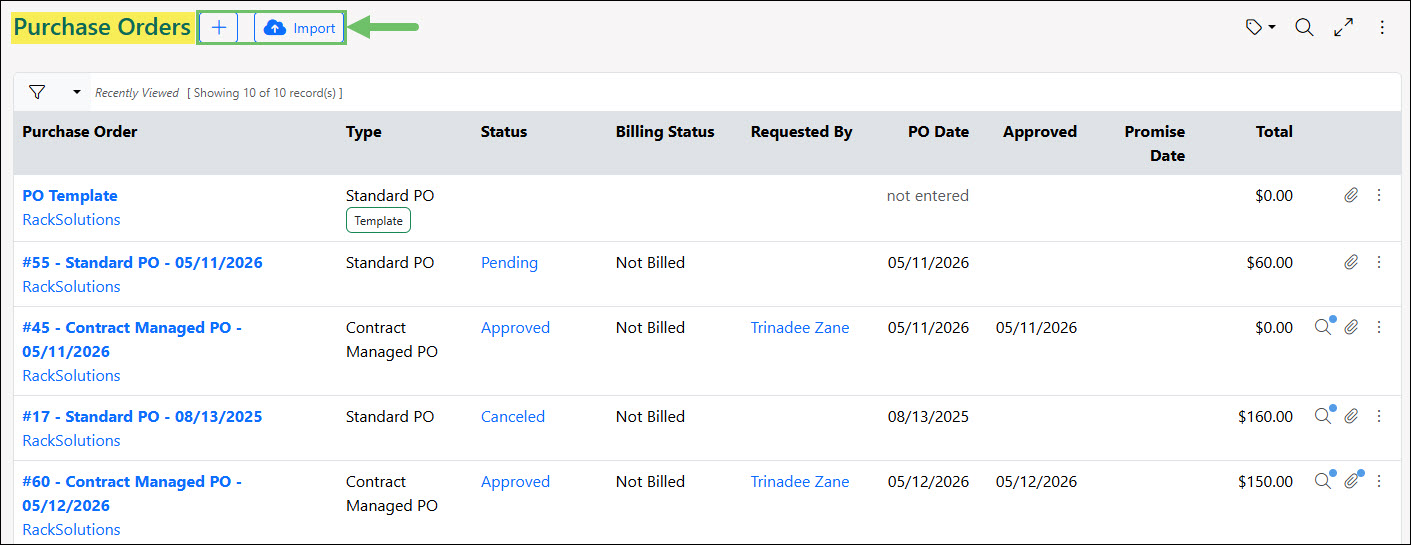
Example of the Purchase Orders List Page

Quick Add Menu: Navigate to the Quick Add menu in the top-right of the Striven Menu Bar. Below the Vendors category, you will find the Purchase Order option.
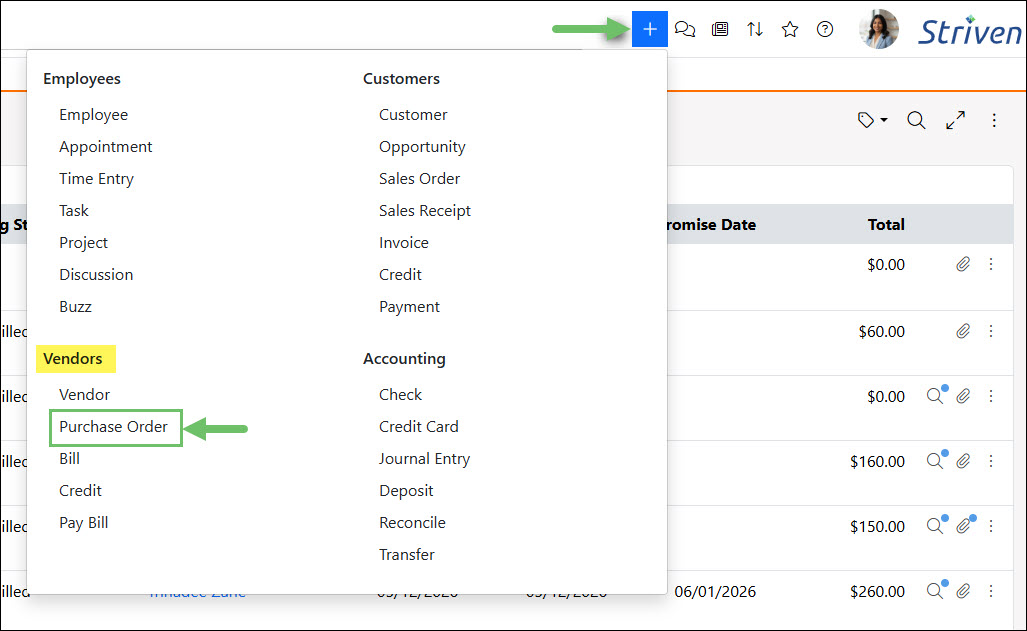
Example of the Purchase Order Option on the Quick Add Menu
Various Entities: The option to add/create a Standard Purchase Order is available from different entities within Striven, such as Sales Orders, Inventory Stock Status Report, and Purchase Order Templates and more.
-
Adding a Standard Purchase Order
Creating a Standard Purchase Order involves navigating several particular configurations to tailor the order to your specific needs. This guide provides a detailed overview of the Add Purchase Order interface, exploring the specific fields and options you will encounter. Below, we explain the functionality of each element and how to utilize them to successfully build your Purchase Order.
- Purchase Order Information: The following information can be entered in this section:
- Create from Template: Provides the option to select from a list of Purchase Order Templates from which to create your Purchase Order. For more information related to Purchase Order Templates, refer to our Purchase Order Management Guide.
- Type: Lists the available Purchase Order Types from which to choose. Purchase Order Types can be configured to meet specific needs of your business, including Contract Management. You may also use the hovering plus ( + ) icon to create a new Purchase Order Type for the current order. Visit our Purchase Order Settings Guide for further details about Purchase Order Types.
- Vendor: Provides a list of existing Vendors from your Vendors List from which to make your selection. Alternatively, if you need to add a new Vendor to the Purchase Order, you can do so by hovering over the Vendor line in this section and clicking on the plus ( + ) icon that appears. This will display the Add Vendor popup with fields to select the Vendor’s Type and enter their general information to save in your system.
- Vendor Contact: Provides a list of Contacts related to the current Vendor for selection. This field also includes a hovering plus ( + ) icon should you need to add a new Contact for the current Vendor to your system. This field becomes available if toggled on within the Display Fields section of the Purchase Order Type.
- Requested By: Displays a list of Employees available for selection. This field becomes available if toggled on within the Display Fields section of the Purchase Order Type.
- Promise Date: Allows for the selection of a date to indicate when the Purchase Order is expected to be fulfilled. This field becomes available if toggled on within the Display Fields section of the Purchase Order Type.
- Labels: Allows you to select Labels from the list of existing Labels created within your Striven system. Available Labels are configured at the Purchase Order Type level.
- Manage Labels: Opens the Manage Labels popup wherein you can select an existing label or add Private Purchase Order Labels. You can choose the Label name and color. Private Labels are not visible or accessible to other system users, but may be used for personal use or reference. Private Labels are indicated by a lock icon displayed on the Label in the Manage Labels popup.
- Note: Private Labels can be made Public to allow other system users to view and access them by clicking on the Label kebab menu and selecting Make Public. Keep in mind that once the Label is made Public, it cannot be switched back to Private. For more information on Purchase Order Labels, check out the Labels Library section of our Purchase Order Settings Guide.
- Order Information: The following information can be entered in this section:
- Purchase Order Number: Allows for a number to be added to the Purchase Order.
- Purchase Order Date: Allows for the selection of a date to indicate when the Purchase Order was created.
- Vendor Notes: Link which will allow you to enter a note that can be visible to the Vendor in the Vendor Portal.
- Internal Notes: Link which will allow Employees to enter a note that will only be visible to internal Employees signed into Striven.
- Shipping Information: The following information can be entered in this section:
- Dropship this Purchase Order: Marking this checkbox will allow you to select a Customer Ship To location.
- Ship To: Displays the Location designated as the Ship To location for the selected Internal Company Location or Customer for drop-shipping. If the entity does not have a designated Ship To location set, a list of Locations is provided from which to choose.
- Ship Via: Allows you to select the preferred shipping method options from the drop down menu.
- Billing Information: Allows you to select or add Payment Terms for the Vendor Bills related to this Purchase Order. Payment Terms may be preset into this section based on the Purchase Order Type’s configurations.
- Attachments: Enables you to choose a file or drag/drop a file to upload as an attachment to the Purchase Order. These files will be available for the Vendor to view in the Vendor Portal as well. (For files that should only be available internally, the Purchase Order’s Hub should be used instead). Hovering over the tooltip icon will display a list of allowed file types.
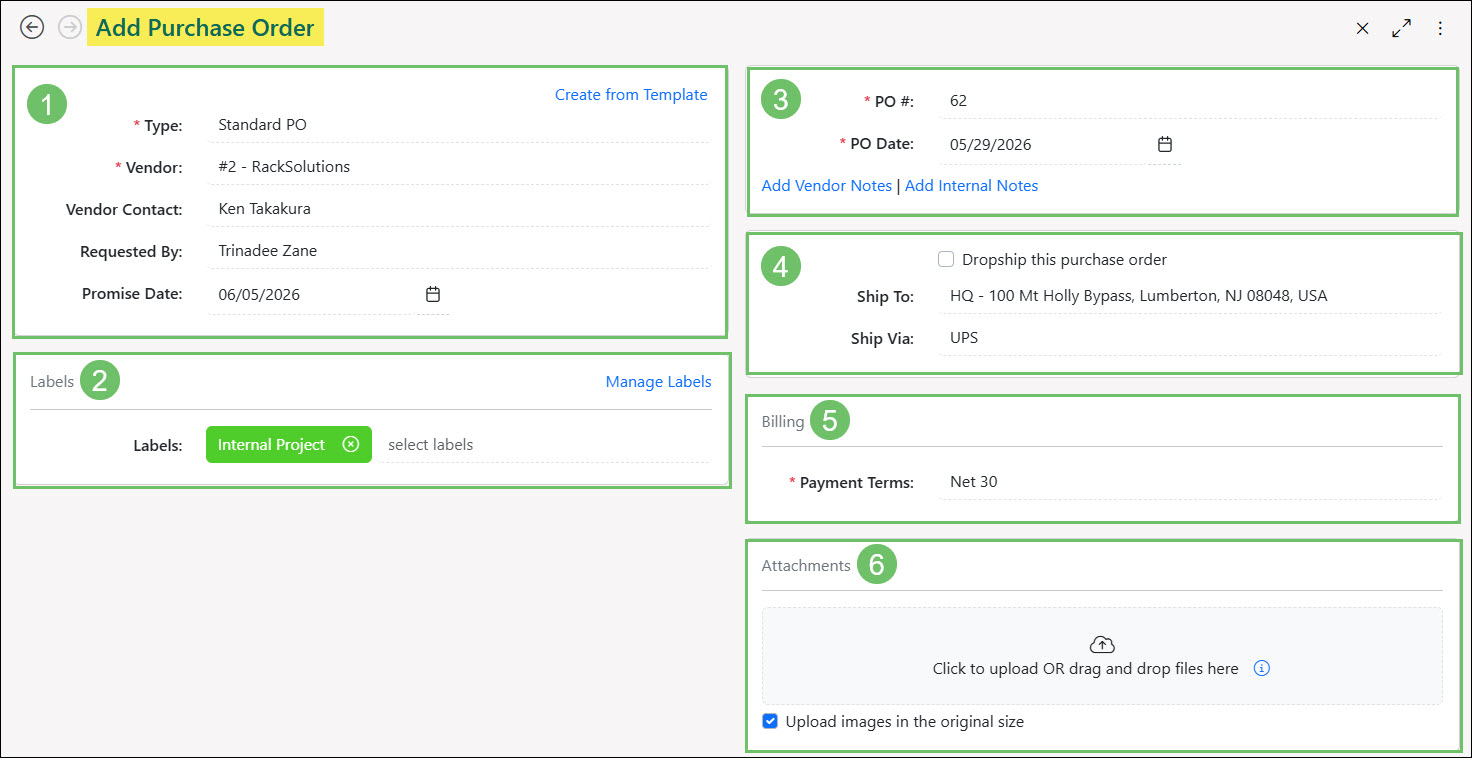
Example of Adding a Standard Purchase Order
- Purchase Order Information: The following information can be entered in this section:
-
Selecting Multiple Vendors
If the Purchase Order Type selected has the Allow multiple vendor selection option enabled an additional toggle option will be available when selecting Vendors on a Purchase Order to Select Multiple Vendors.
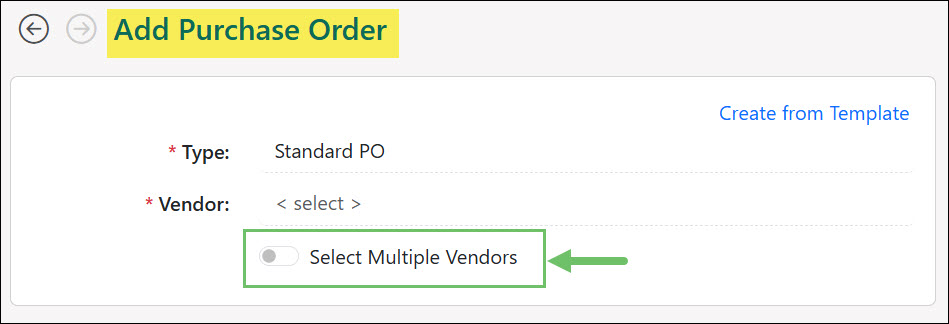
Example of the Select Multiple Vendors Option on a Purchase Order
When toggled on, multiple Vendors can be selected using the Vendor field. To search for specific Vendors using search criteria hover over the Vendor field and use the magnifying glass icon to open the Search and Add Vendors window.
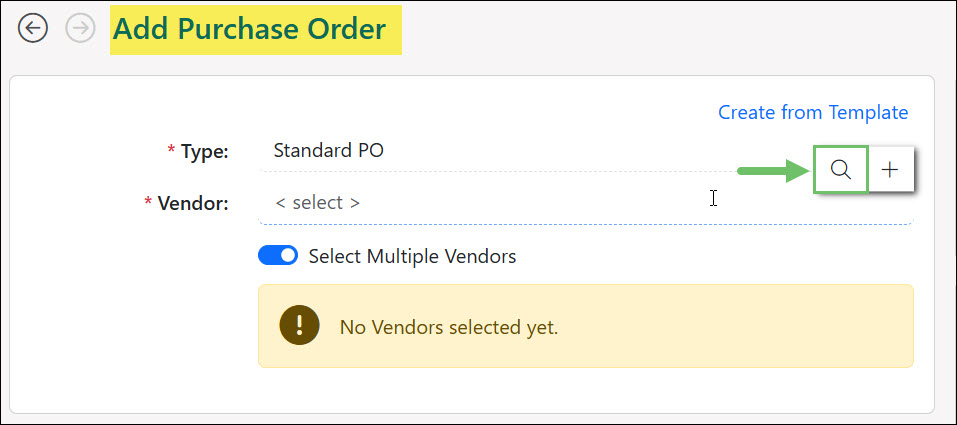
Example of the Select Multiple Vendors Option Enabled on a Purchase Order
Each Vendor selected will be added to a list under the Vendor field with an option to remove them with a trash icon.
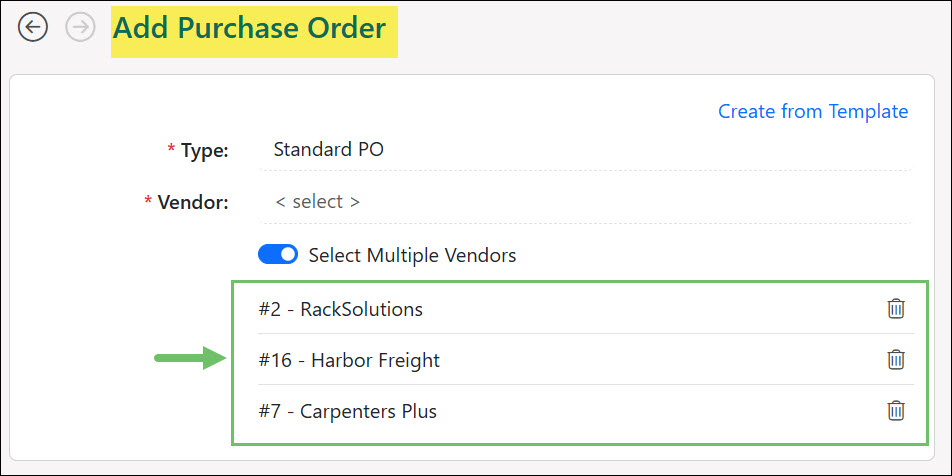
Example of Multiple Vendors Selected on a Purchase Order
-
Creating Purchase Order from a Sales Order
Purchase Orders can also be created from a Sales Order using the Sales Order Actions menu. This will create a connection between the Orders that can later be referenced using the Related To feature.
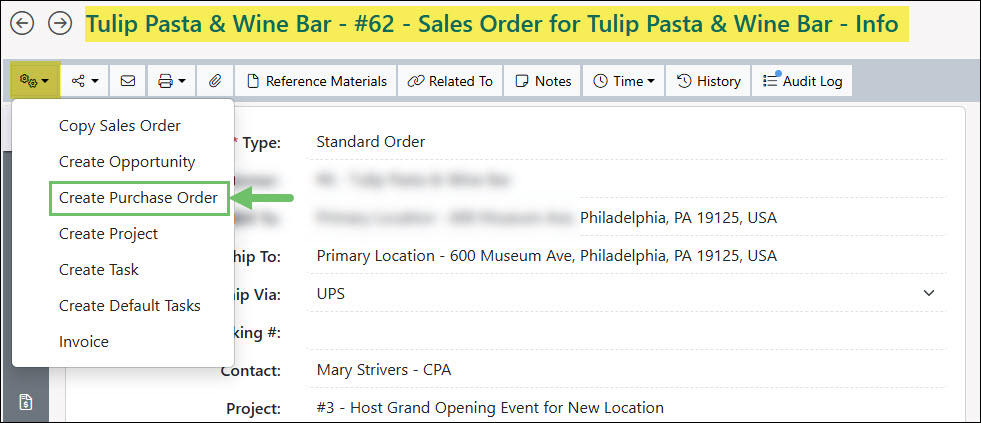
Example of the Create Purchase Order Option from a Sales Order Actions Menu
When using the Create Purchase Order option from a Sales Order different choices can be decided on. Users can choose to add all Items from the Sales Order to a Purchase Order or select certain ones based on the preferred Vendor set up at the Item level. An option is also available to add these Items to a new Purchase Order or select an existing Purchase Order that has already been created in the system.
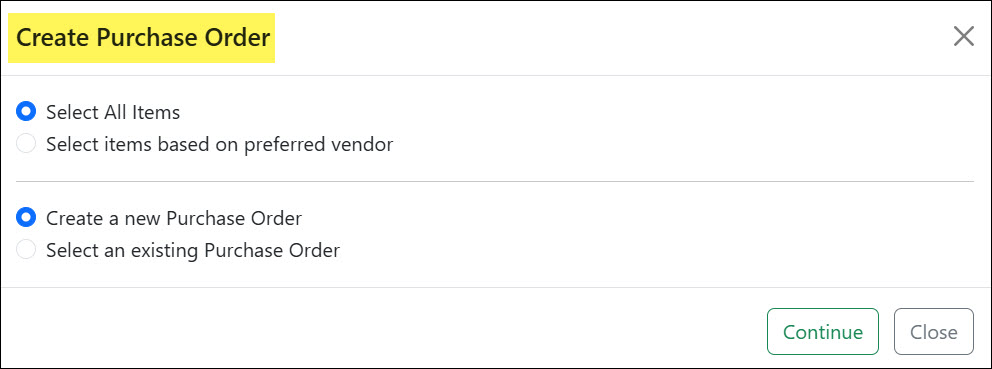
Example of the Create Purchase Order Feature from a Sales Order
-
Purchase Order Items & Totals
Once the initial information for your Purchase Order has been filled in, it is time to select the Items. Items are goods or services that you wish to purchase from your Vendor. After selecting the Item(s), information such as the Quantity and Unit Cost can be entered to calculate the overall Total for the Purchase Order.
- Items Section: Allows you to choose existing Items within your Striven system to be purchased from your Vendor. Use the Item Quick Add [ + ] option to create an Item directly from the Add Purchase Order page. Additionally, use the Items Search button for a more advanced search option.
- Totals Section: Displays the overall Total of the Purchase Order.
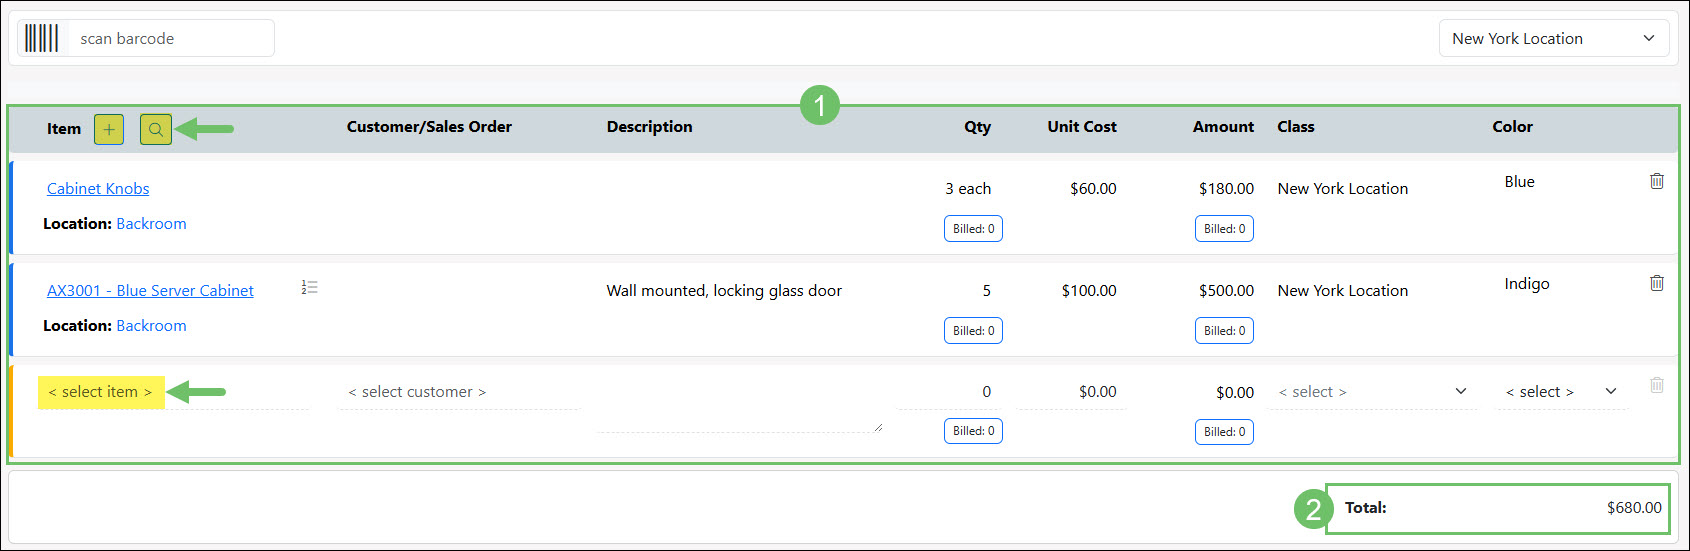
Example of the Items Section & Totals Section of a Purchase Order
-
Item Section
When selecting Line Items for your Purchase Order, you can use the drop-down box on the Add Purchase Order page to search for your Item. Clicking into this field will load the first fifty (50) Items in your Items List, along with an option to Load More. The Item Number (if applicable) and Name are displayed at the top, and the Item Category(ies) are displayed beneath the Item Name, in-line.
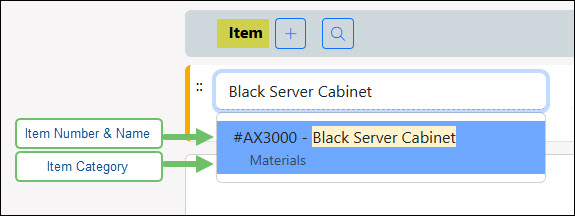
Example of the Item Drop-Down List on a Purchase Order Showing the Item Number-Name and Category
If a Category is deeply nested under other Categories, the Category Name will be truncated so that you will not see the top level Parent Categories, but there will be an ellipsis you can click on to display the full Category hierarchy in-line.
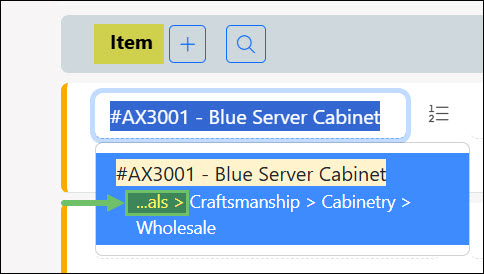
Example of the Category Ellipsis on the Items Drop-Down List on a Purchase Order
You have the option to search using either the Item Number, Item Name, or Category Name, and any matching text will be highlighted in the displayed results.
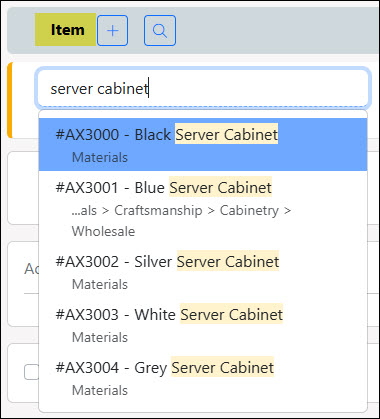
Example of the Highlighted Search Results on the Item Drop-Down List
-
Search & Add Items Option
When selecting Items to add to your Purchase Order, you can use the Search & Add Items option as an alternative to selecting the Items from the drop-down list. This feature is available on the Item section header on a Purchase Order by clicking on the magnifying glass icon to open the Search & Add Items popup.

Example of the Magnifying Glass Icon for the Items Search Option on a Purchase Order
This popup will allow you to search for Items by Name, Number, Description, Manufacturer Part #, Manufacturer, Category, or Type.
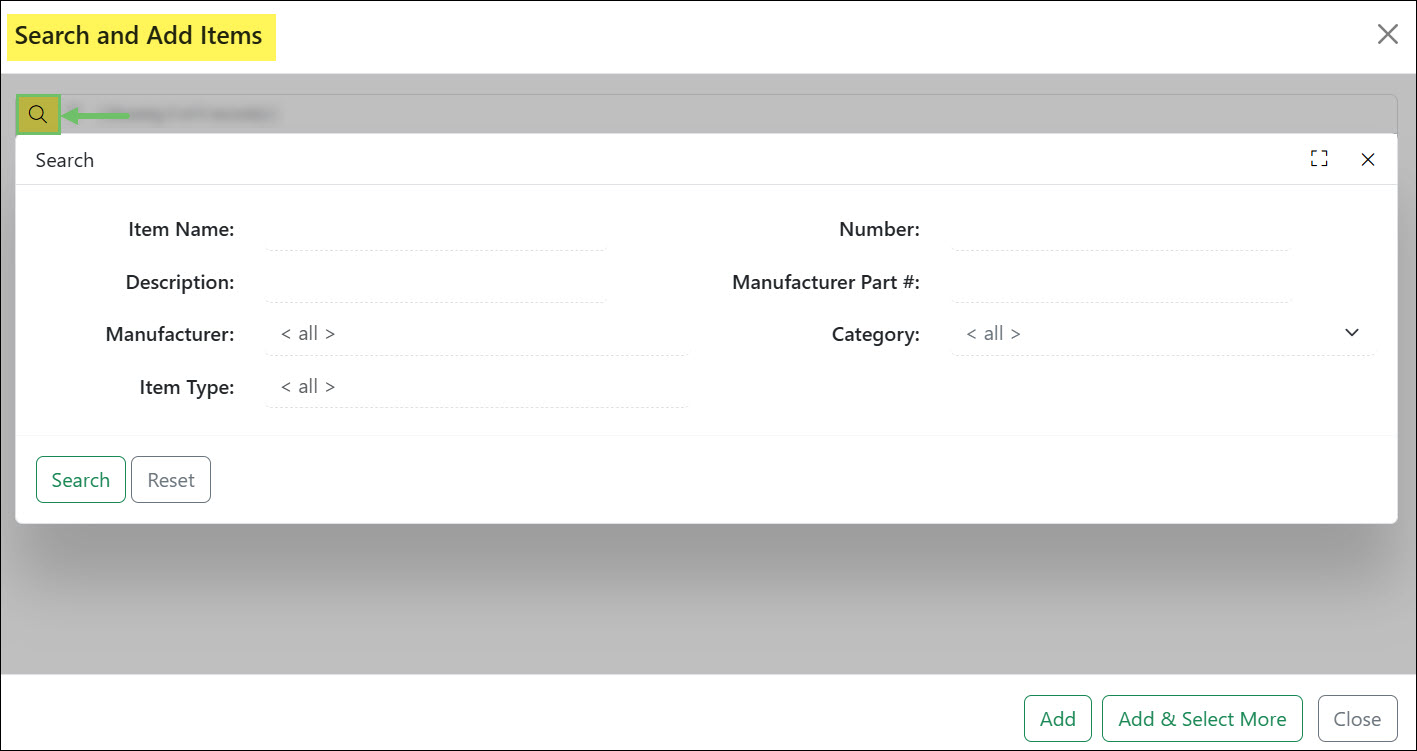
Example of the Search & Add Items Popup on a Purchase Order
If your search returns more than twenty-five (25) Items after you select your criteria and click Search, a Load More button will appear at the bottom of the results, allowing you to view additional options.
To add Items to the Purchase Order, check the box next to the desired Items. After making your selections, you have two options:
- Click the Add button to add the selected Items and close the selection window.
- Click the Add & Select More button to add the Items while keeping the search results visible, allowing you to continue selecting and adding additional Items.
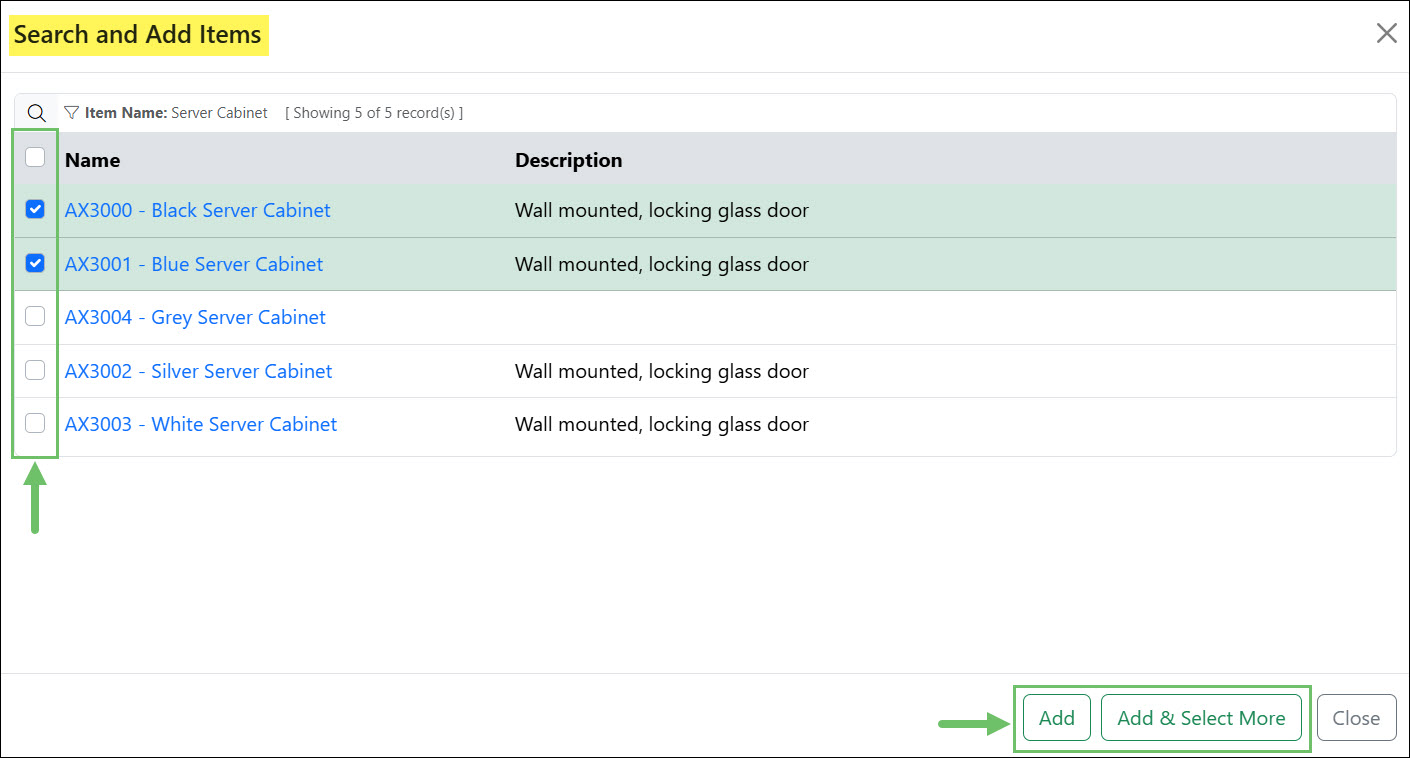
Example of Selecting Multiple Items in the Search and Add Items Pop-Up
-
Save as Template
On the bottom of the Add Purchase Order page, before you create the order you’ll find the option to Save as Template. Checking this box enables you to save the current Purchase Order as a Template to use again for future Purchase Orders without having to reconfigure all the Purchase Order details. For more information related to Purchase Order Templates, refer to our Purchase Order Management Guide.
When saving a Purchase Order as a Template, you will be able to enter a Template Name and select from the following options:
- Use Template Name As The Purchase Order Name: Saves the Purchase Order name with the Template to be used when a new Purchase Order is created from the Template.
- Save Pricing Information: Saves the pricing information for each Item for the Template. If the option is not selected, the pricing information retrieved will be based on the current Item Cost.
- Save Vendor and Shipping Information: When this option is checked, the selected Vendor, Contact and selected Shipping settings will be saved with the Template.
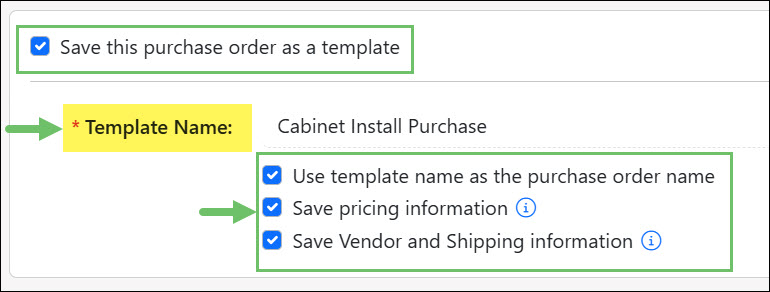
Example of the Save as Template Option on an Add Purchase Order Page
-
Create/Save Purchase Order
The final step when creating a Purchase Order in Striven is to click the Create Purchase Order button, or if you are not prepared to finalize the Purchase Order, you can click the Save button to save your progress in an Incomplete status.
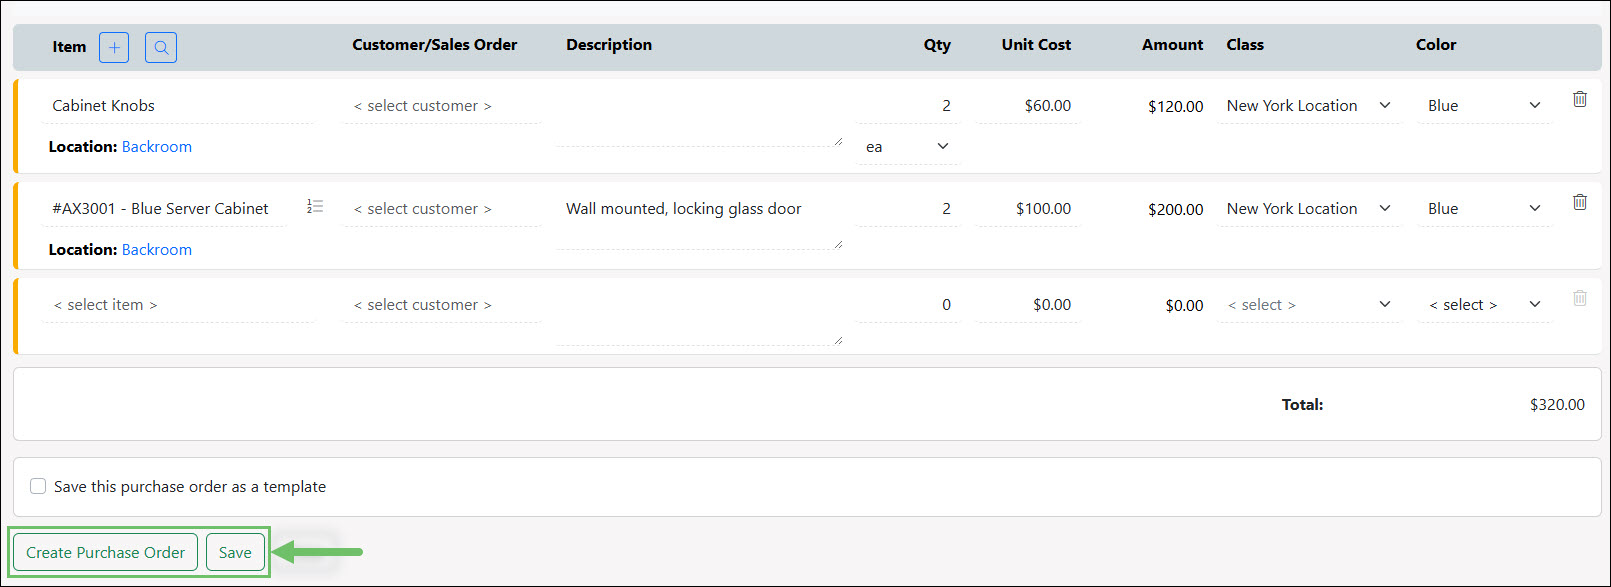
Example of the Create Purchase Order and Save Buttons on the Add Purchase Order Page
Incomplete Purchase Orders are non-validating, meaning you can save the order despite required fields being left blank, such as Item Location or a Requested By Contact. It is essentially a draft that allows you to walk away without losing progress. Incomplete orders also do not impact Inventory forecasting and On PO quantities nor can they be used in Striven Workflows.
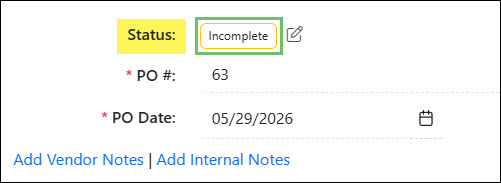
Example of the Incomplete Purchase Order Status Option
You can change an Incomplete Purchase Order status to Canceled, but you will need to click the Create Purchase Order button where the status will change to Approved before you will be able to change the status to In Progress, Fulfilled, Closed, or Canceled.
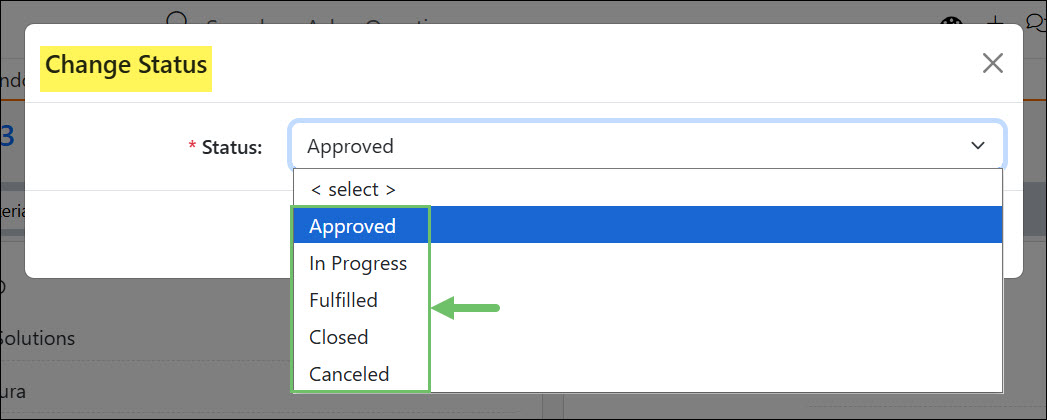
Example of the Created Purchase Order Status Options
Clicking the Create Purchase Order button causes the system to run the Purchase Order through the validation process, checking that all the required fields on the Purchase Order are filled.
From here you now have access to the other features, such as Printable Formats, Discussions, and more. You can also use Striven Workflows to Send an Email, Send a Discussion, or Create a Task related to the Purchase Order.
-
Purchase Order Import
For organizations migrating from legacy systems or handling massive procurement lists generated externally, the Purchase Order Import tool is vital. To use the Purchase Order Import tool, navigate to Vendors → Purchasing → Purchase Orders and select the Import button at the top of the Purchase Orders List.
By mapping a CSV or Excel file to Striven’s import fields, you can generate hundreds of Purchase Orders simultaneously. The import wizard allows you to define headers, line items, costs, and terms in bulk. Visit our Import Management Guide for more information.
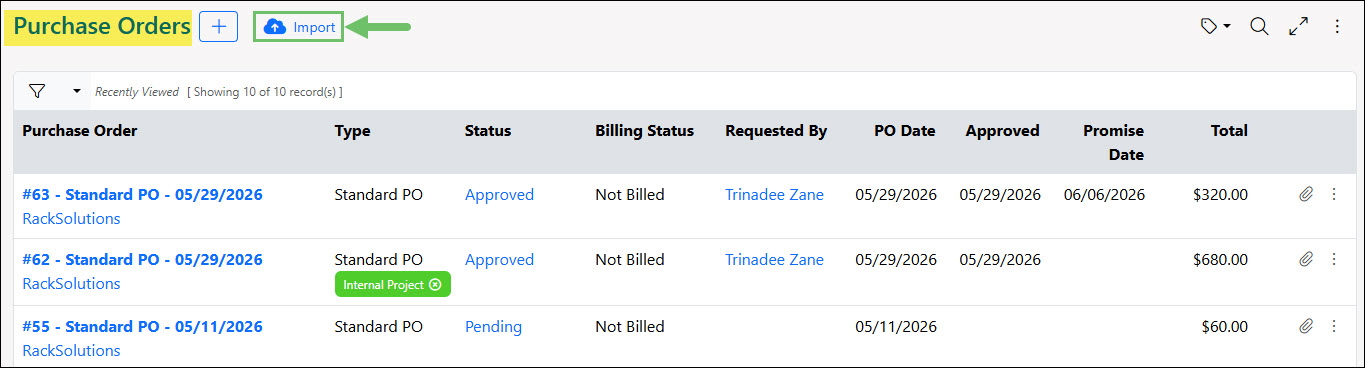
Example of the Import Button on the Purchase Orders List
Best Practice: Always download the Striven sample import template first. Fill out 1-2 test POs on the spreadsheet and run a test import to ensure your Vendor Names and Item Names perfectly match the database records before uploading the entire batch.
-
Recap
This guide covers the creation of Standard Purchase Orders in order to ensure financial accuracy, and communicating with vendors. We reviewed how to create new Purchase Orders from the main list, Quick Add menu, or related entities. We also explored the creation interface to define Vendor details, drop-shipping locations, payment terms, and labels, while providing intuitive item search and selection tools. We also explored how you can streamline your workflow by using the Save as Template feature for recurring orders or the import tool for bulk processing.
FAQs
-
Can I edit a Purchase Order after it has been sent to the vendor?
Yes, users with adequate permissions can edit a PO. However, if items have already been received or billed against the PO, those specific lines will be locked. To adjust a fully received PO, you must reverse the receipt or utilize vendor credits.
-
How do I know if an Item on a PO will update my inventory?
Only Items configured as Inventory types in your Items list will update your Quantity on Hand upon receiving. Non-inventory and Service Items will track purely as financial expenses without affecting warehouse counts.
-
Can a single Purchase Order be linked to multiple Projects?
Yes. While you can set a default Project at the header level of the PO, you can also map individual line items in the Items Section to different Projects or Classes, allowing for highly granular job costing.