


Purchasing & A/P
Billing & Contract Management
Support Guide
-
Overview
This guide provides an in-depth examination of Purchase Order and Billing management within Striven, with a particular focus on Recurring and Contract Managed Orders. We will review essential configurations that are important to the Purchase Order Approval process such as setting up Purchase Order Types, Approval Processes, Payment Terms, and Terms & Conditions.
Read this guide if you are trying to:
✔ Configure settings for your Purchase Order Approval Process in Striven.
✔ Learn about Managing Recurring Purchase Orders.
✔ Utilize different types of Billing for Contract Managed Orders.
-
Permissions
Access to Contract Managed Purchase Order information in Striven is managed by a variety of user permissions. To verify your current access, consult your system administrator or the individual responsible for assigning and managing User Roles within your organization.
You can also check the permissions specifically related to the page you are viewing in Striven by clicking on the kebab menu in the top right corner of the page and selecting Settings. This will display the Settings Info page, where the relevant permissions are listed, along with an indication of your current access status.
If there is a permission listed to which you do not have access, the system may offer the option to Request Access (depending on your organization’s system settings). Choosing this option will notify a designated individual, allowing them to grant you that specific permission.
-
Contract Managed Purchase Order Type Settings
Configurations such as PO Types, Terms and Conditions, Payment Terms, and other settings are available within Striven to assist you with your Contract Managed Purchase Orders. In the following sections, we review the available options for tailoring your Purchase Order Approval Process.
To use advanced features with your Contract Managed Purchase Orders, you must have the contract management option enabled within your Purchase Order Type.
To manage your Purchase Order Types, navigate to Company → Settings → Accounting → Purchasing → Purchase Orders → Purchase Order Types.
Settings to configure when editing a Purchase Order Type without needing to turn on Contract Management include the following:
- Requires Internal Review: Enabling this ensures the Purchase Order is routed through an internal approval process before it can be sent out to the Vendor to view.
- Allow Recurring: Grants the ability to set up the Purchase Order to generate on a regular, recurring schedule.
- Allow multiple Vendor selection: Permits you to select and send the Purchase Order to more than one Vendor simultaneously.
- Display Fields & Defaults: Allows you to toggle the visibility of fields like Promise Date (including requiring it or setting it as date and time), Requested By, and Vendor Contact, as well as setting order defaults like Dropship.
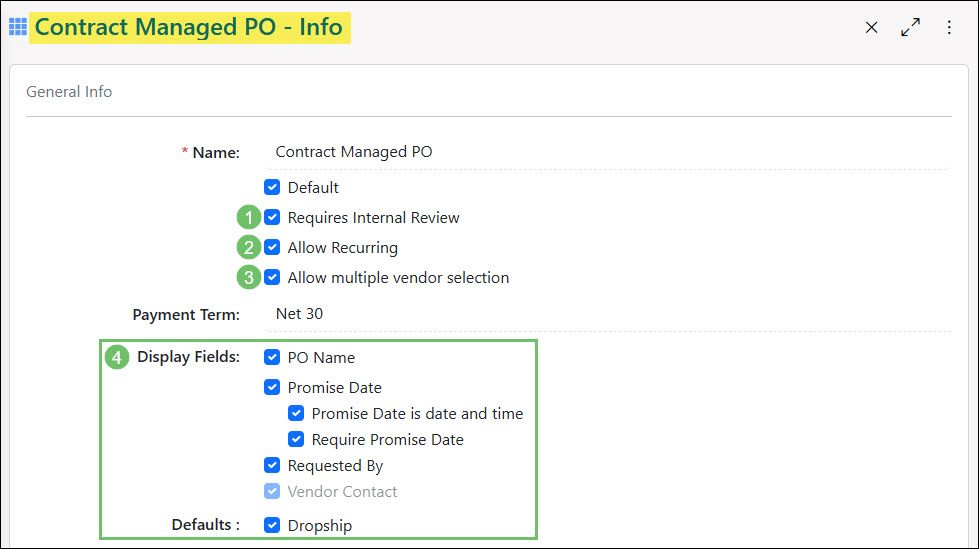
Example of the General Info Section in a Purchase Order Type

When viewing the Purchase Order Type Info page, toggle the Turn on Contract Management checkbox to make available the following configuration options:
- Terms & Conditions: Allows you to define a default set of Terms & Conditions to be applied automatically to the order.
- Requirements: Allows you to enforce specific Vendor actions, such as Vendor must enter tracking information (applicable during the Bill creation if the PO has inventory/non-inventory items) or Requires Vendor Approval. If approval is required and multiple vendors are allowed, you can choose to Assign first vendor who approves the purchase order.
- Approval Methods: Defines how the Vendor can approve the Purchase Order. Options include Electronic, Written, and Verbal. You can also specify if the Written or Verbal methods will trigger a Requires Attachment rule.
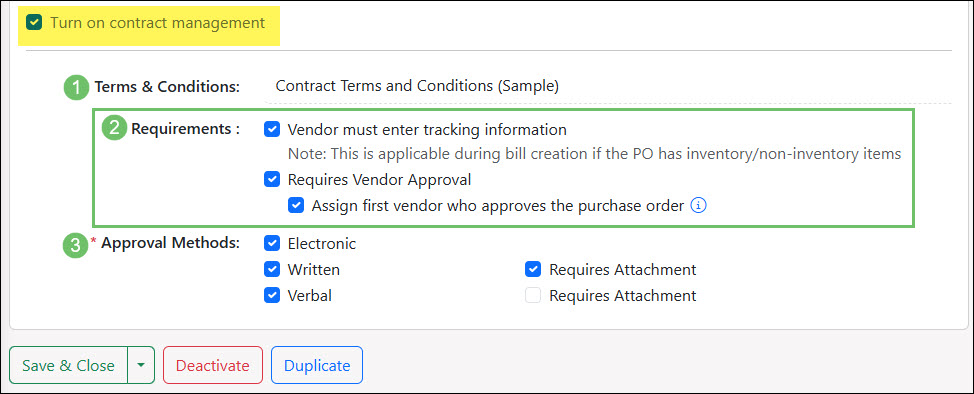
Example of the Contract Management Options in a Purchase Order Type
-
Payment Terms
Payment Terms are time conditions on which two parties agree to fulfill a purchase by a certain date or period. Payment Terms are available for both Accounts Receivable and Accounts Payable Transactions and will allow your Company to track late Payments in Collections. Learn more about setting up Payment Terms in Striven by reviewing the Payment Terms section in our Accounting Setup Guide. You can add new Payment Terms from the Payment Terms List. To view Payment Terms use one of the following steps below:
- Company → Settings → Accounting → Purchasing → Bills → Payment Terms
- Company → Settings → Accounting → Purchasing → POs → Payment Terms
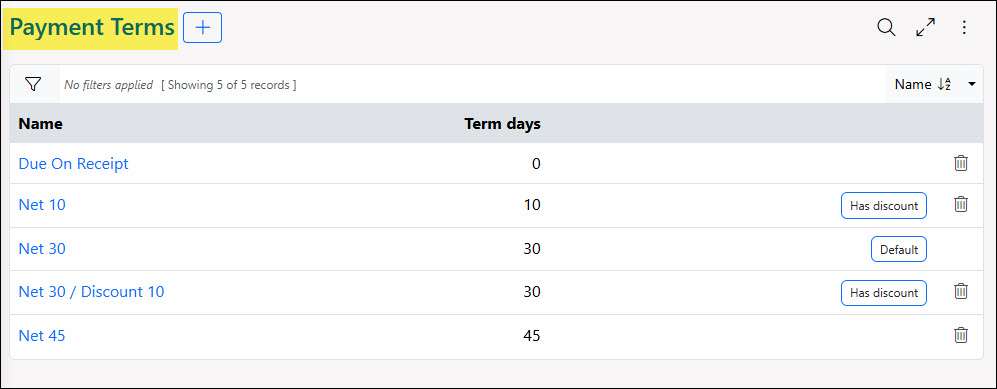
Example of Payment Terms for Purchase Orders and Bills
The default Payment Term for Purchase Orders can be determined within the General Info section of the Purchase Order Type Info page using the Payment Term dropdown field.
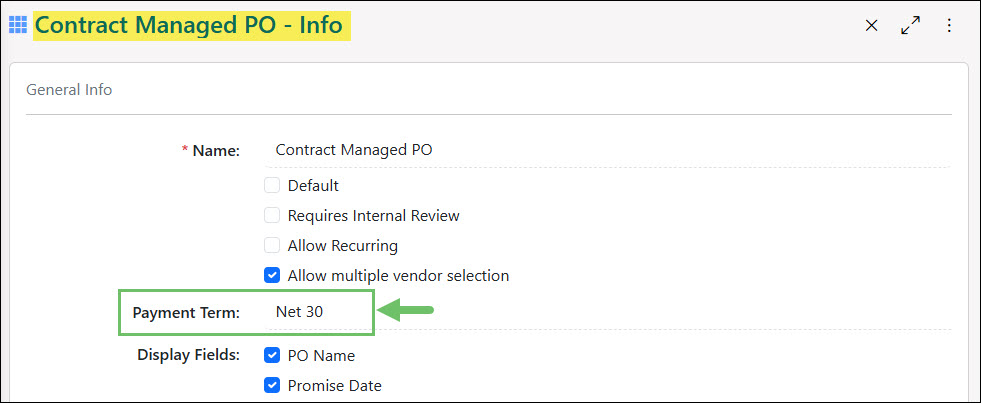
Example of the Payment Terms Field in a Purchase Order Type
The Payment Term for an individual Purchase Order can be determined at the Purchase Order level, by using the Payment Terms field located within the Billing section.
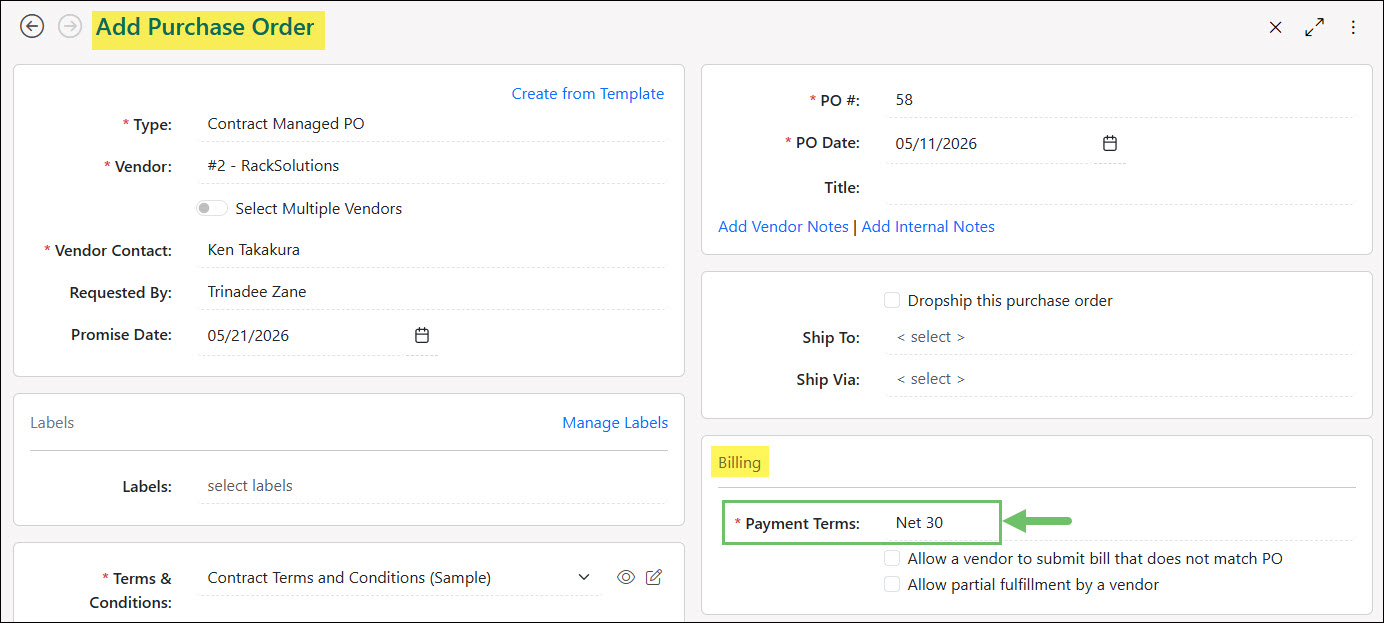
Example of the Payment Terms Field on a Purchase Order
-
Terms & Conditions
Terms & Conditions are agreed upon by both the buyer and seller upon the point of purchase. Once the Purchase Order is approved, it is then considered a Contract and both parties must meet each other’s end of the Purchase Order.
When at the Terms & Conditions List, individual terms can be edited by clicking on the name. This will initiate a popup as shown below in which you can choose where the Terms & Conditions appear. These include Sales Orders, Purchase Orders, public forms, recruiting, and Surveying. These can be enabled by toggling the appropriate checkbox.
To view Terms & Conditions, navigate to Company → Settings → Accounting → Purchasing → Purchase Orders → Terms & Conditions.
- Name: Allows you to name the created Terms & Conditions for clarity.
- Category: The entity in which the Terms & Conditions are in effect. With Striven you have the ability to set Terms & Conditions for different processes, such as Orders or recruiting. This will make sure these Terms show up as available for the entity it should be while hiding it from where it should not be applicable.
- Content: The text editor box is where you enter your Terms. The advanced editing option allows for precise formatting in order to make sure your Terms & Conditions are exactly as your Company needs them.
- View History: Displays previous versions of your Terms & Conditions. Striven keeps a history tab for you for when edits are made or Terms are updated. Keeping records of your previous Terms & Conditions can save you from legal liability at a later date if the situation arises.
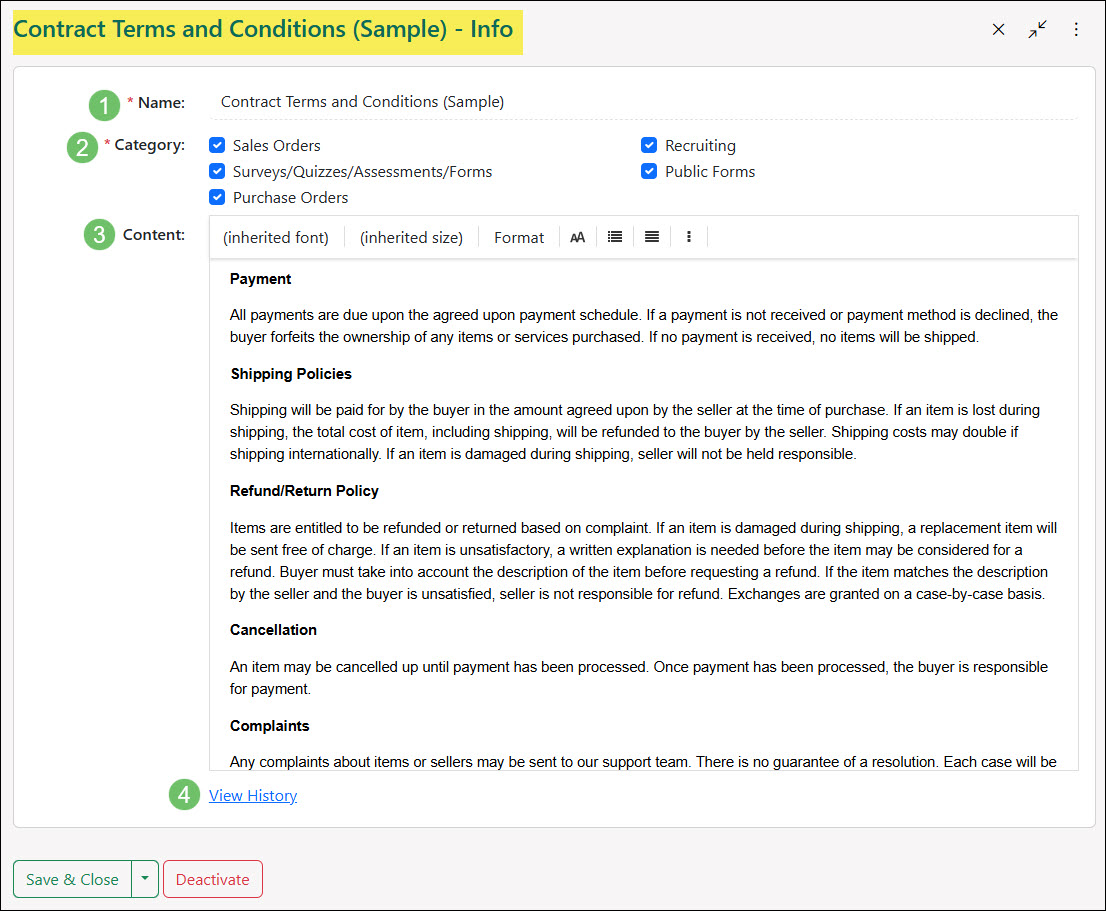
Example of Terms & Conditions for Purchase Orders
To use Terms & Conditions on your Purchase Order, your Purchase Order Type must have the Turn on Contract Management option toggled. Once this setting is toggled, use the Terms & Conditions field to select the appropriate option.
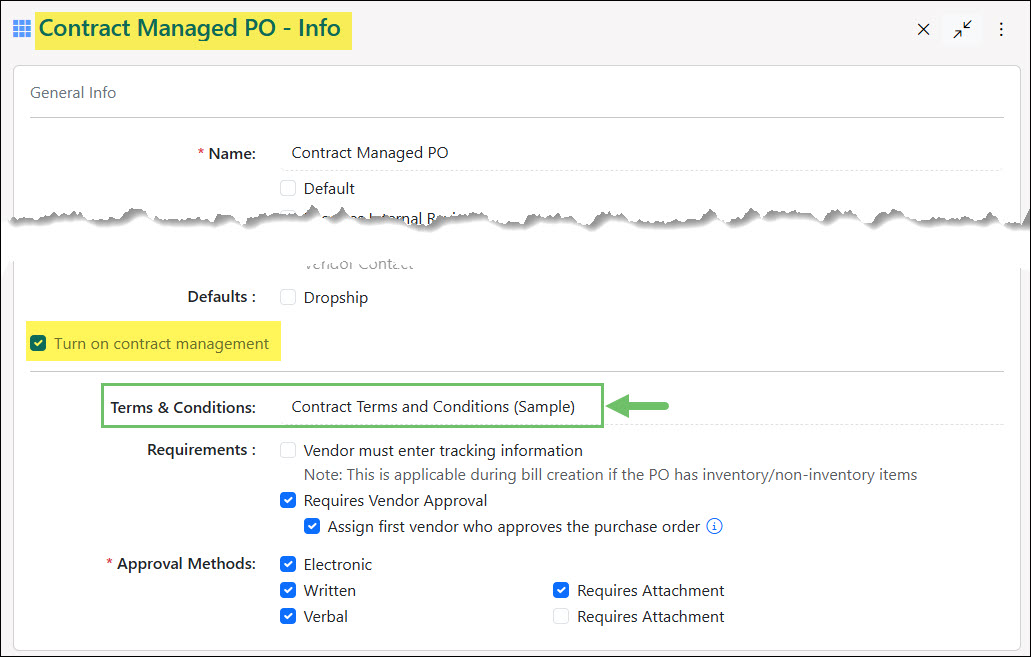
Example of Terms & Conditions Field on a Purchase Order Type
-
Approved Order Notifications
Configuring the Approved Order Notifications for Contract Managed Purchase Orders is a great way to ensure the right people are aware each time a Purchase Order is approved of the selected type, no matter who the purchaser was. When viewing your Purchase Order Type Info page, use the waffle menu to navigate to the Approval Notifications option, then select the Add icon at the top of the page to begin.
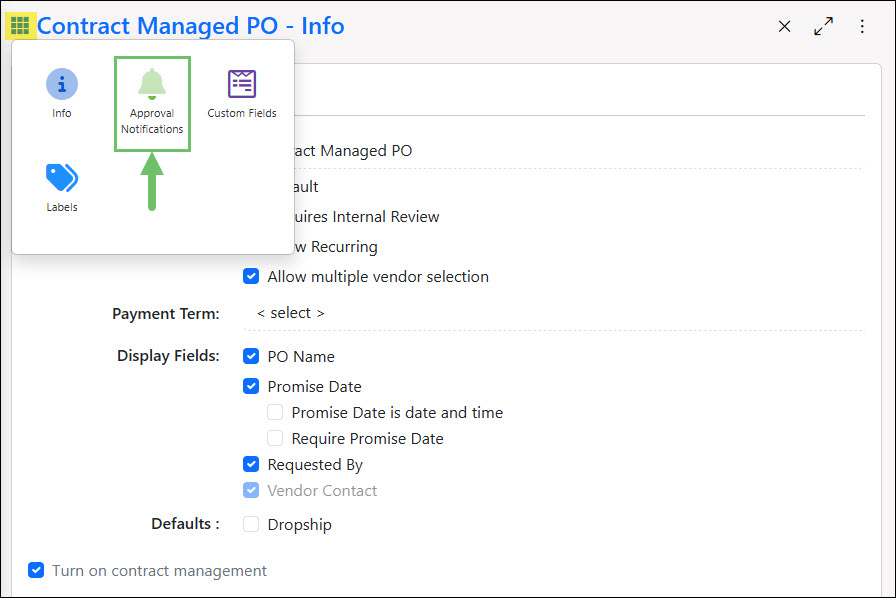
Example of the Approval Notifications Option in a Purchase Order Type
When viewing the Purchase Order Type Add Approval Notification page, there will be several fields available to you which allow you to configure the notification:
- Recipient: Select an Employee from the system or enter an email to make sure that person will always be notified when a Purchase Order of this type is created and approved. This will make sure they are notified even when not the Requested By or Vendor Contact on the Purchase Order.
- Department: If you wish for the recipient to only be notified when Items from their Department are purchased, select the Department here. Departments can be assigned at the Item level. To learn more about Item Management, review our Item Management Guide.
- Order Total Greater Than: If you wish for the recipient to only be notified when Purchase Orders over a certain amount are approved, then enter that amount here. This can come in handy if you want to make sure a warehousing staff is notified if a larger than normal Purchase Order is approved.
- Items: Selecting an Item in this field will make sure the recipient is always notified when a Purchase Order with that Item has been approved, regardless if they are the Requested By or Vendor Contact on the Purchase Order.
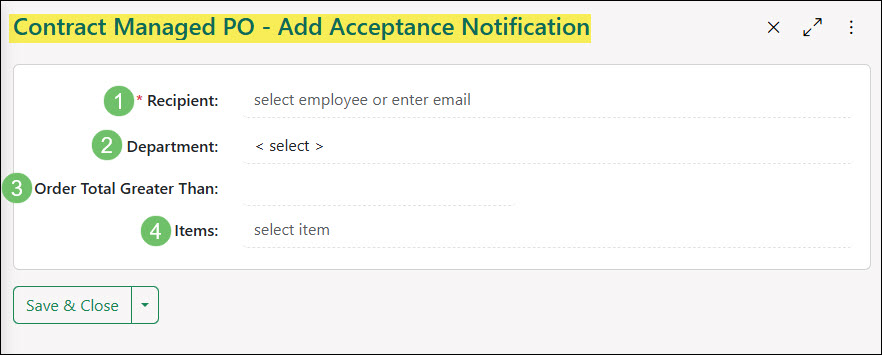
Example of Adding an Approval Notification for a Purchase Order
-
Internal Approval
The Internal Purchase Order Review serves as a crucial checkpoint in the purchasing process, ensuring accuracy and consistency before orders are presented to Vendors. This mechanism allows for an additional layer of oversight, particularly for orders generated by specific Employees. By routing these orders through an internal review process, potential errors or inconsistencies can be identified and rectified before they reach the Vendor, thereby maintaining the company’s professional image and minimizing the risk of misunderstandings.
To utilize the Internal Purchase Order Review effectively, administrators must configure the system to route orders from designated Employees to be flagged for review. This is achieved through settings within the Employee’s Profile, as well as ensuring the Requires Internal Review setting is checked within the General Info section of your Purchase Order Type. Instructions for configuring these Employee settings can be found in the Employee Info section of the Employee Setup Guide, specifically under the Settings area.
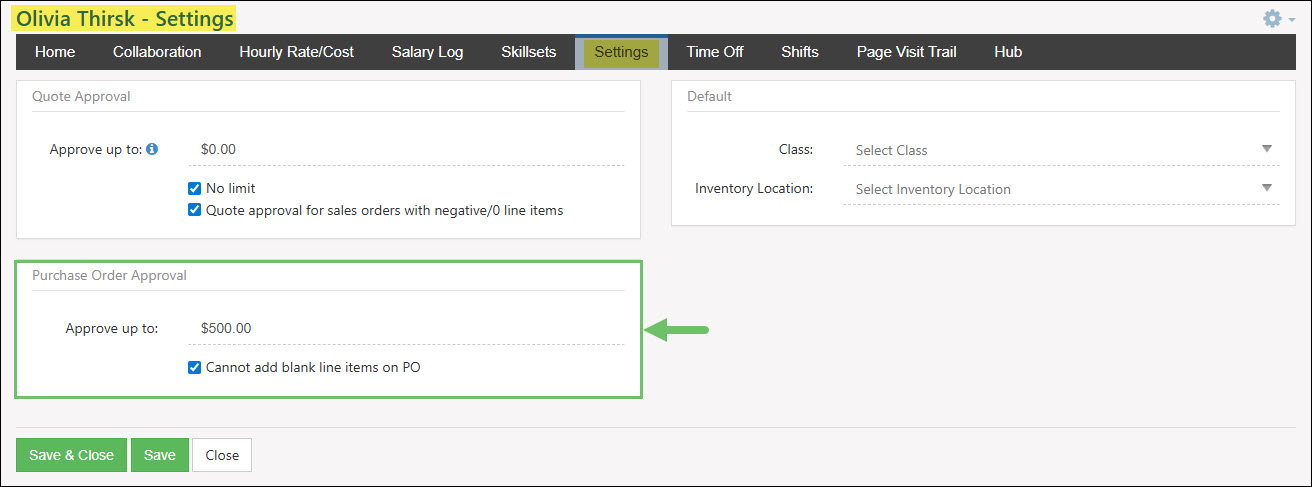
Example of Employees Settings Tab Highlighting the Purchase Order Approval Section
Users can perform an Internal Purchase Order Review by going to Vendors → Purchasing → Purchase Orders and update the Status search filter for Pending. This will generate a list of Purchase Orders that are waiting to be reviewed by an internal Employee.
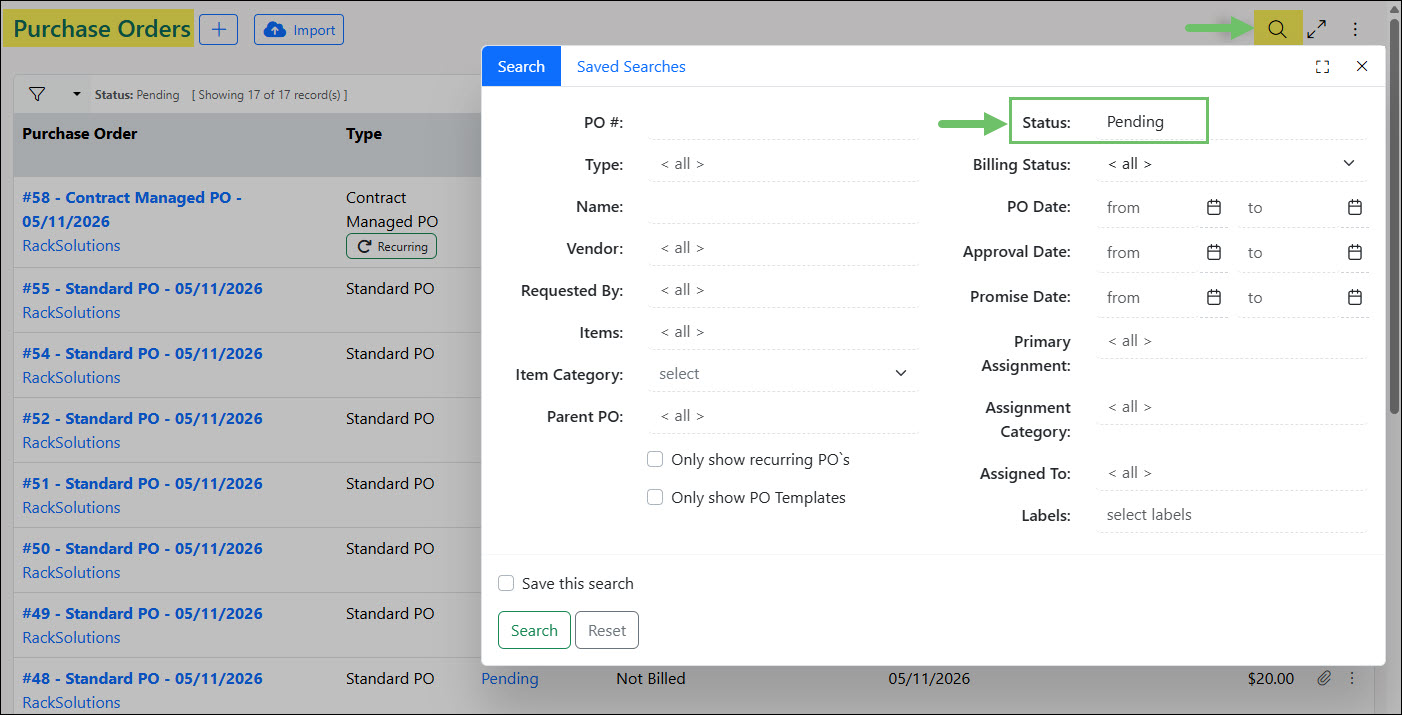
Example of Searching for Pending Purchase Orders from the Purchase Order List
Select the Purchase Order from the list that you wish to review. Once you have looked over the PO and have decided it is ready to be official and sent to a Vendor for approval, select Set Internal Review Status from the Actions menu or scroll to the bottom of the page and click the Review button.
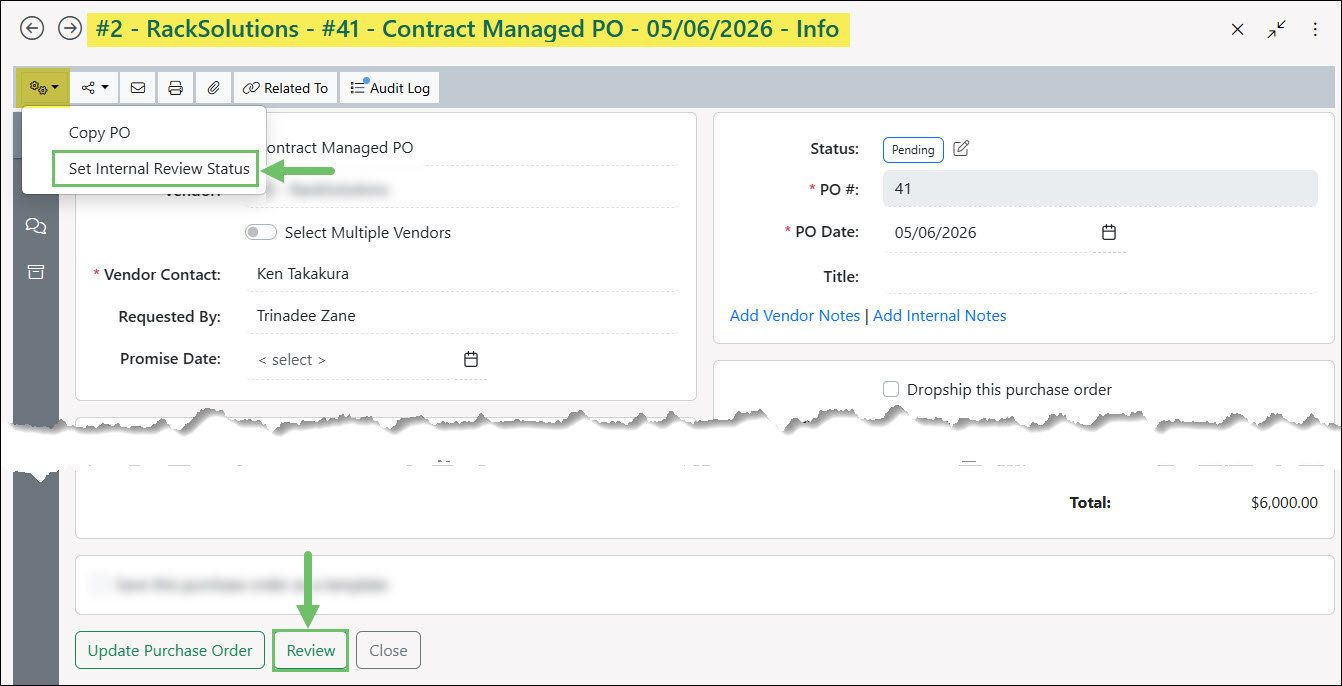
Example of the Review Buttons Available in a Purchase Order
The Employee that was initially selected to be the reviewer will also receive an email notification with a direct link to the Purchase Order that needs to be reviewed.
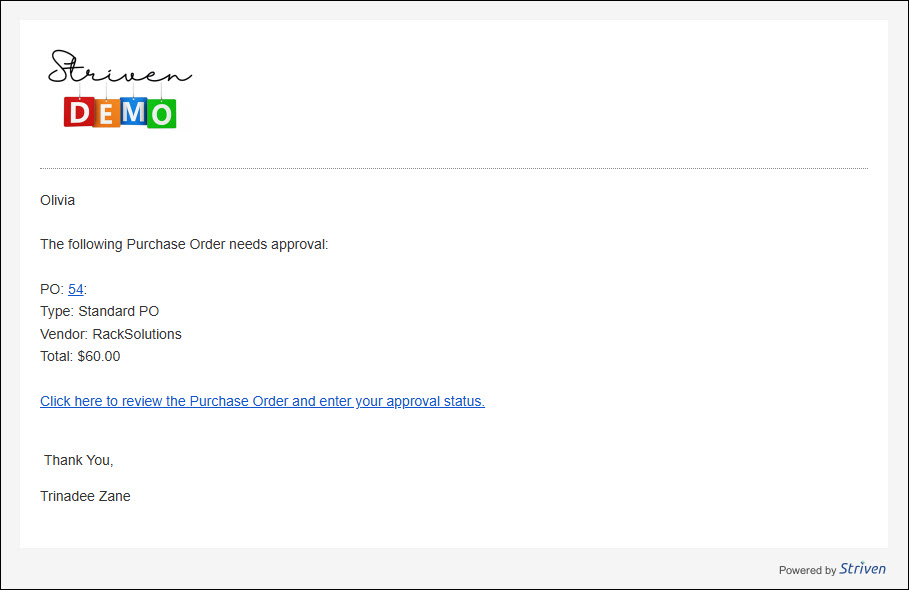
Example of the Purchase Order Review Email Notification
-
TBD vs Zero Cost Items
Contract Managed Purchase Order Item selection is distinguished between Items with a defined zero-dollar cost and those marked as TBD (To Be Determined). When an Item is assigned a cost of zero (0), the system treats it as a finalized, valid numerical value. This allows the Item to be added to Purchase Orders as a no-cost or included Item without triggering any validation errors or prompts for a price update, as the zero value is recognized as a deliberate entry.
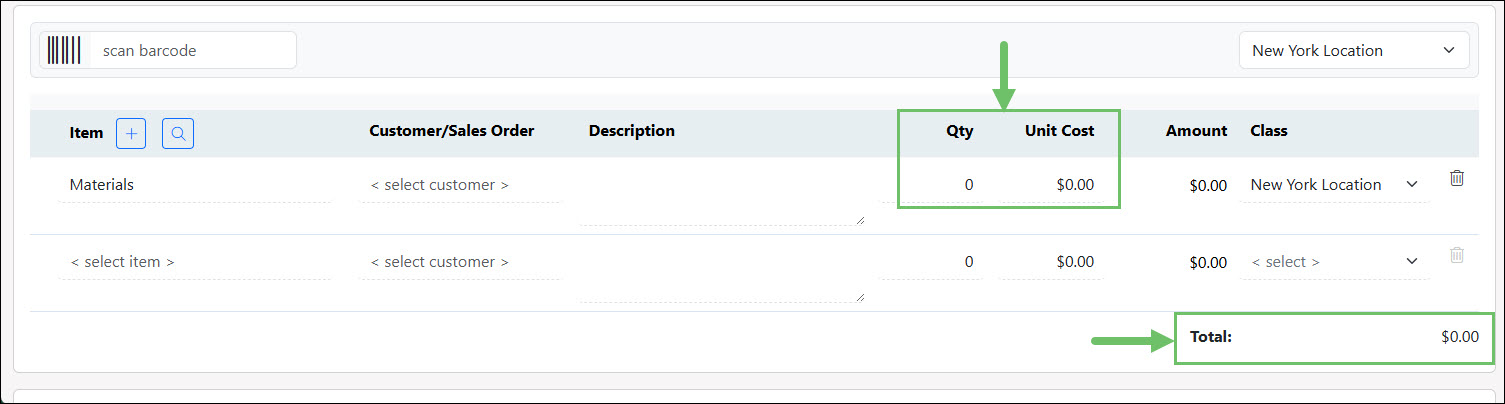
Example of a Zero Cost Item on a Contract Managed Purchase Order
In contrast, the TBD status serves as a placeholder indicating that the actual cost is currently unknown. When an Item is set to TBD the financial data is incomplete. Typically, these items must be updated with a numerical value before the PO can be finalized or processed for payment. This distinction ensures that items where the price is simply not yet entered are clearly separated from items that are intentionally free, maintaining accuracy across all procurement records and draft documents.
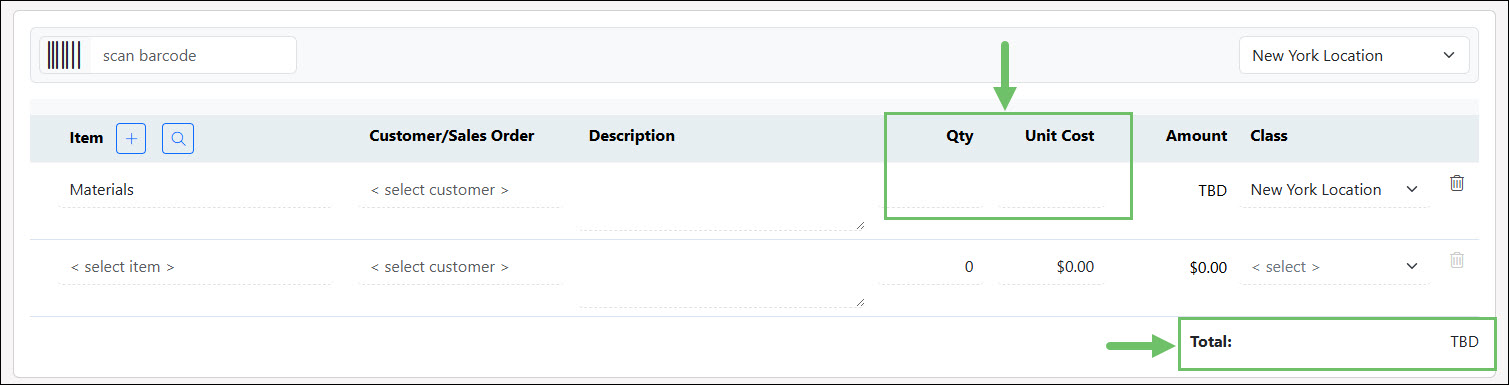
Example of a TBD Item Cost on a Contract Managed Purchase Order
In order for an Employee to enter TBD Cost and Items to Purchase Orders they will need to have their Employee Settings configured to not enable the Cannot add blank line items on PO option. This setting is located under the Settings tab when viewing an Employee’s Profile.
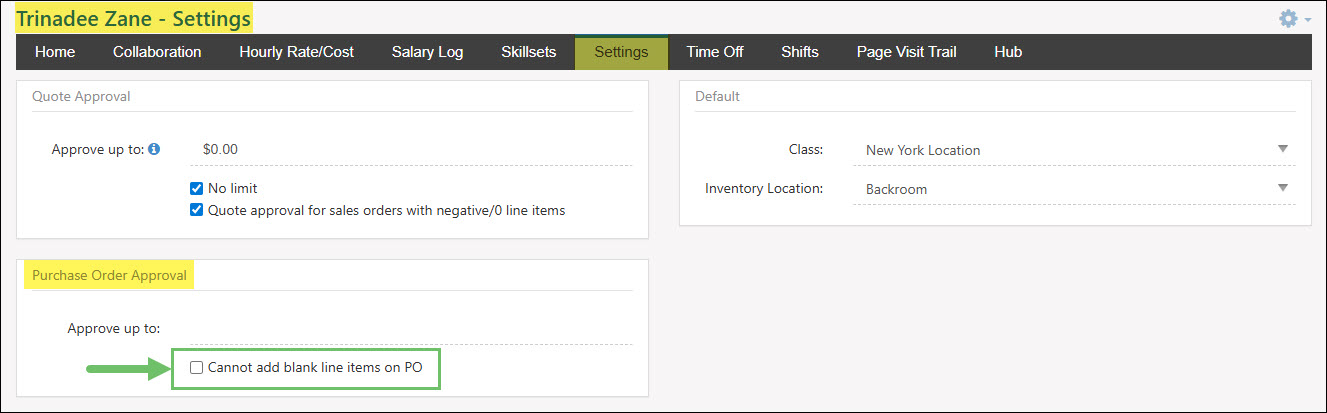
Example of the Cannot Add Blank Line Items On PO Setting in an Employee Profile
-
Purchase Order Frequencies
Purchase Order Frequencies allow you to create preset Billing intervals which you may use when designating Purchase Orders as Recurring. The Frequencies you create will also be available for selection on Recurring Purchase Orders.
You may begin configuring your Frequencies by navigating Company → Settings → Accounting → Sales → Sales Orders → Sales Order Frequency.
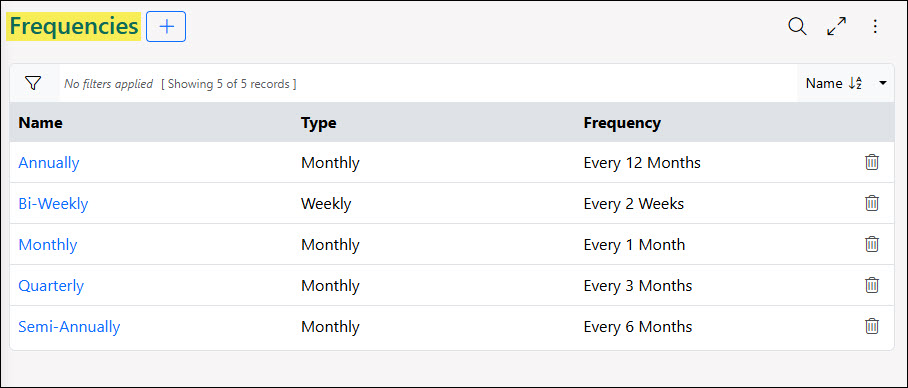
Example of Order Frequencies
-
Creating Order Frequencies
The Frequencies page allows you to create and manage existing Frequencies. If you would like to edit an existing Frequency, select the Frequency Name to reconfigure the name, type, or occurrence frequency. To add a new Frequency, select the plus icon from the top of the page.
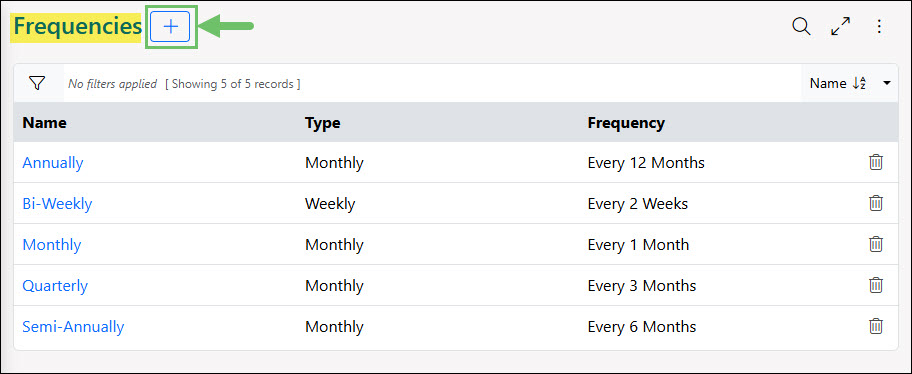
Example of How to Add a New Frequency
When creating a new Frequency, the following fields will be available from the Add Frequency page:
- Name: Allows you to choose a name for the Frequency so it may be easily identified.
- Type: You may use the drop-down menu to choose whether the Frequency will occur on a Monthly or Weekly basis.
- Frequency: Enables you to enter a numeric value within this field which will designate how often the Frequency occurs. For example, if the Monthly type is chosen, and a value of 3 is entered in the Frequency field, the Frequency will be configured to occur every 3 months.
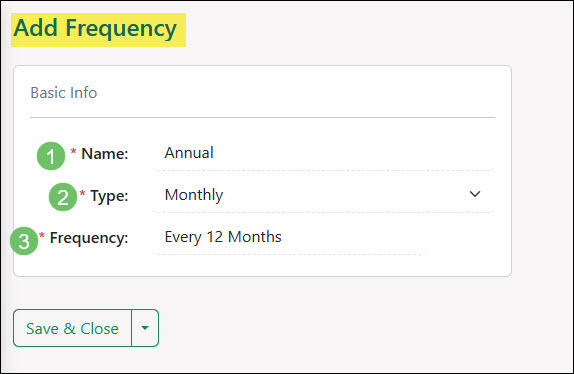
Example of the Add Frequency Page
-
Using Frequencies
When creating a Recurring Purchase Order, the Frequency can be designated for a recurring Purchase Order from the Frequency section. Toggle the option from One-Time to Recurring in order to select how often the Purchase Order should occur. The Frequency field uses a drop-down menu to allow you to choose one of your configured Frequencies. Fields are also available in this section to determine lead time, how many terms, and an expiration date if applicable for your Purchase Order.
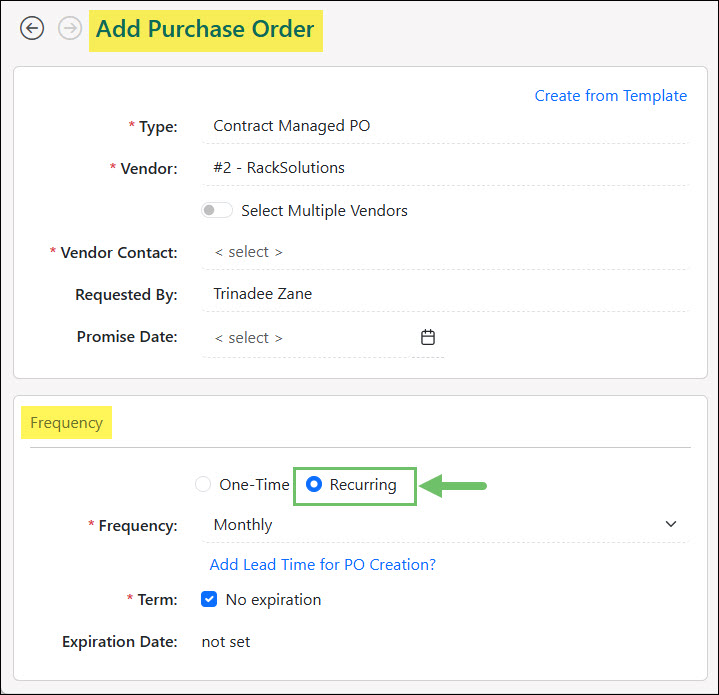
Example of Frequencies on a Purchase Order
-
Multiple Vendors on Purchase Order
Multiple Vendors can be selected on a Purchase Order with the end result of having the first Vendor who approves the Purchase Order will then be assigned to the Purchase Order. This allows for a first-come first-serve process to be put in place for a quick turn around of purchasing goods and services.
To begin using this method the Allow multiple vendor selection option, located in the General Info section of a Purchase Order Type, will need to be enabled. Next, under the Turn on contract management section in a Purchase Order Type, enable the option for Assign first vendor who approves the purchase order. To enable this option, the Requires Vendor Approval field will need to be toggled on.
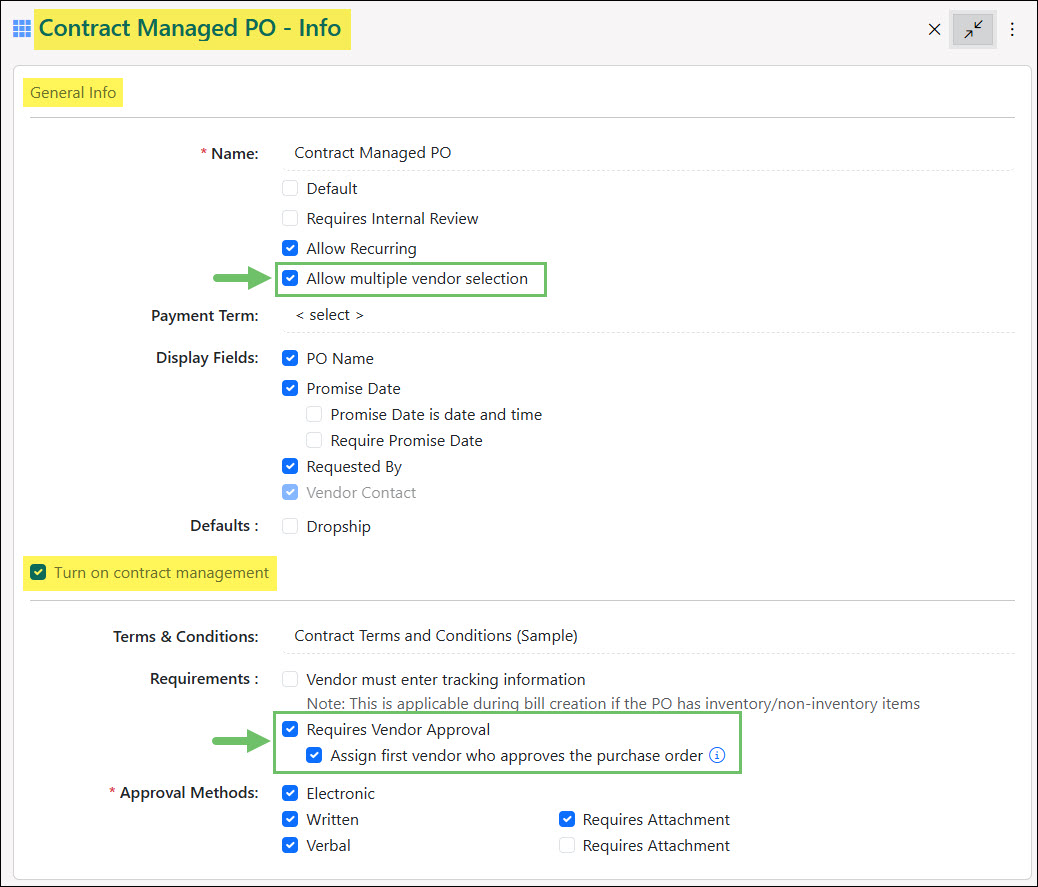
Example of Purchase Order Type Configured to Assign First Vendor Who Approves the Purchase Order
When creating a Contract Managed Purchase Order, toggle on the option for Select Multiple Vendors and select the Vendors you wish to send the Purchase Order to for approval.
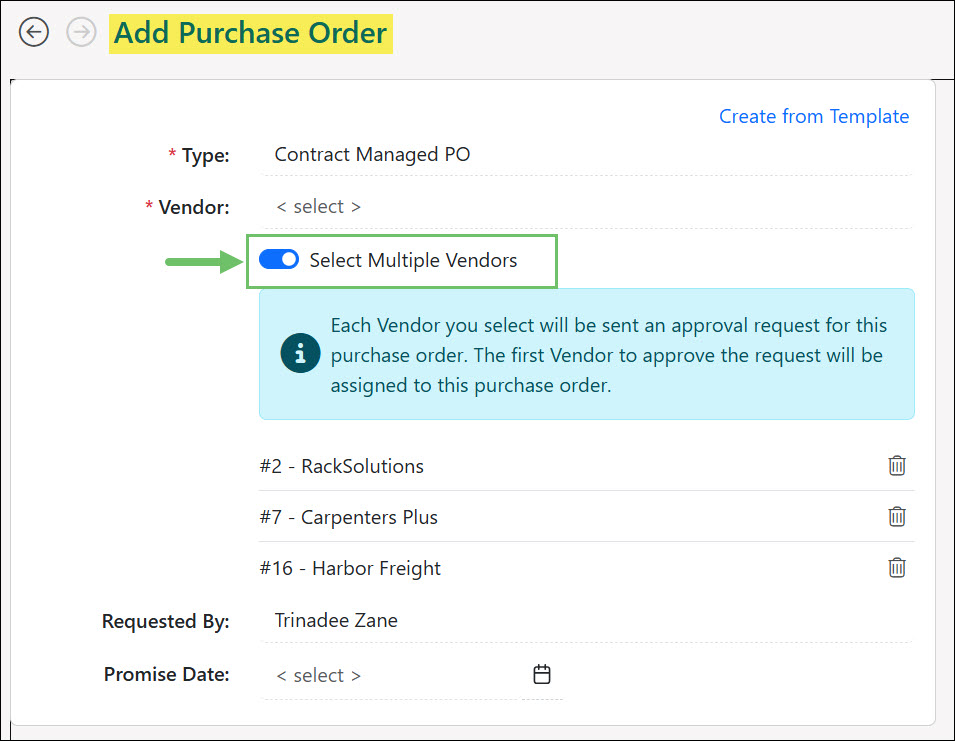
Example of the Select Multiple Vendors Option for a Contract Managed Purchase Order
When sending the Purchase Order to the Vendors for approval a list will be displayed showing which Vendors will receive a notification. Once a Vendor approves the Purchase Order they will be assigned to the PO while the other Vendors will be removed.
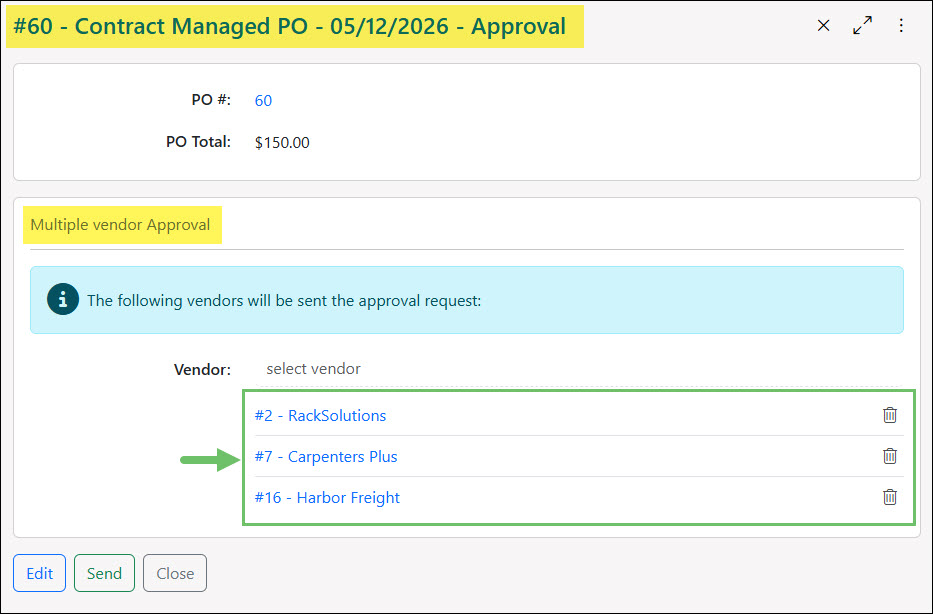
Example of the Send Approval Page for Multiple Vendors on a Purchase Order
-
Standard Billing Methods
For Purchase Orders configured as Recurring or Contract Managed, users have the flexibility to generate Bills manually from the order interface. Alternatively, Vendors can be empowered to submit their own Bills against the Purchase Order directly through the Customer/Vendor Portal.
-
Manually Billing an Order
A Purchase Order may be manually billed by choosing the Create Bill option from the Purchase Order Actions menu located on the top navigation bar of an Order.
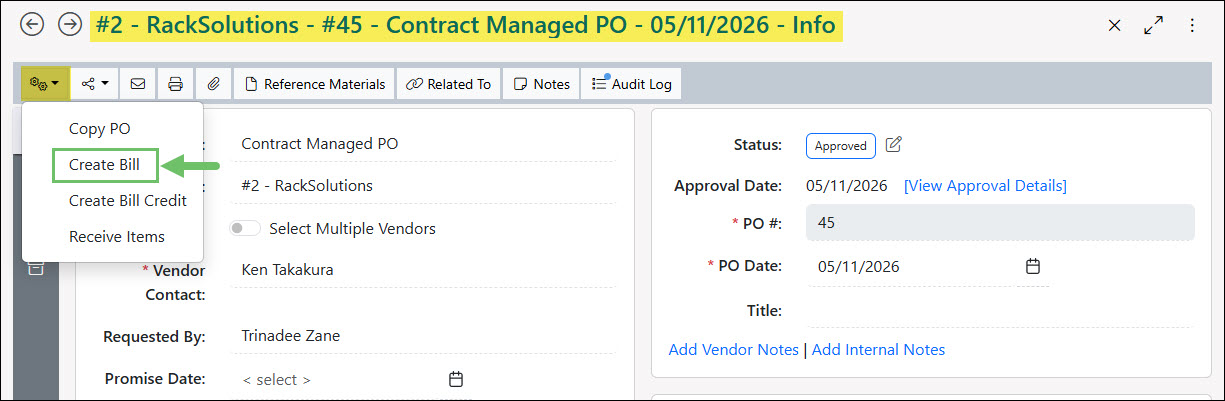
Example of the Create Bill Option from a Purchase Order
If the Purchase Order has been fully billed after saving the newly created Bill, the status of the Purchase Order will automatically transition to Fulfilled.
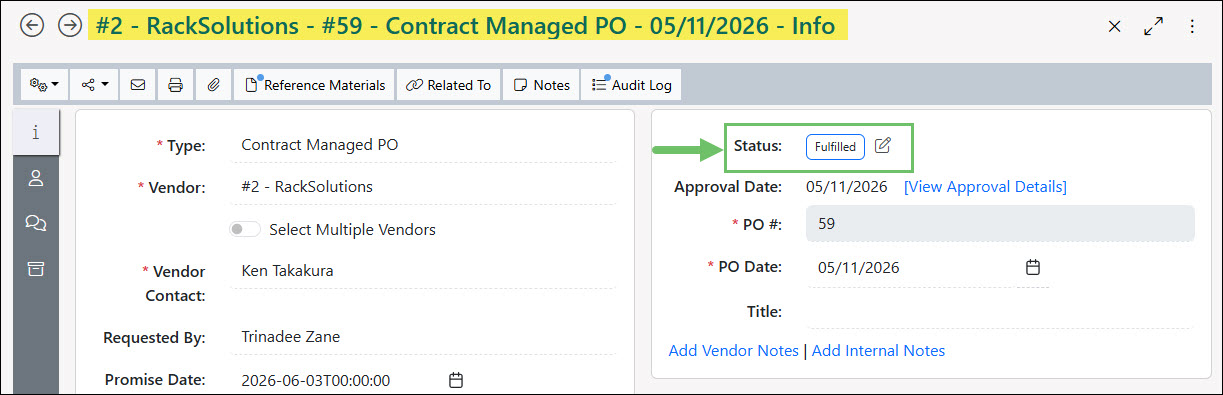
Example of a Fulfilled Purchase Order After Being Billed
-
Bills Submitted by Vendors
Another option to create Bills for Contract Managed Purchase Orders is to enable your Vendor to submit Bills through the Customer/Vendor Portal. Once submitted through the Customer/Vendor Portal, a review process can be put in place before the Bill is in effect.
If you would like for your Vendor to be able to submit Bills through the Customer/Vendor Portal, you will want to make sure they have the permission “Bills: Add” enabled in their Portal Role. To learn more about setting up the Customer/Vendor Portal and configuring Portal Roles, review our Customer/Vendor Portal Setup Guide.
When creating a Purchase Order, options are available in the Billing section which allows the Vendor to either Allow a vendor to submit bill that does not match PO and Allow partial fulfillment by a vendor to give flexibility on how much a PO needs to be fulfilled at the time of Bill entry.
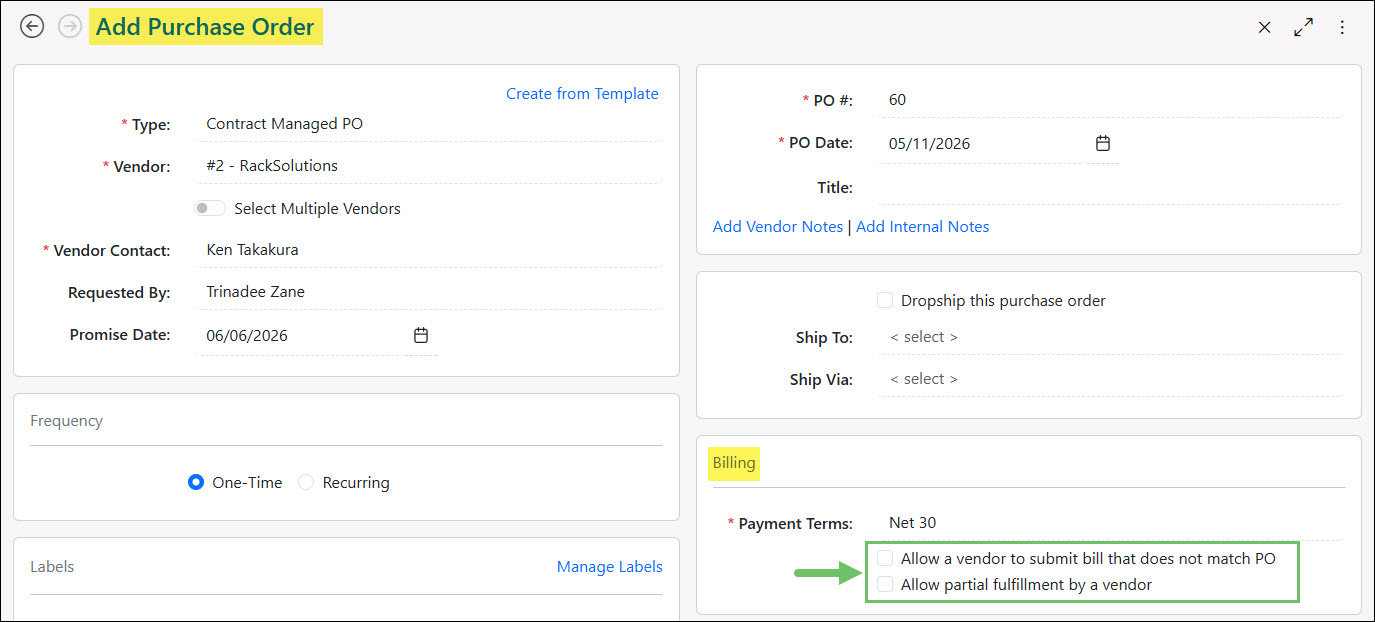
Example of Partial Billing Options For Vendors on Purchase Orders
Once a Vendor Contact has logged into the Customer/Vendor Portal, a Purchase Order can be viewed by selecting one from the Purchase Orders List. From the list view, the Create Bill button can be used without having to open the specific Purchase Order.
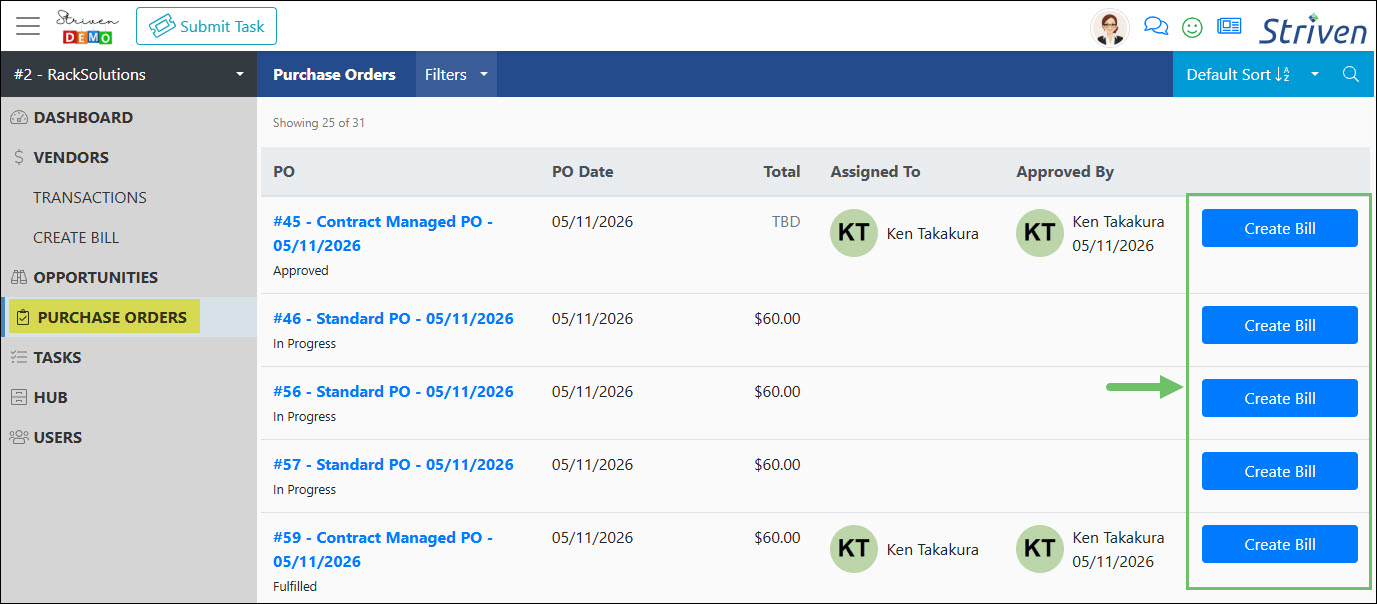
Example of the Purchase Orders List from the Vendor Portal
A Purchase Order can also be accessed from the list and a Create Bill button will be available at the top of the page.
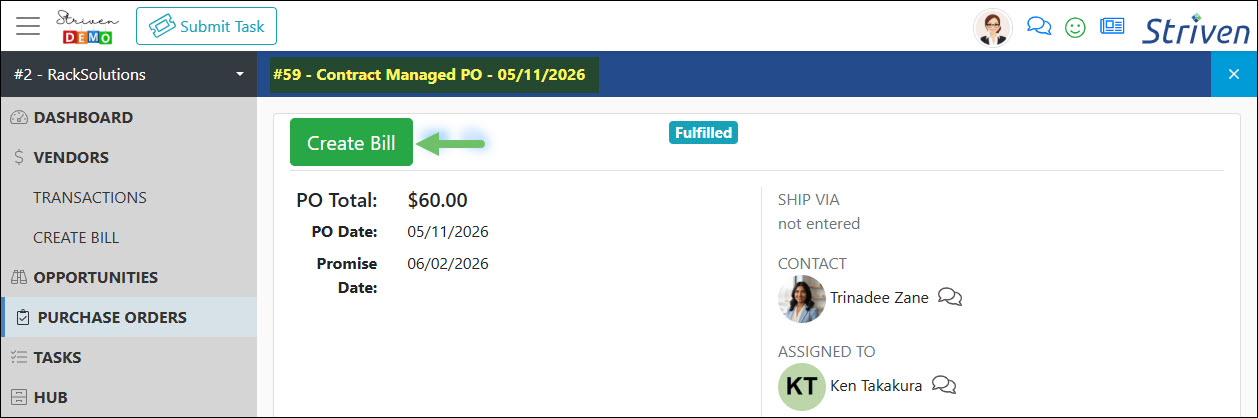
Example of the Create Bill Button from a Purchase Order in the Vendor Portal
Bills submitted through the Vendor Portal will need to be reviewed and approved before they are in effect for Accounting purposes. To approve these Bills, navigate to Vendors → Purchasing → Approve Bills. Bills listed on this page can either be approved individually or in bulk by checking multiple Bills and using the Approve button at the bottom of the page.
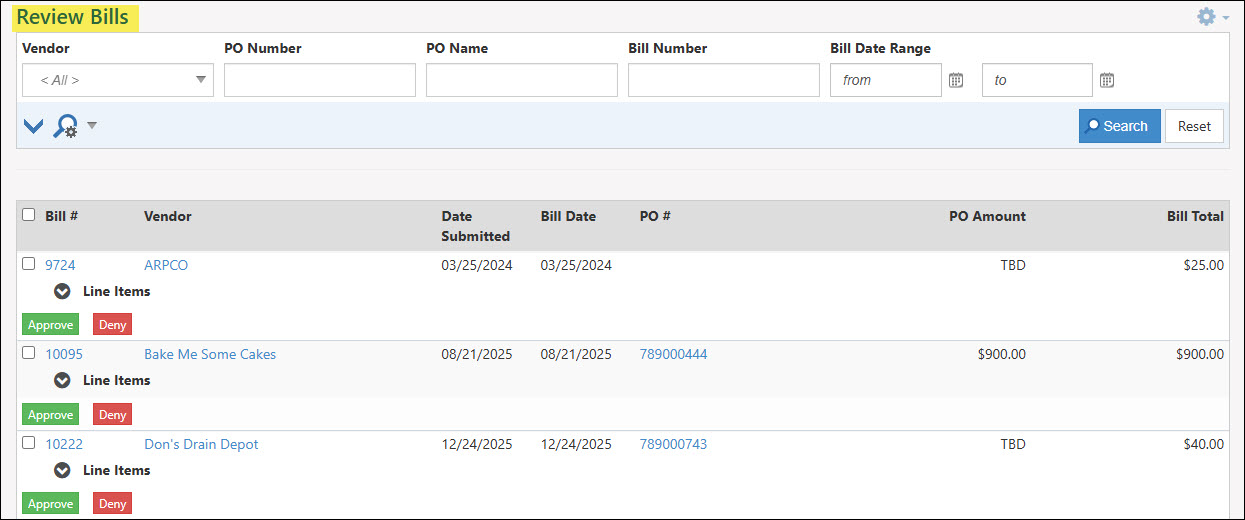
Example of the Review Bills Page
-
Recap
This guide provides a comprehensive overview of managing Billing and Purchase Orders in Striven, focusing on Contract Managed and Recurring Orders. We covered the necessary configurations for the Purchase Order Approval process, including PO Type settings, Payment Terms, and Terms & Conditions, as well as internal review procedures and notification settings. Additionally, the guide detailed how to establish Purchase Order Frequencies for recurring schedules and explored various billing methods, such as manual billing and automated options.
FAQs
-
Why can’t I update my Purchase Order Type to turn on Contract Management?
If a PO Type has already been used to create Purchase Orders, you will be unable to update the PO Type to include Contact Management. Instead, you will need to create a new PO Type.