
Sales Management
Invoicing & Contract Management
Support Guide
-
Overview
This guide offers a comprehensive look at managing Invoicing and Sales Orders in Striven, specifically for Contract Managed and Recurring Orders. We will cover essential configurations that are vital to the Sales Order Approval process such as setting up Sales Order Types, Approval Processes, Payment Terms, and Terms & Conditions.
Read this guide if you are trying to:
✔ Configure settings for your Sales Order Approval Process in Striven.
✔ Learn about Managing Change Orders and Recurring Orders.
✔ Utilize different types of Invoicing for Contract Managed Orders.
-
Permissions
There are multiple permissions associated with the process of approving or managing Contract Managed and Recurring Sales Orders. To verify your current access, consult your system administrator or the individual responsible for assigning and managing User Roles within your organization.
You can also check the permissions specifically related to the page you are viewing in Striven by clicking on the kebab menu in the top right corner of the page and selecting Settings. This will display the Settings Info page, where the relevant permissions are listed, along with an indication of your current access status.
If there is a permission listed to which you do not have access, the system may offer the option to Request Access (depending on your organization’s system settings). Choosing this option will notify a designated individual, allowing them to grant you that specific permission.
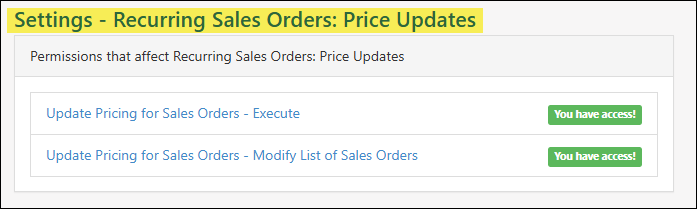
Example of the Permissions Associated with the Price Update Tool

-
Sales Order Approval Process
Terms and Conditions, Payment Terms, and other settings are available within Striven to assist you in configuring your Contract Managed Sales Orders. In the following sections, we review the available options for customizing your Sales Order Approval Process.
-
Contract Managed Sales Order Type Settings
To use Change Orders with your Contract Managed Sales Orders, you must have the feature enabled within your Sales Order Type.
To manage your Sales Order Types, navigate to Company > Settings > Accounting > Sales > Sales Orders > Sales Order Types.
When viewing the Sales Order Type Info, toggle the”Show advanced features” checkbox. After this setting is enabled, an additional setting will display to “Turn on contract management“. Once you have selected the “Turn on contract management option, the Change Order requirement for updates on Sales Orders will automatically be activated.

Example of Contract Management Settings in a Sales Order Type
-
Payment Terms
Payment Terms are time conditions on which two parties agree to fulfill a sale by a certain date or period. Payment Terms are available for both Accounts Receivable and Accounts Payable Transactions and will allow your Company to track late Payments in Collections. Learn more about setting up Payment Terms in Striven by reviewing the Payment Terms section in our Accounting Setup Guide.
You can add new Payment Terms from the Payment Terms List. To view Payment Terms use one of the following steps below:
Company > Settings > Accounting > Sales > Invoices > Payment Terms
Company > Settings > Accounting > Sales > Sales Orders > Payment Terms
Company > Settings > Accounting > Purchasing > Bills > Payment Terms
Company > Settings > Accounting > Purchasing > POs > Payment Terms
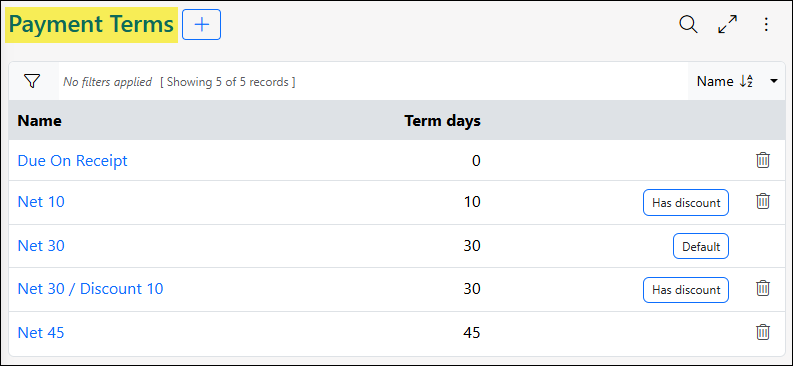
Example of the Payment Terms List
The default Payment Term for a Sales Order Type can be determined within the General Info section of the Sales Order Type – Info page.
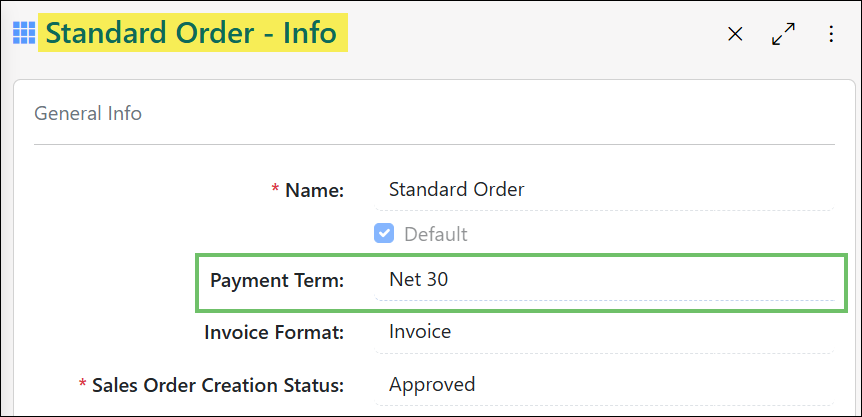
Example of Payment Terms at the Sales Order Type Level
The Payment Term for a n individual Sales Order can be determined at the Sales Order level, by using the Payment Terms field located within the Invoicing section.
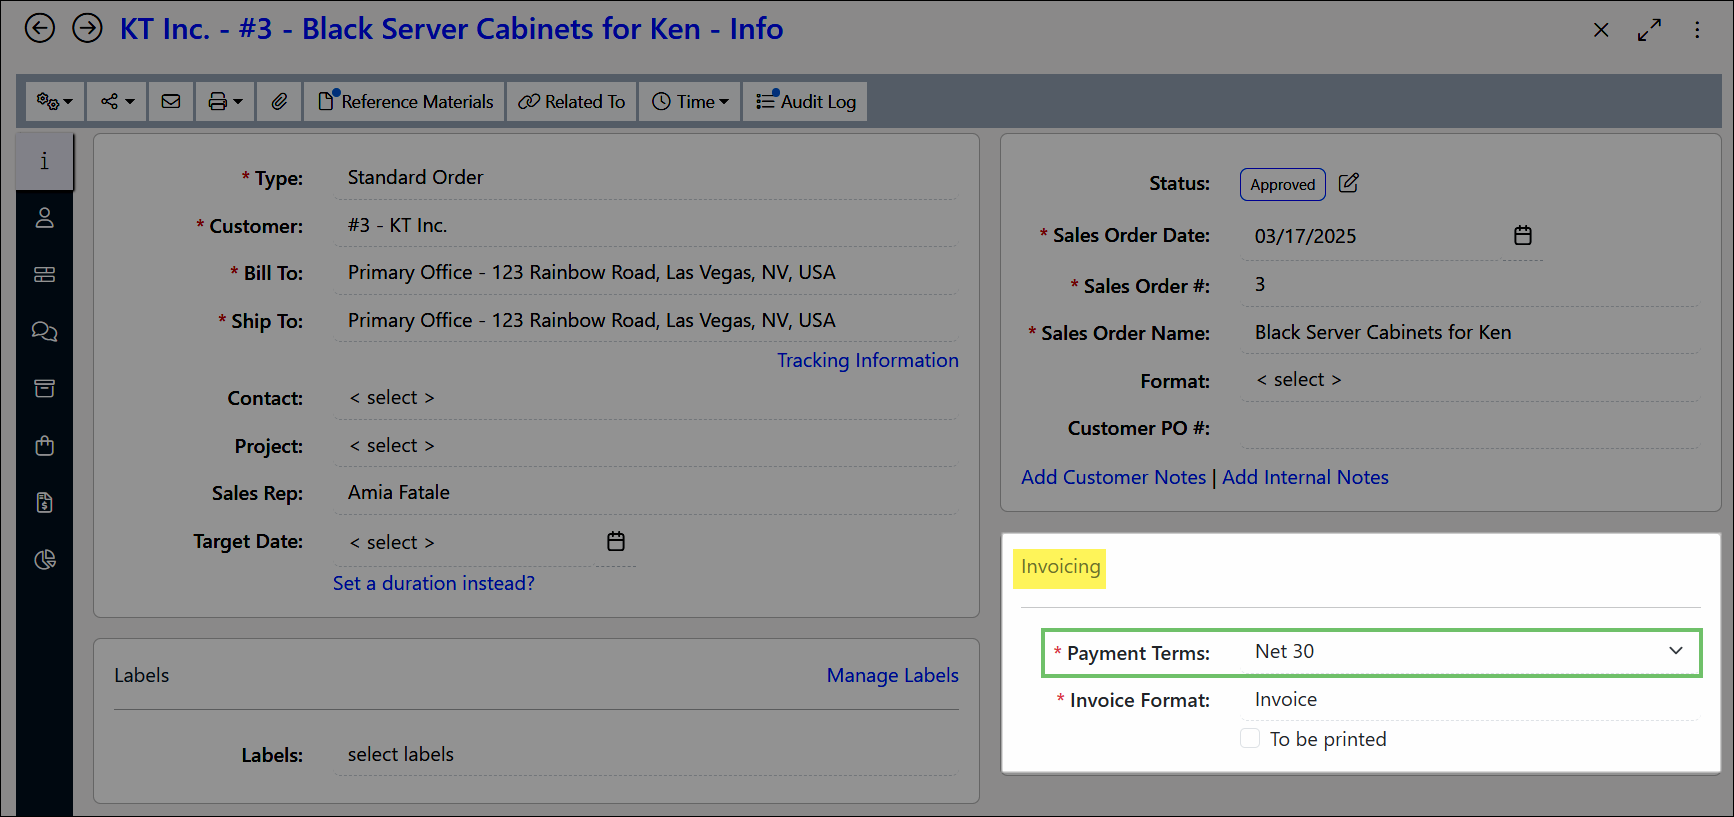
Example of Payment Terms at the Sales Order Level
-
Terms and Conditions
Striven can help facilitate your Contract Management and the Sales Orders active Customers have placed. Included with Payment Terms as discussed above, Terms & Conditions are agreed upon by both the seller and buyer upon the point of purchase. Once the Sales Order is approved, it is then considered a Contract and both parties must meet each other’s end of the Sales Order. When at the Terms & Conditions List, individual terms can be edited by clicking on the name. This will initiate a popup as shown below in which you can choose where the Terms & Conditions appear. These include Sales Orders, Purchase Orders, public forms, recruiting, and Surveying. These can be enabled by toggling the appropriate checkbox.
To view Terms & Conditions, navigate to Company > Settings > Accounting > AR > Sales Orders > Terms & Conditions.
To use Terms & Conditions on your Sales Order, your Sales Order Type must have the “Turn on Contract Managed” option toggled.
- Name: Allows you to name the created Terms & Conditions for clarity.
- Categories: The entity in which the Terms & Conditions are in effect. With Striven you have the ability to set Terms & Conditions for different processes, such as Orders or recruiting. This will make sure these Terms show up as available for the entity it should be while hiding it from where it should not be applicable.
- Content: The text editor box is where you enter your Terms. The advanced editing option allows for precise formatting in order to make sure your Terms & Conditions are exactly as your Company needs them.
- History: Displays previous versions of your Terms & Conditions. Striven keeps a history tab for you for when edits are made or Terms are updated. Keeping records of your previous Terms & Conditions can save you from legal liability at a later date if the situation arises.
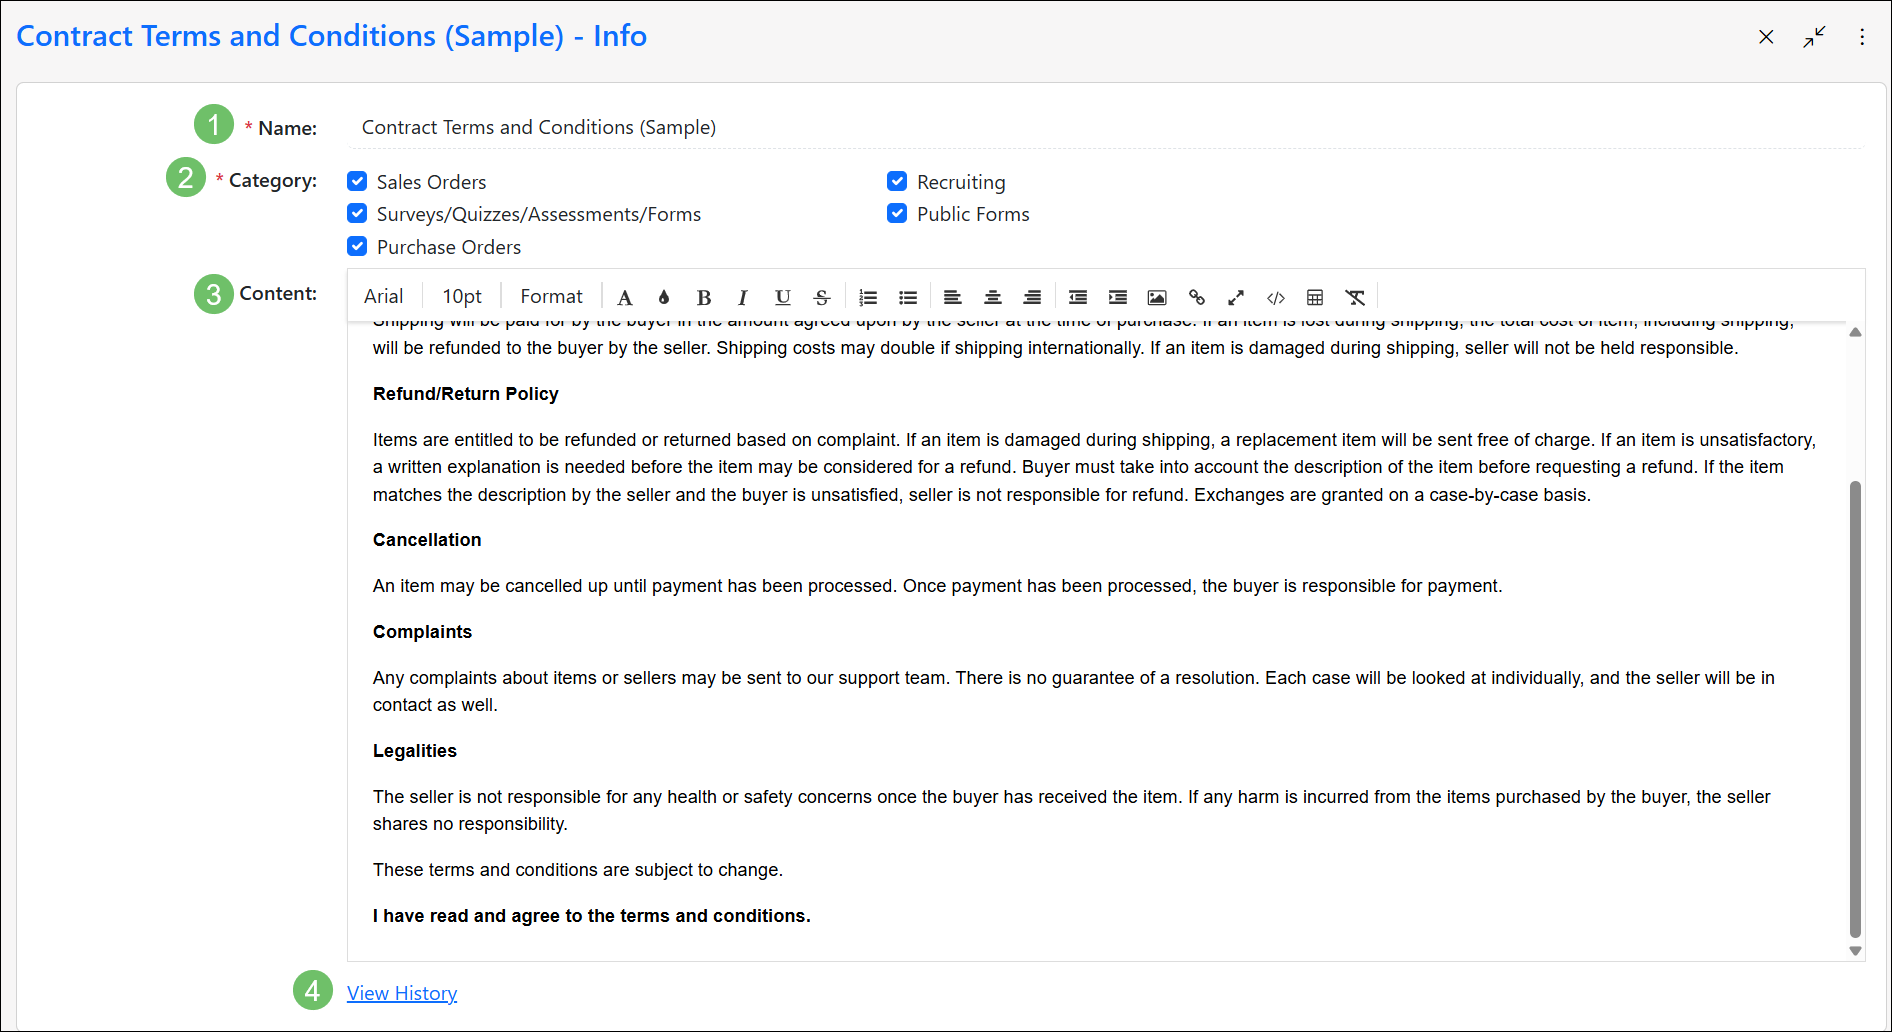
Example of Configuring Terms and Conditions
While Terms & Conditions can be specified for Contract Managed Orders at the Sales Order Type level, you may also choose the Terms & Conditions at the Sales Order creation level using the Sales Order Approval section.
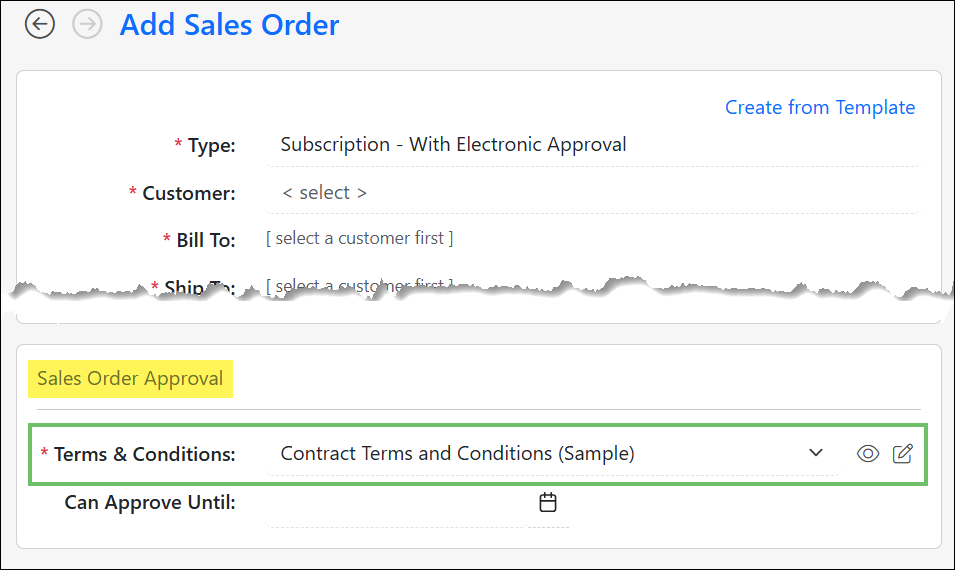
Example of Terms and Conditions on a Sales Order
-
Can Approve Until
When creating a Contract Managed Sales Order, the Sales Order Approval section of the Order allows you to designate a Can Approve Until date. This option allows you to restrict the ability to approve the Sales Order after a specific date in time.
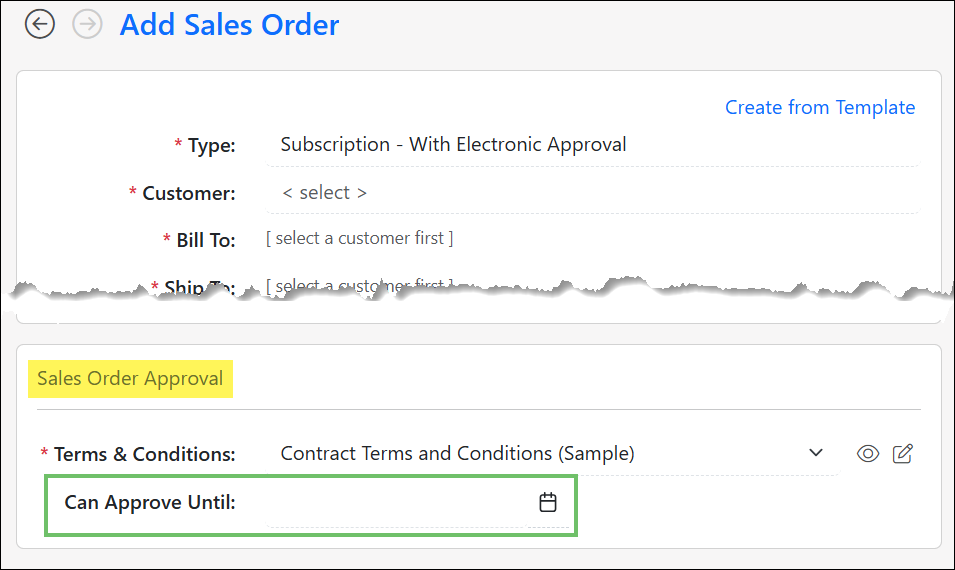
Example of the “Can Approve Until” Option on a Sales Order
-
Groups and Optional Items
The Optional Items feature allows configuring a Sales Order to mark specific Items or entire groups as optional, enabling customer choice via the Customer Portal upon approval. This is limited to Contract Managed Sales Orders with an Incomplete, Quoted, or Pending Approval status.
When configuring Sales Orders, the Striven provides advanced flexibility through the management of individual Items and optional Item Groupings. For individual Items within a Sales Order, the system user has the capability to designate them as either optional or to select them as a default inclusion. This granular control allows for tailoring the Sales Order content precisely to the Customer’s needs.
Additionally, the Optional Item Groupings feature provides an extra level of control by allowing related or mutually exclusive optional Items to be bundled. Importantly, this bundling enables the system user to define specific selection rules for the group. These rules govern how a selection must be made from the group (e.g., “select exactly one,” “select a minimum of two,” “select up to three,”). This ensures that complex product configurations or service packages are configured correctly and consistently according to predefined business logic, streamlining the Sales Order creation process and minimizing errors.
The configuration of individual Items or Item Groupings within a Sales Order provides powerful flexibility, particularly through the use of Optional and Default selection settings. This allows for clear communication with the Customer regarding potential additions to the Sales Order without immediately increasing the total amount.
Designating an Individual Item as Optional
Any individual line item on a Sales Order can be marked as Optional. This designation is used when presenting items that the customer may want to consider but are not required for the original purchase.
To successfully mark an individual Item on the Sales Order as Optional:
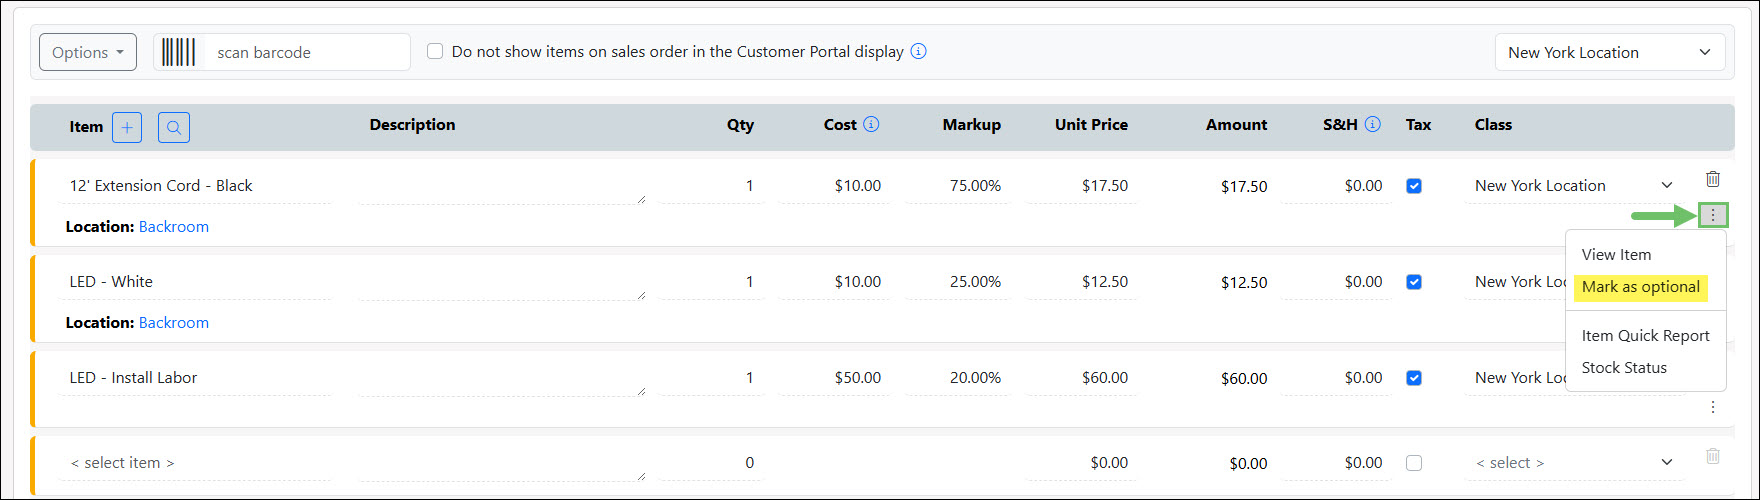
Identify the specific Item on the Sales Order that you wish to designate as Optional and locate the kebab menu located on the right end of the Line Item row. From the drop-down list, choose Mark as optional to display the Mark Item as Optional popup.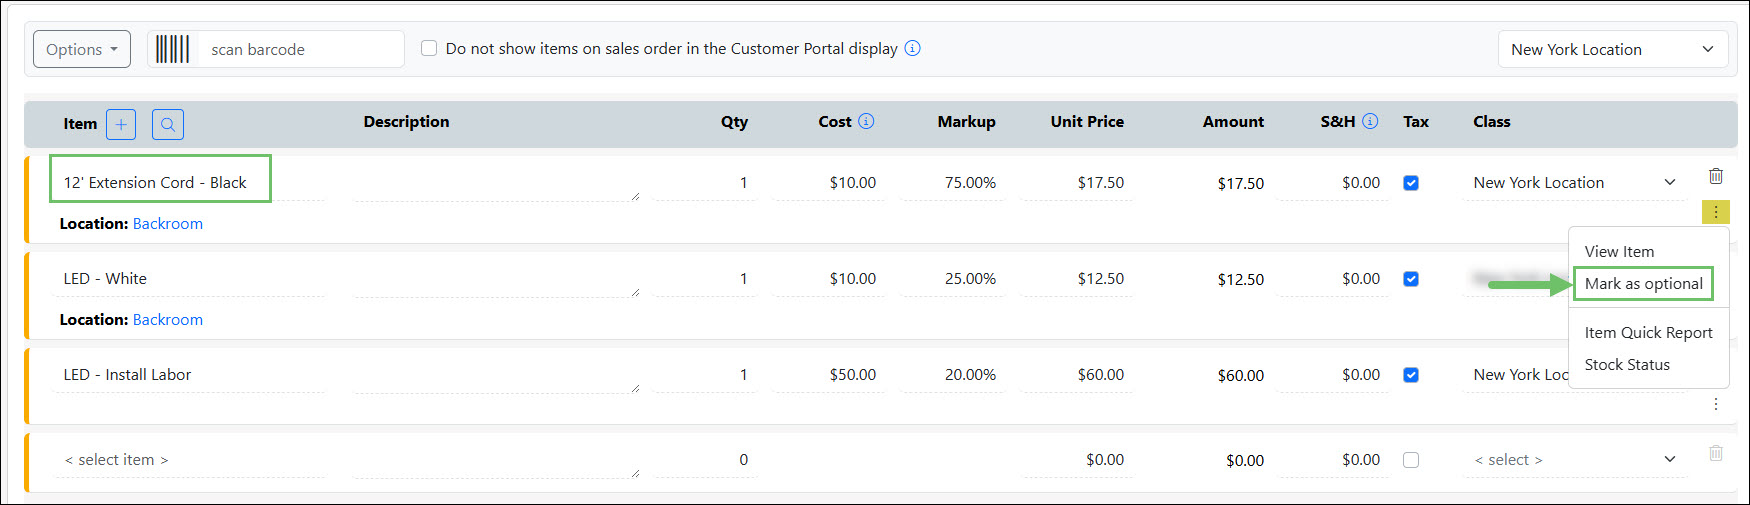
Example of the Mark As Optional Option
Within this popup window, you will find a checkbox to activate this feature. Checking this box reveals an optional setting to Select this item by default. You can check this second box if you want the Item to be selected automatically on the Sales Order, or leave it unchecked to have no Items selected by default.
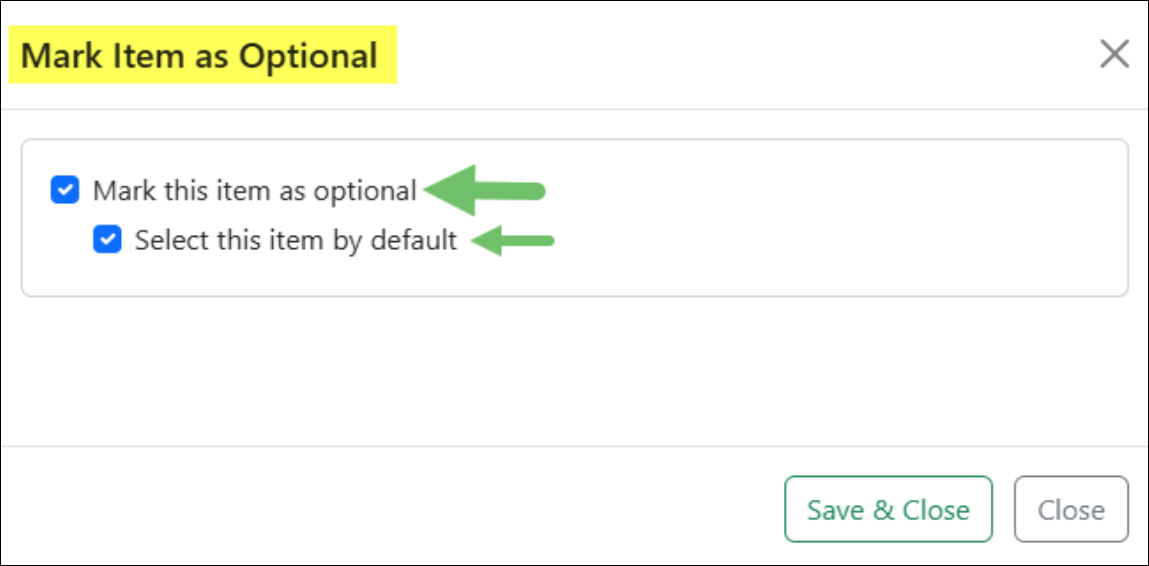
Example of the Mark Item as Optional Window
- If Selected by Default:
- The item’s cost will be included in the initial Sales Order total presented to the customer.
- When the customer views the Sales Order in the Customer Portal for approval, there will be a clear indicator next to the item. This indicator serves two purposes: it confirms that the item is Optional, and it shows that the item has been selected by default. The customer will have the power to easily deselect the item before approval if they choose not to include it.
- If NOT Selected by Default:
- The item’s cost will not be included in the initial Sales Order total. The displayed SO total reflects only the mandatory and default-selected items.
- The customer will see the item listed in the Customer Portal as an available option they can add to the order. Since it is not selected by default, the customer must actively check the box to include it, thereby adjusting the final SO total. This mechanism ensures that the initial quote remains minimal while still presenting potential upgrades or auxiliary services.
Designating an Item Group as Optional
Utilizing Item Groups on a Sales Order can be marked as Optional. This designation is used when presenting Grouped Items that the customer may want to consider but are not required for the original purchase.
The process for marking an Item Group as Optional:
First, create an Item Group on a Sales Order.

Example of Creating an Item Group on a Sales Order
Then, select Mark as Optional from the Group’s kebab menu.
Example of the Item Group’s Kebab Menu
In the Mark Group as Optional popup, check the box to Mark this group as optional. Then you may set the rules for the Group’s selection.
- All Items will be automatically selected within the Group:If selected, an additional option to Select this Group by default appears.
- User can decide which Items to select::You can set rules like “Select any or none,” “At least ____ selection is required,” “Select any ____,” or “Select up to ____.”
Once your configurations are complete, you may select Save and Close.
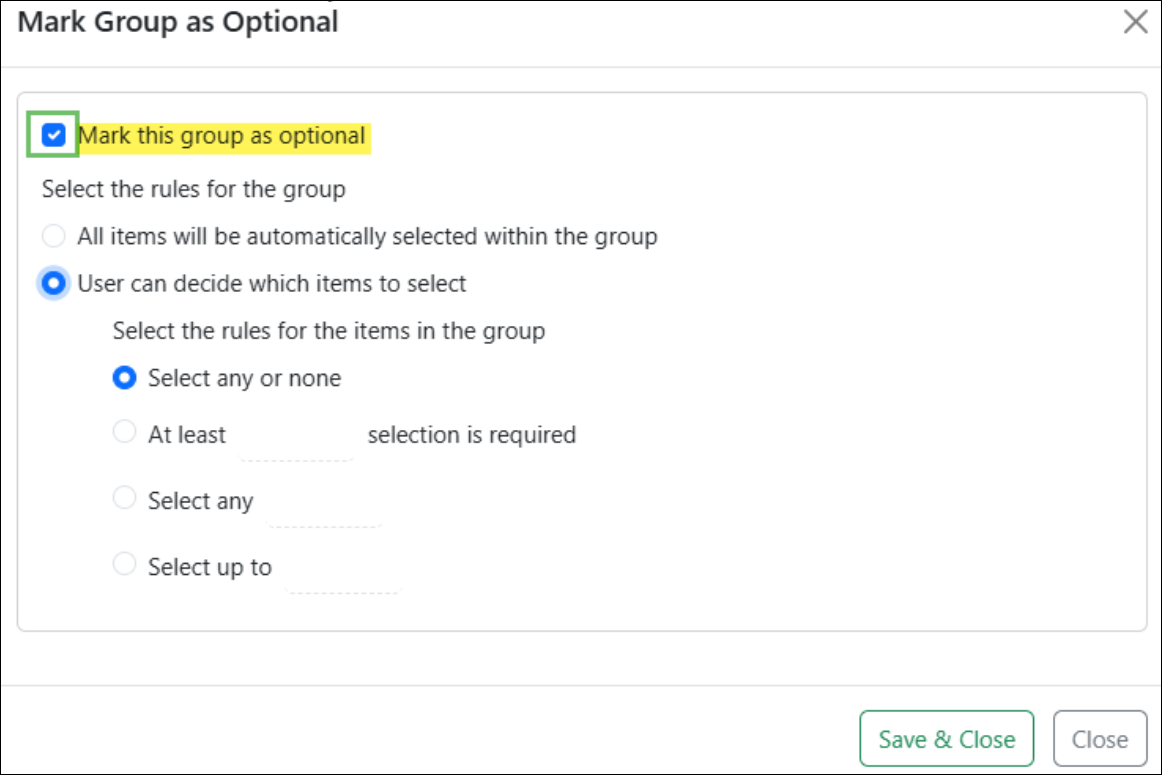
Example of the Mark Group as Optional Window
A note will then display the applied rules in the Group Header.

Example of the Note Displayed in the Group Header
Individual items within the Group can also be marked as the default selection using the Line Item’s kebab menu.
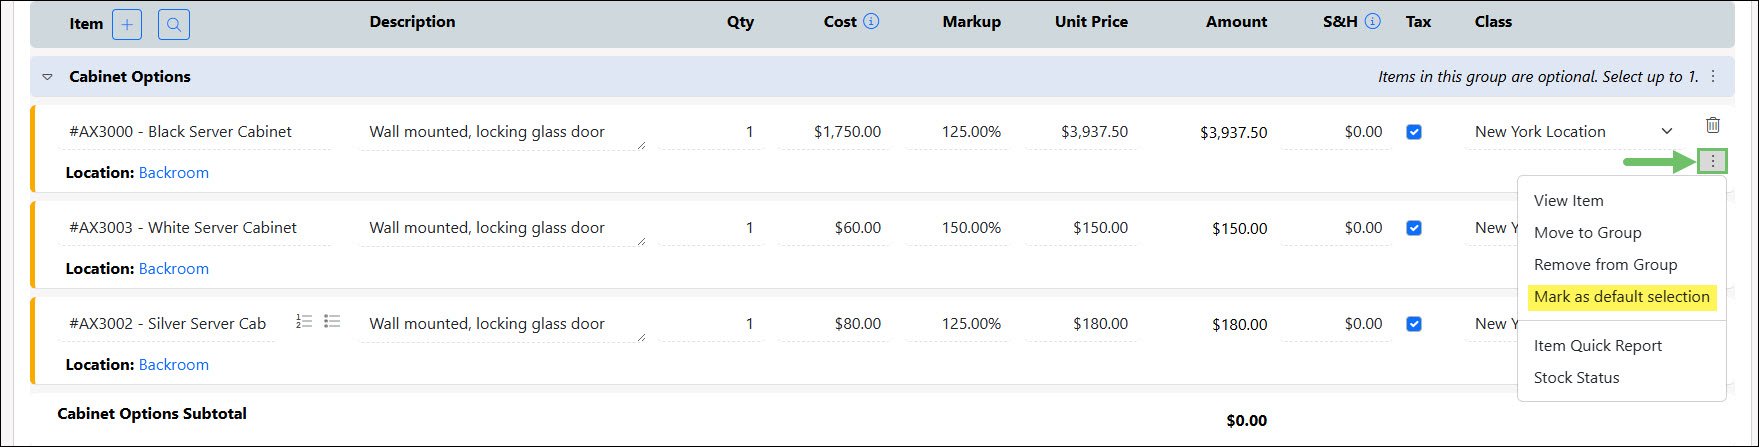
Example of the Mark as Default Selection Option for an Item
- If Selected by Default:
-
Approved Order Notifications
Configuring the Approved Order Notifications for Contract Managed Sales Orders is a great way to ensure you are aware each time a Sales Order is approved of the selected type, no matter who the salesperson was. When viewing your Sales Order Type info, use the waffle menu to navigate to the Approved Order Notifications option, then select the Add icon at the top of the page to begin.
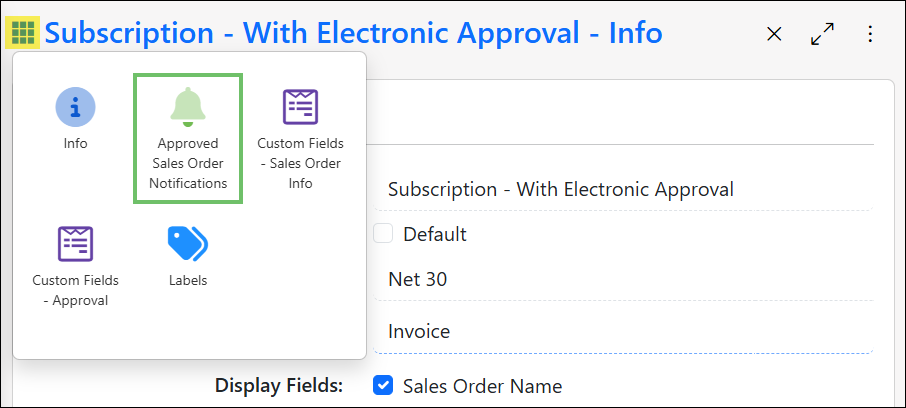
Example of the Approved Sales Order Notifications Option
When viewing the Sales Order Type – Add Approved Sales Order Notification page, there will be several fields available to you which allow you to configure the notification:
- Recipient: Select an Employee from the system or enter an email to make sure that person will always be notified when a Sales Order of this type is created. This will make sure they are notified even when not the salesperson on the Sales Order.
- Department: If you wish for the recipient to only be notified when Items from their Department are sold, select the Department here. Departments can be assigned at the Item level. To learn more about Item Management, review our Item Management Guide.
- Sales Order Total Greater Than: If you wish for the recipient to only be notified when Sales Orders over a certain amount are approved, then enter that amount here. This can come in handy if you want to make sure a warehousing staff is notified if a larger than normal Sales Order is approved.
- Items: Selecting an Item in this field will make sure the recipient is always notified when a Sales Order with that Item has been approved, regardless if they are the salesperson on the Sales Order.
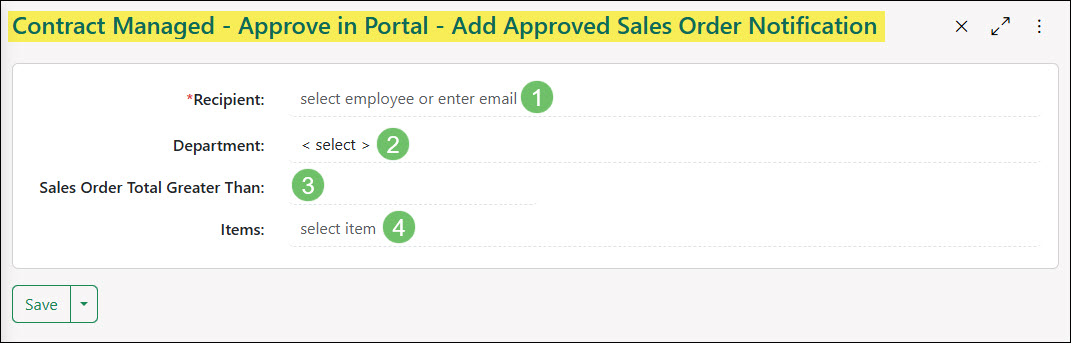
Example of the Approved Order Notification Settings
-
Edit Attachments on Approved Orders
If you wish to restrict the ability to edit attachments on Sales Orders which have already been approved, you can do so with the User Role permission of “Approved Sales Orders – Edit Attachments”. Adding this permission to a User’s Role allows the user to edit or delete attachments on Approved Orders. This can be especially useful in scenarios where the attachments may have sensitive information.
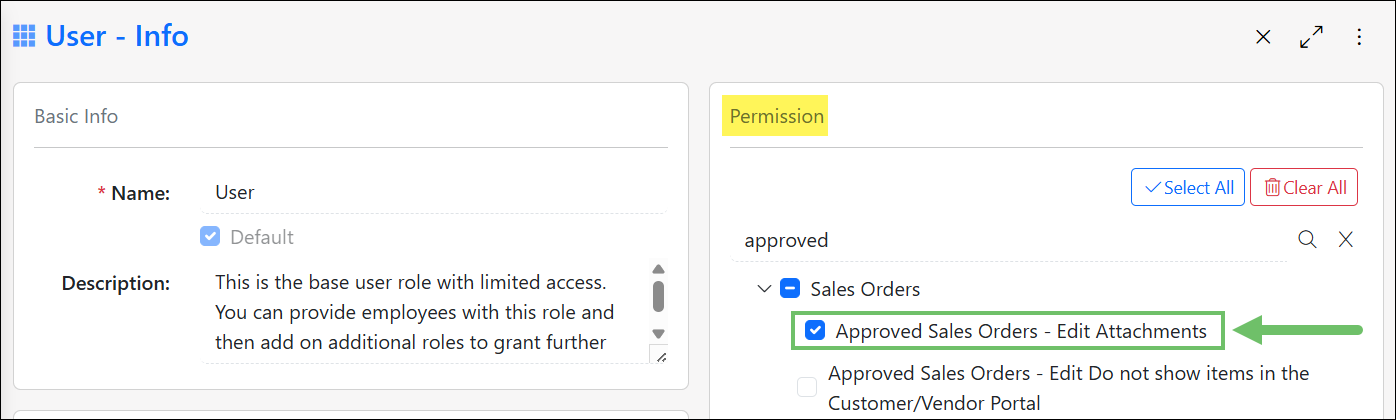
Example of the “Approved Sales Orders – Edit Attachments” Permission
-
Internal Approval
The Internal Quote Review Queue serves as a crucial checkpoint in the sales process, ensuring accuracy and consistency before quotes are presented to Customers. This mechanism allows for an additional layer of oversight, particularly for quotes generated by specific Employees. By routing these quotes through an internal review process, potential errors or inconsistencies can be identified and rectified before they reach the Customer, thereby maintaining the company’s professional image and minimizing the risk of misunderstandings.
To utilize the Internal Quote Review Queue effectively, administrators must configure the system to route quotes from designated Employees into the queue. This is achieved through settings within the Employee’s Profile. Instructions for configuring these settings can be found in the Employee Info section of the Employee Setup Guide, specifically under the Settings area.
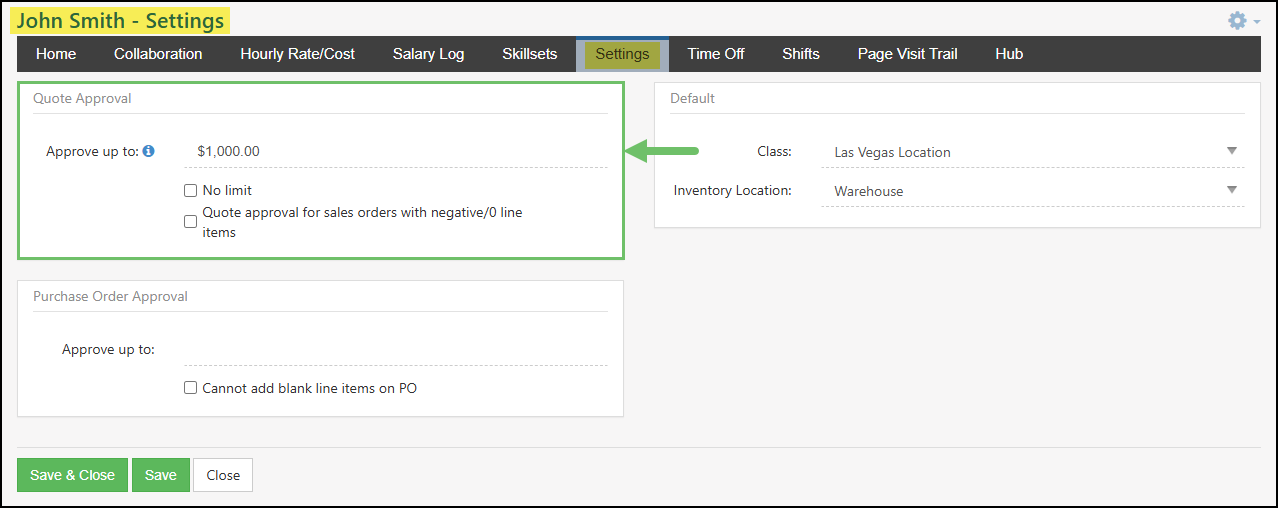
Example of Employees Settings Tab Highlighting the Quote Approval Section
To access the Internal Quote Review Queue, navigate to Customers > Sales > Approve Quotes.
- Search Options: Allows users to filter results by Sales Order #, Customer Name, and Needs Review By. The Needs Review By field will default to the logged-in user for ease of use.
- Sales Order #: Links to the Sales Order that needs to be internally reviewed. Clicking on the Sales Order listed will open the Sales Order in a new browser tab for further review.
- Customer Name: Lists the Customer related to the Sales Order. Clicking on the Customer Name will open the Customer profile in a new browser tab for further review.
- Customer Contact: Lists the Contact associated with the Sales Order requiring approval. If needed, this can be updated before sending the Sales Order to the Customer for approval.
- Sales Order Total: Displays the total numerical value that is listed on the Sales Order.
- Needs Review By: Lists the Employee that was selected to review the Sales Order before it is sent to the Customer for final approval. Clicking on the Employee’s name will open the Employee Information card for further details.
- Approve: Opens the Sales Order Approval page with the configured options on the approval method for the Customer Contact, such as Electronic, Written, or Verbal.
- Mark As Lost: Marks the Sales Order as Lost without notifying the Customer Contact. This is a useful action if the reviewer recognizes the Sales Order should not be sent to the Customer for approval.
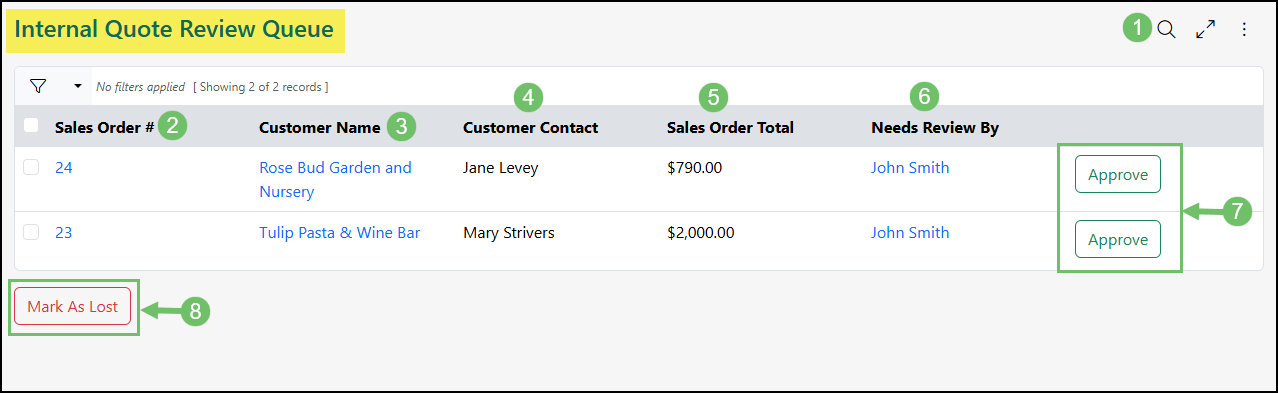
Example of the Internal Quote Review Queue
-
Change Orders
Contract Managed Sales Orders enhance flexibility by allowing for order modifications through Change Order Management. This feature maintains a complete history of changes, providing transparency and accountability for order adjustments. Adjustments may include but are not limited to modifying recurring order quantities or altering costs to non-recurring orders.
-
Sales Order Type Settings
To use Change Orders with your Contract Managed Sales Orders, you must have the feature enabled within your Sales Order Type.
To manage Sales Order Types navigate to Company > Settings > Accounting > Sales > Sales Orders > Sales Order Types.
In your Sales Order Type, enable the setting “Show advanced features“. After this setting is enabled, an additional setting will display to “Turn on contract management“. Once selected, the Change Order requirement for updates on Sales Orders will automatically be activated.
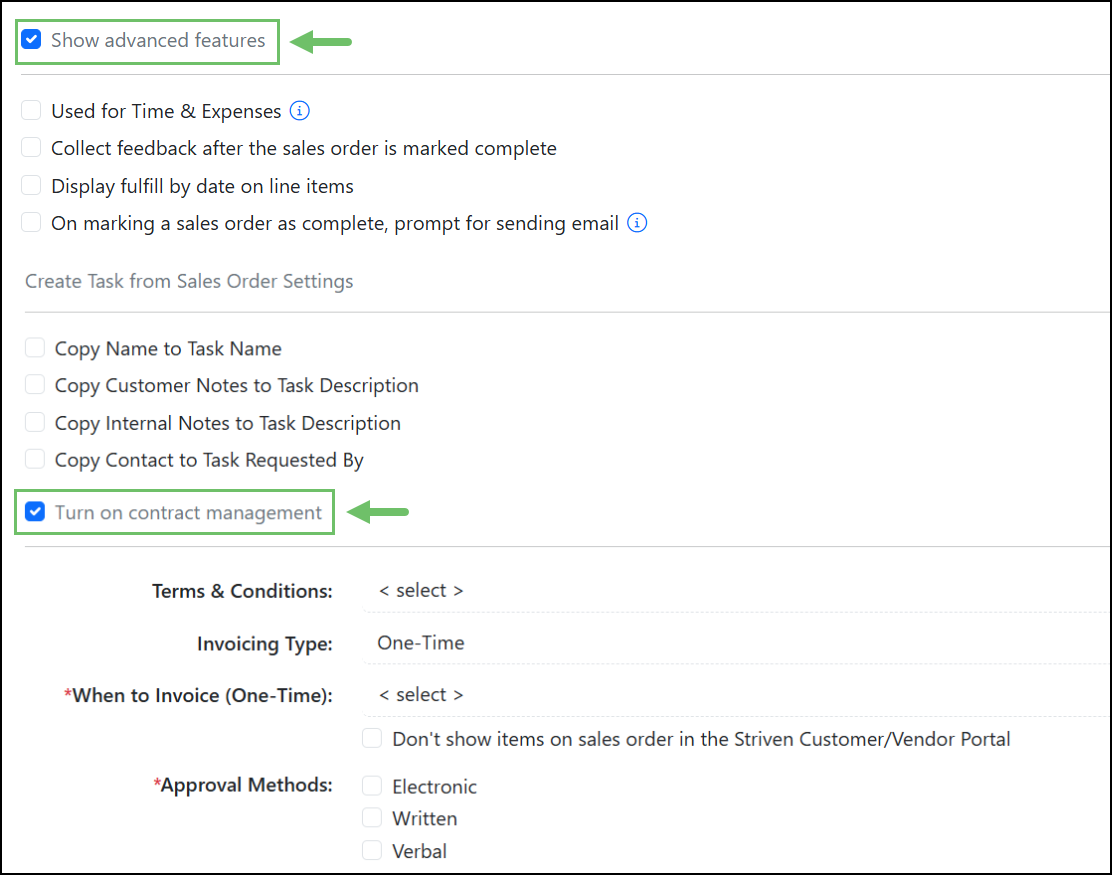
Example of Contract Management Settings
-
Creating Change Orders
To locate a specific Sales Order to create a Change Order, navigate to Customers > Sales > Sales Orders and use the search filters to locate the specific Sales Order that needs to be updated.
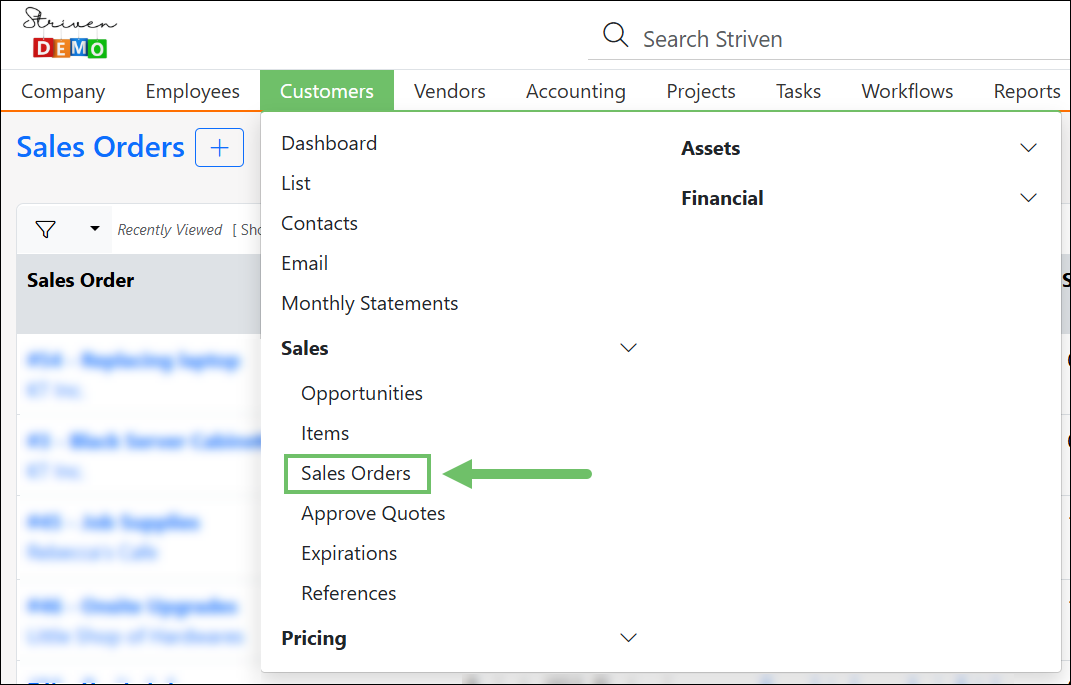
Example of Navigating to the Sales Order List Page
To initiate a Change Order, click on the Sales Order Name of an existing Sales Order that is in an Approved or In Progress status and then select the Create Change Order option from the Actions menu.
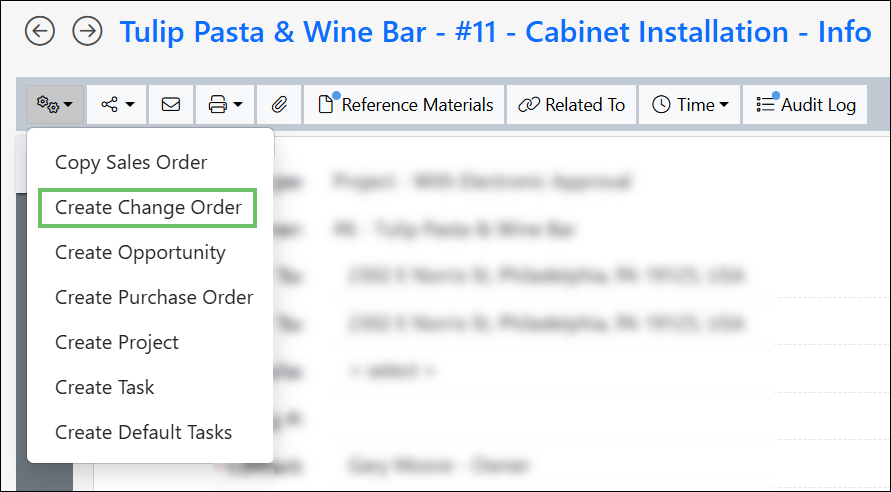
Example of the Create Change Order Option
If the Sales Order is in a Quoted or Pending Approval status, changes can be made without a Change Order. Orders that have been Completed or Closed will need to be reopened in either the Approved or In Progress status to create a Change Order.
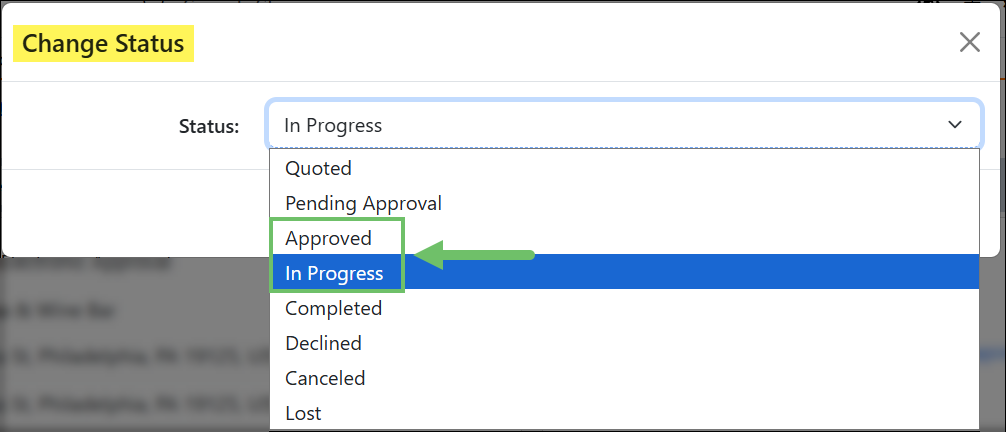
Example of Changing Sales Order Status
-
Change Order Billing Options
Change Order Billing Options offers flexibility in billing for contract-managed one-time change orders. Users have four distinct billing methods to choose from, allowing for better alignment between invoicing and actual operational workflows. This provides users with greater control over the invoicing process.
The Four Billing Options:
- On Approval: Invoice generates immediately upon change order approval.
- On Billing Date: Invoice generates on a specific, pre-defined date.
- On Completion: Invoice generates when the change order is marked complete.
- On Parent Order Completion: Invoice generation is deferred until the main (parent) sales order is marked complete.
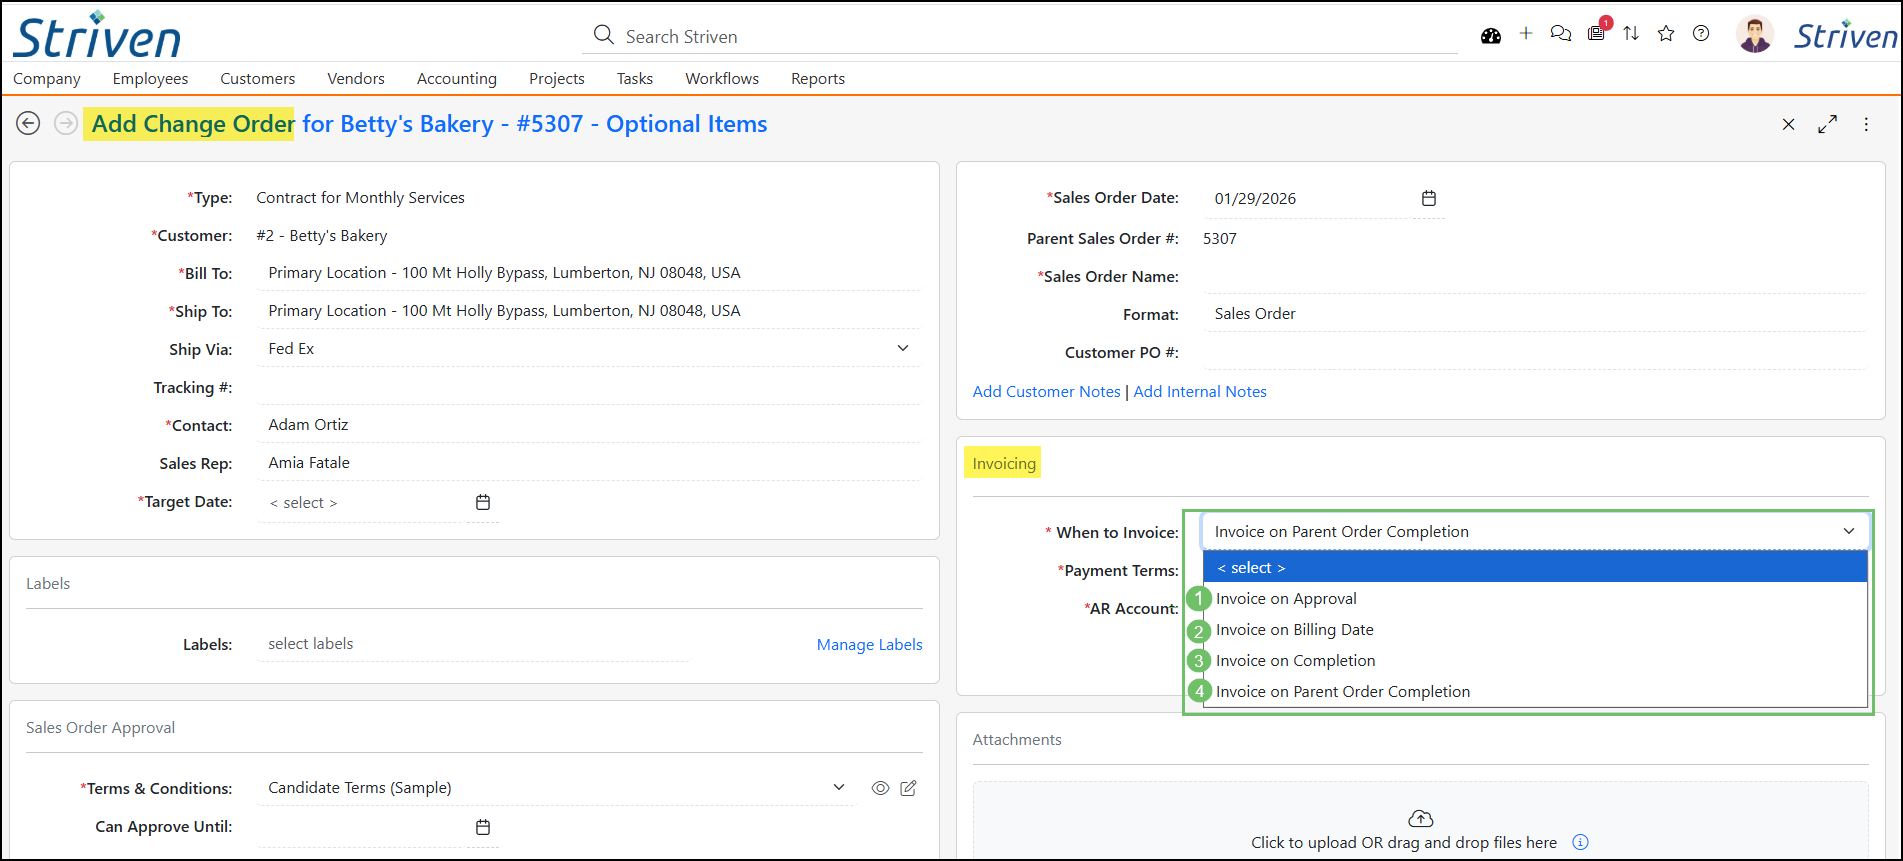
Example of the Change Order Billing Options
-
Managing Change Orders
A few factors may affect how the Change Order may be created or prepopulated. These factors include, but are not limited to, other Sales Order configurations such as the recurrence of the Order or whether or not the Order is partially invoiced. The following sections will review these different scenarios and how the Change Order will be effected.
Non-Recurring Orders
For Sales Orders that are non-recurring, the Change Order will not populate any of the pre-listed Items from the original Sales Order. Additional Items or amounts can be added to the Change Order as needed.

Example of the Items Section When Adding a Change Order
An Item removal can be completed through a Change Order by selecting the same Item that is listed in the previous Order and changing the quantity to a negative. If needed, a Credit Memo will be created to account for the removal.
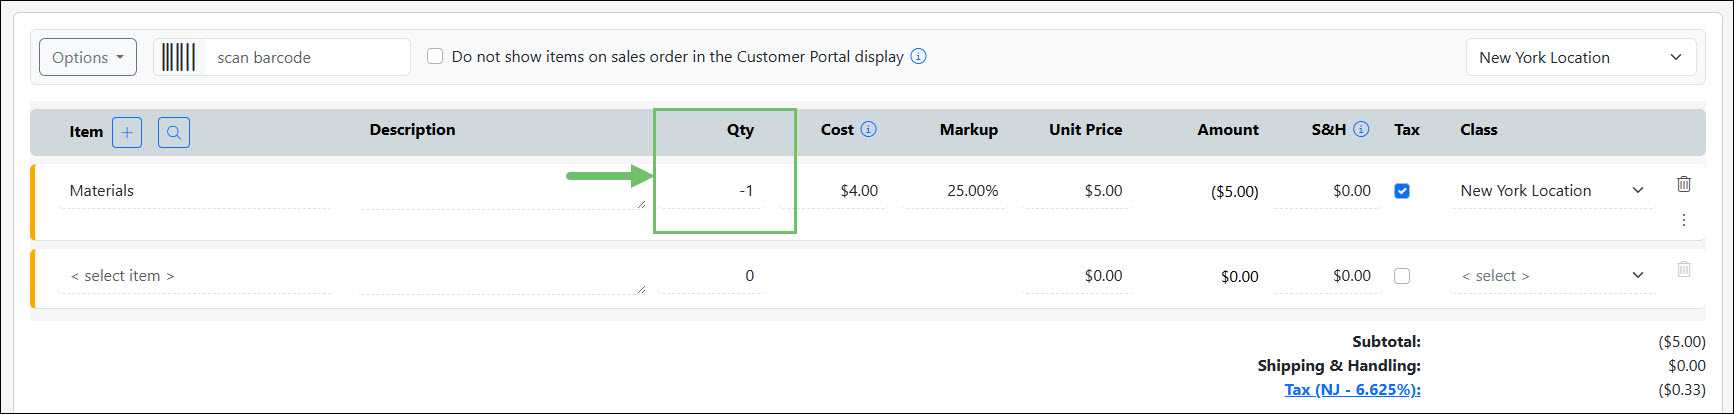
Example of Removing an Item using a Change Order
Any Invoices or Credit Memos related to this Change Order will be listed within the Related To menu option when viewing the Sales Order.

Example of the Related To Option
Recurring Orders
For Sales Orders that are recurring, once you have selected the Create Change Order option in the Actions menu, the previous Items listed on the recurring Order will be listed on the Change Order as well. This allows you to make changes to what is being charged to the Customer on a regular basis.
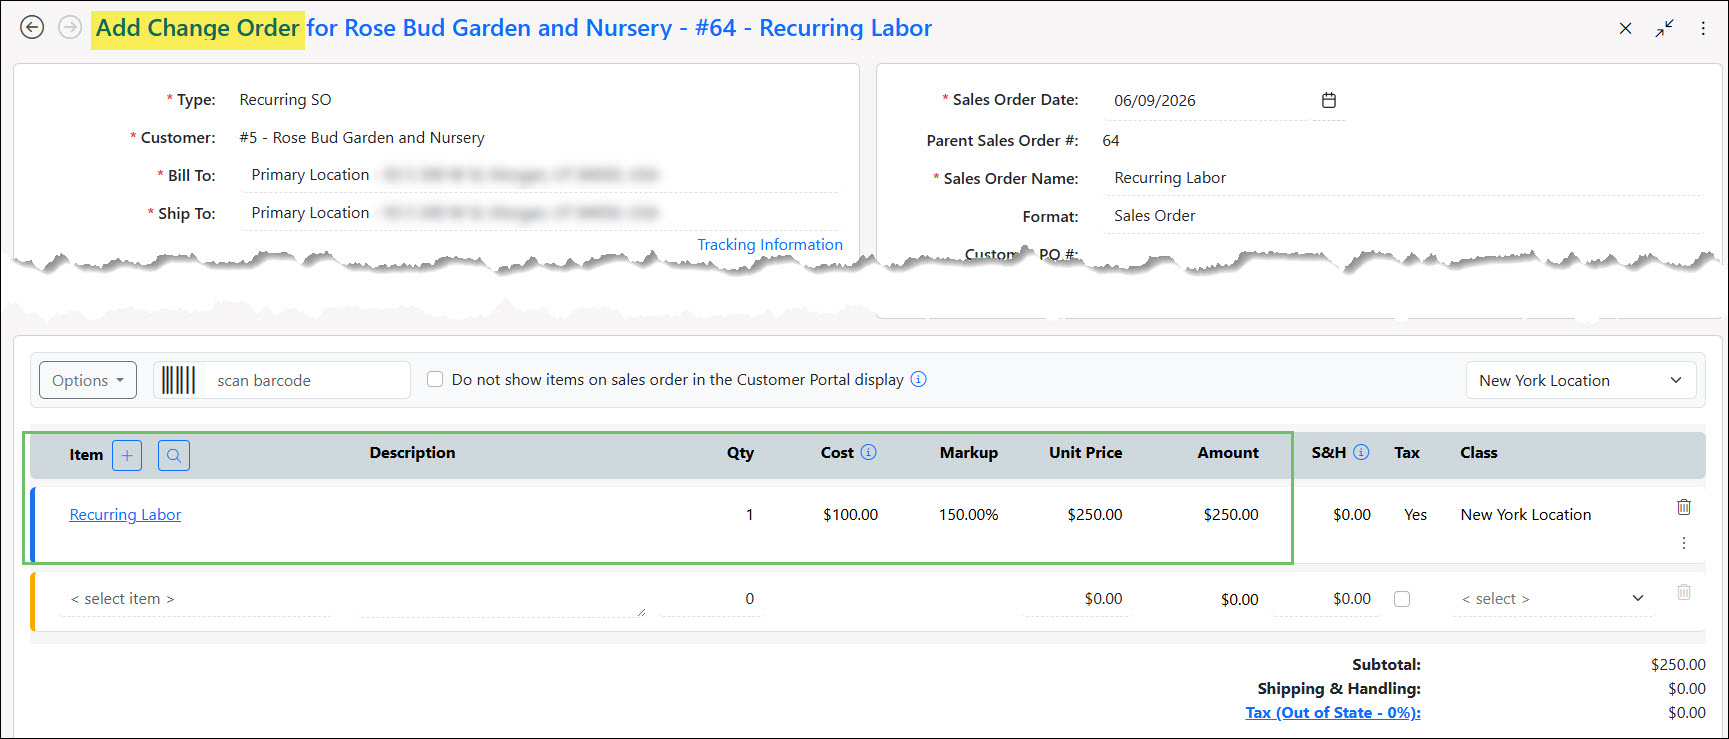
Example of a Change Order for a Recurring Order
Once changes are made to either a recurring or non-recurring type of Sales Order, the Approval process will need to be completed again for the changes to take effect.
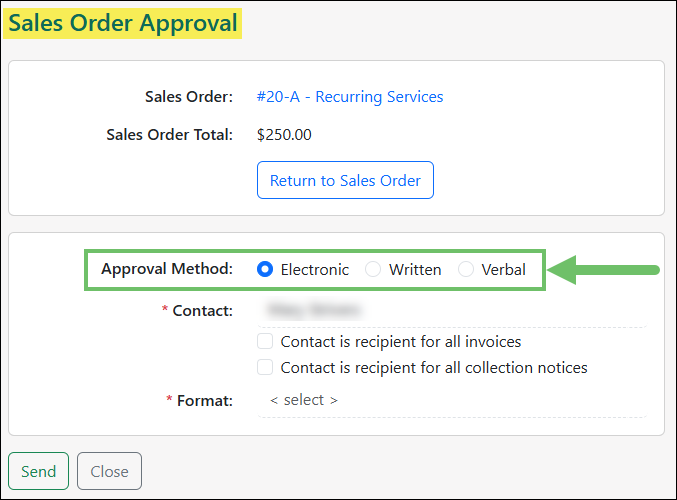
Example of the Sales Order Approval Methods
Change Orders Tab
While viewing a Sales Order, the history can be reviewed by going to the Change Orders tab located in the Left Navigation Menu of the page. This tab will list out previous versions of the Order with an easy to digest view of pertinent information per version, such as the Status, Total and Effective Date which as detailed below.
- Number and Name: The Sales Order Number and Name are hyperlinked, providing convenient access to previous, current, and future versions of the contract order. The Sales Order Number remains consistent across versions, with an additional letter appended to the end to distinguish each iteration.
- Status and Replacement: The Sales Orders status will be listed for each version of the order to easily see which are active compared to closed. If a Sales Order was replaced by a specific Change Order a hyperlink is available to access the Replaced By order.
- Tags: Display next to the Sales Order Number and Name to indicate information such as being the Original Sales Order or Currently Active.
- Total: Shows the total amount of each Sales Order iteration listed.
- Effective as Of: Indicates a calendar date for each listed Sales Order version to convey when it was or will be in effect.
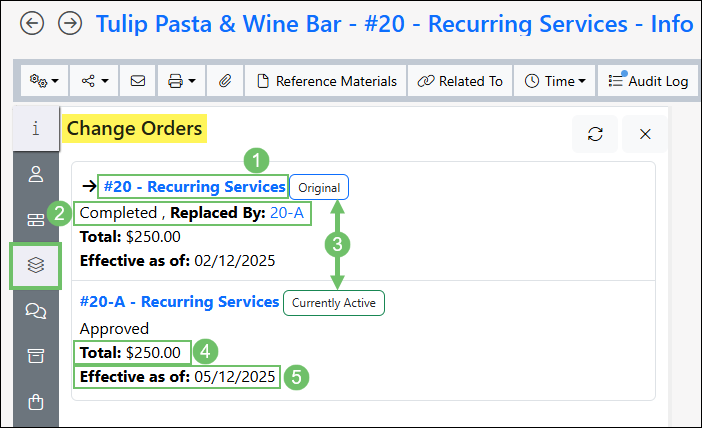
Example of the Change Orders Tab on a Sales Order
-
Sales Order Frequencies
Sales Order Frequencies allow you to create preset Invoicing intervals which you may use when designating Sales Orders as Recurring. The Frequencies you create will also be available for selection on Recurring Purchase Orders. You may begin configuring your Frequencies by navigating Company > Settings > Accounting > Sales > Sales Orders > Sales Order Frequencies.
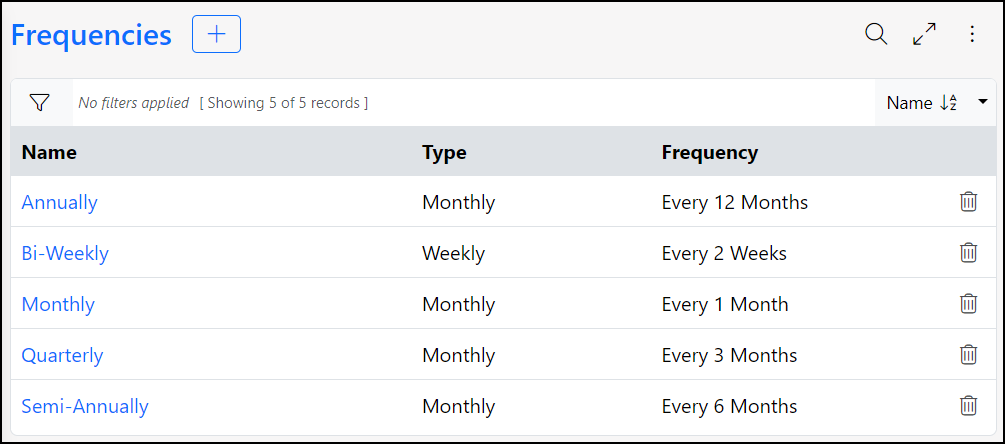
Example of Sales Order Frequencies
-
Creating Sales Order Frequencies
The Frequencies page allows you to create and manage existing Frequencies. If you would like to edit an existing Frequency, select the Frequency Name to reconfigure the name, type, or occurrence frequency. To add a new Frequency, select the Plus icon from the top of the page.
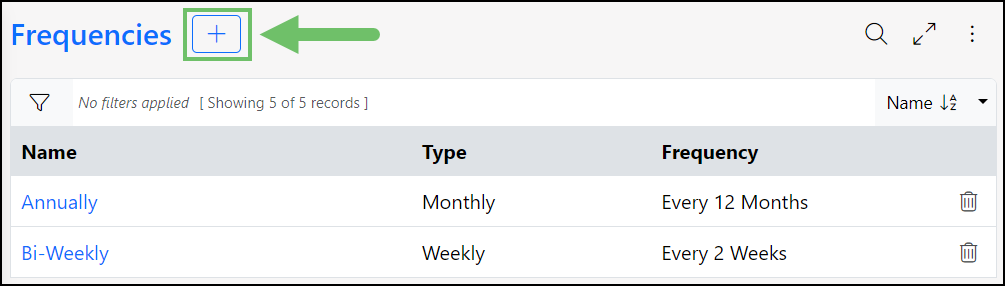
Example of How to Add a New Frequency
When creating a new Frequency, the following fields will be available from the Add Frequency page:
- Name: Allows you to choose a name for the Frequency so it may be easily identified.
- Type: You may use the drop-down menu to choose whether the Frequency will occur on a Monthly or Weekly basis
- Frequency: Enables you to enter a numeric value within this field which will designate how often the Frequency occurs. For example, if the Monthly type is chosen, and a value of 3 is entered in the Frequency field, the Frequency will be configured to occur every 3 months.

Example of the Add Frequency Page
-
Using Frequencies
When creating a Recurring Sales Order, the Frequency can be designated from the Invoicing section using the Frequency field. The Frequency field uses a drop-down menu to allow you to choose one of your configured Frequencies. A Plus icon will appear when hovering over the field, which enables you to quickly create a new Frequency.
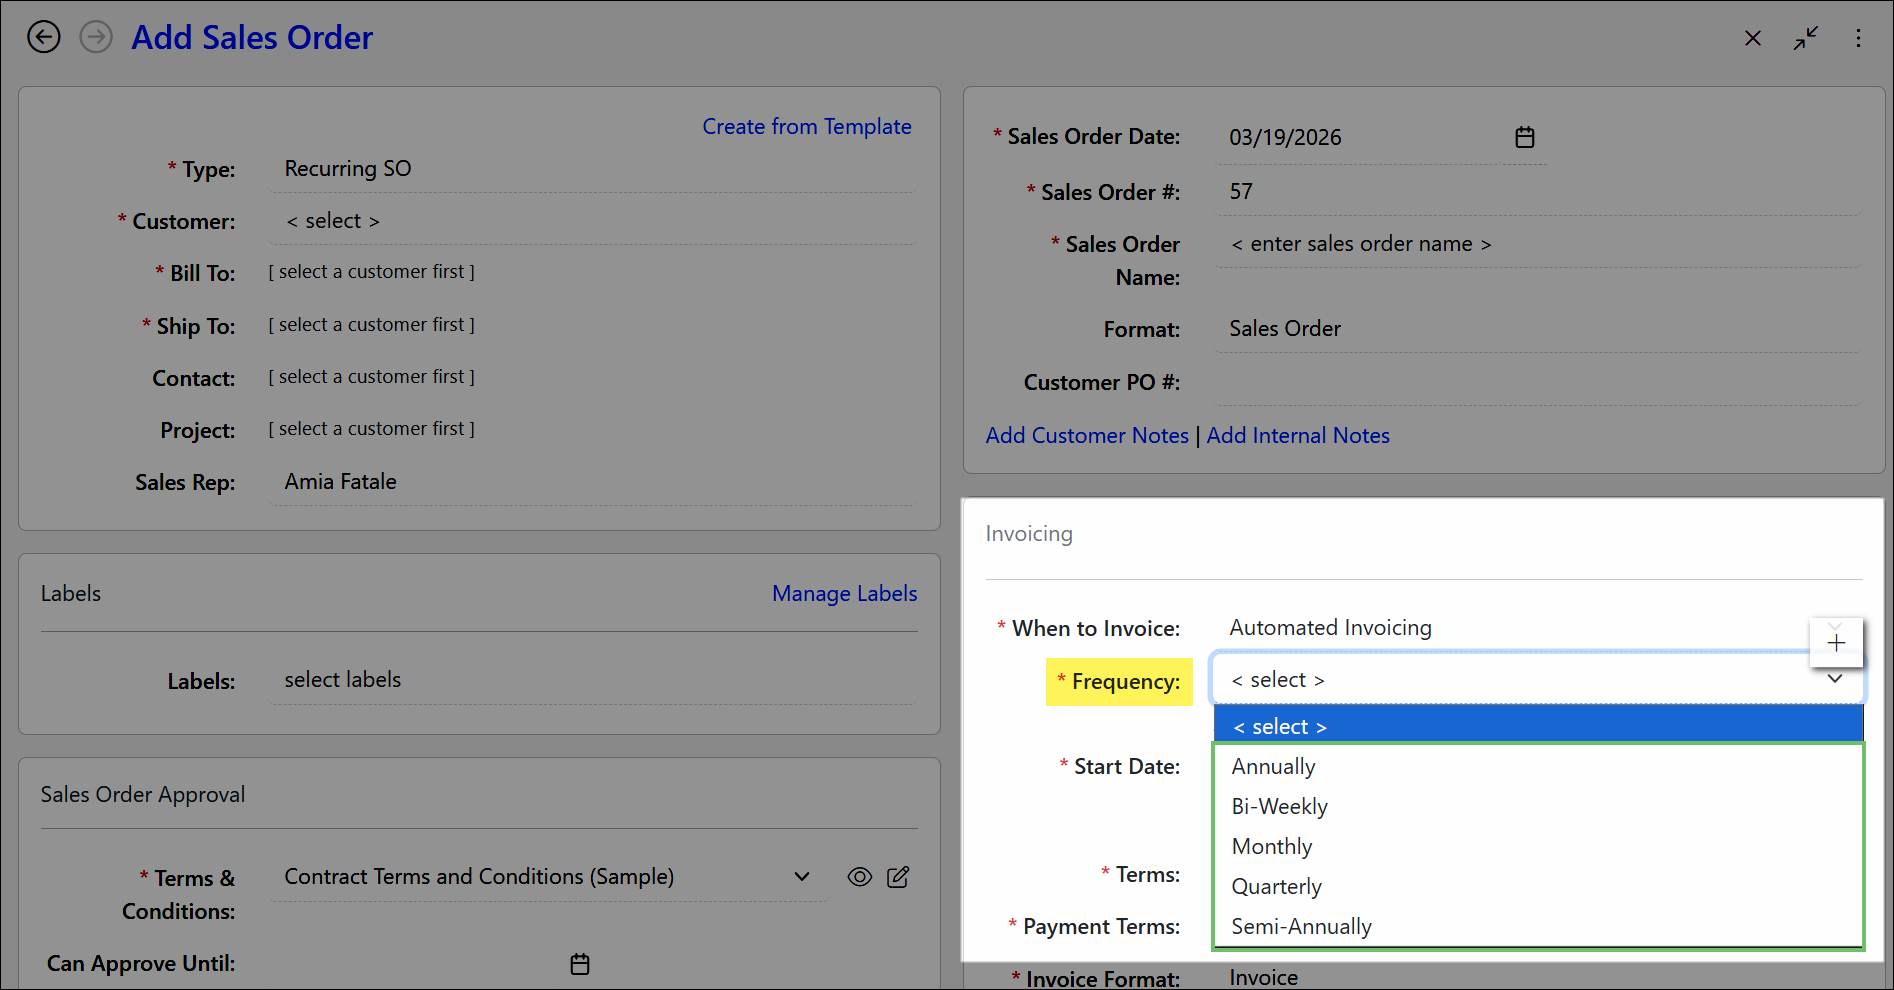
Example of Frequencies on a Sales Order
-
Recurring Sales Orders – Price Update Tool
The Recurring Sales Order: Price Update tool allows you to update item prices across Recurring Sales Orders en masse. Utilizing this tool can assist you in ensuring that your pricing is consistent and up to date.
- Note: Only active Recurring Sales Orders are included in this utility. Sales Orders with Change Orders effective today or on a future date are also excluded.
The Price Update tool can be accessed by navigating Customers > Pricing > Recurring Sales Orders.
The Recurring Sales Orders: Price Updates List page allows you to view Price Update Requests that are Pending, In Progress, and Processed. The search filters at the top of the page allow you to narrow the results shown on this page. Each request has the request ID, effective date, the date the request was created, the employee who created the request, and the request status, listed. Selecting the hyperlinked Request ID for each result will allow you to view the details of the request such as which Sales Orders were updated, the price adjustment, and whether an email notification containing the update information was sent.