


Customers
Customer/Vendor Setup
Support Guide
-
Overview
Before managing Customers and Vendors in Striven, setting up default configurations within the settings is key to saving time later. Configurations such as triggers and required fields enable your company to use Striven in a way that makes the most sense for you. In this guide, we’ll cover configurations that are ideal to review before inputting your Customers/Vendors into your Striven System.
Read this guide if you are trying to:
✔ Configure default settings for your Customers/Vendors
✔ Set up your CRM to fit your Company’s needs
✔ Add Contacts for Customers/Vendors
-
CRM Settings
Before adding Customers/Vendors it is important to check your Customer/Vendor settings to ensure things suit your company’s needs. Here you can choose defaults when adding Customers/Vendors, decide on required fields, and more. Below is a screenshot of what the CRM Settings page looks like and a description of what you can configure there. To view the Customer/Vendor Settings, use the following steps below:
Company → Settings → Customers/Vendors → Settings
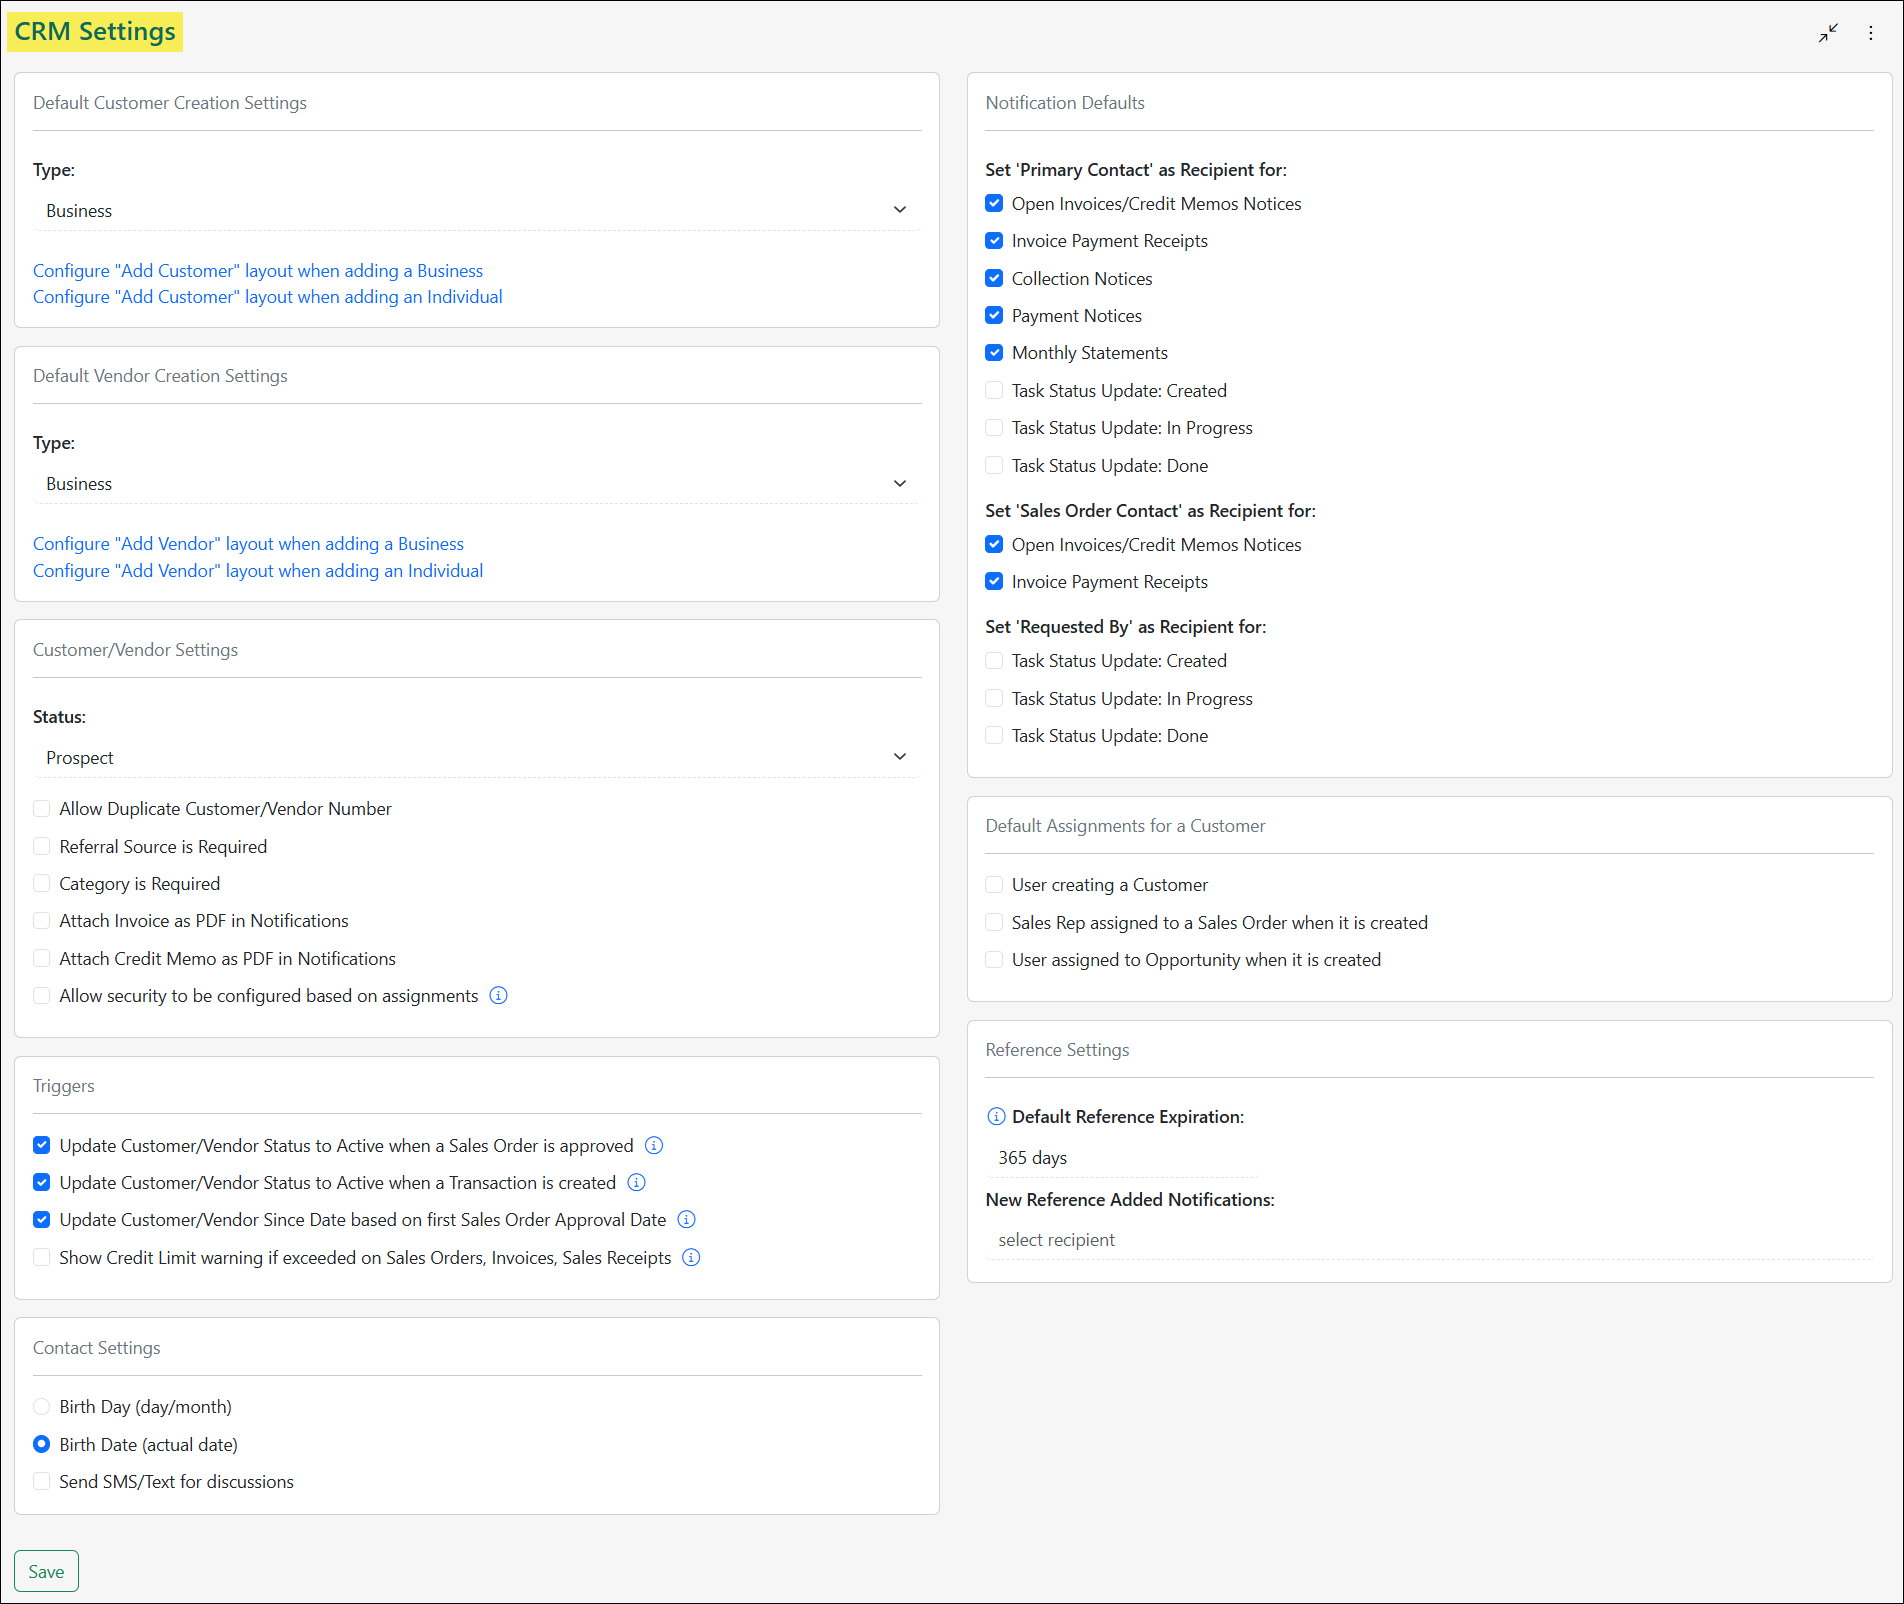
Example of the CRM Settings Page

-
Default Customer/Vendor Creation Settings
The Default Customer/Vendor Creation Settings panel allows you to specify important details like the business type and the data that can be input for each Customer and Vendor during the creation process. These settings are available for both the Customer and the Vendor in order to allow for easy entry for whether you are selling or purchasing from the Account.
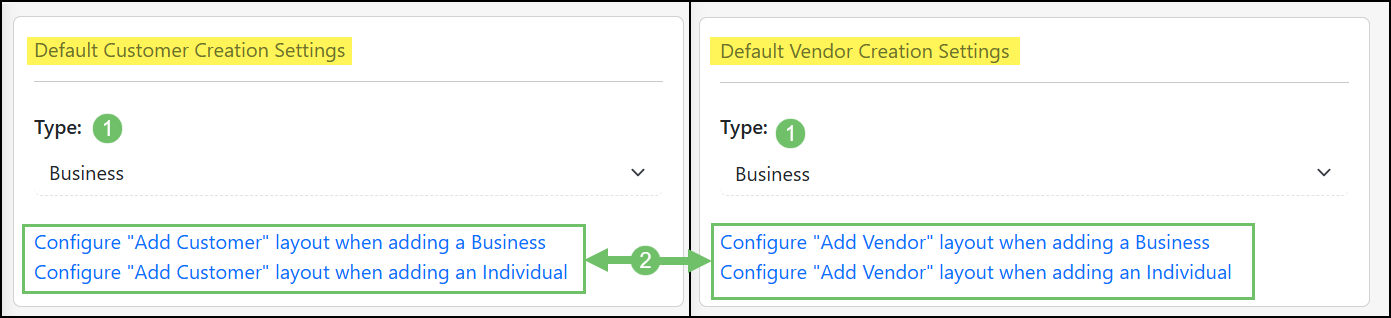
Example of the Default Customer Vendor Creation Settings
- Type: Options for the type of business you are working with include a Business or an Individual.
- Configure “Add Customer/Vendor” layout when adding a Business or Individual: Determines what information will be entered into the system as Customers or Vendors are being added to Striven. This configuration can be completed for the Customer and the Vendor separately as well as if the Account type is a Business or an Individual.
-
Customer/Vendor Settings
The Customer/Vendor Settings panel allows you to determine important information such as the Default Status, Account Security, and more.
- Status: Allows you to enter Customers/Vendors into Striven without having to set the status each time.
- Allow Duplicate Customer/Vendor Number: By default, Striven will check for duplicate numbering when entering a new Customer/Vendor. This is to help keep clean and accurate data within your Striven system. However, if your company does have accounts that have duplicate numbering, this option will allow duplicates within the system.
- Referral Source is Required: This is an easy way to confirm you always know what referrals are bringing you the most business. Requiring this field will also ensure that this field is not bypassed by Employees as they create Customers/Vendors.
- Note: Referral Sources can be configured to fit your company’s needs.
- Category is Required: Categorizing your Customers/Vendors can come in handy in many areas of the system such as reporting, Workflows, and more. Requiring the Category when an account is created will ensure your Customers/Vendors are organized within your Striven system.
- Note: You can learn more about creating Customer Categories by reviewing the Category Management Guide.
- Attach Invoice/Credit Memo as PDF in Notifications: When selected, these checkboxes allow generated Invoices and Credit Memos to be sent via automatic Notification to the Customer. Adjusting these settings will only adjust the default AR Notification settings for newly created Customers, and will not change the settings designated for existing Customers.
- Allow Security To Be Configured Based On Assignment: Restricts access to Customers/Vendors based on Assignments so that only users assigned to that particular Customer/Vendor can access their information. (This feature will be discussed in more detail later in this guide.)
- Default All New Customer/Vendor to Limit Access: Sets the default for all new Customers/Vendors added to the system to automatically have limited access based on Assignments.
- Create a Discussion if Task is Assigned to a User with No Access: There are two options available for this setting, as discussed below:
- To (User): Employee assigned to receive notification Discussion warning when a Task is assigned to a user with no access to that particular Customer/Vendor.
- To Category: If a category is selected, the Discussion will be sent to whomever is assigned at the Customer level for the category. If no one is assigned, the Discussion will be sent to the selected user above.
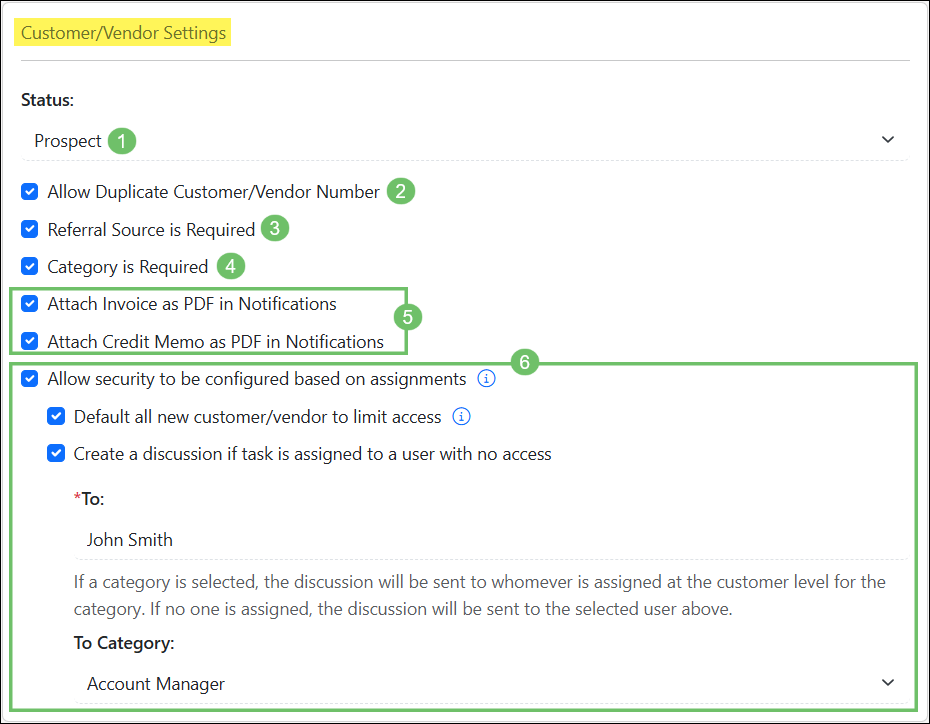
Example of the Customer Vendor Settings Panel of the CRM Settings Page
-
Notification Defaults
Defaults here will set certain value or actions depending on how you would like your Striven system to behave.
- Set Customers to be Consumers by default: If your company primarily works with Consumer accounts, this will set any Customer/Vendor being added as a Consumer by default so no company name will be required. The Consumer’s first and last name will become the Customer/Vendor name in Striven.
- Set “Primary Contact” as Recipient for: This will make sure the Contact who is set as the primary will automatically be set to receive notices for the following when created:
- Open Invoices/Credit Memos Notices
- Invoice Payment Receipts
- Collection Notices
- Payment Notices
- Monthly Statements
- Task Status Update: Created
- Task Status Update: In Progress
- Task Status Update: Done
- Set “Sales Order Contact” as Recipient for: This will allow for the Contact who is on a Sales Order to be automatically set to receive notices for the following options when created in Striven relating to that Sales Order:
- Open Invoices/Credit Memos Notices
- Invoice Payment Receipts
- Set “Requested By” as Recipient for: This will allow for the Requested By to be automatically set to receive notifications with regard to Tasks:
- Task Status Update: Created
- Task Status Update: In Progress
- Task Status Update: Done
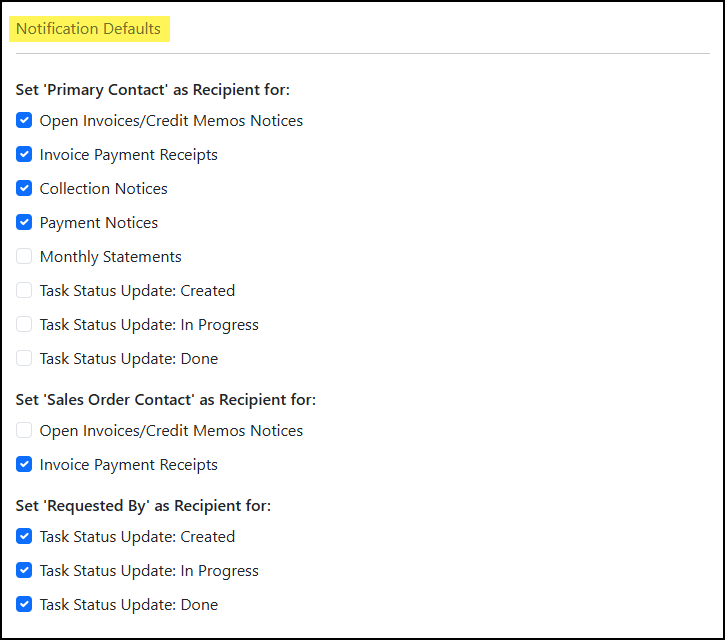
Example of the Notification Defaults Settings Panel of the CRM Settings Page
Note: Notification settings at the Customer/Vendor level can be found by navigating to the Settings page using the waffle menu on a particular Customer/Vendor Dashboard.
-
Triggers
There are certain triggers that can automatically change the Customers’ status to Active based on what you have set here. This is another feature within Striven to streamline and automate the sales process. The following options are available for updating the Customer/Vendor:
- Status to Active when a Sales Order is approved: If checked, if a Customer/Vendor is Inactive and a Sales Order gets approved, the system will automatically update the Customer’s status to Active. Having the Customer set to Active shows Employees that the Customer is currently doing work with your company. This status can be edited within the Customer’s Info.
- Status to Active when a Transaction is created: If checked, if a Customer/Vendor is Inactive and a Transaction is created, the system will automatically update the Customer’s status to Active.
- Since Date based on first Order Approval Date: Having the Active Since date set based on a Sales Order approval is another way to gain a realistic date you began doing business with the selected Customer.
- Show Credit Limit warning if exceeded on Sales Orders, Invoices, Sales Receipts: When checked, if a Customer has a credit limit set, users will receive a warning message when creating Sales Orders, Invoices, and Sales Receipts for Customers whose open balance has exceeded their credit limit. Additionally, users will receive a confirmation messages if the transaction would put their open balance over their credit limit.
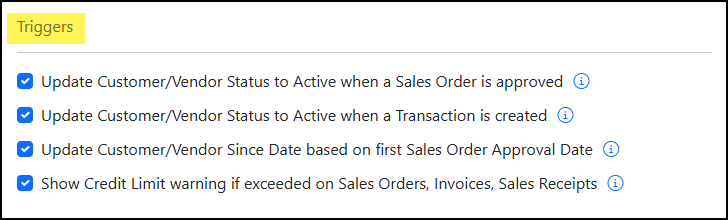
Example of the Triggers Settings Panel of the CRM Settings Page
-
Reference Settings
Once a Contact has been set to be a Reference for your company, these settings will determine how long the Reference will remain active, along with who receives a notification when someone is set to be a Reference. To learn more about how References can be utilized in Striven, review our Contact Management Guide.
- Default Reference Expiration (days): The number of days you would like to keep the Contact as a Reference will be set here. Once the number of days selected has passed, the Contact will be removed as a Reference to ensure all your References are the most up to date.
- New Reference Added Notifications: Anyone set within your company in this panel will be notified each time a Contact is set as a Reference.
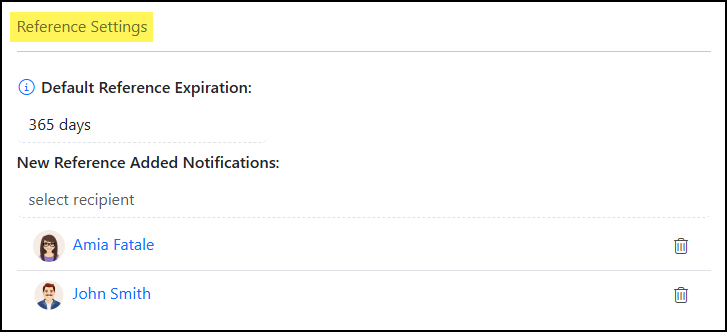
Example of the References Settings Panel of the CRM Settings Page
-
Contact Settings
The Contact Settings section from the CRM Settings page will determine key information such as how Contact’s birthday’s will appear as well as default Text Messages to be sent when Discussions are created.
- Birthday Options: These options will allow you to choose a Contact birthday format whether only displaying the day/month or the actual date. Displaying the Birth Date option will include the birth year within the birthday listed. The Birth Day option will only include the month and day that the person was born and exclude the birth year. When utilizing the Report Builder to build a report regarding Contacts, if the Birth Day option is selected, the column for Contact Birthdate will not populate with data and remain blank.
- Send SMS/Text for Discussions: This option will only be available if you have SMS/Text Messages enabled within your Striven system. With this option toggled on, when a Contact is created or associated with a Customer, their Send SMS/Text for Discussions option will be toggled on or off based on the CRM Setting. To learn more about utilizing Text Messages in Striven, review the Twilio Integration Guide.

Example of the Contact Birthday Setting Panel of the CRM Settings Page
-
Default Assignments for a Customer
The default Assignments can be set for the following scenarios:
- User creating a Customer: The user assigned automatically when creating a new Customer in your system.
- Sales Rep assigned to a Sales Order when it is created: The Sales Rep assigned automatically when a Sales Order is created.
- User assigned to Opportunity when it is created: The user assigned automatically when creating an Opportunity.
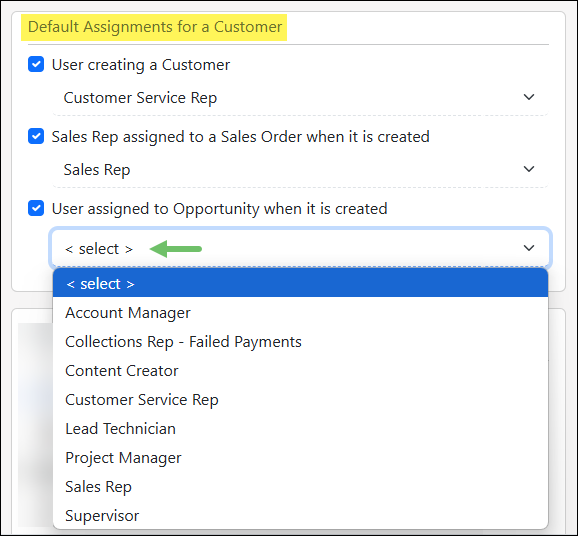
Example of the Default Assignments for a Customer Settings Panel of the CRM Settings Page
-
Industries
While tracking Customer/Vendor information, adding the industry will allow for comprehensive reporting and searching abilities. To manage Industries in Striven, navigate to Company → Settings → Customers/Vendors → Industries.
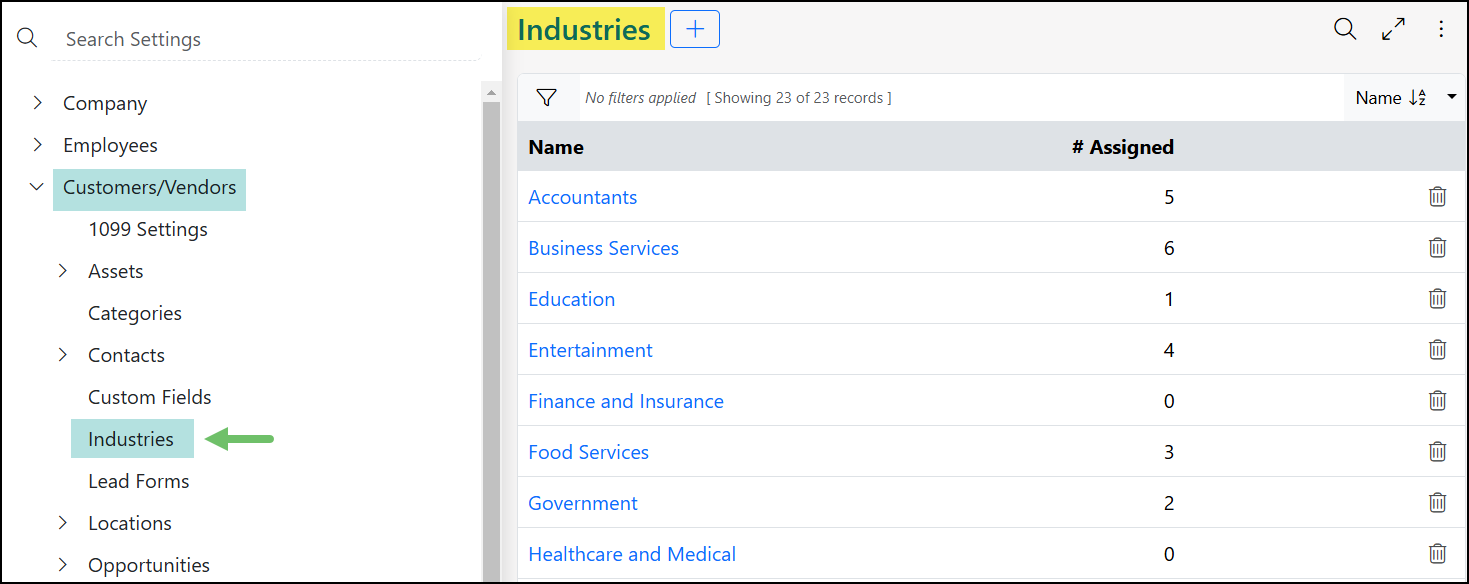
Example of the Industries Settings Page
-
CRM Dashboard
The CRM Dashboard is a customizable page to allow you to add, track, manage, and report on Customers within Striven. Widgets can be added, removed, and restructured using the Manage Widgets popup on the right-hand side of the Dashboard page. Below are some of the available widgets on the CRM Dashboard page.
To learn more about the CRM Dashboard, please view our CRM Dashboard & Reporting Guide.
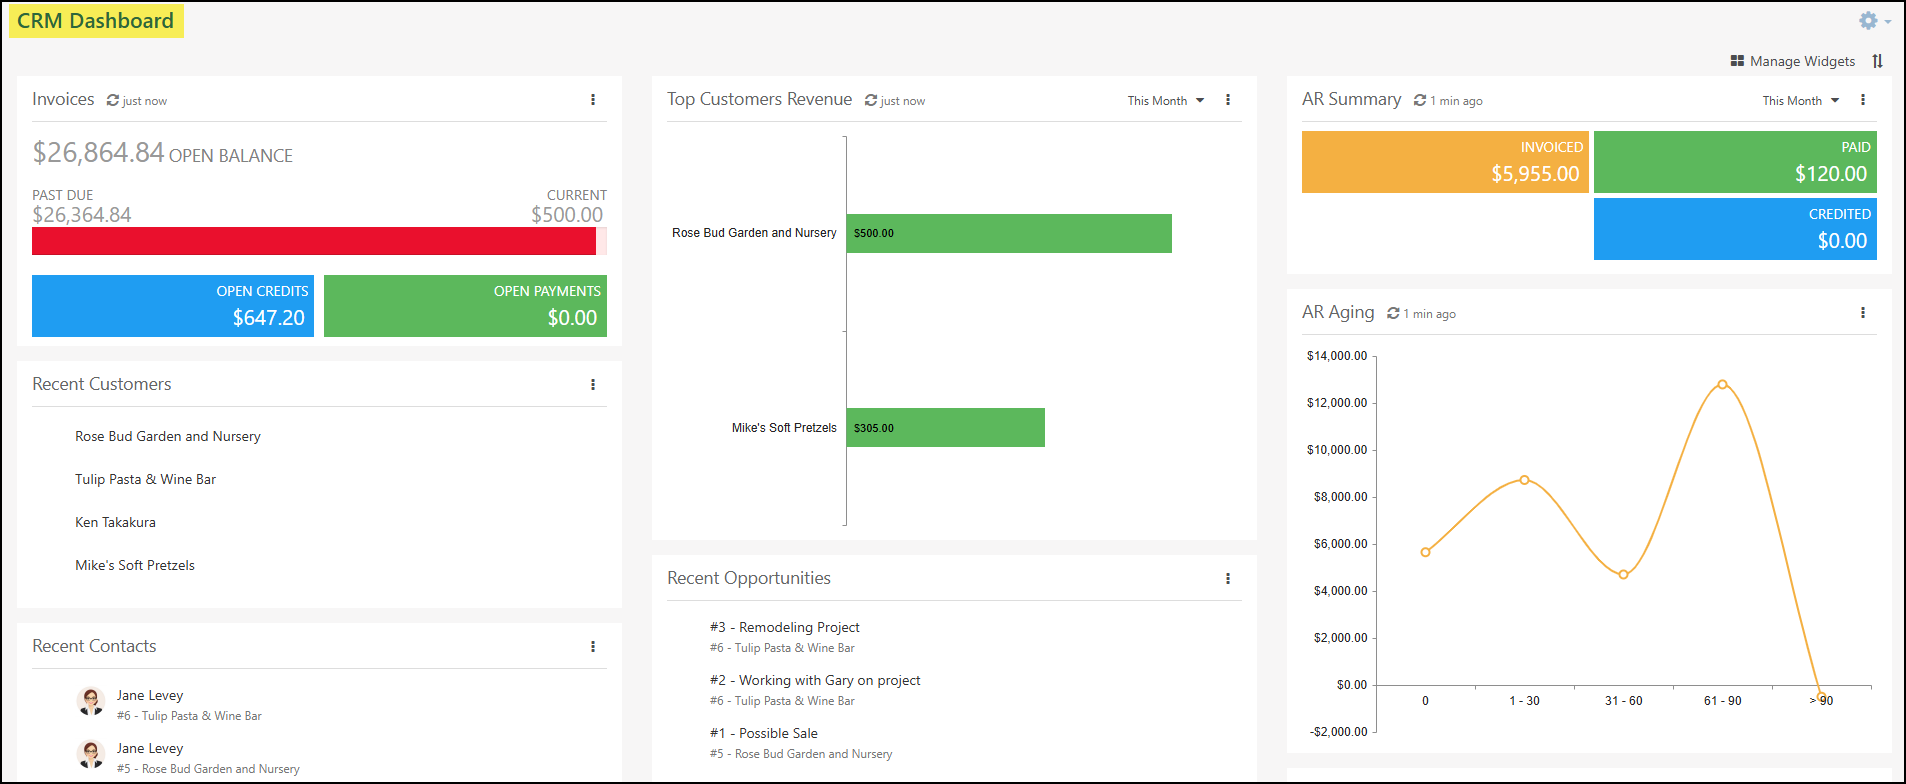
Example of the CRM Dashboard
-
Customer and Vendor Lists
The Customer and Vendor Lists each shows all Customers or Vendors that have been entered or imported into your Striven system. These lists also have tools to enable you to add a new account or import accounts or their locations en masse. These lists capture certain information for each Customer or Vendor which provides some details in the description below. To view the Customer or Vendor List, use the following steps:
Customers → List
Or
Vendors → List
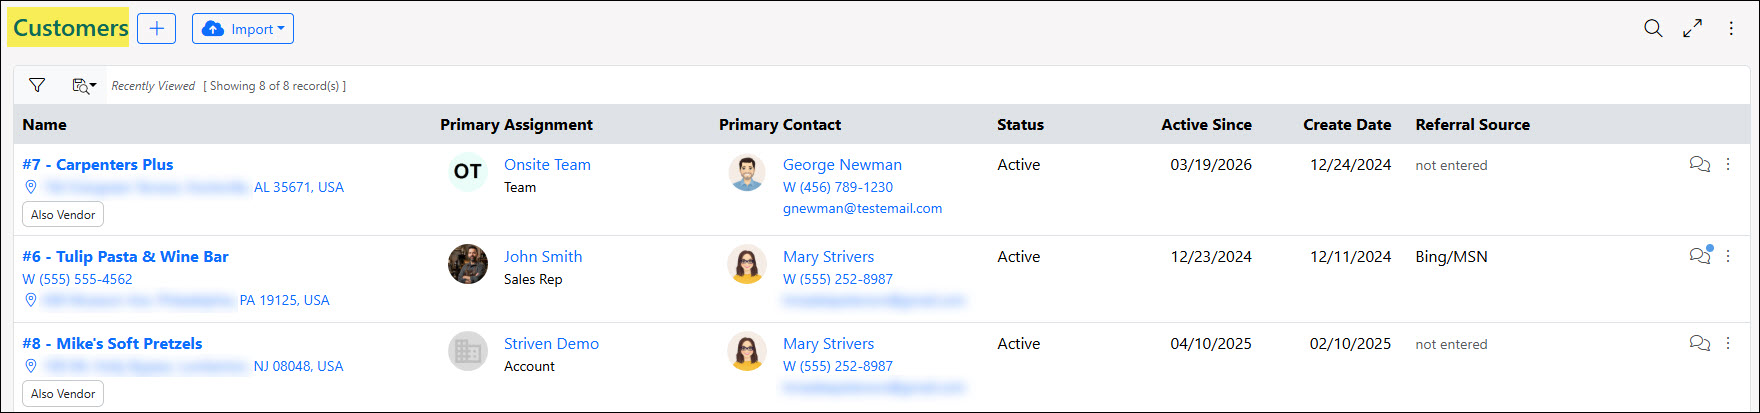
Example of the Customer List
Once on the Customer or Vendor List, new accounts can be added to the system by using the plus icon or the Import button at the top of each list.
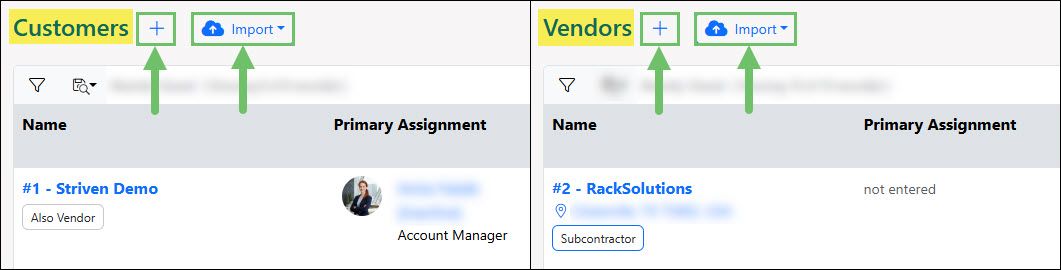
Example of the Customer and Vendor List Add Options
Default View
The Customer and Vendor Lists Default View serves as the landing page for the Customer and Vendor Lists and is shown when there are no Items returned from a search, when there are zero records in the system, or when initially navigating to the page. This initial default view appears in order to help guide users on what can be done from these lists when they first arrive, or when attempting to search and get no results available.
Note: Once Customers or Vendors have been viewed and accessed from the system this page will not be shown and instead the most recently viewed accounts will be displayed in these lists by default.
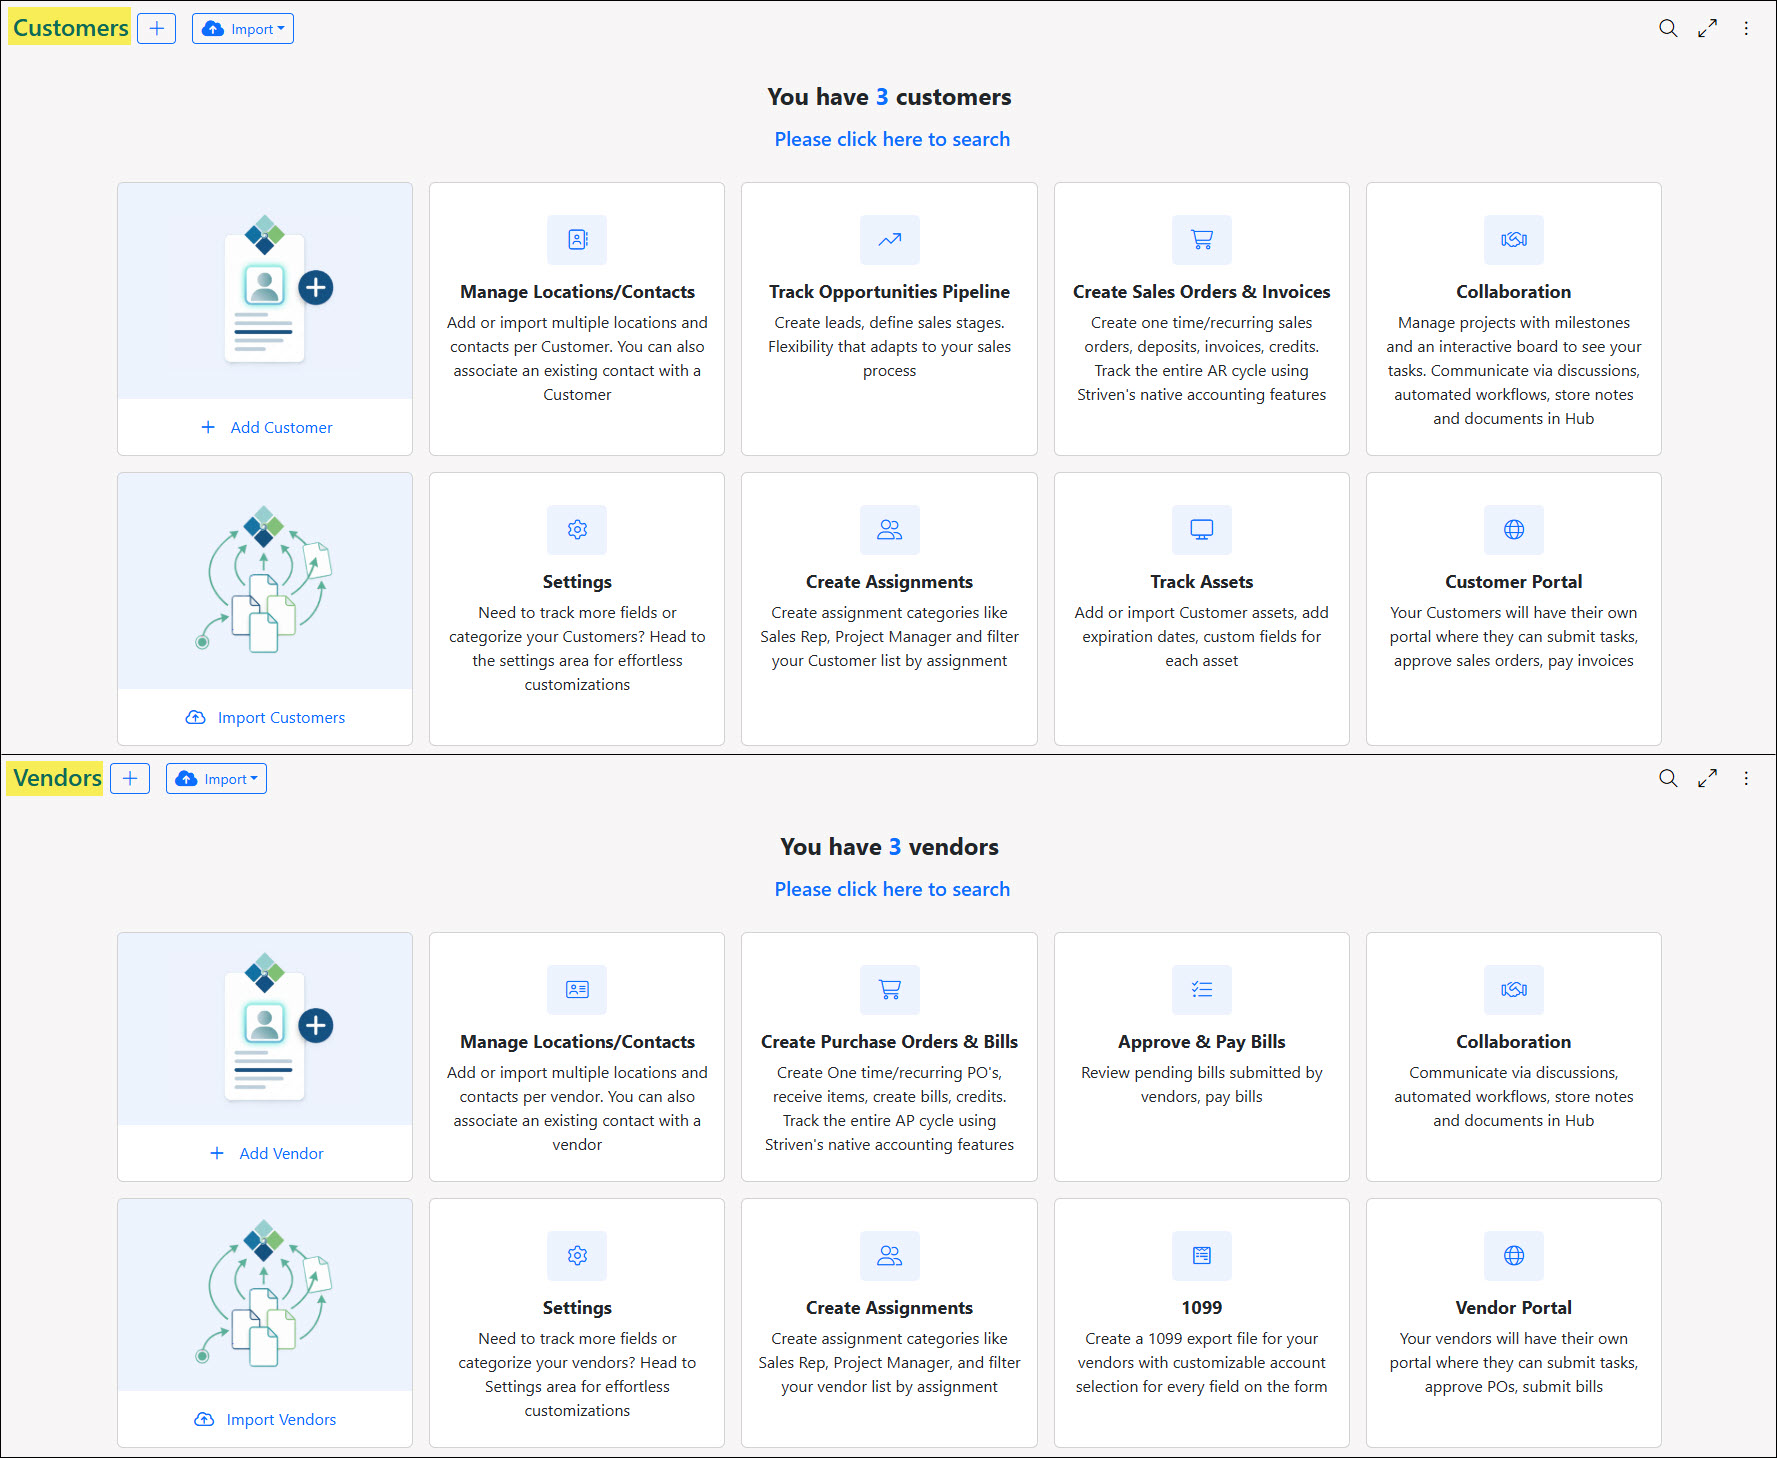
Example of the Customer and Vendor Lists Default View
The Customer or Vendor Lists can be accessed from this page by clicking the total count number of results currently in the system to load the full list of active Customers or Vendors. Alternatively, users can click the link to open the search panel and utilize specific filters to search for and access specific accounts.
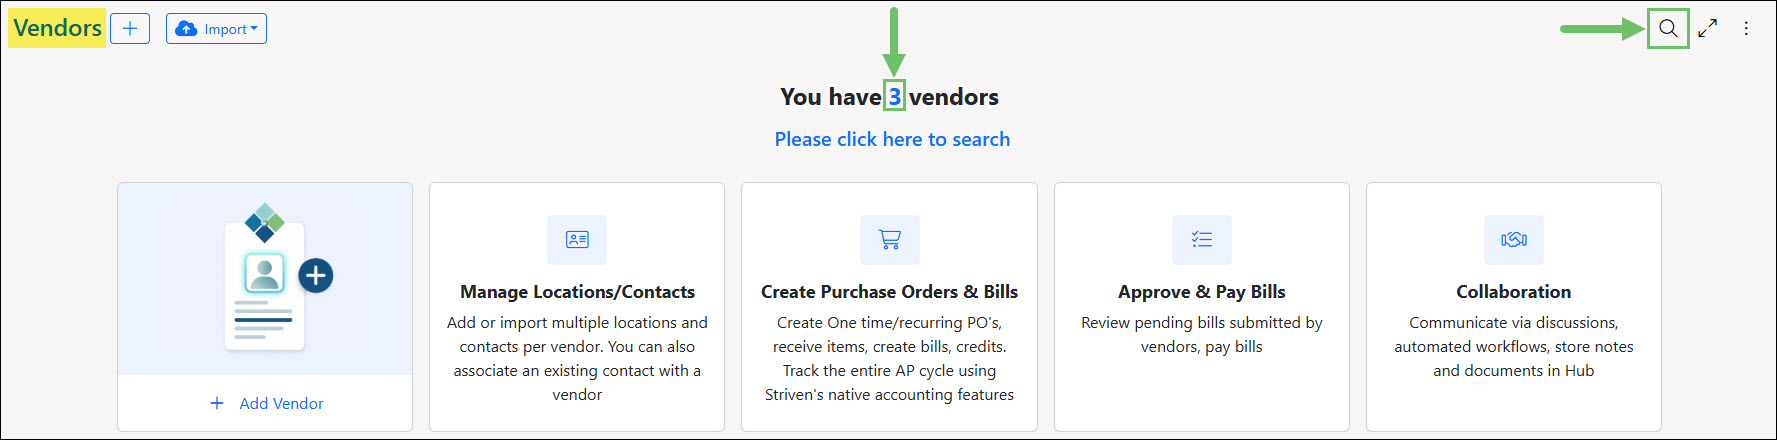
Example of the Locations of the Search Filters from the Vendor List Default View
Recently Viewed
When viewing the Customer or Vendor Lists, the most recently viewed accounts will be listed as results. Up to 25 of the most recently accessed records for the logged-in user are displayed at the top of the list by default. This list only includes accounts with a status of Active, Prospect, or Lost, excluding Deleted accounts unless specifically searched for. This helps in later account management as the Customers or Vendors you view the most will be the easiest accessible through the top of your lists. To search for specific Customers or Vendors or view the full lists, use the search filter options available.
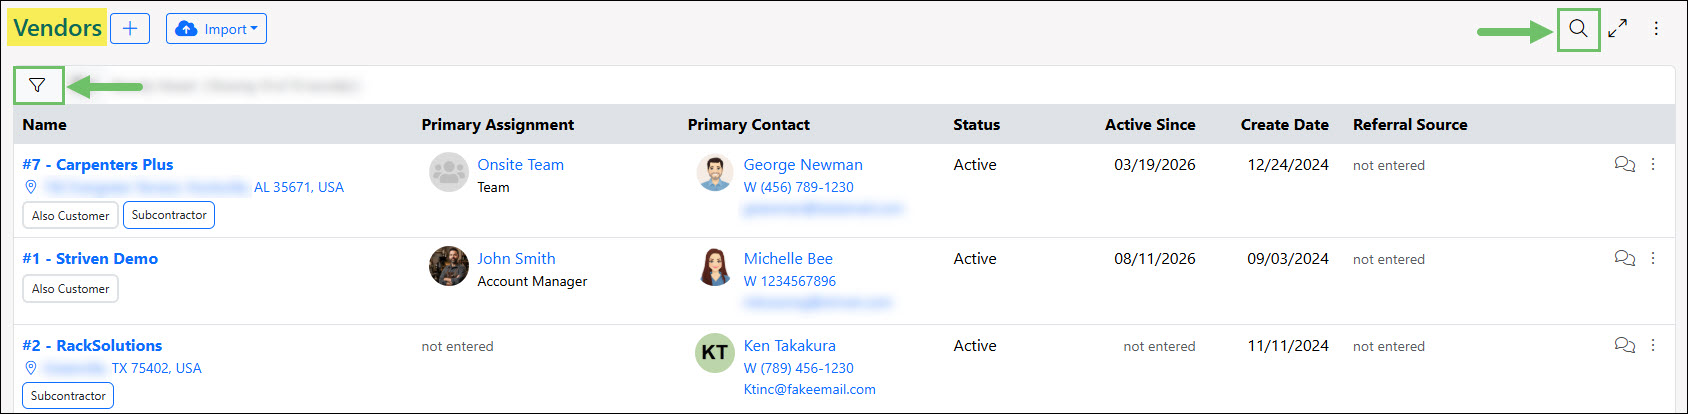
Example of the Search Filter Locations on the Customer or Vendor Lists
Search Filters
Below is a screenshot illustrating how the Search Filters from the Customer and Vendor Lists appear and a description of what can be accomplished there.
- Name/Number: Narrows results of the lists based on the Customer or Vendor’s name or number listed in their profile.
- Price/Cost List: Adjusts the list to only include Customers or Vendors with a specific price or cost list assigned to them. When viewing the Customer List this field will be titled Price List, while viewing the Vendors List will be shown as Cost List.
- Contact Name: Searches through Contacts listed in the accounts in order to only view Customer or Vendors with the specific Contact name.
- Phone: Returns results in the lists based on a phone number saved within the Customer or Vendor account.
- Address: Returns results in the lists based on addresses saved within the Customer or Vendor Locations.
- Website: Will list accounts based on the website saved within their profile.
- Only Show Customer on AutoPay / Is Subcontractor: When viewing the Customer List a checkbox is available to Only Show Customer on autopay. The Vendors List, however, will have a checkbox in this location to narrow results for all Vendors that are listed as Is Subcontractor.
- Status: By default, only accounts in a Prospect, Active, or Lost status will be shown. To include Deleted accounts, adjust this filter to include the Deleted status.
- Industry: Lists Customer and Vendor accounts that have a specific industry saved within their profile.
- Referral Source: Searches through the referral source set within the Customer or Vendor profiles.
-
Assignments: The following assignment information can be used to search through the Customer and Vendor Lists:
- Primary Assignment: Narrows results based on which Employee is set as the Primary Assignment for the account.
- Assignment Category: Searches based on a specific Assignment Category that has been set on the Customer or Vendor account. When this field is left blank, Employees can be selected in the Assigned To search filter. When setting this field to a specific type of assignment, such as Teams, the Assigned To filter will adjust to include Teams, Pools, etc and not just individual Employees.
- Assigned To: Searches for specific people who are assigned to the Customer or Vendor. By default, this search field will only search through Employees unless a specific type of Assignment has been selected in the Assignment Category field to include Teams, Pools, etc.
- Category: Adjusts the search results based on specific categories that have been set on the Customer or Vendor Account.
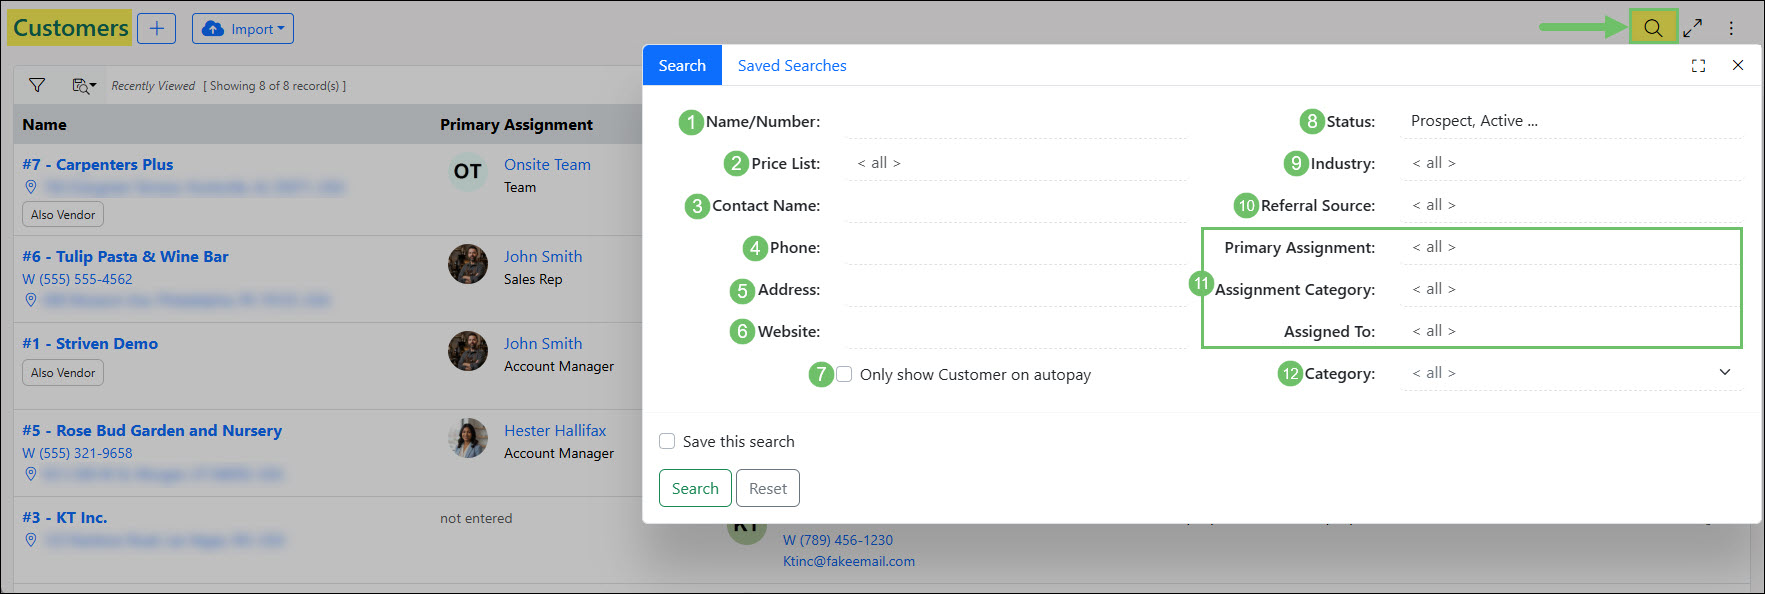
Example of the Search Filters on the Customer and Vendor Lists
List Information
A lot of information can be gathered about the Customer or Vendor right from the list view without having to navigate to their profile. Each profile page can also be accessed right from the list using the Actions Menu option listed with each result. Below is a screenshot illustrating how the Customer and Vendor Lists appear and a description of what can be accomplished there.
Note: The example shown below reflects the Customer List. Specific actions and details may vary depending on the list being viewed, with any differences noted in the section below.
-
Name: This column will list the Customer or Vendor name and their assigned number. Clicking on the name or number will open the Customer or Vendor profile to view additional information. The following is also listed in this column as well:
- Primary Address / Phone: Displays the Customer or Vendor primary location and phone number. Clicking on either of these can be integrated using your computer’s mapping or phone calling system to easily begin contacting the account as needed.
- Tags: If an account is both a Customer and a Vendor there will be a tag stating Also Vendor or Also Customer in order to make this clear. The Customers List will also display an Autopay tag if the Customer has signed up for this option. For the Vendors List, if they have been marked as a Subcontractor within their profile, a Subcontractor tag will also be listed in this area.
- Primary Assignment: Lists who is the primary assignment for the Customer or Vendor. Clicking on the name listed in this column will open either the Employee Information, Contact Information, Team Information, Pool Information, or Customer/Vendor Information Cards depending on the Assignment Category.
- Primary Contact: Lists the Contact for the Customer or Vendor that has been set as the primary. Their primary phone number and email address will be listed underneath their name in this column as well. Clicking on either of these can be integrated using your computer’s emailing or phone calling system to easily begin contacting the account as needed.
- Status: Lists the status the Customer or Vendor currently resides in. Statuses include Prospect, Active, Lost, and Deleted.
- Active Since: List the date added to the Customer or Vendor profile which indicates how long they have been actively working with your company.
- Created Date: Lists the date the account was created in Striven.
- Referral Source: Lists the referral source that was selected in the Customer or Vendor profile information.
-
Actions: The following actions are available in this column:
- Discussions: Opens the Customer or Vendor’s Discussions page. If a blue dot is included on the Discussions icon in this column, this is an indication that the Customer or Vendor does currently have Discussion threads listed on their Discussions page.
- Additional Actions: All pages listed within a Customer or Vendor’s profile can be accessed through the vertical ellipses icon. Pages may vary depending if the account is set as a Customer or a Vendor. If an account is set as both a Customer and a Vendor both types of pages can be accessed through both lists. Learn more about the pages available within the Customer and Vendor profiles by reviewing our Customer/Vendor Management Guide.
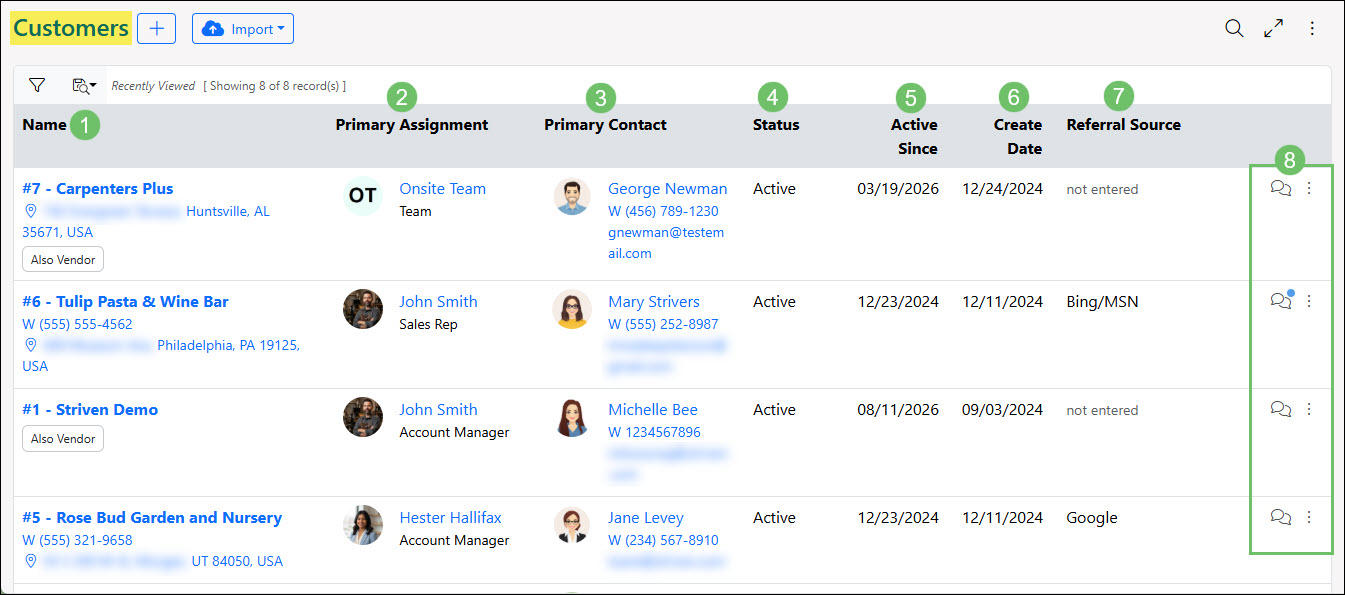
Example of the Columns in the Customer and Vendor List
-
Adding New Customers/Vendors
Striven provides the ability to customize the information gathering fields that are displayed on the Add Customer/Vendor pages, allowing for a more personalized or streamlined process when adding new Customers/Vendors. There are separate Add pages for both Customers and Vendors, but you will still have the option to designate them as both once the entities are saved in your system as one or the other. In other words, if you have a Customer that is also a Vendor, you can save them as a Customer in your system and then go back and check the box to designate them as a Vendor as well.
Add Customer/Vendor Creation Layout
Configurations or changes to the information fields available on the Add Customer or Add Vendor pages can be made by Employees with the permission “CRM Settings – Edit”. This permission is needed to access the configuration options found on the Customer/Vendor Settings page within Striven. Employees with this permission will also see a shortcut link displayed on the Add Customer or Add Vendor pages to the Customer/Vendor Creation Layout on the top right of the page.
- Note: If the shortcut is not displayed on the top right corner of the Add page, you do not have the permission needed to make changes to the layout.
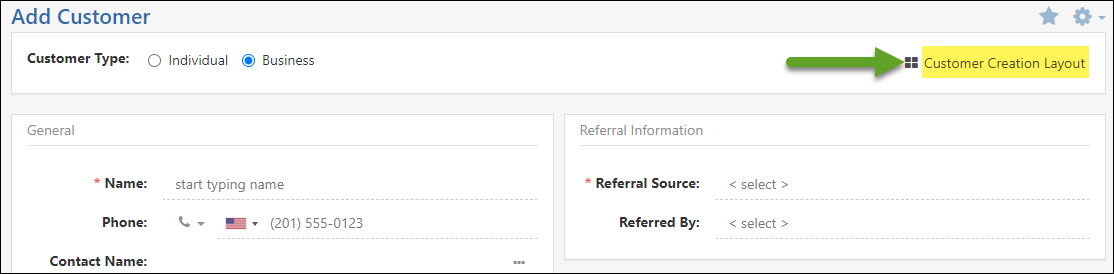
Example of the Shortcut to the Customer Creation Layout Settings on the Add Customer Page
The settings page for both the Add Customer and Add Vendor pages can be found by navigating to:
Company → Settings → Customers/Vendors → Settings
At the top of the Customer/Vendor Settings page, you’ll see the options for the Customer Creation Layout or the Vendor Creation Layout for both Businesses or Individuals. Clicking on one of these options will open the configuration popup where you can arrange your default settings for the layout pages for both individuals and businesses.

Example of the Customer/Vendor Creation Layout Settings
When customizing your Add Customer/Vendor page you will notice three columns. The far left column will show all of your available sections to choose from, and the right two columns are where you can arrange those sections.
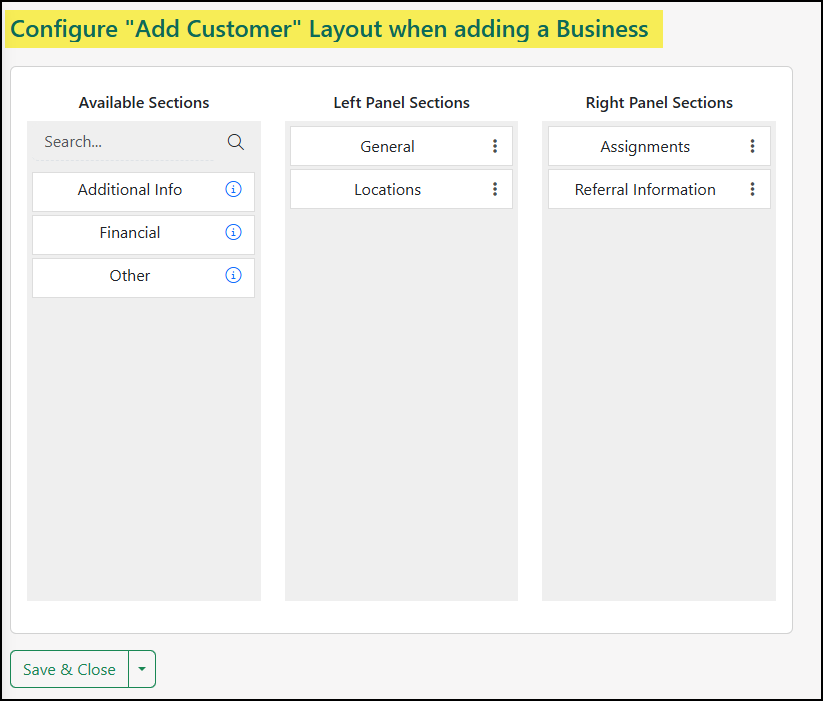
Example of the Default Configure Customer Layout Popup
By default, only the General section will display. It is important to note that the General section cannot be removed, but can be relocated on the page and/or renamed, if desired, from the kebab menu on the right of the section name.
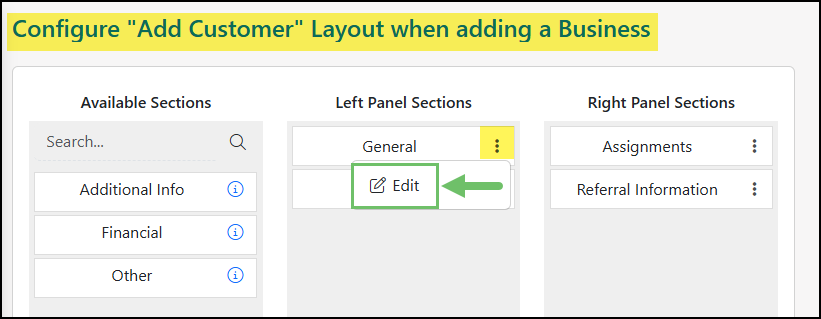
Example of the Edit Option Next to the Layout Section Name
Adding Customers
At the top of the Add Customer page, you’ll see the field for Customer Type. This is where you’ll determine if your Customer is an individual (consumer) or a business. This selection will determine if a Company Name is required when filling out the General section information. This will change other elements of the Customer Creation Layout as well, so be sure to select the appropriate designation.
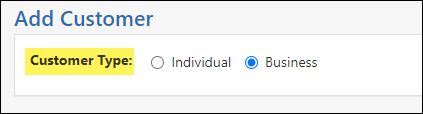
Example of the Customer Type Options on the Add Customer Page
In addition to the General section, the following sections are also available to include on the Add Customer page in either of the 2 available columns:
- General: Includes fields for the Customer name, phone number, email address, address, website, as well as the options to send the Welcome email to give the Customer access to the Customer/Vendor Portal and to check the system for duplicate Customers when saving.
- Note: Available fields depend on whether Customer is an Individual or a Business. If the Customer is a Business, there will be a Contact name field in addition to the Customer’s business name.
- Other: Includes fields to store information about the Customer’s industry, a description of the Customer, and designate the Category for the Customer.
- Locations: Includes checkboxes to set the Customer’s Bill To and Ship To as the same as the Primary Location.
- Referral Information: Allows you to select the Referral Source and the Contact the Customer was referred by.
- Financial: Includes fields to store the TIN Type, TIN, Credit Limit, Payment Terms, and whether the Customer is Tax Exempt.
- Assignments: Includes the option to Limit Access to this Customer based on the Assignments below and to designate the assigned Sales Rep for the Customer. You can also check the box to set the Assignment as visible on the Customer Portal.
- Note: You can add more Assignments by clicking on the Add More button and selecting the Assignment Category and related details.
- Custom Fields (optional): Custom Fields can be included on the Add pages for Customers and/or Vendors. These fields would need to be configured in the Custom Fields Settings of your Striven system under the Customers/Vendors entity on the drop-down list. This option allows for the collection of additional information not already available in Striven. For more information about Custom Fields, review our Custom Fields Guide to learn how they can benefit your Customer/Vendor tracking.
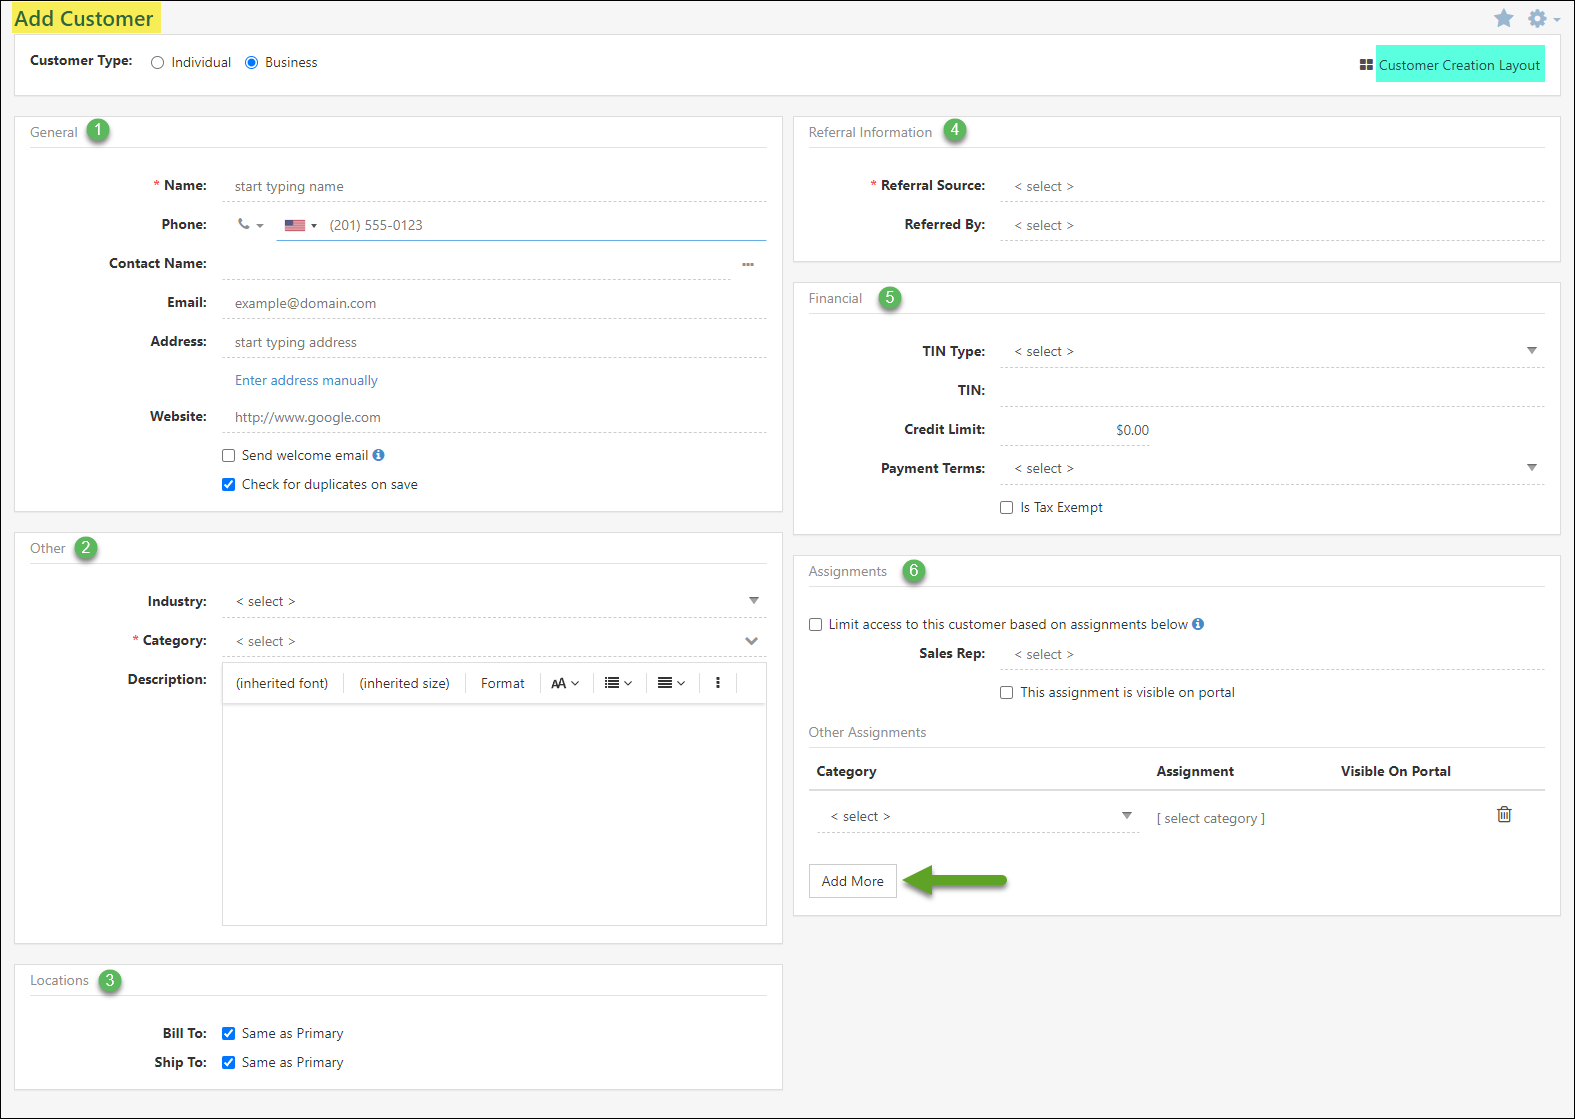
Example of an Add Customer Page
Adding Vendors
The Add Vendor page has most of the same information gathering fields as the Add Customer page, with a couple differences. These differences include:
- When adding a Vendor’s name, the system will search for them through Google so the information is geocoded and can auto-fill the relevant fields when selected. This information can also be entered manually if not found through the search.
- The Financial section will not ask about tax exemption on the Add Vendor page, but instead it has checkboxes to designate if the Vendor is eligible for 1099 or if they are a Subcontractor. Learn about the 1099 Export feature available in Striven by reviewing the 1099 Management section below.
-
Importing Customers/Vendors/Contacts
Customers/Vendors and their Contacts can be brought into Striven en masse by utilizing Striven’s Customers/Vendors/Contacts Import. This can be done for large and small databases to bring in multiple Customers/Vendors and their Contacts at once.
To import Customers/Vendors and their Contacts into Striven, navigate to the Customers or Vendors List and select Customers/Vendors Import from the import drop-down menu.
- The Generate Sample File button provides a spreadsheet with pre-filled column headers (listed on the mapping) to assist with entering data.
- The Import History button will direct you to a page of the import files you have already uploaded/imported into your Striven system.
- The Ready to Import? field is where you’ll select your import file in either .TXT or .CSV format.
- The Update Matching Data checkbox allows you to utilize the import tool to update existing information. This can be accomplished by including the Customer/Vendor ID column in the import file, which can be gathered via the Report Builder using the Customer/Vendor Dataset.
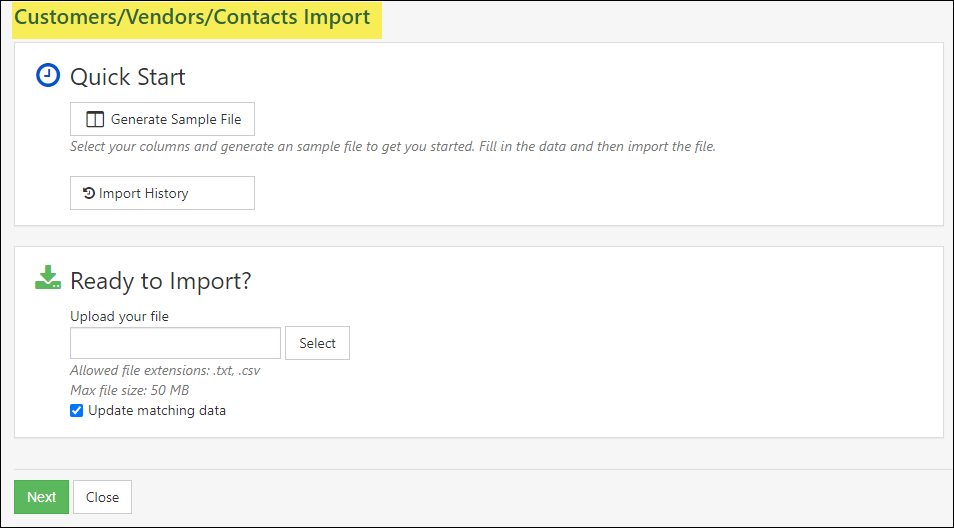
Example of the Customers/Vendors/Contacts Import Page
-
Importing Customers/Vendors Locations
Customer/Vendor Locations can be brought into Striven en masse by utilizing Striven’s Customers/Vendors Locations Import. This can be done for large and small databases to bring in multiple locations at once.
To import Customer/Vendor Locations into Striven, navigate to the Customers or Vendors List and select Customers/Vendors Locations Import from the Import drop-down menu.
- The Generate Sample File button provides a spreadsheet with pre-filled column headers (listed on the mapping) to assist with entering data.
- The Import History button will direct you to a page of the import files you have already uploaded/imported into your Striven system.
- The Ready to Import? field is where you’ll select your import file in either .TXT or .CSV format.
- The Update Matching Data checkbox allows you to utilize the import tool to update existing information. This can be accomplished by including the Customer/Vendor Location ID column in the import file, which can be gathered via the Report Builder using the Customer/Vendor Locations Dataset.
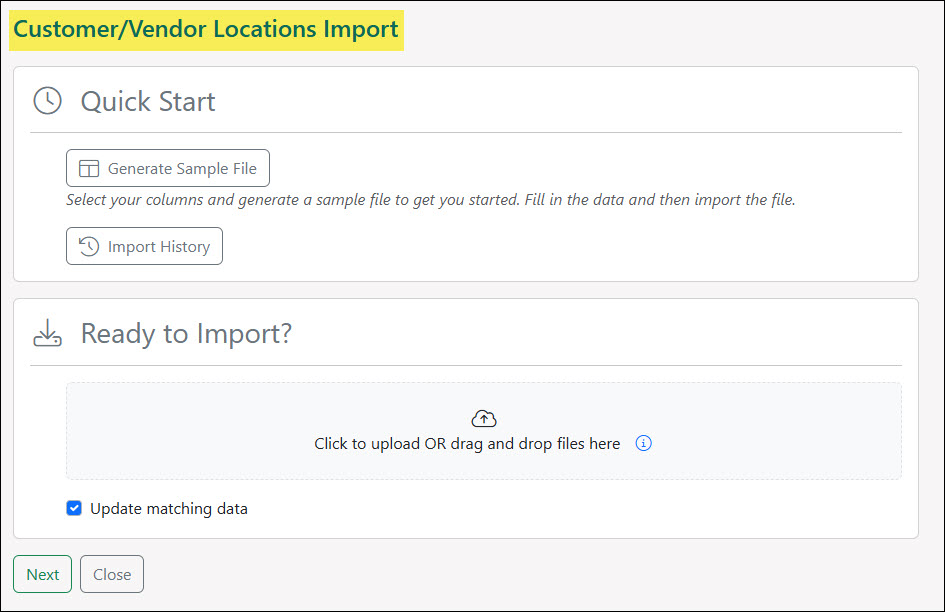
Example of the Customers/Vendors Locations Import Page
-
1099 Management
Striven provides tools to identify and monitor Vendors who are eligible for 1099 forms. During tax season, a 1099 export can be used to extract the necessary data needed in order to utilize a third party 1099 filing solution.
Permissions
The following permissions will need to be configured for the Employee’s User Role if they will be managing 1099s:
- “1099 Settings – Edit”
- “1099: Export”
- “Customers/Vendors – Edit”
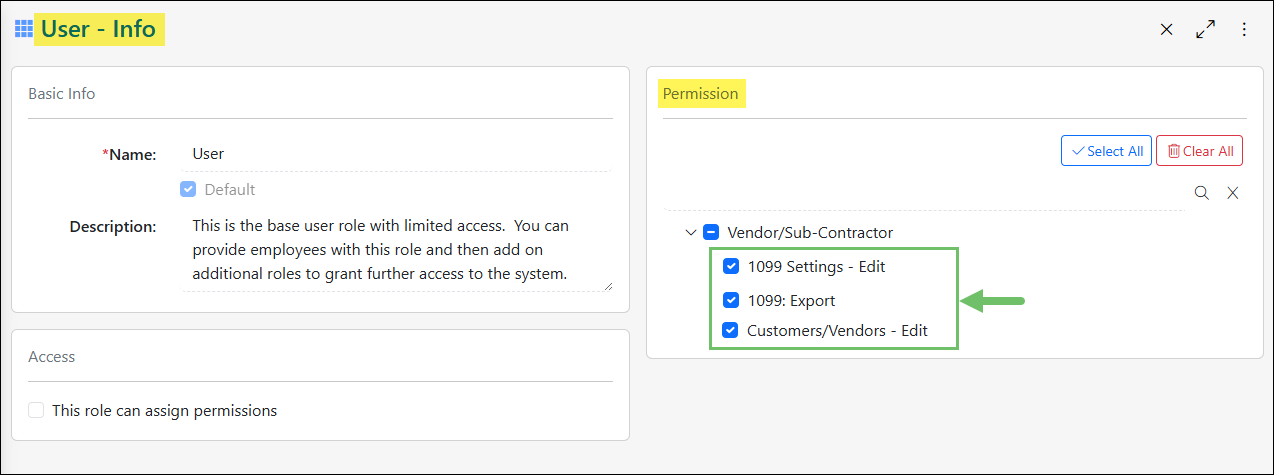
Example of 1099 Related Permissions
Learn more about managing User Roles and Permissions in Striven by reviewing the User Roles Guide.
-
1099 Settings
Configurations will need to be completed before the 1099 Export feature can be utilized. To complete these setting configurations, make sure all the appropriate GL Accounts have first been added to your system. Learn more about managing GL Accounts by reviewing the Chart of Accounts section in the Accounting Setup Guide.
When you are ready to configure your 1099 Settings page, navigate to Company → Settings → Customers/Vendors → 1099 Settings.
Below is a screenshot illustrating how the 1099 Settings page appears and a description of what can be accomplished there.
- Create an Export: Once the appropriate fields are filled in on the 1099 Settings page, an export can be created to export Vendor information that qualify for a 1099. The 1099 Export feature will be detailed further in the section below.
- Payer Information: The information entered into these fields should be regarding your company’s information such as the Payer Type, TIN, Payer Name, and Payer Location.
- Export Based On: Setting either Accrual or Cash in this setting will automatically determine how the Based On field will be configured when accessing the 1099 Export page.
- Map Accounts: The accounts selected in this section will be based on GL Accounts that you have selected to match with each type of data that is captured for 1099s. Each type of data can have multiple GL Accounts selected which will then be added as a total sum on the 1099 Export feature. Most commonly, you will need the mappings for Federal Income Tax Withheld and Nonemployee Compensation, which is often used for commissions. Other fields can be filled in as well depending on your company’s needs and requirements for 1099 information being tracked.
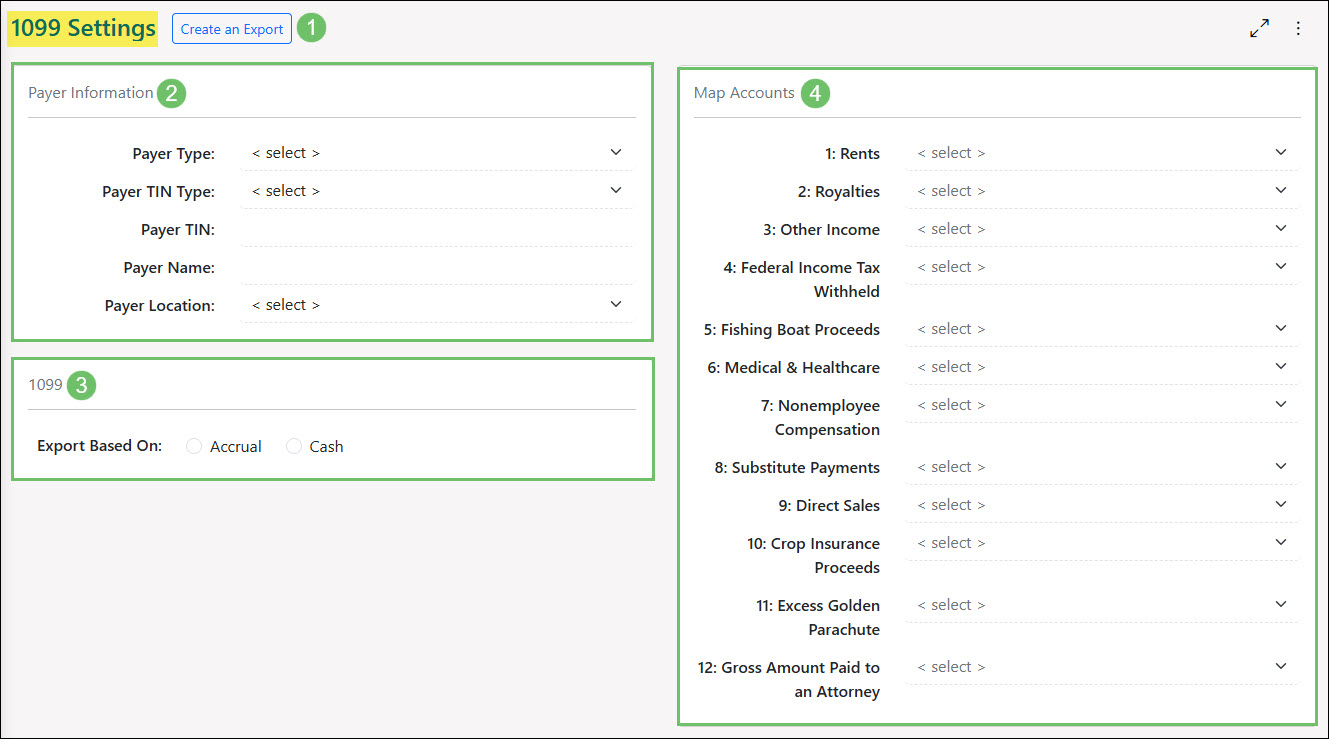
Example of the Actions and Information Available on the 1099 Settings Page
-
1099 Vendors
Not all Vendors will appear in the 1099 Export feature unless they have been configured as such. To mark a Vendor as eligible for 1099s, their Vendor profile will need to be edited to reflect this information. When on the Vendor’s Dashboard, the Financial widget can be edited to track important information such as the TIN Type (EIN or SSN), TIN Number and whether or not the Vendor is Eligible for 1099.
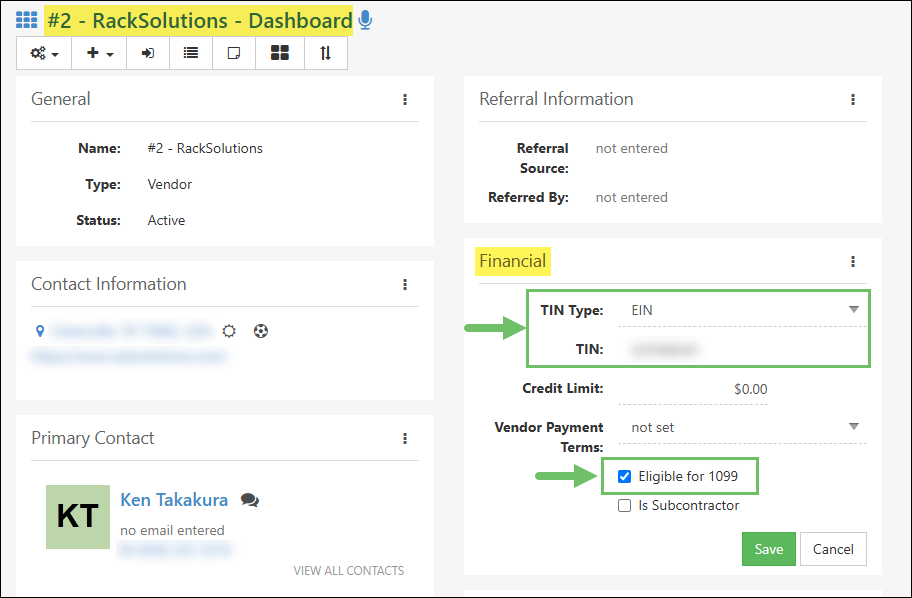
Example of a Vendor That is 1099 Eligible
-
1099 Export
Once you have completed configuring the 1099 Settings page and have updated the appropriate Vendors to be Eligible for 1099, you can begin using the 1099 Export feature.
To export 1099s, navigate to Vendors → Financials → 1099.
Below is a screenshot illustrating how the 1099 Export page appears and a description of what can be accomplished there.
- Settings: Navigates to the 1099 Settings page to make further configurations before using the 1099 Export.
- Year: Information exported will be based on the year selected here.
- Based On: The data exported will be whether your company runs on an Accrual or Cash basis. This can be automatically set based on the Export Based On field setting which can be configured from the 1099 Settings page.
- Vendor: Individual Vendors can be selected in this field. Vendors will only appear as an available option if they have been marked as Eligible for 1099 in their Vendor profile. If no Vendors are selected, all Vendors that are marked as Eligible for 1099 will be included in the export file.
- Class: If your company utilizes Classes, specific Classes can be selected here to narrow down data that is included in the export.
- File Type: Options for the file type that is being exported includes excel or csv.
- Generate 1099 Export: Downloads the file based on the configurations that were selected on this page.
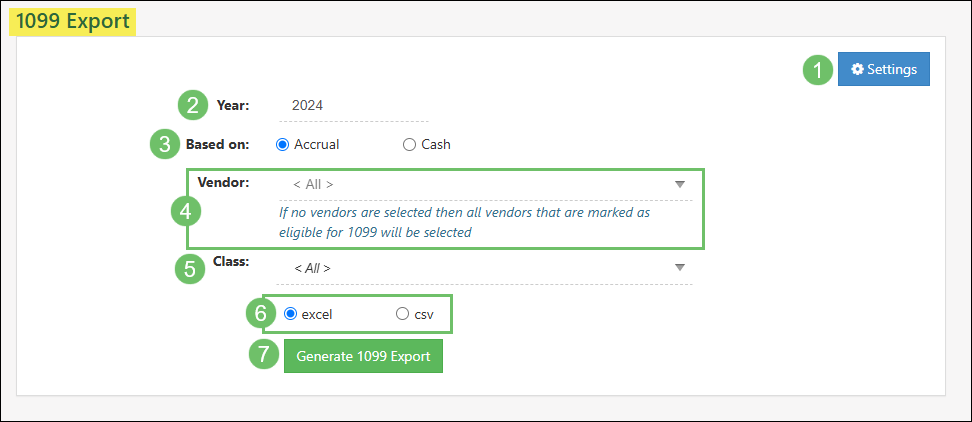
Example of the 1099 Export Page
-
Recap
With this Customer/Vendor Setup Guide, we’ve discovered how to configure the CRM settings so Customers/Vendors are entered and managed in a way that makes sense for your company. We also reviewed how to add Customers/Vendors in order to begin tracking and managing work with them.
Have a Question?
Ask the Striven Community
User-sourced how-to’s, feedback, and more!
FAQs
-
I’m trying to enter an individual as a Customer, but Striven is requiring a Company name. Can this requirement be turned off?
Within your CRM Settings, you can determine if your Customer/Vendor is an Individual or Business by default, so the Company name field is removed if not needed.